Phonic Ear EasyListener 2 User manual

user guide
230R receiver
330T transmitter
470-2856-119 compact speaker
AT0806 distributed ceiling speaker
AT0664 cluster ceiling speaker
216MHz
3745 EL2 System User Guide 2/24/04 4:29 PM Page 2

contents
advanced system setup
advanced speaker daisy-chaining . . . . .49-51
adjusting 3 band equalizer . . . . . . . . . . . .52
adjusting squelch . . . . . . . . . . . . . . . . . . .53
optional accessories (not included) . . .54-55
troubleshooting . . . . . . . . . . . . . . . . . .56-57
caring for your system . . . . . . . . . . . . . . .58
Phonic Ear channel numbers and
corresponding frequencies . . . . . . . . . . . .59
product specifications . . . . . . . . . . . . .60-62
warranty . . . . . . . . . . . . . . . . . . . . . . .63-65
code of federal regulations . . . . . . . . .66-67
regulatory approvals . . . . . . . . . . . . . . . . .68
introduction . . . . . . . . . . . . . . . . . . . . . . . .1
understanding sound field and its benefits .2
installation tips . . . . . . . . . . . . . . . . . . . . .3
basic system guidelines . . . . . . . . . . . . . .4
basic system package components
and accessories . . . . . . . . . . . . . . . . . . .5-6
230R receiver features . . . . . . . . . . . . .7-8
330T transmitter features . . . . . . . . . .9-10
230R setup and operation . . . . . . . . . . . . . .11-13
330T setup and operation . . . . . . . . . . . . . .14-22
330T transmitter aux-in . . . . . . . . . . .23
230R receiver aux-in . . . . . . . . . . .24-25
auxiliary output . . . . . . . . . . . . . . .26-33
speaker setup . . . . . . . . . . . . . . . . .34-35
compact speakers . . . . . . . . . . . . . . . .36-41
distributed ceiling speakers . . . . . . . . .42-45
cluster ceiling speaker . . . . . . . . . . . .46-48
3745 EL2 System User Guide 2/24/04 4:29 PM Page 6

introduction
Congratulations on the purchase of your new EasyListener 2 sound field system! With proper
care and use it will become one of your most valuable classroom tools for many years.
Students will be able to consistently and easily understand what the teacher is saying,
regardless of his/her location in the classroom. Teachers can now speak all day in their
normal voice and will suffer far fewer vocal problems as a result.
Numerous studies show that classrooms using sound field enjoy better student comprehen-
sion, increased student participation, better grades and fewer behavioral referrals.
Read this manual carefully to become familiar with your system and to get the most out of
its many features and options.
1
3745 EL2 System User Guide 2/24/04 4:29 PM Page 7

understanding sound field and its benefits
?
• distance
• noise
• echo
• vocal
fatigue
cough!
• distance
• noise
• echo
• vocal
fatigue
?
without sound field
with sound field
2
3745 EL2 System User Guide 2/24/04 4:29 PM Page 8

Before you set up your system, take a good look around your room. Where are the outlets
located? Where are the computers and other electronic equipment? Where can you put your
receiver so it's easy for you to reach, but out of the way of students and main traffic areas?
Though each classroom is different, there are some general guidelines for both receiver and
speaker placement:
The receiver — should be in the front of the classroom at teacher's eye level when standing,
close to a wall outlet. Try to keep it at least six feet (19.5 meters) away from computers or other
electronic equipment, since there may be interference if it is placed too close to these devices.
Compact wall speakers — should be mounted as high as possible and angled down
toward the listeners' ears. Place them around the room so there is even coverage in the listening
area (where the students are seated). Use as many as needed — four is recommended.*
Distributed ceiling speakers — space them evenly above the students’ seating area.
A minimum ceiling height of 10 feet is necessary, and 12 feet is even better. Use as many
as needed — a minimum of four is recommended.*
Cluster ceiling speaker — should be centered directly over the students’ seating area.
A minimum ceiling height of 12 feet is recommended, and 14 feet is even better.
* For optimal speaker placement, download Sound field Wizard software from our website at www.phonicear.com.
installation tips
3
3745 EL2 System User Guide 2/24/04 4:29 PM Page 9

basic system guidelines
To help ensure that you get the most out of your new sound field system, we have put
together the following list of suggested guidelines:
Charge the batteries every night. Rechargeable Nickel Metal Hydride batteries (included
with system) last approximately 12 hours between charges, but should be recharged every
night so they are ready to go in the morning. Plan on buying new NiMH batteries (only
Phonic Ear brand can be used) after 12 months of use. Alkaline batteries can also be used
as backups, and will last approximately 15 hours. Alkaline batteries cannot be recharged
by the system.
Do not coil the microphone cord. Since it also acts as your antenna, coiling or wrap-
ping the cord will affect its range and may also reduce its life.
Speak at a normal level — the system is projecting your voice for you.
Periodically check the volume and OptiVoice settings. These are often set and
then forgotten, but if accidentally changed, will affect how your system sounds.
4
3745 EL2 System User Guide 2/24/04 4:29 PM Page 10

5
basic system package components and accessories
5
678
10
4
11 12 13 14
9
12 3
3745 EL2 System User Guide 2/24/04 4:29 PM Page 11

6
5 aux out cable/(RCA 3.5mm)
(AT0805)
6 aux-in adaptor plug /(1
/4in– Dual RCA)
(310-2544-1342)
7 aux-out adaptor plug/(3.5mm – 2.5mm)
(310-2544-1341)
8 power supply, receiver
(040-7402-105)
10 antenna, receiver
(AT0831)
4 accessory/transmitter kit
(841-6440-101)
11 330T transmitter charging cord
(1.3mm – Dual 1.3mm)
(300-6497-105)
12 elastic belt
(AT0712)
13 rechargeable AAA batteries
(374-30-310-09)
14 microphone/(AT0655 boom
microphone shown here)
9 power cord, receiver (USA/CAN)
(AT0787)
2 330T body-worn transmitter
1 230R base station receiver
3 speakers
(compact wall speaker shown here)
*speakers packaged separately
3745 EL2 System User Guide 2/24/04 4:29 PM Page 12

7
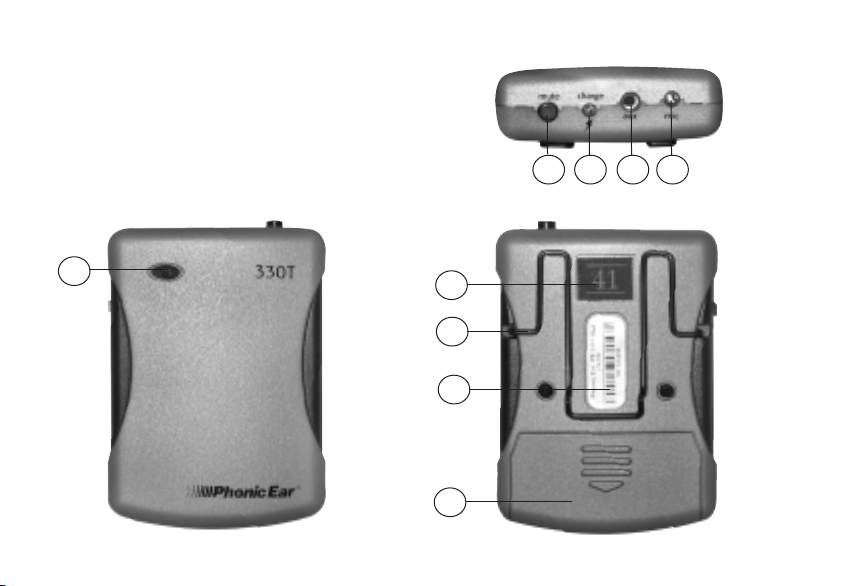
230R receiver features
front
back
7
2 3
4
56
8
911 12 13 14 16
17
10 15
18
1
3745 EL2 System User Guide 2/24/04 4:29 PM Page 13

8
3 channel adjustment button
4 FM receiver signal light
1 channel display
6 FM Volume control
5 OptiVoice™control
7 aux Volume control
8 power button
9 power cord jack
10 transmitter charge jack (1.3mm)
11 3-band equalizer adjustment
12 aux in jack (1
/4in)
13 speaker wire terminals
14 number of speakers switch
15 aux out port (RCA)
16 aux out level control
17 squelch adjustment
18 antenna
2 sleep/standby power indicator light
3745 EL2 System User Guide 2/24/04 4:29 PM Page 14
9
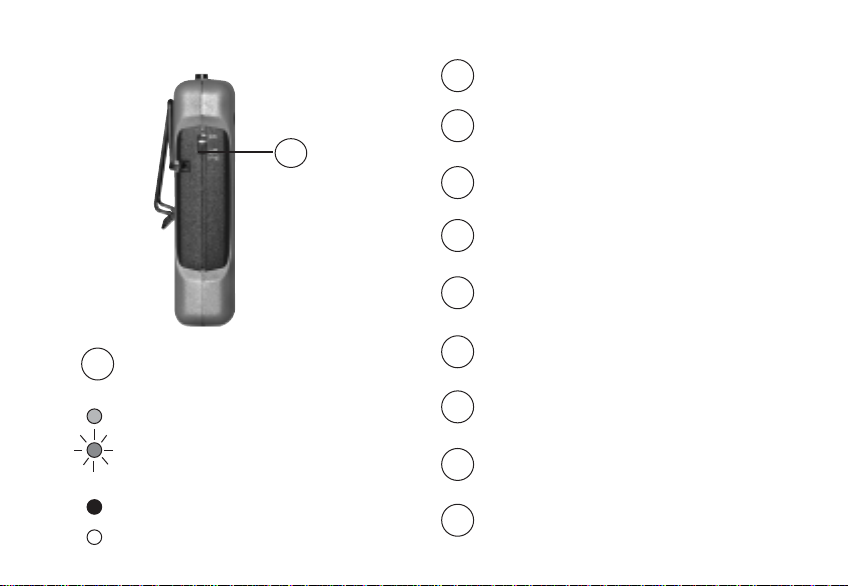
330T transmitter features
front back
1
3
5
2
4
top
6 7 8 9
3745 EL2 System User Guide 2/24/04 4:29 PM Page 15
10
10 on/off(chg) switch
1 on/off, low battery and charging
indicator light
2 channel number
5 battery compartment
3 belt clip
6 mute button
7 charging input jack (1.3mm)
9 microphone input jack (2.5mm)
8 auxiliary input jack (3.5mm)
side
10
4 serial number
on = Dim red light
low batt = Blinking light. When light
starts blinking there is approximately
1 hour of battery life left.
batt charging = Bright red light
improper charging = No light
3745 EL2 System User Guide 2/24/04 4:29 PM Page 16
11
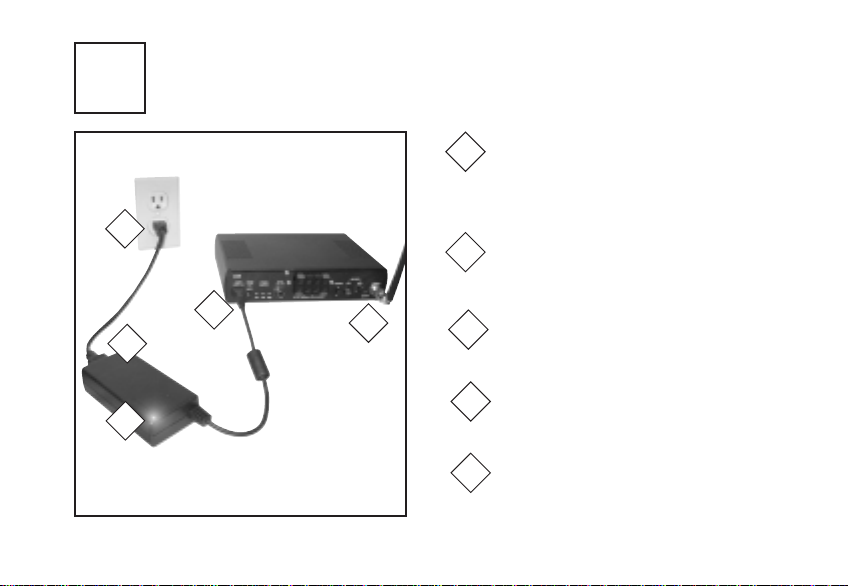
connecting power to 230R receiver
1
230R back
Plug power supply (040-7402-
105) into power port on back of
230R receiver
Plug power cord (AT0787) into
power supply unit (040-7402-105)
1
2
040-7402-105
1
3
2
AT0787
Plug power cord (AT0787) into
wall socket
3
4Check to see that green light is on,
indicating that unit has power
4
230R setup and operation
5
Attach antenna to antenna port on
back of 230R receiver
5
3745 EL2 System User Guide 2/24/04 4:29 PM Page 17
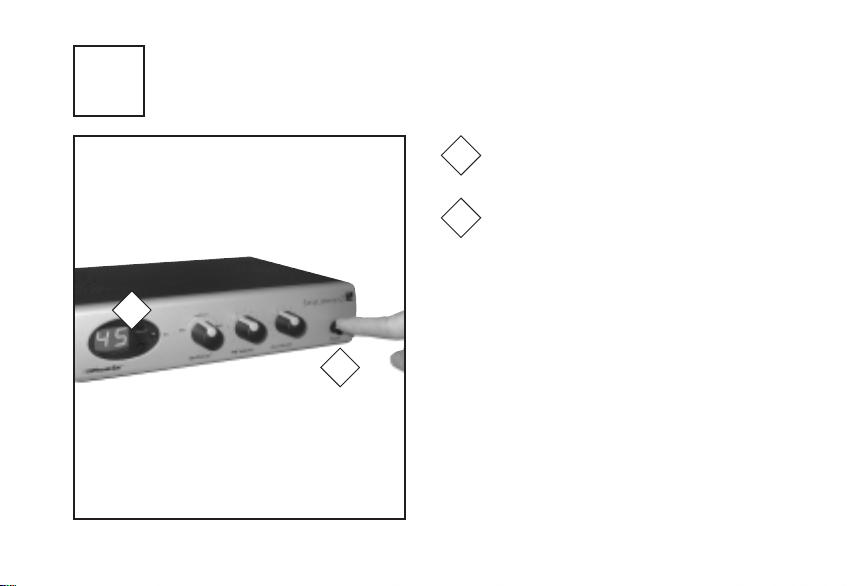
12
Push power button
Confirm that LED channel
display lights
turning on 230R receiver
2
1
2
1
2
3745 EL2 System User Guide 2/24/04 4:29 PM Page 18

13
Push up or down channel adjust-
ment buttons to set channel on
receiver to match transmitter
channel
Make sure that receiver channel
matches transmitter channel
adjusting channel setting
3
1
2
1
2
330T
NOTE: There are 19 channels available in
the 216MHz frequency. See page 61 for a
complete list of Phonic Ear channel num-
bers and corresponding frequencies.
3745 EL2 System User Guide 2/24/04 4:29 PM Page 19

14
4inserting batteries
Push off battery compartment door
1
Insert rechargeable AAA NiMH
batteries included with system (or
alkaline batteries) into compart-
ment and replace door. Check
polarity markings to make sure
batteries are positioned correctly.
2
2
1
NOTE: Before the first use, batteries must
be charged for 12 hours. After that, we
recommend charging for 12 hours every
night for up to 12 hours of battery life.
330T setup and operation
3745 EL2 System User Guide 2/24/04 4:29 PM Page 20

15
5a charging batteries
Do not attempt to charge alkaline batteries. The fail safe charging
system will not allow alkaline batteries to be charged.
Push power button to turn 230R
receiver off.
1
Switch transmitter power to
off (chg) position
2
1
then
2
NOTE: Sleep/standby power light
on receiver will remain lit in off
position.
3745 EL2 System User Guide 2/24/04 4:29 PM Page 21

16
5b charging batteries (cont’d)
NOTE: We recommend charging for 12
hours every night for up to 12 hours of
battery life.
Charge only rechargeable NiMH batteries
from Phonic Ear.
230R (back)
Plug 300-6497-105 charging cord
into charge jack on top of 330T
body-worn unit(s)
3
Plug 300-6497-105 charging cord
into charge out jack on back of
230R receiver
4
4
300-6497-105
3
5Confirm that bright red LED dis-
play is lit
5
3745 EL2 System User Guide 2/24/04 4:29 PM Page 22

17
turning on 330T transmitter
6
Push power switch up to turn
transmitter power on
1
Confirm that red indicator light
is on
2
1
2
LED indicator light functions:
on = Dim red light
low battery = Blinking light. When
light starts blinking there’s approxi-
mately 1 hour of battery life left.
battery charging = Bright red light
improper charging = No light
3745 EL2 System User Guide 2/24/04 4:29 PM Page 23

18
7wearing 330T transmitter
Clip to belt (AT0712), pocket, pants, etc.
or
Attach lavalier (AT0512-BK)* to clip on
the back of transmitter
AT0712
AT0512-BK
or
*Lavalier not included with system package
3745 EL2 System User Guide 2/24/04 4:29 PM Page 24
This manual suits for next models
5
Table of contents
Other Phonic Ear Stereo System manuals


