Photonic Universe 10A dual battery solarcharging kit User manual

Photonic Universe Ltd - Bringing you the benefits of solar power -
Registered office: Tel: +44 (0) 203 150 11 11
13 David Mews Fax: +44 (0) 203 150 12 12
Porter Street Email: info@photonicuniverse.com
London W1U 6EQ UK Web shop: www.photonicuniverse.com
10A dual battery solar charging kit set
for 40W –150W Photonic Universe solar panels
Instruction manual
Dear Customer,
Thank you very much for choosing Photonic Universe products. This manual will guide you through the
installation of your solar kit and answer frequently asked questions. Please read this manual carefully
before installing the kit.
Remember, any work should be carried out by an appropriately qualified person with all necessary
precautions and safety measures taken.
Contents of the package
№
Item
Quantity
1
10A dual battery solar charge controller
1
2
Plastic corner mounting brackets
4
3
Side mounting brackets
2
4
Waterproof double entry cable gland
1
5
5m double core battery cable 4.0mm2cross section
1
6
Pair of waterproof MC4 cable connectors
1
7
Instruction manual
1
This 10A dual battery solar charging kit set is suitable for 40W –150W Photonic Universe solar panels
with the maximum power voltage 17-18V and 5m cable with MC4 connectors attached to the solar panel.
If the solar panel was supplied with 1m cable, you will also need a pair of solar extension cables in
addition to this set.
The kit is designed for charging either one 12V battery, or two independent and electrically isolated 12V
batteries. For the purposes of this instruction manual, when we refer to a “battery”, we will either mean a
single 12V battery, or a 12V bank of several batteries connected in parallel (“+” to “+”, “-“ to “-“).
Electrical installation of the solar kit for two independent batteries
1. Before you install the solar kit, please make sure that both 12V batteries are charged and generate at
least 6V or more. This is required to enable the solar charge controller to work. If your batteries are
fully discharged, please charge them by other means first, otherwise the controller will not start.
2. Cut 5m battery cable supplied with the kit into two pieces for Battery 1 and Battery 2. Connect the
terminals of your 12V batteries to the solar controller Battery 1 and Battery 2 terminals, following the
order of connection stated in the solar controller manual. If the length of 5m cable is not enough for
both batteries, please use some extra cable with 4.0mm2cross section.
Note: when you connect the batteries to the solar controller, the battery LED lights on the controller
should start flashing about once every second. This means the controller has detected the batteries.
3. When connecting the solar panel to the charge controller, we recommend installing additional MC4
connectors approximately 1m away from the solar panel for ease of connection, and also for feeding
the solar panel cable through the waterproof cable entry gland. Follow the instructions below to install
additional MC4 connectors:
- If your solar panel was supplied with 5m cable with MC4 connectors, cut this cable approximately
1m from the solar panel (so that 1m cable remains attached to the solar panel and 4m cable with
MC4 connectors becomes a separate piece of cable). Attach the pair of MC4 connectors supplied
with the kit on the end of 1m solar panel cable (note the polarity printed on MC4 connectors: male
should be attached on “+” lead, female on “-“ lead). You may need pliers or a crimping tool to
attach MC4 connectors.

Photonic Universe Ltd - Bringing you the benefits of solar power -
Registered office: Tel: +44 (0) 203 150 11 11
13 David Mews Fax: +44 (0) 203 150 12 12
Porter Street Email: info@photonicuniverse.com
London W1U 6EQ UK Web shop: www.photonicuniverse.com
- Plug the MC4 end of 4m cable (which has been cut off from the solar panel) into the new MC4
connectors on 1m solar panel cable
- Connect bare ends of 4m cable to the solar controller. Make sure connection polarity is correct
according to the original polarity labels on the solar panel cable: “+” to “+”, “-“ to “-“.
Note: if you do not need this additional MC4 connectivity point, you can skip this step by simply
cutting the existing MC4 connectors on the end of 5m solar panel cable off, and connecting the bare
wires to the screw terminals of the solar charge controller.
Note: after connecting the solar panel to the controller, and with the panel exposed to some daylight /
sunlight, battery LEDs on the controller should turn to constant ON. This means the controller has
started charging your batteries. If the controller LEDs turn to ON constantly first, but after a short
period of time start flashing slowly again, it might mean that the batteries are fully charged. Please
check the battery voltage with a digital multimeter for confirmation.
4. For maximum output from the solar panel make sure it is exposed to as much sunlight as possible
and it is not shaded. Even a small shaded area can reduce the output significantly (e.g. leaves,
shades from trees etc.)
5. For information on how to operate the controller, including choosing the battery type and charging
priority, please refer to the instruction manual for the solar charge controller.
To disconnect, the order should be the reverse to connection. You should disconnect the solar panel
from the controller first, and then disconnect each of the batteries. It is important that you follow this
disconnection order if you need to remove one of the batteries or if you need to change it to charge a
different battery.
Electrical installation of the solar kit with a single battery
The solar kit can also work with a single 12V battery if needed (it’s not necessary to use Battery 2
terminals of the solar charge controller). In order to install the solar kit with a single 12V battery, please go
through the above steps but skip everything which relates to the second battery.
If there is only one battery connected to Battery 1 terminals of the controller, the unit will recognise this
automatically and pass 100% of solar power to this battery. You will not need to adjust charging priority
settings of the controller for that.
Fitting the solar panel to your roof
1. Make sure all the components of your solar charging kit are disconnected when you start fitting the
solar panel.
2. Choose a location for the solar panel where it will be exposed to maximum sunlight and minimum
shading from nearby objects.
3. Drill holes in each of the corner and side plastic brackets in the designated places.
4. Attach the brackets to the solar panel frame (corners and sides) and mark corresponding holes on the
frame.
5. Drill smaller holes in the solar panel frame, according to the diameter of self-tapping screws which
you are planning to use (the drill size should be smaller than the screw diameter, so that screws grip
well).
6. Using self-tapping screws, fix plastic brackets to the corners and sides of the solar panel frame.
7. Using an appropriate adhesive, bond the brackets with the solar panel to your roof (using sand paper
and cleaning the surfaces if needed). To ensure that the polarity of the wires is clear, mark the “+”
solar panel lead so that it is visible from the outside.
Note: when choosing the adhesive / bonding agent for your installation, make sure it is suitable for
outdoor use (e.g. it’s suitable for a wide temperature range). For added strength, in addition to
bonding the brackets to the roof, you can drill a small vertical hole in each bracket and fix the brackets
by self-tapping screws (if the roof surface allows that). Sealant / adhesive should then be put on the
top of the screws to make the area waterproof.

Photonic Universe Ltd - Bringing you the benefits of solar power -
Registered office: Tel: +44 (0) 203 150 11 11
13 David Mews Fax: +44 (0) 203 150 12 12
Porter Street Email: info@photonicuniverse.com
London W1U 6EQ UK Web shop: www.photonicuniverse.com
8. Feed the solar panel cables through the cable entry gland, the hole in your roof and then bond the
gland to the roof. Tighten the cable gland nuts after the adhesive has dried.
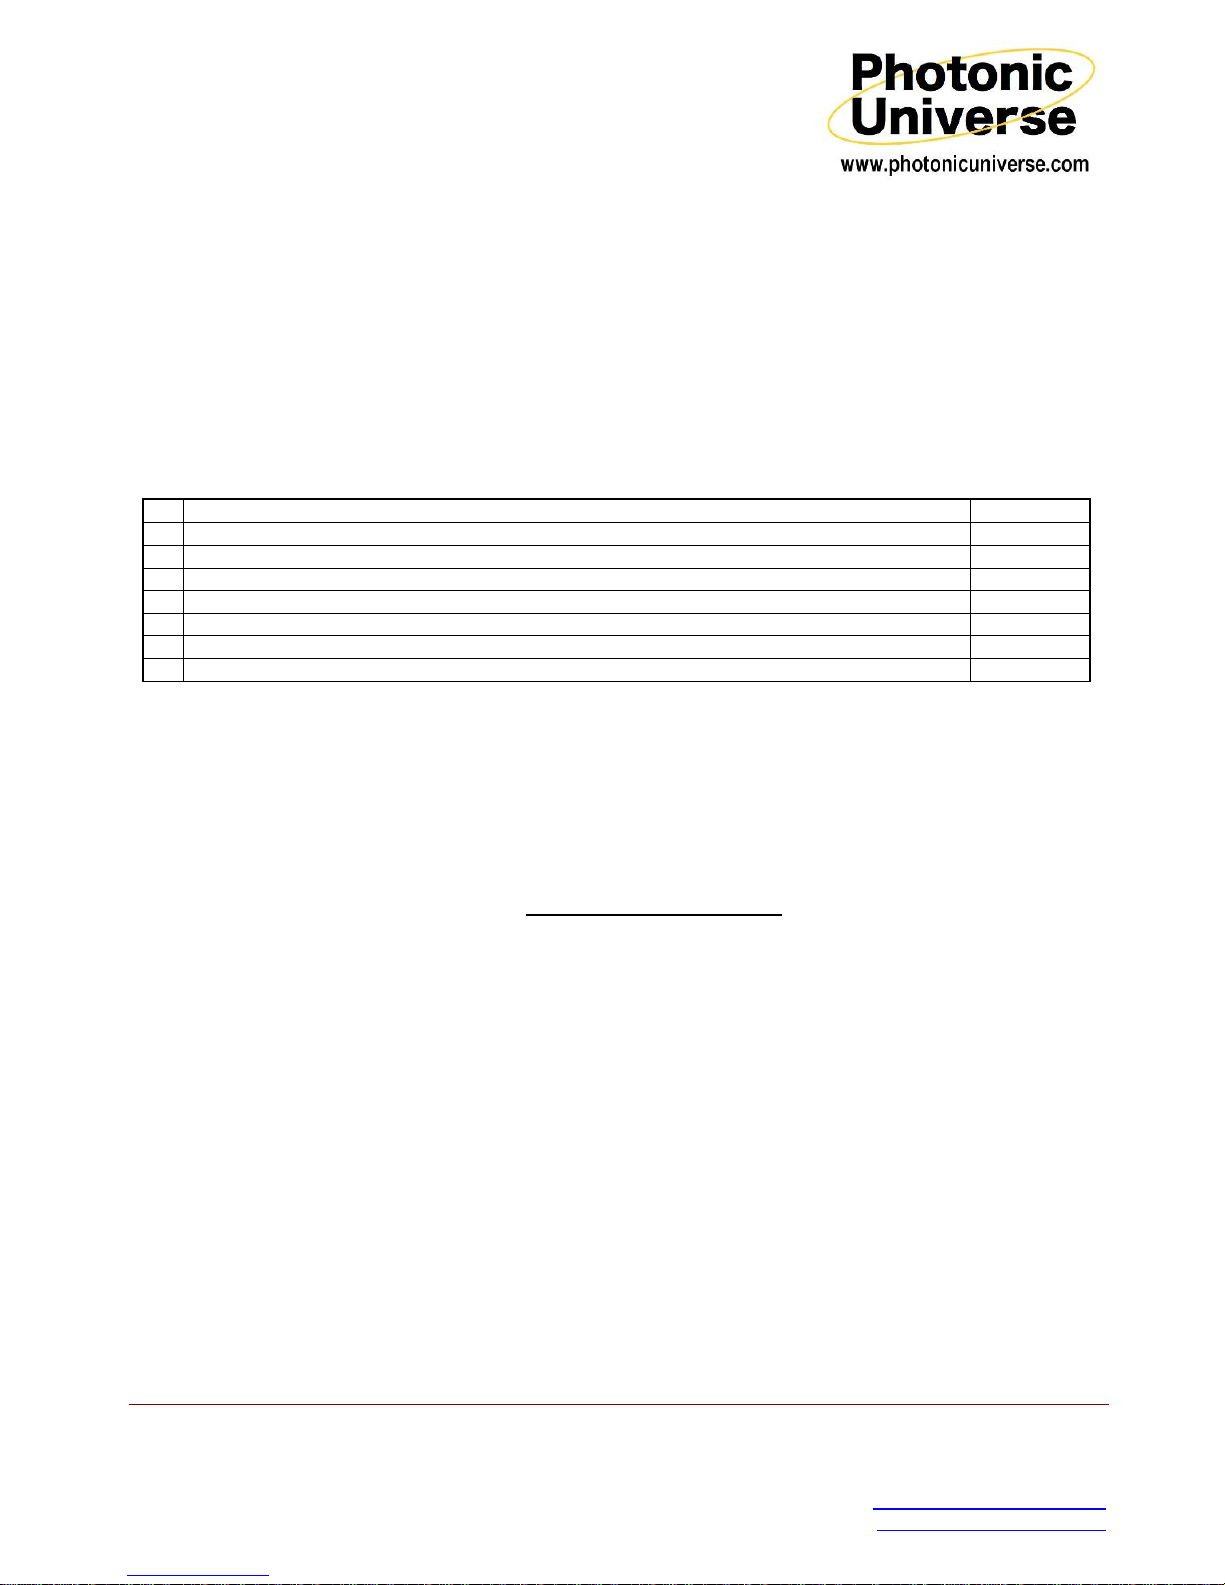
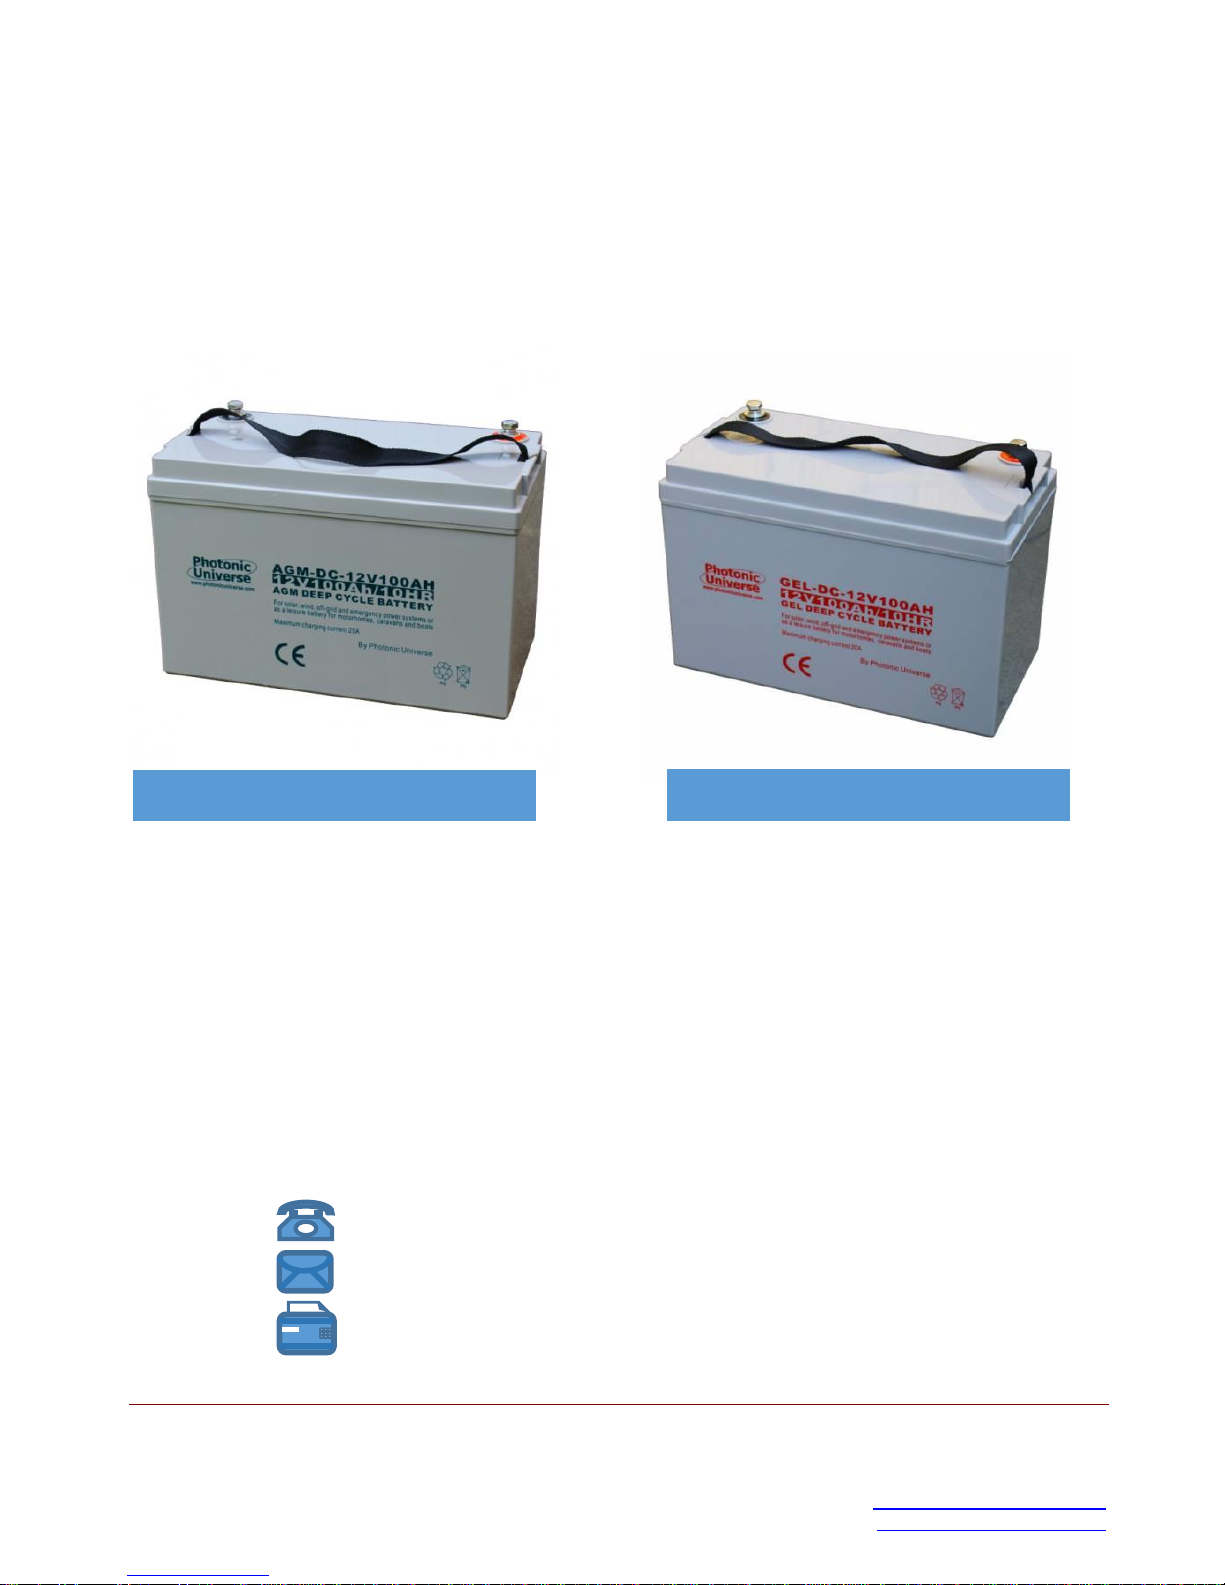
Adding fuses to your system
Although the solar charge controller has battery protection functions, you can install fuses in each of the
battery circuits for additional protection against short circuits and wiring mistakes. They should be inline
fuses between the solar charge controller and each of the batteries. The size of fuses depends on the
maximum charging current of the solar panel. Please check solar panel specifications for Maximum power
current and choose a fuse with the next available rating higher than that (to a maximum of 10A).
Negative common ground of vehicles and boats
Most vehicles (including campervans and motorhomes) and boats typically have the common ground
when a vehicle body or boat hull is used as a shared connection point by the engine, generator, battery,
lights and other system components. When installing the solar kit on such vehicles / boats, please note
the following:
•To avoid any short circuits or conflicts between you vehicle / boat system and the solar kit system,
you should never ground the solar panel (i.e. never connect it to your vehicle body / boat hull). The
solar panel cables should be fully electrically isolated from your vehicle body / boat hull and should be
connected directly to the solar charge controller.
•Your solar charge controller is a negative common ground device. If you are planning to use the solar
charging kit to charge two separate batteries, the controller can work with these batteries even if their
negative terminals are connected to the same negative common ground of your system. However, in
order to allow the solar charge controller to treat your batteries independently and choose individual
charging programmes, positive terminals of your batteries must be fully electrically isolated from
each other, i.e. they should not be connected to each other or to the same system or wiring. This
electrical isolation of “+” terminals of the batteries from each other will allow the solar charge
controller to use its full dual battery functionality, for example it will be able to split the power from the
solar panel to batteries according to the pre-set priority ratio and it will also be able to stop charging
one of the batteries when full but continue charging the other battery.
Below you can find a description of situations in which you need to use your dual battery solar charge
controller as a single battery controller:
•If the two batteries are connected to different systems with the same negative common ground (e.g.
“engine” and “leisure” battery), but their positive terminals are also connected to a split charger or
switch or another component which might link the batteries together, then the solar charge controller
may not work properly. When the positive terminals of two batteries become linked, the controller will
see both batteries as a mix, and it will not be able to treat batteries independently (e.g. even if you set
the controller to 80%/20% it will still charge them as 50%/50%, and if one of the batteries is full it
might continue charging anyway etc). You should avoid such situations when the positive terminals of
two batteries become linked through another system component such as a split charger or a switch. If
this is required in your system, use the solar charging kit to charge one battery at a time only, keeping
the other pair of battery terminals of the solar charge controller unconnected.
•If your engine and leisure battery are connected to the positive common ground, you cannot use both
Battery 1 and Battery 2 output of the solar charge controller at the same time either. You can only
charge one battery at a time and keep the other pair of battery terminals of the controller
unconnected. Remember: the solar panel cables should not be grounded in any case.
•If you only have one bank of two or more 12V leisure batteries to charge, and these batteries are
connected in parallel (“+” to “+”, and “-“ to “-“), then you should treat them as a single battery and use
only one pair of battery terminals of the solar charge controller to charge them. The other pair of
battery terminals of the controller should remain unconnected.

Photonic Universe Ltd - Bringing you the benefits of solar power -
Registered office: Tel: +44 (0) 203 150 11 11
13 David Mews Fax: +44 (0) 203 150 12 12
Porter Street Email: info@photonicuniverse.com
London W1U 6EQ UK Web shop: www.photonicuniverse.com
If your system has the negative common ground, we advise using dedicated battery cables from the
terminals of the solar charge controller directly to both terminals of each battery anyway, and installing
inline fuses between each battery and the solar charge controller for additional protection.
Charging by the engine or another charger
In a vehicle or boat, it is possible that one of the batteries connected to the solar charge controller will also
be charged by your engine from time to time (e.g. your starter or “engine” battery). Sometimes you might
also need to charge one of your batteries by a different charger e.g. a mains charger. In such cases you
do not need to disconnect this battery from the solar charge controller, but please note the following:
- When you charge one of your batteries by the engine or a mains charger, the voltage at the terminals
of this battery will increase
- The solar charge controller will detect this increase in voltage and treat it as if the battery was fully
charged. So the controller might switch solar charging off temporarily for this particular battery to
prevent overcharging. More power will be diverted to the other battery (assuming it is not being
charged by any other source at the same time)
- When you stop charging by another charger, the solar controller will resume charging the battery.
Frequently asked questions
Q. What type of batteries can be used with this kit?
A. Any sealed, gel or flooded 12V DC battery normally used in caravans, motorhomes, cars, boats, motor
cycles etc. Please note that battery type settings of the solar controller relate to both batteries.
Q. Can this kit charge a 24V battery or 2 separate 24V batteries?
A. No, this kit is designed to charge 12V batteries. If you add another identical solar panel, the kit will be
able to charge a 24V battery. Before you make any changes, you will need to contact Photonic Universe
first for assistance and advice on the type of solar panel which can be used and the wiring.
Q. Can the kit charge a 12V battery bank or 2 separate 12V battery banks?
A. Generally batteries in the same 12V battery bank should have the same type, capacity and age. In this
case the kit can be used for charging such battery banks, and each 12V battery bank should be treated as
a single battery for the purposes of connection. For example, it is possible to connect 2 x 12V batteries
(wired in parallel, “+” to “+”,“-”to “-”) to “Battery 1” terminals of the solar controller, and 3 x 12V batteries
wired in parallel to “Battery 2” terminals of the controller.
Q. Is there any risk that the solar kit will overcharge my battery?
A. The solar charge controller has a built-in overcharge protection –it will ensure that your battery is not
overcharged, by reducing the charging current/voltage to the trickle charge level or stopping the charge
completely when the battery is full. However it is your responsibility to make sure that your battery size
and capacity can accept the maximum charging current from the solar panel.
Q. My battery gets charged quickly but does not last very long. I think the solar kit undercharges it?
A. No, this is not a kit problem. Most likely your battery is at the end of its useful life so the capacity has
shrunk. Consider replacing it with our special AGM or gel deep cycle batteries (see Appendix 1).
Q. Does the kit produce less power in the winter than in the summer?
A. If the daytime gets shorter in the winter, the total output of the solar kit will reduce proportionally. In
addition, the kit would produce significantly less energy on a dark cloudy day compared to a bright sunny
day. The output of the solar kit is proportional to the amount of light falling on the solar panel surface.

Photonic Universe Ltd - Bringing you the benefits of solar power -
Registered office: Tel: +44 (0) 203 150 11 11
13 David Mews Fax: +44 (0) 203 150 12 12
Porter Street Email: info@photonicuniverse.com
London W1U 6EQ UK Web shop: www.photonicuniverse.com
Q. Can I upgrade the solar kit to generate more power and charge my batteries faster?
A. The solar charge controller can work with solar panels with up to 160W combined power. If the wattage
of your solar panel allows it, you can add another solar panel to your kit so that the total combined power
output is less than 160W. This second solar panel should be connected in parallel to your existing solar
panel (“+” to “+”,“-” to “-”). It is essential that the second solar panel is made of solar cells from the same
manufacturer.
If the wattage of your solar panel does not allow adding another solar panel (e.g. 150W solar panel), then
you will need to upgrade the solar charge controller to 20A before adding another solar panel.
If you need help with upgrading your solar kit please contact Photonic Universe for assistance using the
contact details below.
Q. Can I run 240V AC household appliances from my 12V battery?
A. You can run 12V DC appliances from your battery, but if you also want to run 240V AC household
appliances you need an off-grid pure sine wave power inverter (see Appendix 2 for more details).
Troubleshooting
It is important to remember that if your battery is not getting enough charge, it does not necessarily mean
there is a problem with the solar charging kit. In most cases the power drain from the battery would simply
be higher than the power generated by the solar charging kit (especially in the winter when you might
have a noticeable reduction in solar energy output and an increase in energy consumption at the same
time). Another reason could be that there is a power leakage in your system. Only after disconnecting the
battery from the system of your vehicle / boat and from all your loads, and when you then left it charging
for a considerable amount of time with no effect on the battery, should you use the following
troubleshooting options:
•Disconnect and reconnect the system (solar panel should be disconnected first, then the batteries;
connection in the reverse order: batteries, then the solar panel).
•If the controller does not recognise the battery (upon connection the battery light on the controller
remains switched off), make sure that the battery generates at least 11.5V for troubleshooting
purposes. If necessary, charge the battery by other means first.
•Disconnect the battery from your vehicle / boat (both “+” and “-”) so that there is no power drain or
leakage.
•Check all connections to ensure they are secure and clean
•Check polarity of the battery connection and the solar panel connection
•Ensure the solar panel is exposed to sufficient light –ideally position it to face the sun directly
•For more information refer to the Troubleshooting section of the solar controller manual
Warranty
The solar charge controller included in this set is covered by 1 (one) year warranty after purchase. The
warranty is provided by Photonic Universe –we will repair or replace any products with defects at our
discretion.
Disclaimer
Working with electricity and batteries can be dangerous. The information provided in this
manual is for general guidance only. All work should follow the safety standards and
should be carried out by an appropriately qualified person.
Photonic Universe Ltd is not responsible for any damage or injury caused by inappropriate
installation or use of the product.

Photonic Universe Ltd - Bringing you the benefits of solar power -
Registered office: Tel: +44 (0) 203 150 11 11
13 David Mews Fax: +44 (0) 203 150 12 12
Porter Street Email: info@photonicuniverse.com
London W1U 6EQ UK Web shop: www.photonicuniverse.com
Appendix 1
Battery no longer able
to hold a charge?
Choose 12V deep cycle AGM or GEL Photonic Universe batteries
specially designed for solar charging kits and leisure applications
AGM Batteries
Best for large or powerful appliances
such as fridges, pumps and inverters.
✓Absorbed Glass Mat technology
✓Completely sealed, non-spillable
and maintenance free
✓Low self-discharge
✓3-4 years design service life
✓Better recovery from deep
discharge
✓Faster charging up to 25A
GEL Batteries
Best for small appliances such as
lighting, TV and phone charging.
✓Electrolyte in gel form
✓Completely sealed, non-spillable
and maintenance free
✓Very low self-discharge
✓4-7 years design service life
✓Better recovery from deep
discharge
✓Suitable for outdoor installations
and temperatures up to -10⁰C
@
+44 (0) 20 3150 11 11
info@photonicuniverse.com
+44 (0) 20 3150 12 12

Photonic Universe Ltd - Bringing you the benefits of solar power -
Registered office: Tel: +44 (0) 203 150 11 11
13 David Mews Fax: +44 (0) 203 150 12 12
Porter Street Email: info@photonicuniverse.com
London W1U 6EQ UK Web shop: www.photonicuniverse.com
Appendix 2
Need an inverter for your battery
to run 240V household appliances?
Choose 12V DC pure sine wave off-grid power
inverter from Photonic Universe with
240V AC mains power output
Visit our online store at www.PhotonicUniverse.com to find out more
@
+44 (0) 20 3150 11 11
info@photonicuniverse.com
+44 (0) 20 3150 12 12
Table of contents
Other Photonic Universe Inverter manuals