Physis Piano H1 User manual

User Manual - EN
Ver. 1.5
H 1 - H 2 - H3


User Manual - Index
EN - 1
INDEX
1. Important notes.....................................................................................................................................................2
1.1 Looking after the product ...............................................................................................................................................2
1.2 Notes about the manual..................................................................................................................................................2
2. Introduction........................................................................................................................................................... 3
3. Switching on and connections...............................................................................................................................4
3.1 Connecting pedals .........................................................................................................................................................4
3.2 Connecting an audio system ..........................................................................................................................................5
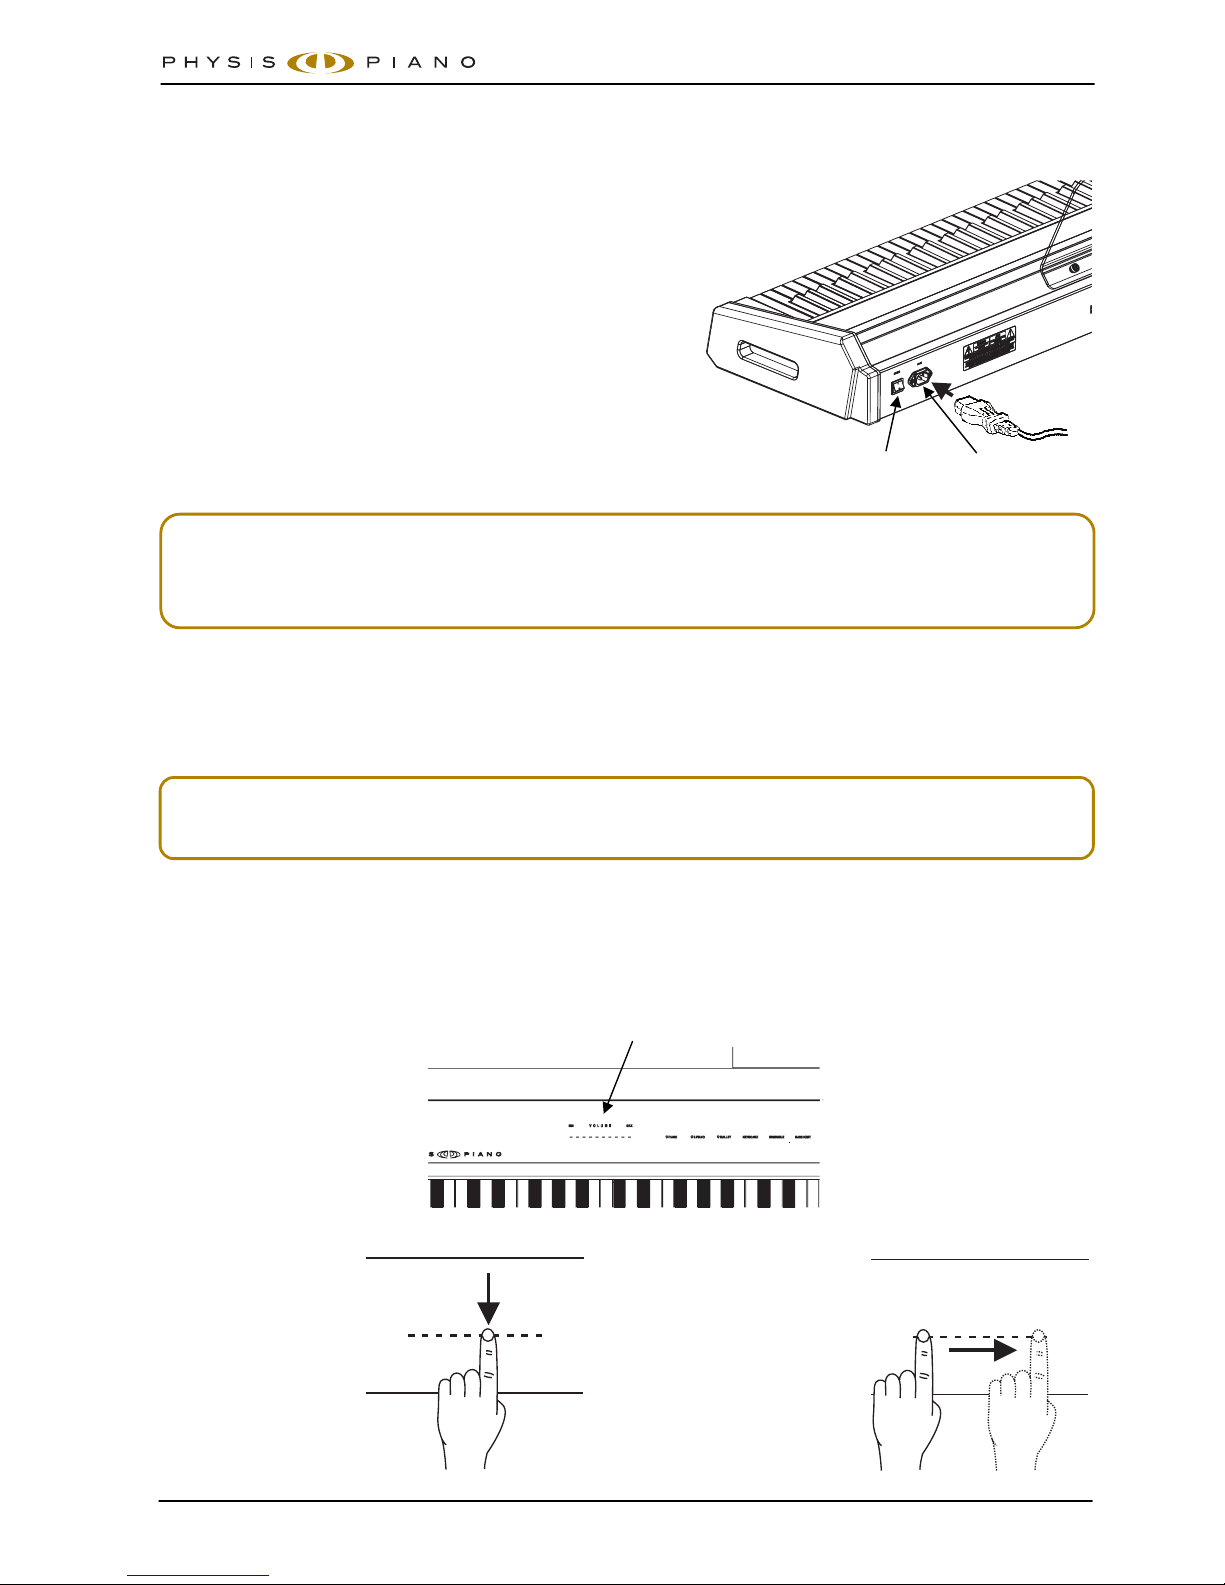
3.3 Power cable connection .................................................................................................................................................7
3.4 Switching on ...................................................................................................................................................................7
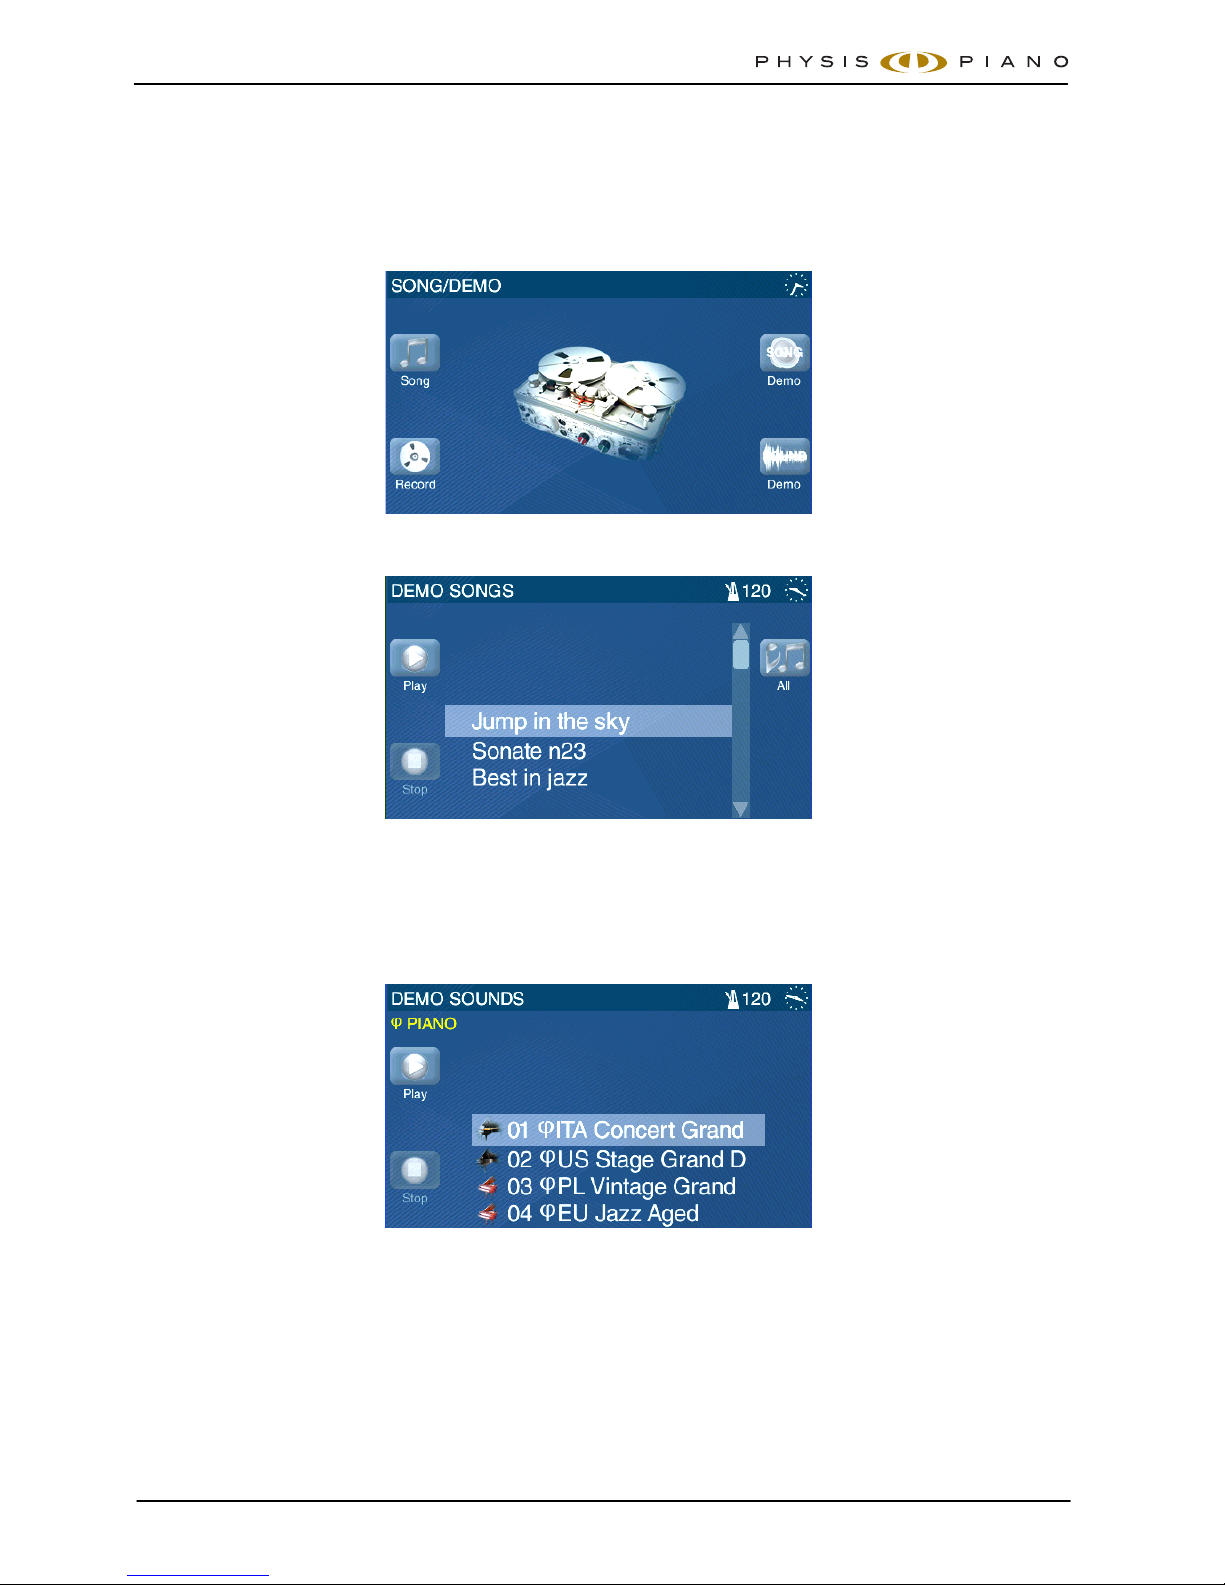
3.5 Playing demo songs .......................................................................................................................................................8
4. Controls and connections......................................................................................................................................9
4.1 Front panel......................................................................................................................................................................9
4.2 Beside the keyboard.....................................................................................................................................................11
4.3 Rear panel ....................................................................................................................................................................12
4.4 Pedals...........................................................................................................................................................................15
5. Customizing the multitouch panel........................................................................................................................ 16
5.1 Manual settings ............................................................................................................................................................16
5.2 Selecting a configuration ..............................................................................................................................................17
5.3 Saving a user-made configuration................................................................................................................................17
5.4 Renaming a user-made configuration ..........................................................................................................................18
6. The structure of the Physis Piano......................................................................................................................... 19
6.1 Data and signal routes.................................................................................................................................................. 19
6.2 Memory structure..........................................................................................................................................................20
7. Memories ............................................................................................................................................................ 21
7.1 What is a Memory .........................................................................................................................................................21
7.2 Main Memory page.......................................................................................................................................................21
7.3 Memory selection..........................................................................................................................................................21
7.4 Saving a Memory..........................................................................................................................................................22
7.5 Renaming a Memory..................................................................................................................................................... 23
8. Sounds ............................................................................................................................................................... 25
8.1 What is a Sound............................................................................................................................................................25
8.2 Main Sound page .........................................................................................................................................................25
8.3 Sound selection ............................................................................................................................................................26
8.4 Keyboard mode............................................................................................................................................................27
8.5 Transposer....................................................................................................................................................................29
8.6 Selecting the velocity curve..........................................................................................................................................30
8.7 Creating a user-made velocity curve............................................................................................................................31
8.8 Activating the metronome.............................................................................................................................................32
9. Post-processing section...................................................................................................................................... 33
9.1 Setting and applying an effect......................................................................................................................................33
9.2 Equalizer.......................................................................................................................................................................34
9.3 Setting up the Mixer......................................................................................................................................................34
10. Modifying a Sound ............................................................................................................................................ 35
10.1 Blocks function ...........................................................................................................................................................35
10.2 Saving a Sound...........................................................................................................................................................36
10.3 Renaming a Sound .....................................................................................................................................................37
11. Instrument general settings ............................................................................................................................... 38
11.1 Recalling factory settings (Factory Reset) ..................................................................................................................38
11.2 Selecting the language of the on-line guide ...............................................................................................................39
11.3 Options .......................................................................................................................................................................39
11.4 Checking and updating the operating system release...............................................................................................40
11.5 Setting time and date..................................................................................................................................................41
11.6 Pedal settings .............................................................................................................................................................41
11.7 Fine tuning ..................................................................................................................................................................42
11.8 MIDI settings...............................................................................................................................................................42
11.9 Moving files or folders.................................................................................................................................................43
11.10 Deleting files or folders.............................................................................................................................................49
11.11 Rename files and folders ..........................................................................................................................................50
12. Recording and playing songs............................................................................................................................ 51

User Manual – Important notes
EN - 2
1. IMPORTANT NOTES
1.1 LOOKING AFTER THE PRODUCT
•Do not apply excessive force to the instrument’s structures or the controls (buttons, connectors, etc.).
•When possible, do not place the instrument close to units which generate strong interference, such as radios, TVs,
computer videos, etc.
•Do not place the instrument close to heat sources, in damp or dusty places or in the vicinity of strong magnetic fields.
•Do not expose the instrument to direct sunlight.
•Never insert foreign bodies inside the instrument or pour liquids of any kind into it.
•To clean the case, use only a soft brush or compressed air. To clean the tempered glass of the front panel, use
common glass detergents (for windows etc.).
•Always use good quality screened cables for connection to amplification or diffusion systems. When disconnecting
cables from sockets, always take hold of the connector and not the cable itself; when winding cables, do not knot or
twist them.
•Before making the connections ensure that the other units (especially amplification and diffusion systems) you are
about to connect are switched off. This will prevent noisy or even dangerous signal peaks.
•If the instrument is to be out of use for lengthy periods, disconnect the plug from the power socket.
•Connect the power cable to an earthed socket.
•Check that the voltage corresponds to the voltage shown on the serial number plate of the device.
•Clean periodically the power cable.
•Only use the power cable provided with the instrument.
•Do not place the power cable close to heat sources Do not damage the cable or bend it overmuch.
•Do not place heavy objects on the cable. Do not place the cable where it could be trampled.
1.2 NOTES ABOUT THE MANUAL
•The Physis Piano documents include
- This User Manual, describing all the instrument controls and connections, together with the basic functions
required to play it;
- A Reference Manual, describing all the advanced functions, such as sound editing parameters, song recording
and MIDI interface. This manual can be found at the website
http://www.physispiano.com
.
•Take good care of this manual.
•This manual is an integral part of the instrument. The descriptions and illustrations in this publication are not binding.
•While the instrument’s essential characteristics remain the same, the manufacturer reserves the right to make any
modifications to parts, details or accessories considered appropriate to improve the product or for requirements of a
constructional or commercial nature, at any time and without undertaking to update this publication immediately.
•All rights reserved; the reproduction of any part of this manual, in any form, without the manufacturer’s specific written
permission is forbidden.
•All the trademarks referred to in this manual are the property of the respective manufacturers.
•Read all the information carefully in order to obtain the best performances from your product and waste no time.
•The codes or numbers in square brackets ([ ]) indicate the names of the controls and connectors of the device. For
exampe, [ENTER] refers to the ENTER button.
•The illustrations and display pages are purely guideline and may differ from those actually shown on the display.
•The instructions provided in this manual only concern the instrument's operating system version that was up to date
when the document was released. Therefore, such instructions might not describe faithfully your current operating
system release. Please, visit the website http://www.physispiano.com to check for the newest operating system release
and manual.

User Manual – Introduction
EN - 3
2. INTRODUCTION
Thank you for choosing Physis Piano.
The core of Physis Piano is a new technology, based on complex mathematical algorithms that faithfully simulate the
mechanical and acoustic phenomena which generate the sound of real instruments. This is called a "physical model" and it
is the heart of Physis technology.
This revolutionary sound technique does not require recording real instruments - a technique used by all others digital
instruments today. Physis technology “calculates” in real time the waveform that each sound generates, through an
accurate mathematical model. Such a model is based on a thorough and careful study of the way sound is produced in a
given instrument. All parameters are taken into account by these physical models: for example, the materials of the
instrument, the size and position of the components, of the instrument etc...
This means that Physis instruments do not simply “reproduce” a recorded sound, and can therefore reach a level of realism
and detail that were unachievable before; the realism of real instruments.
The model replicates the original instrument, generating a different sound for each key, as in an acoustic piano. It is also
able to produce a different sound at each subsequent pressure of the same key, keeping in mind the previous conditions.
Physis Piano can replicate the following sounds through the physical modeling technique: upright and Grand piano (APM-
Acoustic Piano Model); electric piano, in its versions from different periods (EPM- Electric Piano Model, WPM- Wurly Piano
Model, CPM- Clavy Piano Model); idiophones (AMM - Acoustic Mallet Model).
The other sounds featured in the sound library are generated through the HDSE technology (High Definition Sound
Engine). These sounds are: electronic piano, pipe organ, electromagnetic organs, synthesizer, string instruments, choirs,
guitar, bass guitar and more.
The sound generated by a Physis Piano can be modified and customized to the smallest detail.
Musicians can adjust their own Physis Piano according to their needs and taste. Size, resonance, mallets, strings: all these
can be customised, affecting the harmonics produced by the strings, the reflection of the sound inside the case and many
other sound features.
Many parameters of the electric piano can be customized, such as the transductors' position, tone bar size, hammer and
damper size.
Xylophone, vibraphone and marimba can be customized by setting the bar material, the striking point, the mallet's material
and much more.
Physis piano H1 is equipped with an 88-keys weighted keyboard PGK Physis Grand Keyboard, with "Ivory feel" keys, which
faithfully replicates the feeling of the greatest acoustic pianos.
Physis piano's elegant design features a new ergonomic user interface, embedded in a special black tempered glass, with
multi-touch functions. A high-resolution display (480x72 pixels, 4,7") enables to visually edit all parameters with ease. The
graphic interface can be completely customized, according to the user's needs.

User Manual – Switching on and connections
EN - 4
3. SWITCHING ON AND CONNECTIONS
3.1 CONNECTING PEDALS
The H1 model of Physis Piano comes with a set of pedals (Sustain, Sostenuto, Soft). Connect the 13-pins connector cable
of the pedal set to the [PIANO PEDAL STAND] connector of the piano's rear panel.
On H2 and H3 models, grab the cable of the single pedal provided with the instrument, and plug it into the [SUSTAIN]
connector.
Both models allow to connect other pedals, either foot-switch or expression (potentiometer) pedals to the [PEDALS] and
[FOOT CONTROLLER] connectors.
NB
•
For Sustain, Sostenuto and Soft functions see par. 4.4.
•
The Sostenuto and Soft pedals can be assigned different functions. For further information, see par. 11.6
•
Owners of Physis Piano H2 or H3 can still buy the pedal group as an optional. To do so, get in touch with your
favourite retailer.
[PIANO PEDAL STAND]
connector
[SUSTAIN]
connector

User Manual – Switching on and connections
EN - 5
3.2 CONNECTING AN AUDIO SYSTEM
Physis Piano is not equipped with internal loudspeakers; therefore, loudspeakers or headphones are required.
The following pictures show connection examples.
HEADPHONES
1. Insert the stereo jack of your headphones into the audio connector, located
on the front left of the instrument, below the USB connector.
AMPLIFIER
1. Insert the amplifier's mono jack into the [L/MONO] connector located on the rear panel of your Physis Piano.
2. Insert the other end of the cable into the audio input of the amplifier.
NB
Physis Piano generates stereophonic sounds, that is, containing spatial information, for a complete listening
experience. Using a mono connection, this information will be lost, affecting negatively the resulting sound. Therefore,
we advise against mono connections.
NB
Always keep in mind to connect the devices before switching them on.
NB
Keep in mind that using headphones at a sufficiently high volume might cause hearing loss.
[L/MONO]
jack connector
Amplifier
Amplifiers’ audio
input

User Manual – Switching on and connections
EN - 6
LOUDSPEAKERS
1. Insert the mono jack cable from the first speaker to the [L/MONO] connector, located on the rear panel of the Piano.
Place this speaker on the left.
2. Insert the mono jack cable from the second speaker to the [R] connector, located on the Piano's rear panel of the
Piano. Place this speaker on the right.
AUDIO SYSTEM
1. Grab the XLR connector from the mixer channel sending signal to the speakers on the left. Plug this cable into the XLR
[L] connector of the Piano.
2. Grab the XLR connector from the mixer channel sending signal to the speakers on the right. Plug this cable into the
XLR [R] connector of the Piano.
Connect the mixer to an amplifier or amplified loudspeakers.
+22
+10
+7
+4
+2
0
-2
-4
-7
-10
-20
-30-30
10
5
U
5
10
20
30
40
50
10
5
U
5
10
20
30
40
50
10
5
U
5
10
20
30
40
50
10
5
U
5
10
20
30
40
50
10
5
U
5
10
20
30
40
50
10
5
U
5
10
20
30
40
50
10
5
U
5
10
20
30
40
50
10
5
U
5
10
20
30
40
50
10
5
U
5
10
20
30
40
50
GAIN 1GAIN 1
MIC 1MIC 1
LINE 1LINE 1
TRIM 1TRIM 1
LRL R
PANPAN
AUX 1/EFF.AUX 1/EFF.
AUX 2AUX 2
+15+15
+15+15
+4 dB -40 dB+4dB -40dB
MID
LOW
HI
-15 +15-15 +15
-15 +15-15 +15
-15 +15-15 +15
GAIN 5-6GAIN 5-6
LRL R
PAN
AUX 1/EFF.AUX 1/EFF.
AUX 2AUX 2
+15+15
+15+15
MID
LOW
HI
-15 +15-15 +15
-15 +15-15 +15
-15 +15-15 +15
GAIN 2GAIN 2
MIC 2MIC 2
LINE 2LINE 2
TRIM 2TRIM 2
LRL R
PAN
AUX 1/EFF.AUX 1/EFF.
AUX 2AUX 2
+15+15
+15+15
+4 dB -40 dB+4dB -40dB
MID
LOW
HI
-15 +15-15 +15
-15 +15-15 +15
-15 +15-15 +15
MUTE
SOLO
GAIN 3GAIN 3
MIC 3MIC 3
LINE 3LINE 3
TRIM 3TRIM 3
LRL R
PANPAN
AUX 1/EFF.AUX 1/EFF.
AUX 2AUX 2
+15+15
+15+15
+4 dB -40 dB+4 dB -40 dB
MID
LOW
HI
-15 +15-15 +15
-15 +15-15 +15
-15 +15-15 +15
MUTE
SOLO
GAIN 4GAIN 4
MIC 4MIC 4
LINE 4LINE 4
TRIM 4TRIM 4
LRL R
PAN
AUX 1/EFF.AUX 1/EFF.
AUX 2AUX 2
+15+15
+15+15
+4 dB -40 dB+4dB -40dB
MID
LOW
HI
-15 +15-15 +15
-15 +15-15 +15
-15 +15-15 +15
MUTE
SOLO
L
R
LINE 5-6LINE 5-6
MonoMono
GAIN 7-8GAIN 7-8
LRL R
PAN
AUX 1/EFF.AUX 1/EFF.
AUX 2AUX 2
+15+15
+15+15
MID
LOW
HI
-15 +15-15 +15
-15 +15-15 +15
-15 +15-15 +15
L
R
LINE 7-8LINE 7-8
Mono
GAIN 9-10GAIN 9-10
LRL R
PAN
AUX 1/EFF.AUX 1/EFF.
AUX 2AUX 2
+15+15
+15+15
MID
LOW
HI
-15 +15-15 +15
-15 +15-15 +15
-15 +15-15 +15
L
R
LINE 9-10LINE 9-10
Mono
GAIN 11-12GAIN 11-12
LRL R
PAN
AUX 1/EFF.AUX 1/EFF.
AUX 2AUX 2
+15+15
+15+15
MID
LOW
HI
-15 +15-15 +15
-15 +15-15 +15
-15 +15-15 +15
MUTE MUTE MUTE MUTE MUTE
SOLO SOLO SOLO SOLO SOLO
L
R
LINE 11-12LINE 11-12
Mono
Mono
AUX RETURNAUX RETURN AUX OUTAUX OUT
AUX 1AUX 1
AUX 2AUX 2
EFF.
L
R
PHONESPHONES
TAPE
IN OUT
L
R
MAIN OUTSMAIN OUTS
L
R
+20+20
+20+20
RET. to MAINRET. to MAIN
+20+20
RET. to AUXRET. to AUX
TAPE INTAPE IN
MASTER
NB
Mono jack cables can be used as an alternative to XLR. Jack cables must be connected to the [L/MONO] and [R]
connectors of the rear panel.
[R]
jack connector
Left speaker Right speaker
[L]
XLR connector
[R]
XLR connector
Mixer
Amplifier
Left
speaker/diffusor
Mixer input
channels
[L/MONO]
jack connector
Right
speaker/diffusor

User Manual – Switching on and connections
EN - 7
3.3 POWER CABLE CONNECTION
1. Make sure that the [POWER] switch is set as 0.
2. Insert the female cable connector in the [AC-IN] port on the rear
panel.
3. Plug the other end of the cable to a socket.
3.4 SWITCHING ON
1. First, operate all the necessary connection. Then, press the [POWER] switch on the rear panel (see previous picture).
2. When switched on, Physis Piano will automatically select the acoustic piano physical model Sound (if the Last
Selection function is set as Off, see par.11.3).
3. Use the [VOLUME] Key Touch located on the left to set the general volume.
NB
Because of the complexity and power of the instrument, the switching on phase takes some time. Please wait until the
system is completely loaded.
WARNING!
•
Always make sure to use earthed sockets.
•
Only use the power cable provided with the instrument.
•
If the instrument is to be out of use for lengthy periods, disconnect the plug from the power socket.
[POWER]
switch
[AC-IN]
port
[VOLUME]
Key Touch
You can also touch the
Key Touch bar on the
desired position
or slide your finger on the
surface for a continuous
volume control
VOLUMEMIN MAX VOLUMEMIN MAX

User Manual – Switching on and connections
EN - 8
3.5 PLAYING DEMO SONGS
Physis Piano comes with a set of demo songs, so as to evaluate the sound capabilites of the instrument.
It is possible to play short song fragments for each Sound or complete songs, in which several instruments play. For more
information on Sounds, see chapter 8.
To play demo songs, press the [SONG/DEMO] Key Touch (see also point 4 to par. 4.1). The following page will appear:
To play demo songs, press [F3]:
Press [+], [-], [U] or [V] to place the cursor (the bright rectangle) on a song, then press [F1] to play it.
To stop the song, press [F2].
To play all songs in sequence, press [F3]. Press [F3] again to return to the previous mode and select a song.
To play a demo sequence for each Sound, access the SONG/DEMO page. Press [F4]: a Sound list for the Acoustic Piano
family (PIANO) will appear, then after the last selected:
Press [+], [-], [U] or [V] to select the Sound you wish to test by playing a demo sequence. Select a different Sound family
by pressing the dedicated Key Touch to test a different Sound.
Press [F1] to start playing the sequence.
Press [F2] to stop.
Press [EXIT] to return to the previous page.

User Manual – Controls and connections
EN - 9
4. CONTROLS AND CONNECTIONS
4.1 FRONT PANEL
Physis Piano is equipped with a black glass multi-touch panel. The panel has several touch sensitive areas. In fact there
are no sliders or buttons: all settings and operations can be performed by touching the glass area identified by a back
light, corresponding to a given control. Such areas will be called “Key Touch” from now on. When the function is active, the
back light changes colour. The panel itself can be customized: it is possible to set the backlights' mode and colour, and
the display background (for more information see chap. 5). A wide, high-resolution graphic display makes all operations
easier.
Key Touch [VOLUME]: the general volume. This control has been described in par.
3.4.
Sound selection Key Touch: these Key Touch control sounds and memories.
j
E.PIANO MALLET KEYBOARD ENSEMBLE BASS/GUIT. MEMORYPIANO
jj
Pressing one of these Key Touch will show the Sound or Memory list, according to the selected mode:
- [φPIANO]: Acoustic Piano family.
- [φE.PIANO]: Electric Piano family.
- [φMALLET]: Mallet family (Vibraphone, Marimba and Xylophone).
- [KEYBOARD]: Keyboard family (Electric piano, synthesizer, electromagnetic organ, pipe organ, bellows-driven
aerophones, harpsichord).
- [ENSEMBLE]: Ensemble family (strings, brasses, choirs and pads).
- [BASS/GUIT.]: Bass and Guitar family.
- [MEMORY ]: Memory selection.
For more information on Sound and Memory consult the par. 7 and 8.
NB:
As with Key Touch [MEMORY ], all Key Touch that end with the symbol have a secondary function. To recall
these functions, press and hold the Key Touch for a short while.
For example, press [MEMORY ] to activate/deactivate the "memory" function. Holding the same Key Touch for a
while recalls the memory saving process. The secondary function of a Key Touch is described in its dedicated
manual section.
1 2 34 5
1
2
VOLUMEMIN MAX

User Manual – Controls and connections
EN - 10
Display and navigation section: this section contains the graphic display and all the controls to navigate menus and
pages.
F1
F2 F4
F3 EXIT
ENTER
The Key Touch in this section are:
- [F1], [F2], [F3] and F4]: These controls change function according to the current video page. The function
assigned to each Key Touch is shown on the display, beside each Key Touch.
- [+ ııı -]: this slider can be used to adjust the selected parameter. Place the cursor on a parameter to adjust it.
Press the [+] or [-] Key Touch to increase/decrease the value by 1.
Use the slider bar between + and - to increase/decrease the
value in a continuous manner.
- [EXIT]: Press this Key Touch to leave the current video page and return to the previous one, or to refuse a request
by the system.
- [ENTER]: Press this Key Touch to access a highlighted function, or to accept a request by the system
- [U]: moves the cursor one field up.
- [V]: moves the cursor one field down.
- [Y]: moves the cursor one field left.
- [Z]: moves the cursor one field right.
Post-processing and Setup section: here you can find the controls to process the signal and the Setup options.
The Key Touch in this section are:
- [EFFECT ]: Activates/deactivates (press) or set up (press
and hold) chorus and delay effects (see par.9.1).
- [REVERB ]: activates/deactivates (press) or set up (press
and hold) the master reverberation effect (see par.9.1).
- [EQ ]: Activates/deactivates (press) or set up (press and
hold) the master equalizer.
- [MIXER]: Adjust sound volume and effects sends.
- [SOUND EDIT]: Set up and adjust the sound generation
block chains (see chap. 10).
- [FUNCTION]: General setup and file management. (see
chap. 11).
- [SONG/DEMO]: songs player and recorder (see chap. 12).
- [VIEW]: Multi touch panel and display setup (see chap. 5).
3
4

User Manual – Controls and connections
EN - 11
Key Touch [ ]: activates/deactivates stand-by mode. Deactivating the stand-
by function, that is, switching on the instrument, will restore the
configurations (volume, sounds, levels etc.) to their previous condition (i.e.before
the instrument was set in stand-by mode).
To put the instrument on stand-by, press the [ ] Key Touch twice.
Press the Key Touch again to turn it on.
4.2 BESIDE THE KEYBOARD
The USB host port is placed just left from the keyboard. The headphones connector is right under it. The USB port can be
used to connect USB memories, in order to exchange data with the internal memory.
[ ] port: Connect here a USB device.
[ ] port: Connect your headphones here.
INFORMATION ON USB PENS
•
Always use USB pens formatted with FAT or FAT32 file system (no NTFS).
•
It is recommended to format USB pens with dedicated utilities, provided by the manufacturer (usually on CD-
ROM or web site).
•
If no USB pen is available when required, the following message will appear:
To access a USB pen, plug it into the [ ] connector on the front panel. Then wait a short while before trying
to access it. If the pen is already connected, try disconnecting and reconnecting. Then, check that the USB
device is working and properly formatted.
NB
Keep in mind that in Stand-By mode, the instrument still consumes a small amount of electricity; therefore it is best to
use this function onl
y
for short
p
eriods of time.
5
1
2
1
2

User Manual – Controls and connections
EN - 12
4.3 REAR PANEL
All the connection of the Physis Piano can be found in the rear panel.
Power section: this section contains all the power supply components:
- [POWER]: on/off switch.
- [AC-IN]: power cable connector.
[PIANO PEDAL STAND] Connector: 13-pin connector for the Sustain, Sostenuto and Soft pedals.
[MIDI] Ports: MIDI connectors for external devices.
- [OUT]: this connector sends out the MIDI data generated by Physis Piano. Connect this
port to the MIDI input of the receiving device (e.g. an expander module).
- [THRU]: This port transmits the incoming data from the [IN] port to other MIDI devices
(e.g. to play the data transmitted by an external sequencer, through Physis Piano, with
an external expander module).
- [IN]: Physis Piano receives MIDI data from an external unit through this connector.
Connect this port to the MIDI OUT port of a transmitting device (e.g. a sequencer).
WARNING!
•
Always make sure to use earthed sockets.
•
Only use the power cable provided with the instrument.
•
If the instrument is to be out of use for lengthy periods, disconnect the plug from the power socket.
1 2 4
3 5 7
6
1
2
3
[MIDI THRU]
connector
[MIDI OUT]
connector
[MIDI IN]
connector
Expander or digital drum
Expander or digital drum Computer
MIDI interface
MIDI OUT
MIDI IN
MIDI IN
POWER AC-IN
PIANO-PEDAL
STAND
MIDI
OUT THRU IN

User Manual – Controls and connections
EN - 13
USB
TO HOST
[DIGITAL OUT] Connector: this port sends out the digital S/PDIF audio signal generated by Physis
Piano. Connect this port to a recording system (computer sound card, recorder, mixer) or an
amplification/diffusion system with a digital input.
[USB TO HOST] Connector: USB port; connect to a computer to send and receive MIDI data..
[PEDAL] and [FOOT CONTROLLER] connectors: jack connectors for
pedals.
- [SUSTAIN]: plug here the pedal (either foot-switch or potentiometer)
jack to control the Sustain effect.
- [SOFT]: plug here a foot-switch pedal jack to control the Soft effect.
NOTE IMPORTANTI
•
Use with an USB A/B type cable.
•
Always connect the USB cable while the instrument is switched off.
•
Exit the power saving mode on your computer before connecting the cable.
•
After connecting the [USB TO HOST] cable for the first time, Physis Piano will install its drivers on the computer.
When the process has been completed, a pop-up message will appear, to confirm that the new hardware is
ready for use.
•
When connecting a USB cable or when switching on the instrument with a connected device, always wait 5
seconds before starting any MIDI application.
NB
The [
V
OLUME] Key Touch does not affect the output si
g
nal of the [DIGITAL OUT] connector.
4
[DIGITAL OUT]
connector
Computer
Soundboard
Digital audio input
Digital audio input
Left
speaker
Right
speaker
5
6
Computer
[USB TO HOST]
connector
DIGITAL OUT
PEDAL
SUSTAIN SOSTENUTO SOFT
FOOT CONTROLLER
21
USB
connector

User Manual – Controls and connections
EN - 14
- [SOSTENUTO]: plug in here a foot-switch pedal jack to control the Sostenuto effect.
- [1]: plug in here the jack connector from a pedal (either foot-switch or potentiometer) to control the assigned
function.
- [2]: plug in here the jack connector from a pedal (either foot-switch or potentiometer) to control the assigned
function.
Any time a pedal is connected, a pop-up message will appear on the display. The message contains information on
the connector used and the kind of pedal connected.
How to read the message:
- Pedal: the rear-panel connector in which the pedal has been plugged.
- Type: the pedal type. Switch stands for foot-switch, Potent. stands for potentiometer (expression pedal).
- Polarity: pedal reading polarity. Can be Direct or Reverse. Polarity can be set through the "Pedals" function under
the FUNCTION menu.
Press [EXIT] or wait a short while to quit the pop-up window.
[OUTPUT] connectors: audio output connectors. Jack connectors send out a
unbalanced signal, that should be used for amplifiers or amplified speakers. If
a monophonic output is necessary, use the [L/MONO] output.
XLR outputs send out a balanced signal. Use with mixer and high quality audio
systems.
Some examples of connections are described at par. 3.2.
NB:
Sometimes you might experience a disturbing noise, known as "main hum" and related to the network frequency
(50Hz or 60Hz, depending on the country). This noise is caused by external devices and their connections. Using XLR
outputs instead of jack outputs usually suppresses this noise.
NB:
•
Pedals can be connected also while the instrument is switched on. However, do not press the pedals while
inserting the jack into the connector.
•
To avoid undesirable effects, do not use both the 13-pins [PIANO PEDAL STAND] connector and the three
[PEDAL] jacks at the same time.
•
With all sounds not belonging to the
φ
PIANO family, the [SOFT] and [SOSTENUTO] pedals perform instrument-
related functions, that might therefore differ from Soft and Sostenuto. To check or modify the pedals' functions,
first select the desired Sound, then recall the Pedals function under the FUNCTION menu. The Pedals function
is described in par. 11.6.
•
To check or modify the function assigned to the [FOOT CONTROLLER], first select the desired sound, then recall
the Pedals function under the FUNCTION menu (described in par. 11.6).
•
The pop-up message shown above always corresponds to the type of pedal connected to the [FOOT
CONTROLLER] connectors. With [PEDALS] connectors instead, the message shows the pedal type set under
the Pedals function (FUNCTION menu). For example, the message might show an expression pedal when in fact
a foot-switch has been connected, if such are the settings of the Pedals function.
7
OUTPUT
R L / MONO R L

User Manual – Controls and connections
EN - 15
4.4 PEDALS
Usually, three pedals are used with the piano to enhance its expressivity. Physis Piano replicates the effect of these pedals
as accurately as possible, so as to simulate a real acoustic piano.
Physis Piano H1 is provided with a set of three pedals (which can be purchased separately also for the H2 and H3).
When using a different pedal set, its function depends on the [PEDAL] connector used.
- SUSTAIN pedal: when pressing this pedal, Physis Piano simulates the lifting of the dampers as in an acoustic piano;
the sound will therefore persist until its natural decay, even when releasing the corresponding key. Releasing the pedal
(lowering the dampers) will suppress the sound of struck strings whose keys had been released. In addition to that,
when the pedal is pressed, Physis Piano replicates the sound of all other strings reverberating by sympathetic
resonance, the resonance of the sound board, and the sound of dampers.
Moreover, the pedal allows continuous control. This means that the pedal can be pressed only partially to achieve the
half-damper effect. In fact, in acoustic pianos, by lightly pressing the Sustain pedal, the dampers are lifted only
partially, dampening only partially the strings.
- SOSTENUTO pedal: similar to the sustain pedal, except that it only lifts the dampers of the keys pressed when the
pedal is activated. Keys played after that will sound normally. When releasing the pedal, the strings that are still
vibrating thanks to the pedal's action will be suppressed.
- SOFT Pedal: this pedal reduces the piano volume and softens the notes.
NB:
With all sounds not belonging to the
φ
PIANO family, the SOFT and SOSTENUTO pedals perform instrument-related
functions, that might therefore differ from Soft and Sostenuto. To check or modify the pedals' functions, first select the
desired Sound, then recall the "Pedals" function under the FUNCTION menu. The Pedals function is described in par.
11.6.
SOFT
pedal
SOSTENUTO
pedal
SUSTAIN
pedal

User Manual – Customizing the multitouch panel
EN - 16
5. CUSTOMIZING THE MULTITOUCH PANEL
5.1 MANUAL SETTINGS
To ensure the best comfort, convenience and aesthetic appeal, the multi-touch panel can be configured. The colours of the
Key Touch can be changed, the lights turned on or off, and the display background and colours can be selected.
To access these options press the [VIEW] Key Touch. The display will show the configuration panel:
First select a field by placing the cursor on it using the [U] or [V] Key Touch, then select an option using [+] and [-].
To set Skin, Back Colour and Active Colour, use the Key Touch [Y] or [Z].
The parameters set:
- ZONE 1: the [VOLUME] leds mode.
- ZONE 2: the [φPIANO], [φE.PIANO] and [φMALLET] leds mode.
- ZONE 3: the [KEYBOARD], [ENSEMBLE], [BASS GUIT.] and [MEMORY ] leds mode.
- ZONE 4: the [F1], [F2], [F3], [F4], [+ ı ı ı -], [EXIT], [ENTER] and display leds mode.
- ZONE 5: the [EFFECT ], [REVERB ], [EQ ] and [MIXER] led mode.
- ZONE 6: the [SOUND EDIT], [FUNCTION,[SONG/DEMO] and [VIEW] leds mode.
To place the cursor on a ZONE, use the [Y] o [Z] Key Touch.
The Key Touch can be set in the following modes:
- on: the Key Touch is active and the led light is on.
- off: the Key Touch is inactive and the led light is off.
- auto: the Key Touch is active but the led light is off. When first pressed, the light turns on. Pressing the Key Touch
a second time will activate the corresponding function. After 5 seconds, the led light is turned off again.
- Skin: the display background.
- Back Colour: the colour of a deactivated/not pressed Key Touch. (for example, sound families which have not been
selected)
- Active Colour: the colour of a pressed/activated Key Touch (for example, the currently selected Sound family).
- Panel Bright: Key Touch brightness.
- Display Bright: display brightness.
Press [EXIT] to return to the main Sound page and save the current settings.
NB.
•
While in the VIEW function, the Key Touch belonging to ZONEs set as “off” will blink.
•
To allow the user to change settings, the [VIEW] Key Touch always remains in "auto" mode when ZONE 6 is set as
"off".

User Manual – Customizing the multitouch panel
EN - 17
5.2 SELECTING A CONFIGURATION
While in the VIEW video page, Press [F3]. A list of already made settings will appear:
The first 10 configurations of this list are presets, included in each instrument. They can be modified but not overwritten.
The following 10 configurations are user-made and can be modified and saved (see next paragraph).
To select a new configuration, use the [U], [V], [+] or [-] Key Touch. The new configuration will be immediately active, to
test it. If you wish to keep the selected configuration, press [ENTER].
Press [EXIT] instead to return to the main video page.
5.3 SAVING A USER-MADE CONFIGURATION
When a parameter is modified, two asterisks will appear on the top of the VIEW page, beside the configuration's name. These
asterisks mean that the configuration has been modified but not saved yet. Nonetheless, these settings will remain, even if the
instrument is switched off. However, loading a different configuration will delete these settings.
You can save a user-made panel configuration, so as to recall it quickly when needed. To do so, press the [F3] Key Touch.
Ten overwritable user configuration will appear on screen.
Use the [U], [V], [+] or [-] Key Touch to select which configuration to overwrite.
Press [F3] to confirm saving or [EXIT] to abort. In both cases, the display will show the previous page.

User Manual – Customizing the multitouch panel
EN - 18
5.4 RENAMING A USER-MADE CONFIGURATION
To rename a user-made configuration, place the cursor on the configuration to rename and press [F1].
Use the virtual keyboard to enter a new name. The currently selected key is highlighted in red.
To select a key, use the [Y], [Z], [U] or [V] Key Touch.
Press [ENTER] to activate the selected key. The modified name immediately appears on display.
Press [EXIT] to cancel and return to the previous page.
The virtual keys have the following functions:
- Backspace: deletes the previous character.
- Cancel: deletes the following character.
- Caps: The “Caps Lock” led on the display shows the function's actual state. When the led is on, all inserted characters
will appear as upper case. When the led is off, all new characters will be lower-case.
- Return: confirms the new name. Returns to the previous page.
- Ins: Insert function. The “Insert” led on the display shows whether the function is active or not. When the led is on, all
new characters are placed between old characters. When the led is off, new characters will replace old characters.
- Home: places the cursor at the beginning of the text.
- End: places the cursor at the end of the text.
- <--: moves the cursor one step left.
- -->: moves the cursor one step right.
To enter characters you can also use the keyboard keys as shown in the following drawing:
1
0
SPACE
2469=
;
38
7φBCEGI
ADFH
JLNO
KM PRT WY &
QSUVXZ[] abdf
ce
gi kmnp
hjl oq
rs
uwy z
tvx
BACKSPACE
BACKSPACE
BACKSPACE
BACKSPACE
BACKSPACE
BACKSPACE
BACKSPACE
BACKSPACE
5
NB.
The maximum length of a name is 19 characters.
Other manuals for H1
1
This manual suits for next models
3
Table of contents
Other Physis Piano Musical Instrument manuals