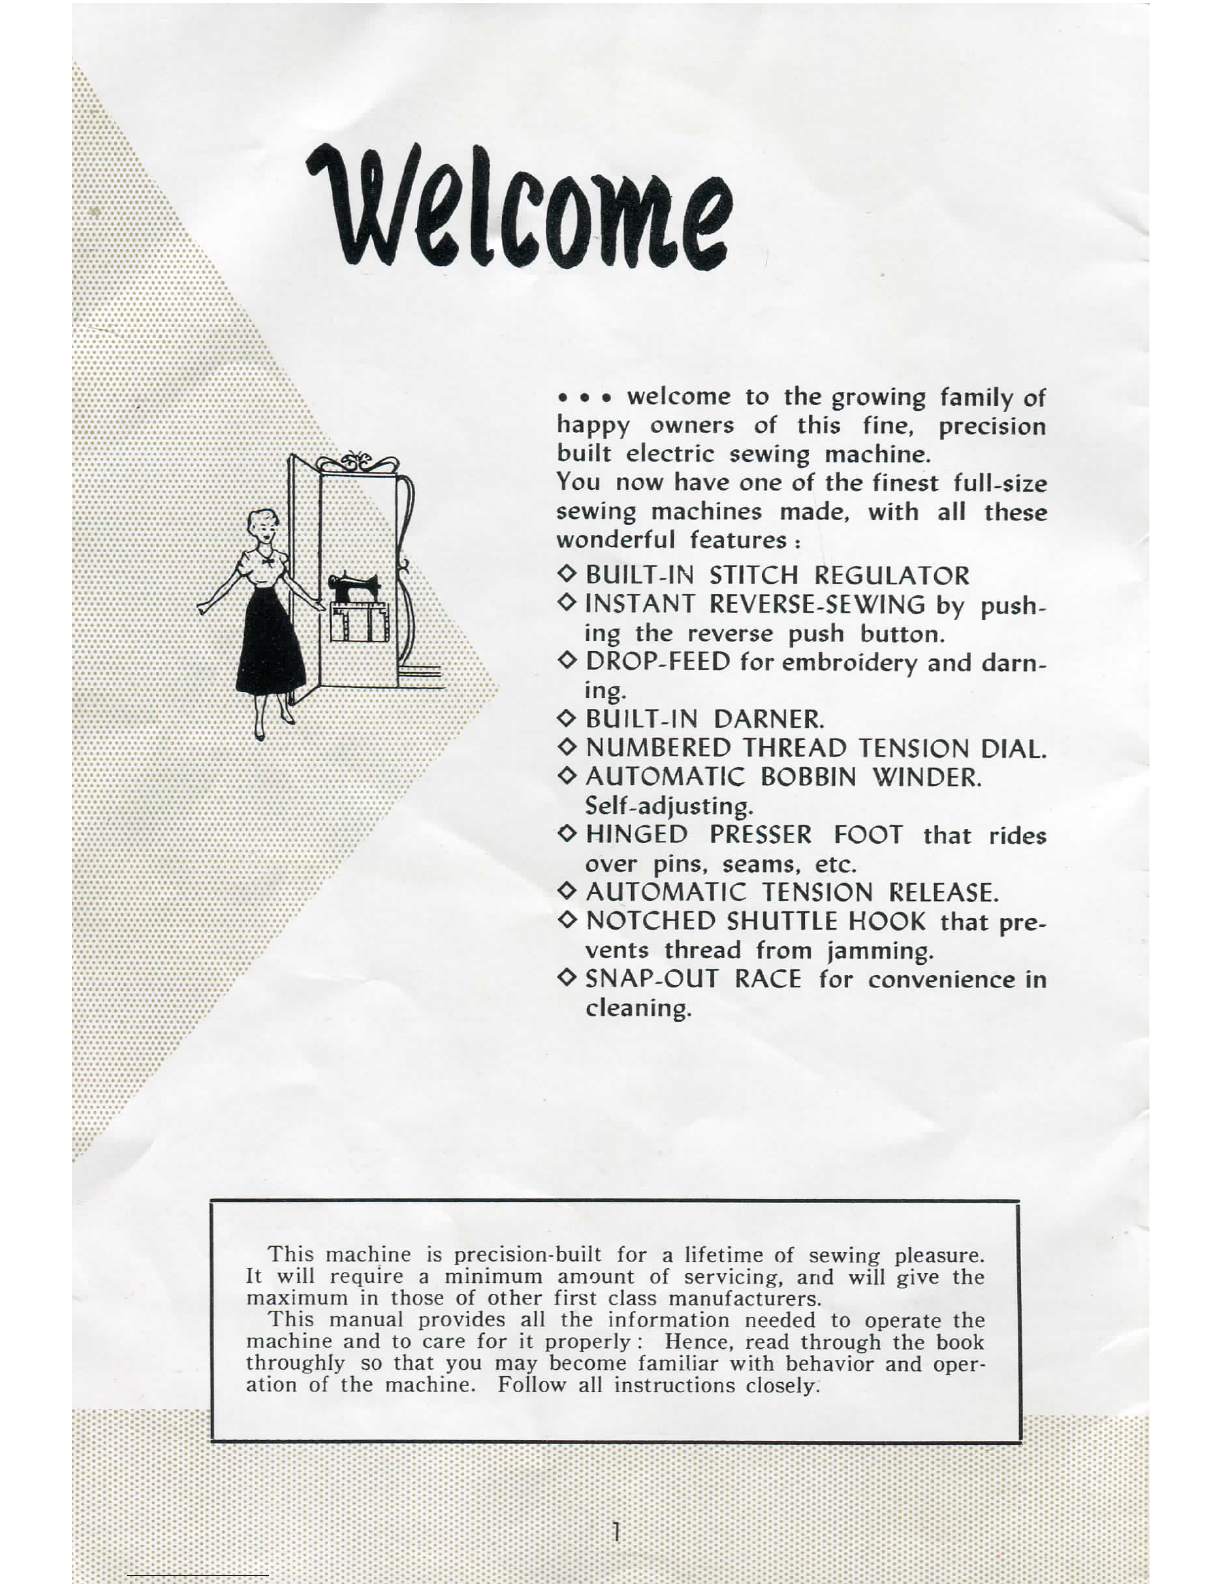
Piedmont KD-3 User manual

Instruction
for
the use and
care
of
Sewing
machine
KD-3
Model 701
J-A33

'Welcome
•• •
welcometothegrowingfamilyof
happyownersofthisfine,precision
built
electricsewingmachine.
Younow
have
oneofthefinestfull-size
sewing
machines
made,
with
allthese
wonderful
features:
O
BUILT-IN
STITCH
REGULATOR
O
INSTANT
REVERSE-SEWING
bypush-
ing
thereversepush
button.
O
DROP-FEED
forembroideryanddarn-
ing.
O
BUILT-IN
DARNER.
O
NUMBERED
THREAD
TENSION
DIAL.
O
AUTOMATIC
BOBBIN
WINDER.
Self-adjusting.
O
HINGED
PRESSER
FOOT
thatrides
overpins,
seams,
etc.
O
AUTOMATIC
TENSION
RELEASE.
O
NOTCHED
SHUTTLE
HOOK
thatpre-
ventsthreadfromjamming.
O
SNAP-OUT
RACE
forconveniencein
cleaning.
Thismachineisprecision-builtfora lifetimeofsewingpleasure.
It
will
requirea minimumamountofservicing,and
will
givethe
maximum
inthoseofother
first
class
manufacturers.
Thismanualprovidesalltheinformationneededtooperatethe
machineandtocareforitproperly:
Hence,
readthroughthebook
throughly
sothatyoumay
become
familiar
with
behaviorandoper-
ation
ofthemachine.Followallinstructionsclosely.
1

a5 a
eivin
OKeepthemachinecleanandwell
oiled
OAdjust
tension,
etc.properly
OUseproper
size
needles
NEVER
ATTEMPTTOUSEA BENTNEEDLE,
NORONEWITHA BLUNTPOINT.
WHENPURCHASINGNEEDLESFORTHISMACHINE,
ASKFOR15x1NEEDLESONLY.
Sizes
and
Grades
of
Needles
TypeofFabric
and
Worli
tobe
done
SIZE
OFTHREAD
Sizes
and
Grades
of
Needles
TypeofFabric
and
Worli
tobe
done
Cotton
Silk
Linen
11
(Medium-
Fine)
Nylon
andPlastics.
Medium
light-weightand
summertimefabrics.
For
house
dresses,
children's
dresses,
washable
cotton
dresses,
aprons,
curtains.
80
to
100
0
Twist
14
(Medium)
Dress
silksandcottons,
light
weightwoolens,
draperies,
fabricfurnishings.
For
general
household
sew-
ing,
fine
men's
shirts,
smocks,
window
draperies
andfabric
decorations.
60
to
80
A&B
Twist
16
(Light
Heavy)
Heavy
cretonne,
madras,
muslin,
brocades
andquilts.
For
men's
workshirts,sturdy
smocks
and
aprons,
heavy
quilting
andfabricfurnish-
ings.
40
to
60
C
Twist
18
(Medium-
Heavy)
Heavywovencoating,
light
weight
canvas,
bed
ticking,
upholsteryandawningma-
terials,slipcoverfabrics.
Forworkor
sports
uniforms,
suits
made
ofstronglinen
of
cottonfabrics,awnings,
slip-coversand
mattresses.
Heavywovensuiting,
coat-
ing,
duck,
ticking,
drilling,
canvas
andsacking.
For
heavy
washuniforms,
beddine
suoplies
forhospi-
tals,
hotels
and
camps.
24
to
30
D
E
Twist
60
to
80
In
general
sewing,
usethe
same
size
threadinthebobbinas
LS
usedontop

Set
tlie
Jlfleedie
SIDE
Raise
needle
toitshighestpointbyturn-
ing
the
balance
wheeltowardyoubyhand.
Loosentheneedle-clampscrewontheright
hand
side
ofthe
needle
bar.Removethe
old
needle,
andslidenew
needle
up
(FLAT
SIDE
TOWARD
BALANCE
WHEEL)
until
it
hitsthestop.Thentightenthe
needle-
clampscrewsecurely.
For
best
results,
change
needles
frequently.
I
ee
iiiiiiii-::::::
WHEN
SEWING,
WINDING
BOB-
jjHIiBINS,or
CHANGING
NEEDLES
iiiiii
ALWAYS
TURN
THE
BALANCE
WHEEL
TOWARDS
YOU
\."
The
balance
wheelisprovided
with
a stop-motiondevice
which
al-
lows
the
balance
wheeltorunfreely
sothatbobbinsmaybewound
with-
outoperatingthe
needle.
To
loosenthewheel,
hold
it
tightly
•
with
the
left
hand,and
with
the
right
hand,turnthestop-motion
knobtowardyou.Seearrow.
To
tightenthe
balance
wheel,turn
stop-motionknobaway
from
you.

Firstremovetliebobbin
case
as
follows:
Turn
the
balance
wheeltoward
you
until
the
needle
barisatits
highestpoint.Move
the
slideplateout,and
with
twofingers,
grasp
the
:ir":::;;;i;'::':^
hinged-latch
onthe
bobbin
case
andremovethe
":":V:iV::V::::
case.
li-liiVr-i:::::";
Thebobbin
will
remain
in
the
case
as
long
as
you
holdontothehinged-latch.
Close
thelatch
:'"::r:::V;:r:V:'
and
the
bobbin
will
fall
out.
Ifiiiiiiiiii
Loosen
the
balance
wheel
(as
explained
on
Page
3).
r:iV:':'::;;;:;;'::
:::::::!::::
Place
a
bobbin
onthe
bobbin-winderspindle,and
press
ittotheendofthe
i::::;::;;':::::'
:::::::::i::spindle,
makingcertainthat
the
pinonthespindleshoulder
enters
the
slot
inthe
liiiliiiiiiilbobbin
turning
the
rubberwheel.
i::::::::::::
Then
press
down
the
flat lever(between
the
bobbinand
the
rubberwheel)
i.-jjiiiiijiiluntil
the
bobbin
is
held
in
place
bythe
little
metalfinger thatfits between
the
:;V:V:ii:':':::::
::::::::i:::;Sides
ofthe
bobbin.
:::•.•.••':••=••!::
Place
a
spool
of
thread
onthe
lower
spoolpin
of
themachine,and
pass
the
r:V::':'.;;;iV:':i
::::::l:::;:'threadthrough
the
bracket
(frombelow)
atthe
bottomright
ofthe
machine.
'
Hii-iililiii
Next,
wind
the
thread
at
theleftend
ofthe
bobbin,from
rear
andbehindrffftVU:::::::'
::::::::::ii!the
bobbinandtowardyou,
seven
or
eighttimes.
V:iir:":V;':'::::
:::::::::::::Turn
the
balance
wheeltowardyou,and
press
the
knee
controlorfootcontrol
i-r:":^;::'::':;:;
iii;iiiij:iii(as
in
sewing)
to
wind
thebobbincompletely.Runthemachineslowly
to
wind
;V:U::::iV::::'
:::::::::::::thebobbinevenly.V::::':^::::':;;;
:::::::::::::When
the
bobbin
is
full
it
will
release
automatically
and
come
toa
stop,
l:::::::':::::::
iiiiiiiiifiiiBreak
offthe
thread,andremove
the
bobbinand
reset
the
balance
wheel
for
V::;;;:;;!!':^^^^^
:::::::::::::sewing.
:::::::!:::::Shouldthethread
wind
unevenly
on
thebobbin,adjustthetension
bracket
at
liiVr:^::::':':;:
;::::::i.;:::::thebottom
by
looseningthe
screw
andslidingthetensionright
or
left
as
needed
:r:r:r:::::":V::
;::iliiJ:Hiiito
change
the
tension.
Note:
—
this
machine
uses
standard
15
class
bobbins—available
at all
sewing
stores.
4

andtwo
fingers
of
your
right
hand
withthe
thread
ontop
leading
away
from
you.(see
pic-
ture)
Insert
the
bobbin
into
the
case,
pullthe
thread
into
the
slot;
then
down
under
the
spring
until
it
enters
the
delivery
eyeof
tension
spring.
(Be
suretheneedleisatitshighestpoint.)
Holdthebobbin
case
with
yourlefthand
bythehiiiged-latch,
with
themetalfinger
of
the
case
pointingupandinline
with
the
notchatthetopofthebobbinraceway.
Release
thehinged-latch,and
fitting
the
centerofthebobbinoverthecenter-pin
protruding
fromtheraceway,
press
thebob-
bin
gentlyintoposition,beingsurethatthe
metalfingerfitsintothenotchoftherace-
way.
The5 or6
inches
ofthreadhangingfreely
from
the
case
will
bebroughtuplater
through
theholeinthecenterofthe
needle
plate.
Close
theslideplate.
5

m ine M
Turn
BalanceWheel
towardsyou
until
the
take-upleverisraisedto
its
highestpoint.
Place
spool
ofthreadonthe
spool
pinofthemachine
arm;
pass
threadthrough
thethreadguide(A)at
thetopcornerofthe
faceplate,downandover
thebackto
front
bet-
weenthetension-disc
(B),
uptooverthreadguard
(E),
down
into
thehook
of
take-upspring(C),
andoverbackto
front
through
holeintheend
of
thethreadtake-up-
lever
(F),down
into
the
eyeletoftheface-plate
(G),
into
thelower
wire-
threadguide(H),then
from
left
to
right
through
eyeofthe
needle
(I).
Draw
about5"ofthread
through
theeyeofthe
needle
with
which
tocom-
mence
sewing.
Hold
theendofneedlethreadinyour
left
hand,
turn
balancewheeltowardsyou
until
needle
movesupand
down,
andupagaintoitshighestpoint,catchingthe
bobbin
thread,
which
will
bebroughtupthatway
through
theholeinthe
needle
plate.

Do
eivin
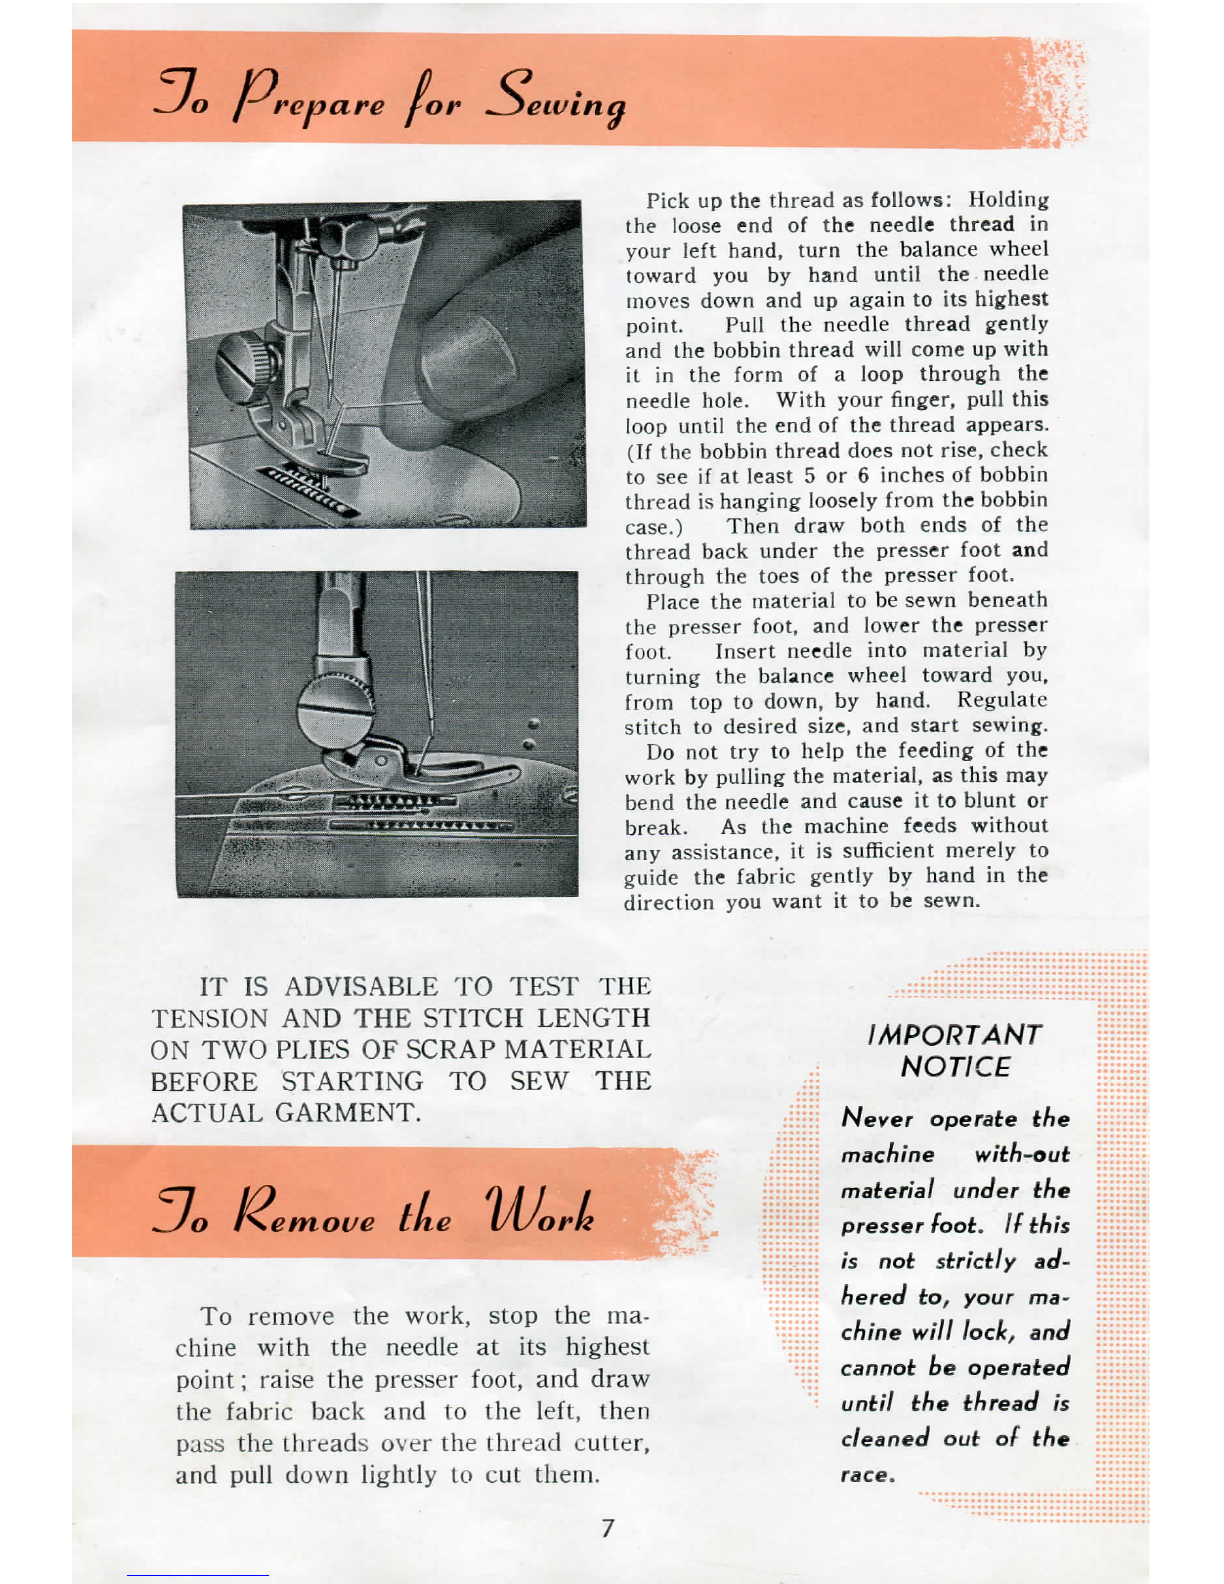
Pickupthethreadasfollows:Holding
the
loose
endofthe
needle
threadin
yourlefthand,
turn
the
balance
wheel
toward
youbyhand
until
the
needle
moves
downandup
again
toitshighest
point.
Pullthe
needle
threadgently
andthebobbinthread
will
come
up
with
it
intheformofa loopthroughthe
needle
hole.Withyourfinger,
pull
this
loop
until
theendofthethread
appears.
(If
thebobbinthread
does
notrise,
check
to
seeifatleast5 or6
inches
ofbobbin
threadishanginglooselyfromthebobbin
case.)
Thendrawboth
ends
ofthe
thread
back
underthepresserfootand
through
the
toes
ofthepresserfoot.
Place
thematerialtobesewnbeneath
thepresserfoot,andlowerthepresser
foot.
Insert
needle
intomaterialby
turning
the
balance
wheeltowardyou,
from
toptodown,byhand.
Regulate
stitch
todesired
size,
andstartsewing.
Donottrytohelpthe feedingofthe
work
bypullingthe material,asthismay
bendthe
needle
and
cause
ittobluntor
break.Asthemachine
feeds
without
any
assistance,
itissufficientmerelyto
guidethefabricgentlybyhandinthe
direction
youwantittobesewn.
IT
IS
ADVISABLE
TO
TEST
THE
TENSION
ANDTHE
STITCH
LENGTH
ONTWO
PLIES
OF
SCRAP
MATERIAL
BEFORE
STARTING
TOSEWTHE
ACTUAL
GARMENT.
Remove
tite lAJorii
Toremovethework,stopthema-
chine
with
the
needle
atitshighest
point;
raisethepresserfoot,anddraw
thefabric
back
andtotheleft,then
pass
thethreadsoverthethreadcutter,
and
pull
downlightlytocutthem.
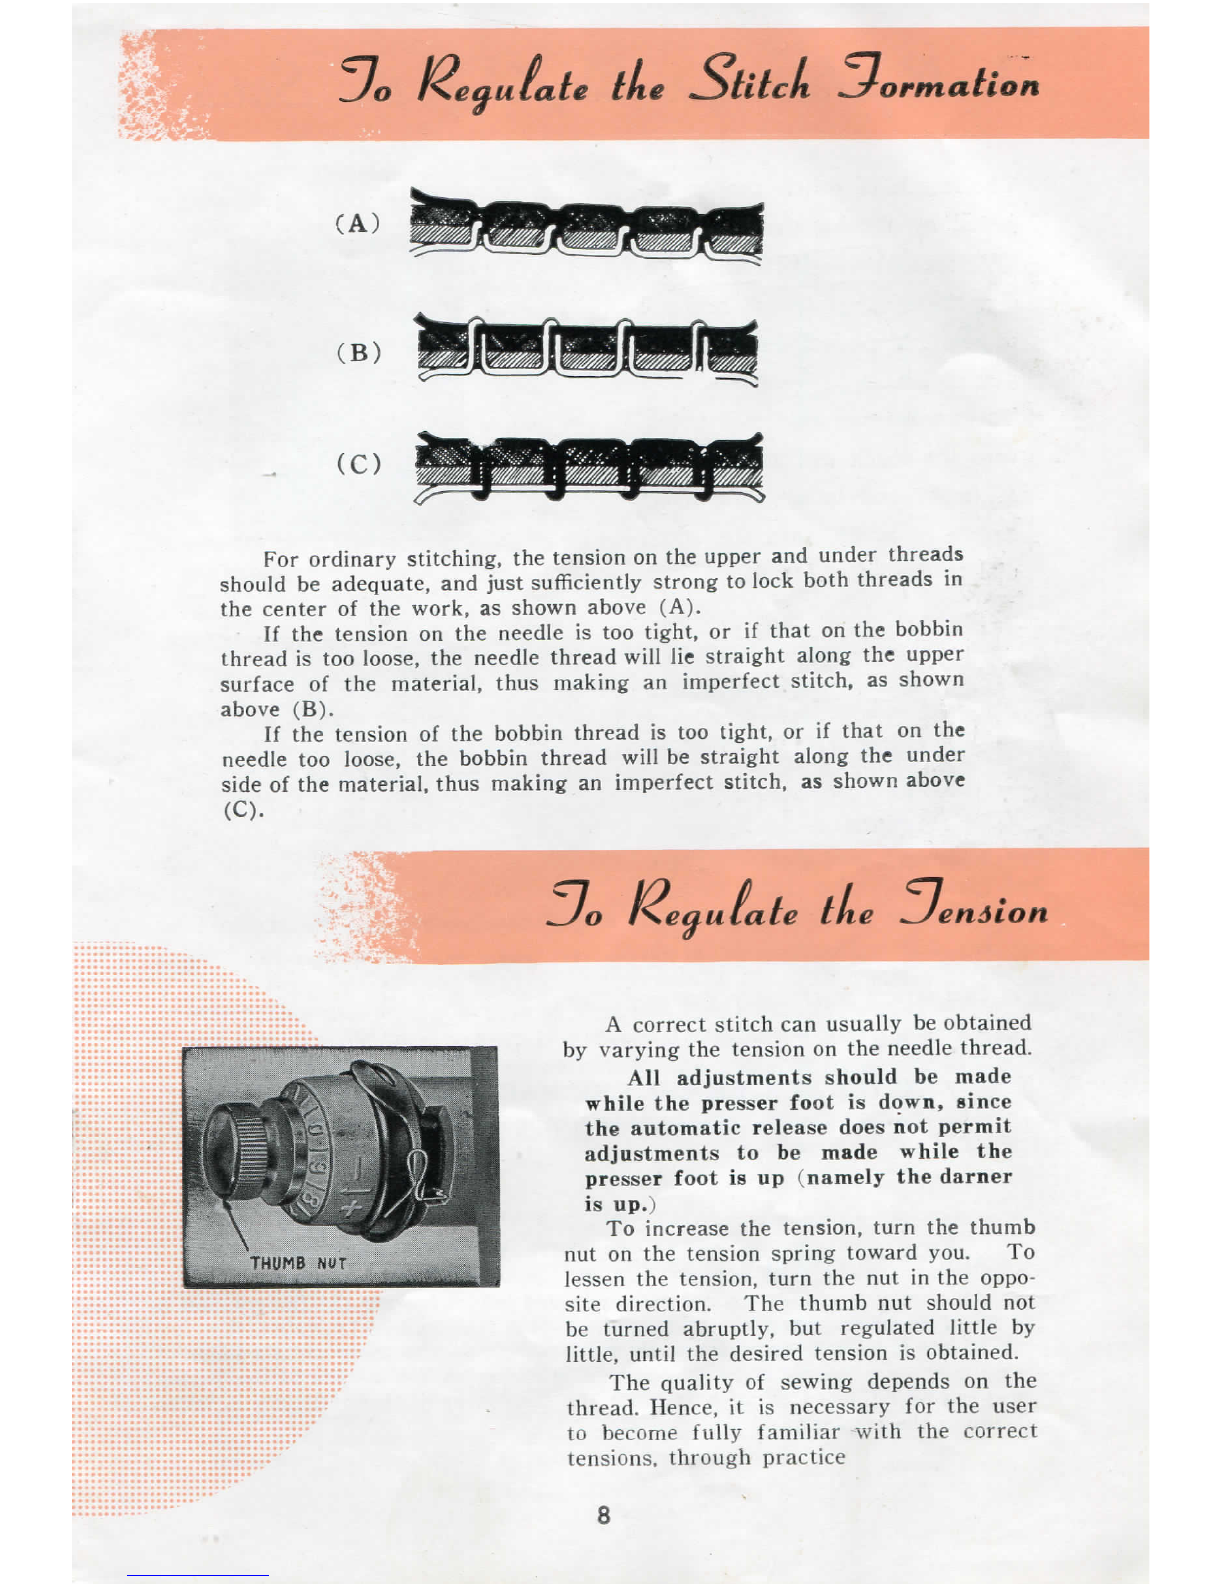
IMPORTANT
NOTICE
Never operate the
machine with-oui
material under the
presser foot. If this
is not strictly ad-
hered to, your ma-
chine will lock, and
cannot be operated
until the thread is
cleaned out of the

ormaCion
(A)
(B)
(C)
For
ordinarystitching,thetensionontheupperandunder
threads
should
be
adequate,
andjust
sufficiently
strongto
lock
both
threads
in
thecenterofthe
work,
asshownabove(A).
If
thetensiononthe
needle
istoo
tight,
orifthatonthebobbin
threadistooloose,the
needle
thread
will
liestraightalongtheupper
surfaceofthematerial,thusmakinganimperfectstitch,asshown
above(B).
If
thetensionofthebobbinthreadistoo
tight,
orifthatonthe
needle
tooloose,thebobbinthread
will
bestraightalongtheunder
sideofthematerial,thusmakinganimperfectstitch,asshownabove
(C).
enAion
A
correctstitchcanusuallybeobtained
by
varyingthetensiononthe
needle
thread.
All
adjustmentsshouldbemade
whilethepresser
foot
isdown,since
theautomaticrelease
does
notpermit
adjustmentstobemadewhilethe
presser
foot
isup(namelythedarner
isup.)
To
increase
thetension,
turn
thethumb
nut
onthetensionspringtowardyou.To
lessen
thetension,
turn
thenutintheoppo-
sitedirection.Thethumbnutshouldnot
beturnedabruptly,butregulated
little
by
little,
until
thedesiredtensionisobtained.
Thequalityofsewing
depends
onthe
thread.Hence,itis
necessary
forthe
user
to
become
fully
familiar
with
thecorrect
tensions,throughpractice
8

Thelength
of
stitch
canbead-
justed
by
turning
the
stitchdial
(A),
andthe
numbers
0,1,2,3,
4
onthe
stitchplate
will
help
you
to
select
the
stitchlengthwhich
youdesired.
To
increase
the
length
of
stitch,
turn
the
stitehdial
tothe
right
(...to
4)andtosewthe
short
length
of
stitch,
turn
the
stitch
dial
tothe
left(...to
0).
Reverse
stitch
at
same
length
in
ordinarysewing,
canbe
obtained
by
pushing-up
the
Reverse
Push
Button
(B)
under
the
stitchdial
(A).And
in
free
return
to
ordinarystitching.
NEVER
SEWORUSETHE
MACHINE
atthe
ZERO
position
of
StitchDial.
To
ADJUST
THE
BOBBIN
TENSION.
All
sewing
machines
are
correctlyadjustedbeforeleaving
the
factory,
andit
:::;::::
isthereforeseldom
necessary
to
alter
the
bobbintension.
iiii'::":!
Should
it
become
necessary
todoso,
however,
dueto
usingcertainkinds
of
iiijiiil
materials,
the
adjustingscrew
inthe
tensionspring
onthe
outside
ofthe
bobbin
jiijilii
case
canbe
tightened
soasto
increase
the
tension
or
loosened slightly
in
order
iiiiilji
to
lessen
the
tension.

By
using
the
dropfeedbuttonsyou
may
adjust
the
feed
dogfor
sewingdifferent
types
of
materialsand
for
embroidering
or
daring.
This
machine
is
fitted
with
both
a
drop-
feed mechanism
anda
built-in
darning
mm
^
""^.L^
device
which
will
enable
youtodarn,sew
T
^Sfcs_—
rips
and
patches,
and
do
embroidery
any•
appliquework.
TO
WORK
THEDROP-FEED,simply
turn
the
drop-feedknob
to
the
right
until
it
stops
a
quarter-turn.
The
feed
dog
isthen
outofthe
way.
For
regular
sewingturnthebuttonback
to
itsnormal
position.
TO
WORK
THE.
BUJLT.
IN
DARNER.
iiiiiyiiliiiiiliPiiiiiHiijij^
Catchbetweenthumb
and
fore-
finger
the
fringer
of
(B)darnerand
press
downthenthedarner(A)jump
up,
and
release
the
pressure
on
sew-
ing
clothesautomatically,thenyou
areready
to
darn
or
embroidery.
Largerepairs,finematerials,em-
broidery
and
applique
are
best
done
with
a
hoop.
It
is
advisablethatyoupractice
carefully
on
scrap
materialbefore
attemptingandmajorrepairsothatyou
will
learn
to
controlthestitch-
ing
evenly.Be
sure
to
keep
thematerialconstantlymovingby
pressure
of
yourfingersinasmuch
as
permitting
the
cloth
to
remain
in
oneplace
while
sewingmay
cause
yourthread
to
break.
Upon
completion
of
youruseoftheDarner,simply
press
the
device
down
toits
normalposition.Alsoturn
the
drop-feedknobback
to
regularsewing.
If
you
want
to
sew
the
fine fabric,
silk
etc., you
will
get
good
result
to
press
the
darner
at
medium
height
iiP.P.iiiii
'^'"P
f^^^ knob
in
silk
position
at
"S".
iii
liiiiir
TO
REGULATEPRESSURE
OF
THEPRESSER
FOOT
IN
REGULAR
SEWING.
Always
maintainonlyenoughpressure
to
keep
the
clothmovingand
to
per-
mitthemachine
to
make
a
straightseam.When
goods
donot
feedthrough
i
themachineproperly,theremay
betoo
muchpressure
ofthe
presser
foot,
i
Adjust
thiscondition
by
allowingthedarningdevice
to
rise
a
bit.Testthis
i
adjustmentbeforesewing.
IIyou
wish,youcaninsteadadjust
the
machine
i
forsewingheavierfabrics
by
adjusting
the
Drop-Feed.
:

If
yourmachinehas beenstanding
idle
formanymonths,
it
will
requirea thoroughcleaningand
oiling
thatcan
best
bedonebyyoursewingmachinedealer.
Use
only
a goodgradeofoil.
Inferior
oils
may
cause
thema-
chinetobecome sluggish.
*
Use
only
oilwhoselabelspeci-
fies
"forSewingMachines."
*
Ifyourmachineisusedcontinuously,itshouldbe
oiled
everyday;
preferably
whenyouaredoneusingthemachinefortheday.Ifnot
in
constantuse,oilthemachinebeforeusing.
#UseONEdropofoilonbearings,andwhereveronepartrubsagainst
another,orturns
within
anotherpart.
#Somesuchpartsare
visible
totheeye.Othersarehiddeninside
thecastings.Hence
look
foralloilholesinthecastingsasindicated
by
arrowsinthepicture.Inserttheoilcannozzle
well
into
theoil
hole.
Before
oiling
theoilholetothe
RIGHT
ofthespool-pinontopof
themachine,
turn
thebalancewheel
until
theneedleis
DOWN
atits
lowest
point,and
look
into
theoilholetoseethattheoilreceptable
on
theshaftisinposition.
Also
removethefaceplatebylooseningthescrew
near
thetopand
lower,
and
lifting
thefaceplateupandoff.
Turn
thebalancewheel
slowly
byhandandwatchthemechanismunderthefaceplatetosee
which
partsmoveandrequireoil.
Next,
putthreedropsofoilinthebobbinracewayafterthe
race
hasbeenremovedasdescribedatthetopof
page
12.
Themachineisalsotobe
oiled
from
theback.Loosenthescrew
holding
themetalplate,movetheplateoutoftheway,andtighten
thescrewto
hold
itthere.
Turn
thebalancewheel
slowly
inorderto
see
which
partsmoveandrequireoil.
OL
NC

To
CleanOil
Lint,
dustand
threads
collectinginthe
machine
will
cause
itto
become
sluggish.
To
cleanthemachine,
first
disconnectthe
electriccord.Thenremovethe
needle,
presser
footandhinged
needle
plate.
Also
removethe bobbinandbobbin
case.
Brush
the exposed
parts
thoroughly.Re-
moveanypacked
lint
with
a toothpick.
Cleanthe insideofthebobbin
case
and
underthespring.Alsocleantheraceway
asinstructedon
Page
13.(Leavethema
chineinthisconditionfor
oiling^}
the
MACHINE
Then
tiltthemachineback,andagainturnthebalancewheelslowly
to
locate
thebearingsandothermovingparts.Here,too,you
will
find
some
oil
holes
inthecastings.
Wipe
awayall
excess
oilfromallpartsofthemachine.Connect
and
runthemachinerapidlyfora minutetoallow theoiltopenetrate
into
thebearings.
Alsosew
some
scrapmaterialtobesurethatnooil
will
dripfrom
the
needle
baronyourmaterial.

1.
Turnthe
balance
wheelbyhand
until
needle
isatitshighestpoint.
2.
Removebobbinandbobbin
case.
3.Turnknob(A)one
half
turntowardyou.
4.
Turnknob(B)one
half
turnaway
from
you.
5.Removeretaining(C),andhook(D)bygraspingaxleofhook(D).
6.Removeaccumulated
lint
andthread
from
retaining
ring,
hookand
race
body.
7.
Replace
hook(D)in
race
body,
with
axlefacingout,forminga
perfectcircle
with
Driver(E).
8.
Replace
retaining
ring
(B),polished
side
out,sothatbothnotch
are
under
knobs(A)and(B).
9.Lockretaining
ring
with
knobs(A)and(B).
10.
Replace
bobbinandbobbin
case,
and
commence
sewing.
DO
NOT
ATTEMPT
TOFORCEANYOF
THE
ABOVE
OPERATIONS.
13


2ir.3
21742106
1
^
2040
2ir.:5-3
O
o
2094
T
2041;
2172
6
2i9i;
2022
:ill6:
2089
204:S
2044"
If
^
2023
2039
2020
2021
2or>o
2048
2049
2024
2084
2085
3038
2019
2l)(iO
205920592060
2027
2061
2038
2062
3030 20302026
i
20102009n 20342
20092010
2067
2023207420322033
3^
^
2063
-=
2105
f
3027
=G2083
1845
f
3037
2054
¥
2173
21892094
t
20992098
2046
-no8
2045-1
2045-22052
0B=
-O
2042
2056
2055
2053
3139
t
"005
2006
31402097
•^"•"^
teias
209'^
O
3141
O
3142
2138
n
3226-1
L':!0-8
•or
3226-9
:,0;
3226-4
3226.5
20102009f
Ji
•^^ilLl"
3226-11
2083
2083
3226-63226-7
.
' '6-23226-3
2194
2080
2081
20102009
2164-22164-32164-1
2057,
2079
2035
2164-4
20092010
2082
3123
—*5
2083
2081::
i
20092010
2168
2065
3032
2121
2122
f
o
2007
2175
s*
3023}

KD.3
Model
Sewing
Machine
Parts
Key
No.
Parts
Name
1755
Bobbin
WinderComplete
1845
Reverse
Button
SpringSetScrew
2005
Presser
Bar
Lifter
2006
Presser
Bar
Lifter
Hinge
2007SetScrewfor#2006
2009TaperCenterScrew
2010Nutfor#2009
2019ArmShaft
2020ThreadTakeUpCam
2021
PositionScrewfor#2020
2022NeedleBarConnecting
Link
Hinge
Stud
Screw
2023
Nutfor#2022& 2074
2024ArmShaftBushing
2026SetScrewfor#2025 & 2027
2027FeedCam
2028Stop
Motion
Bushing
2029Stop
Motion
TaperPin
2030CrankConnectingRod
2032HingeScrewfor#2030
2033
Nutfor#2032
2034
Oscillating
RockShaft
2035Feed
Lifting
RockShaft
2038CrankRoller
with
Studfor#2035
2039ThreadTakeUpLever
2040NeedleBarBushing
2041
NeedleBar
2042NeedleBarConnecting
Link
Complete
2043
NeedleBarThreadGuide
2044SetScrewfor#2043
2045-1
NeedleClamp
2045-2NeedleClampSetScrew
2046Needle
2048
Presser
BarBracket
2049SetScrewfor#2048
2050
Presser
BarSpring
2052ThreadCutter
2053
Presser
FootHinged
2054ArmSideCoverSetScrew
2055NeedlePlate
Key
No.
2056
2057
2058
2059
2060
2061
2062
2063
2065
2067
2074
2079
2080
2081
2082
2084
2085
2088
2089
2094
2095
2096
2097
2098
2099
2103
2104
2105
2106
2108
2121
2122
2123
2138
2153
2153-3
2164-1
2161-2
2164-3
Part Name
r
Screw
ock
ShaftCrank
SetScrewfor(f2055
Feed
Driving
I|:ock
Shaft
FeedBar
FeedBarCent
Nut
for#2059
FeedDog
SetScrewforb2061
Feed
Driving
I
Nut
fo#3032
FeedConnectirgSlide
Block
Complete
FeedForkedCfannectingHingeScrew
Lower
Shaft
Shuttle
Driver
TaperPinfor#2080& #2082
Oscillating
RockShaftCrank
OpenShuttle
Race
SetScrewfor#2084
Bobbin
Winder
Bobbin
Winder
SetScrewfor
1(2189
& 2153
Slide
Plate
Slide
Plate
Bacjk
Spring
SetScrewfor;
Bobbin
Case
Bobbin
Stop
Motion
Ri
Stop
Motion
C,
Stop
Motion
S^opScrew
NeedleBarCa,
Spool
PinFelt
Sewing
Motor
Washerfor#2^21
RubberCordF oleBush
SetScrewfor{^2006
Face
Plate
Face
PlateSetScrewWasher
Drop
FeedRockArm
Drop
FeedRegulatingArm
Rubber
Ring
SetScrew
2096
gulator
Washer
ampScrew
SetScrew
Drop
FeedLev
erSpring
Key
No.
Parts
Name
2164-4DropFeedRegulatingPin
2168DropFeedLeverPin
2172ThreadTension
Dial
2173ThreadGuideonArm
2174
Face
PlateSetScrew
2175DropFeedIndicatorPlateSetScrew
2189
Bobbin
WinderBracket
2191
Patch-o-maticDarner
3023
Push
TypeDropFeed
3027FeedRegulatorHinge
3030FeedForkedConnection
3032DropFeedRod
3037ArmSideCover
3038ShuttleHook
with
Cut
3116
Presser
Bar
3139SetScrewfor#2053
3140ArmSpoolPin
3141
Spring-Washerfor#3140
3142Nutfor#3140
3239BalanceWheel
3226-1
StitchRegulator
Base
3226-2StitchRegulatorPin
3226-3StitchRegulatorSpringPin
3226-4StitchRegulator
Ring
3226-5StitchRegulator
Ring
Spring
3226-6
Reverse
Button
Spring
3226-7
Reverse
Button
3226-8StitchRegulatorNamePlate
Base
3226-9StitchRegulatorNamePlate
3226-10StitchRegulatorKnob
3226-11StitchRegulatorKnob
Window
Plate
3235FeedRegulator
3239
Reverse
Spring
3236BalanceWheel

INCORPORATE:)2-°MAYI670.
GUARANTE:
This
PIEDMONTSewingMachineiswarrantedtobefreefrom
defects
in
materialsandworkmanshipentering
into
themanufactureandassemblyforthe
life
ofthemachine.Any
part,
when
returned
transportation
chargesprepaid,
will
berepairedorreplacedifprovedtobedefective.
Parts
and
accessories,
suchasbelts,needles,bobbins,
light
bulbs,pulleys,
attach-
ments,
etc.,whichnormallyrequirereplacement,arenotcoveredby
this
warranty.
Electrical
equipmentassuppliedbythemanufactureriswarrantedforone(1)yearon
the
controlrheostatandthree(3)yearsonthemotoragainst
defects
inmaterialsand
workmanship.
This
warranty
does
not
cover
anymachine
which,
inouropinion,has
been
altered
ordamagedsoastoaffectitsperformance,noranymachinenotusedunder
normal
householdconditions,noranymachinenotgivenreasonablecareinaccord-
ance
with
the
printed
instructions.
This
guaranteeisextendedonlytothe
original
purchaserof
this
machine
when
new.
Date
ofPurchase:- -
Hudson'sBayCo.Storein-
SignedBy:
i
Certificate
of
Registration
Piedmont
Sewing
Machine
Serial
No.
Mode!No.-
Purchaser
Address
City
Date
ofPurchase
H.B.C.
Store
Please
Detach
and
Mail.

CONGRATULATIONS!
Youorenowtheproudownerofa newprecision-built
"Piedmont"SewingMachine.
Togetthemostoutofyournewmachine,andinorder
toensuremanyyearsofsatisfactory,trouble-freeuse,
we
suggest
thatyou
READ
YOUR
INSTRUCTION
BOOK
,THOROUGHLYandbecomefamiliarwithallofitswon-
^^^^^>:derfulfeaturesBEFOREyouattemprtooperate
(t,
^
PLEASE
REMEMBER:
This
isa modernsewingmachine,withmanyfeaturesthatarevery
different
fromthosefoundonolderstylemachines.Allofthelatest
features
designedfora machineofthisclasswillbefoundonthis
fine
newmachine.
BUT
ONCE
YOU
HAVE
READ
THE
INSTRUCTION
MANUAL
THOROUGHLY,youwillfindthismachineeasytooperate.
Youwillbeabletodofiner work thanyoudreamedpossible...so
easily
. . . IFYOUFOLLOWYOURILLUSTRATED
INSTRUCTION
BOOK
Table of contents