Pifco P40014 User manual

MODEL P40014
www.pifco.co
3-In-1
Evaporative
Air Cooler
YOUR SAFETY & INSTRUCTION MANUAL
PLEASE READ CAREFULLY
Need help?
For advice, spares & returns.
Call: +44 (0)333 220 6054
8:30am to 6:00pm Monday - Friday
Visit: www.pifco.co

2
Customer support team: +44 (0) 333 220 6054
Technical data
Description: 3-in-1 Evaporative Air Cooler
Model: P40014
Rated Voltage: 220 - 240V
Frequency: ~ 50Hz
Power consumption: 55W
Documentation
We declare that this product conforms to the following product legislation in accordance with the
following directive(s):
2014/30/EU Electromagnetic Compatibility Directive.
2014/35/EU Low Voltage Directive.
2011/65/EU Restriction of Hazardous Substances Directive.
2009/125/EC Eco-Design of Energy Related Products.
RK Wholesale LTD Quality Assurance, United Kingdom
Warranty
This product is guaranteed for 12 months from the date of original purchase. If any defect arises
due to faulty materials of workmanship, the faulty products must be returned to the place of
purchase. Refund or replacement is at the discretion of the retailer.
The following conditions apply:
• The product must be returned to the retailer with proof of purchase.
• The product must be installed and used in accordance with the instructions contained in this
instruction guide.
• It must be used only for domestic purposes.
• It does not cover wear and tear, damage, misuse or consumable parts.
• RK Wholesale LTD has limited liability for incidental or consequential loss or damage.
• This guarantee is only Valid in the UK and Eire Only.
An extended warranty is available for this appliance.
See back page for details.

3
www.pifco.co
WARNING:
This appliance is double insulated.
Do not connect any wire to the earth terminal.
WIRING SAFETY FOR UK USE ONLY
IMPORTANT
As the colours in the mains lead of this
appliance may not correspond with the
coloured markings identifying the terminals in
your plug, please proceed as follows:
The wires in the mains lead are coloured in
accordance with the following code:
Blue neutral [N] Brown live [L]
Plug Fitting Details (Where Applicable).
The wire coloured blue is the neutral and must
be connected to the terminal marked [N] or
coloured black.
The wire coloured brown is the live wire and
must be connected to the terminal marked [L]
or coloured red.
On no account must either the brown or
the blue wire be connected to the [EARTH]
terminal .
Always ensure that the cord grip is fastened
correctly.
The plug must be fitted with a fuse of the
same rating already fitted and conforming to
BS 1362 and be ASTA approved.
If in doubt consult a qualified electrician who
will be pleased to do this for you.
Non-Rewireable Mains Plug
If your appliance is supplied with a non-
rewireable plug fitted to the mains lead and
should the fuse need replacing, you must use
an ASTA approved one (conforming to BS
1362 of the same rating).
If in doubt, consult a qualified electrician who
will be pleased to do this for you.
If you need to remove the plug – disconnect
it from the mains – and then cut it off of the
mains lead and immediately dispose of it in a
safe manner. Never attempt to reuse the plug
or insert it into a socket outlet as there is a
danger of an electric shock.
Fuse
Neutral
(Blue)
Live
(Brown)

4
Customer support team: +44 (0) 333 220 6054
• Check that the voltage of the
main circuit corresponds with
the rating of the appliance
before operating.
• The intended use for this unit
is described in this manual.
The use of any accessory
or attachment or the
performance of any operation
with this appliance other
than those recommended in
this instruction manual may
present a risk of personal
injury.
• Retain this manual for future
reference.
• WARNING! When using
mains-powered appliances,
basic safety precautions,
including the following,
should always be followed
to reduce the risk of fire,
electric shock and personal
injury and material damage.
• Check that the voltage of the
main circuit corresponds with
the rating of the appliance
before operating.
• Always ensure that the
appliance is placed on a firm
level surface. Ensure that the
air cooler is not positioned
close to curtains, furniture
or any combustible materials
as this could create a fire
hazard. The appliance must
not be located immediately
below a mains socket outlet.
• DO NOT immerse cords,
plugs or any part of the
appliance in water or any
other liquid.
• DO NOT let the cord hang
over the edge of a table
or counter or let it come
into contact with any hot
surfaces.
• DO NOT carry the appliance
by the power cord.
• DO NOT use any extension
cord with this appliance.
• The use of accessory
attachments is not
recommended by the
appliance manufacturer,
apart from those supplied
with this product. DO NOT
use extension cords with the
appliance.
PRODUCT SAFETY
When using any electrical appliance, basic safety precautions should
always be followed including the following:

5
www.pifco.co
• DO NOT pull the plug out by
the cord as this may damage
the plug and/or the cable.
• Switch off at the wall socket
then remove the plug from
the socket when not in use or
before cleaning.
• Switch off and unplug before
fitting or removing tools/
attachments, after use and
before cleaning.
• DO NOT use this product
for anything other than its
intended use.
• DO NOT leave the appliance
unattended while it is
operating.
• This appliance is for
household use only.
• DO NOT use the appliance
outdoors.
• DO NOT use the appliance
near water.
• Always place wires in a
regular and orderly manner
to prevent the air cooler from
becoming a trip hazard or the
plug from accidentally being
pulled out.
• Close supervision is
necessary when any
appliance is used by or near
children.
• Children should not play with
the appliance.
• This appliance can be used
by children aged from 8 years
and above and persons with
reduced physical, sensory
or mental capabilities or
lack of experience and
knowledge if they have
been given supervision or
instruction concerning use of
the appliance in a safe way
and understand the hazards
involved.
• Cleaning and user
maintenance should not
be undertaken by children
without supervision.
• Take care when any appliance
is used near pets.
• When not in use, please
unplug the portable air cooler
from the mains socket.
• Always unplug the appliance
and allow it to cool before
moving it from one location
to another.

6
Customer support team: +44 (0) 333 220 6054
• Please ensure that the
appliance is used on a stable,
level, and heat resistant
surface.
• If the supply cord or
appliance is damaged,
stop using the appliance
immediately and seek advice
from the manufacturer, its
service agent or a similarly
qualified person.
• In the unlikely event the
appliance develops a fault,
stop using it immediately and
seek advice from the service
department.
• DO NOT attempt to
dismantle or repair any part
of the heater. This should
only be done by a qualified
service agent.
• Please DO NOT install the
air cooler in washhouses or
other places with water and
moist.
• Please DO NOT turn on or
off the air cooler by inserting
or pulling out the plug.
• DO NOT place things on the
air cooler.
• DO NOT put anything into
the air inlet and outlet.
• DO NOT use insecticide
spray or other flammable
matters in the vicinity of the
air cooler.
• DO NOT splash oil or water
into the air cooler.
• DO NOT clean the air cooler
with water. Wipe it with a
semi-wet soft cloth.
• DO NOT wipe the air cooler
with chemical solvents
such as benzene, gasoline
or alcohol. Use neutral
detergents only.
• Please put the air cooler in
flat and dry places. Keep the
air cooler 50cm away from
the surrounding objects.
• The air cooler should be
placed away from gasoline,
cooking stoves or other
combustibles and heat
sources.
• Use the appliance in a well-
ventilated area.
• Caution: DO NOT operate
the appliance with wet hands.
• When the water tank is full,
take extra care when moving
the air cooler, as water may
overflow from inside.
• In the unlikely event the
appliance develops a fault,
stop using it immediately
and seek advice from the
Customer Support Team.
HIGH VOLTAGE ROTATING PARTS

7
www.pifco.co
What’s in the box & details:
Instruction Manual
3-in-1 Evaporative Air Cooler
Remote Control
Ice Box
1. Control panel
2. Air outlet grille
3. Water window
4. Wheel (x4)
5. Remote control recess
6. Honeycomb filter
7. Water tank
Before your first use:
1. Remove the parts from the packaging.
2. Assemble as instructed.
3. Your appliance is now ready for normal use.
Dispose of the packaging in a responsible manner.
2
1
3
6
7
4
5

8
Customer support team: +44 (0) 333 220 6054
Control Panel Layout:
1. Power On/Off Button
2. Oscillation Button
3. Timer Button
4. Speed Button
5. Mode Button
6. Humidifier Button
7. Low Speed Indicator
8. Medium Speed Indicator
9. High Speed Indicator
10. Normal Mode Indicator
11. Natural Mode Indicator
12. Night Mode Indicator
Remote Control Layout:
1. Oscillation button
2. Power On/Off button
3. Speed/timer - button
4. Mode button
5. Timer button
6. Speed/timer + button
7. Humidifying button
1
3
5
2
6
7
4
Installing The Wheels:
To install the wheels, simply insert them into
the corresponding slots at the base of the
appliance, then push down firmly until they are
securely locked into place.
To remove the wheels at any time, pull on
them firmly to detach them from the body of
the appliance.
Using your appliance:
Turning Your Air Cooler On/Off:
To turn your air cooler on or off, press the On/
Off button on the unit’s control panel or the
remote control. Press this button once to turn
the air cooler on, and again to turn the unit off.
NOTE: The unit will automatically start
running whenever it is turned on, using the
latest settings as a default.
Installing The Batteries:
To install the batteries, first detach the battery
cover from the remote. To do this, place a
thumb on the grooved area at the top of the
battery cover and push it gently down, while
simultaneously pulling the compartment away
from the body of the remote.
Insert 2 x AAA batteries into the battery
compartment, taking care to ensure the
polarities are correct.
Once the batteries are in place, slide the
battery cover back into the remote. It will
automatically click into place and secure the
battery inside.
Regulating The Air Flow:
You can regulate the unit’s air flow by manually
opening or closing the front grill vents.
To open these vents, grip the underside of one
of them and push them gently upwards until
they are in a horizontal position and the inner
grille of the unit is visible.
1 2 3 4 5 6
129 118 107

9
www.pifco.co
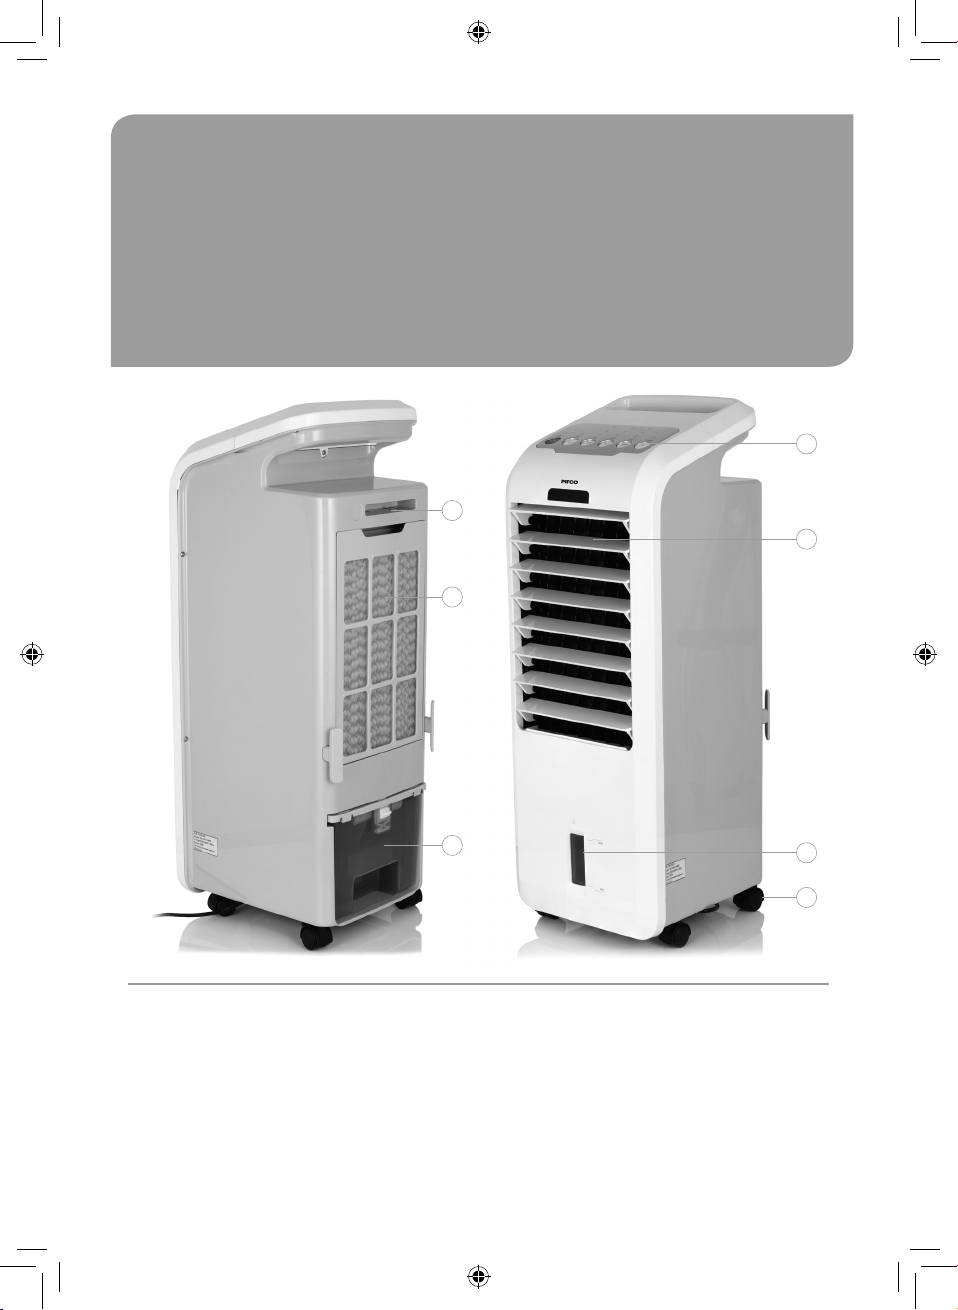
To close the vents when they are open, grip
the underside of the topmost vent and pull it
gently downwards. The remaining vents will
automatically return to their original position
over the inner grille, and air will stop emitting
from the unit.
We recommend closing the vents when not
using the unit for long periods of time or
before storing it.
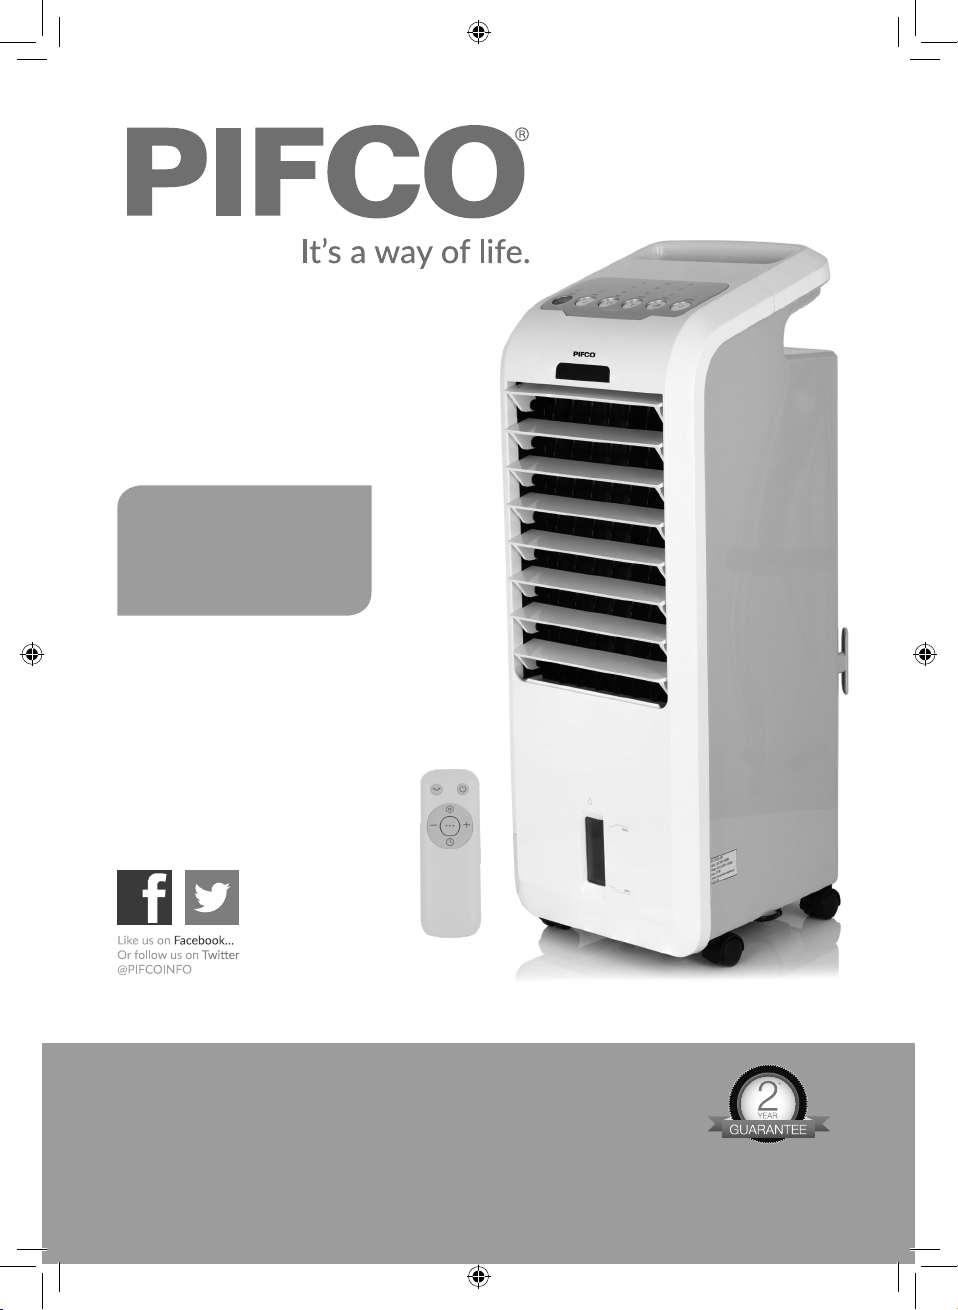
Selecting Your Speed:
This air cooler offers a choice of low, medium
and high speed.
To cycle through the available speeds, press
the speed selection button on the appliance’s
control panel or the remote control. The
corresponding symbol will light up to indicate
each speed has been selected (see control
panel illustration).
Selecting Your Mode:
This unit is equipped with normal, natural and
sleep cooling modes.
To cycle through the available cooling modes,
press the Mode button on the appliance’s
control panel or the remote control. The
corresponding symbol will light up to indicate
each mode has been selected (see control
panel illustration).
Setting the Timer:
This air cooler lets you program a pre-set
cooling period of between 1 and 7 hours.
To program a pre-set cooling time, press the
Timer button on the appliance’s control panel
or the remote control. The corresponding
symbol will light up to indicate the timer
has been set. The indicators will light up as
follows:
• 1 hour timer: the ‘1H’ indicator will light up.
• 2 hour timer: the ‘2H’ indicator will light up
• 3 hour timer: both the ‘1H’ and ‘2H’
indicators will light up together (1 + 2 = 3)
• 4 hour timer: the ‘4H’ indicator will light up.
• 5 hour timer: both the ‘1H’ and the ‘4H’
indicators will light up together (1 + 4 = 5)
• 6 hour timer: both the ‘2H’ and the ‘4H’
indicators will light up together (2 + 4 = 6)
• 7 hour timer: all three indicators will light
up together (1 + 2 + 4 = 7)
Using the Humidifying Function:
This air cooler is equipped with a humidifying/
cold wind function.
To use the humidifying function, press
the Humidifier/Cold wind button on the
appliance’s control panel or the remote
control. The corresponding symbol will light up
to indicate this function has been selected.
Note:
The unit will automatically shut off
whenever the set period of time expires.
Note:
The included ice packs can be used to
create an even cooler wind when using
the humidifying function.
To make use of the chilled air function,
put the two ice packs included with the
unit into the bottom drawer of a freezer
and leave them overnight, so that the
water inside turns into ice.
Once the ice packs are fully frozen, take
them out of the freezer and insert them
into the smallest compartment inside the
water tank. When each pack is secured
inside the compartment, close the water
tank, turn the unit on and press the
Humidifier/Cold wind button to activate
the humidifying function. The unit will
now operate as normal.

10
Customer support team: +44 (0) 333 220 6054
Filling the Water Tank:
To fill up the water tank, first remove it from
the back of the unit. To do this, place your
fingers over the groove on the underside
of the tank drawer and press the release
catch down using your thumb. Once the
catch is loose, pull the tank drawer out of its
compartment.
You can now fill the water tank and ice box.
Cleaning and Care:
Cleaning the Unit:
To clean the unit’s housing, wipe it down with
a soft, damp cloth and a mild detergent.
Never use aggressive chemicals, gasoline,
detergents, chemically treated cloths or other
cleaning solutions to clean the unit, as this
may cause damage to its components.
Take care to thoroughly dry the unit before
using it again.
Note:
Always unplug the unit from the mains
before cleaning.
Clean the unit regularly to ensure optimal
performance.
WARNING!
Do not allow water or any other liquid
into the motor housing or any of the inner
components, as this could cause damage
to the unit.
Note:
When filling up the tank, take care to
ensure the water level is between the
MIN and MAX lines. You can gauge the
water level at any time using the water
window at the front of the appliance.
Take care to ensure the water tank
is filled when attempting to use the
humidifying function. If this function is
selected while the water tank is empty,
the corresponding indicator will flash and
you will hear an alarm sound, Should this
happen, fill the water tank immediately
or refrain from using the humidifying
function.

11
www.pifco.co
Troubleshoong:
Problem Check Soluon
The air cooler does
not work.
Is the power o and/or is
the appliance plugged in?
Has the power supply
been turned o?
Is the me set properly?
Is the water tray full?
Has the fuse burnt out?
Turn the appliance back on or re-insert the
power cord.
Change the me seng.
Empty the water tray.
Consult the manufacturer or a qualied
service person for repair.
The unit is not
cooling suciently.
Are the air inlet or outlet
blocked?
Are there any heang
sources available in the
room?
Are the lters dirty?
Is the temperature seng
appropriate?
Is the fan speed set to
LOW?
Remove any blockage from the air vent.
Remove any heat sources from the vicinity.
Clean the lters.
Change the temperature.
Select the appropriate speed.
Minimal or limited
operaon.
Is the unit exposed to
direct sunshine? Are there
too many windows or
doors open?
Are there too many
people in the room?
Is there a heat source in
the room?
Draw the blinds or curtains.
Close some of the windows or doors around
the unit.
Move the unit to a less crowded locaon or
vacate its current locaon.
Switch o or cover any heat sources in
the surrounding area.
The air cooler shakes
and there is a noise
coming from it.
Is the appliance’s body
inclined? Is the ground
uneven?
Put the air cooler on a at, stable surface.

12
Customer support team: +44 (0) 333 220 6054
Notes

13
www.pifco.co
Notes

14
Customer support team: +44 (0) 333 220 6054
Notes

15
www.pifco.co
WARNING:
DO NOT immerse any electrical part of the appliance in water such as motor units or plugs.
Please see cleaning secon for further instrucons.
DISPOSAL OF THE UNIT
Appliances bearing the symbol shown here may not be disposed of in domestic rubbish. You are
required to dispose of old electrical and electronic appliances like this separately.
Please visit www.recycle-more.co.uk or www.recyclenow.co.uk
for access to information about the recycling of electrical items.
Please visit www.weeeireland.ie for access to information about the recycling of electrical items
purchased in Ireland.
The WEEE directive, introduced in August 2006, states that all electrical items must be recycled,
rather than taken to landfill.
Please arrange to take this appliance to your local Civic Amenity site for recycling,
once it has reached the end of its life.
Notes

0919.V5
We hope you enjoy your appliance for many years.
As a thank you for purchasing one of our fantasc products,
we are oering you an extra 1 year peace of mind.
*To receive your extra 1 years guarantee, register your appliance online
within 28 days of purchase by vising:
www.pifco.co
Make sure to retain your original receipt.
Should you have a problem
with your appliance or need any spare parts please call our
Customer Support Team on:
+44 (0) 333 220 6054
Distributed throughout the UK by RK Wholesale LTD
Table of contents
Other Pifco Air Conditioner manuals
Popular Air Conditioner manuals by other brands

Pioneer
Pioneer FAB Series installation manual

Mitsubishi Electric
Mitsubishi Electric Mr.Slim PUZ-SM100VKA Service manual

Whynter
Whynter ARC-12SDH instruction manual

York
York DJ 300 Technical guide

Mitsubishi Electric
Mitsubishi Electric MSZ-FA25VA Service manual

Dometic
Dometic BRISK AIR 579 SERIES installation instructions

GE
GE AGM24DH Owner's manual and installation instructions

Crosley
Crosley CAE10MR410A13 use & care

Mars
Mars COMFORT-AIRE PS-81G Owner's manual & installation manual

Whynter
Whynter MSFS-024H23016-01NE instruction manual

GE
GE ASQ12AL Dimensions and installation information

Panasonic
Panasonic U-8ME2E8 Service Manual & Test Run Service Manual