Pifco P40018 User manual

MODEL P40018
5000 BTU
3-in-1 Air
Conditioner
YOUR SAFETY & INSTRUCTION MANUAL
PLEASE READ CAREFULLY
Need help?
For advice, spares & returns.
Call: +44 (0)333 220 6054
8:30am to 6:00pm Monday - Friday
Visit: www.pifco.co
www.pifco.co

2
Customer support team: +44 (0) 333 220 6054
Technical data
Description: 5000 BTU 3-in-1 Air Conditionerr
Model: P40018
Rated Voltage: 220-240V~
Frequency: 50Hz
Power consumption: 785W
Documentation
We declare that this product conforms to the following product legislation in accordance with the
following directive(s):
2014/30/EU Electromagnetic Compatibility Directive.
2014/35/EU Low Voltage Directive.
2011/65/EU Restriction of Hazardous Substances Directive.
2009/125/EC Eco-Design of Energy Related Products.
RK Wholesale LTD Quality Assurance, United Kingdom
Warranty
This product is guaranteed for 12 months from the date of original purchase. If any defect arises
due to faulty materials of workmanship, the faulty products must be returned to the place of
purchase. Refund or replacement is at the discretion of the retailer.
The following conditions apply:
• The product must be returned to the retailer with proof of purchase.
• The product must be installed and used in accordance with the instructions contained in this
instruction guide.
• It must be used only for domestic purposes.
• It does not cover wear and tear, damage, misuse or consumable parts.
• RK Wholesale LTD has limited liability for incidental or consequential loss or damage.
• This guarantee is only Valid in the UK and Eire Only.
An extended warranty is available for this appliance.
See back page for details.

3
www.pifco.co
WARNING:
This Appliance MUST be Earthed
Wiring safety for UK use only
IMPORTANT
As the colours in the mains lead of this
appliance may not correspond with the
coloured markings idenfying the terminals in
your plug, please proceed as follows:
The wires in the mains lead are labelled in
accordance with the following code:
Blue neutral [N] Brown live [L]
Green/Yellow [EARTH]
Plug Fing Details (Where Applicable).
The wire labelled blue is the neutral and must
be connected to the terminal marked [N].
The wire labelled brown is the live wire and
must be connected to the terminal marked [L].
The wire labelled green/yellow must be
connected to the terminal marked with the
leer [E].
On no account must either the brown or
the blue wire be connected to the [EARTH]
terminal.
Always ensure that the cord grip is fastened
correctly.
The plug must be ed with a fuse of the same
rang already ed and conforming to BS 1362
and be ASTA approved.
If in doubt consult a qualied electrician who
will be pleased to do this for you.
Non-Rewireable Mains Plug.
If your appliance is supplied with a non-
rewireable plug ed to the mains lead and
should the fuse need replacing, you must use an
ASTA approved one (conforming to BS 1362 of
the same rang).
If in doubt, consult a qualied electrician who
will be pleased to do this for you.
If you need to remove the plug - disconnect it
from the mains - then cut it o of the mains
lead and immediately dispose of it in a safe
manner. Never aempt to reuse the plug or
insert it into a socket outlet as there is a danger
of an electric shock.
FUSE
Earth
(Green/Yellow)
Fuse
Neutral
(Blue)
Live
(Brown)

4
Customer support team: +44 (0) 333 220 6054
• Check that the voltage of the
main circuit corresponds with
the rating of the appliance
before operating.
• The intended use for this unit
is described in this manual.
The use of any accessory
or attachment or the
performance of any operation
with this appliance other
than those recommended in
this instruction manual may
present a risk of personal
injury.
• Retain this manual for future
reference.
• WARNING! When using
mains-powered appliances,
basic safety precautions,
including the following,
should always be followed
to reduce the risk of fire,
electric shock and personal
injury and material damage.
• Check that the voltage of the
main circuit corresponds with
the rating of the appliance
before operating.
• Always ensure that the
appliance is placed on a firm
level surface. Ensure that the
air cooler is not positioned
close to curtains, furniture
or any combustible materials
as this could create a fire
hazard. The appliance must
not be located immediately
below a mains socket outlet.
• DO NOT immerse cords,
plugs or any part of the
appliance in water or any
other liquid.
• DO NOT let the cord hang
over the edge of a table
or counter or let it come
into contact with any hot
surfaces.
• DO NOT carry the appliance
by the power cord.
• DO NOT use any extension
cord with this appliance.
• The use of accessory
attachments is not
recommended by the
appliance manufacturer,
apart from those supplied
with this product. DO NOT
use extension cords with the
appliance.
PRODUCT SAFETY
When using any electrical appliance, basic safety precautions should
always be followed including the following:

5
www.pifco.co
• DO NOT pull the plug out by
the cord as this may damage
the plug and/or the cable.
• Switch off at the wall socket
then remove the plug from
the socket when not in use or
before cleaning.
• Switch off and unplug before
fitting or removing tools/
attachments, after use and
before cleaning.
• DO NOT use this product
for anything other than its
intended use.
• DO NOT leave the appliance
unattended while it is
operating.
• This appliance is for
household use only.
• DO NOT use the appliance
outdoors.
• DO NOT use the appliance
near water.
• Always place wires in a
regular and orderly manner
to prevent the air cooler from
becoming a trip hazard or the
plug from accidentally being
pulled out.
• Close supervision is
necessary when any
appliance is used by or near
children.
• Children should not play with
the appliance.
• This appliance can be used
by children aged from 8 years
and above and persons with
reduced physical, sensory
or mental capabilities or
lack of experience and
knowledge if they have
been given supervision or
instruction concerning use of
the appliance in a safe way
and understand the hazards
involved.
• Cleaning and user
maintenance should not
be undertaken by children
without supervision.
• Take care when any appliance
is used near pets.
• When not in use, please
unplug the portable air cooler
from the mains socket.
• Always unplug the appliance
and allow it to cool before
moving it from one location
to another.

6
Customer support team: +44 (0) 333 220 6054
• Please ensure that the
appliance is used on a stable,
level, and heat resistant
surface.
• If the supply cord or
appliance is damaged,
stop using the appliance
immediately and seek advice
from the manufacturer, its
service agent or a similarly
qualified person.
• In the unlikely event the
appliance develops a fault,
stop using it immediately and
seek advice from the service
department.
• DO NOT attempt to
dismantle or repair any part
of the heater. This should
only be done by a qualified
service agent.
• Please DO NOT install the
air cooler in washhouses or
other places with water and
moist.
• Please DO NOT turn on or
off the air cooler by inserting
or pulling out the plug.
• DO NOT place things on the
air cooler.
• DO NOT put anything into
the air inlet and outlet.
• DO NOT use insecticide
spray or other flammable
matters in the vicinity of the
air cooler.
• DO NOT splash oil or water
into the air cooler.
• DO NOT clean the air cooler
with water. Wipe it with a
semi-wet soft cloth.
• DO NOT wipe the air cooler
with chemical solvents
such as benzene, gasoline
or alcohol. Use neutral
detergents only.
• Please put the air cooler in
flat and dry places. Keep the
air cooler 50cm away from
the surrounding objects.
• The air cooler should be
placed away from gasoline,
cooking stoves or other
combustibles and heat
sources.
• Use the appliance in a well-
ventilated area.
• Caution: DO NOT operate
the appliance with wet hands.
• When the water tank is full,
take extra care when moving
the air cooler, as water may
overflow from inside.
• In the unlikely event the
appliance develops a fault,
stop using it immediately
and seek advice from the
Customer Support Team.
HIGH VOLTAGE ROTATING PARTS

7
www.pifco.co
What’s in the box & details:
Instruction Manual
3-in-1 Air Conditioner
Remote Control
Hose
Window Slides
1. Exhaust Hose
2. Window Adapter Kit
3. Remote Control
4. Control Panel
5. Handle
6. Wind Louvers
7. Exhaust Outlet
(back of unit)
8. Air Inlet (back of unit)
9. Drainage Nozzle
(back of unit)
10. Castor Wheels
Before your first use:
1. Remove the parts from the packaging.
2. Assemble as instructed.
3. Your appliance is now ready for normal use.
Dispose of the packaging in a responsible manner.
1
4
2
3
6
7
8
9
10
5

8
Customer support team: +44 (0) 333 220 6054
Control Panel Layout:
1. Timer button
2. Mode button
3. Remote control sensor window
4. LED display screen
5. Speed Selection button
6. Power On/Off button
7. Temperature Up/Down buttons
Remote Control Layout:
1. Temperature Up/Down buttons
2. Speed Selection buttons
3. Sleep mode button
4. Timer button
5. Mode button
6. Celsius/Fahrenheit selection button
7. Power On/Off button
Before First Use:
1. Remove your appliance from the
packaging.
2. Locate your appliance in accordance with
the safety instructions.
3. Plug the appliance into the mains supply.
4. Your appliance is now ready for normal
use.
5. Dispose of the packaging in a responsible
manner.
Installing The Batteries:
1. To use the unit, start by installing the
batteries.
2. To install the batteries, first detach the
battery cover from the remote. To do this,
place your finger on the grooved area at
the top of the battery cover and push
it down and away from the body of the
remote.
3. Once the battery cover has been
removed, insert 2 x AAA batteries (not
included) into the battery compartment,
taking care to ensure the polarities are
correct.
4. When the batteries have been correctly
installed, replace the battery cover. To do
this, place it over the top of the battery
compartment and slide it upwards until
it clicks into place. Use the grooved area
at the edge of the cover as a guide; the
cover is correctly installed when this
grooved area is at the far end of the
battery compartment.
2
5
1
3
4
6
7
1 2 3 4 5 6
7

9
www.pifco.co
Installing the Exhaust Pipe into a
sliding window:
WARNING! Before performing any instalation,
assembly or maintenance, switch off and
remove from power supply.
Before using the air conditioning unit, install
the exhaust pipe, so that fumes from the
appliance are released onto an outside, open-
air area. The sections below illustrate the
correct way to attach and install the exhaust
pipe.
1. Open the window and insert the window
slides into the open gap.
2. Close the window until the window kit
is held securely. You may need to adjust
the size of the window kit or secure it
with screws. This technique may also be
used for sash windows.
3. Place the unit in a flat, stable surface,
taking care to observe a distance of at
least 50cm between the unit and the
window.
4. Insert the narrow end of the exhaust
hose into the window kit so that any
hot air from the appliance flows into an
outdoor area. Ensure the hose is firmly
secured into place before attempting to
use the appliance.
Attaching the Exhaust Pipe:
To attach the exhaust pipe, slot it into the
corresponding air outlet vent at the back
of the unit and twist it counter-clockwise
to lock it into place. Take care to avoid any
bends or kinks as this could cause the pipe
to clog, resulting in overheating and potential
malfunction.
To remove the exhaust pipe, twist it clockwise
to unlock it, then pull it firmly away from the
body of the unit until it detaches.

10
Customer support team: +44 (0) 333 220 6054
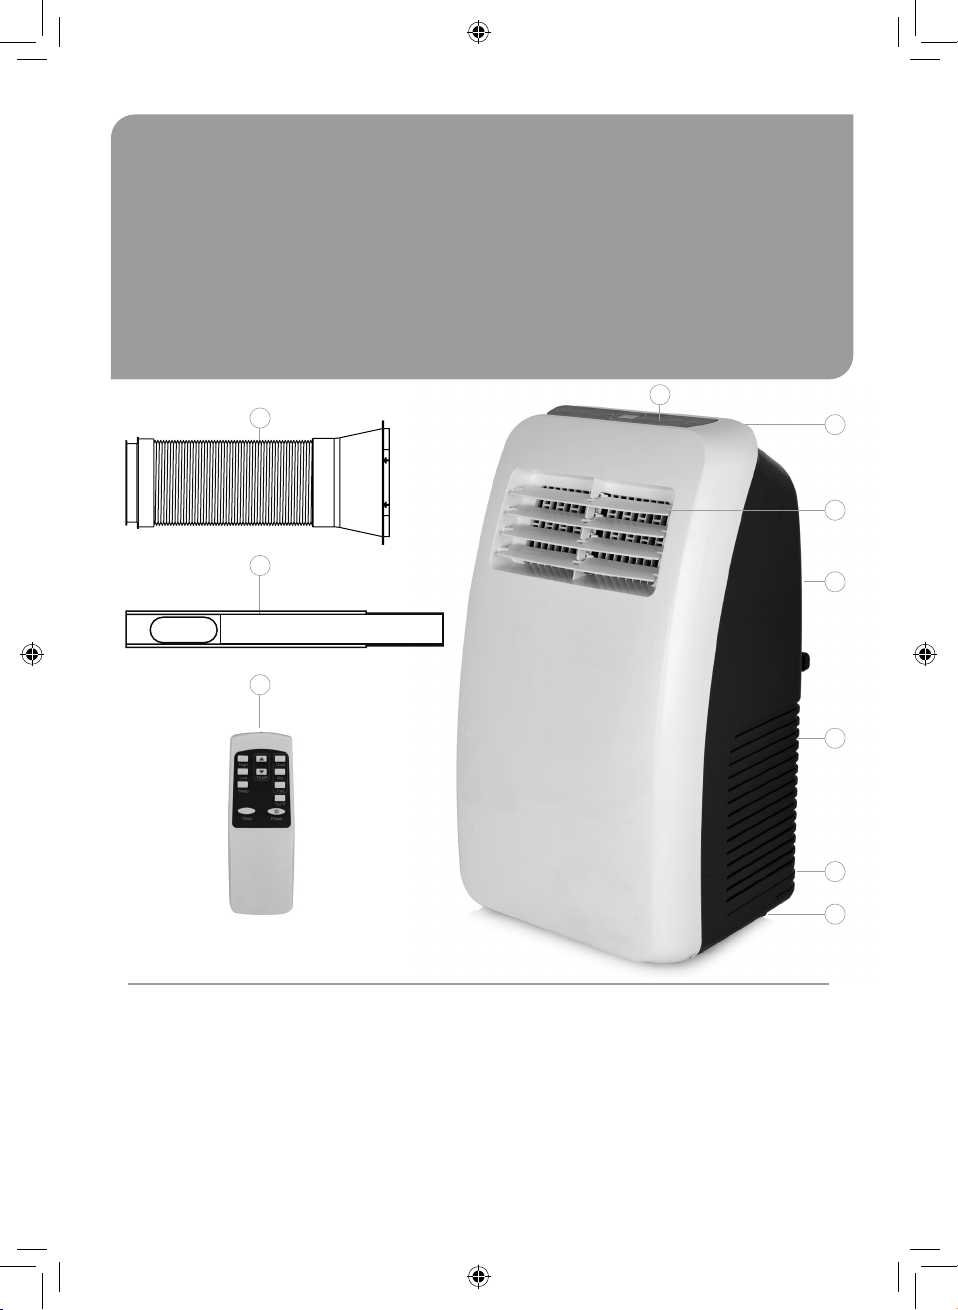
NOTE: We recommend hose length be
kept as short as possible to ensure optimal
performance.
NOTE: Use ONLY the hose provided with your
air cooling unit. Attempting to attach other
hoses to it to extend the length could result in
the unit malfunctioning.
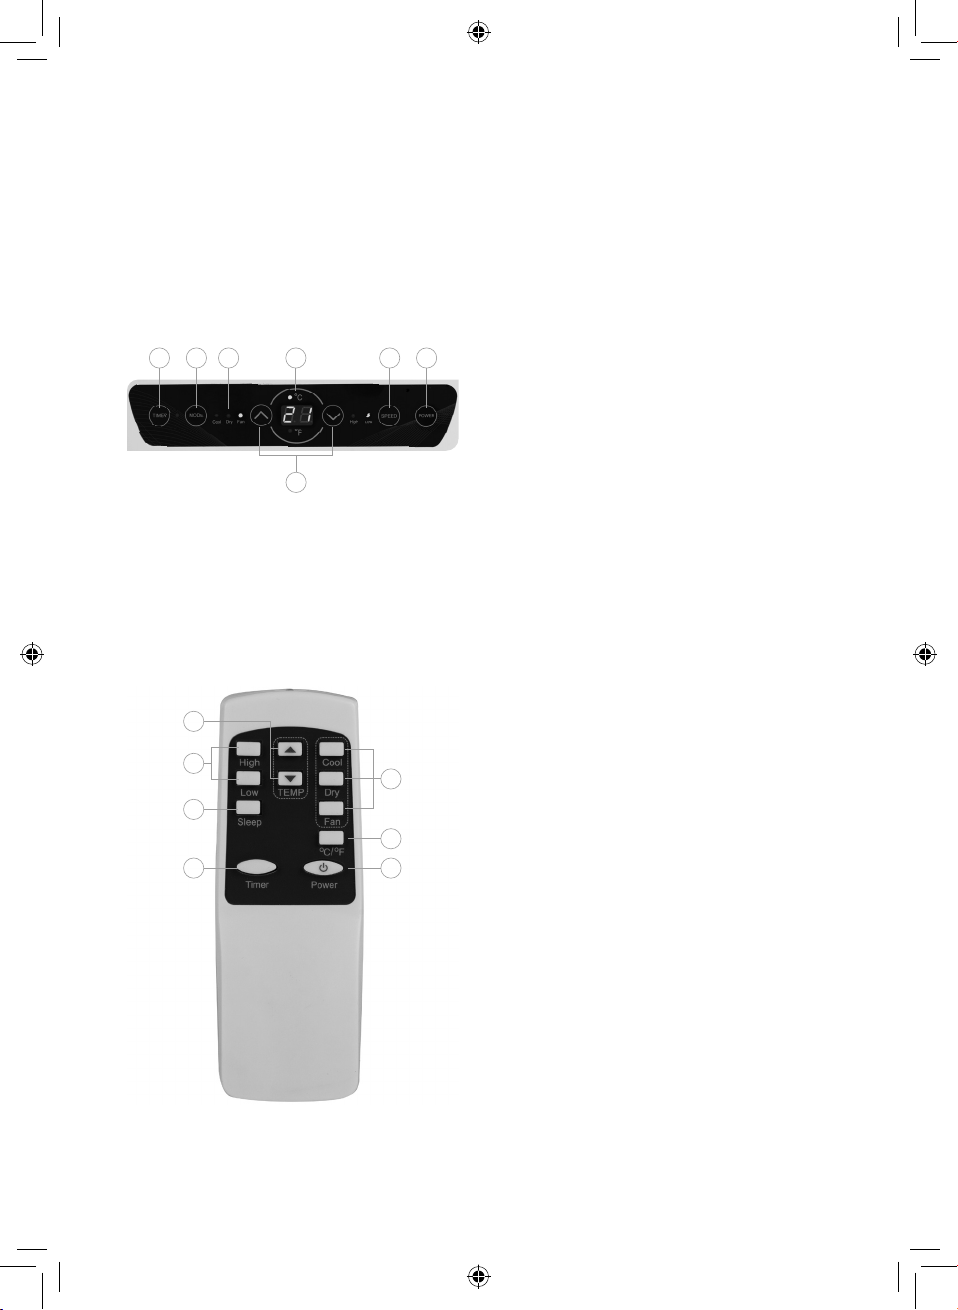
Turning the Unit On or Off:
1. To turn the appliance on, begin by
plugging it into an active mains socket,
ensuring the socket switch is set to the
On position. There will be a musical cue
to indicate the unit has been plugged into
the mains.
2. Press the Power On/Off button on the
remote control or on the appliance’s
control panel to turn it on. There will
be a musical cue to indicate the unit has
been turned on.
3. Press the button again to put the
appliance on Standby. There will be a
musical cue to indicate the unit has been
put into Standby mode.
NOTE: When the unit is in Standby mode, the
LED display will remain lit, showing the room
temperature. To turn the unit off altogether,
disconnect it from the mains supply. The LED
display will remain lit for a few seconds, then
go off altogether to indicate the unit has been
unplugged from the mains.
Temperature Selection:
This unit is equipped with manual temperature
selection for the Cooling mode.
1. Press the Up and Down arrow buttons on
the remote control or the unit’s control
panel to manually adjust the unit’s output
temperature.
2. Press the Up arrow button to increase the
temperature, or the Down arrow button
to decrease it.
3. There will be a sound prompt to indicate
each button has been pressed, and the
corresponding temperature will be shown
on the unit’s LED display.
NOTE: The temperature will increase or
decrease by increments of 1, from 16 up to 30
degrees.
NOTE: Manual temperature selection is
only applicable in Cooling mode. When the
unit is in Dehumidifying or Fan mode, the
temperature cannot be manually adjusted.
Celsius/Fahrenheit Selection:
This unit is equipped with both Celsius and
Fahrenheit temperature indicators.
1. Press the Celsius/Fahrenheit Selection
button on the unit’s remote control to
cycle between Celsius and Fahrenheit
temperature scales.
2. There will be a sound prompt, the
corresponding indicator on the unit’s
control panel will light up and the values
on the unit’s LED display will change
accordingly to show each temperature
scale has been selected.
Speed Selection:
1. Press the High and Low buttons on the
remote control or the Speed button on
the appliance’s control panel to choose
between High and Low speed settings.
2. There will be a sound prompt and the
corresponding indicator will light up on
the unit’s body to show which speed has
been selected.

11
www.pifco.co
Regulating the Air Flow:
The unit’s air flow can be regulated and
directed by manually adjusting the unit’s front
louvers.
1. To adjust the louvers, push them gently
up or down, as required. Push the louvers
up to direct the air flow upwards, or push
them down to direct it downwards.
Mode Selection:
Press the Cool, Dry and Fan buttons on the
remote control or the Mode button unit’s
control panel to select between Cooling,
Dehumidifying and Fan modes. There will be a
sound prompt and the corresponding indicator
on the unit’s control panel will light up to show
each mode has been selected.
The unit’s functionality modes are as follows:
1. Cooling Mode- In cooling mode, the unit
will blow out cold air to decrease the
ambient temperature. To select cooling
mode, press the ‘Mode’ button repeatedly
until the corresponding indicator lights
up.
NOTE: Cooling mode is the unit’s default
mode of operation. The unit will automatically
start operating in this mode whenever it is
turned on. In this mode, both temperature
levels and speed settings can be selected and
changed manually, as described in the relevant
sections below.
2. Dehumidifying Mode- In dehumidifying
mode, the unit automatically assesses
room temperature and adjusts its settings
accordingly.
• If room temperature is above 17
degrees when dehumidifying mode
is selected, the compressor will be
turned on.
• If room temperature drops below 15
degrees while the unit is operating in
this mode, the compressor will turn
itself off.
• When room temperature reaches 15
degrees again, the compressor will
come back on after 3 minutes.
• This cycle will repeat as necessary for
as long as the unit is in humidifying
mode.
NOTE: When in dehumidifying mode, the unit
will automatically operate at low speed and
adjust the cooling levels according to room
temperature. When this mode is selected,
neither temperature nor wind speed can be
manually set or adjusted.
3. Fan Mode- In fan mode, the unit will
blow out natural air to cool the ambient
temperature.
• To select fan mode, press the
‘Mode’ button repeatedly until the
corresponding indicator lights up.
NOTE: In Fan mode, the unit’s speed can be
manually adjusted, but the temperature will
regulate itself automatically and cannot be
manually set or changed.
The Timer Function:
This unit is equipped with a 24-hour
programmable timer.
Setting the Timer:
1. Press the Timer button on the remote
control or on the appliance’s control
panel to activate the timer. There will
be a sound prompt, the corresponding
indicator on the unit’s control panel will
light up and the number ‘1’ will appear
on the unit’s LED display to indicate the
timer function has been selected.
2. Once this function has been activated,
press the Up and Down arrows on the
remote control or the unit’s control panel
to select your desired operation time.

12
Customer support team: +44 (0) 333 220 6054
3. Press the Up arrow to increase the timer
length, or the Down arrow to decrease it.
There will be a sound prompt to indicate
each button has been pressed, and the
corresponding time in hours will be
shown on the unit’s LED display.
NOTE: The timer length will increase or
decrease by increments of 1 hour, from 1 to
24 hours.
Pre-Setting the Timer:
The unit’s timer can also be pre-set and used
as a delay timer, so that the unit will begin
operation after a set period of time.
1. To pre-set a delay time, press the Timer
button while the unit is plugged into the
mains, but not in operation. . There will
be a sound prompt, the corresponding
indicator on the unit’s control panel will
light up and the number ‘1’ will appear
on the unit’s LED display to indicate the
timer function has been selected.
2. Once this function has been activated,
press the Up and Down arrows on the
remote control or the unit’s control panel
to select your desired operation time.
3. Press the Up arrow to increase the timer
length, or the Down arrow to decrease it.
There will be a sound prompt to indicate
each button has been pressed, and the
corresponding time in hours will be
shown on the unit’s LED display.
Draining the Unit:
During the process of cooling, water will be
extracted from the air into the unit.
When the reservoir is full, the compressor will
stop and the text ‘FL’ will show on the unit’s
LED display. When this occurs, we recommend
you drain or empty the water tank, to ensure
the unit continues to operate correctly.
To empty the water tank, follow the steps
opposite:
1. Turn off the unit and avoid moving it.
2. Place a container, such as a water tray,
underneath the drain hole.
3. Remove the drain plug and plug cap, to
allow the water to drain out.
4. When the container is almost full, place
the drain plug back into the plug hole and
empty the water container..
5. Repeat this procedure until the unit is
empty.
6. Once you have emptied the unit, put the
drain plug and plug cap back into place
and tighten the cap firmly.
7. When you have completed the drainage
process, turn the unit back on and ensure
the text ‘FL’ is not showing on the unit’s
LED display. This signals the process has
been carried out correctly and the unit
has been drained.
NOTE: Always wait at least 3 minutes after
switching off the unit before turning it back
on. This will help prolong the life of the
compressor.

13
www.pifco.co
Cleaning and Care:
NOTE: Always unplug the unit from the mains
before cleaning.
NOTE: Clean the unit regularly to ensure
optimal performance.
Cleaning the Housing:
• To clean the unit’s housing, wipe it down
with a soft, damp cloth.
• Never use aggressive chemicals, gasoline,
detergents, chemically treated cloths
or other cleaning solutions to clean the
unit, as this may cause damage to its
components.
Cleaning the Filter:
• This unit is equipped with a removable
and washable filter, for easy cleaning and
maintenance.
• To wash the filter, begin by removing it
from its slot at the bottom of the unit, as
shown in the picture below.
• When the filter has been removed from
the unit, rinse it under running water, as
shown in the picture below, and leave it
to dry thoroughly.
Storing the Appliance:
1. Drain any water inside the tank.
2. Operate the unit in ventilation only mode
for a few hours to thoroughly dry the
interior.
3. Clean or change the filter.
4. Remove the exhaust pipe and store it
accordingly.
5. Unplug and store the power cord.
6. Place the unit back into its original box
and store it in a cool, dry place, preferably
covered with a protective plastic sheet
or bag.

14
Customer support team: +44 (0) 333 220 6054
Troubleshoong:
Problem Check Soluon
The unit does not work. Is the power off and/or is the
appliance plugged in?
Has the power supply been turned
off?
Turn the appliance back on or re-insert
the power cord.
Is the time set properly? Change the time setting.
Is the water pan full? Empty the water pan.
Has the fuse burnt out? Consult the manufacturer or a qualified
service person for repair.
Minimal cooling effect. Is the air inlet/outlet blocked? Remove any blockage.
Are there other heating sources
available in the room?
Remove other heat sources.
Are the filters dirty? Clean the filters.
Is the temperature setting
appropriate?
Change the temperature.
Is the fan speed set too low? Select the appropriate speed.
Minimal or limited operation Is the unit in direct sunshine? Draw the blinds or curtains.
Are any windows or doors open? Close some of the windows or doors
around the unit.
Are there too many people in the
room?
Move the unit to a less crowded
location or vacate its current location.
Is there another heat source in
the room?
Switch off or cover any other heat
sources in the surrounding area.
No operation Are the filters dusty? Clean the filters.
Is the air intake or output blocked? Unclog the air intake or output.
Is the temperature setting
appropriate?
Check the room temperature is not
below your selected temperature.
The compressor does not run Is the overheat protection on? Wait for the temperature to drop.
The air cooler shakes and
there is a noise coming
from it.
Is the body of the unit inclined? Is
the ground uneven?
Put the air cooler on a flat, stable
surface.
The LED display is showing
‘FL’ and the compressor is
not working.
The water tank is full. Drain the unit as instructed in the
‘Cleaning and Care’ section of this
instruction manual.
An error message is showing
on the display panel (E1,
E2, E4)
The unit has self-diagnosed and
found an error.
E1 and E2 indicate errors in the unit’s
sensors. Unplug the unit from the
mains, wait a few moments, then plug
it back in. If the error persists, contact
a qualified repair technician or our
Customer Support Team.
E4 indicates the unit’s anti-freezing
protection has activated. This will
automatically de-activate when room
temperature is above 8 degrees.

15
www.pifco.co
WARNING:
DO NOT immerse any electrical part of the appliance in water such as motor units or plugs.
Please see cleaning secon for further instrucons.
DISPOSAL OF THE UNIT
Appliances bearing the symbol shown here may not be disposed of in domestic rubbish. You are
required to dispose of old electrical and electronic appliances like this separately.
Please visit www.recycle-more.co.uk or www.recyclenow.co.uk
for access to information about the recycling of electrical items.
Please visit www.weeeireland.ie for access to information about the recycling of electrical items
purchased in Ireland.
The WEEE directive, introduced in August 2006, states that all electrical items must be recycled,
rather than taken to landfill.
Please arrange to take this appliance to your local Civic Amenity site for recycling,
once it has reached the end of its life.
Notes

1119.V1
We hope you enjoy your appliance for many years.
As a thank you for purchasing one of our fantasc products,
we are oering you an extra 1 year peace of mind.
*To receive your extra 1 years guarantee, register your appliance online
within 28 days of purchase by vising:
www.pifco.co
Make sure to retain your original receipt.
Should you have a problem
with your appliance or need any spare parts please call our
Customer Support Team on:
+44 (0) 333 220 6054
Distributed throughout the UK by RK Wholesale LTD
Table of contents
Other Pifco Air Conditioner manuals