PIKA Warp User manual

PIKA WARP Pager
Configuration and Installation Manual
Systems Requirements
• Power Source: 110V-240V AC (50-60 Hz).
• Non VLAN tagged LAN Port at the customer
premise; on same network as the IP Phones.
• Standard Polycom SIP User Agent (UA) Account.
• IP Phone Info: MAC Address & DN for each IP
Phone.
• FTP or TFTP Server with option 66; or a static
(T)FTP Server
•Optional: common USB Stick
Configuration Overview
• Configuration and physical connection of WARP
Pager should require no more then 15 minutes.
• Simply create two small configuration files and post
them on an FTP server, a TFTP server or a USB
stick (USB config requires an autorun script
provided by PIKA).
• Power up at customer premise.
Configuration File Basics
• Use a text editor to create two comma delimited files
<macaddress>.cfg and <macaddress>.phones. Eg.
001e840005ab.cfg and 001e840005ab.phones.
• Be sure to use lower case and remove the colons.
• The MAC address used for the filenames are that of
the Warp (located on the underside of the Warp).
Creating Configuration File #1
• <macaddress>.cfg contains the SIP (UA) User
Agent Account information assigned to the WARP
Pager.
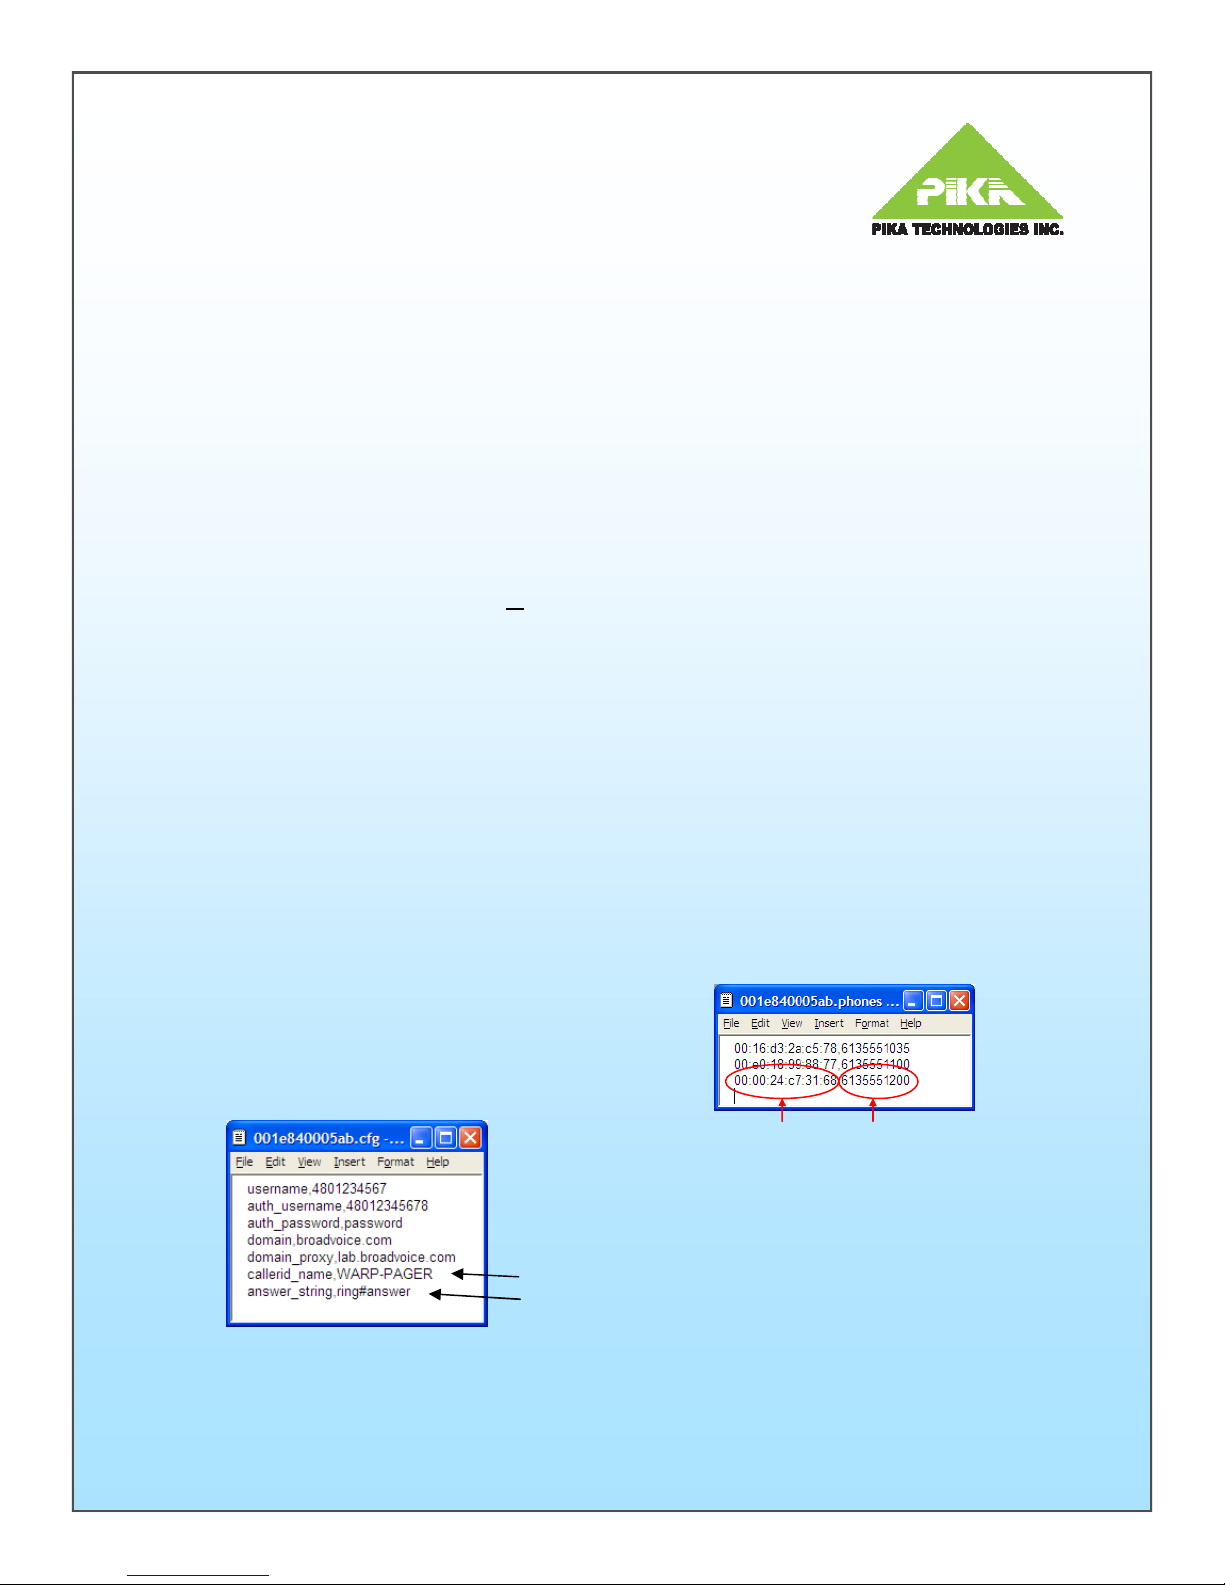
• Sample content for this file is as in Figure 1.
• Line 6 is an optional string that assigns a ‘caller id’
value to the pager . In the example, “WARP-
PAGER” will be displayed on the display of a each
phone receiving a page. If left empty, the callerid will
default to ‘Paging’. (see Figure 1: Note 1)
Note 1
Note 2
Figure 1
Creating Configuration File #1 (cont.)
• Line 7 contains the string which identifies the ‘Auto
Answer’ calling feature within Polycom phone
configuration files (see Figure 1: Note 2). If unspecified
the default value of ‘answer_string’ is ‘Auto Answer’ but it
is recommended that the administrator specifically check
the Polycom configuration files to determine the strings
proper setting. Note: any white space (blanks) must be
substituted with the # delimiter if you choose to change
the default setting (answer_string,auto#answer).
• It is recommended that the administrator provision the
‘Ring Answer’ calling feature. Whereby the paged party
will receive a page notification tone prior to auto answer.
See ‘Application Note for Polycom Phones’ for
provisioning details.
Note 3: for Static TFTP server add:
• ftp_server,192.168.1.1
Note 4: for Static FTP server with password add:
• ftp_server,192.168.1.1
• ftp_user,user
• ftp_password,password
Creating Configuration File #2
•<macaddress>.phones contains details of the IP Phones
in the Paging Group. MAC addresses and DN numbers
are required.
• Sample content for this file is as in Figure 2.
• The number of lines in this file must equal the number of
Phones in the Paging Group.
• The maximum is 30 IP Phones. Do not include the
Warp Pager in this list.
WARP Pager Configuration - (T)FTP Server
• Enable DHCP option-66 or configure your static (T)FTP
server (see Notes 3 & 4).
• Save Files #1 and #2 in the root directory of the (T)FTP
server prior to powering up the Warp. Note: Default
Polycom user name and password is being used.
• WARP Pager supports (T)FTP provisioning similar to
that of common IP Phones. After obtaining DHCP info,
WARP Pager will first attempt an FTP connection to
retrieve the two configuration files. If FTP is not
available, a TFTP connection will be attempted.
MAC Address DN Number
Figure 2

System Administration
•WARP Pager requires a SIP UA account
• This information includes a regular phone
extension and perhaps a DID number. Note: a DID
number is required to enable the PFA function
(Page From Anywhere)
• If preferred, a PAGE Feature Code (e.g. *51) may
be assigned and mapped to the WARP Pager
phone extension from BroadWorks.
Physical Connections
• Locate the LAN switch associated with the Hosted
PBX service and the IP Phones.
• Connect WARP Pager to any available non VLAN
tagged port with a standard Ethernet cable.
• Apply power by inserting power cord into the unit.
• Wait approximately 2 minutes for the WARP to
boot-up. Once the Line Status Icons are visible on
the LCD display, it is ready to be configured.
How to Page-All
• To initiate a Page-All, simply dial the WARP Pager
Phone Extension or the PAGE Feature Code
assigned by the system administrator.
• At the Tone, announce the Page.
• From an offsite location, simply call the WARP
Pager DID to PAGE remotely (PFA)
PIKA WARP Pager
Configuration, Installation and Specification
Optional (USB Configuration)
• If you choose to use a USB stick for configuration
instead of (T)FTP follow these steps. Otherwise,
they are not required.
• Create the two files as previously described.
• Save File 1 as config.csv instead of
<macaddress>.cfg to the USB stick.
• Save File 2 as phones.csv instead of
<macaddress>.phones to the USB stick.
• You will also need a script file on your USB stick.
• At the customer premise insert the USB stick
containing all three files into the port on the rear
connector panel of the WARP Pager.
• During the Phone detection period, the LED on
the front panel of the WARP should toggle from
green to red. The LED will then turn back to
green and LCD will then display “Configuring
the PIKA WARP Pager”. The LCD will then
toggle and display “Warp Pager”.
•WARP Pager is now ready to Page-All.
~ 23 cm
~ 23 cm
~ 9
~ 9¼
¼in.
in.
~ 17 cm
~ 17 cm
~ 6
~ 6¾
¾in.
in.
~ 6 cm
~ 6 cm
~2
~2¼
¼in.
in.
Weight: < 2 lbs
~ 23 cm
~ 23 cm
~ 9
~ 9¼
¼in.
in.
~ 17 cm
~ 17 cm
~ 6
~ 6¾
¾in.
in.
~ 6 cm
~ 6 cm
~2
~2¼
¼in.
in.
Weight: < 2 lbs
PIKA Technologies – Company Confidential
www.pikatechnologies.com

FAQ’s
Q: How do I determine the WARP Pagers IP-Address?
A: With your finger, tap the ICON to the left of the LED on the front panel (there is a hidden button there). The
IP Address will toggle on to the LCD display.
Q: I inserted the USB key, but the files were not transferred to the WARP Pager.
A: Wait 10 seconds, remove and reinsert the USB stick. File transfer to start. If not, please contact
Q: I would like to place my own brand and logo on the WARP Pager, how do I do this?
A: For orders of 20 units or more, PIKA will help you do this. Please send a high resolution logo to PIKA with
your order and we will print and mount the custom label with your shipment free of charge. For lesser
Q: Not all Phones are Paging. What could be the reason?
A: Please verify that the correct MAC address for that phone is included in File #2. Also insure that DND is not
enabled on the Phone.
Q: How do I permanently disable or add a phone to the Paging Group?
A: Simply remove or add the target phone’s MAC address and DN number from File #2. If using (T)FTP,
reboot the Warp. If using USB, reinsert the updated USB memory stick.
Q: How do I configure the Warp Pager using static (T)FTP server?
A: Simply add the corresponding lines in File #1 as indicted in Notes 3 or 4 earlier in this document.
PIKA WARP Pager
FAQ’s and Application Notes
Version 5.1
Updated May 31
st
, 2010
Application Note for Polycom Phones:
The recommended definition (tag value pair) for “Ring
Answer” is as below. This should be included or
incrementally added to the sip.cfg file.
<alertInfo voIpProt.SIP.alertInfo.1.value="Ring Answer"
voIpProt.SIP.alertInfo.1.class="4" />
<RING_ANSWER se.rt.4.name="Ring Answer"
se.rt.4.type="ring-answer" se.rt.4.timeout="2000"
se.rt.4.ringer="2" se.rt.4.callWait="6" se.rt.4.mod="1"/>
The alertInfo.1.class in this example is set to 4
corresponding to the se.rt.4 ring type. 4 may be replaced
with another number to specify a different ring type.
More details for all the options are available here:
http://www.voip-info.org/wiki/view/Polycom+auto-
answer+config
….
301 2 WARP Pager
Internet
Internet
Overhead
Speaker
PIKA Technologies – Company Confidential
www.pikatechnologies.com