Pinnacle Systems miroVIDEO DV200 User manual

miroVIDEO DV200
USER´S GUIDE

miroVIDEO DV200
User´s Guide
Version 1.0/GB March 1999
160594
© Pinnacle Systems 1999
All rights reserved.
No part of this manual may be reproduced or transferred to other media without explicit written permission
from Pinnacle Systems, Braunschweig, Germany.
Adobe™ and Acrobat™ are trademarks of Adobe Systems Inc.
FireWire™ is a trademark of Apple Computers, Inc.
IBM AT® is a registered trademark of International Business Machines Corp.
miroVIDEO™ and miroINSTANT Video™ are trademarks of Pinnacle Systems Inc.
Pentium™ is a trademark of Intel Corp.
Sony® is a registered trademark of Sony Corp.
Windows® and MS-DOS® are registered trademarks of Microsoft Corp.
All other brand and product names are trademarks or registered trademarks of their respective holders.
This manual is printed on chlorine-free paper using environmentally safe ink.
Pinnacle Systems has written this manual to the best of its knowledge, but does not guarantee that the
programs/systems will fulfill the desires of the user.
No warranty is made as to the specifications of features.
Pinnacle Systems retains the right to make alterations to the content of the manual without the obligation to
inform third parties.
All tenders, sales, supply and manufacturing contracts from Pinnacle Systems, including consulting,
installation and other contractual performance are subject exclusively to the General Sales and Delivery
Terms of Pinnacle Systems.

User´s Guide
i
Contents
OVERVIEW 1
BEFORE YOU START 2
SYSTEM REQUIREMENTS 2
DEFRAGMENTING THE HARD DISK 4
PACKAGE CONTENTS 4
QUICK START 5
QUICK INSTALLATION 5
SCANNING DV (QUICK START)6
VIEWING CLIPS AND ADDING TRIMS (QUICK START)6
CAPTURING DV (QUICK START)7
EDITING AVI FILES USING ADOBE PREMIERE (QUICK START)7
PRINTING TO DV (QUICK START)7
CAPTURING SINGLE FRAMES (QUICK START)8
INSTALLING ADOBE PREMIERE 9
INSTALLATION 10
INSTALLING THE SOFTWARE 12
INSTALLING DRIVERS FOR WINDOWS 95 13
INSTALLING THE DRIVERS FOR WINDOWS 98 15
INSTALLING THE SOFTWARE FOR WINDOWS 95 / WINDOWS 98 16
INSTALLING SOFTWARE FOR WINDOWS NT 4.0 19
INSTALLING THE DV200 SOFTWARE LATER 23
UNINSTALLING THE DV200 SOFTWARE AND DRIVERS 23
CONNECTING THE DEVICES 24
ATTACHING A DV CAMCORDER OR A DV VCR 24
CONNECTING THE TV SET/VIDEO MONITOR 25
WORKING WITH DV MATERIAL 27
MAKING MOVIES 27
CAPTURING SINGLE FRAMES (SNAPSHOTS)37
miroVIDEO DVTOOLS 40
CAPTURE GALLERY 40
TAPE GALLERY 45
DV DEVICE CONTROLLER 45
miroINSTANT VIDEO PLAYBACK 51

ii
miroVIDEO DV 200
miroVIDEO DV200 & ADOBE PREMIERE 4.2LE 53
ADOBE PREMIERE PROJECT PRESETS 53
THUMBNAIL ACCELERATION 54
miroINSTANT VIDEO 2.0 55
WORKING WITH miroVIDEO DV200 AND A BOARD OF THE miroVIDEO DC30 SERIES
59
miroVIDEO DV200 & ADOBE PREMIERE 5.1 61
INSTALLATION 62
PRESETS 62
CAPTURE VIDEO WITH ADOBE PREMIERE 5.1 64
DEVICE CONTROL WITH ADOBE PREMIERE 5.1 66
miroINSTANT VIDEO 5.0 72
TIPS & TRICKS 81
HARDWARE 81
SOFTWARE 82
DV TAPE 82
TROUBLESHOOTING 83
TECHNICAL DATA 87
APPENDIX I
CONFIGURING THE DV200 I
IDENTIFYING THE WINDOWS 95 VERSION VI
UNINSTALLING miroVIDEO DV200DRIVERS AND SOFTWARE VII
CHANGING THE NUMBER OF COLORS AND SCREEN RESOLUTION VII
COMPATIBLE DV DEVICES VII
TV STANDARDS VIII
GLOSSARY X
INDEX

User´s Guide
iii
About the manual
This manual explains how to install and use the miroVIDEO DV200
hardware and software. Instead of using the complete product designation
(miroVIDEO DV200), the abbreviation DV200 is used to ensure a better
readability.
The following conventions are used in this manual:
In the margins are subheadings to help you quickly find your way through
this manual.
Important text passages are marked with the ”notepad” and this format.
Numbers mark step-by-step instructions:
1. Switch on the computer.
Bullets mark instructions for optional steps, if the order is not important.
• Connect the 1394 cable to the DV200 board.
All keyboard commands appear in this font:
install
Menus, commands, options or buttons are written in italics.
1. From the Start menu, select the Run ... command.
Subheadings

iv miroVIDEO DV 200
For your own safety
In the interest of your own safety and the proper functioning of your new
product and computer system please note the following:
s Computer components are sensitive to static charge. Divert any
electrostatic charge before touching the components with your hands or
any tools. To do so, touch the casing of your computer.
s Before opening the computer make sure that the power plug is
disconnected from the wall outlet.
For changes or supplements that could not be included in the printed or in
the online documentation, refer to the ReadMe file/s on the CD-ROM
supplied with your system!

User´s Guide
1
Overview
With the introduction of the digital video camcorders, it is now possible to
shoot, store and produce video productions entirely in digital format. In a
video production sense, first-generation quality is maintained through-out all
productions. The traditional loss in analog video production does not apply
and every digital copy is the same quality as the original.
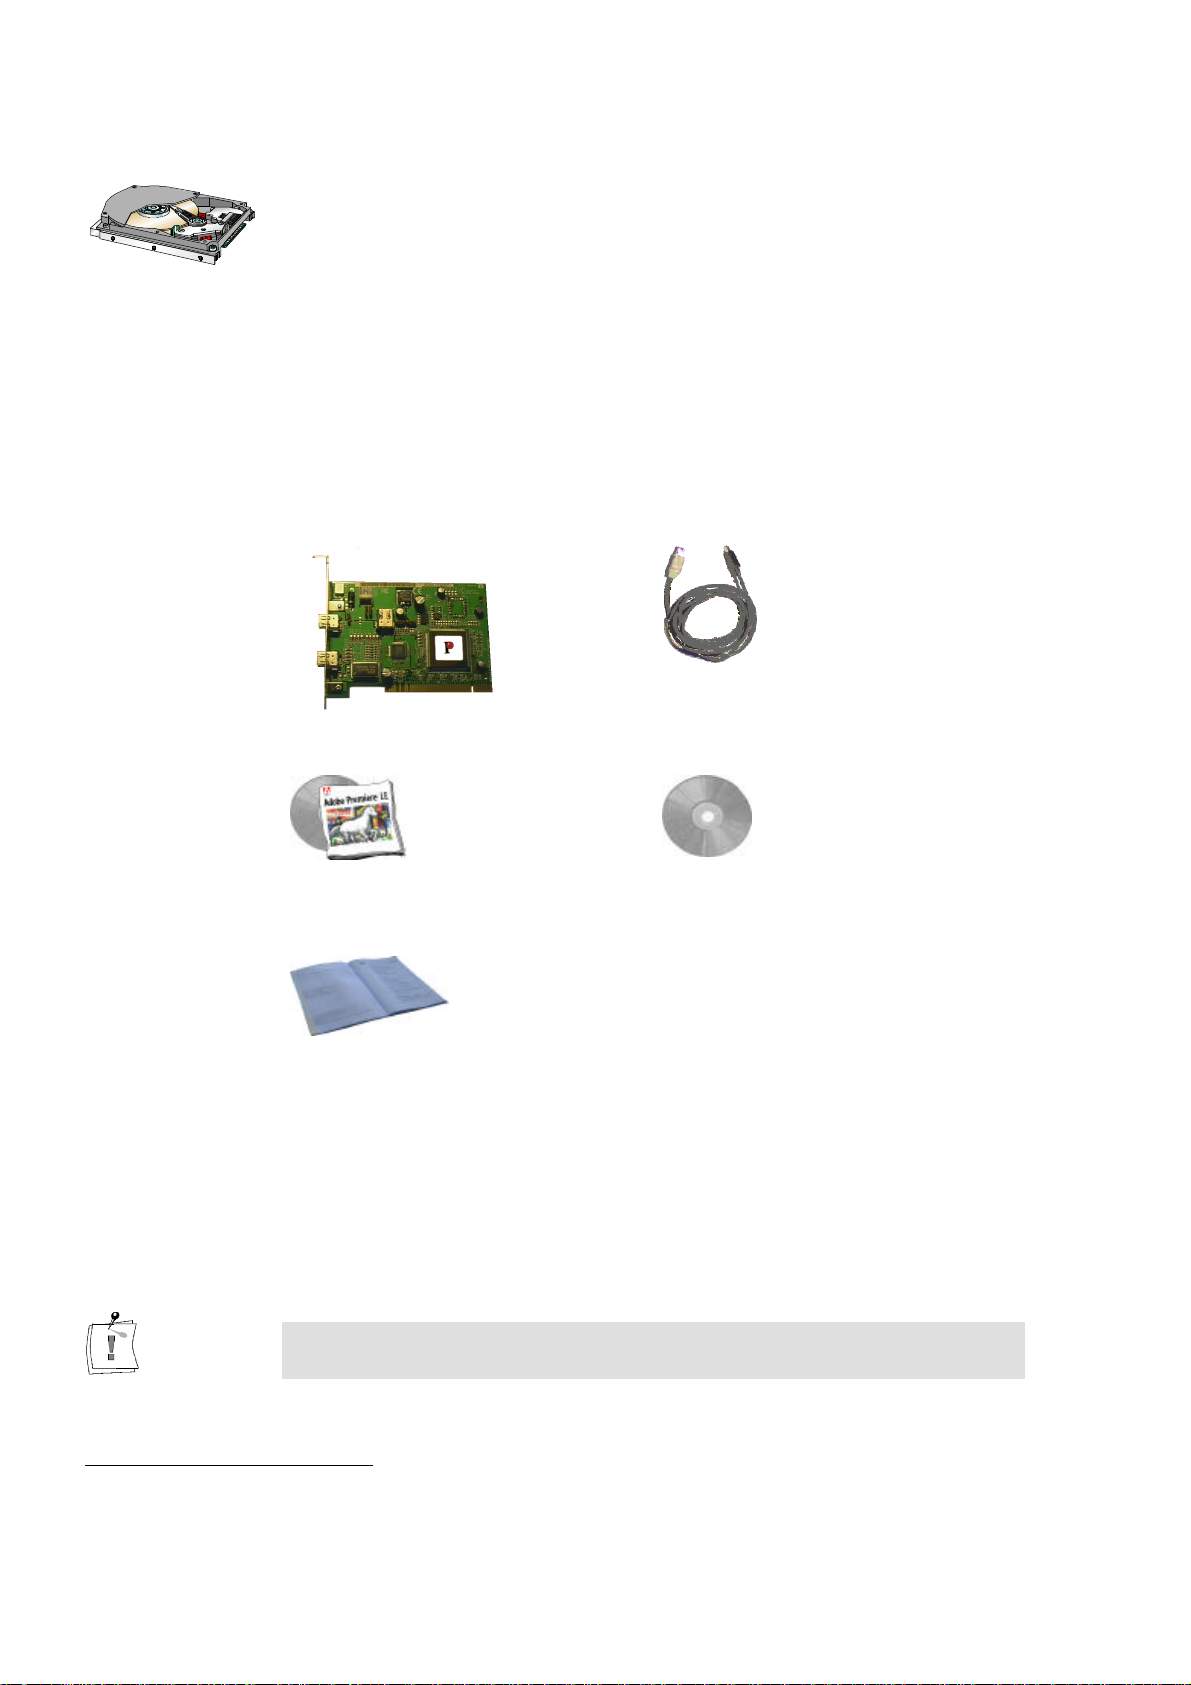
The miroVIDEO DV200 is a complete hardware and software solution
which allows you to connect your DV digital camcorder or DV VCR
(equipped with a IEEE-1394 interface) to your computer. The DV200
transfers data stored on the DV camcorder tape into the computer. Once in
the computer miroVIDEO DVTools software allows you to index, arrange,
store and edit your DV video footage. The miroVIDEO DVTools also
allows you to save the edited video clips back to the DV tape. The product is
intended for those users who have PCI bus-based systems running
Windows 95, Windows 98 or Windows NT.
The miroVIDEO DV200 is a state-of-the-art PCI bus mastering expansion
board . The board connects to the DV camcorder through the
miroVIDEO DV200 1394 DV cable.
The board includes the following connectors:
s two external 6-pin 1394 connectors
s one internal 6-pin 1394 connector.
The miroVIDEO DV200 software includes:
s the miroVIDEO DV200 drivers,
s miroVIDEO DVTools, a software for capturing DV clips and record the
clips back to the DV tape*,
s Adobe Premiere LE (Light Edition),
s Presets for Adobe Premiere,
s miroINSTANT Video 2.0, a plug-in for Adobe Premiere which
accelerates the making of movies considerably,
s intro files for miroINSTANT Video which help you switch on your VCR
very precisely when you start recording,
s one ten second and one 30 second silent audio clip for use in blank spaces
of premiere ten seconds or longer,
s miroINSTANT Video 5.0, a plug-in for Adobe Premiere
s miroVIDEO DV Capture, a capture plug-in for Adobe Premiere 5.1
s miroVIDEO DV Device control, a device control plug-in for Premiere 5.1
for DV devices.
s DVExpert, a system performance and 1394 test utility.
s miroVIDEO DV200 Configuration, a configuration tool.
*Not all devices support the recording of video clips via the DV connector.
Hardware
Software

2
miroVIDEO DV 200
Before you start
Before installing the tools, please completely uninstall of the former software
versions, including possible update versions.
During the installation, make sure no 1394 DV devices are connected to the
board, as they could interfere with the initialization of the driver.
This chapter tells you which requirements your system has to meet for
operating the DV200 board, which devices you can connect to the board and
what is included in the package contents.
SYSTEM REQUIREMENTS
Please make sure your system meets the following requirements before
installing the miroVIDEO DV200:
Computer
PCI-based Pentium II 233 MHz computer with a free PCI-2.1 compliant slot.
New computers only have PCI-2.1 compliant slots. For more information,
please read the documentation that was supplied with your computer system.
Memory
At least 64 MB memory. Recommended: 128 MB.
Hard disk
Hard disk with a sufficient data transfer rate and storage capacity. For further
details, refer to the following:
s Data transfer rate:
The DV format is fixed at a 5:1 compression ratio. The data transfer rate
needed to transfer real-time from the DV camcorder is approximately
3.6 MB/s. The transfer rate of your hard disk has to be at least 5 MB/s.
Hard disk capacity:
The DV200 drivers and miroVIDEO DVTools need approximately 20 MB of
hard drive space. Adobe Premiere 4.2LE needs about 16 MB hard drive
space. Adobe Premiere 5.1LE needs about 30 MB of hard disk space..
Raw DV formatted video occupies 3.6 MB for each second of content. For
example, four minutes of DV video would occupy approx. 900 MB (with
splitted audio) of disk space. While DVTools takes care to minimize the
space used on your hard disk, it is recommended that you use a hard disk
with sufficient capacity.
To accelerate capturing and playing back a large amount of data, we
recommend that you defragment your hard disk/s before capturing/playing
back video. Under Windows 95/Windows 98 you will find a de-
fragmentation utility under Start, Programs, Accessories, System Tools, Disk
De-fragmenter. Under Windows NT no defragmentation utility is available.
If you are using Windows NT, please use a de-fragmentation utility you can
obtain or from your computer store.
Hardware

User´s Guide
3
Graphics board and monitor
A graphics system with at least 16 bits color depth (65,000 colors) and a 800
x 600 resolution is required. We recommend a graphics system that supports
Direct Media 6.x.
Windows 95 (recommended: OSR 2.1), Windows 98, Windows NT 4.0.
NTSC devices (Capture and print to tape):
Devices that connect to the board include any DV format video equipment
that has an IEEE-1394/DV connector, such as devices from Sony, Panasonic,
Canon, JVC or Sharp.
PAL devices:
s Capture (transfer of DV data from the video device to the computer):
Devices that connect to the board include any DV format video
camcorder or recorder that has an IEEE-1394/DV connector.
s Print to tape (Transfer of DV data from the computer back to the tape):
Note that not all PAL DV devices available on the market support a
playback back to the camcorder. Please refer the documentation that
comes with your camcorder/VCR. If you want to playback to analog
VCR’s, you can also playback your video back to (analog) tape using the
miroVIDEO DC30 or miroVIDEO DC30 plus boards.
For more information on video standards (PAL, NTSC) refer to the
Appendix on page VII. You will find a list of compatible devices in the
Appendix on page VII and in the readme file.
To be able to check the quality of your video footage during editing, a TV
set or a video monitor is required. (Some camcorders have an integrated
display. If you own such a device, you do not necessarily have to connect a
monitor.) In case you do not want to connect a TV set or video monitor to
your DV device, you can always use the preview window provided in the
miroVIDEO DVTools, though the quality and size is limited.
To connect a television/video monitor to your camcorder/VCR, you need a
S-Video or a composite cable or a cinch cable for the audio inputs/outputs.
Software
DV Devices
TV/
video monitor
Cable

4
miroVIDEO DV 200
DEFRAGMENTING THE HARD DISK
Before installing and configuring the DV200 you should de-fragment your
hard disk/s. You find the Windows 95/Windows 98 defragmentation utility
under Start, Programs, Accessories, System Tools, Disk De-fragmenter.
Under Windows NT no de-fragmentation utility is available. If you are using
Windows NT, please use a de-fragmentation utility you can obtain from your
computer store.
PACKAGE CONTENTS
Make sure your miroVIDEO DV200 kit is complete before you begin the
installation. The system includes*:
miroVIDEO DV200 board** IEEE-1394 DV cable
Adobe Premiere and documentation*** CD-ROM with driver software,
miroVIDEO DVTools, Presets and drivers
for Adobe Premiere
User´s Guide
If any parts are missing, please contact your retailer.
Computer components are sensitive to electrostatic charge. Do not take the
miroVIDEO DV200 board out of its antistatic package until you install it.
*The package contents may vary from the contents listed in this manual.
** For an exact model name and serial number of your board, refer to the label on the board.
*** As soon as Adobe Premiere 5.1LE will be available, this version of Adobe will be included in the delivery scope
of miroVIDEO DV200.

User´s Guide
5
Quick start
The following chapter shall help the experienced user to start using the
miroVIDEO DV200 board immediately.
For more detailed installation instructions, please refer to the subsequent
chapters in the manual.
QUICK INSTALLATION
Install Adobe Premiere.
þPlace the Adobe Premiere-CD-ROM in your CD-ROM drive.
þIf the installation program is not started automatically, select Run…
from the Start menu.
þDepending on your drive,
for Adobe Premiere 4.2LE enter, for example:
e:\english\win95&nt\disk1\setup,
for Adobe Premiere 5.1LE enter, for example:
e:\premiere\setup,
then click OK.
þFollow the installation instructions on the screen.
Install the miroVIDEO DV200 board.
þTurn your computer and all peripherals off.
þRemove the necessary cables.
þOpen the computer's housing.
þRemove the slot cover.
þInsert the board.
Reassemble the computer.
þReassemble the computer.
þReconnect all cables.
Install the miroVIDEO DV200 software.
þPlace the CD-ROM in the CD-ROM drive.
þFollow the installation program instructions on the screen.
Connect the DV device to the DV200 board.
þConnect the DV device to the DV200 board using the IEEE-1394
cable.
Connect a video monitor/television to the DV device.
þConnect a video monitor or a TV set to the appropriate video output
of your DV device using the appropriate cable.
Establish the audio link.
þConnect an audio cable to the audio output of your DV device.
þConnect the other end of the audio cable to the audio input of your
video monitor/TV set.

6
miroVIDEO DV 200
SCANNING DV (QUICK START)
Test your system.
Use the DVExpert from the miroVIDEO DV200 Program Group to test
the performance of your hard disk and your 1394 system.
Check preferences.
Start DVTools from the miroVIDEO DV200 program group. From the
Tools menu, select Preferences and check the settings.
Turn on DV device.
Turn on your DV device. Make sure that it is running in VTR mode.
Scan DV tape.
From the Tools menu, select Scan DV tape. Scan additional tapes, if
desired.
VIEWING CLIPS AND ADDING TRIMS (QUICK START)
Open a Tape Gallery.
Double-click a tape gallery name in the DV Explorer.
Preview the clips.
Double-click on a clip. In the Clip Info window click on the Eye button.
Choose the clips you want to capture.
Drag and drop the clips from the Tape Gallery into the Capture Gallery.
Add trims.
Define in and out points using the DV Device Controller.
Save the Capture Gallery file.
Save the Capture Gallery using the Save as menu item from the File
menu.

User´s Guide
7
CAPTURING DV (QUICK START)
Open a Capture Gallery.
Open the Capture Gallery you want to capture.
Check the file size.
Check the file size in the status bar at the bottom of the Capture Gallery.
Capture AVI files.
Click on the Capture button on the right-hand side of the Capture
Gallery.
Enter the file name and the directory.
If you do not want to use the default drive which was determined in the
Preferences window, select a drive and directory where you want to
capture the file/s and enter a file name for the first clip.
EDITING AVI FILES USING ADOBE PREMIERE (QUICK START)
Start Adobe Premiere.
Click on the corresponding button on the right-hand side in the Capture
Gallery.
Select a Preset.
Select a suitable Preset from the Adobe Project Presets.
Import AVI file(s).
From the File menu, select Import and File.
Edit AVI file(s).
Add effects and edit your video.
Make a movie.
From the Make menu, select Make Movie (Adobe Premiere 4.2LE).
From the File menu, select Export (Adobe Premiere 5.1LE).
PRINTING TO DV (QUICK START)
Open the miroVIDEO DVTools.
Click Program Files in the Start menu. Select the program group
miroVIDEO DV200 and click on miroVIDEO DVTools.
Insert a new tape.
Insert a new tape and rewind it to a position where you want to start
recording.

8
miroVIDEO DV 200
Select a file.
Click on the Print-to-tape button on the right-hand side of the Capture
Gallery. DVTools will prompt you to select the file you want to print to
tape. After selecting the file, the print-to-tape process will start
immediately.
CAPTURING SINGLE FRAMES (QUICK START)
Connect your DV equipment.
If you haven't already, connect your DV camcorder or DV video
recorder to the DV200 board.
Turn on your DV equipment.
Switch your DV device on. Select the desired mode (either VTR or
Camera mode).
Open the DV Device Controller.
To open the DV Device Controller, click on the (camera) icon in the
DVTools window.
Create bitmap.
Click on the (snapshot) button.
Name and save the BMP file.
Enter a name and a location where you like to save your BMP file.
What's next?
For more detailed instructions concerning any of the above functions, please
refer to the following chapters. You can also find information concerning the
installation of a PCI expansion board in the documentation supplied with
your computer.

User´s Guide
9
Installing Adobe Premiere
The following chapter describes the procedure to install Adobe Premiere.
It is required that you install Adobe Premiere before installing the
miroVIDEO DV200 board and software. The DV200 software installation
program needs to know where the Adobe Premiere folders are located so
that it can copy the DV200 plug-ins and presets into the corresponding
folders.
Proceed as follows to install Adobe Premiere:
1. Place the Adobe Premiere CD-ROM in your CD-ROM drive.
2. If the installation program is not started automatically, select Run… from
the Start menu.
3. Depending on your drive, enter, for example:
• for Adobe Premiere 4.2LE
e:\english\win95&nt\disk1\setup.
• for Adobe Premiere 5.1LE
e:\premiere\setup.
If your CD-ROM drive has a different drive designation, change the path
accordingly.
—or—
4. Click on Browse..., switch to your CD-ROM drive and to the directory
mentioned above and double-click the setup.exe file.
5. Click OK.
6. Follow the program installation instructions on the screen.
The complete Adobe Premiere documentation is available as PDF file on the
corresponding Adobe Premiere CD-ROM. You can view the documentation
using the Acrobat Reader. If the Acrobat Reader has not already been
installed on your computer, it will be installed together with your DV200
software.
After you have installed Adobe Premiere on your computer, you can install
the miroVIDEO DV200 board.
Adobe Premiere
documentation

10
miroVIDEO DV 200
Installation
This chapter explains how to install the DV200 board.
Computer components are sensitive to electrostatic charge. Do not take the
miroVIDEO DV200 board out of its antistatic package until you install it.
To install the board, you need a screwdriver.
To insert your DV200 board in your computer, proceed as follows:
1. Discharge electrostatic charge.
Discharge electrostatic charge by touching the metal case of your
computer.
2. Switch off the devices and pull the power cord.
Switch off the computer and all peripheral devices. Pull out the power
cord and disconnect all necessary cables.
3. Open the computer.
Loosen the screws of the computer's cover and remove the cover. Keep
the screws in a safe place.
4. Select a slot.
Select a free PCI slot. PCI slots are the shorter ones available in your
computer and mostly made of white plastic. Make sure that the PCI slot
you use supports busmastering. If you are not sure about this, please
consult your computer documentation.
Slots
Slot shields
Power
supply
unit
PCI slots
PCI slots

User´s Guide
11
5. Remove the slot shield.
Remove the screw and the slot shield for the PCI slot you have selected.
Keep the screw because you will need it later to secure the board once it
is installed.
6. Unpack the board.
Remove the DV200 from its sleeve.
You only need to connect the internal connector to your computer´s power
supply, if you plan to use devices such as video conferencing cameras that
require a 6-pin 1394 cable.
7. Insert the board.
Carefully insert the board into the PCI slot you selected by holding the
board at the top and gently pushing both ends into the slot. Press onto the
upper edge of the board to make sure it is firmly seated in the slot.
8. Fasten the bracket.
Fasten the board´s bracket at the back of the computer using the screw
you saved from the shield.
9. Reassemble the computer, reconnect the cables.
Reassemble the computer and replace the computer cover. Connect all
cables that have been disconnected before the installation.
Now that the hardware installation is complete, you can proceed with the
DV200 driver and software installation (see next chapter).

12
miroVIDEO DV 200
Installing the software
Once you have installed the miroVIDEO DV200 into your computer, you
can install the miroVIDEO DV200 drivers and software. The installation
steps for the Windows 95 August Release, Windows 95 OSR2, Windows 98
and Windows NT are slightly different.
Before installing the miroVIDEO DV200 drivers for Windows 95, we
recommend you to identify the Windows version you use first.
You can check which Windows 95 version you use by entering the DOS
command ver. The Windows 95 OSR 2 (OEM Service Release 2) version
has the version number: Windows 95. [Version 4.00.1111] or [Version
4.00.950b]; the August Windows 95 Release has the version number:
Windows 95. [Version 4.00.950]. For detailed information on how to use the
DOS ver command refer to the appendix in the section “Identifying the
Windows 95 version” (page VI).
The complete installation consists of the following steps:
s Installing drivers for Windows 13
s Windows 95 (Release August 95) as of page 13, or
s Windows 95 (Release August 95) as of page 14.
s Installing the software for Windows 95 / Windows 98 as of page 16.
If you use Windows 98, please proceed with the “Installing drivers for
Windows 98” section on page 15.
The complete installation consists of the following steps:
s Installing drivers for Windows 98 as of page 15.
s Installing the software for Windows 95 / Windows 98 as of page 16.
If you use Windows NT, please read the “Installing software for
Windows NT 4.0” section as of page 19.
Among other things, installing the miroVIDEO DV200 software copies the
miroVIDEO DV200 drivers to your hard disk. The miroVIDEO DV200
program group is created, and—among other things—the expanded Adobe
Premiere project defaults (Presets) are copied to your hard disk.
Windows 95
Windows 98
Windows NT

User´s Guide
13
INSTALLING DRIVERS FOR WINDOWS 95
Windows 95 (Release August 95)
1. Switch computer on.
Switch your computer on. Windows 95 is started automatically.
If your computer is configured in such a way, that Windows 95 is not
started automatically, please start Windows 95 now.
After Windows 95 starts, the New hardware found dialog box will appear.
A PCI FireWire (IEEE 1394) will be detected.
2. Select Driver from disk provided by hardware manufacturer,
click OK.
In the New hardware found dialog box, click the Driver from disk
provided by hardware manufacturer option. Click OK.
3. Insert CD-ROM.
Insert the installation CD-ROM into the CD-ROM drive.
4. Click Browse... .
Click on the Browse... button.
5. Switch to the \DRIVER directory, click OK.
Switch to your CD-ROM drive and go into the \DRIVER directory.
Select DV200.inf and click OK.
6. Click OK.
Click the OK button again.
After the drivers have been copied, the installation program starts
automatically. Proceed with the “ Installing the software for Windows 95 /
Windows 98” section as of page 16.
Windows 95
(Release
August 95)

14
miroVIDEO DV 200
Windows 95 (OSR 2)
To install the drivers for the OSR2 Release, proceed as follows:
1. Switch on computer.
Switch on your computer. Windows 95 is started automatically. If your
computer is configured in such a way, that Windows 95 is not started
automatically, please start Windows 95 now.
After Windows 95 starts, the New hardware component found dialog box
appears followed by the Update Device Driver Wizard dialog. A PCI
FireWire (IEEE 1394) will be detected.
2. Click Next.
Click on the Next button.
3. Insert the CD-ROM.
Insert the installation CD-ROM into the CD-ROM drive.
4. Click Other Locations....
Click on the Other Locations... button.
5. Click Browse... .
Click on the Browse... button.
6. Switch into the \DRIVER directory, click OK.
Switch to your CD-ROM drive and go into the \DRIVER directory. Click
OK.
7. Click Finish.
Click on the Finish button.
8. Click OK and Browse... again.
When your system requests you to insert the CD-ROM again, click on OK
and once again on Browse... .
9. Switch into the \DRIVER directory, click OK.
Switch to your CD-ROM drive and go into the \DRIVER directory. Click
OK.
10.Click OK.
Click the OK button again.
Windows 95
(OSR 2)
Table of contents
Popular Adapter manuals by other brands

Rosewill
Rosewill RNX-AC1200UB user manual

Mitsubishi Electric
Mitsubishi Electric MAC-558IF-E manual

HT Instruments
HT Instruments YABAT0004001 instructions

Bacharach
Bacharach LonWorks FT-10 installation guide

Kewtech
Kewtech Lightmate BC instructions

ZyXEL Communications
ZyXEL Communications ZyAIR B-420 Quick installation guide