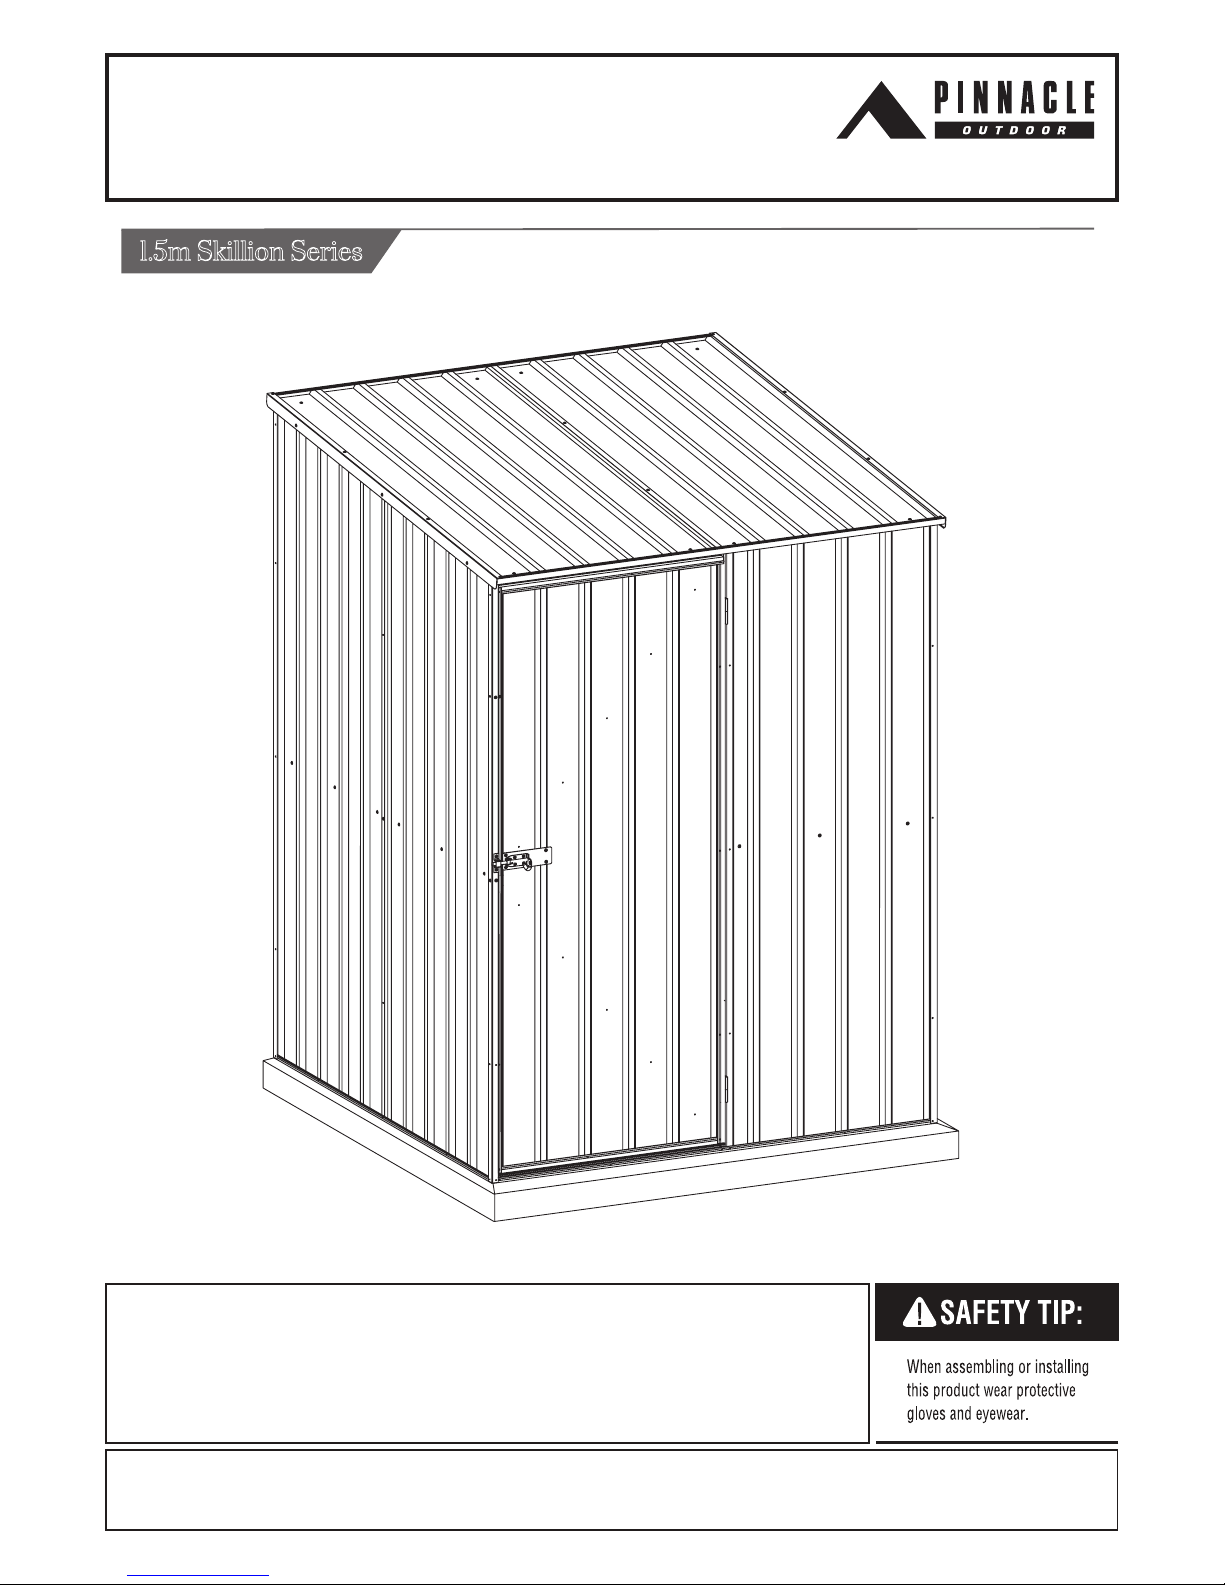
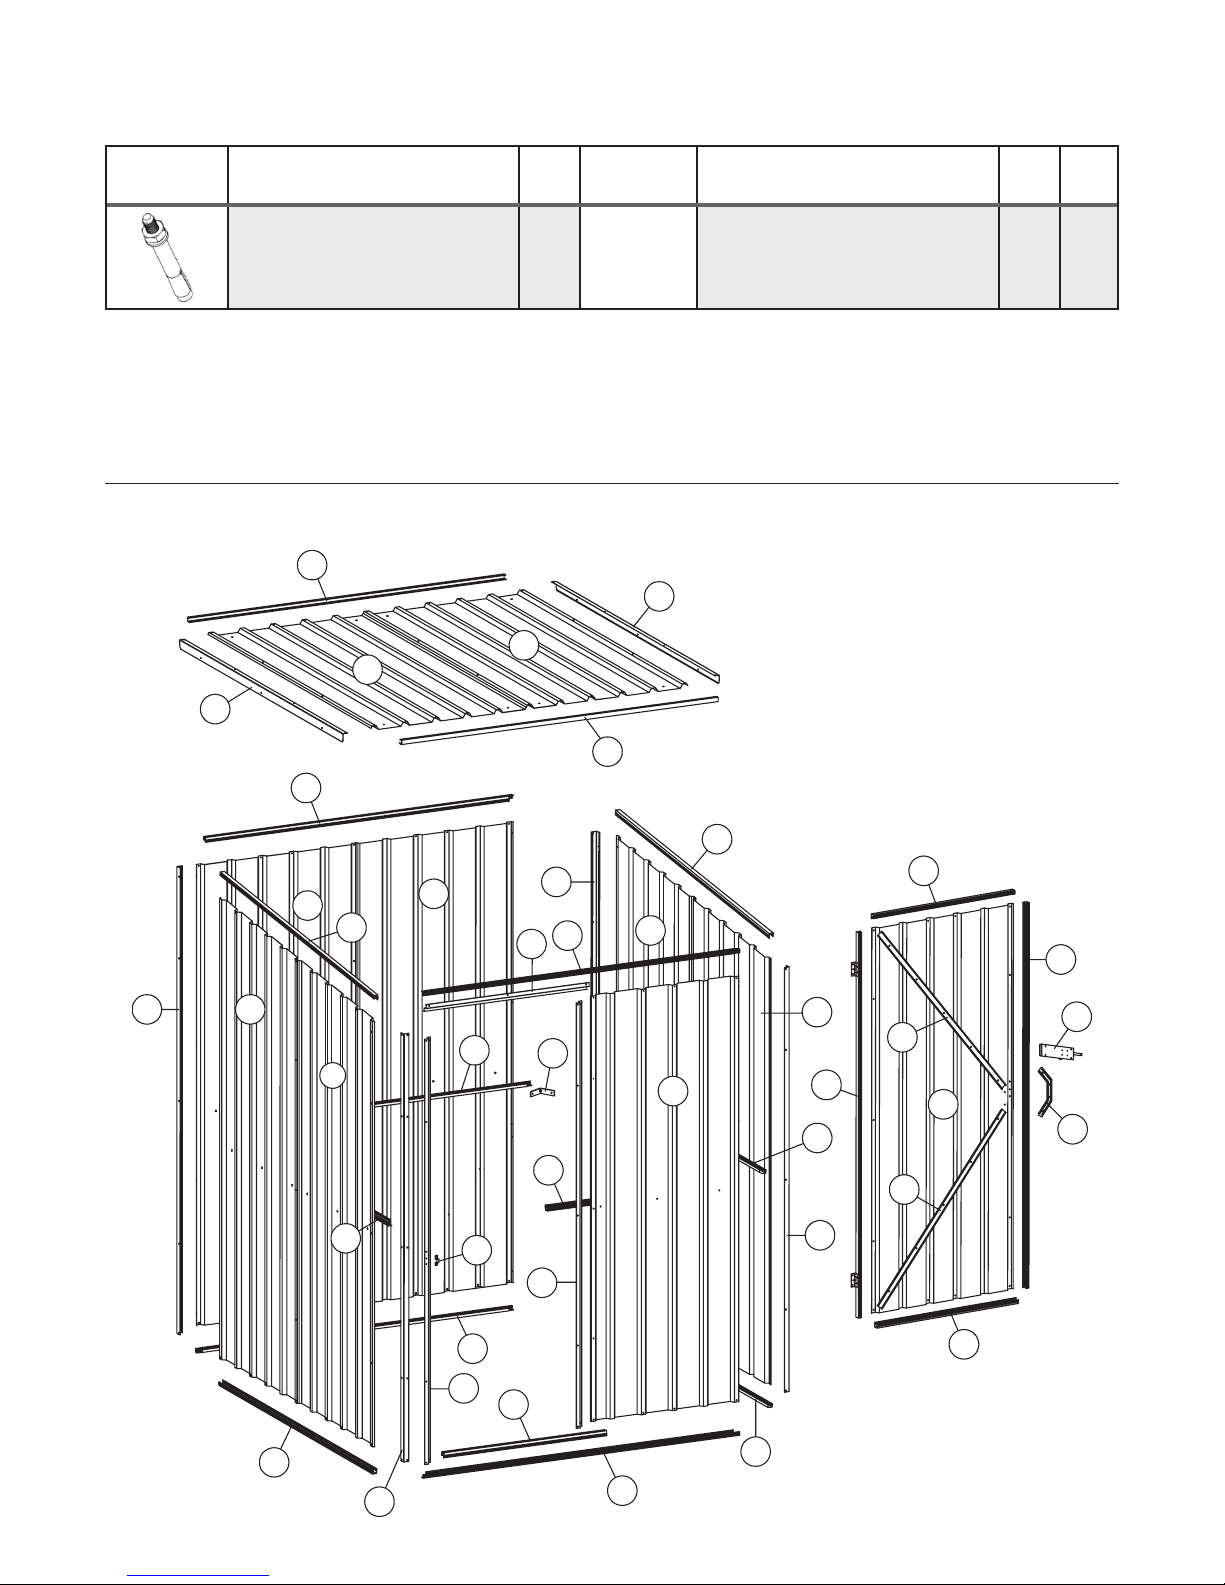
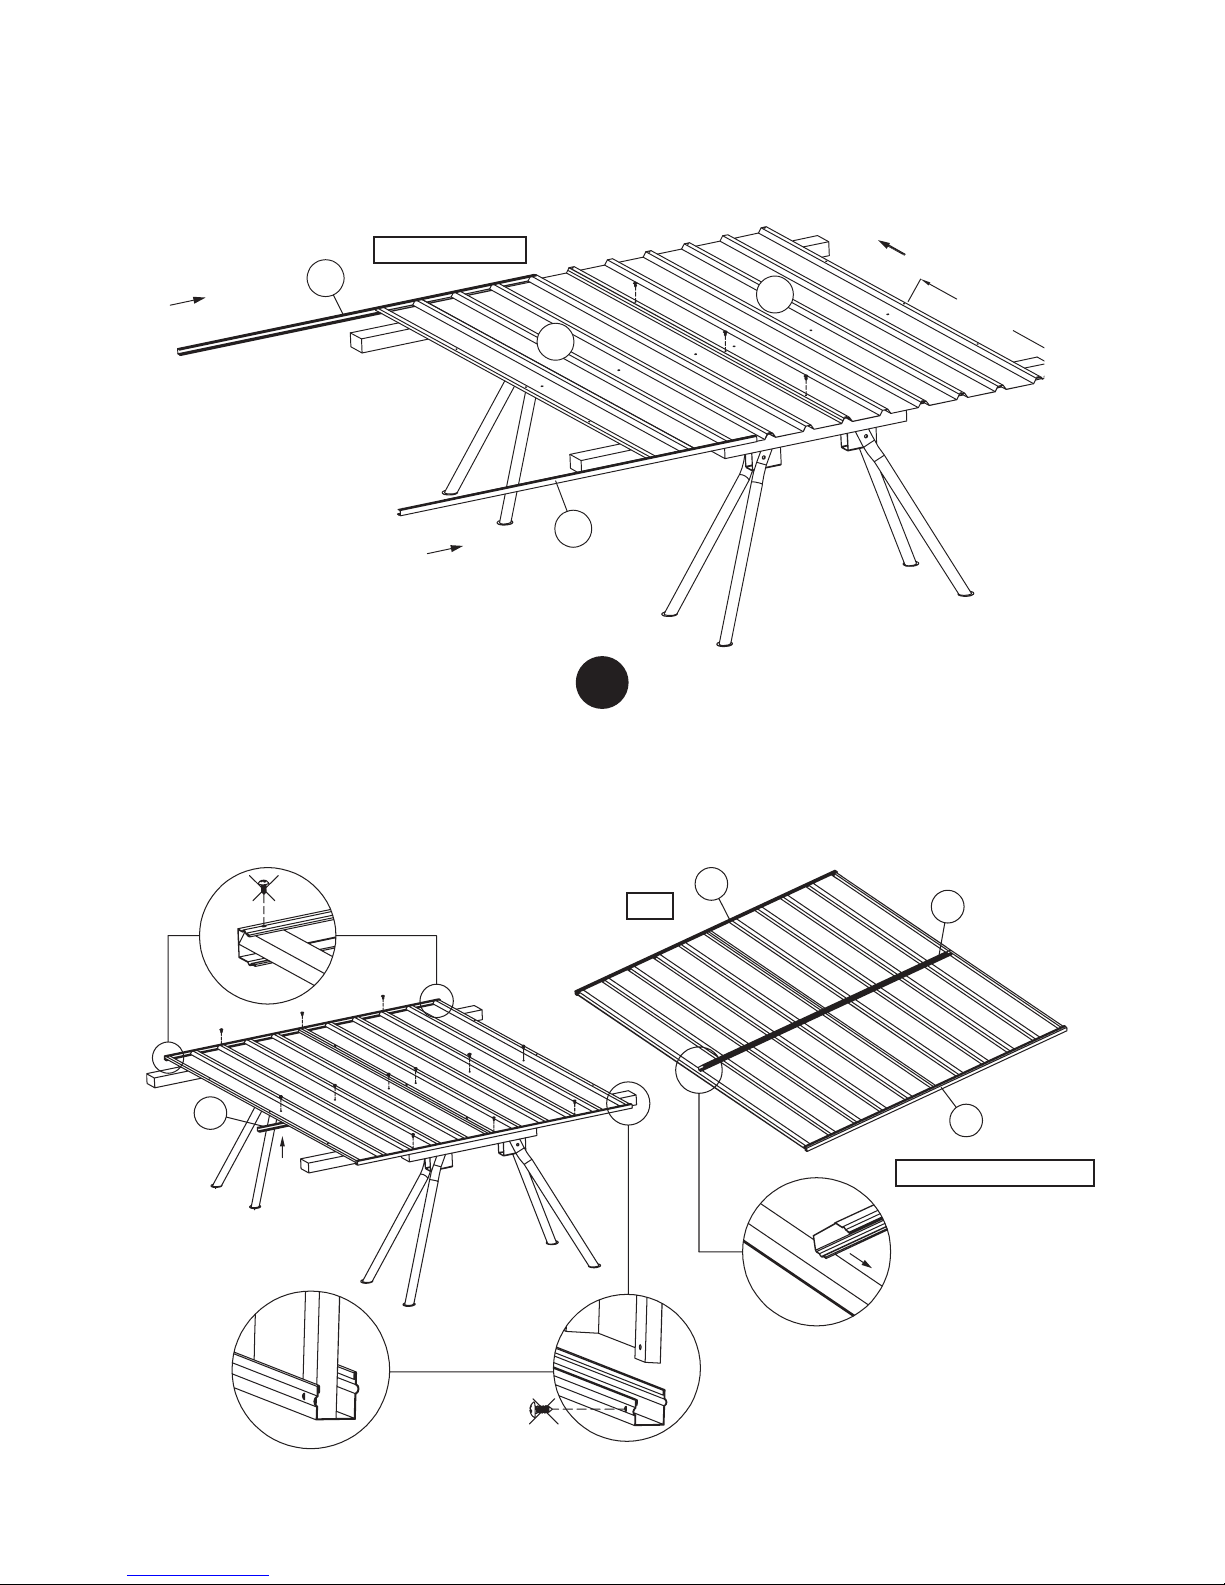
Pinnacle 1.5m Skillion Series User manual

GardenShed
1.5W x 1.5D x 2.1Hm
Tools required: Drill, measuring tape, Phillips-head screw driver, rivet gun, rubber mallet, sturdy ladder, shifting spanner, 2 saw horses, 3mm
steel drill bit, 4mm steel drill bit and a 9mm masonry drill bit.
1.5m Skillion Series Assembly instructions
Congratulations on purchasing your new Pinnacle garden shed. Before assembling, we recommend
you read the instructions thoroughly. Your new shed comes with pre-drilled holes to make assembly
quicker. We recommend you assemble the shed using a trestle table or sawhorses and planks. This
will ensure that you are working off the ground and make it easier for you. Assembly is a two-person
job and should not be attempted in windy conditions.

GardenShed 1.5 x 1.5 x 2.1m
Build your garden shed in 7 easy steps!
Step 1: Check all parts against the component list
Step 2: Assemble the rear wall panels
Step 3: Assemble the side wall panels
Step 4: Assemble the roof panels
Step 5: Assemble the front wall panel
Step 6: Assemble the front door
Step 7: Fit the panels together
IMPORTANT: It is recommended that your new shed is secured to a concrete slab as per the specifications in this manual.
Concrete slab: Please ensure that your site is level. It is recommended that your slab is 100mm thick and you use builder’s
plastic and F52 reinforcing mesh. We recommend that you make your slab approximately 100mm bigger than the base
dimensions of your shed. This will allow for a 50mm edge around your shed. We recommend that you slope the 50mm edges
downward by 10mm so that rain water can drain away from your shed.
CONCRETE SLAB1600mm
1600mm
100mm

Step 1: Check all parts against the component list
Lay out all parts with number facing outwards and check off against parts list.
Picture Description Component Location Part
No. QTY Check
Sheet Sheet 2057x770 Rear wall 6A 2
Sheet Sheet 1977-2057x770
Left Side wall 7A 1
Sheet Sheet 1977-2057x770
Right Side wall 7B 1
Sheet Sheet 1900-1980x770
Left Side wall 2L' 1
Sheet Sheet 1900-1980x770
Right Side wall 2D 1
Sheet Sheet1600x770 Roof 8 2
Sheet Sheet 1900x708 Front 4B 1
Door Sheet Sheet 1845x770 Door 5B 1
Channel Channel 1843 Door 24F 1
Channel Channel 1843 Door 24G 1
Channel Channel 768 Door M26 2

GardenShed 1.5 x 1.5 x 2.1m
Picture Description Component Location Part
No. QTY Check
Brace Brace 1034 Door U12 2
Channel Channel 1508 Roof side
wall 20A 4
Channel Channel 1508 Rear wall 20B 1
Channel Channel 1508 Rear wall 20C 1
Channel Channel 1508 Front 20D 1
Channel Channel 1508 Front 20E 1
Channel Channel 1515 Side wall 25 2
Channel Channel 775 Front 23 1
Channel Channel 1458 Rear wall
side wall 31 3
Channel Channel 674 Front 33R 1
Jamb Jamb 1898 Front 41A 1
Jamb Jamb 1898 Front 41B 1
Jamb Jamb 775 Front 42 1
Brace Corner brace 1898 Corner Z19 1

Picture Description Component Location Part
No. QTY Check
Brace Corner brace 1898 Corner Z20 1
Brace Corner brace 2055 Corner Z21 1
Brace Corner brace 2055 Corner Z22 1
Lip Lip 1601 Roof 51 2
Joining brace Joining brace Door W 1
Fittings part list: All fittings in this list are located in box 2
Picture Component QTY Picture Component QTY √
Self tapping screws (10mm) 150 Self tapping screws (16mm) 20
4 x 10mm Rivet 12 3 x 10mm Rivet 40
Pad bolt 1 Keeper 1
Bracket 8 5/16 x 19mm Hexagonal bolt 8
5/16 Hexagonal Nut 8 Mid wall brace bracket 3
Self tapper safety cover 25 Channel safety cover
(L type) 1
Channel safety cover
(R type) 1 Plastic stopper 4

GardenShed 1.5 x 1.5 x 2.1m
6
Shed overview:
Picture Component QTY Picture Component QTY √
Sleeve anchor bolt 8
72
71
25
2D
6A
7A
7B
2L'
8
8
4B
20A
20A
20B
20C
20A
20A
25 20D
20E
41A
41B
23
42
51
51
31
33R
31
31
70
U12
W
5B
M26
24F
24G
U12
M26
Z21
Z22
Z19
Z20
6A
Qty checking date: ____ / ____ / _____
Qty checking personal badge number: _______________
Signature: _________________________________________
In the unlikely event that you find you are missing a part, please contact Pinnacle at 1800 349 776. A copy of proof of purchase may be requested.

7
Step 2: Assemble the rear wall panels
You will find it easier to assemble your shed using sawhorses with timber studs attached (timber needs to be the same length as the
shed (1.5m)) or alternatively, a trestle table.
Place 2 x part 6A (sheet) on your worktable and join together with the self-tapping screws as per the diagram below.
Now fit part 20B (top channel) and part 20C (bottom channel) to the sheeting by tapping it in (diagram A) or sliding it in (diagram B).
Make sure the small lip of the channel is always facing out. This ensures rainwater cannot build up inside your shed.
A
950mm
20B
20C
TOP
6A
6A
RIDGES FACING UP
A
ROOF TOP EDGE

GardenShed 1.5 x 1.5 x 2.1m
8
31
31
20B
20C
B
950mm
20B
20C
6A
6A
Step 2: Assemble the rear wall panels (continued)
Now fit part 31 (mid wall channel) to the sheeting and position it with the self-tapping screws provided. Please note the groove should
face downwards. Position the top and bottom channels with self-tapping screws as well. NOTE: All screws marked with a cross should
not be fixed at this stage.
Tip: If panel and screw holes do not line up, try pulling panel to match up holes.
TOP
B
ROOF TOP EDGE
RIDGES FACING DOWN

9
7A
2D
25
20A
31
Step 3: Assemble the side wall panels
Place part 2D and 7A (sheet) on your worktable and tap or slide on part 25 (top channel) and part 20A (bottom channel).
Position and fix part 31 (mid wall channel) using the self-tapping screws. Fix part 20A (bottom channel) with self-tapping
screws but not part 25 (top channel) at this stage. Make sure that the small lip of the channels is always facing out. This ensures
rainwater cannot build up inside your shed. Repeat the same steps for part 2L and part 7B (the other sidewall). NOTE: All
screws marked with a cross should not be fixed at this stage.
RIDGES FACING UP
ROOF TOP EDGE
ROOF TOP EDGE
Note: Channel 31
should face down.
RIDGES FACING UP

GardenShed 1.5 x 1.5 x 2.1m
10
Step 4: Assemble the roof panel
Place 2 x part 8 (sheet) on your worktable and join together with the self-tapping screws provided as per the diagram below.
8
8
Now tap or slide in 2 x part 20A (channels) onto the sheeting and fix them to the top and bottom with the self-tapping screws provided.
Make sure that the small lips on channels 20A are always facing out. This ensures rainwater cannot build up inside your shed.
20A
51
51
20A

11
Step 4: Assemble the roof panel (continued)
Now fit 2 x part 51 (side lips) to the sheeting and fix them with the self-tapping screws provided.
51

GardenShed 1.5 x 1.5 x 2.1m
12
42
20D
20E
41B
4B
41A
33R
23
Step 5: Assemble the front wall panel
Place part 4B (sheet) on the worktable. Fit part 20D (top channel), part 20E (bottom channel) and part 41B (jamb) (There are pre-drilled
holes for the next step on both parts 4B and 41B that must be aligned) and part 33R (mid wall channel) to the sheeting and fix them
with the self-tapping screws. NOTE: All screws marked with a cross should not be fixed at this stage. Make sure that the small lips on
channels 20D and 20E are always facing out. This ensures rainwater cannot build up inside your shed.
Fit part 41A (jamb), part 42 (jamb) and part 23 (bottom channel) and fix them with the self tapping screws (except those
marked with a cross). Make sure both joins (diagrams A and B) are fixed the same followed by diagrams C and D.
RIDGES FACING UP
Note: Small lip on
channels 20D &
20E should always
be facing out.
Note: Channel 33R
should face down.
C
A
B
D
ROOF TOP EDGE

13
M26
M26
FIXW ITH3 .0*10MMR IVET
FIXW ITH3 .0*10MMR
IVET
FIXW ITH3 .0*10MMR IVET
5B
24F
24G
Step 6: Assemble the front door
Place part 5B (door sheet) on the worktable and fix 2 x part M26, part 24G and part 24F (channels) with the provided 3.0 x 10mm rivets.
Make sure the small lips on channels M26 are always facing out. This ensures rainwater cannot build up inside your shed.
RIDGES FACING UP
FIX WITH 3.0MM RIVETS
RIDGES FACING UP

GardenShed 1.5 x 1.5 x 2.1m
14
5B
W
BACK
U12
U12
Step 6: Assemble the front door (continued)
Once channels are fitted to both doors, align 2 x part U12 (brace) and part W (joining brace) with holes on the back of the door and
position temporarily with some tape or simply hold in place.
Turn door over so the
ridges are facing down.

15
WHITEP L
ASTIC
STOPPER
WHIT
EP LASTIC STOPPER
FIXW ITH3 .0*10MMR IVET
Step 6: Assemble the front door (continued)
Turn door over with bracing aligned with holes (make sure the ridges of the door are facing up) and fix the bracing with the provided 3.0 x
10mm rivets through the front of the panel. Then turn door over and insert plastic stoppers at the ends of braces as shown below.
Note: Fix rivets
through the front panel
with ridges facing up.
FIX WITH 3.0MM RIVETS
WHITE PLASTIC STOPPER
WHITE PLASTIC
STOPPER
ROOF TOP EDGE RIDGES FACING UP
RIDGES FACING DOWN

GardenShed 1.5 x 1.5 x 2.1m
16
5B
70
70
AB
Step 6: Assemble the front door (continued)
Fit part 5B (assembled door) to the front wall panel as per the diagram below. Use a rivet gun to fix the door using the pre-drilled
holes. Fix the pad bolt (but NOT its keeper at this stage) using the pre-drilled holes and the self-tapping screws (diagram A) or the
rivets (diagram B) provided.
RIDGES FACING UP
FIX PAD BOLT WITH
3.0 X 10MM RIVETS
FIX DOOR HINGES WITH
4.0 X 10MM RIVETS
AB
ROOF TOP EDGE

17
71
FIXP ADBOLT KEEPE
R
WITH 16mm SCREWS
B
71
FIXP ADBOLT KEEPER
WITH 3.0*10MM RIVE
T
A
Z19
Z21
Z21
Z20
Z22
Step 7: Fit the panels together
Attach the side walls to the back wall, then the front wall, then the roof. Fix all the components using self tapping screws. Fix part 71
(pad bolt keeper) using 16mm self-tapping screws (diagram A) or using rivets (diagram B) ensuring the keeper lines up with the pad
bolt. Also attach parts Z19, Z20, Z21 and Z22 (Corner brace) to each corner using the self-tapping screws provided.
FIX PAD BOLT KEEPER
WITH 16MM SCREWS
FIX PAD BOLT KEEPER
WITH 3.0 X 10MM RIVETS
A
B

GardenShed 1.5 x 1.5 x 2.1m
18
Now fit the bolt down kit as per the diagram. Strengthen the mid wall braces by applying part 72 (mid wall brace bracket) to
each corner if necessary.
WALL SHEE
T
BOLT & NUT
SLAB
STEELA NGLE
SLEEVEA NCHORB OLT
DOOR
72
DOOR
BOLT & NUT
STEEL ANGLE
WALL SHEET
SLEEVE ANCHOR BOLT

19
Apply channel safety cover (L type) to part 31 (channel) and channel safety cover (R type) to part 33R (channel). Also apply the
self-tapper covers to screw ends visible in the walls on the inside of the shed as per the diagram below.
33R
31
L
L
R
R

GardenShed 1.5 x 1.5 x 2.1m
20
The door can be hinged on the opposite side as well. Align the door with the edge and make holes using a cordless drill. Remove
the pins from the hinges and reverse their direction before you attach the door. If you are concerned about the visibility of any pre-
drilled holes, you can fill them with rivets. Perform the same procedure for the pad bolt.
Table of contents
Other Pinnacle Outdoor Storage manuals
Popular Outdoor Storage manuals by other brands

garofalo
garofalo BAULE EVO 80 BAULE EVO 120 user manual

TMG
TMG TMG-MS0506 product manual

Décor et Jardin
Décor et Jardin BUCHER Assembly Notice

Palram
Palram CANOPIA RUBICON 6x8 / 2x2.3 How to assemble

Duratuf
Duratuf Garrison PL84 Assembly instructions

Décor et Jardin
Décor et Jardin ALBECOUR Assembly Notice

Biohort
Biohort PP4000 Assembly manual

ABSCO SHEDS
ABSCO SHEDS 23301GK Assembly & instruction manual

juwel
juwel Beetsystem Biostar Protect 1000 manual

Karibu
Karibu 67417 Building instructions

Mercia Garden Products
Mercia Garden Products 03COR0707-V4 General instructions

Arrow Storage Products
Arrow Storage Products IWC82 Owner's manual & assembly guide