PINNACOLO PREMIO Guide

OWNER’S MANUAL, USER GUIDE AND WARRANTY
PREMIO
PIZZA OVEN
MODEL NO: PPO-1-00
2
PINNACOLO PREMIO PIZZA OVEN
CONGRATULATIONS!
ON BECOMING A NEW MEMBER OF THE PINNACOLO FAMILY!
• DO NOT OVERHEAT OVEN: Extreme heat can permanently
damage the Outdoor Oven. Bring the Outdoor Oven up to
temp slowly. Start with a small re located in the center of the
oven. Once the re has been established, carefully reposion
the re to the side of the oven. Connue to feed the re
with small amounts of wood unl the oven reaches an even
high heat. We have found that achieving a temperature of
315°C (600°F) – 345°C (650°F) is perfect for cooking on your
Cordierite Pizza stones included with your oven;
• COOKING UTENSILS: Always use cooking utensils (peels,
brushes and cookware) suitable for use with a wood-red oven;
• SEASONING: It is imperave that the oven is ‘SEASONED’ in
accordance with the instrucons provided by PINNACOLO and
included within this manual;
• Do not cook before the HARDWOOD has a coang of ash;
• NEVER USE CHEMICAL CLEANERS INSIDE THE OVEN:
The oven should only be cleaned when the oven is cool.
Only use the brush supplied with your oven or a brush
approved for use with your oven for clearing the ash or debris
from the cordierite stones. You may use a damp cloth to clean
or wipe the stone surface clean when the oven is cold;
• ONLY POSITION the oven on a solid, level, non-combusble,
stable surface (concrete, stone, etc.) that is capable of supporng
the weight of the oven. Never use on wooden or other
combusble surfaces;
• Maintain a MINIMUM clearance of 3 meters (approximately
10’) between the oven and any combusble materials (including
bushes, trees, wooden decks, fences, buildings, etc.) at all mes
when the oven is in use. BEWARE of ying sparks from the
opening of the oven;
• DO NOT USE gasoline, kerosene, or alcohol or any petroleum
based product for lighng the wood. Use of any of these or
similar products will cause an explosion and could possibly
lead to severe bodily injury;
• NEVER add any form of lighng uid to hot or even warm
coals, or to ignite or re-ignite a re in the oven. Never use any
petroleum based product in the oven. Use of this could result
in a ash back or an explosion which may cause severe burns;
• USE HARDWOOD FIREWOOD FOR BURNING ONLY.
DO NOT use charcoal, charcoal pre-treated with lighter uid,
pressure-treated lumber, chipped wood products, sappy wood
(such as pine) laminated wood, or any material other than
dry, untreated hardwood rewood in your oven. Use extreme
cauon when adding wood during cooking;
• AVOID TOUCHING HOT SURFACES AND USE EXTREME
CAUTION WHEN REMOVING THE DOOR. The oven will be
extremely hot during use. Use cauon when reaching into the
oven. To protect yourself from burns, always wear shoes, long
oven mis or gloves, and protecve clothing with long sleeves
while operang this oven;
• DO NOT LEAVE THE OVEN UNATTENDED WHEN IN USE.
Place the oven in an area where children and pets cannot come
into contact with the unit. Close supervision is necessary when
the oven is in use;
• ENSURE THE CASTERS ARE LOCKED AND THE OVEN IS
SECURELY POSITIONED. Never move the oven when it is in
use, or when it contains hot coals or ashes.
• Do not store or use the oven near gasoline or any other ammable
liquids, or where gases or ammable vapors may be present.
• Improper installaon, amendment, service, or maintenance may
cause property damage, personal injury, or death.
• USE CAUTION when assembling and operang your oven to
avoid scrapes or cuts from any sharp edges on the metal parts.
• This appliance is not intended for use by persons (including
children) with reduced physical, sensory, or mental capabilies,
or lack of experience and knowledge, unless they have been
given supervision or instrucon concerning the use of the oven
by a person responsible for their safety.
• WARNING! Keep children and pets away;
• WARNING! This OVEN may become extremely hot;
• NEVER ATTEMPT to move the oven while operang it.
WARNING READ AND UNDERSTAND
INSTRUCTIONS PRIOR TO ASSEMBLY

3
pinnacolopizzaovens.com
1
3
57
12
2
8
6
11
14
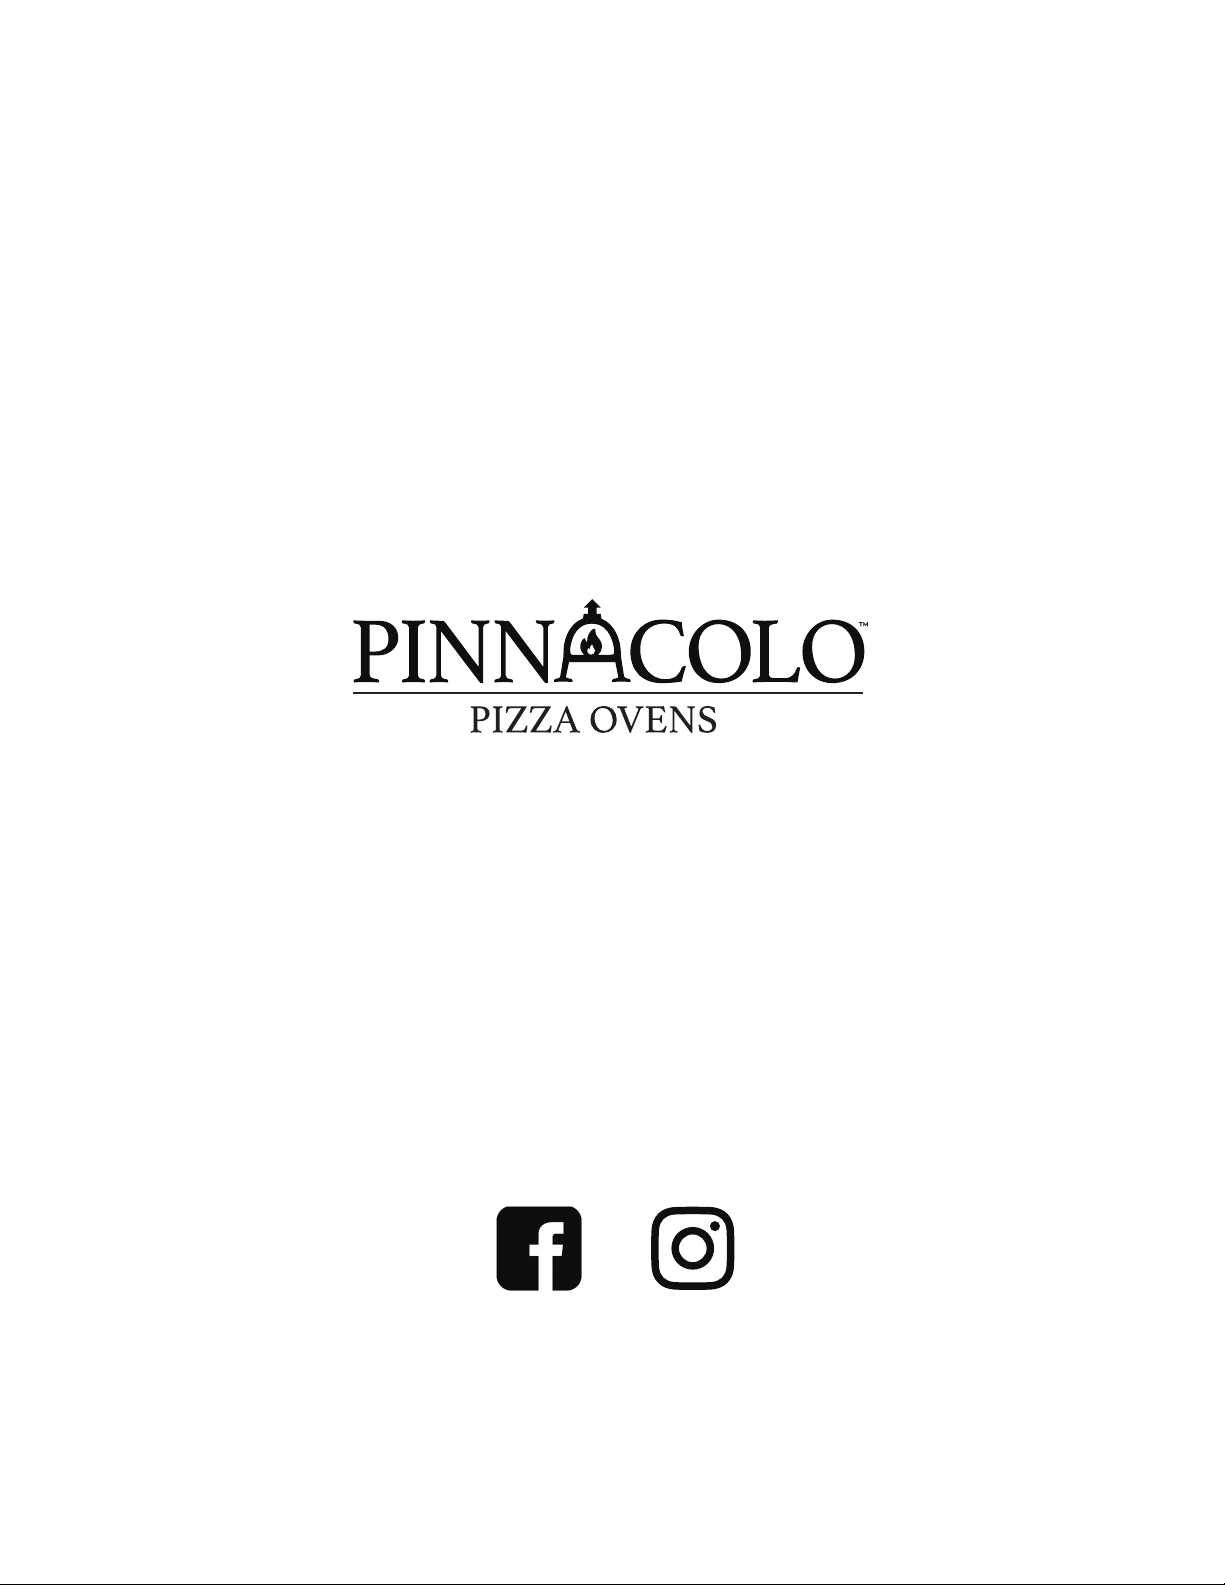
NO. FEATURE
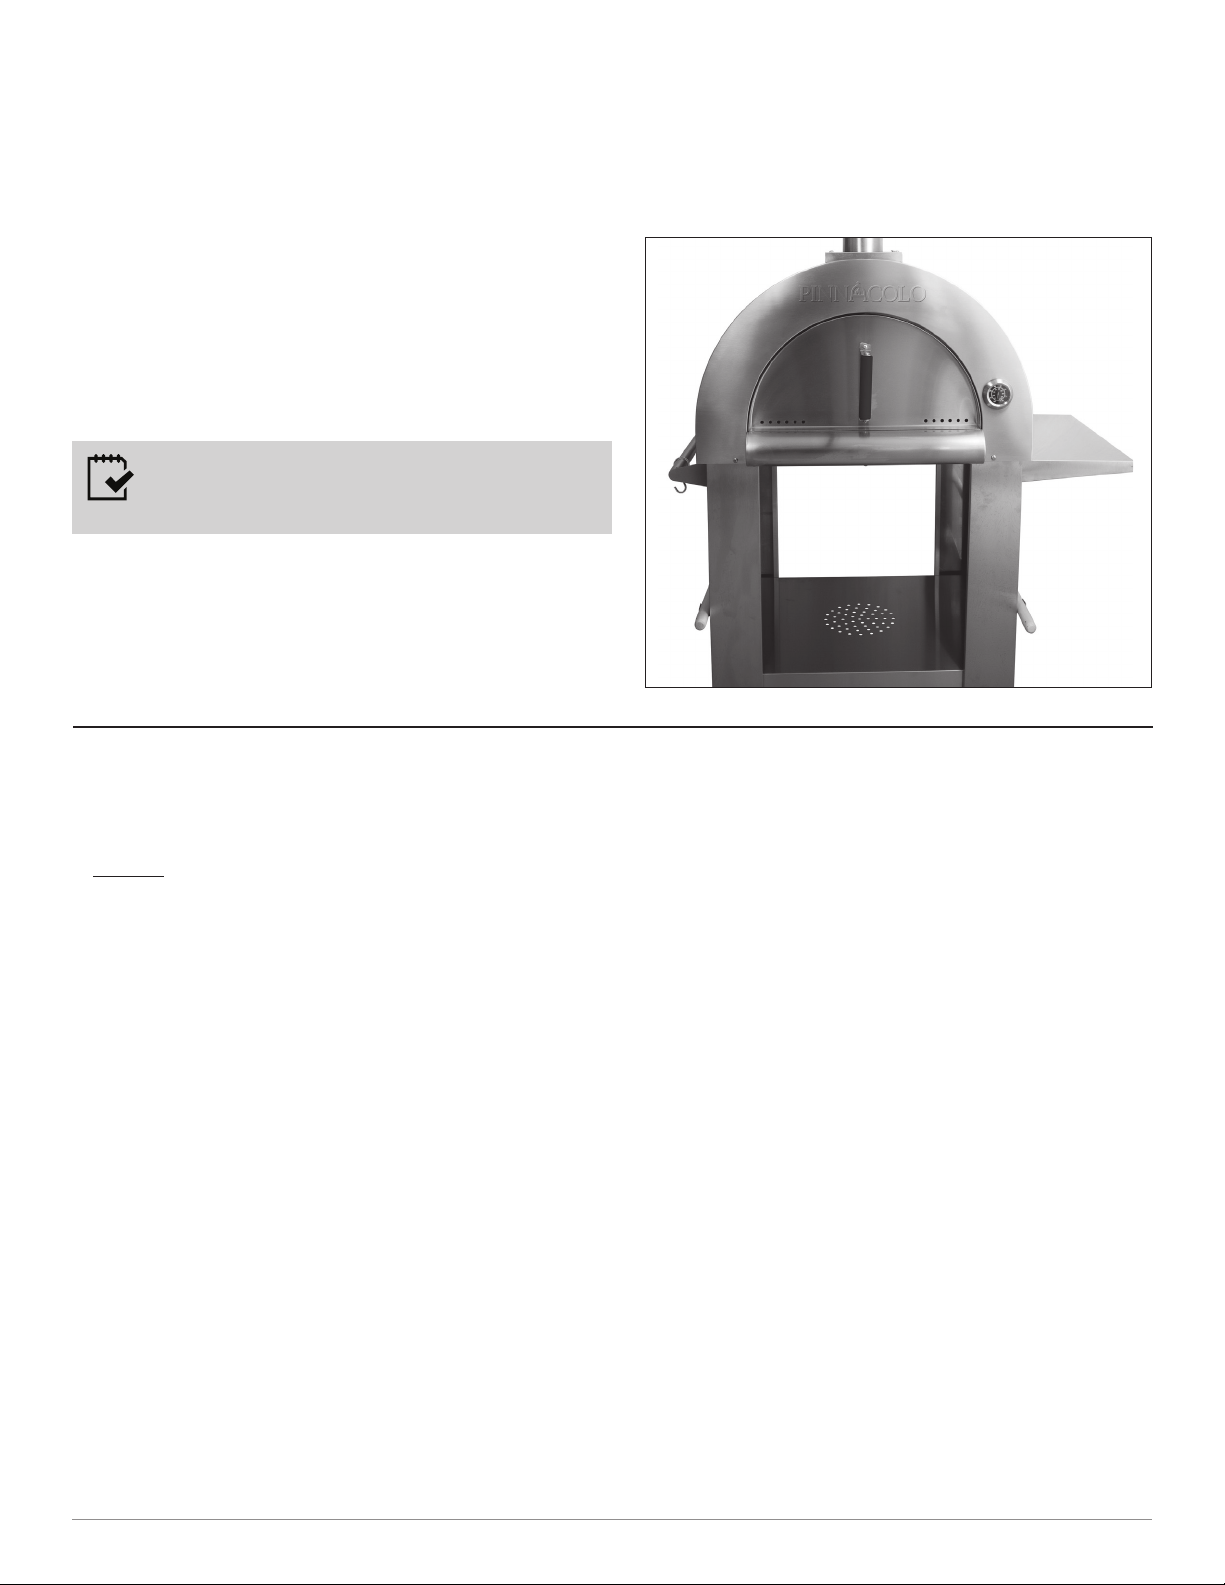
1Stainless Steel Flue Cap to prevent rain and
snow from entering
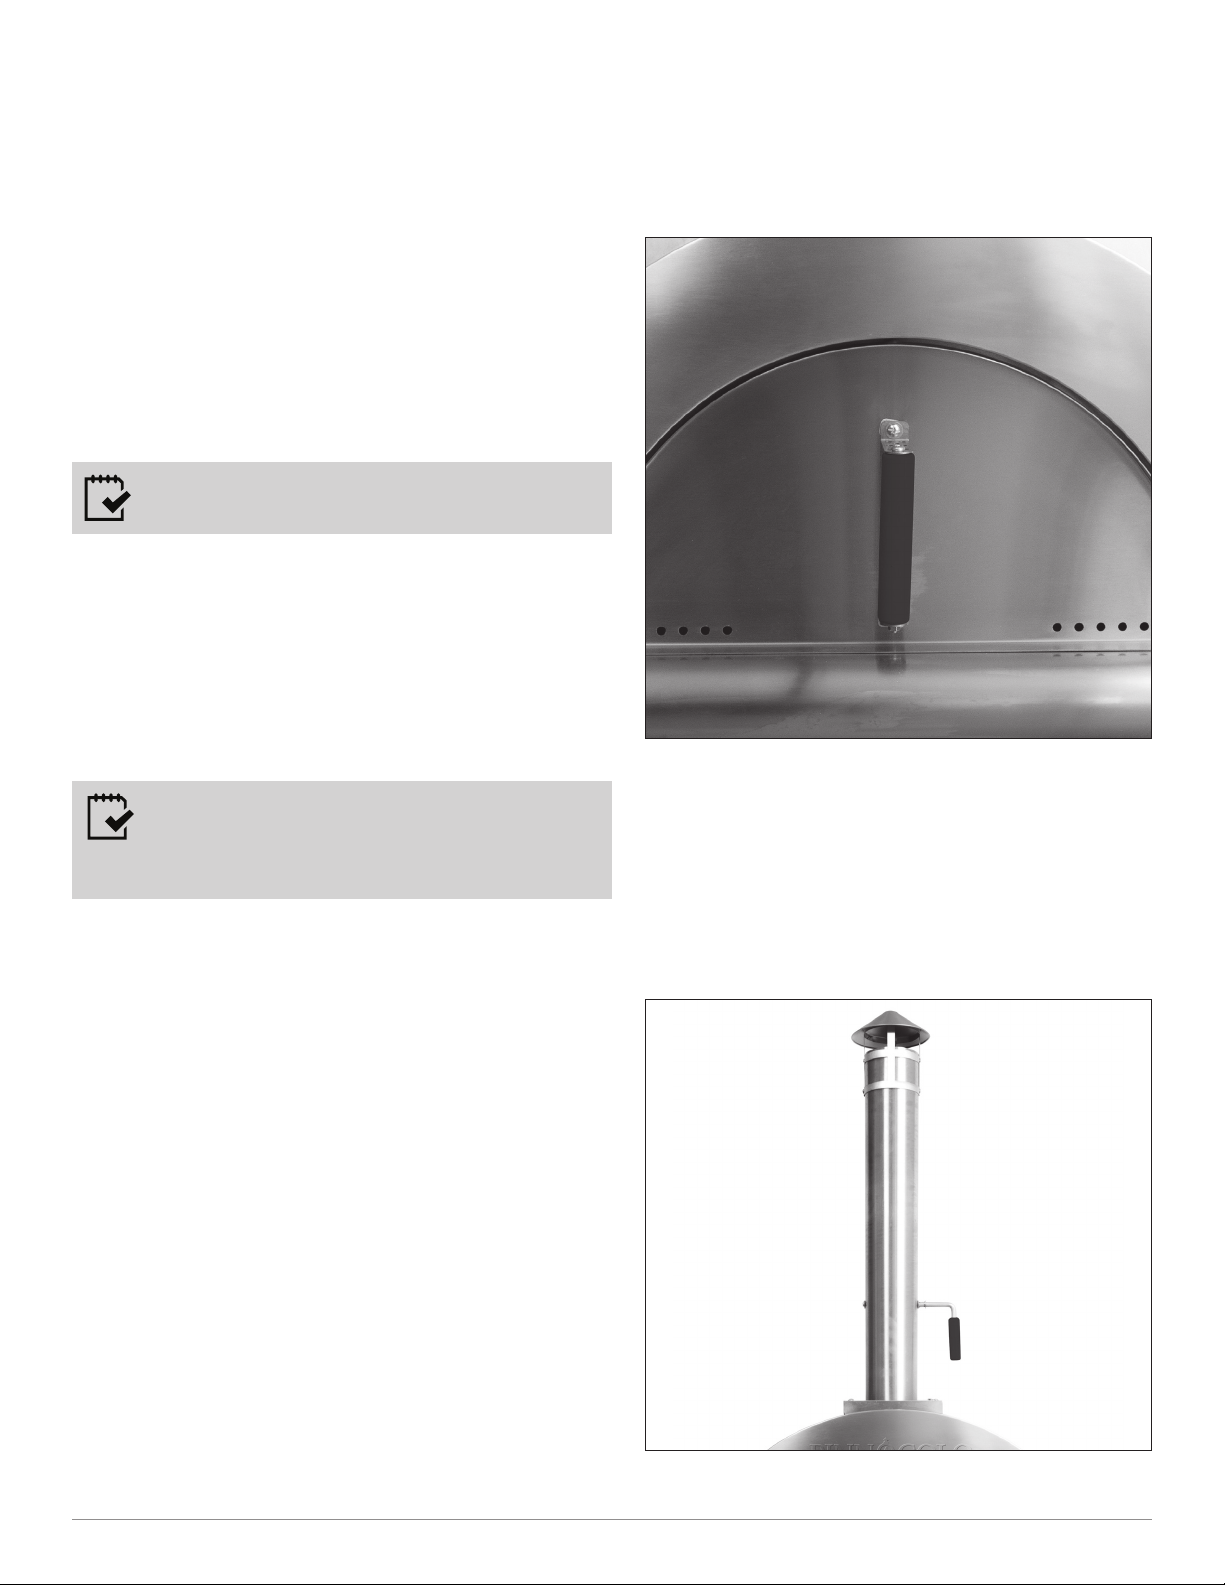
2Adjustable damper controls internal heat and
helps regulate air ow
3Heavy-Duty Stainless Steel construcon
provides strength, durability and beauty
4Handle
5Stainless Steel door includes vent holes
to allow for beer airow
6Slide-Out Stainless Steel ASH Drawer for user
friendly cleaning aer oven has fully cooled
7Stainless Steel door features a stay cool
wooden handle
8Built-in Thermometer assists in determining
the overall internal temperature
9Heavy duty stainless steel ulity shelf
10
“S” Hooks provided to hang oponal accessories
11
Bolt on tool brackets for hanging broom and peel
12 Boom shelf features predrilled vent and
drainage holes to prevent water from pooling
13 Heavy Duty solid core casters help making
posioning easier
14 Two (2) Solid core casters with built-in locks
to help secure the oven in place
PREMIO PIZZA OVEN FEATURES
9
4
10
13
4
PINNACOLO PREMIO PIZZA OVEN
1
28
24
32
12
16
18
14
13
3
9
7
8
10
6
5
4
34
33
31
21
20
23
22
29
30
27
26
25
11
2
15
19
35
36
17
37
38
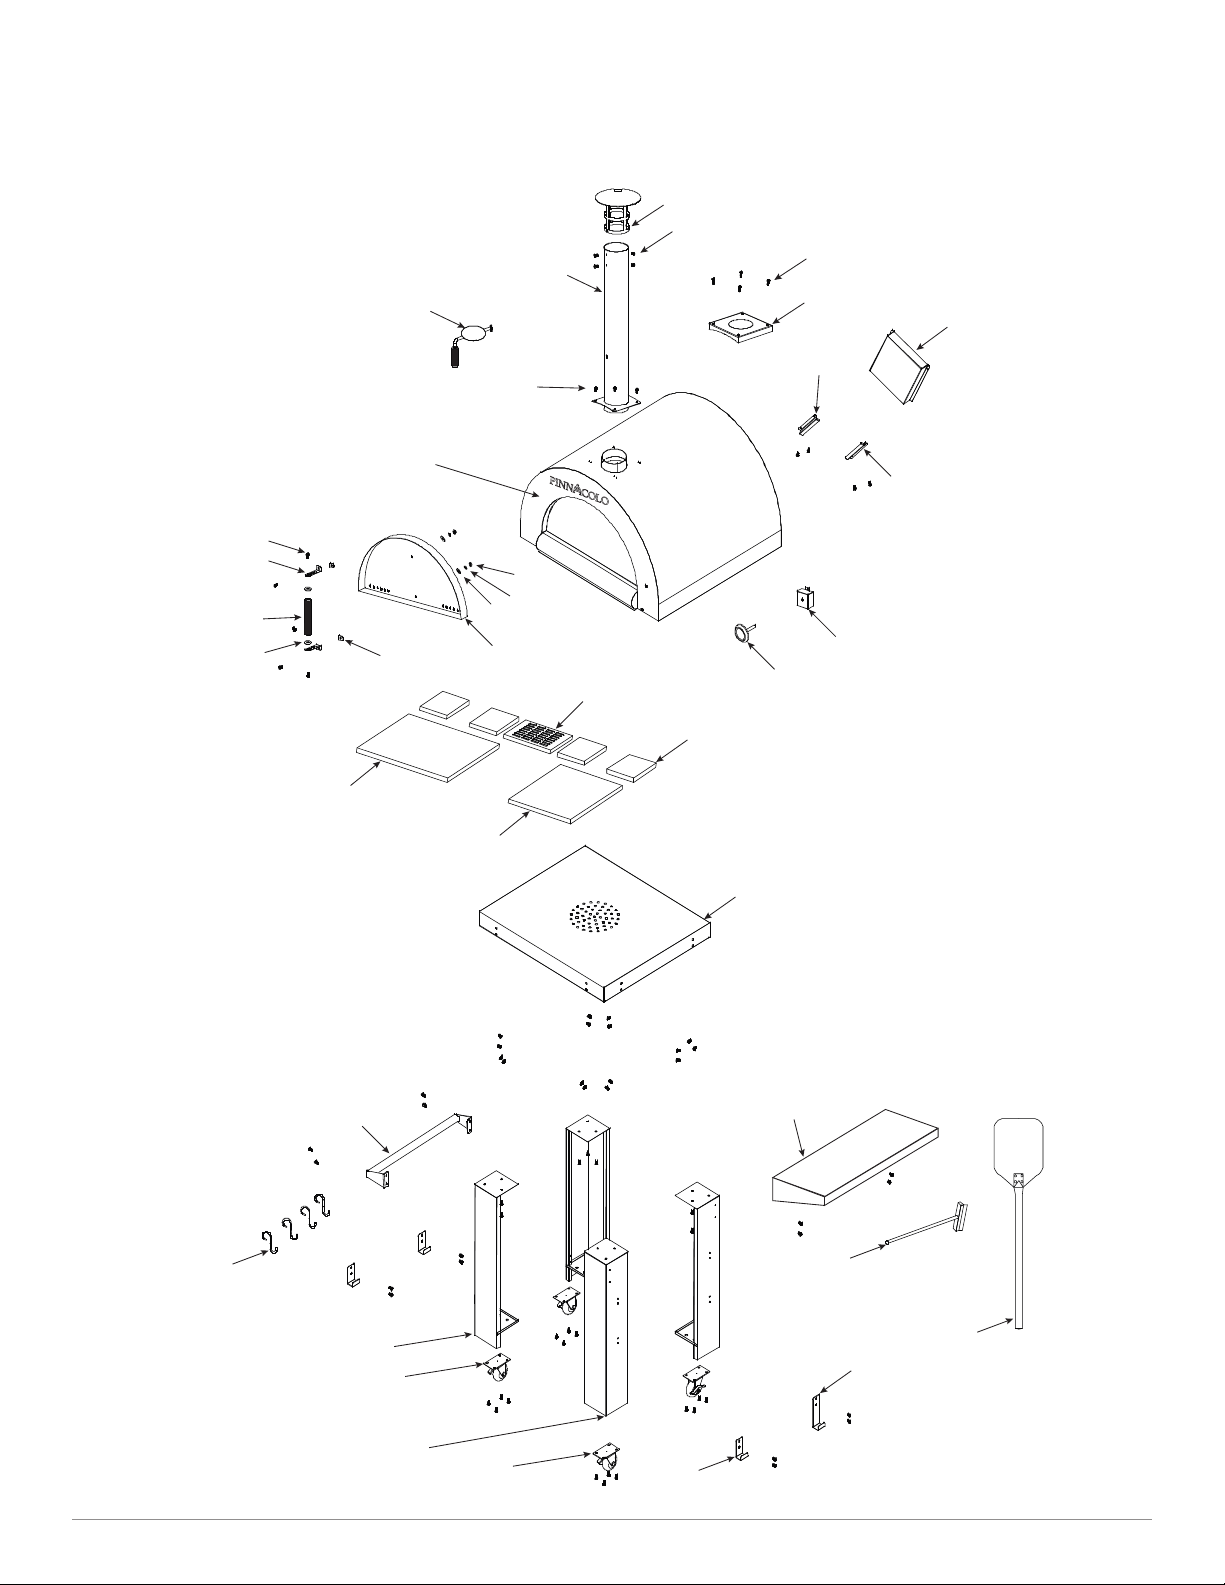
EXPLOSIVE VIEW
5
pinnacolopizzaovens.com
PART LIST
NO. PART NAME QTY
1Le Leg 2
2 Right Leg 2
3Oven 1
4 Ash Pan 1
5 Ash Support 1 1
6Ash Support 2 1
7Chimney 1
8Chimney Cap 1
9Chimney Handle 1
10 Chimney Boom 1
11 Boom 1
12 Door 1
13 Handle Support 2
14 Door Handle 1
15 Insulaon Mat 1 (Handle) 1
16 Insulaon Mat 2 (Handle) 1
17 1/4” 15mm Bolt (Handle) 4
18 1/4” Flat Washer (Handle) 2
19 1/4” Spring Washer (Handle) 2
20 Thermometer Support 1
21 Thermometer 1
22 Rigid Caster 2
23 Caster with Brake 2
24 Side Handle 1
25 Shelf 1
26 Oven Broom 1
27 Pizza Peel 1
28 “S” Hooks 4
29 “L” Hooks 1 3
30 “L” Hooks 2 1
31 Ash Cover 1
32 Pizza Stone 1 1
33 Pizza Stone 2 4
34 Pizza Stone 3 2
35 1/4” Nut 2
36 1/4” Bolt 48
37 1/4” 35mm Bolt 4
38 1/4” 10mm Bolt 4
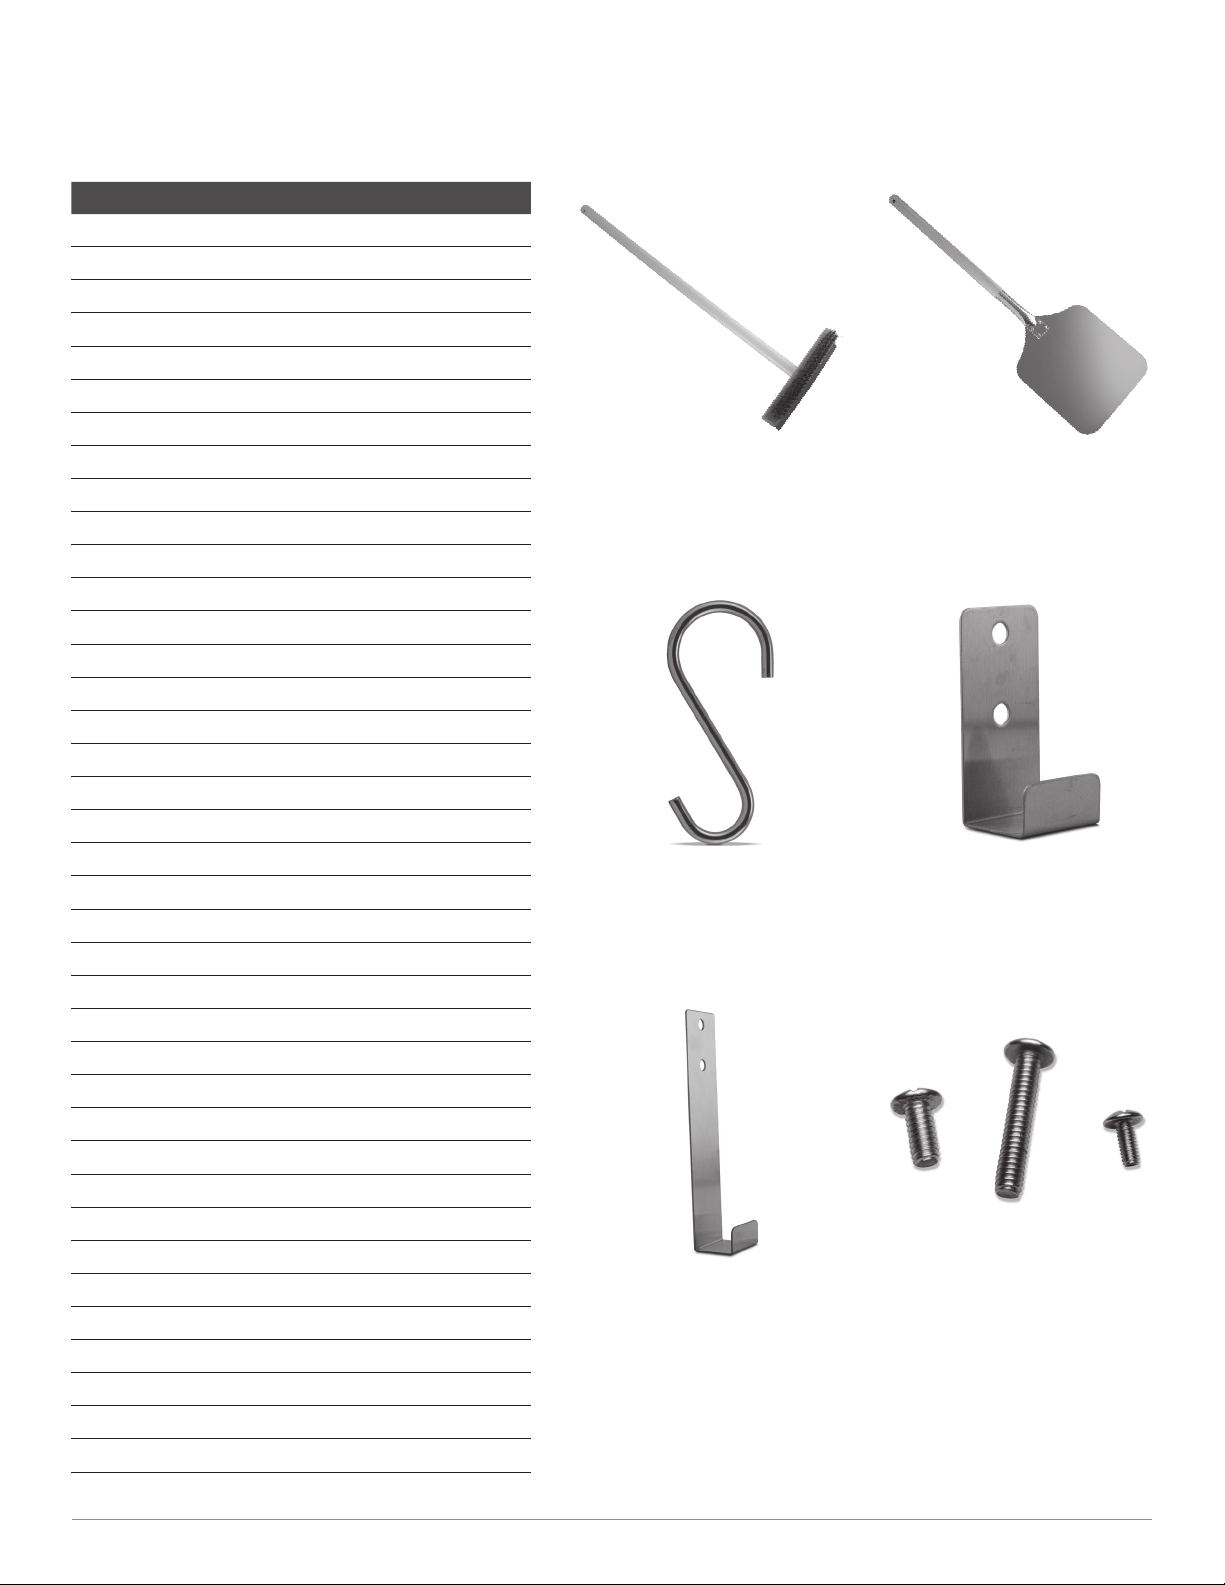
#26 – OVEN BROOM #27 – PIZZA PEEL
#28 – “S” HOOKS #29 – “L” HOOKS 1
#30 – “L” HOOKS 2 #36 – 1/4” BOLT
#37 – 1/4” 35MM BOLT
#38 – 1/4” 10MM BOLT
36
37
38

6
PINNACOLO PREMIO PIZZA OVEN
PREPARATIONS
Carefully unpack your PINNACOLO PIZZA OVEN.
A minimum of two (2) people should work in coordinaon to li
the oven.
The Dome Secon must be lied evenly (level) to prevent the
cordierite pizza stones from shiing and being damaged. We suggest
you posion all the components within reach in order to make your
assembly easier.
To prevent damaging the nish, the plasc coang, which protects
the surface of the oven, should be removed following assembly.
NOTE: Be certain that the plasc is removed
BEFORE seasoning your oven!
COOKING WITH FIRE
Cooking in your PINNACOLO PIZZA OVEN is similar to cooking
with a bbq or cooking in your home oven. In a short me, you will
learn how to control and maintain temperatures using your choice
of dry hardwood. You will learn how dierent woods aect the
avour of your foods. You can discover the many foods you can
cook and bake in your PINNACOLO PIZZA OVEN and how much
amazing avour cooking with wood-re makes. ENJOY!
The design of each of our ovens is related to the original POMPEII
style clay brick ovens dang back hundreds of years. The unique
dome design in combinaon with the stone base means that your
food is being cooked from above and below simultaneously. We
look at it like…your food is being blanketed with wood-red avour.
Your PINNACOLO PIZZA OVEN can achieve temperatures in
excess of 320°C (600°F). It is imperave that you use only
OVEN SAFE baking pans and use extreme cauon when handling
these products.
Using extreme temperature heat safe
oven gloves is suggested.
FUEL THE FLAME
FOR BEST RESULTS… Using dry hardwoods, such as oak, are
best suited for use in your oven. Oak will burn slower and help
maintain a more consistent temperature. The re should be
started slowly, and cooking should not be started unl ash begins
to be seen on the exterior of logs. NEVER USE pine, spruce or
any type of resinous woods. NEVER USE TREATED WOOD.
For best results, prepare and start the re in your PINNACOLO
PIZZA OVEN approximately one hour ahead of when you plan
to begin cooking. Wood used should be cut/chopped into small
pieces about 30cm – 45cm (12” – 18”) in length and range from
1cm – 5cm (1/2” – 2”) in thickness. Do not overload. We suggest
a maximum load of no more than 3kg (6.5lbs).
Start your re with a combinaon of pieces of kindling and
newspaper posioned in the centre of the oven. NEVER USE ANY
FORM OF PETROLEUM OR CHEMICAL FIRE STARTER! Light your
re using a match or an approved lighter. Be careful to avoid burning
yourself. EXTREME CAUTION SHOULD ALWAYS BE USED! Feed
the re by adding two or three larger pieces of wood or unl the re
becomes well established. Once the re is burning well, we suggested
the re be pushed to the side of your PINNACOLO PIZZA OVEN
using the broom provided with your oven.
NOTE: A small amount of wood will allow your
oven to quickly reach 650°F. Check the built-in
thermometer OR we suggest using a Point and
Shoot Laser Thermometer for conrmaon.
NOTE: We would suggest using FLAMERS
Natural Fire Starter for easy and eecve
lighng of your re.
7
pinnacolopizzaovens.com
To achieve the desired temperature within the cooking dome of
the oven, posion the door so there is enough air ow to keep
the ame burning. Add wood as needed to keep the re going.
You will see ames reach the top of the dome and curve around
to the other side. This is part of the design of the oven is normal.
However, be sure that you do not stoke the re to the point that
ames come out the opening. The oven is designed to cook from
the top and boom surrounding your food. Both the dome and
the stone oor will absorb heat.
Reaching and maintaining a temperature
between 320°C – 350°C (620°F – 650°F)
is opmal for pizza making.
The perfect temperature for cooking pizza is when the base
stones (cordierite stones) achieve a temperature of 300°C – 350°C
(572°F – 662°F). This temperature will bake your pizza crust to
a crispy nish. It will also prevent the dough from scking to the
stones. CAUTION must be taken when inserng the pizza into
the hot oven. The pizza should be inserted using the pizza peel.
We suggest that you wear heat protecve gloves whenever your
hands are near or entering the oven. The pizza should be rotated
during the cooking process. The poron closest to the heat
source will bake faster and be crispier. Rotaon helps ensure
an even nish.
When you have a stone temperature of 225°C – 315°C
(450°F – 600°F) this would be the prime temperature for
roasng meat, cooking vegetables, baking sh and/or seafood.
Please review the PINNACOLO website for recipes. We will
be posng those we use or develop and will also include those
provided by other members of the PINNACOLO family.
It should be noted that breads, rolls, desserts and pies should be
baked with the oven maintaining a temperature in the range of
160°C – 220°C (320°F – 428°F). Baking at this level will likely be
achieved once the physical re has stopped burning. The longer
that the oven has been heated, the longer the heat will likely be
retained for cooking without an acve re.
NOTE: If you plan to remove the ash, embers or
debris, aer the re has ended, you must do this
when the oven is cold and with safety in mind.
Use only a broom or brush suited for this oven.
A heat safe container should be readily available.
Heat protect gloves should be worn. Any residue
needs to be handled and disposed of carefully
once it is conrmed that everything is OUT
and cold.
SAFELY CLEANING YOUR PINNACOLO OVEN:
The oven should ONLY be cleaned when cold. The stones should
be swept and cleared using the broom provided or with a broom
or brush designed for use in a wood burning oven. NEVER forcibly
exnguish the re using water. This could result in serious injury
or damage to the oven. NEVER use any chemical cleaners or
petroleum based cleaners. You can wipe the stone surface using
a damp cloth aer it has been well cleared.
PREPARATIONS
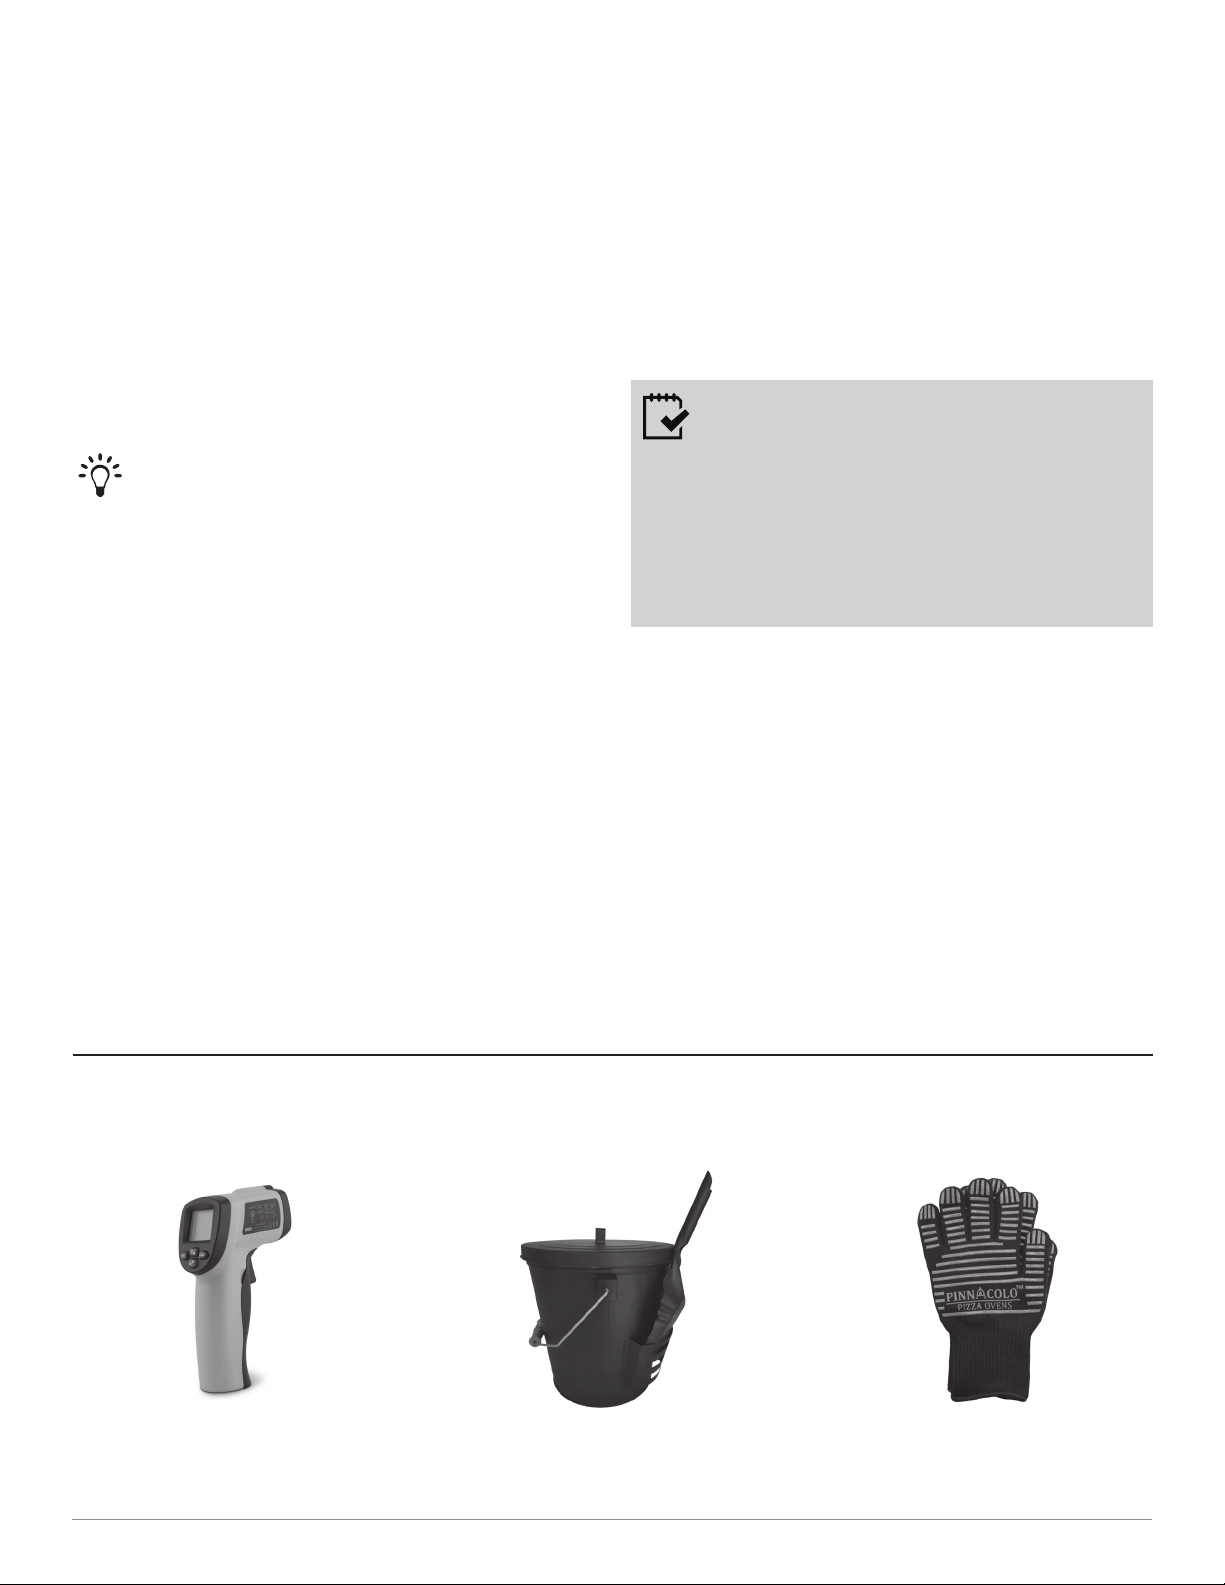
WE SUGGEST YOU OWN THE FOLLOWING ITEMS
LASER THERMOMETER
To ensure the actual temperature
of the stones within the oven.
ASH BUCKET AND SHOVEL/SCOOP
Designed for storing embers,
ash and debris.
HIGH HEAT RESISTANT GLOVES
For handling anything near or
in the cooking chamber.

8
PINNACOLO PREMIO PIZZA OVEN
Follow these steps in the order shown to assemble your PINNACOLO PIZZA OVEN. A minimum of two (2) people should work in
coordinaon to complete the assembly and posion the oven for use.
Begin by securing the boom shelf to the legs using the 16pcs of
1/4” 15mm bolts provided.
NOTE 1: The swivel casters with built-in brakes
must be posioned on either the right or le side
of the unit.
NOTE 2: The legs with the pre-drilled holes must
be posioned facing the side of the stand and not
facing either the front or rear of the oven.
NOTE 3: The boom shelf is rectangle in shape
and the longer side will be the front/rear of the
unit. Legs with the pre-drilled holes should be
secured to the shorter sides of the boom shelf.
ASSEMBLY
Once the base secon is assembled it should be posioned on
a solid and level surface with the wheels towards the ground.
We suggest that the wheel brakes are engaged to keep the base
from moving. In order to secure the base to the cooking dome
secon of the oven, the oven should be lied by at least 2 people
onto the legs of the base secon. IT IS CRITICAL that the cooking
dome is raised evenly to prevent damage to the cordierite cooking
stones. Once in place, the cooking dome must be secured to the
base using the 12pcs of 1/4” 15mm bolts provided.
STEP 1
STEP 2
9
pinnacolopizzaovens.com
Install chimney cap (Part No. 8) to chimney (Part No. 7) and secure
using the 4pcs of 1/4” 10mm bolts.
Secure chimney assembly to the top of the cooking dome using
the 4pcs of 1/4” bolts (Part No. 36).
Secure outer chimney plate to the cooking dome using 4pcs of
1/4” 35mm bolts.
Secure the wooden handle to the door itself using the necessary in
the order as follows;
– Posion 1 x 1/4” 15mm bolt through handle.
– Place an insulaon mat (Part No. 15 or 16) behind the handle.
– Posion the handle against the door with the nut through
the pre-drilled hole on the face of the door.
NOTE: the outside of door has the edge
surround towards the handle.
– Once the bolt is through the hole, posion the second
insulaon mat in the inside of the door.
– Apply the metal washer (Part No. 19) onto the bolt and secure
with the nut (Part No. 35).
- Once bolts are in posion with nuts aached, ghten the nuts
using a 10mm wrench.
NOTE: The door itself may ex slightly. This
is inherent to the design of the door in order
to permit the stainless steel door to expand
and contract.
ASSEMBLY
STEP 3
STEP 4
10
PINNACOLO PREMIO PIZZA OVEN
Now that your PINNACOLO PIZZA OVEN is assembled, it is me
to SEASON the oven in order to prepare it for cooking.
SEASONING is the process necessary to remove any moisture or
residue that might accompany your oven during the producon
and/or shipping process.
In order to SEASON YOUR OVEN, you will be required to Light
and Burn logs in the oven. For best results, this will need to be
done at 2 separate mes.
The 1st burn will involve starng a small re in the centre of
the oven. The goal is to maintain a burning temperature of about
150°C (300°F) and have that connue for a period of about
1 hour. Once you have maintained this temperature for an hour,
you would simply allow the oven to cool. This will take many
hours and the cooling poron is also part of the seasoning process.
About 24 hours later, when the oven interior should be cold, we
suggest you carefully remove any ash and debris that remains on
the pizza stones.
Now, once again, you will be required to start a new and fresh re.
During this 2nd burn, you will also posion the logs in the centre
of the oven, although this me the goal is to prepare a re that
reaches and maintains a temperature of 260°C (500°F) for 1 hour.
The following day, once the oven has cooled, clear the ash and
debris that remains on the pizza stones.
Once you have completed these 2 burns, you have SEASONED
your oven and will be ready to use your oven to prepare amazing
meals for many years to come.
Posion and secure one (1) handle (Part No. 24) and one (1) shelf
(Part No. 25) on side of the pizza oven using the 8pcs of 1/4” 15mm
bolts supplied. Shelf and handle can be posioned to your choice
of side.
Determine which side you prefer to have your tools on and secure
the 3pcs of predrilled hooks using the 8pcs of 1/4” x 15mm bolts.
NOTE: Posion the longest hook at the lower
rear posion of the base in order to support the
Pizza Peel
Hang the “S” hooks on the handle in order to hang any future tools
or accessories.
ASSEMBLY
SEASONING YOUR OVEN
STEP 5

11
pinnacolopizzaovens.com
LIMITED WARRANTY
Fire One Up Sales Inc., the importer and distributor of the
PINNACOLO PIZZA OVENS brand of Outdoor Ovens, warranes
the Stainless Steel ovens and their components, including the body,
oor, venng system, factory nish, stand and door (hereinaer
referred to as the Product) to be free of defects in materials and
workmanship for a period of one (1) year from me of purchase.
Qualicaons of the Warranty
The complete Product Warranty does not apply to the following:
1. The Product was not assembled or installed in accordance
with the instrucons or local building codes.
2. This Warranty does not cover any hairline cracking in the
cordierite stones, or problems caused by extreme temperatures.
3. The Product has been subjected to non-standard or
inappropriate use, including but not limited to tossing or
throwing rewood into the oven with force, addion of
non-approved accessories or cooking devices, or burning
inappropriate or abnormal woods including; driwood, coal,
plywood and woods that have sap, include chemical treatment
or are not designed for burning in an outdoor oven.
4. The Product has been subject to icing or wet-mopping while
the oven is heang or during the cooling period, which
can cause cracking or damage to the oven oor or metal
components, or improper chemicals or liquids have been
used to clean or sanize the interior of the Product.
5. This Warranty does not cover any damage caused by storing
any material either on top, below or inside of the Product.
6. The Warranty does not apply to normal wear and tear or any
parts of the Product that would need replacing under the
normal condions including;
a. Normal or minor cracking due to expansion and
contracon stress relief in the refractory materials,
including but not limited to the cordierite stone.
b. Scratches to the exterior surface during normal use.
c. Any discoloraon due to neglect, weather condions, and
any areas exposed to smoke or any aspect of the Product
that may deteriorate as a result of normal use or aging.
7.
This Warranty does not cover damage to, or failure of the Product,
resulng from natural causes, or other catastrophic events, such a
ood, freezing, re, earth movement, wind or storms.
Limitaon of Liability
It is expressly agreed and understood that Fire One Up Sales
Inc., sole obligaon and the Purchaser`s exclusive remedy under
this Warranty, and under any other Warranty whether expressed
or implied otherwise, shall be limited to replacement, repair, or
refund up to the original purchase price of the Product, excluding
shipping costs. Such liability shall not include, and Purchaser or
other third pares, specically renounce any rights to recover
special, incidental, consequenal, or other damages of any kind
whatsoever, including, but not limited to, injuries to persons or
damage to property, loss of prots or ancipated prots, damage
to business reputaon or goodwill, all costs incurred receiving,
unloading, moving at your locaon, and installing the Product,
or loss of use of the Product.
In no event shall Fire One Up Sales Inc., or any reseller, business
partner or associated business, be responsible for any incidental
or consequenal damages caused by defects in Products, whether
such damage occurs, or is discovered before or aer replacement
or repair, and whether or not such damage is caused by Fire One
Up Sales Inc. or its representaves. The direcon of any Warranty
with respect to this Product is limited to the legimate claims
received within the duraon of the foregoing Warranty.
Warranty of replacement parts or Product shall only be from the
original purchase date of the Product, not the date or repair or
replacement covered under this Warranty. Parts to be replaced
under the Warranty will be repaired or replaced with new or
funconally sound parts at the discreon of Fire One Up Sales Inc.
or their representave or designated service provider.
NOTE: Some Provinces or States do not allow the exclusion or
limitaon of incidental or consequenal damages, or the duraon
of implied warranty, so the above exclusions or limitaons may
not apply to you.
INVESTIGATION OF CLAIMS AGAINST WARRANTY
Fire One Up Sales Inc. reserves the right to invesgate any and
all claims against this Warranty and to decide upon the method
of selement.
Before any Product is returned, Fire One Up Sales Inc., or its
authorized representave, must provide Purchaser with wrien
return authorizaon and instrucon for preparaon of the shipment.
Failure to properly package Product for return may result in
Purchaser being billed by Fire One Up Sales Inc. Fire One Up Sales
Inc. reserves the right to bill Purchaser for return freight if Product
was found to be damaged through negligence or Warranty was
voided, as outlined in this Warranty. Reference your original
Terms of Sale Agreement for addional details.
DEALERS HAVE NO AUTHORITY TO ALTER THIS WARRANTY
Fire One Up Sales Inc. employees and dealers have no authority
to make any Warranes, nor to authorize any remedies in addion
to, or inconsistent with, those stated above.
HOW TO REGISTER A CLAIM AGAINST THE WARRANTY
In order for any claim under this Warranty to be valid, Fire One
Up Sales Inc. must be noed to the claim defect by emailing
(sales@reoneup.com) or through the ocial chat access in the
PINNACOLO PIZZA OVENS website.
All claims against this Warranty should include the Product Model,
original invoice number, date of purchase, date of installaon, a
descripon of the defect, photographs or the area of concern, and
a full descripon of the circumstances giving rise to the Warranty
claim, if known. Please examine all of the contents of your delivery
as soon as possible aer receipt and inform Fire One Up Sales
Inc. or the place of purchase within ten (10) days if any items are
missing, incorrect or damaged.
By following the informaon within you can expect to
ENJOY your Pinnacolo Pizza Oven and great tasng food,
for many years to come!
Don’t forget to share posts and stories on
PINNACOLOPIZZAOVENS.COM
FIREONEUP.COM
© Copyright 2021 PINNACOLO Pizza Ovens are a trademark of Fire One Up Sales Inc.
This manual suits for next models
1
Table of contents
Other PINNACOLO Kitchen Appliance manuals


