pintexx pinBox II User manual

pinBox II
Manual
Version 1.0

pinBox II
Table of contents
1Introduction.....................................................................................................................................3
2Set-up...............................................................................................................................................4
2.1 Scope of delivery and device features........................................................................................4
2.2 Safety.........................................................................................................................................4
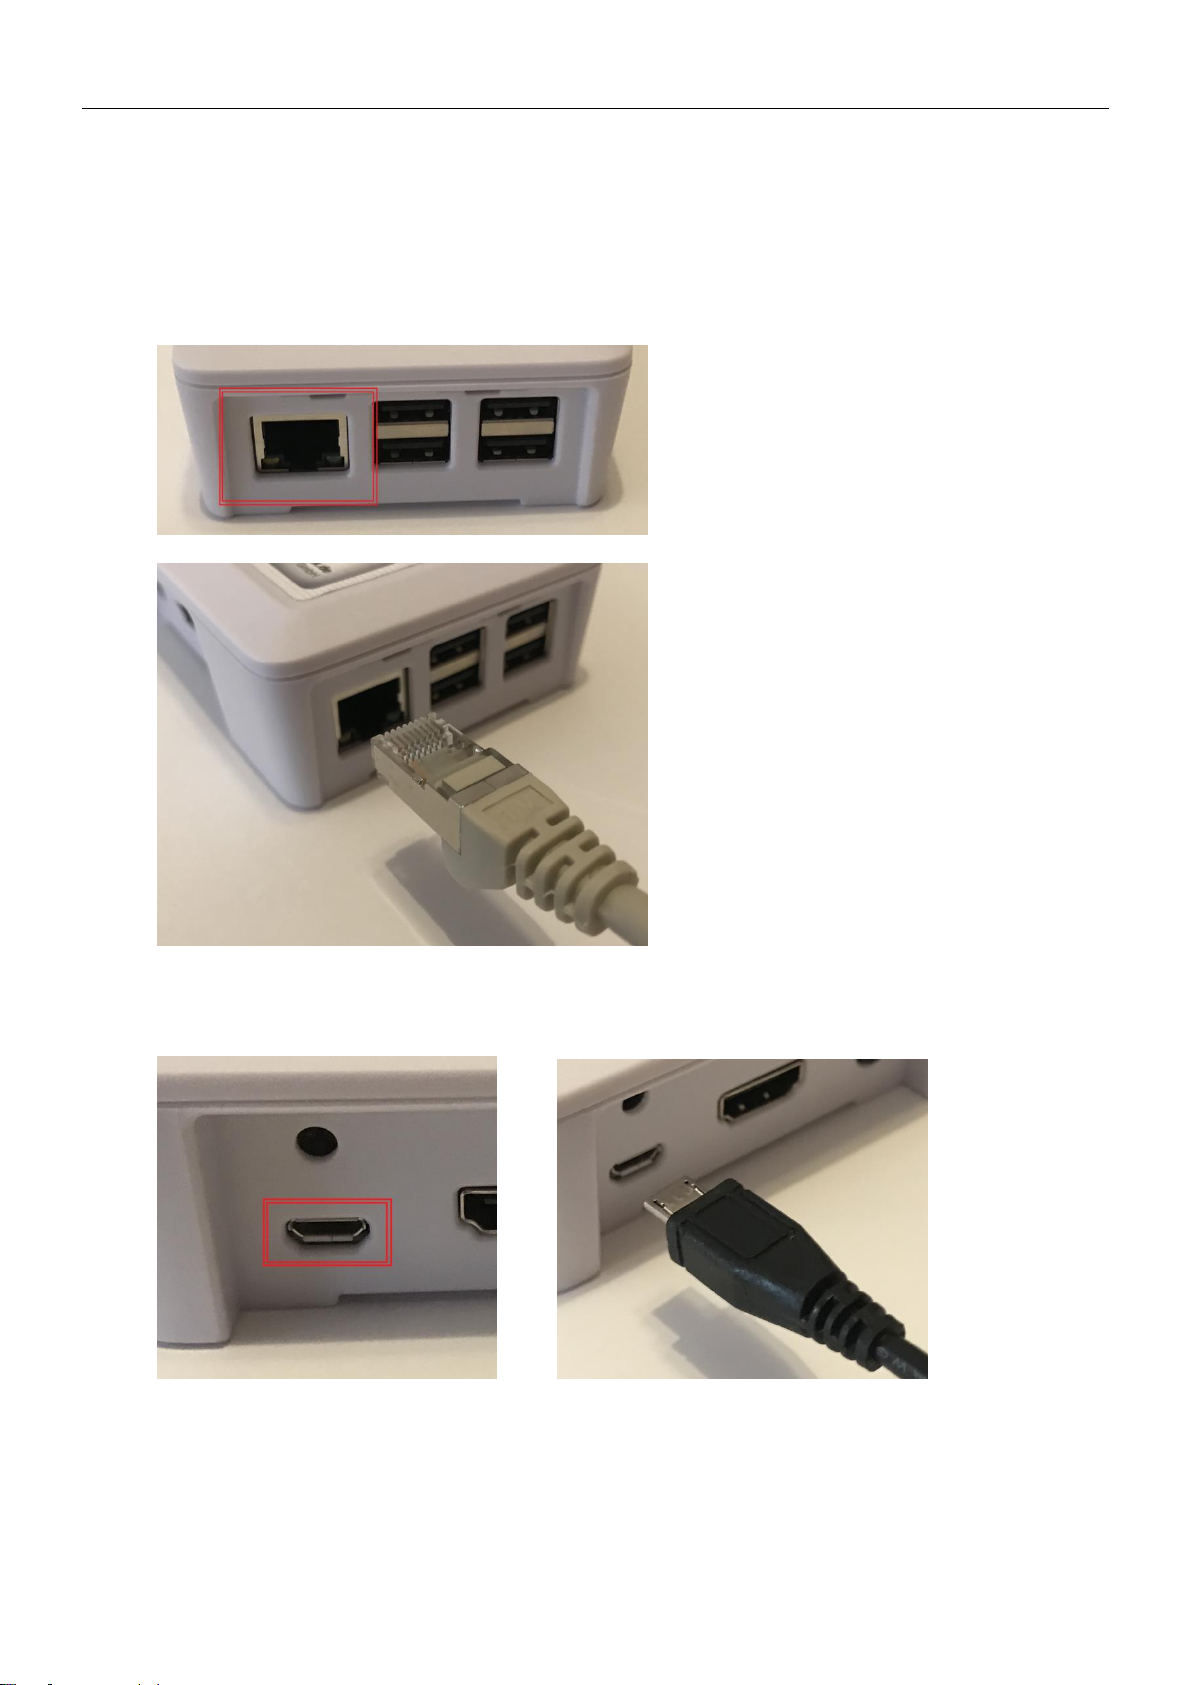
2.3 Hardware installation..................................................................................................................5
2.4 Software installation...................................................................................................................6
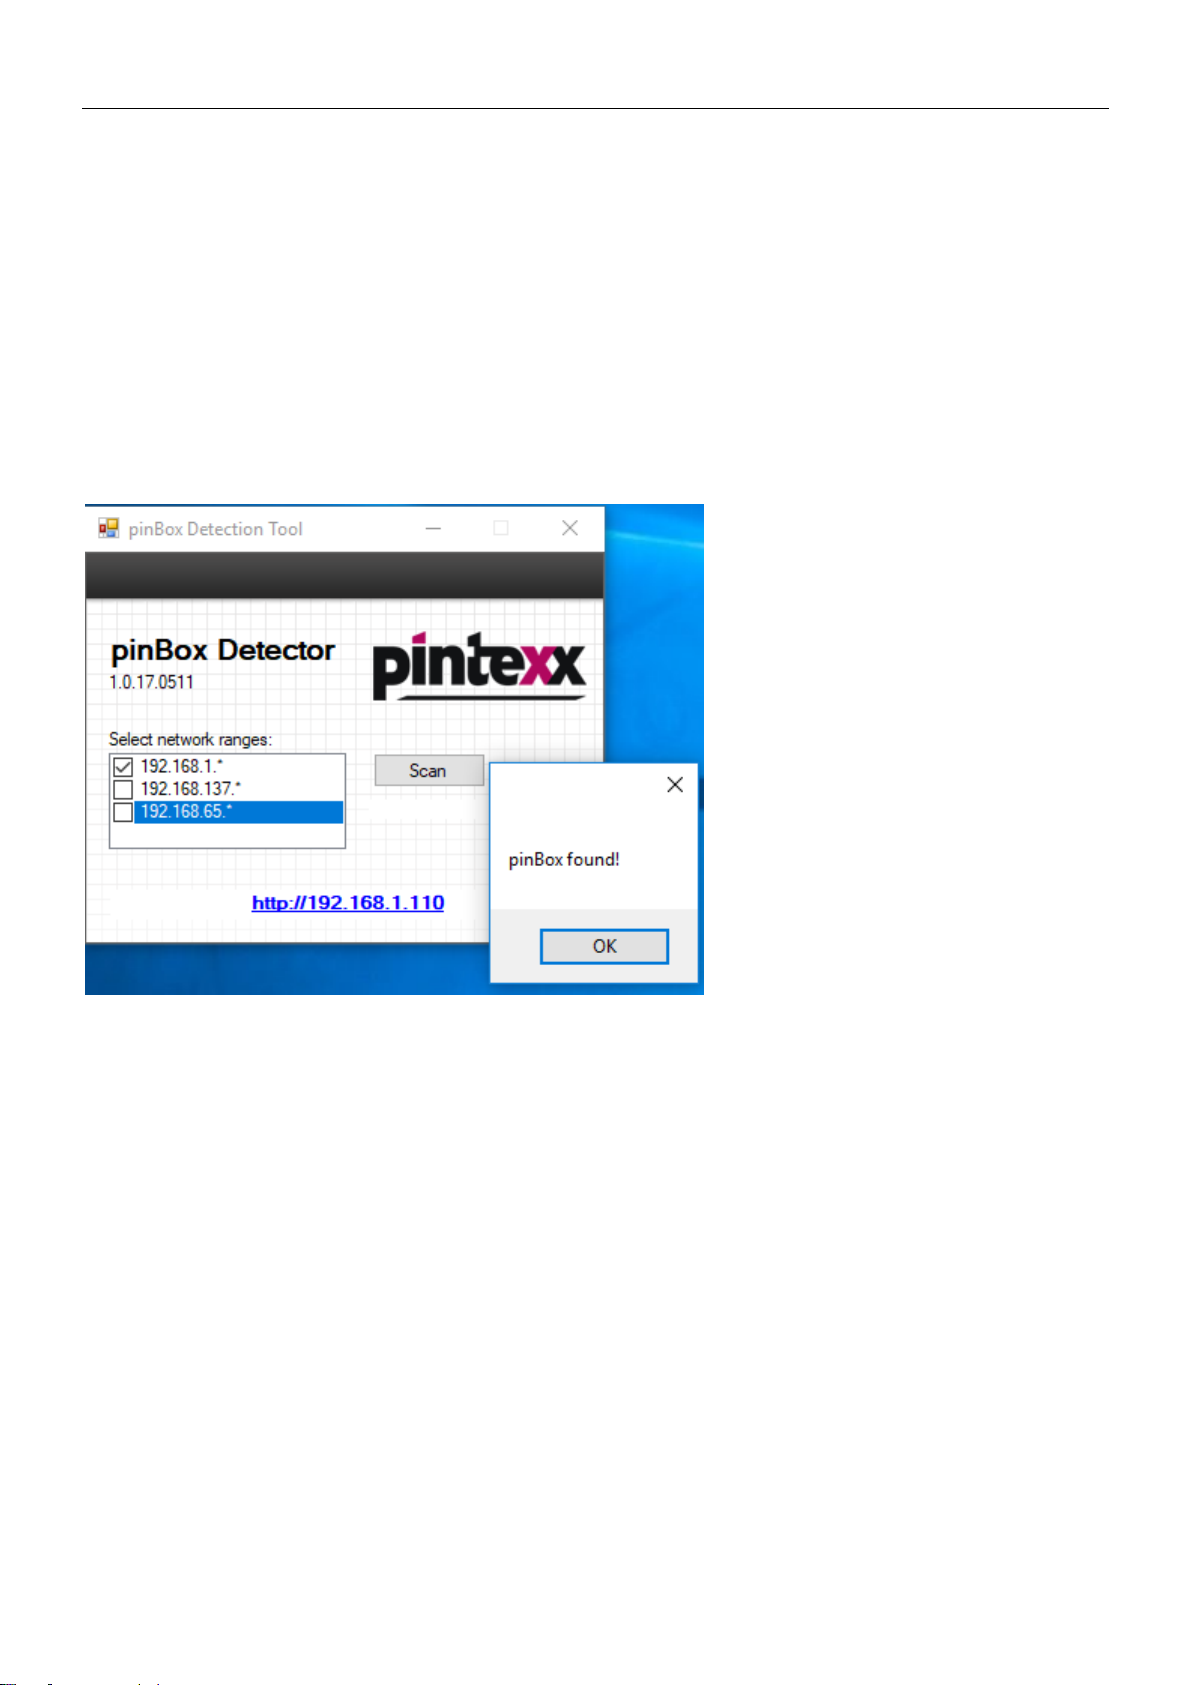
2.4.1 Determining the IP address.................................................................................................6
2.4.2 About the "Detection Tool" ..................................................................................................6
2.4.3 About the DOS box .............................................................................................................6
2.4.4 Opening the admin tool.......................................................................................................6
3Quick test.........................................................................................................................................8
4Basics ..............................................................................................................................................9
4.1 Start configuration......................................................................................................................9
4.2 Additions..................................................................................................................................10
5Access via the Internet .................................................................................................................11
5.1 Setting up a domain .................................................................................................................11
5.1.1 Public IP............................................................................................................................12
5.2 Dynamic DNS service ..............................................................................................................13
5.2.1 Integrated DynDNS services .............................................................................................13
5.2.2 Router...............................................................................................................................13
5.3 Port authorisation.....................................................................................................................13
6Encryption configuration..............................................................................................................15
7Direct access configuration..........................................................................................................16
7.1 Target computer.......................................................................................................................17
7.1.1 Determining the IP address...............................................................................................17
7.1.2 Allowing access to PCs.....................................................................................................17
8Two-factor authentication.............................................................................................................19
9Active directory/LDAP/radius.......................................................................................................20
10 Notification.................................................................................................................................21
11 System........................................................................................................................................22
12 Printing.......................................................................................................................................23
13 Changing the password ............................................................................................................24
14 IPv6.............................................................................................................................................25
15 Info..............................................................................................................................................26
16 Licensing/registration ...............................................................................................................27
17 Using the pinBox .......................................................................................................................28
18 Technical specifications............................................................................................................29
19 Miscellanea ................................................................................................................................30
19.1 System requirements ...............................................................................................................30
19.2 Copy protection........................................................................................................................30
19.3 Legal information......................................................................................................................30
19.4 Disposal...................................................................................................................................30

pinBox II
1 Introduction
The pinBox is a hardware box based on ARM technology (Raspberry Pi). It is connected to a local
area network, usually to a router or a switch. Appropriate port authorisations in the router/firewall will
allow access to any PC in the network via a browser.
.
Unlike a so-called VPN, the pinBox does not require any installations or configurations on the user
side. Moreover, it needs no browser extensions or other tools.
The combination of HTML5 technology and the Internet allows access -provided Internet is
available - to PCs, mobile devices and desktops of all operating systems. You just need a browser.
Access security is based on Internet standards such as HTTPS/SSL and the use of certificates. The
pinBox supports the free certificate system "Let's Encrypt" for free certificates. Furthermore, it also
supports so-called two-factor authentication via email or Google Authenticator.
The differences to pinBox I are described here:
https://www.pintexx.com/de/products/pinbox-compare
The following documentation is based on the structure of the pinBox I, making it easier to switch to
the pinBox II.

pinBox II
2 Set-up
It is necessary to install the hardware and the software for the initial setup of the pinBox.
2.1 Scope of delivery and device features
The package includes the hardware box, a network cable and a power adaptor.
2.2 Safety
Please note the following safety instructions:
- Operate the pinBox in a dust-free and dry place away from direct sunlight with adequate
ventilation.
- The pinBox may only be operated inside buildings. Ensure that liquids do not enter the device.
- The pinBox must not be opened, as you may endanger yourself by improper opening.

pinBox II
2.3 Hardware installation
1.) Remove the pinBox from the packaging and connect it to a router, hub or switch using the
network cable.
2.) Connect the power adapter to the pinBox and the mains electricity supply.
Switch on the device.
3.) Wait approx. 2-3 minutes until the system is ready for operation.

pinBox II
2.4 Software installation
2.4.1 Determining the IP address
In order to access the web interface, the IP address must first be determined.
2.4.2 About the "Detection Tool"
Download the pinBox Detection Tool from the Pintexx Home Page.
The tool detects all corresponding networks and then starts determining the IP address.
If a pinBox system is found, a link with the IP address is displayed which allows direct access to the web
interface.
2.4.3 About the DOS box
Open a DOS box (right-click on Windows icon, run, "cmd" and enter "nslookup pinbox" in the box. The
IP address should then be displayed
2.4.4 Opening the admin tool
If the IP address is known, the system can be retrieved via
http://<IP Adresse>
in a browser.

pinBox II
When first logging in, the access portal for the user appears.
By default, 3 users are defined:
Login: user1-user3
Password: 12345678

pinBox II
3 Quick test
After commissioning, a demo configuration is set up.
Perform the following steps for the quick test:
1. Enter the pinBox <IP-Adresse>
2. Log in to the remote portal with
Login: user1
Password: 12345678
3. Go to the desktop app and start the connection displayed
Log in to the demo desktop with
Login: testuser1
Password: 12345678

pinBox II
4 Basics
The pinBox II is based on the pinApps platform and, therefore, includes the following apps:
System app
Applications app
Console app
User app
Remote app
The manuals for the respective apps can be found on the Pintexx homepage.
We, therefore, strongly recommend the documentation for:
pinApps - Getting started
pinApps - General information
pinApps - System app
pinApps - Applications app
pinApps - Users app
pinApps - Remote app
4.1 Start configuration
The pinBox is configured after startup so that all apps are functional.
The current IP address is automatically set in all apps.
The Users app (LDAP) is used as authentication. If an AD is to be used, this can be configured in the
Remote app admin under Settings -> Directory.
The remote maintenance console is disabled.

pinBox II
4.2 Additions
The individual apps have these accesses:
Link
App
<IP>/system
System app
<IP>/applications
Applications app
<IP>/console
Console app
(not released on first installation)
<IP>/ users
Users app admin
<IP>/remote
<IP>/remote/adminlogin
Remote app user
Remote app admin
User management is done by default in the Users app.
The connection is configured in the Remote app for this.
After setup, the following users are defined:
Remote portal:
Login: user1-user3
Password: 12345678
All admin accesses:
Login: administrator
Password: 12345678

pinBox II
5 Access via the Internet
Warning:
The pinBox should always communicate via an encrypted line.
5.1 Setting up a domain
To set up an encrypted connection, a so-called domain is required.
e.g.
https://www.myportal.co.uk
or
https://myaccess.mydomain.co.uk
Domains can be obtained from well-known Internet providers.
The domain must then point to a public IP address of the router.
Example:

pinBox II
5.1.1 Public IP
You need a public IP address to connect to the Internet.
This is visible in the router.
Example:
The domain must point to this IP address.
Warning:
If your Internet provider does not provide a static IP address, the IP changes constantly.
This means that the outside access will stop working after a change, because the domain will point to the
wrong IP address.
A so-called dynamic DNS service (DYNDNS) might be suitable in this situation.
See 5.2

pinBox II
5.2 Dynamic DNS service
If the Internet provider does not provide a static IP address, you can also use a dynamic DNS service.
This can be configured in the pinBox or in the router.
5.2.1 Integrated DynDNS services
The dynamic DNS services can be used directly in the pinBox.
The DNS services are defined in the System app under "Settings" -> "Dyn. DNS".
5.2.2 Router
This service always "connects" a domain to the current IP address of the provider.
Example:
5.3 Port authorisation
Once the domain has been set up, access to the pinBox from the outside must be possible.
To that end, set up a so-called port authorisation.
This "connects" the corresponding ports with the IP address of the pinBox.
Please ensure that ports 80 and 443 remain available for setup should you wish to use the free "Let's
Encrypt" certificate system.
If you use your own certificates, any ports can be used.
Example:

pinBox II

pinBox II
6 Encryption configuration
Access to pinBox should definitely be done via an encrypted connection.
Encryption is set up in the System app under "Settings" -> "Certificates".

pinBox II
7 Direct access configuration
Access to a PC can also be done via a link.
The link is encrypted and can only be decrypted by the pinBox.
The link contains NO passwords.
The link will then be sent to the respective user.
Warning:
Please ensure that the link does not fall into the wrong hands!
The direct link is configured in the Remote app admin.

pinBox II
7.1 Target computer
The target computer is the PC or VM to be accessed from outside.
7.1.1 Determining the IP address
The unique identifier in the network is the so-called IP address. This is entered in the "RDP IP/Host" field
in the "Direct access" menu.
The IP address can be determined as follows:
- Run the command prompt on the target computer
- Run the ipconfig
command
The IP address consists of 4 individual numbers, separated by a dot.
In the example: "192.168.1.30".
7.1.2 Allowing access to PCs
This access must be allowed for pinBox to access PCs.
To do so, go to the "System and security" section of the control panel and click on "Allow remote
access".

pinBox II
Then, click on the option "Allow connection of computers on which ..." for Windows 7.
For Windows 10, "Allow remote connection to this computer".
Confirm with "OK".
This allows remote access to the PC and the access link can now be generated.

pinBox II
8 Two-factor authentication
Two-factor authentication provides another security level. Further to logging in using login and password,
users must specify another number that is known only to them.
Whilst not strictly necessary, its use is highly recommended.
Two-factor authentication is configured in Remote app admin .

pinBox II
9 Active directory/LDAP/radius
Authentication can be done in several ways.
These are configured in the Remote app admin .
Table of contents