PIONEER CORPORATION
4-1, Meguro 1-Chome, Meguro-ku, Tokyo 153-8654, Japan
PIONEER ELECTRONICS (USA) INC.
P.O. BOX 1540, Long Beach, California 90801-1540, U.S.A. TEL: (800) 421-1404
PIONEER ELECTRONICS OF CANADA,INC.
300 Allstate Parkway, Markham, Ontario L3R 0P2, Canada TEL: 1-877-283-5901, 905-479-4411
PIONEER EUROPE NV
Haven 1087, Keetberglaan 1, B-9120 Melsele, Belgium TEL: 03/570.05.11
PIONEER ELECTRONICS ASIACENTRE PTE.LTD.
253 Alexandra Road, #04-01, Singapore 159936 TEL:65-6472-7555
PIONEER ELECTRONICS AUSTRALIA PTY.LTD.
178-184 Boundary Road, Braeside, Victoria 3195, Australia,TEL:(03) 9586-6300
PIONEER ELECTRONICS DE MEXICO S.A. DE C.V.
Blvd.Manuel Avila Camacho 138 10 piso Col.Lomas de Chapultepec, Mexico,D.F. 11000 TEL:55-9178-4270
K002_B_En
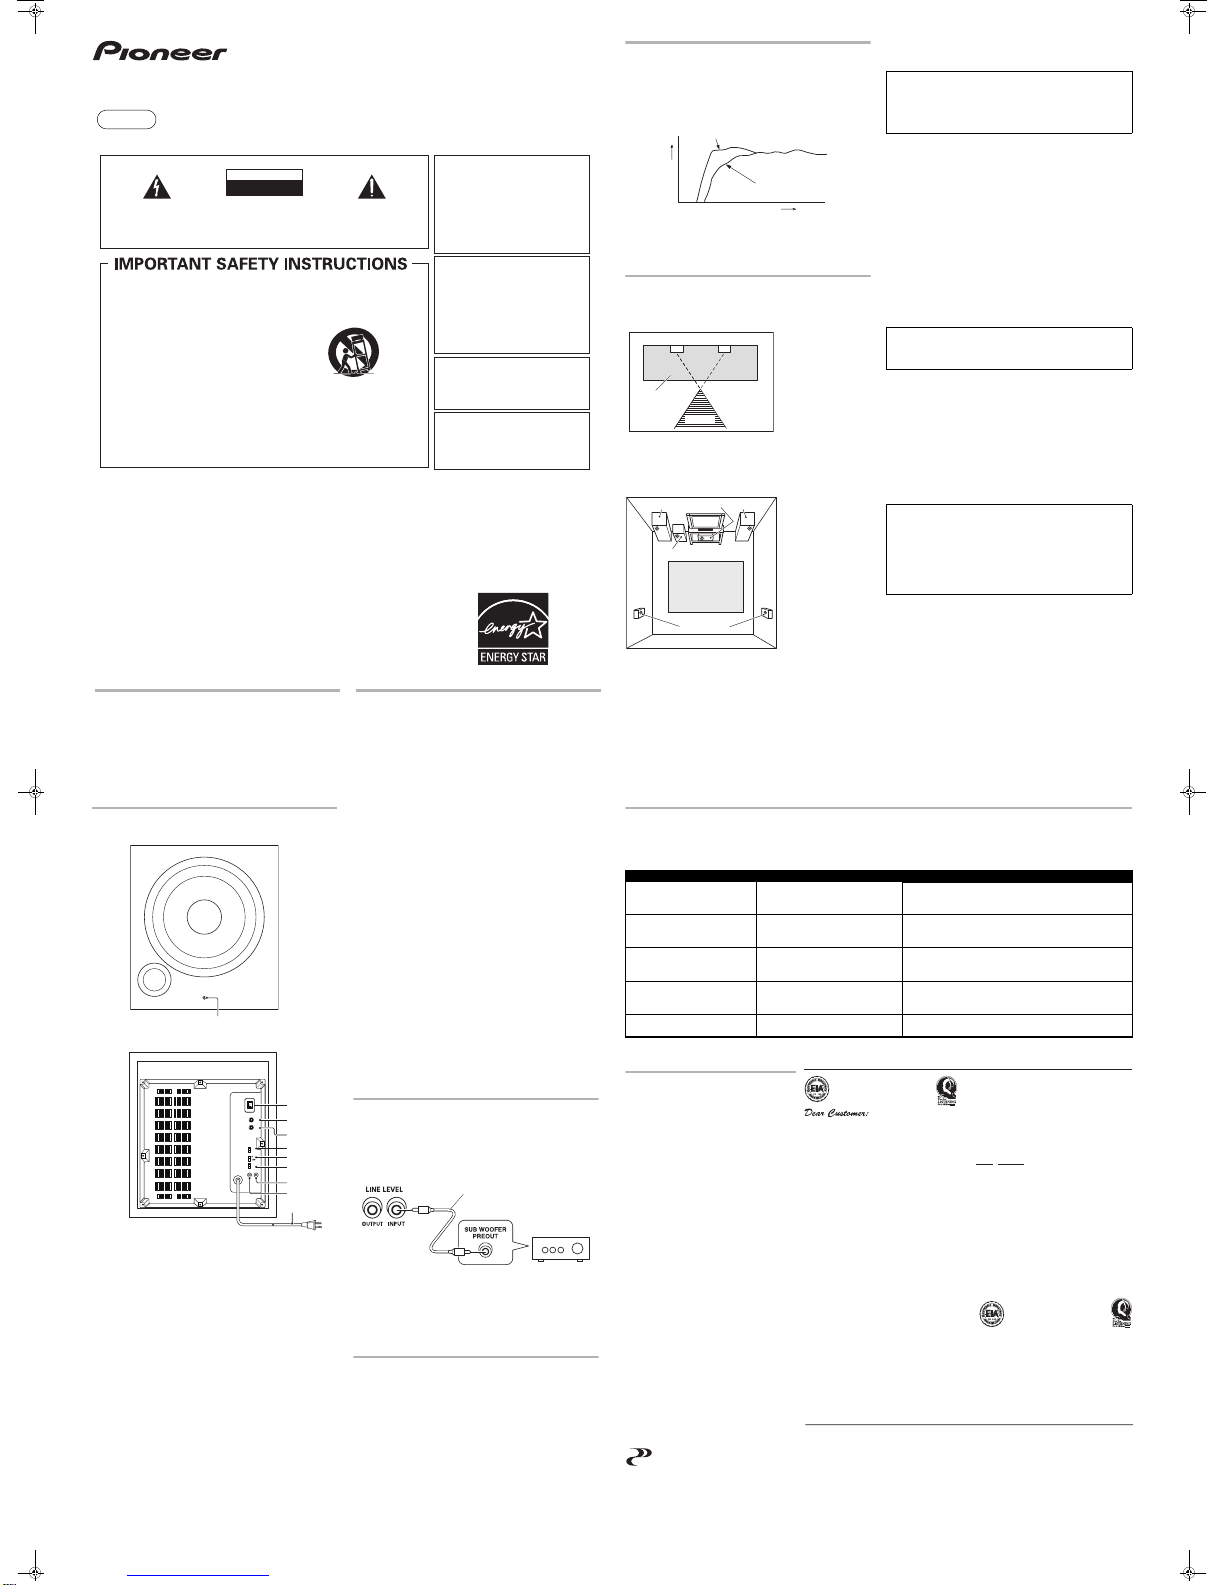
IN COMBINATION WITH SPEAKERS
The frequency characteristics of the S-W301/S-W501/S-W601 combined
with small-size speakers are shown below. As shown in these figures,
the low frequency range is improved.
• These special characteristics are obtained in an echoless chamber.
The effect of an additional S-W301/S-W501/S-W601 in an ordinary
listening room is better than the chart indicates when positioned
adequately.
• With playback of Dolby Digital, establishment of a special channel
for the subwoofer is recommended; and with playback of LFE (Low
Frequency Effect: sound effect like the rumbling of the earth, whose
purpose is to intensify the force of the video), the S-W301/S-W501/S-
W601 is especially effective.
INSTALLATION
Speaker Installation
•Subwoofer Installation Criteria
1 Left speaker
2 Right speaker
3 Recommended
installation range
for the subwoofer
4 Listening position
The subwoofer plays back the bass in monaural, making use of the fact
that the human ear is not very sensitive to the direction of low-pitched
sound. Because of this, the subwoofer can be installed almost
anywhere. If it is installed too far away, however, the sound from the
other speakers may become unnatural.
•An example of speaker positioning
1 Front left speaker
2 Center speaker
3 Front right speaker
4Subwoofer
5 Listening area
6 Rear left speaker
7 Rear right speaker
NOTES:
• Position the left and right channel speakers at equal distances from
the TV set and approximately 1.8 meters (6 ft.) from each other.
• Install the center speaker above or below the TV so that the sound of
the center channel is localized at the TV screen.
• The rear (surround) speakers are most effective when installed in
parallel locations directly to the side, or slightly behind, the listener,
at a level about 1 meter (3.3 ft.) above the listener’s ears.
Installation Precautions
• Do not attach the subwoofer to the wall or ceiling. They may fall off
and cause injury.
• Install the unit in a well-ventilated location where it will not be
exposed to high temperatures and high humidity.
• Do not place the unit near stoves or other heating equipment or at
locations exposed to direct sunlight, as these can have an adverse
effect on the cabinet and internal components. Also, do not install
the unit where there is too much dust or high humidity, as these can
cause malfunctioning or breakdowns. (Avoid cooking tables and
other locations where the unit would be exposed to heat, steam and
soot.)
• Do not place heavy or large objects on top of the speaker. Doing so
could provoke the speaker to fall, causing damages or bodily injury.
If speakers fall from their installation locations, they may suffer
irreparable cracks in their finish.
• Keep the unit away from devices such as cassette decks which are
sensitive to magnetic fields.
• Do not place the speaker on an unstable surface, as doing so may
cause the speaker to fall and cause damage or bodily injury.
• Do not place cups, glasses, or other containers with fluids on top of
the units, since the units may be damaged if the liquid spills.
• The installation location selected should have a sturdy floor surface.
Mounting the speaker on a long-pile carpet should be avoided, since
the carpet may touch the driver’s diaphram, causing distorted
sound.
• Please install this unit away from the antenna cable of the tuner, as
noise can be caused with installation close to the antenna cable. In
such a case, use this unit at a position away from the antenna and
the antenna cable, or when playback of extra bass is not required,
switch off the power for this unit.
Small-size speakers + S-W301/S-W501/S-W601
Small-size speakers
FREQUENCY (Hz)
RESPONCE (dB)
3
12
4
CAUTION:
When installing the center speaker on top of the TV, be sure to
secure it with tape or some other suitable means.
Otherwise, the speaker may fall from the TV due to external shocks
such as earthquakes, and it may lead to endangering those nearby
or damaging the speaker.
The subwoofer is not magnetically shielded and so should not be
placed near a TV or monitor. Magnetic storage media (such as
floppy discs and tape or video cassettes) should also not be kept
close to the subwoofer.
MAINTENANCE OF EXTERNAL SURFACES:
• Clean the surface by wiping with a soft, dry cloth.
• When the surfaces are very dirty, wipe with a soft cloth dipped in
some neutral cleanser diluted five or six times with water, and
wrung out well, and then wipe again with a dry cloth. Do not use
furniture wax or cleaners.
• Never use thinners, benzine, insecticide sprays and other
chemicals on or near this unit, since these will corrode the
surfaces.
PANEL FACILITIES
FRONT PANEL
REAR PANEL
1 Power Indicator (STANDBY/ON)
Lights blue when the power has been switched ON. When AUTO
STANDBY switch is set to ON, lights blue whenever the speaker receive
an audio signal. If the power is switched OFF only briefly, the indicator
lights blue when power is restored. If no signal is present for more than
12 minutes, the subwoofer automatically reverts to standby mode and the
power indicator lights red. If, subsequently, a signal is received, power
automatically comes back on and the power indicator lights blue.
NOTE:
• If you are planning on switching the unit OFF for a long period of
time, make sure to check that the indicator light has gone out after
switching OFF.
2 Power switch (POWER)
Switches the subwoofer between ON and OFF.
3 Volume knob (VOLUME)
Sets the subwoofer volume.
• Turn the knob slowly from the MIN position.
• With this unit, the bass level can be independently set, so do not
turn up the bass on the AV amplifier.
4 Crossover knob (CROSSOVER)
When using the subwoofer, set the upper frequency limit for the
subwoofer (50 Hz to 200 Hz) so that it complements the output from
your other speakers.
When using the bass management features of an AV receiver, set to
BYPASS ON in order to use the low-pass filter of the AV receiver for
high quality sound.
5 Bypass switch (BYPASS)
When set to ON, the audio signal is routed to the woofer unit,
bypassing the amplifier’s crossover circuit.
6 Phase switch (PHASE 0º /180º)
When set to 180º, the output phase becomes the reverse of the input
signal, and when set to 0º, it is in the same phase as the input signal.
• Normally, the switch is set to 0º.
But when the sound connection between the subwoofer and the
left and right speakers sounds unnatural, try switching to 180º
and set the switch in the position where the sound is natural.
• When using two or more subwoofers together, make sure that the
phase switch of all of them are set to the same position.
7 Auto Standby switch (AUTO STANDBY)
Switches the Auto Standby feature on/off.
When switched ON (the default setting is OFF), the Auto Standby
feature becomes active. In this mode, if there is no input signal for 12
minutes the system automatically switches to standby. The power is
automatically switched on again if an input signal is detected.
NOTE:
There may be cases where a connected component outputs noise or
some other non-audio signal which causes this system to
automatically power on when in Auto Standby mode. If this happens,
switch off the Auto Standby mode and switch the system on/off
manually.
8 Line Level Input terminal (LINE LEVEL INPUT)
Connect to the SUBWOOFER PREOUT terminal of an amplifier or
receiver, with the specially provided RCA plug cord.
9 Line Level Output terminal (LINE LEVEL OUTPUT)
Used for connecting other equipment through the amplifier. The
signal output from this jack is not affected in any way by the settings
of the various controls on the unit.
10 AC CORD
Connect the AC cord to a AC socket (in the room).
CONNECTIONS
Before making or changing any connections, switch off the power
and disconnect both this unit and the amplifier/receiver from the
AC outlet.
LINE LEVEL CONNECTION
This connection is for an amplifier or receiver equipped with a
SUBWOOFER PREOUT terminal. Connect to the LINE LEVEL INPUT
terminal on this unit, using the specially provided RCA plug cord.
NOTE:
• When connected to the PREOUT terminal for surround center
channel on the amplifier or receiver, the bass is heard only on the
center channel, so it will be insufficient.
OPERATION
For details regarding operating part functions, refer to PANEL
FACILITIES above.
1. Turn the POWER switch (2) ON.
• If the unit’s power cord is connected to a switched AC outlet on
the amplifier or receiver and the switch is left ON, the unit can be
turned ON/OFF together with the amplifier or receiver.
• If the unit cannot be connected to the amplifier or receiver, turn
the power to the amplifier or receiver ON before turning the power
to the unit ON. When turning the power OFF, turn the power to the
unit OFF before turning the power to the amplifier or receiver OFF.
2. Operate the amplifier or receiver and adjust the volume of the
other speakers.
3. Adjust the volume of the bass with the VOLUME knob (3).
• When necessary, operate the CROSSOVER knob (4) and PHASE
switch (6), and then adjust with the VOLUME knob (3).
4. Turn the POWER switch (2) OFF.
•Thepowerindicator disappears.
POWER
VOLUME MAX
MIN
ON
OFF
200Hz
50Hz
CROSSOVER
BYPASS
ON
OFF
AUTO
STANDBY
PHASE
LINE LEVEL
INPUTOUTPUT
3
5
7
4
6
8
9
10
2
RearPanel
Supplied RCA plug cord
The exclamation point within an equilateral
triangle is intended to alert the userto the
presence of important operating and
maintenance (servicing) instructions in the
literature accompanying the appliance.
The lightning flash with arrowhead symbol,
within an equilateral triangle, is intended to
alert the userto the presence of uninsulated
"dangerous voltage" within the product's
enclosure that may be of sufficient
magnitude to constitute a risk of electric
shock to persons.
CAUTION:
TO PREVENT THE RISK OF ELECTRIC
SHOCK, DO NOT REMOVE COVER (OR
BACK). NO USER-SERVICEABLE PARTS
INSIDE. REFER SERVICING TO QUALIFIED
SERVICE PERSONNEL.
CAUTION
RISK OF ELECTRIC SHOCK
DO NOT OPEN
IMPORTANT
D3-4-2-1-1_En-A
WARNING
This equipment is not waterproof. To prevent a fire
or shock hazard, do not place any container filled
with liquid near this equipment (such as a vase or
flower pot) or expose it to dripping, splashing, rain
or moisture. D3-4-2-1-3_B_En
WARNING
The voltage of the available power supply differs
according to country or region. Be sure that the
power supply voltage of the area where this unit
will be used meets the required voltage (e.g., 230 V
or 120 V) written on the rear panel. D3-4-2-1-4_A_En
Before plugging in forthe first time, read the following
section carefully.
WARNING
To prevent a fire hazard, do not place any naked
flame sources (such as a lighted candle) on the
equipment. D3-4-2-1-7a_A_En
VENTILATION CAUTION
When installing this unit, make sure to leave space
around the unit for ventilation to improve heat
radiation (at least 25 cm at top, 15 cm at rear, and
10 cm at each side).
WARNING
Slots and openings in the cabinet are provided for
ventilation to ensure reliable operation of the
product, and to protect it from overheating. To
prevent fire hazard, the openings should never be
blocked or covered with items (such as newspapers,
table-cloths, curtains) or by operating the
equipment on thick carpet or a bed.
D3-4-2-1-7b_A_En
Operating Environment
Operating environment temperature and humidity:
+5 ºC to +35 ºC (+41 ºF to +95 ºF); less than 85 %RH
(cooling vents not blocked)
Do not install this unit in a poorly ventilated area, orin
locations exposed to high humidity ordirect sunlight (or
strong artificial light) D3-4-2-1-7c_A_En
If the AC plug of this unit does not match the AC
outlet you want to use, the plug must be removed
and appropriate one fitted. Replacement and
mounting of an AC plug on the powersupply cord of
this unit should be performed only by qualified
service personnel. If connected to an AC outlet, the
cut-off plug can cause severe electrical shock. Make
sure it is properly disposed of afterremoval.
The equipment should be disconnected by removing
the mains plug from the wall socket when left
unused fora long period of time (forexample, when
on vacation). D3-4-2-2-1a_A_En
CAUTION
The POWER switch on this unit will not completely
shut off all powerfrom the AC outlet. Since the
powercord serves as the main disconnect device for
the unit, you will need to unplug it from the AC outlet
to shut down all power. Therefore, make sure the
unit has been installed so that the powercord can
be easily unplugged from the AC outlet in case of an
accident. To avoid fire hazard, the powercord should
also be unplugged from the AC outlet when left
unused fora long period of time (forexample, when
on vacation). D3-4-2-2-2a_A_En
POWER-CORD CAUTION
Handle the powercord by the plug. Do not pull out the
plug by tugging the cord and nevertouch the power
cord when yourhands are wet as this could cause a
short circuit orelectric shock. Do not place the unit, a
piece of furniture, etc., on the powercord, orpinch the
cord. Nevermake a knot in the cord ortie it with other
cords. The powercords should be routed such that they
are not likely to be stepped on. A damaged powercord
can cause a fire orgive you an electrical shock. Check
the powercord once in a while. When you find it
damaged, ask yournearest PIONEER authorized
service centeroryourdealerfora replacement. S002*_En
This product is forgeneral household purposes. Any
failure due to use forotherthan household purposes
(such as long-term use forbusiness purposes in a
restaurant oruse in a carorship) and which
requires repairwill be charged foreven during the
warranty period. K041_En
This product contains mercury. Disposal of this
material may be regulated due to environmental
considerations. Fordisposal orrecycling information,
please contact yourlocal authorities orthe Electronics
Industries Alliance : www.eiae.org. K057_En
WARNING: Handling the cord on this product or
cords associated with accessories sold with the
product will expose you to chemicals listed on
proposition 65 known to the State of California and
othergovernmental entities to cause cancerand
birth defect orotherreproductive harm.
D36-P4_A_En
For U.S. Model
Read these instructions.
Keepthese instructions.
Heed all warnings.
Follow all instructions.
Do not use this apparatus nearwater.
Clean only with dry cloth.
Do not block any ventilation openings. Install in
accordance with the manufacturer’s
instructions.
Do not install nearany heat sources such as
radiators, heat registers, stoves, orother
apparatus (including amplifiers) that produce
heat.
Do not defeat the safety purpose of the polarized
orgrounding-type plug. A polarized plug has two
blades with one widerthan the other. A
grounding type plug has two blades and a third
grounding prong. The wide blade orthe third
prong are provided foryoursafety. If the provided
plug does not fit into youroutlet, consult an
electrician forreplacement of the obsolete outlet.
Protect the powercord from being walked on or
pinched particularly at plugs, convenience
receptacles, and the point where they exit from
the apparatus.
1)
2)
3)
4)
5)
6)
7)
8)
9)
10)
Only use attachments/accessories specified by the
manufacturer.
Use only with the cart, stand, tripod, bracket, ortable
specified by the manufacturer, orsold with the
apparatus. When a cart is used, use caution when
moving the cart/apparatus combination to avoid
injury from tip-over.
Unplug this apparatus during lightning storms or
when unused forlong periods of time.
Referall servicing to qualified service personnel.
Servicing is required when the apparatus has been
damaged in any way, such as power-supply cord or
plug is damaged, liquid has been spilled orobjects
have fallen into the apparatus, the apparatus has
been exposed to rain ormoisture, does not operate
normally, orhas been dropped.
P1-4-2-2_En
11)
12)
13)
14)
S-W301/S-W501/S-W601
Operating Instructions POWERED SUBWOOFER
Mode d’emploi ENCEINTE ACTIVE D’EXTREMES GRAVES
Thank you for buying this PIONEER product. Please read through these operating instructions so you will know how to
operate
your model properly. After you have finished reading the instructions, put them away in a safe place for future reference.
In some countries or regions, the shape of the power plug and power outlet may sometimes differ from that shown in the
explanatory drawings. However, the method of connecting and operating the unit is the same.
S001_En
Selecting fine audio equipment such as the unit
you’ve just purchased is only the start of your
musical enjoyment. Now it’s time to consider how
you can maximize the fun and excitement your
equipment offers. This manufacturer and the
Electronic Industries Association’s Consumer
Electronics Group want you to get the most out of
your equipment by playing it at a safe level. One that
lets the sound come through loud and clear without
annoying blaring or distortion-and, most importantly,
without affecting your sensitive hearing.
Sound can be deceiving. Over time your hearing
“comfort level” adapts to higher volumes of sound.
So what sounds “normal” can actually be loud and
harmful to your hearing. Guard against this by
setting your equipment at a safe level BEFORE your
hearing adapts.
To establish a safe level:
• Start your volume control at a low setting.
• Slowly increase the sound until you can hear it
comfortably and clearly, and without distortion.
Once you have established a comfortable sound
level:
• Set the dial and leave it there.
Taking a minute to do this now will help to prevent
hearing damage or loss in the future. After all, we
want you listening for a lifetime.
We Want You Listening For A Lifetime
Used wisely, your new sound equipment will
provide a lifetime of fun and enjoyment. Since
hearing damage from loud noise is often
undetectable until it is too late, this manufacturer
and the Electronic Industries Association’s
Consumer Electronics Group recommend you avoid
prolonged exposure to excessive noise. This list of
sound levels is included for your protection.
Decibel
Level Example
30 Quiet library, soft whispers
40
Living room, refrigerator, bedroom away from traffic
50 Light traffic, normal conversation, quiet office
60 Air conditioner at 20 feet, sewing machine
70 Vacuum cleaner, hair dryer, noisy restaurant
80
Average city traffic, garbage disposals, alarm clock
at two feet.
THE FOLLOWING NOISES CAN BE DANGEROUS
UNDER CONSTANT EXPOSURE
90
Subway, motorcycle, truck traffic, lawn mower
100 Garbage truck, chain saw, pneumatic drill
120 Rock band concert in front of speakers,
thunderclap
140 Gunshot blast, jet plane
180 Rocket launching pad
Information courtesy of the Deafness Research Foundation.
SPECIFICATIONS
Cabinet .....................Bass-reflex, floor-standing type
Speaker
S-W301.............................................20 cm cone type
S-W501.............................................25 cm cone type
S-W601.............................................30 cm cone type
Power Amplifier Continuous Power Output (RMS)
S-W301........................................150 W/6 Ω(100 Hz)
S-W501........................................170 W/6 Ω(100 Hz)
S-W601........................................180 W/6 Ω(100 Hz)
Input (sensitivity at 100 Hz)
LINE LEVEL (RCA jack)..................................200 mV
Output (Level at 100 Hz)
LINE LEVEL (RCA jack)..................................200 mV
Selectable CROSSOVER Frequencies
..............................................................50 Hz to 200 Hz
Outline Dimension
S-W301
..............360 mm (W) x 360 mm (H) x 398.5 mm (D)
14.2 in. (W) x 14.2 in. (H) x 15.7 in. (D)
S-W501
..............360 mm (W) x 380 mm (H) x 418.5 mm (D)
14.2 in. (W) x 15.0 in. (H) x 16.5 in. (D)
S-W601
..............360 mm (W) x 430 mm (H) x 438.5 mm (D)
14.2 in. (W) x 16.9 in. (H) x 17.3 in. (D)
Weight (without package)
S-W301......................................... 14.6 kg/32 lb. 4 oz.
S-W501......................................... 15.6 kg/34 lb. 7 oz.
S-W601....................................... 17.2 kg/37 lb. 15 oz.
Power Requirements................................120 V, 60 Hz
Power Consumption...........................................144 W
Power Consumption in standby.........................0.5 W
Accessories......................................RCA plug cord x1
Operating instructions
Specifications and design subject to possible
modification without notice, due to
improvements.
is a trademark placed on a product with
Pioneer’s Phase Control technology. This technology
enables high-grade sound reproduction through
each component by improving overall phase matching.
Published by Pioneer Corporation.
Copyright © 2008 Pioneer Corporation.
All rights reserved.
ACCESSORY ITEMS
• RCA plug cord x1
• Operating instructions
FEATURES
n150 W (S-W301)/170 W (S-W501)/180 W (S-W601) (RMS) power with
AB class amplifier that serves audio and video software playback
such as Dolby Digital with a wide dynamic range.
nEquipped with
20 cm (S-W301)/25 cm (S-W501)/30 cm (S-W601) driver
nCrossover frequency can be set to 50 Hz to 200 Hz.
TROUBLESHOOTING
Incorrect operations are often mistaken for trouble and malfunctions. If you think that there is something wrong with this component, check the
points below. Sometimes the trouble may lie in another component. Investigate the other components and electrical appliances being used. If the
trouble cannot be rectified even after exercising the checks listed below, ask your nearest PIONEER authorized service center or your dealer to carry
out repair work.
SYMPTOM CAUSE REMEDY
1 No power is being supplied
(Indicator does not light up when
power switch is turned on.)
• Power supply plug is not correctly
inserted. • Insert plug securely.
2Nosound
(Indicator is lit.)
• Connection of accessory RCA plug
cord is wrong or disconnected.
•VOLUME knob is set to MIN.
• Check again and connect correctly.
• Turn clockwise slowly.
3 Sound is distorted. • Level is too high.
• Input level is too high.
• Turn the VOLUME knob counter-clockwise to lower the level.
• Turn the amplifier’s output level (volume, bass control, bass
boost) counter-clockwise to lower the level.
4 Howling noise occurs. • No power supplied to the amplifier.
• Subwoofer level is set too high.
• Connect an amplifier and supply power.
• Place the subwoofer a good distance from speakers. Turn the
VOLUME knob counter-clockwise to lower the volume.
5 Much noise when listening to
AM or FM broadcasts.
• The AM loop antenna or the FM indoor
antenna is close to this unit. • Increase the distance between the AM or FM antenna (for
indoor use) and this unit.
XRE3208A_S-W301W501W601_En.fm 1 ページ 2008年7月16日 水曜日 午後7時45分


