PIRATE MIDI CLICK User manual

THINK LESS. CREATE MORE.
CLICK
MIDI INTERFACE &
RELAY SWITCHER

© PIRATE MIDI 2022 www.learn.piratemidi.com
2
This device was created and
designed to empower your
creativi.
It is the result of many long nights and early
mornings. It is born from the desire to
bridge the gap between musician and
instrument, and we want to say a huge
thank you for your support. Our brand is
built around a strong communi and we
hope you love your new PIRAT MIDI
creation as much as we do.
The PIRAT MIDI team.

© PIRATE MIDI 2022 www.learn.piratemidi.com
3
Table of contents .......................................................................... 3
Device Description ....................................................................... 4
Technical Specs ............................................................................. 5
Hardware Layout........................................................................... 6
Quick Start...................................................................................... 8
1. Device Interface......................................................................10
2. Power ........................................................................................11
3. Presets & MIDI Channel ........................................................12
4. USB MIDI Interface .................................................................13
5. AUX Switch Input....................................................................14
6. MIDI Implementation ............................................................15
Support & Warranty ...................................................................16
TABLE OF CONTENTS
CLICK User Manual

© PIRATE MIDI 2022 www.learn.piratemidi.com
4
DEVICE DESCRIPTION
introduction to your new MIDI interface
The CLiCK is a 1 in/1 out USB MIDI Interface & relay switcher for adding MIDI Control
to amp channels, control ports, and other auxiliary controls on any kind of music or
effects device.
The TRS ¼” jack has a relay for the Tip and a relay for the Ring, which means with a
Split-Y cable, you can control 2 devices that use TS cables for external switch control.
Some common favourites for the Click include:
• Guitar amplifiers
• Strymon Fave switch substitute
• Delay pedals with tap tempo switch inputs
• Pedals with external switch support (e.g. JHS Red Remote)
• Pedal with aux switch inputs
The Click doesn’t necessarily need to be connected to a MIDI controller.
It can also be controlled by a simple 3-way aux switch via the MIDI in 3.5mm TRS
jack. Control messages can also be sent via the USB MIDI interface, so a computer
can remotely switch the relays via USB.
Power the Click with USB or standard 2.1mm centre negative DC jack.

© PIRATE MIDI 2022 www.learn.piratemidi.com
5
LINK TO DOWNLOADS:
https://learn.piratemidi.com/downloads/firmware-updates
DIMENSIONS
Metric (70x43x22 mm)
Imperial (2.7”x 1.7”x 0.86”)
RELAYS
2(34 Volts @ 1A)
WEIGHT
Metric (80g)
Imperial (2.8 oz.)
POWER REQUIREMENT
9 Volts DC (@ 150 mA)
or 5 Volts USB
TECHNICAL SPECS
all important specification
BOX CONTENTS
1x CLICK MIDI Relay Interface
1x USB type C cable
1x Getting Started Card

© PIRATE MIDI 2022 www.learn.piratemidi.com
6
HARDWARE LAYOUT
quick overview of top interface
USB type C (able included) for USB MIDI, editing the device
with the app, and powering the device.
Dedicated 1/8” (3.5mm) TRS MIDI Out conforming to the MIDI.org
specification.
2.1mm 9v DC barrel jack - as standard on most effects pedals
and power supplies.
Dedicated 1/8” (3.5mm) TRS MIDI In conforming to the
MIDI.org specification
1
1
2
2
3
3
4
4

© PIRATE MIDI 2022 www.learn.piratemidi.com
7
HARDWARE LAYOUT (CONT.)
quick overview of other inputs and outputs
¼” (6.35mm) TRS Relay Switch port for switching non-MIDI devices.
5
5
Heavy-duty aluminium enclosure with black anodising.
Scratch-resistant and no flex.
6
6

© PIRATE MIDI 2022 www.learn.piratemidi.com
8
QUICK START
Getting started with the basics
1. Power
Power the CLiCK with a type-C USB cable, or a 2.1mm centre negative 9V DC power
supply.
The CLiCK requries 150mA to function correctly.
2. Connecting MIDI
You can take your CLiCK straight out of the box, plug in a MIDI controller, and send CC’s
to switch the relays.
Send CC 0 to control the Tip relay, CC 1 to control the Ring relay, and CC 2 to controler
to Tip and Ring simultaneously.
See the MIDI Implementation on page 15 for full details.
Check that your CLICK firmware is up to date. Updates are released
periodically adding new features and bug fixes. Go to:
https://learn.piratemidi.com/downloads/firmware-updates
3. USB MIDI Interface
Any MIDI sent to the MIDI In TRS port on the CLiCK will be passed through to the USB
MIDI port on the device. Likewise with USB MIDI being passed to the MIDI out TRS
port.
Even without using the relay function, you can use this is a super compact 1x1 USB
MIDI interface.

© PIRATE MIDI 2022 www.learn.piratemidi.com
9
QUICK START (CONT.)
Getting started with the basics
•QUICK TIP
Check whether the device you’re trying to control with relays is meant to be
switched with a TS or TRS cable. Using the wrong type may cause the switching on
your target device to not work properly.

What it all does
© PIRATE MIDI 2022 www.learn.piratemidi.com
10
1. DEVICE INTERFACE
1/4” (6.35mm) TRS Relay Switching Port
The relay switching port is designed to be used with a TRS cable. This cable can be
terminated as a single TRS cable, or as a split-Y TRS to 2x TS cables. This port will send
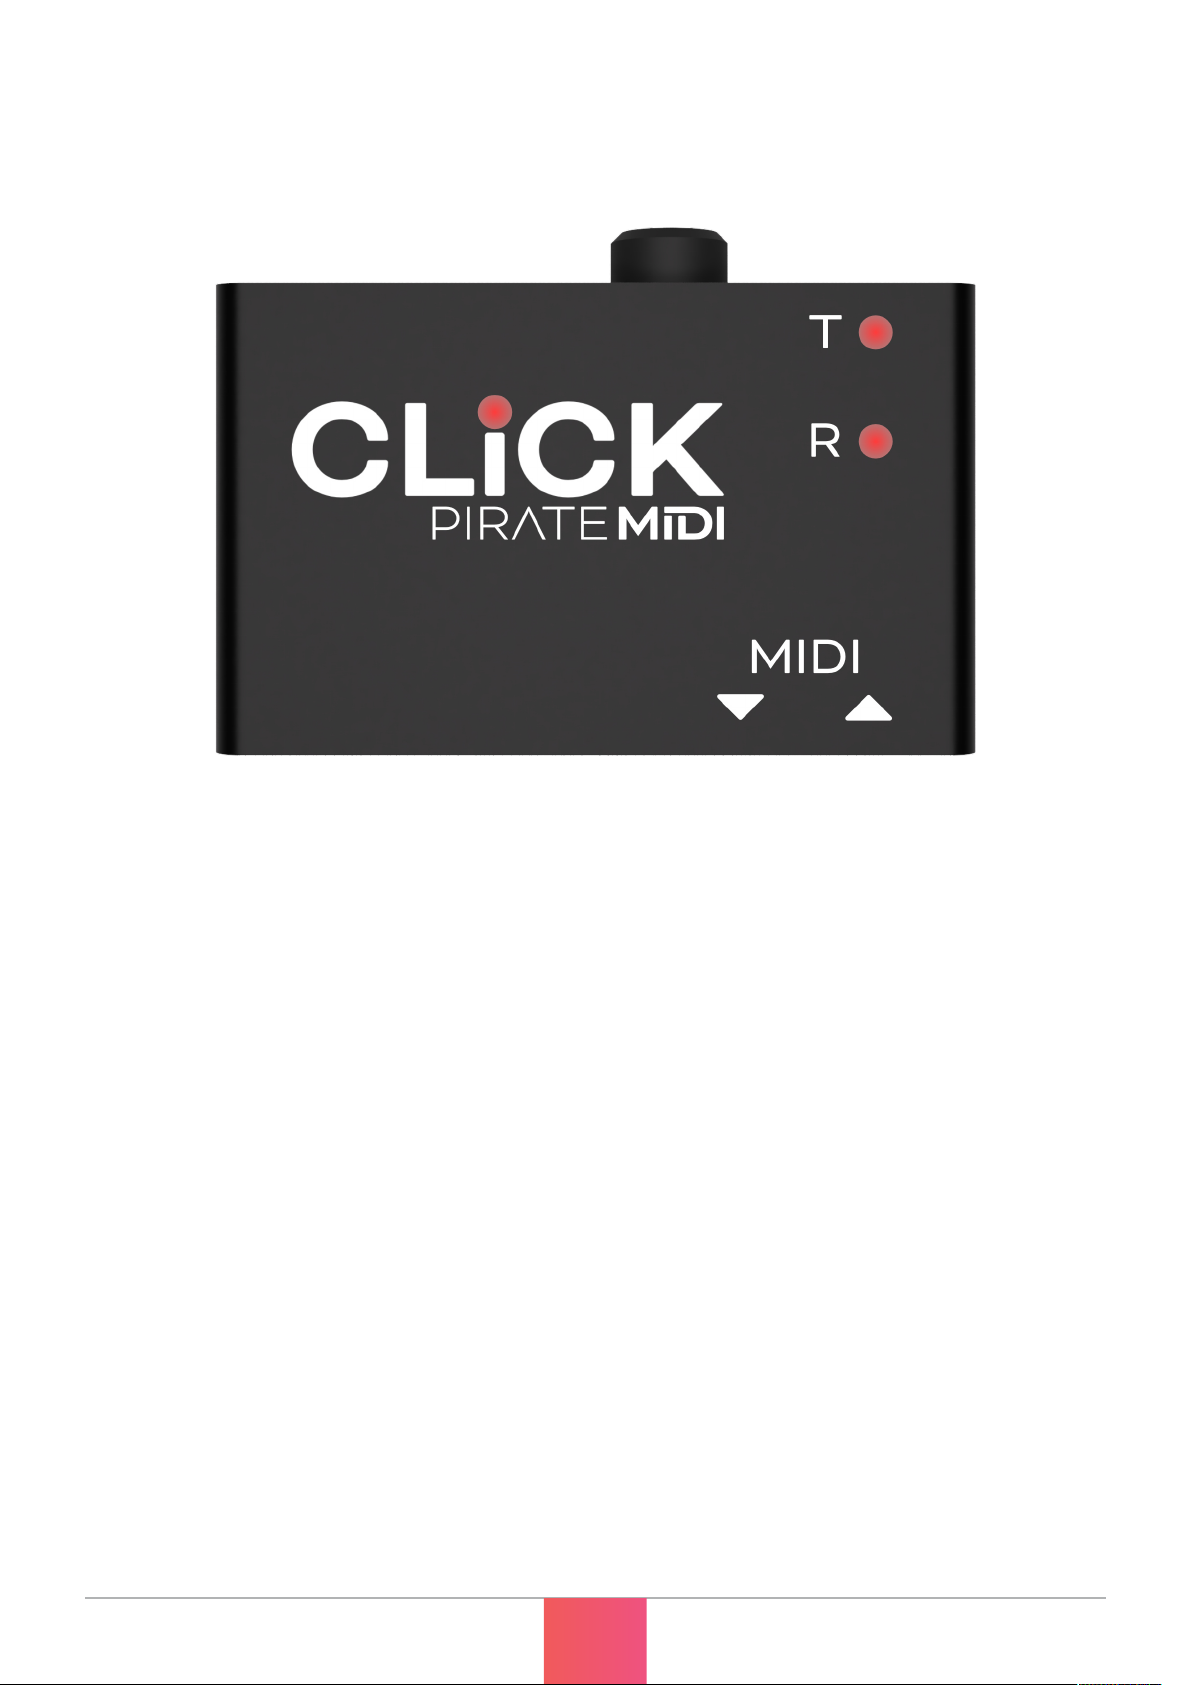
the analog switch signals from the CLiCK to your target device/s.
1/8” (3.5mm) TRS MIDI In & Out Ports
The MIDI In port is a Type A TRS MIDI port for receiving MIDI messages that are
intended to control the relay switching port, or for passing through to the USB when
being used as a compact USB MIDI interface.
The MIDI Out port is also a Type A MIDI port. This port will send MIDI messages from
the USB MIDI, and pass it onto other devices, or it can be used to daisy-chain MIDI
devices so that your CLICK doesn’t have to be the last MIDI device in the chain.
The MIDI Out port can also be used to plug in a TRS 3-way aux switch to control the
relays without needing to use MIDI at all.
Triggering the Tip on the aux switch will toggle the Tip relay.
Triggering the Ring on the aux switch will toggle the Ring relay.
Triggering the Tip+Ring on the aux switch will toggle the Tip+Ring relays.
Power/Data LED
The LED in the CLiCK logo will show solid when the device is powered. When MIDI data
is passing through the device - either via USB or the 1/8” (3.5mm) TRS MIDI ports - the
LED will flash.
Tip/Ring Relay LEDs
Both of the relays in the CLiCK have an indicator LED to show when the switch is
closed. T=Tip, and R=Ring.
When the light is on, the relay is closed, completing the circuit and pulling the switch
low. You can have the LEDs act as normally open or normally closed based on how you
send the MIDI messages. By sending CC value 127 on switch press, and 0 on release,
you will create a normall open config. Reversing the CC values will create a normally
closed config.

© PIRATE MIDI 2022 www.learn.piratemidi.com
11
let’s turn this thing on and get going
2. POWER
You can power your CLICK with either a USB cable, or a centre-negative 9v DC jack
(2.1mm) commonly used for guitar pedals.
Centre-Negative DC Power USB Power
Switching Power Sources
The CLiCK uses smart power switching so you can have both plugged in at once, and if
you need to remove one or the other, the unit will seamlessly switch power sources
without shutting down or restarting.
Power Requirement
If you’re using a 9v DC power supply, please make sure
it is able to supply the required 80mA.

Preset Up & Down
There are 127 presets available for you to customise. Sending MIDI CC 4 will advance
to the next preset, and sending MIDI CC 5 will go to the previous preset.
Save A Preset
To save the current settings as a new preset, send MIDI CC 3 and set the CC value to
the preset number you want to overwrite.
MIDI Channel
Out of the box, your CLiCK will respond to any MIDI channel. If you want to change the
MIDI channel so that it only listens to MIDI messages sent with its specific channel
number - THIS SECTION WILL BE UPDATED ON RELEASE.
Saving your settings
3. PRESETS & MIDI CHANNEL
© PIRATE MIDI 2022 www.learn.piratemidi.com
12

© PIRATE MIDI 2022 www.learn.piratemidi.com
13
An interface for your pedalboard
4. USB MIDI INTERFACE
The CLiCK is a class-compliant USB MIDI device. You can plug it into any USB host
device like a PC, Mac, Phone, or Tablet and you will see the 1 In/1 Out MIDI device
show up in apps that support MIDI devices. This means you can send MIDI into and out
of your computer using the CLiCK!
It does not have USB host capability, so it cannot connect to a MIDI controller directly
via USB nor power anything via the onboard USB port.
Sending the appropriate MIDI from your USB device to the CLiCK will allow you to
switch relays and recall/save presets from your computer.
No Need For Relays? Still Awesome.
Even if you have no use for the relay switching features of the CLiCK, we think it’s a
really good option for adding USB MIDI interfaces to small form-factor pedalboards, or
even just to have a USB MIDI interface handy in your gigbag or on your work desk.

© PIRATE MIDI 2022 www.learn.piratemidi.com
14
5. AUX SWITCH INPUT
No MIDI required!
3-Way Aux Switch
By plugging a TRS 3-way switch into the MIDI Out port of your CLiCK, you can toggle
the relays without using any MIDI at all. This could be super helpful for controlling a
non-MIDI pedal that happens to be hiding away in an awkward spot on your pedalboard
or rack.
Generally speaking, although it can be opposite with some brands, The switch that
triggers the Tip on the Aux switch will toggle the Tip relay on the CLiCK. Ring for Ring,
and Tip+Ring for Tip+Ring relays. Some brands may differ in which TRS contacts they
use, but because it’s plug and play with no setup, you’ll be able to figure it out in about
30 seconds by looking at how the aux switch makes the Tip and Ring LEDs on the
CLiCK change.
The PIRATE MIDI Aero (Coming Soon) is an aux switch AND a MIDI controller. It would
be an excellent companion for this feature!

© PIRATE MIDI 2022 www.learn.piratemidi.com
15
6. MIDI IMPLEMENTATION
Controlling the CLICK with external MIDI commands
The CLiCK can be controlled by MIDI from an external MIDI device via the dedicated
MIDI In (3.5mm TRS) or USB MIDI.
You can set the MIDI channel as per chapter 3.
These MIDI assignments are included in the PIRATE MIDI Device Library. If you are
using a BRIDGE controller, you can probably ignore this part ;)
FUNCTION MIDI CC# VALUE
Preset Control
Save Current Settings to Preset 3 0-127 (Value=Preset Number)
Preset Up 4 Any (0-127)
Preset Down 5 Any (0-127)
Go to Preset ‘x’ 6 0-127
Go to Preset ‘x’ (PC) PC 0-127
Relay Control
Tip Relay 0 Off=0, On=127, Toggle=64
Ring Relay 1 Off=0, On=127, Toggle=64
Tip+Ring Relay 2 Off=0, On=127, Toggle=64

Thanks for purchasing a CLiCK!
If you have any questions, please feel free to contact us via
support@piratemidi.com or use technical support on
www.learn.piratemidi.com.
Manufacturing defects are covered by our warranty. Please contact us if
your device is defective.
Australian domestic customers are covered by Australian Consumer Law
which requires repair or replacement for devices that do not fulfil their
advertised purpose.
International (Non-Australian) customers are covered by our own
workmanship guarantee. We aim to create a satisfactory outcome for
every single customer. Please contact us if you have an issue with your
device.
Customer-caused damage may be repairable for a fee. We offer repair
services for most components that receive damage. Contact us for
details.
MADE IN
AUSTRALIA
© PIRATE MIDI 2022 www.learn.piratemidi.com
16
SUPPORT & WARRANTY
Technical help & guarantee

© PIRATE MIDI 2022 www.learn.piratemidi.com
17

THINK L SS. CR AT MOR
support@piratemidi.com
www.learn.piratemidi.com
Table of contents
Other PIRATE MIDI Recording Equipment manuals