manuals.online logo
Brands
  1. Home
  2. •
  3. Brands
  4. •
  5. Plastica
  6. •
  7. Cables And Connectors
  8. •
  9. Plastica ERC3001 User manual

Plastica ERC3001 User manual

This manual suits for next models

22

Popular Cables And Connectors manuals by other brands

StarTech.com ST124HD20 quick start guide

StarTech.com

StarTech.com ST124HD20 quick start guide

Philips SWV4543S/10 Features

Philips

Philips SWV4543S/10 Features

Larson Electronics 10-50C instruction manual

Larson Electronics

Larson Electronics 10-50C instruction manual

Grip MEK-PM Assembly and operating manual

Grip

Grip MEK-PM Assembly and operating manual

Ultra Products Travel Pack #3 ULT31436 Specifications

Ultra Products

Ultra Products Travel Pack #3 ULT31436 Specifications

Surpass QCH-F Operation manual

Surpass

Surpass QCH-F Operation manual

Philips SWA6310 Specifications

Philips

Philips SWA6310 Specifications

StarTech.com CRJ4550PK quick start guide

StarTech.com

StarTech.com CRJ4550PK quick start guide

Nohau EMUL-IP2K-PC user guide

Nohau

Nohau EMUL-IP2K-PC user guide

Foxun SX-SP144E-HD4K2K operating instructions

Foxun

Foxun SX-SP144E-HD4K2K operating instructions

Philips SWA3305W Specifications

Philips

Philips SWA3305W Specifications

opticis Stretch DVIM1-1P0x user manual

opticis

opticis Stretch DVIM1-1P0x user manual

Volkswagen VAS 6558A operating manual

Volkswagen

Volkswagen VAS 6558A operating manual

NEXIBO N-13 user manual

NEXIBO

NEXIBO N-13 user manual

CYP PU-1H3HBTL Operation manual

CYP

CYP PU-1H3HBTL Operation manual

Allen-Bradley 1784-u2dhp installation instructions

Allen-Bradley

Allen-Bradley 1784-u2dhp installation instructions

Global Caché Flex Link Blaster quick start

Global Caché

Global Caché Flex Link Blaster quick start

Hauppauge USB-Live2 Quick installation guide

Hauppauge

Hauppauge USB-Live2 Quick installation guide

manuals.online logo
manuals.online logoBrands
  • About & Mission
  • Contact us
  • Privacy Policy
  • Terms and Conditions

Copyright 2025 Manuals.Online. All Rights Reserved.

Napier Road • St Leonards-on-Sea • East Sussex • UK
[email protected] • www.plasticapools.com
Key No. Description art No.
6 Bearing Long ERC3001
6a Bearing Short ERC3002
7 Hand Wheel ERC3003
8 Bearing Sleeve ERC3004
9 Stand Frame ERC3005
10 End Boss ERC3006
11 Washer ERC3007
12 Nut ERC3008
13 End Cap ERC3009
14 Brake Rod ERC3010
15 Brake Screw ERC3011
Key No. Description art No.
16 Tube Inner (1.85m) ERC3012
17 Tube Outer (2.70m) ERC3013
19 Brass Insert ERC3014
20 Brass Insert Screw ERC3015
21 End Boss ERC3016
25 lastic Strap Insert ERC3017
26 Strap Buckle ERC3018
27 Strap ERC3019
30 lastic Strap Clamp ERC3020
31 Strap Clamp Nut ERC3021
32 Strap Clamp Screw ERC3022
40/41/42 Wheel Assembly ERC3023
Premium
Reel
System
Assembly
Instructions
TUBE ASSEMBLY
1. First loosen allen screws on assembled tube
and insert loose inner tube to other end.
2. Undo the allen screws fixed to the short brass
insert (item 19). Slide the brass insert rods
inside the channel under the outer tubes until
the holes line up and insert brass screws (item
20) to clamp the tube.
3. Fit steering wheel end frame (item 9) into tube
and secure with self tapping screws provided. It
is important that the channel lines up with the
gaps in the end frames (Failure to do so will
prevent plastic insert - item 25 - from sliding
into the tubes - item 16).
4. Fit non-steering wheel end frame (item 9) into
tube and secure with self-tap screws provided,
ensuring that the channel lines up as above.
5. lace the assembled reel system in a position
square to the pool where it will be used.
6. The reel system tubes should be adjusted to
the required size of the pool. Normally the tube
length should be 2ʼ (0.6m) longer than the pool
width. This reel is only suitable for a maximum
cover width of 17ʼ(5.18m). (Do not exceed maximum tube extension, this is marked
on the inner tubes - item 16 - by a blue line).
7. Fit straps by inserting the plastic slide bars into the channels depending on how
many are required. Straps should be at approximately 2ʼ - 3ʼ (0.6m - 0.9m)
spacings starting from the middle of the reel system.
8. Fit locking bar (item 14/15) into channel and tighten. This prevents the tube from
rotating when not in use.
9. You are now ready to attach the straps to the cover.
COVER ATTACHMENT
1. With the cover cut to the size of the pool as required pull the cover
out of the water towards the reel system until the two meet.
2. Start from the middle of the cover with the first strap point and
work towards the outside positioning straps at distances no more
than 3ʼ (0.9m) apart. (Ideal strap spacing 2ʼ - 3ʼ (0.6m - 0.9m).
3. The two outside straps should be 1.5” (40mm) in from the edge
of the cover.
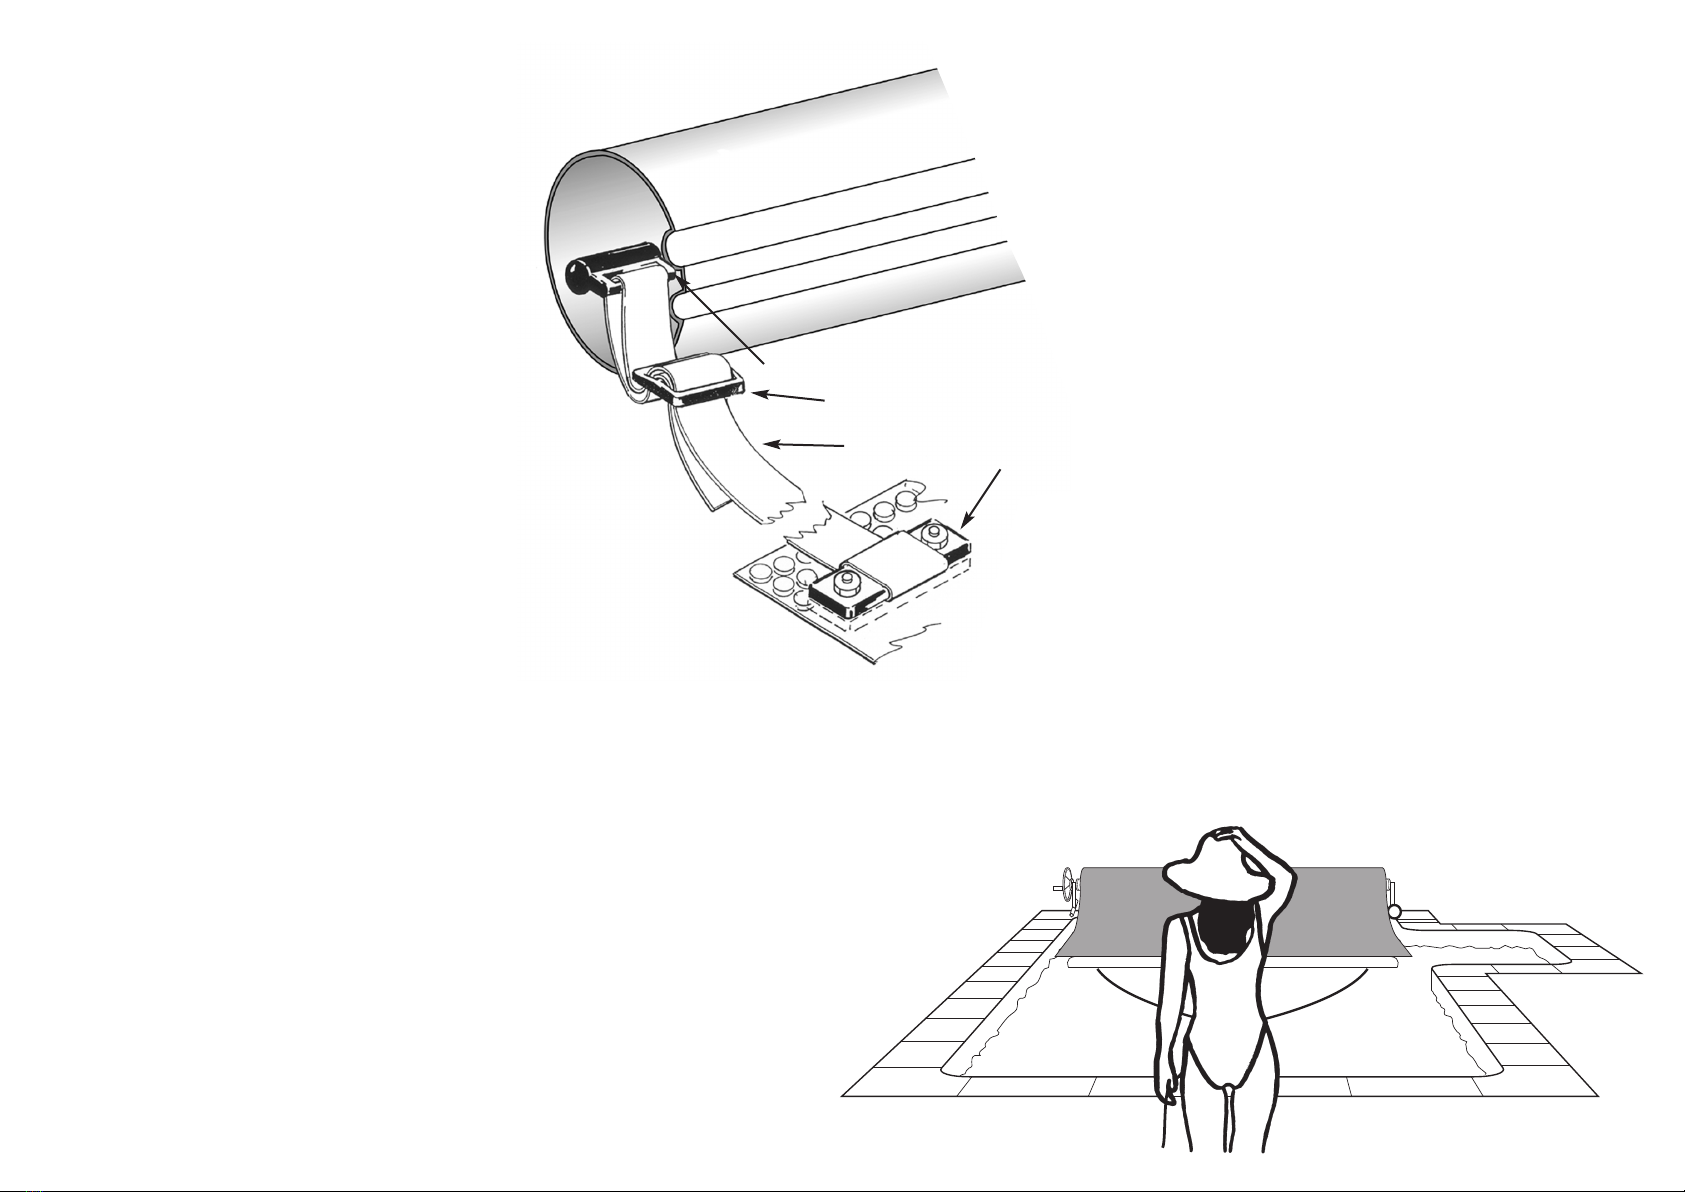
4. Attach long straps to plastic bar (item 25) as diagram and fit
to cover.
5. Adjust strap length for even tension and tighten bolts
(items 30/31/32) on cover.
6. Be sure strap lengths allow the cover to be in complete
contact with the water surface when on the pool.
NOTE
The reel is best operated as close to the pool edge as possible
to avoid the cover rubbing on the copings or pool surround.
This can cause damage to the underside of the cover if the reel
is not positioned correctly.
Both reel and cover should be washed down on a regular basis
with fresh tap water to stop build up of chemical deposits.
To aid pulling the cover on and off the pool we recommend you fit a Plastica
D.I.Y. leading edge, which is available through your local supplier.
ITEM 25
ITEM 26
ITEM 27 ITEM 30/31/32