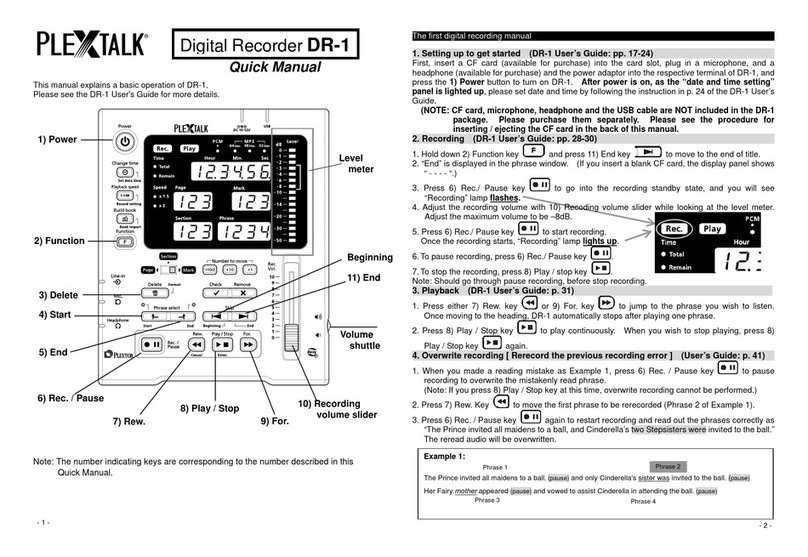
Plextalk DR-1 User manual

Digital Recorder
DR-1
User’s Guide
This User’s manual includes important information and explains proper product handling
to prevent an accident. Please read this manual to use DR-1 safely.
Please keep it in the place in which it is always seen.
©2007 Shinano Kenshi Co.,Ltd.

2
Application of Council Directives: 2006/95/EC, 2004/108/EC
Manufacturer’s Name: Shinano Kenshi Co.,Ltd.
Manufacturer’s Address: 6-15-26 Chuo, Ueda-Shi,
Nagano-Ken, 386-0012 JAPAN
Importer’s Name: PLEXTOR S.A./N.V.
Importer’s Address: Excelsiorlaan 9,
1930 Zaventem, Belgium
Tel: +32.2.725.55.22 FAX: +32.2.725.94.95
Type of Equipment: PLEXTALK Digital Recorder
Models: DR-1
Conforms to the following standards: EMC: EN 55022:2006
EN 55024:1998+A1+A2:2003
EN 61000-3-2: 2000+A2:2005
EN 61000-3-3: 1995+A1+A2:2005
SAFETY: EN 60950-1:2001
I, the undersigned, hereby declare that the equipment specified above
conforms to the above directive (s) and standard (s).
Place: Zaventem Date: 1 September, 2007
PLEXTOR S.A./N.V.
Signature: Position: General Manager
Masahiko Takao

3
IMPORTANT
FCC NOTICE
Declaration of Conformity
Model Number: DR-1
Trade Name:
Responsible party: PLEXTOR LLC
Address: 830 Hillview Court, Suite 210 Milpitas, CA 95035 U.S.A.
Telephone Number:1.408.719.3000
This device complies with Part 15 of the FCC Rules, Operation is subject to the following two
conditions :
(1) This device may not cause harmful interference, and (2) This device must accept any
interference received, including interference that may cause undesired operation.
This equipment has been tested and found to comply with the limits for a Class B digital
device, pursuant to part 15 of the FCC Rules. These limits are designed to provide
reasonable protection against harmful interference in a residential installation. This equipment
generates, uses and can radiate radio frequency energy and, if not installed and used in
accordance with the instructions, may cause harmful interference to radio communications.
However, there is no guarantee that interference will not occur in a particular installation. If
this equipment does cause harmful interference to radio or television reception, which can be
determined by turning the equipment off and on, the user is encouraged to try to correct the
interference by one or more of the following measures:
_ Reorient or relocate the receiving antenna.
_ Increase the separation between the equipment and receiver.
_ Connect the equipment into an outlet on a circuit different from that to which the receiver is
connected.
_ Consult the dealer or an experienced radio / TV technician for help.
CAUTION:
Any changes or modification not expressly approved by the party responsible for compliance
could void the user’s authority to operate the equipment.
Canadian Department of Communications Statement
This digital apparatus does not exceed the Class B limits for radio noise emissions from digital
apparatus set out in the Radio Interference Regulations of the Canadian Department of
Communications.
This class B digital apparatus complies with Canadian ICES-003.
Cet appareil numerique de la classe B est conforme a la norme NMB-003 du Canada.

4
Table of Contents
Safety Information ·········································································6
Safety terms and symbols used in this guide ··························································································· 6
Legal and copyright Information··················································································································· 8
Chapter 1 Introduction··································································9
What you get in the box?·····························································································································10
What is a Digital Recorder “DR-1”?···········································································································11
What is DAISY? ·············································································································································12
What is a DAISY book?···························································································································12
Flow of DAISY book production·············································································································12
Terms of DAISY ········································································································································13
Part names and functions····························································································································14
DR-1 top layout (Operation panel)········································································································14
Input/output connectors ···························································································································15
Display panel··············································································································································16
Chapter 2 Setting up to get started········································· 17
Prepare a CF card·········································································································································18
About a CF card ········································································································································18
How to insert a CF card?·························································································································19
How to eject a CF card?··························································································································20
Connecting a microphone and a headphone ·························································································21
Plug in a microphone ·······························································································································21
Connecting a headphone························································································································21
Connecting a power adaptor ······················································································································22
Power ON / OFF············································································································································22
Display panel while booting-up, processing, and finishing operation, etc.·······································23
Setting the date and time·····························································································································24
Chapter 3 Basic Operation of DR-1········································ 27
Recording ························································································································································28
How to record? ··········································································································································28
Stop recording············································································································································30
Playback······················································································································································31
Adjusting audio volume of playback ·····································································································32
Appending Page/Section·························································································································33
Correcting························································································································································34
Three (3) methods of correcting recording··························································································34
Navigation ……<Navigating from beginning to end>·······································································36
Navigation……<Phrase navigation>····································································································37
Navigation…… <Skip navigation>········································································································38

5
Navigation……<Navigating by specified number>···········································································39
Marking························································································································································40
Overwrite recording (Rerecord while recording)················································································41
Insert recording··········································································································································42
Punch-in recording STEP 1 (Specify range) ······················································································43
Punch-in recording STEP 2 (Replacing correction)··········································································44
Delete phrases···········································································································································45
Chapter 4 Other Useful Features············································ 47
Displaying the total time & remaining time ······························································································48
Changing the playback speed····················································································································49
Changing the beep sound ···························································································································50
Change the recording setting ·····················································································································51
Building the book ···········································································································································54
Importing (DAISY import) ····························································································································55
Deleting all contents stored in the CF card (Format) ············································································56
Checking DR-1 version ································································································································57
Transferring data to a PC ····························································································································58
Connecting DR-1 to a PC ·······················································································································58
Connecting a card reader to a PC ········································································································60
Connecting a PC card adaptor for CF card to a PC ·········································································61
Contents list in a CF card························································································································62
Data transferring to PRS ·························································································································62
Restore PLEXTALK project file··················································································································63
Chapter 5 Main Specifications················································· 65
Main specifications········································································································································66
Product specifications ······························································································································66
Audio characteristics ································································································································67
Card drive specifications ·························································································································67
Recommended CF cards & microphones ·······························································································68
Recommended CF cards························································································································68
Recommended microphones·················································································································68
Chapter 6 Troubleshooting······················································· 69
When DR-1 does not operate well ············································································································70
When an error is displayed ·························································································································73
Chapter 7 Glossary / Index······················································· 77
Glossary···························································································································································78
Index·································································································································································80

6
Safety Information
The following gives you information about how to operate your DR-1
safely, including information about the operating environment and
about safe handling of the rechargeable battery. It is essential that
you read this information carefully as failure to take note of it may
invalidate your guarantee and could cause serious injury to yourself
or others.
Safety terms and symbols used in this guide
The following terminology and associated symbols, relating to safety
and points of note, has been used throughout the guide:
DANGER: A danger notice warns you of “Cautions” (including “Warning”) that must
pay special attention that could cause serious personal injury. Failure to follow the
precautions highlighted in this way could result in serious injury or death, fire, or
electrical shock.
WARNING: A warning notice denotes “Prohibition” (Don’ts) that could result in
personal injury.
CAUTION: A caution notice denotes “Strict Observance” you must follow that
could lead to damage or destroy the PLEXTALK product, destroy the recording
media, destroy or affect your data or computer configuration.
WARNING!
Please take careful note of all the following points regarding general safe
use of DR-1. Inappropriate handling may lead to serious physical injury
to human body.
Do not allow any foreign matters, such as clips, coins, and staples from the clearance of
DR-1. It is very dangerous that it may cause short-circuit and may lead to fire, electric
shock and breakdown.
Do not disassemble, repair, and remodel DR-1. It may lead to a cause of fire, electric
shock and product damage, and it is very dangerous.
Do not use DR-1 other than supplied AC power adaptor and power cord. It may lead to
a cause of fire, electric shock and product damage.
Do not use DR-1 in the bathroom and the place where rain hits and high moisture
exists. It may lead to a cause of fire, electric shock and product damage.
Do not get DR-1 wet. It may cause electric shock. If water penetrates in the product,
immediately unplug the power cord out of the electrical outlet and contact the store you
purchased DR-1.

7
Do not pull out the power plug from the electrical outlet with wet hands. It may cause
electric shock.
Do not place any thermal appliances near the power adaptor and the power cord.
Coating may melt, and it may cause fire and electric shock.
Do not damage the power adaptor and the power cord. If you place something heavy
on DR-1 and tuck DR-1 into something, it gets damaged and may lead to a cause of fire
and electric shock.
When you unplug the power adaptor and the power cord, do not hold the cable to pull it
out. The cable may cut off, and it may lead to a cause of fire and electric shock.
Take the dust off from the plug of the power cord regularly. Dust may lead to a cause
of fire.
Do not connect many loads on one electrical outlet. If the product is used with
exceeding rated current, and it may lead to a cause of fire and product breakdown.
If any product damages or abnormalities, such as smoke, offensive odor, breakdown
from dropping are found, stop using the product urgently. It may cause of fire and
electric shock. Unplug the power cord immediately and contact the store you
purchased DR-1.
Do not put anything on DR-1 or cover DR-1 with cloth or plastic sheet. Do not place
DR-1 anywhere does not allow air to pass through easily. Product internal cooling
system becomes insufficient, and it may cause fire or electric shock.
Do not expose DR-1 to dusty areas, direct sunlight, close to the heating appliances,
cellular phones, audio amplifier, microwave oven, toaster, and hair dryer, and other
places where heat or heat and electric wave is generated. It may cause fire or electric
shock.
CAUTION! Please observe the following safety precautions. Failure to use DR-1
may cause physical injury to human body or physical damage.
Place DR-1 near the power supply outlet for easy reach to the power supply adaptor.
Always pull out the power plug from the outlet when you move DR-1 to prevent the
electric shock accident and the breakdown.
Always unplug the power plug from the electric outlet when not using DR-1 for a long
time.
Be careful not to drop or jolt DR-1 when you move. It may cause breakdown to a
precise part in the device.
Using the headphone for a long time may exert a harmful influence to hearing sense.

8
To wipe dust and dirt off, prepare tightly squeezed damp soft and clean cloth with water
or soap water.
Do not use thinner, benzine and any alcohols solvent that damages on the surface of
DR-1.
Insert the CF card in the correct direction. If inserting it in the wrong direction, it leads to
a cause of damage. Never add excessive power.
Legal and copyright Information
Copyright information about this guide
Shinano Kenshi reserves the right to modify the products described in this guide
at any time without prior notice.
Shinano Kenshi makes no representation or warranties with respect to the
contents hereof and specifically disclaims any implied warranties of
merchantability or fitness for any particular purpose. Further, Shinano Kenshi
Co., Ltd. reserves the right to revise this guide and to make changes in its content,
without obligation to notify any person or organization of such revision or change.
This guide is copyright. All right reserved. It may not be copied, photocopied,
translated, or reduced to any electronic medium or machine-readable form
without Shinano Kenshi's prior permission.
Manual copyright 2007 Shinano Kenshi Co., Ltd.
Licenses and trademarks
All licenses and trademarks are property of their respective owners.

9
1
Chapter 1
Introduction
What you get in the box?·······································
·
10
What is a Digital Recorder “DR-1”?·······················
·
11
What is DAISY?·····················································
·
12
What is a DAISY book? ···································
·
12
Flow of DAISY book production·······················
·
12
Terms of DAISY ···············································
·
13
Part names and functions······································
·
14
DR-1 top layout (Operation panel) ···················
·
14
Input/output connectors····································
·
15
Display panel····················································
·
16

10
What you get in the box?
Digital Recorder DR-1
1
PowerCord 1
Power Adaptor 1
PLEXTALK Recording
Software (PRS) Installation
CD
1
PLEXTALK Recording Software (PRS) is bundled
with DR-1. Designed for Windows PCs, it is a
simple DAISY recording and editing tool with voice
guidance to make it accessible to people who are
blind or partially sighted.
Quick manual
1
User’s manual
(This manual)
1
Accessories NOT included in this package
Below listed accessories are not included in this package.
These items are available and can be purchased separately at the
electronics retail stores.
CF card, Microphone, Headphone,
USB cable

11
1
What is a Digital Recorder “DR-1”?
“DR-1” is a digital recorder that can perform the work of
"Recording", "Proofreading", and "Correction" in DAISY book
production.
Features of DR-1
1. No complicated setup is required.
You can start recording after just inserting the CF card and
connecting the microphone. (*)
2. DR-1 makes DAISY book creation easy and
simple.
It has not only recording but also simple editing function such as
breaking section or page.
3. Bigger keys and display help you operate easily.
Easily understand the recording status by displaying the elapsed time,
remaining recordable time, the number of phrases, the mark that can
be inserted at any position.
(*) CF card and microphone are not included in DR-1 package.
Please purchase them separately.
A
s for the work
of DAISY book
production,
refer to "Flow o
f
DAISY book
production
(p.12)."

12
What is DAISY?
What is a DAISY book?
DAISY, which is an abbreviation for Digital Accessible Information
System, is a standard of a digital recording book that was developed
for a visually impaired person or people who have a difficulty reading
ordinary printed materials.
DAISY’s format was developed is being developed as the international
standard for digital talking books.
Advantages of DAISY book
1. Available a long-time recording on a single CD.
2. Ability to skip directly to a specific pages, sections, and chapters.
3. Sound quality does not deteriorate even after repeated hearing.
Flow of DAISY book production
Recording Reading of books
Correction of reading errors, etc.
Proofreading
Comparison between original book and
recorded audio
Check a mark on points where require
correction
Correction Reviewing check-marked points
Correction of reading errors, etc.
Editing Daisy
Setting of pages, sections, and chapters, etc.
Work with editing software, such as
PRS, etc.
CD Creation
Burning data on CD
Producing CD by PC and other media
burning device
= Production process that can be done with DR-1

13
1
Terms of DAISY
1) What is a “Phrase”?
When the book is being recorded, the audio files are automatically divided
into segments called "phrases". The recording software will decide on
where a phrase starts and ends based on the amount of silence between
one piece of audio and the next. The length of silence permitted before a
new phrase is created is called the "pause time" and can be adjusted by
the person making the DAISY recording. In order to detect the audio up into
phrases that are not too long or short, a fast reader might require a short
pause time and a slower reader a longer pause time. When the recording is
finished, the reader can use the phrases as an additional navigation
feature.
Once upon a time, (pause) a queen was doing needle work (pause) while staring
outside her window at the beautiful snow. (pause)
2) What is a “Section”?
A Section refers to the segment of audio between one heading and the
next. A section is generally made up of a number of phrases but can have
as few as one phrase. Each section has a heading and an associated
navigation level. Do not get confused between sections in a DAISY
recording and sections of this guide.
When you cannot detect phrases as desired, please refer to “Change the recording
setting (p.51)” to adjust it.
Phrase 1
Phrase 3
Phrase 2
[Example]

14
Part names and functions
DR-1 top layout (Operation panel)
1) Power
Turn the power ON/OFF.
2) Change time
Change time display and set time.
3) Playback speed
Change playback speed and specify
recording setting.
4) Build book
Execute build book and import functions.
5) Function
Use together with another key to execute
some functions.
6) Select switch
Change switch setting.
7) Delete
Delete recorded contents.
8) Phrase select
Select the range of phrase.
9) Rec. / Pause
Record/ pause recording.
10) Rew.
Rewind /Jump backwards by the phrase
unit.
11) Play / Stop
Play/stop playback.
12) For.
Jump forwards by the phrase unit.
13) Number to move
Set the jumping destination position.
14) Check, Remove
Set/Remove pages, sections, and marks.
15) Skip
Skip by the selected skipping unit.
16) Recording volume slider
Adjust recording volume.
1)
2)
4)
5)
6)
7)
8)
9)
10) 12)
13)
14)
15)
16)
11)
3)

15
1
Input/output connectors
1) Line input terminal
Connect the output terminal of VCR, etc.
2) Microphone input terminal
Connect the output terminal of the
microphone.
3) Headphone output terminal
Connect the input terminal of the
headphone.
4) DC input terminal
Connect the power adaptor.
5) USB cable connector
Connect the terminal of PC.
6) Volume shuttle
Adjusting playback volume.
7) CF card loading slot
Insert a CF card.
1)
2)
3)
4) 5)
6)
7)

16
Display panel
1) ”Play” lamp
Flash during playback.
2) ”Rec.” lamp
Flash at “Rec./Pause” and the light comes
up during recording.
3) ”Time” lamp
Display present elapsed time, total time, or
the remaining time.
4) ”Speed” lamp
Display the state of playback speed.
5) ”Sound quality” lamp
Display selected sound quality.
6) Recording level
Display recording level.
7) Hour Min. Sec.
Display the state of time presently
showing.
8) Page
Display the present page.
9) Mark
Display the present mark.
10) Section
Display the present section.
11) Phrase
Display the present phrase.
1)
2)
3)
4)
5)
6)
7)
8) 9)
10) 11)

17
2
Chapter 2
Setting up to get started
Prepare a CF card················································
·
18
About a CF card··············································
·
18
How to insert a CF card? ································
·
19
How to eject a CF card? ·································
·
20
Connecting a microphone and a headphone·······
·
21
Plug in a microphone ······································
·
21
Connecting a headphone ·······························
·
21
Connecting a power adaptor································
·
22
Power ON / OFF ··················································
·
22
Display panel while booting-up, processing, and
finishing operation, etc. ········································
·
23
Setting the date and time ·····································
·
24

18
Prepare a CF card
About a CF card
There are mainly two types of CF (Compact Flash*) card; one is a hard
disc type and the other is a memory type (Type I & Type II: 2 sub-types).
DR-1 is able to use the memory type of Type I CF card only. Type II CF
card cannot be used with DR-1. However, the SD card can be used
through the adaptor of the CF card type.
You can use the CF card with up to 8GB capacity and the SD cards with
up to 2GB capacity.
* CompactFlash is a registered trademark of SanDisk.
CFCard Adaptor SD card
● Recording capacity and standard recording time of CF card
Recording
Format PCM*MP3*
Sound Quality 22.05kHz 64kbps 48kbps 32kbps
512MB 2.5 15 20 30
1 GB 6 30 40 60
2 GB 12 60 80 120
4 GB 24 120 160 240
8 GB 48 240 320 480
Even if you correct a recording error, the audio file physically remains.
Therefore, you will need a CF card that has approximately twice large
capacity than the capacity indicated in the above table.
* Unit of Recording time: Hours

19
2
How to insert a CF card?
1) Turn OFF the power.
2) Hold the CF card correctly as shown on the left below
figure.
(The long sideways of the card goes into the card slot, not the short sideways.)
3) There is a very small ridge on the front edge of the CF
card. This ridge should be towards you and facing
downwards when the card is inserted.
4) Gently align the CF card with the slot and push it carefully
in until it is fully home. A slightly firmer push is required
at the last part of this process to ensure that it is properly
inserted.
.
CAUTION!
■ Use of the CF card with label, etc. adhered leads to a cause of the label peel-off at
the card insertion and also may trigger a defect when inserting/ejecting the card.
■ Always insert / eject the CF card in the state of the power-off.
NOTE:
Never be tempted to
use excess force as
you may cause
damage to the CF card
or DR-1.

20
How to eject a CF card?
1) Turn OFF the power.
2) Press the eject key which is located on the right of the CF
card slot.
3) Carefully grip the CF card and pull it out of the slot.
CAUTION!
■ Before ejecting the CF card, ensure that the power of DR-1
is turned off. If the CF card is ejected in the state of
power-on, stored data in the card may be destroyed.
Other manuals for DR-1
1
Table of contents
Other Plextalk Voice Recorder manuals