SMONET 2PCS User manual

Wireless
Network Video Recorder System
User Manual
2PCS/4PCS/6PCS/8PCS
720P/960P/1080P
2CH/4CH/6CH/8CH NVR Kits
V.9-201905

01
Content
Package Contents
Camera System Installation
Password Management and Internet Connection
Remote Viewing on a Smart Phone
Viewing on PC by Eseecloud Software
Record Video
Playback Video
Frequently Asked Questions
02
03
05
08
09
11
14
15

02
Package Contents
USA Toll Free: (866) 678-0666 (Available after 5:00 PM at Pacific Time)
CANADA Toll Free: (888) 792-5254 (Available after 5:00 PM at Pacific Time)
UK Toll Free: 08004 725222
Skype ID for US&CA: safeskysales003
Skype ID for UK: SMONETSERVICE
Wechat for US&CA: B997520270
Website: WWW.SMONETCCTV.COM
Thank you for choosing Smonet product.
Here is the list for product and relevant accessories.
S/N
1
2
3
4
5
6
7
Item
NVR
IP Camera(2CH/4CH/6CH/8CH)
DC 12V/2A power supply(for NVR)-3.3 feet
DC 12V/1A power supply(for IPC2CH/4CH/6CH/8CH)-10 feet
3.3 Ft network cable
USB mouse
User manual
Quantity
1pc
2/4/6/8 pcs
1pc
2/4/6/8 pcs
1pc
1pc
1pc
How can I get product and technical support?

Preparation for setup
Before installation, be sure to have the following:
TV/PC monitor (Not laptop or all in one computer), with 1080P or higher resolution.
VGA or HDMI cables for connection to the TV/PC monitor.
Router (WAN) and Internet Service (for remote viewing)
Ethernet cable for connecting the NVR to the Router
If you purchased the system without a hard drive, you will need a hard drive if you
wish to record videos from the cameras.
Installing a Hard Drive (Skip this section if a hard drive was pre-installed)
Hard Drive Specifications: 4TB maximum, internal, SATA Interface, 3.5/2.5 inches
Please power off the NVR before installing the hard drive.
NOTE: A newly installed Hard Drive needs to be formatted before
recording. More information can be found at FAQ Part below.
1 Camera System Installation
Remove the cover from the unit,
and remove the top two screws
Remove the cover
Insert the hard drive, secure it
to the bottom of the unit with the
four screws
Connect the data wire and
power wire as shown
Replace the cover and fasten screws
03

Installing the system
Connect NVR and cameras with corresponding power adapters.NOTICE,
NVR Power Adapter: 12V/ 2A
Camera Power Adapter: 12V/ 1A
DO NOT USE WRONG ADAPTER FOR SYSTEM WORKING
Connect provided mouse to NVR box.
Attach provided antennas to cameras.
NOTE:
If antenna already has been screwed into the camera, please DO NOT unscrew it.
Otherwise camera will be broken. Systems have two different antennas. One can be
removed and the other cannot be, which is all-in-one.)
NOTICE,
Fasten antennas tightly for better signal transfer.
Connect NVR to PC Monitor or TV by VGA/ HDMI cable, please kindly noted that the
system doesn’t support on laptop and All- in-One PC for initial Setup.
Connect NVR to the router by provided Ethernet cable, the router must be
WAN(wide area work).
The NVR and cameras that came with your order have been paired and tested at
the factory to operate immediately when powered up. Pairing would only be neces-
sary if you add additional cameras to your system. (More on the pairing process
later)
04
VGA Port
(PC Monitor)
HDMI Port
(TV Monitor)
Ethernet Port
(Router)
USB Port
(Mouse)
Power Supply

Best placement of cameras in their final location
The NVR’s signal coverage is circular with the NVR’s antennas in the center. Signal
is strongest around the combined NVR antennas and weak in the area immediately
between the 2 antennas. For best signal reception the cameras should be placed
around the NVR and as close to the same horizontal plane as the location of the
NVR. The camera antennas should be vertical or perpendicular to the orientation of
the antennas on the NVR.
Password Management and Internet Connection
2
Log in: Right click your mouse to open the main menu on the home screen. Click
System Setup and the password page will appear.
NOTE: The Default Username is “admin” and a Password is not required. Leave
the password field blank. Simply click Login to access the System Setup menu.
Setting a Password: Right click on the home screen of your monitor, navigate to
System setup > System admin, click User on the left menu bar > Set password(Re-
quest: 8 Characters Max.. Keep it short.). Create a password and type it in the field,
repeat new password, click ‘OK’. Be sure to remember your password.
05
Best wireless signal Worst wireless signal

Check Network Status: With the NVR connected to your router via an Ethernet
cable, navigate to System setup > Network setup, make sure DHCP is checked. At
the bottom of the window you should see Network Status as Healthy Network.
Click Show QR Code, you should see Cloud ID.
06
Click network icon at the bottom right side of main screen > you should see page
of Fast network.

Once Cloud(P2P) is “Online”, you will be able to access videos from the cameras
remotely by PC or Smart Phone (More on this in the next Section of this manual).
If the system does not come “Online” please do the following:
1.Make sure the light at the network port of the NVR is flashing which indicates
active communication with the router. Re-seat or replace the cable if necessary.
07

From your Smartphone, download free App ‘IP PRO’ or ‘Eseecloud’ from Google
Play or App Store.
Click Register to create an account and password based on your email or phone
number. Be sure to remember your account login info.#Pic 1
Click "+", then click Add device by ID.#Pic2
On your device, either scan the QR code or manually enter your Cloud ID. You
can locate your Cloud ID on your monitor screen as seen earlier in section 2 of
this manual. (Use NVR login Username/password on your monitor screen
here).#Pic3
If you have multiple Smartphones, you must register multiple accounts. You
cannot have one account across multiple devices.
Remote Viewing on a Smart Phone
3
08
Pic1 Pic2 Pic3
2. In System Setup>Network Setup page, please tick off DHCP, click Apply.
Then, please select DHCP again, click OK.
3.Power off the NVR by removing the power cable. Then, plug it in again to
re-power the unit. NVR will re-boot.
4.Wait 2-3 minutes then repeat steps 1-2. If the problem remains please contact
the Smonet Customer Service Team.

Viewing on PC by Eseecloud Software
4
Please contact seller for Eseecloud software.
Install Eseecloud Software first.
The default setting of Eseecloud software is no password under admin account,
please.
Select “Add” at upper right corner.
In the “Add device” box, select Cloud ID. Enter the cloud ID(9 or 10 numbers). You
can find it at the bottom right side of your home monitor screen.
Username is NVR system user name on your home monitor screen.(If you don’t
change it in your setup, it should be admin)
Password is your NVR system password on your home monitor screen.(If you
don’t change it in your setup, it should be blank, no password)
Channels: Input 4 or 6 or 8. If you have 4 cameras, enter 4 etc.
Click Finish, the device will be added successfully.
09

At right bar, you’ll see your Device name, double click on it, select Connect
Videos, you’ll be able to view live videos.
10

Record Video
5
NOTE: Recording and playback requires a hard drive installed and shipped with the
system or installed in the NVR by the user.
Recording - There are two types of recording – Scheduled Recording and Motion
Activated Recording.
TYPE 1: Scheduled Recording – Right click the mouse on the home screen and
navigate to System Setup>Record Setup.
Factory default setting is playing 24 hours/ 7days recording for all channels.
11

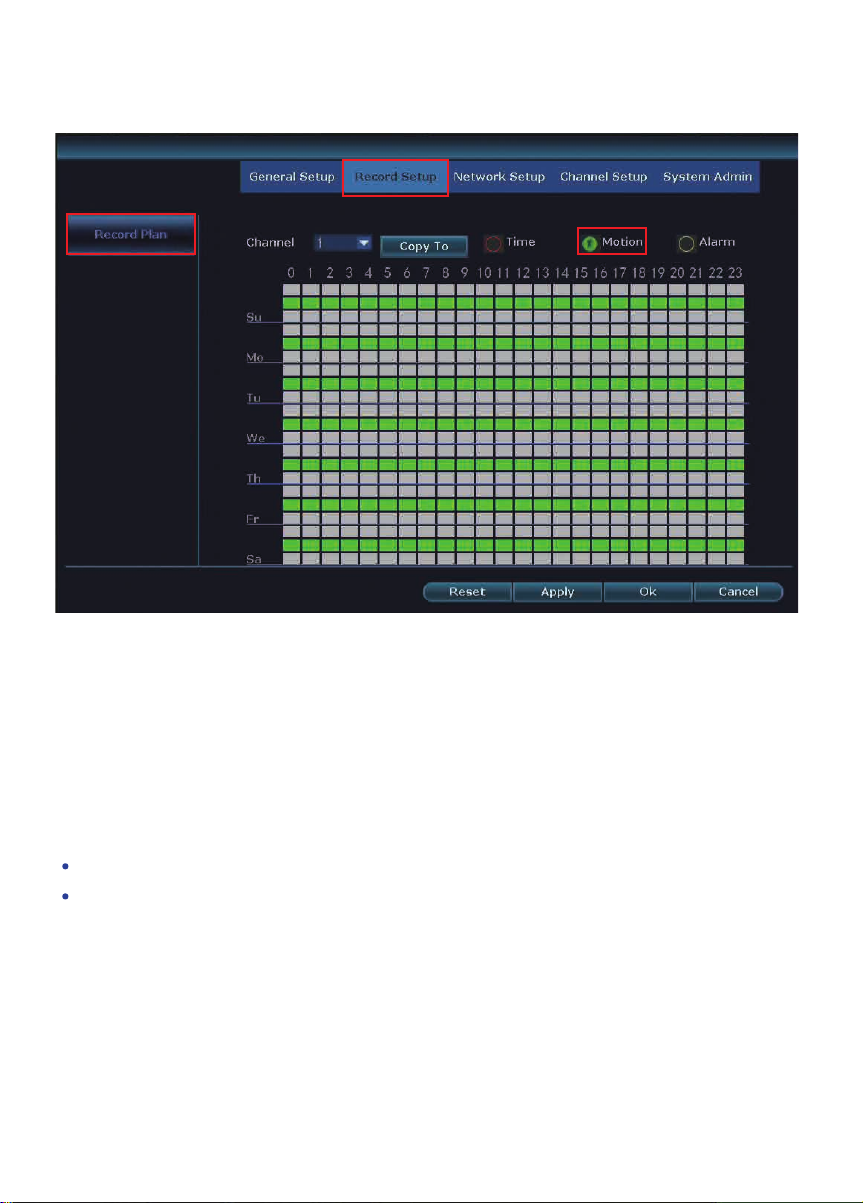
If device user like to change, please ‘Reset’ first. Then, setup your own schedule.
How:
Repeat the following steps for each camera channel:
Step1: Select the channel you wish to schedule.
Step2: Highlight the Time button. The “Motion” and “Alarm” buttons will be discussed
ads part of Type 2: Motion Recording in the next section.
Step3: The period can be set to an individual day of the week (7 day available from
Monday to Sunday)
Step4: Specific time intervals can be set for recording during a 24-hour period (from
0am to 23pm)
Step5: If you wish to set the same period and time periods for all camera channels,
simply click “Copy to.”
NOTE: You do not have to repeat this process for each channel if you select “Copy
to”
12
Then, please set motion detection alarm as following information.
Step1: On your monitor, please navigate to System Setup>Channel Setup>Video
Detection.
Step2: Please make sure Enable is checked. Select one channel, choose Motion in
Detection.
Step3: Motion sensitivity adjustment.
Step4: Select alert type including Buzzer, E-mail Notice and APP Alarm
Buzzer: your NVR box will start to beep when motion being detected.
E-mail Notice: you need to bind your email to the system if you want to receive
email alert. More information about how to bind email can be checked in FAQ.
Step5: Arming time: Factory Default Setting is 24 hours/ 7 days selected for motion
detection.
Click ‘Reset’ first and go to setup your own plan.
Step6: Area edit: Factory Default Setting is all areas selected for motion detection. If
device user like to change, please right-click mouse to clear all first. Then, select
motion detection area as you wish.
TYPE 2: Motion Activated Recording - In System Setup>Record Setup>Record
Plan page, please select Motion.
13

Playback Video
6
Step7: After setting area, please right click your mouse, choose Return get back to
Video Detection page. Please click Apply to save the setting.
Step8: You can simply click Copy to, copy the motion detection setting to other
channels, and adjust area setting for each cameras one by one.
To use the playback feature, you must first set up the recording function as described
in the section above. To playback, from the home screen of your monitor, right click
and navigate to ‘Video playback’.
14

Frequently Asked Questions
7
Q1: How do I format my new hard drive and check my hard drive
information?
A: From the home screen of your monitor, right click the mouse, navigate to System
setup > General setup > HDD Setup, select Format and click Format > click OK.
From this screen you can also turn off the overwrite function and check your hard drive
Status.
At right bar, please select a date, channel, record type, specific time, click Search,
you’ll see colorful timeline show up at bottom of your screen, recorded video will start
to playback.
15

Q2: Do I need to connect the camera with network cable?
A: No, the cameras are wireless. You do, however, need to connect the camera with
a power supply. The cameras and NVR are already paired. The camera will connect
with the NVR automatically once attached to a power supply. Do not attempt to install
your cameras until you are able to view images on your TV or PC monitor first.
Q3: How can I troubleshoot camera issues?
A: First check to see if the power adapter is working by testing with another power
adapter. lf the power adapter is functioning, move the camera close to NVR box to
check whether you have video or not. lf there is no video, cover the photocell with
your finger as shown in the figure below cover around 5 to 10 seconds. If the IR-CUT
light turns red, the camera is working. If it does not turn red, this indicates that the
camera has experienced a malfunction.In this case,please contact us for after sale
service.
Cover the
photocell
16

Q4: Why I cannot get motion notifications on my Smartphone?
A: First verify that the status of your Cloud ID is ONLINE and the Network Status
indicates Healthy Network (refer to section 2). Next, from the home screen of your
monitor, right click the mouse, navigate to System setup > Channel Setup > Video
detection. Next, select the following: Enable for Motion Detection, E-mail Notice, and
APP Alarm. Click OK.
Please make sure you haven not blocked message notifications from the IP PRO
app in your phone settings.
Q5: How can I receive e-mail notifications for motion detection?
A: First,ensure you follow the steps outlined in the previous question How can I get
motion notifications on my Smartphone?
To receive notifications, you need a Email account (Such as, Hotmail,Gmail,Ya- hoo,
etc.)
Next, log into the web version of your Email account. In the upper right-hand corner,
click on the Settings button, then select Connected accounts > POP and IMAP
Select Yes and Don’t as shown in the figure and Save.
17

From the home screen of your monitor, right click your mouse and navigate to
System Setup, select Network setup, select Email from the left menu bar. From
there, click Enable and More Parameter, enter the information in the fields as shown
in the figure below. For the dot, please be sure to use the correct key on the
keyboard next to the forward slash as shown in this figure:
Complete the fields on the screen as follows(take hotmail account as an example):
SMTP Provider: select it per your email type
Sender: Sender e-mail address to send alarm
Password: Sender E-mail login password
Port: 25 or 587
Encryption Type: TLS or SSL
Sendee: Receiver e-mail address to receive alarm (it can be the same email account
with sender)
If you use other email account as sender,such as gmail,yahoo,etc,you need find out
their own SMTP server and port.
18

After you have entered all of your information, click Test until the Test success
message appears on the screen. Please allow a few minutes for the testing cycle to
complete. If the test failed, try another Email account.Click OK. Whether or not your
test was successful, be sure to click Ok to save your settings.
To test your alarm, walk past your camera. You will receive an Email notification
within 2 to 3 minutes as shown in the sample figure below.
Notice: Motion detection snapshot will only be sent by email, not included in app
notification.
Event:Motion detect in video channel 1; Time: 2017-8-18
11:24:36; Device: K9604-W; IP Address: 192.168.0.236
19
Other manuals for 2PCS
1
This manual suits for next models
10
Table of contents


