Plustek eDoc N600 User manual

Setup
Configuration
Technical Guides

Trademarks
©2016. All rights are reserved. No portion of this document may be reproduced
without permission. All trademarks and brand names mentioned in this publication are
property of their respective owners.
Liability
While all efforts have been made to ensure the accuracy of all contents in this manual,
we assume no liability for errors or omissions or by statements of any kind in this
manual, whether such errors are omissions or statements resulting from negligence,
accidents, or any other cause. The contents of this manual are subject to change
without notice.
Environmental Information
The product is designed and produced to achieve sustainable environmental
improvement. We strive to produce products in compliance with global environmental
standards. Please consult your local authorities for proper disposal. The product
packaging can be recycled.
Attention to recycling (For EU countries only)
Protect your environment! This product should not be thrown into the household waste
container. Please give it to the free collecting center in your community.
Screen Examples in This Manual
The screen shots in this guide were made with Windows 7. If you are using Windows
XP / Vista / 8 / 10, your screens will look somewhat different but functions are the
same.

Table of Contents
Introduction ...................................................................................................1
How to Use This Guide ..........................................................................................1
Conventions of This Guide ..............................................................................1
A Note about Icons..........................................................................................2
Safety Precautions...........................................................................................2
Minimum System Requirements ............................................................................3
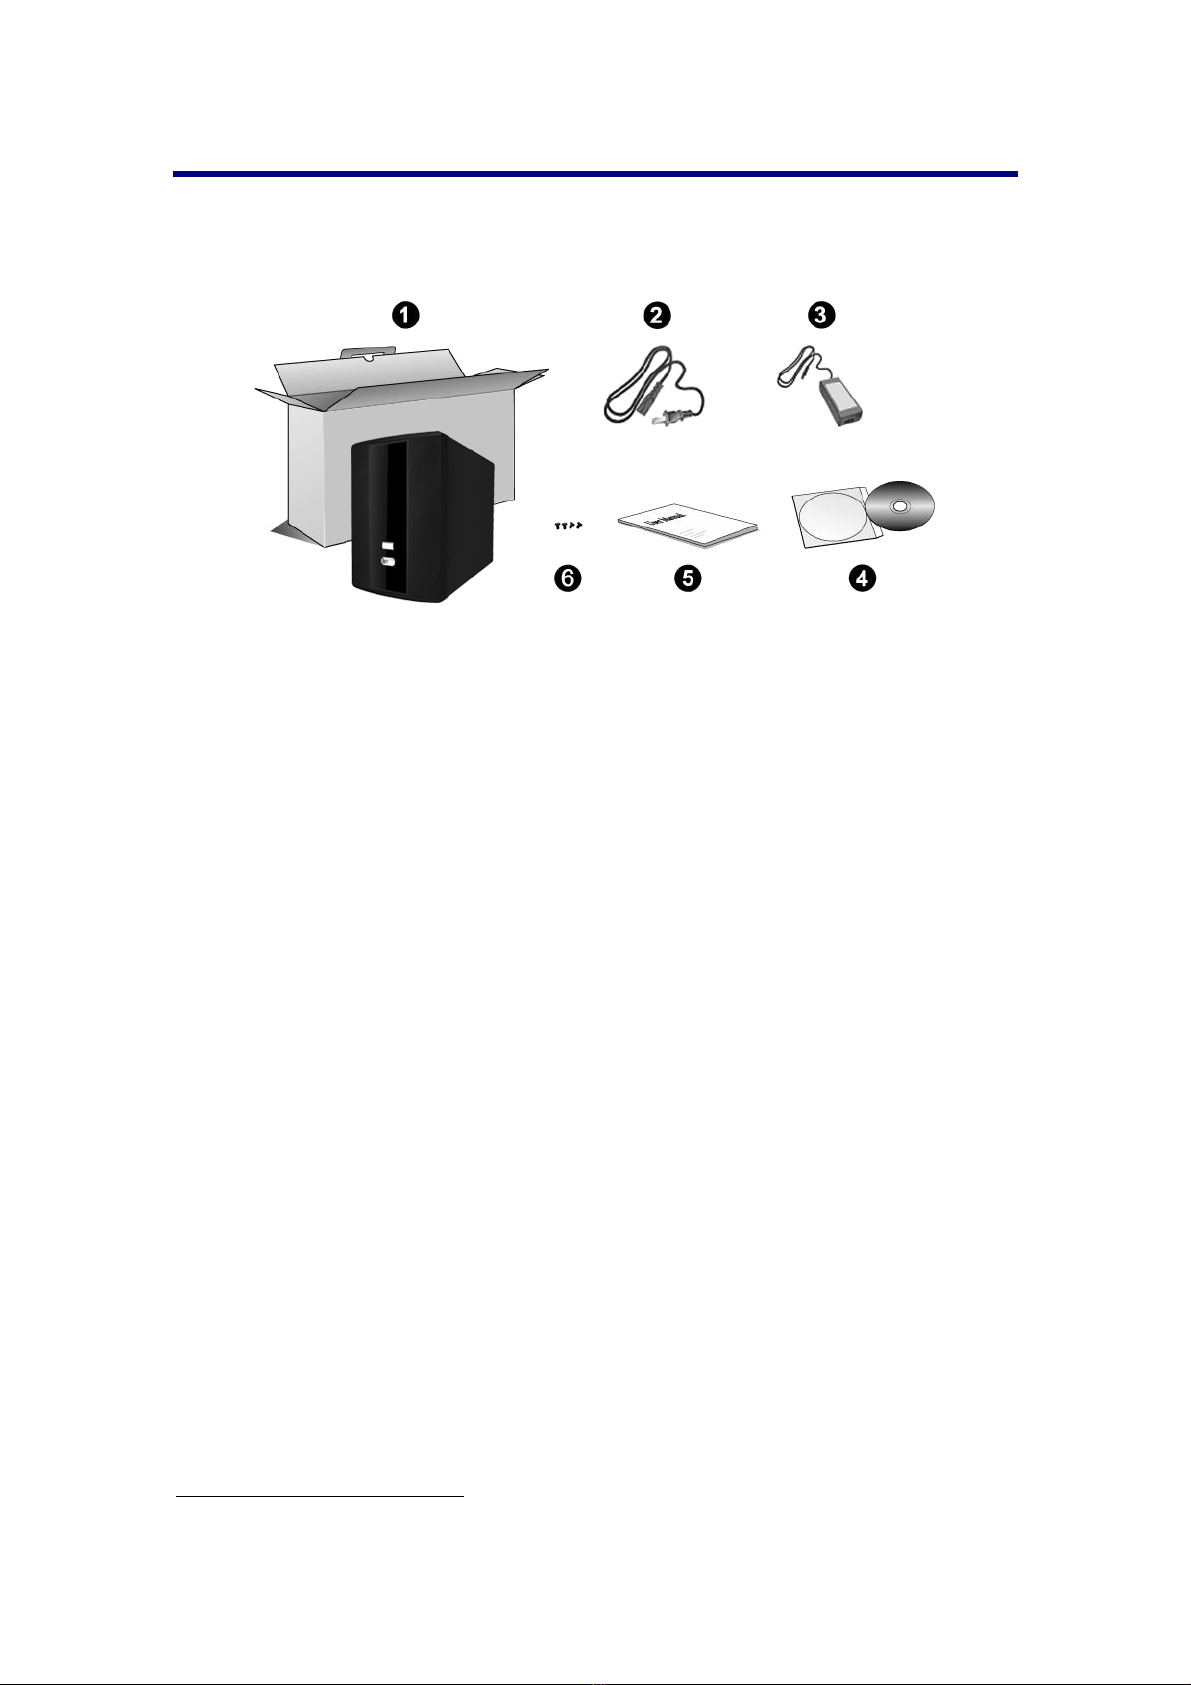
Box Contents..........................................................................................................4
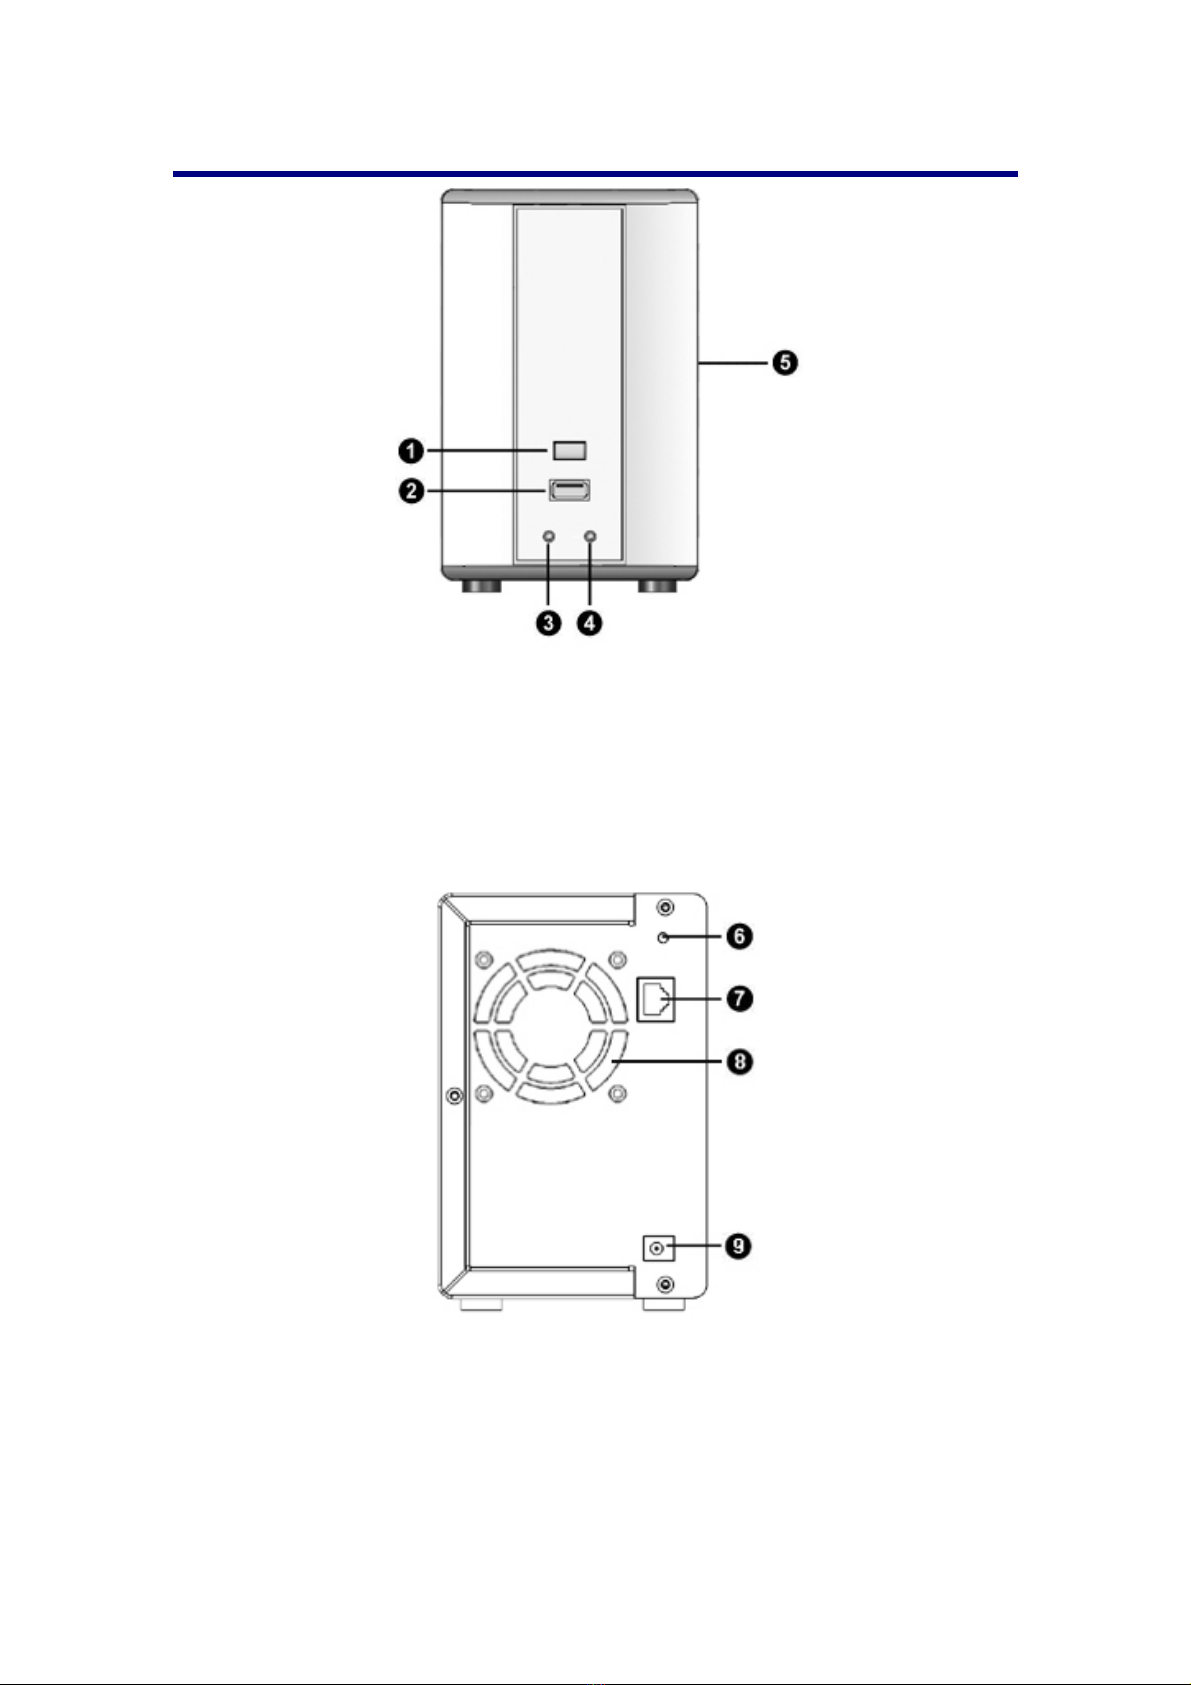
Overview ................................................................................................................5
Chapter I. Setup the eDoc Manager...............................................................6
Installing Hard Disk Drive.......................................................................................6
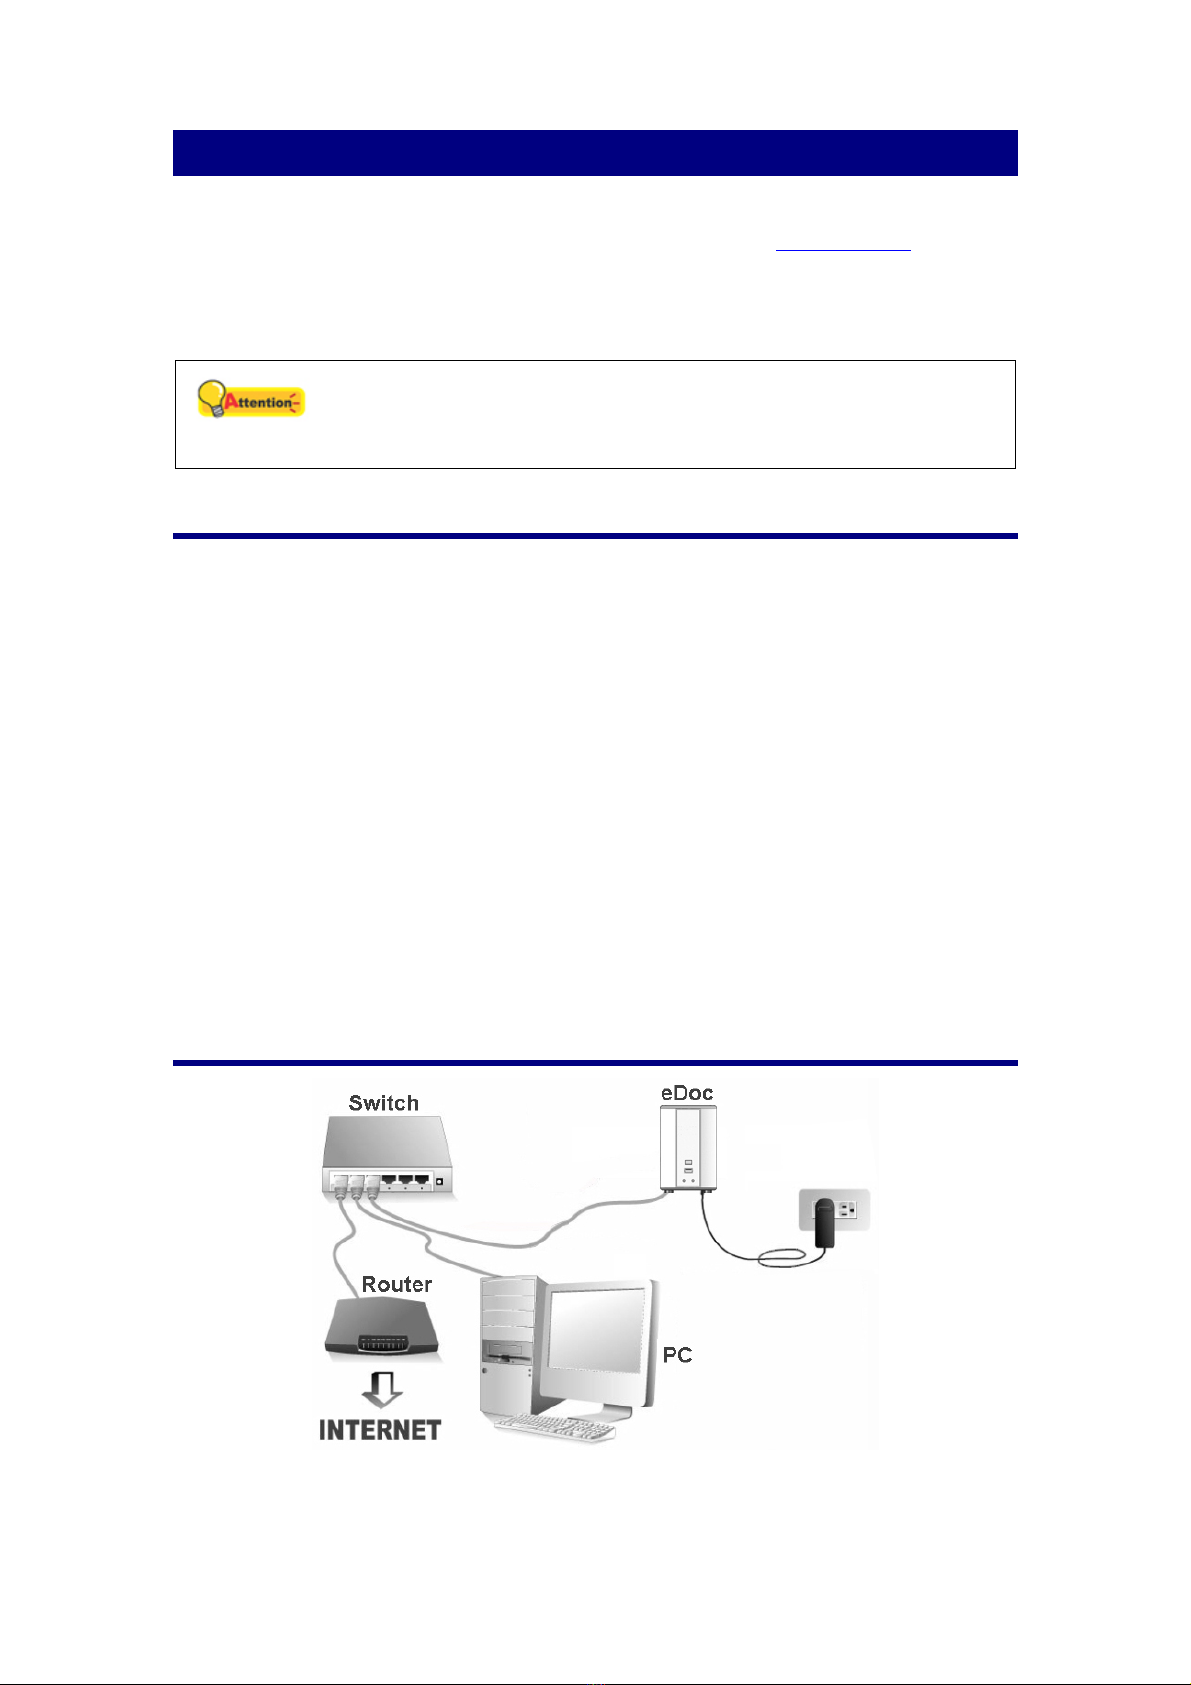
Setting up the eDoc Manager in your network.......................................................6
Chapter II. Getting Started with the eDoc Manager......................................8
Connecting to the eDoc Manager using eDoc Quick Link......................................9
Configuring the eDoc Manager for the first time...................................................13
Logging on to the eDoc Manager as administrator........................................13
Changing the connection method (IP address) .............................................14
Creating user accounts..................................................................................15
Logging in to the eDoc Manager as user .............................................................16
Logging out of the eDoc Manager........................................................................17
Chapter III. Advanced eDoc Manager Configuration...................................18
Logging in to the eDoc Manager as administrator................................................19
Network settings...................................................................................................20
IP settings......................................................................................................20
Dynamic domain service settings..................................................................22
External mail settings.....................................................................................25
Information Management...............................................................................26
Account management ..........................................................................................28
Users .............................................................................................................28
Groups...........................................................................................................32
Space allocation ............................................................................................33
Device Management......................................................................................34
System management ...........................................................................................34
System management.....................................................................................34
Log management...........................................................................................37
Daily System Backup.....................................................................................38
RAID..............................................................................................................41
System update .....................................................................................................42
Update management.....................................................................................42
Resetting the eDoc Manager................................................................................50
Chapter IV. Using the eDoc Manager...........................................................51
Logging in to the eDoc Manager as user .............................................................51
User interface overview........................................................................................52
Search box.....................................................................................................52
Settings and Log out......................................................................................52
Toolbar...........................................................................................................52
Side panel......................................................................................................53
File browser...................................................................................................53
Settings and Log out ............................................................................................54
Edit profile......................................................................................................54
Log records & inquiries..................................................................................55
Logging out of the eDoc Manager .................................................................56
Side panel ............................................................................................................56

Creating new folders......................................................................................56
Uploading new files........................................................................................57
Media Cabinet................................................................................................58
My files...........................................................................................................58
Sharing Center...............................................................................................58
Management..................................................................................................59
File browser..........................................................................................................59
Viewing files...................................................................................................60
Navigating folders..........................................................................................60
Smart file icons..............................................................................................60
Previewing files..............................................................................................61
Selecting files.................................................................................................61
Online previewing files...................................................................................62
Toolbar.................................................................................................................62
Delete ............................................................................................................62
Copy ..............................................................................................................63
Move..............................................................................................................63
Download.......................................................................................................64
File request....................................................................................................64
Share.............................................................................................................64
Collaborate ....................................................................................................67
Full Text.........................................................................................................69
Tag.................................................................................................................70
Rename.........................................................................................................70
Display mode.................................................................................................71
Search box...........................................................................................................71
Searching for files..........................................................................................71
Chapter V. Using the eDoc Cabinet ..............................................................72
eDoc Cabinet installation requirements................................................................72
Installing the eDoc Cabinet ..................................................................................73
Logging in to the eDoc Manager with eDoc Cabinet............................................73
Viewing folder links...............................................................................................75
Creating and editing folder links...........................................................................76
Name.............................................................................................................76
Status.............................................................................................................76
Color..............................................................................................................76
Synchronization mode...................................................................................76
Manual or Automatic......................................................................................77
Schedule........................................................................................................77
Local folder....................................................................................................77
Server folder..................................................................................................78
Using your local folders........................................................................................78
Uploading and downloading files and folders................................................78
Viewing the synchronization status................................................................78
Appendix A: Specifications...........................................................................79
Appendix B: Customer Service and Warranty..............................................80
Statement of Limited Warranty.............................................................................80
FCC Radio Frequency Statement........................................................................81

Introduction
Thank you for choosing our eDoc Manager. Like all of our products, your new eDoc
Manager is thoroughly tested and backed by our reputation for unsurpassed
dependability and customer satisfaction. We hope you will continue to turn to us for
additional quality products as your computing needs and interests grow.
How to Use This Guide
This User’s Guide provides instructions and illustrations on how to setup and
configure your eDoc Manager. This guide assumes the user is familiar with Microsoft
Windows. If this is not the case, we suggest you learn more about Microsoft Windows
by referring to your Microsoft Windows manual before using your eDoc Manager.
The Introduction section of this manual provides an outline of this manual, and
describes the minimum system requirements, the main features and box contents.
Chapter I describes how to set up the eDoc Manager in your network environment.
Chapter II describes how to log in to the eDoc Manager interface.
Chapter III provides you with plenty of illustrations and information about advanced
configuration of the eDoc Manager. You may get familiar with it and try out all
functions provided with the eDoc Manager.
Chapter IV describes how to use the eDoc Manager.
Chapter V describes how to use the eDoc Cabinet.
Appendix A contains the specifications of the device you purchased.
Appendix B contains our customer service, limited warranty agreement and FCC
statement.
Conventions of This Guide
“XXX” — Represents commands or contents on your computer screen.
Bold — Represents important notes.
1

A Note about Icons
This guide uses the following icons to point out information that deserves special
attention.
Warning
Warning: A procedure that must be followed carefully to prevent
injury, or accidents.
Attention
Attention: Instructions that are important to remember and may
prevent mistakes.
Information Information: Optional tips for your reference.
Safety Precautions
Before using this product, please read the following important information carefully to
eliminate or reduce any possibility of causing damage and personal injury.
1. Do use the AC adapter that comes with this device (if it is available). Use of other
AC adapters may lead to malfunction, hard disk damage, overheating, electrical
shock, fire or injury.
2. Keep the space around the adapter clear in case you need to quickly unplug the
adapter during emergencies.
3. Keep the eDoc Manager protected from liquids.
4. Do not install the device near any heat sources such as radiators or other devices.
Install the device only in environments that meet the factory specifications.
5. Ensure that the eDoc Manager is properly secured to a stable surface. Major
shocks, jolts and/or excessive vibration may damage the sensitive electronics
inside the eDoc Manager.
6. Ensure there is ample room for any cables leading to and coming from the eDoc
Manager.
7. Do not touch the device or the AC adapter when they are powered on.
8. Unplug the device if you don’t need to use it for a certain period of time to avoid
any risks of causing fire.
9. Do not remove the eDoc Manager's hard disk(s) while the device is still turned on
and operating. Please make sure the power is disconnected from the eDoc
Manager or your hard disk may be damaged.
10. Damaged wire could cause fire or electrical shock. Keep the power cord straight
and without twisting, bending or scraping it.
2

11. Moisture condensation may occur inside this device and cause malfunction under
these conditions:
• When this device is moved directly from a cold to a warm location.
• After a cold room is heated.
• When this device is placed in a damp room.
To avoid moisture condensation, you are recommended to follow below procedure:
• Seal this device in a plastic bag for it to adapt to room conditions.
• Wait for 1 ~ 2 hours before removing this device from the bag.
12. Avoid excessive smoke, mechanical, dust, or direct sunlight.
13. Do not incorrectly replace the battery on the Server main board. There is risk of
explosion if the battery is replaced with an incorrect type. Dispose of used
batteries according to the instructions.
Information
The mark shown to the left is in compliance with the Waste
Electrical and Electronic Equipment Directive 2002/96/EC (WEEE).
The mark indicates the requirement NOT to dispose the equipment
as unsorted municipal waste, but use the return and collection
systems according to local law. If the batteries, accumulators and
button cells included with this equipment, display the chemical
symbol Hg, Cd, or Pb, then it means that the battery has a heavy
metal content of more than 0.0005% Mercury, or more than 0.002%
Cadmium, or more than 0.004% Lead.
Minimum System Requirements1
The eDoc Manager is recommended to work with a networked personal computer that
meets the following minimum requirements:
Operating System Microsoft Windows XP / 7 / 8 / 8.1 / 10
CPU Intel Core 2 Duo, 2.6GHz or better
Web Browser Microsoft Internet Explorer 11 or above2, Firefox, Chrome,
RAM 1 GB or more
Network 10/100/1000 Mbps (RJ-45)
1The system requirements here are only a guideline, as in general the better the computer
(motherboard, processor, hard disk, RAM, video graphic card), the better the results.
2The program is available with Microsoft Windows and therefore is not included in the
Setup/Application CD-ROM of this product.
3

Box Contents3
Before you start installing your eDoc Manager, check the box contents to make sure
all parts are included. If any items are damaged or missing, please contact the vendor
where you purchased your eDoc Manager or our customer service directly.
1. eDoc Manager
2. Power Cord
3. AC Adapter
4. Installation CD
5. Quick Guide
6. Hard Disk Screws x4
3Save the box and packing materials in case you need to transport this NVR in the future.
The product packaging can be recycled.
4

Overview
1. Function button
2. USB port
3. System LED (green indicates system operating normally)
4. Network LED (green indicates working network connection)
5. SATA HDD enclosure (supports 3.5” drives; RAID 1 configuration)
6. Reset button hole
7. RJ-45 Ethernet port
8. Ventilation openings
9. DC-Jack
5

Chapter I. Setup the eDoc Manager
Before you setup the eDoc Manager, please make sure all components are available
and ready. A list of the package contents is provided in the Box Contents section of
this guide. If any items are damaged or missing, please contact the vendor where you
purchased your eDoc Manager or our customer service directly. This chapter will
guide you through the physical installation of the eDoc Manager in your network.
Attention
Please make sure a hard disk is installed in the eDoc Manager
before you use the eDoc Manager.
Installing Hard Disk Drive
If there is no hard disk installed on the eDoc Manager, please install it before you
power on the eDoc Manager. The eDoc Manager supports SATA interface, 3.5-inch
hard disk, and you can choose to install one or two hard disks.
Before you install the hard disk drive, please backup the data stored in the hard disk
drive if there is any. After the installation is completed, the eDoc Manager will
automatically format the hard disk drive. It takes time to format the hard disk drive.
Follow the steps below to install the hard disk drive:
1. Use a screwdriver to open the cover located on the side of the eDoc Manager.
2. Connect the SATA adaptor and the power source.
3. Tighten the screws firmly on the side of the hard disk drive to secure the hard disk
drive.
4. Close the lid. Tighten the screws to secure the cover.
Setting up the eDoc Manager in your network
Follow the steps below to set up the eDoc Manager in your LAN environment:
6

1. Plug the RJ-45 connectors into the eDoc Manager’s LAN port and the Switch’s
LAN port.
2. Plug the AC adapter into the DC-Jack of the eDoc Manager. Plug the other end of
the power cable into a standard AC power outlet. After the eDoc Manager has
booted, it will beep two times and the System and Network LEDs will turn on
(green) to indicate that the eDoc Manager has successfully booted and
established a network connection.
3. Connect a PC or Laptop to the Switch’s LAN port.
7

Chapter II. Getting Started with the eDoc
Manager
After setting up the eDoc Manager in your network, there are a few settings you need
to take care of as administrator. This chapter will guide you through connecting to the
eDoc Manager and configuring the most basic settings.
8

Connecting to the eDoc Manager using eDoc Quick
Link
Insert the installation DVD into your DVD-ROM drive. Select the desired language
then click on the Quick installation system button to install the eDoc Quick Link
program. Please do not use the WiFi connection to install the eDoc Manager. (You
may click on the User guide button to read the quick guide and the user guide, click
on the Install Utility button to install the OCR program, the eDoc Cabinet program
and the network drive program.)
Launch the eDoc Quick Link program from the shortcut from your desktop.
1. Click on the Search eDoc button to search the connected eDoc Manager in the
same network segment. The display information includes Server name, IP status,
IP address, Status, eDoc version, firmware version, Mac address and UDID. The
Status column indicates the status of the eDoc Manager: no install means it is the
first time installation; Ready means the eDoc Manager is installed completely and
is ready to be connected; Maintenance mode means you can install, upgrade,
backup and restore the eDoc Manager.
2. Check the UDID & MAC sticker on the eDoc Manager to select the desired one for
installation.
9

3. You may click on the Network Setting button to configure the network settings. If
you select Use the following IP address option, you have to enter the IP
address, Subnet mask, Gateway and DNS server for the eDoc Manager to use.
4. The Status column will show no install when you install the eDoc Manager for the
first time. Click on the Connect to eDoc button to install the eDoc Manager. Enter
admin as your user name, 123456 as your password and click Login.
10

5. Click on the Install button to start the installation process.
6. Click on the Next button.
11

7. Select Upload from your computer option, and load the eDoc_image_1.x.x.tar
file from the installation DVD for the installation. Click on the Next button.
8. The Confirm dialog pop-ups, click on the Yes button.
12

9. The installation is completed, click on the Finished button to close the window.
10. The Status column will show Ready when the eDoc Manager installation is
completed. Click on the Connect to eDoc button to open the eDoc Manager login
page.
Configuring the eDoc Manager for the first time
Before the eDoc Manager can be used in your network environment, there are some
settings on the administrator side of things to take care of in addition to creating the
necessary user accounts and groups. The following section describes the minimum
actions you should perform as administrator to get the eDoc Manager up and running
and ready for your users.
Logging on to the eDoc Manager as administrator
13

Enter admin as Account and 123456 as Password to log on to the eDoc Manager
as an administrator to configure some necessary settings.
Changing the connection method (IP address)
Depending on your network environment, you may not wish to use the eDoc
Manager’s default connection method of obtaining an IP address from a DHCP server.
If you do wish to use DHCP as connection method, skip this part.
1. Open the IP settings page by clicking on Network settings on the left panel, then
clicking on the IP settings tab.
2a. If you select static from the Connection method drop-down list, enter the IP
address, Subnet mask, Default gateway and Preferred DNS server for the
eDoc Manager to use.
14

2b. If you select PPPoE from the Connection method drop-down list, enter the
PPPoE account and PPPoE password for the eDoc Manager to use.
3. Click on the Apply button to save the changes.
Creating user accounts
Before the eDoc Manager can be accessed by your users, you need to create user
accounts for them. The eDoc Manager provides some pre-defined settings so you
only need to fill in the most basic information when creating user accounts. The users
can then modify the pre-defined settings by themselves after they log in to their
accounts.
1. Open the Users page by clicking on Account management on the left panel,
then clicking on the Users tab.
2. Click on the New user button to open the New user account dialog.
15

3. You only need to enter the User account name, Nickname and E-mail of the
new user account. You can leave the Password,Employee Number and Quota
fields empty to use the default values. The default password is 123456 and you
should advise your users to change it after they log in. The preset Quota is 10000
MB (10 GB) and can be adjusted at any time by opening the Space allocation
page. You can assign the user to a Group once you have created one.
4. Click on the Create button to create the new user account.
Logging in to the eDoc Manager as user
Now that you know your eDoc Manager’s IP address and have created a couple of
user accounts, the core functions are ready to be used by your users. The following
steps describe how to log on to the eDoc Manager as a user and change the
password.
1. Open the web browser of your choice and enter the eDoc Manager’s IP address in
the address bar.
2. The eDoc Manager’s login page will open. Enter your Account and Password
and select your desired user interface Language.
3. Click on the Login button to log in to the eDoc Manager.
4. After logging in, click on the cogwheel button in the upper right corner of the
eDoc Manager interface to open the Edit profile tab.
16
Other manuals for eDoc N600
1
Table of contents
Other Plustek Server manuals
Popular Server manuals by other brands

Sun Microsystems
Sun Microsystems Sun N2000 Series Introduction Guide

IBM
IBM System x3300 M4 Installation and service manual

HP
HP 117755-003 - ProSignia - 740 Error Prevention Guide

Bosch
Bosch VJT-X10S Installation and operating manual

Williams Sound
Williams Sound HHS 108 installation manual

StarTech.com
StarTech.com USB4000IP instruction manual