PNI Clementine 8440 User manual

PNI Clementine 8440
Car Radio MP3 player
EN User manual ............................................. 2
DE Benutzerhandbuch ................................... 5
ES Manual de usuario .................................... 8
FR Manuel utilisateur ..................................... 11
HU Használati utasítás ................................... 14
IT Manuale utente ........................................ 17
PL Instrukcja obsługi ..................................... 20
RO Manual de utilizare ...................................
Version......................................................
23
01

2
RADIO MP3 CAR PLAYER PNI CLEMENTINE 8440 USER MANUAL
Thanks for your purchase.
Please read the instructions in this manual carefully before using the product.
CAUTIONS:
1. Do not use the product under very high or very low temperature conditions.
2. Do not insert metal objects (screws or coins) inside the unit to avoid short circuiting.
3. The unit can play MP3 / WMA les. Do not try to play back photo or video les. The type of le
being played will be displayed on the unit screen.
4. We recommend that you call a specialist car audio installer to avoid any defects that may
occur due to incorrect installation. The specialist assembler has the necessary experience and
knowledge to check each connector on the car, the correspondence with the ISO connector
schema presented in this manual and on the product casing, and make the necessary
modications if necessary.
FRONT PANEL DESCRIPTION:
1. On / off button
2. Screen
3. IR remote control receiver
4. Volume adjustment potentiometer
5. Playback source selection button
6. Display and clock adjustments
7. Select the radio band
8. Radio station tuning, fast forward and
rewind
9. Mute sound
10. Play / pause melody
11. Play Intro
12. Repeat the current track
13. Shufe songs
14. Jump previous 10 songs
15. Jump next 10 tracks
16. SD card slot
17. Auxiliary input
18. USB 2.0 slot
EN

3
REMOTE CONTROL BUTTON DESCRIPTION:
1. Long press = start / stop
Short press = select playback
source
9. Play Intro
2. Mute the sound 10. Go over the previous 10
songs
3. Select the radio band 11. Go over the next 10 songs
4. Watch clock 12. Roll out / radio frequency
search
5. Select audio settings 13. Volume adjustment
6. Select audio equalizer 14. Play / pause melody
7. Automatic search and
storing 15. Shufe songs
8. Repeat current melody
CONNECTIONS:
A
B
1 3 5 7
2 4 6 8
1 3 5 7
2 4 6 8
FUSE
A:
1-
2-
3-
4- Battery +
5- Antenna connector
6-
7- Contact +
8- Ground (GND)
B:
1- Right rear speaker +
2- Right rear speaker -
3- Right front speaker +
4- Right front speaker -
5- Left front speaker +
6- Left front speaker -
7- Left rear speaker +
8- Left rear speaker -
DASHBOARD MOUNTING
Insert mounting case
in dashboard
Bend the mounting case
clips for a secure mount
To remove the unit insert the two keys from the
package (2) on both sides of the unit and pull it
out.
1. Insert mounting case in dashboard.
2. Bend the mounting case clips for a secure mount.
3. To remove the unit insert the two keys from the package (2) on both sides of the unit and pull it
out.
EN

4
TROUBLESHOOTING:
1. The unit doesn’t start
- check the ISO connection - power cables
2. The power button doesn’t work
- press the Reset button on the front panel; if it still doesn’t work, unplug the power
and plug it in again after a while
3. No sound or just noise coming from the speakers
- check the ISO connection, speaker cables or sound settings
4. Low quality sound
- check the ISO connection, speaker cables
5. Poor radio reception
- check the radio antenna connection
TECHNICAL SPECIFICATIONS:
FM Radio
Frequency
Sensitivity
Stereo separation
Signal-to-noise ratio
Play compatible audio les
Distortion
Signal-to-noise ratio
Radio station memory
Maximum audio power
Digital clock
ISO Connector
Dimensions
Power supply
Consumption in standby
Working temperature
Yes
87.5 - 108.0 MHz
<= 20 dB
>= 25 dB
>= 60 dB
MP3, WMA
<= 0.3%
>= 60dB
18 channels FM
4x45W
Yes
Yes
188x150x58 mm
12V
maximum 10 mA
-26°C~+50°C
WARNINGS:
Installing this player on a car should be done by qualied personnel after checking the
type of power and audio connectors on the car.
Some cars are equipped with different sockets congured against ISO standards (different
thread positioning).
If the vehicle is not equipped with international standard ISO connectors, the necessary
modications should be made by qualied personnel before tting the player.
EN

5
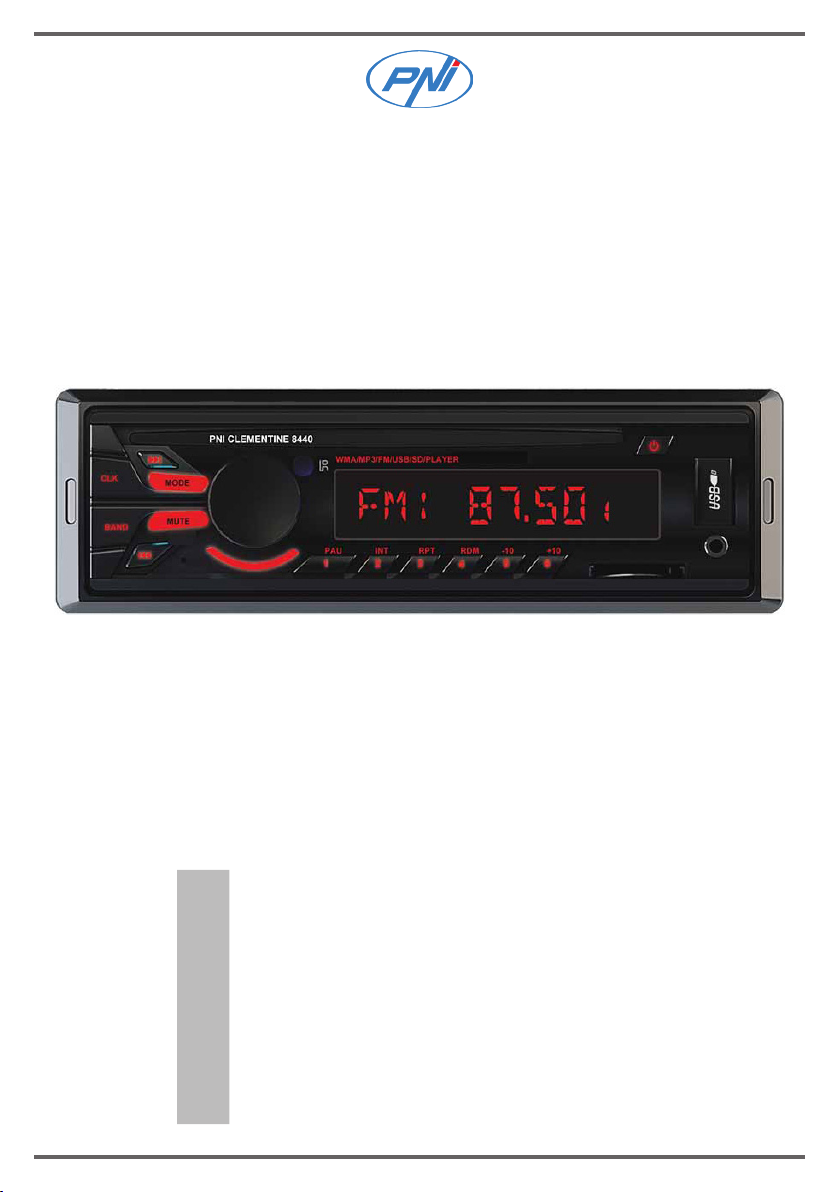
BEDIENUNGSANLEITUNG RADIO MP3 CAR PLAYER PNI CLEMENTINE 8440
TVielen Dank für Ihren Einkauf.
Bitte lesen Sie die Anweisungen sorgfältig durch, bevor Sie das Produkt verwenden.
VORSICHTSHINWEISE:
1. Verwenden Sie das Produkt nicht bei sehr hohen oder sehr niedrigen Temperaturen.
2. Führen Sie keine Metallgegenstände (Schrauben oder Münzen) in das Gerät ein, um
Kurzschlüsse zu vermeiden.
3. Das Gerät kann MP3 / WMA-Dateien abspielen. Versuchen Sie nicht, Foto- oder Videodateien
wiederzugeben. Der Typ der wiedergegebenen Datei wird auf dem Bildschirm des Geräts
angezeigt.
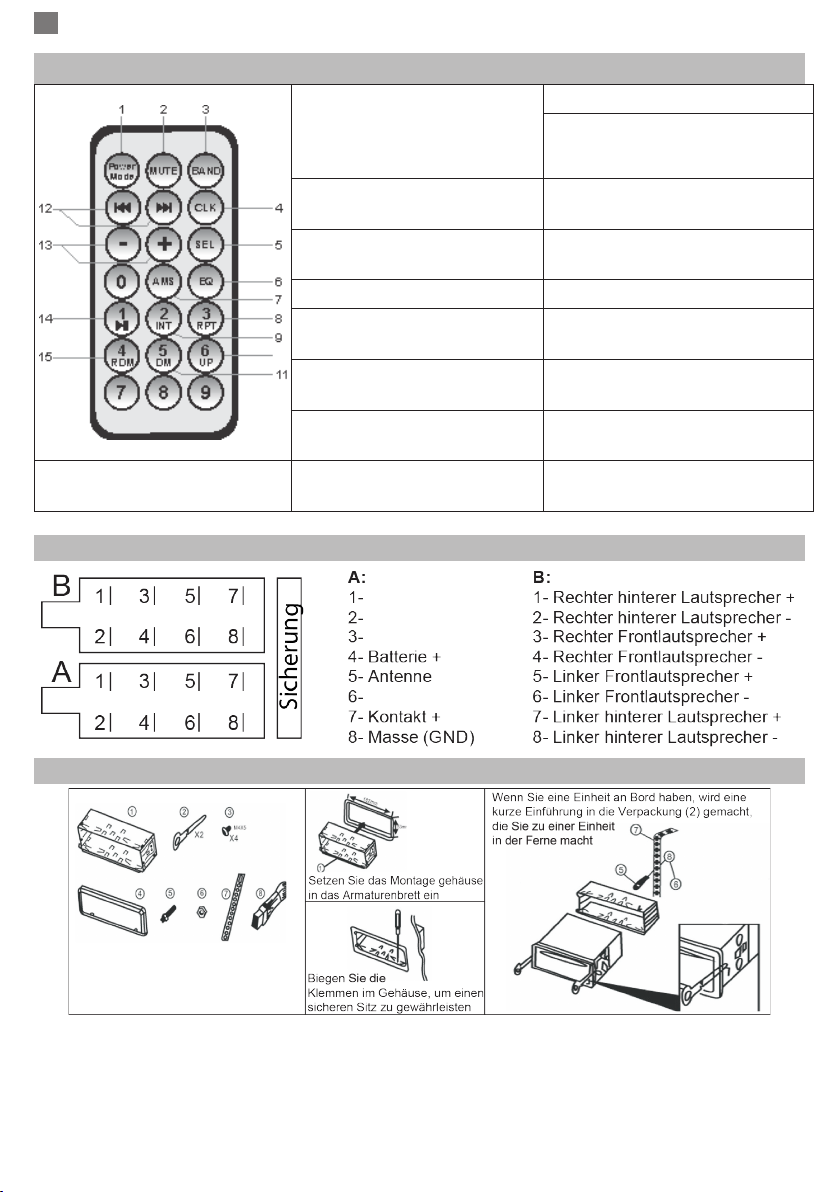
4. Wir empfehlen, dass Sie sich an einen spezialisierten Kfz-Installateur wenden, um Fehler zu
vermeiden, die durch eine fehlerhafte Installation verursacht werden können. Der Fachmonteur
verfügt über die erforderlichen Erfahrungen und Kenntnisse, um jeden Steckverbinder am
Fahrzeug, die Übereinstimmung mit dem in diesem Handbuch und auf dem Produktgehäuse
angegebenen ISO-Steckerschema zu überprüfen und gegebenenfalls die erforderlichen
Änderungen vorzunehmen.
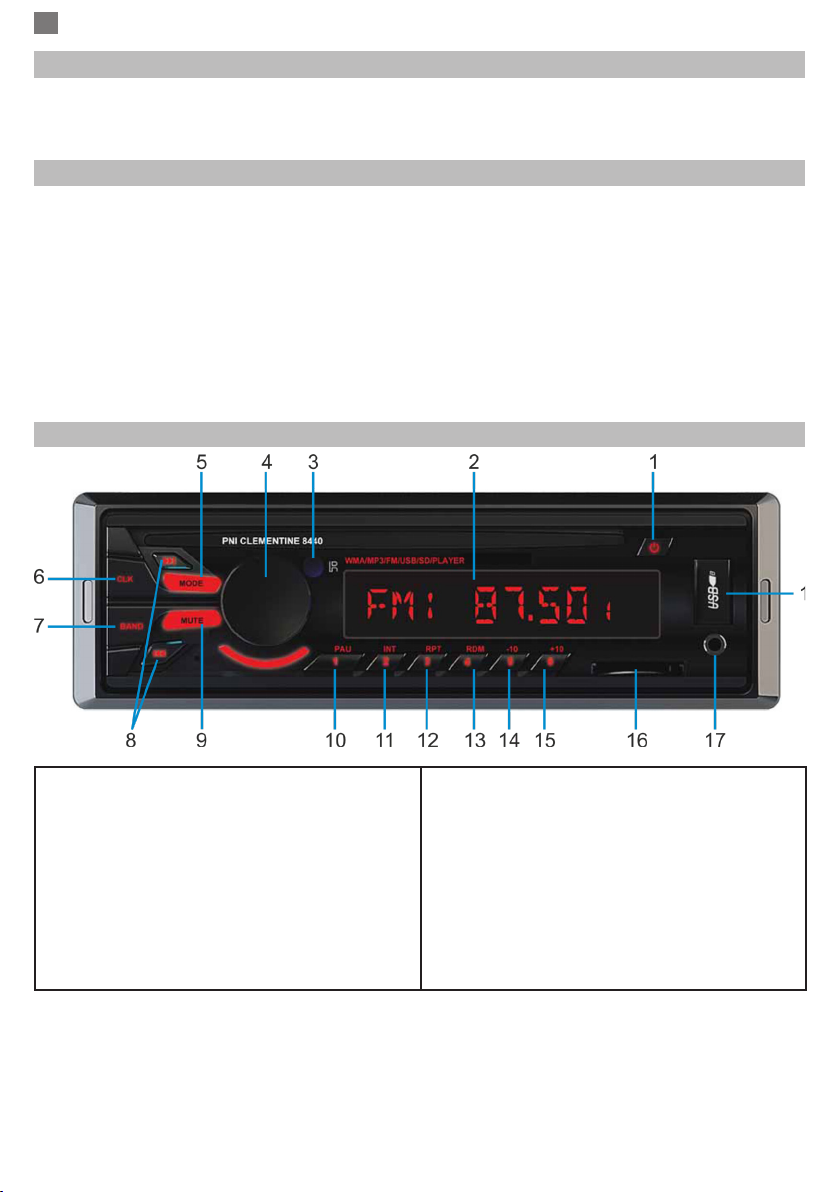
BESCHREIBUNG DER FRONTPLATTE:
1. Ein / Aus-Taste
2. Bildschirm
3. IR-Fernbedienungsempfänger
4. Potentiometer zur Lautstärkeregelung
5. Taste zur Auswahl der Wiedergabequelle
6. Anzeige und Uhreinstellungen
7. Wählen Sie das Radioband
8. Radiosender einstellen, schnell vor- und
zurückspulen
9. Ton stumm schalten
10. Melodie abspielen / anhalten
11. Intro spielen
12. Wiederholen Sie den aktuellen Titel
13. Songs mischen
14. Springe zu den vorherigen 10 Songs
15. Springe zu den nächsten 10 Titeln
16. SD-Kartensteckplatz
17. Hilfseingang
18. USB 2.0-Steckplatz
DE

6
BESCHREIBUNG DER FERNBEDIENUNGSTASTE:
1. Lang drücken = Start /
Stopp
Kurz drücken =
Wiedergabequelle auswählen
9. Intro spielen
10. Gehen Sie die vorherigen
10 Songs durch
2. Schalten Sie den Ton aus 11. Gehen Sie die nächsten 10
Songs durch
3. Wählen Sie das
Radioband
12. Rollout /
Radiofrequenzsuche
4. Uhr sehen 13. Lautstärkeeinstellung
5. Audioeinstellungen
auswählen
14. Melodie abspielen /
anhalten
6. Wählen Sie Audio
Equalizer 15. Songs mischen
7. Automatische Suche und
Speicherung
8. Wiederholen Sie die
aktuelle Melodie
ANSCHLÜSSE:
MONTAGE DES ARMATURENBRETTS
1. Insert mounting case in dashboard.
2. Bend the mounting case clips for a secure mount.
3. To remove the unit insert the two keys from the package (2) on both sides of the unit and pull it
out.
DE

7
FEHLERSUCHE :
1. Das Gerät startet nicht
- Überprüfen Sie die ISO-Verbindung - Stromkabel
2. Der Netzschalter funktioniert nicht
- Drücken Sie die Reset-Taste an der Vorderseite. Wenn es immer noch nicht funktioniert, ziehen
Sie den Netzstecker
und nach einer Weile wieder einstecken
3. Aus den Lautsprechern kommt kein Ton oder nur Geräusch
- Überprüfen Sie die ISO-Verbindung, Lautsprecherkabel oder Toneinstellungen
4. Niedrige Klangqualität
- Überprüfen Sie die ISO-Verbindung und die Lautsprecherkabel
5. Schlechter Radioempfang
- Überprüfen Sie die Funkantennenverbindung
TECHNISCHE DATEN:
FM-Radio
Frequenz
Empndlichkeit
Stereo-Trennung
Signal-Rausch-Verhältnis
Spielen Sie kompatible Audiodateien ab
Verzerrung
Signal-Rausch-Verhältnis
Speicher für Radiosender
Maximale Audioleistung
Digitaluhr
ISO-Anschluss
Maße
Netzteil
Verbrauch im Standby
Arbeitstemperatur
Ja
87.5 - 108.0 MHz
<= 20 dB
>= 25 dB
>= 60 dB
MP3, WMA
<= 0.3%
>= 60dB
18 Kanäle FM
4x45W
Ja
Ja
188x150x58 mm
12V
maximal 10 mA
-26°C~+50°C
Warnhinweise:
Die Installation dieses Players in einem Auto sollte von qualiziertem Personal durchgeführt
werden, nachdem die Art der Strom- und Audioanschlüsse am Auto überprüft wurden.
Einige Fahrzeuge sind mit verschiedenen Steckdosen ausgestattet, die gemäß ISO-
Standards konguriert sind (unterschiedliche Gewindepositionierung).
Wenn das Fahrzeug nicht mit ISO-Steckern nach internationalem Standard ausgestattet
ist, sollten die erforderlichen Änderungen vor dem Einbau des Players von qualiziertem
Personal vorgenommen werden.
DE

8
MANUAL DE USO RADIO REPRODUCTOR DE MP3 AUTO
PNI CLEMENTINE 8440
Gracias por su compra.
Lea atentamente las instrucciones de este manual antes de utilizar el producto.
ADVERTENCIAS:
1. No utilice el producto en condiciones de temperatura muy alta o muy baja.
2. No inserte objetos metálicos (tornillos o monedas) dentro de la unidad para evitar
cortocircuitos.
3. La unidad puede reproducir archivos MP3 / WMA. No intente reproducir archivos de fotos o
videos. El tipo de archivo que se está reproduciendo se mostrará en la pantalla de la unidad.
4. Le recomendamos que llame a un instalador de audio para automóvil especializado para
evitar cualquier defecto que pueda ocurrir debido a una instalación incorrecta. El ensamblador
especialista tiene la experiencia y el conocimiento necesarios para vericar cada conector en el
automóvil, la correspondencia con el esquema del conector ISO presentado en este manual y
en la carcasa del producto, y hacer las modicaciones necesarias si es necesario.
DESCRIPCIÓN DEL PANEL FRONTAL:
1. Botón de encendido / apagado
2. Pantalla
3. Receptor de control remoto por infrarrojos
4. Ajuste del volumen del potenciómetro.
5. Botón de selección de fuente de reproducción
6. Muestra y congura la hora.
7. Selecciona la banda de radio.
8. Desplácese por la búsqueda de frecuencia de
radio / pista
9. Sonido mudo
10. Reproducir / pausar melodía
11. Intro de juego
12. Repite la pista actual.
13. Mezclar canciones
14. Repasar las 10 canciones anteriores.
15. Repasar las siguientes 10 pistas.
16. Ranura para tarjeta SD
17. Entrada auxiliar.
18. Ranura USB 2.0
ES

9
DESCRIPCIÓN DE LOS BOTONES DEL CONTROL REMOTO:
1. Pulsación larga = inicio /
parada
pulsación corta = seleccionar
fuente de reproducción
2. Silencia el sonido.
3. Selecciona la banda de
radio.
4. reloj reloj
5. Selecciona la conguración
de audio
6. Seleccione ecualizador de
audio
7. Búsqueda y
almacenamiento automático.
8. Repita la melodía actual
9. Juega Intro
10. Repasar las 10 canciones
anteriores.
11. Repasar las siguientes 10
canciones.
12. Despliegue / búsqueda de
radio frecuencia
13. Ajuste de volumen
14. Reproducir / pausar
melodía
15. Mezclar canciones
CONEXIONES:
INSTRUCCIONES DE INSTALACIÓN
1. Inserte la carcasa de montaje en el tablero de instrumentos.
2. Doble las abrazaderas en la carcasa para un ajuste más seguro.
3. Para extraer la unidad de la unidad, inserte las llaves de extracción (2) en ambos lados del
paquete y luego extraiga la unidad.
ES

10
MANTENIMIENTO Y POSIBLES DEFECTOS:
1. La unidad no arranca.
- Compruebe la conexión ISO - cables de alimentación
2. El botón de encendido / apagado no funciona
- Presione el botón de reinicio en la unidad; Si el fallo de funcionamiento persiste, desconecte la
alimentación y vuelva a enchufarlo.
3. No hay sonido o no hay sonido
- Verique la conexión ISO, los cables de los altavoces o la conguración de sonido en la unidad
4. Sonido de muy mala calidad.
- Compruebe la conexión ISO o los cables de los altavoces.
5. Pobre recepción de radio.
- Compruebe la conexión de la antena de radio
ESPECIFICACIONES TÉCNICAS:
Radio FM / AM
frecuente
sensibilidad
Separación estéreo
Relación señal-ruido
Reproduce archivos de audio compatibles
distorsión
Relación señal-ruido
Memoria de la emisora de radio
Máxima potencia de audio
Reloj digital
Conector ISO
dimensiones
alimentación
Consumo en standby
Temperatura de trabajo
Si
87.5 - 108.0 MHz
<= 20 dB
>= 25 dB
>= 60 dB
MP3, WMA
<= 0.3%
>= 60dB
18 estaciones FM
4x45W
Si
Si
188x150x58 mm
12V
máximo 10 mA
-26°C~+50°C
ADVERTENCIAS:
La instalación de este reproductor en un automóvil debe ser realizada por personal
calicado (instalador / electricista) después de vericar el tipo de conectores de
alimentación / audio en el automóvil.
Algunos automóviles están equipados con tomas conguradas de manera diferente a los
estándares ISO (diferentes posiciones de rosca en tomas).
Si el vehículo no está equipado con conectores ISO estándar internacionales, deben
realizarse las modicaciones necesarias en los enchufes / conectores de personal
calicado antes de montar el reproductor.
ES

11
RADIO MP3 LECTEUR DE VOITURE PNI CLEMENTINE 8440 MODE D’EMPLOI
On vous remercie pour votre choix.
On vous prie de lire avec attention les instructions de ce manuel avant utiliser le produit.
ATTENTION!
1. Ne pas utiliser le produit dans les conditions de temperature trop elevee ou trop basse.
2. Ne pas introduire des objets metalliques (des vis ou des monnaies) a l’interieur de l’unite pour
eviter le court-circuit.
3. L’unite peut reproduire les chiers du type MP3/WMA. Ne pas essayer la reproduction des
chiers photo ou video. Sur l’ecran de l’unite il sera afche le type du chier reproduit.
4. Nous vous recommandons d’appeler un installateur spécialisé dans l’audio de voiture pour
éviter tout problème pouvant résulter d’une installation incorrecte. L’assembleur spécialisé
dispose de l’expérience et des connaissances nécessaires pour vérier chaque connecteur de la
voiture, la correspondance avec le schéma de connecteur ISO présenté dans ce manuel et sur
le boîtier du produit, et apporter les modications nécessaires, le cas échéant.
DESCRIPTION DU PANNEAU FRONTAL:
1. Bouton demarrage/arret
2. Ecran
3. Recepteur IR pour la telecommande
4. Potentiometre pour adapter le volume
5. Bouton selection source de reproduction
6. Afchage et reglage de l’heure
7. Selecter la bande radio
8. Derouler la melodie/chercher la frequence
radio
9. Son muet
10. Rendre la melodie / pause
11. Reproduction intro
12. Repeter la melodie en cours
13. Reproduction aleatoire des melodies
14. Derouler les 10 melodies anterieures
15. Derouler les 10 melodie suivantes
16. Slot carte SD
17. Entrée auxiliaire
18. Slot USB 2.0
FR

12
DESCRIPTION DU BOUTON DE LA TÉLÉCOMMANDE:
1. Appuyer longuement =
demarrage/arret
Appuyer courtement =
selecter la source
2. Son muet
3. Selecter la bande radio
4. Afchage de l’heure
5. Selecter les reglages audio
6. Selecter l’egalisateur audio
7. Chercher et stocker
automatiquement les stations
radio
8. Repeter la melodie en
cours
9. Reproduction intro
10. Derouler les 10 melodies
anterieures
11. Derouler les 10 melodies
suivantes
12. Derouler la melodie/
chercher la frequence radio
13. Adaptation du volume
14. Rendre la melodie/pause
15. Reproduction aleatoire
des melodies
CONNEXIONS:
MONTAGE SUR TABLEAU DE BORD
1. Insérez le boîtier de montage dans le tableau de bord.
2. Pliez les clips du boîtier de montage pour un montage sécurisé.
3. Pour retirer l’appareil, insérez les deux clés de l’emballage (2) des deux côtés de l’appareil et
tirez en dehors.
FR

13
DÉPANNAGE:
1. L’unité ne démarre pas
- vérier la connexion ISO - câbles d’alimentation
2. Le bouton d’alimentation ne fonctionne pas
- appuyez sur le bouton de réinitialisation situé sur le panneau avant; si cela ne fonctionne toujours
pas, débranchez le cordon d’alimentation
et branchez-le à nouveau après un certain temps
3. Pas de son ou juste du bruit provenant des haut-parleurs
- vériez la connexion ISO, les câbles d’enceinte ou les réglages du son
4. Son de basse qualité
- vériez la connexion ISO, les câbles des haut-parleurs
5. Mauvaise réception radio
- vérier la connexion de l’antenne radio
SPÉCIFICITÉ TECHNIQUE:
Radio FM
La fréquence
Sensibilité
Séparation stéréo
Rapport signal sur bruit
Lire des chiers audio compatibles
Distorsion
Rapport signal sur bruit
Mémoire de station de radio
Puissance audio maximale
Horloge digitale
Connecteur ISO
Dimensions
Source de courant
Consommation en veille
Température de fonctionnement
Oui
87.5 - 108.0 MHz
<= 20 dB
>= 25 dB
>= 60 dB
MP3, WMA
<= 0.3%
>= 60dB
18 channels FM
4x45W
Oui
Oui
188x150x58 mm
12V
maximum 10 mA
-26°C~+50°C
AVERTISSEMENTS:
L’installation de ce lecteur sur une voiture doit être effectuée par du personnel qualié
après vérication du type de connecteurs d’alimentation et audio de la voiture.
Certaines voitures sont équipées de différents sockets congurés selon les normes ISO
(positionnement du letage différent).
Si le véhicule n’est pas équipé de connecteurs ISO conformes aux normes internationales,
les modications nécessaires doivent être effectuées par du personnel qualié avant de
monter le lecteur.
FR

14
RÁDIÓ MP3 AUTÓS LEJÁTSZÓ PNI CLEMENTINE 8440 FELHASZNÁLÓI
KÉZIKÖNYV
Köszönjük a vásárlást.
Kérjük, gyelmesen olvassa el a kézikönyv használati utasításait a termék használata előtt.
VIGYÁZAT:
1. Ne használja a terméket nagyon magas vagy nagyon alacsony hőmérsékleten.
2. A rövidzárlat elkerülése érdekében ne helyezzen fémtárgyakat (csavarokat vagy érméket) a
készülék belsejébe.
3. Az egység MP3 / WMA fájlokat játszhat le. Ne próbálja meg lejátszani a fénykép- vagy
videofájlokat. A lejátszandó fájl típusa megjelenik az egység képernyőjén.
4. Javasoljuk, hogy hívjon fel egy speciális autórádió-telepítőt, hogy elkerülje a hibás
telepítés következtében fellépő hibákat. A speciális szerelőnek rendelkeznie kell a szükséges
tapasztalatokkal és ismeretekkel, hogy ellenőrizze az autó minden csatlakozóját, az ebben a
kézikönyvben bemutatott ISO csatlakozó sémát és a termék házát, és szükség esetén végezze
el a szükséges módosításokat.
ELSŐ PANEL LEÍRÁSA:
1. Be / ki gomb
2. Képernyő
3. IR távirányító vevő
4. Hangerőszabályzó potenciométer
5. Lejátszási forrás kiválasztása gomb
6. A kijelző és az óra beállítása
7. Válassza ki a rádió sávot
8. Rádióállomás hangolása, gyors előre- és
visszacsévélés
9. Hang elnémítása
10. Dallam lejátszása / szüneteltetése
11. Játssz Intro-t
12. Ismételje meg az aktuális műsorszámot
13. Vegyes dalokat
14. Ugrás az előző 10 dalra
15. Ugrás a következő 10 számra
16. SD-kártya nyílás
17. Kiegészítő bemenet
18. USB 2.0 nyílás
HU

15
TÁVVEZÉRLŐ GOMB LEÍRÁSA:
1. Hosszú megnyomás = start
/ stop
Röviden nyomja meg a =
válassza a lejátszási forrást
2. A hang elnémítása
3. Válassza ki a rádió sávot
4. Óra megtekintése
5. Válassza ki az audio
beállításokat
6. Válassza ki a
hangszínszabályzót
7. Automatikus keresés és
tárolás
8. Ismételje meg az aktuális
dallamot
9. Játssz az Intro-t
10. Ugrás az előző 10 dalra
11. Menj át a következő 10
dalra
12. Hajtsa ki /
rádiófrekvenciás keresés
13. Hangerő beállítása
14. Dallam lejátszása /
szüneteltetése
15. Vegyes dalokat
KAPCSOLATOK:
A MŰSZERFAL FELSZERELÉSE
1. Helyezze be a szerelődobozt a műszerfalba.
2. Hajlítsa meg a rögzítődobozokat egy biztonságos rögzítéshez.
3. A készülék eltávolításához helyezze be a két kulcsot a csomagolásból (2) a készülék mindkét
oldalán, és húzza meg ki.
HU

16
HIBAELHÁRÍTÁS:
1. A készülék nem indul el
- ellenőrizze az ISO csatlakozást - a tápkábeleket
2. A bekapcsológomb nem működik
- nyomja meg a Reset gombot az előlapon; ha még mindig nem működik, húzza ki a tápkábelt
és egy idő után csatlakoztassa újra
3. Nincs hang vagy csak zaj a hangszórókból
- ellenőrizze az ISO csatlakozást, a hangszórókábeleket vagy a hangbeállításokat
4. Alacsony minőségű hang
- ellenőrizze az ISO csatlakozást, a hangszórókábeleket
5. Rossz rádióvétel
- ellenőrizze a rádióantennát
MŰSZAKI ADATOK:
FM rádió
Frekvencia
Érzékenység
Sztereó szétválasztás
Jel-zaj arány
Kompatibilis hangfájlok lejátszása
Torzítás
Jel-zaj arány
Rádióállomás memória
Maximális hangteljesítmény
Digitális óra
ISO csatlakozó
Méretek
Tápegység
Fogyasztás készenléti állapotban
Üzemhőmérséklet
Igen
87.5 - 108.0 MHz
<= 20 dB
>= 25 dB
>= 60 dB
MP3, WMA
<= 0.3%
>= 60dB
18 channels FM
4x45W
Igen
Igen
188x150x58 mm
12V
maximum 10 mA
-26°C~+50°C
WARNINGS:
Installing this player on a car should be done by qualied personnel after checking the
type of power and audio connectors on the car.
Some cars are equipped with different sockets congured against ISO standards (different
thread positioning).
If the vehicle is not equipped with international standard ISO connectors, the necessary
modications should be made by qualied personnel before tting the player.
HU

17
MANUALE D’USO RADIO MP3 PLAYER AUTO PNI CLEMENTINE 8440
Grazie per il vostro acquisto.
Si prega di leggere attentamente le istruzioni in questo manuale prima di utilizzare il prodotto.
AVVERTENZE:
1. Non usare il prodotto a temperature molto alte o molto basse
2. Non inserire oggetti metallici (viti o monete) all’interno dell’unità per evitare cortocircuiti.
3. L’unità può riprodurre le MP3 / WMA. Non provare a riprodurre foto o video. Lo schermo
dell’unità mostrerà il tipo di le che sta riproducendo.
4. Si consiglia di chiamare un installatore audio per auto specializzato per evitare eventuali
difetti che potrebbero vericarsi a causa di un’installazione errata. L’assemblatore specializzato
ha l’esperienza e le conoscenze necessarie per controllare ogni connettore sull’auto, la
corrispondenza con lo schema del connettore ISO presentato in questo manuale e sull’involucro
del prodotto e apportare le modiche necessarie, se necessario.
DESCRIZIONE PANNELLO FRONTALE
1. Pulsante On / Off
2. Schermo
3. Ricevitore IR per telecomando
4. Ricevitore IR per telecomando
5. Pulsante selezione sorgente di riproduzione
6. Mostra e imposta l’ora
7. Seleziona banda radio
8. Scorre la melodia/cerca frequenza radio
9. Mute suono
10. Riproduzione/pausa canzone
11. Riproduzione intro
12. Ripeti la melodia attuale
13. Riproduzione casuale delle canzoni
14. Salta le precedenti 10 canzoni
15. Salta le prossime 10 canzoni
16. Slot scheda SD
17. AUX
18. Slot USB 2.0
IT

18
DESCRIZIONE DEI PULSANTI SUL TELECOMANDO:
1. Pressione lunga = On / Off
pressione breve = selezionare
sorgente
2. Mute suono
3. Selezione banda radio
4. Mostra orologio
5. Impostazioni audio
6. Livellamento audio
7. Ricerca e memorizzazione
automatica
stazioni radio
8. Ripeti la melodia attuale
9. Riproduzione intro
10. Salta le precedenti 10
canzoni
11. Salta le precedenti 10
canzoni
12. Scorre la melodia/cerca
frequenza
radio
13. Controllo volume
14. Riproduzione/pausa
canzone
15. Riproduzione casuale
CONNESSIONI:
MONTAGGIO A BORDO
1. Inserire la scatola di montaggio nel cruscotto.
2. Piegare i morsetti nell’alloggiamento per un adattamento più sicuro.
3. Per rimuovere l’unità di azionamento, inserire i tasti di rimozione (2) su entrambi i lati del pacco
e quindi estrarre l’unità.
IT

19
MANUTENZIONE E POSSIBILI DIFETTI:
1. L’unità non si avvia
- controllare la connessione ISO - cavi di alimentazione
2. Il pulsante di accensione / spegnimento non funziona
- premere il pulsante di ripristino sull’unità; se il malfunzionamento persiste, rimuovere
l’alimentazione e ricollegarla
3. Non c’è suono o si sente solo un rumore
- controllare la connessione ISO, i cavi degli altoparlanti o le impostazioni audio nell’unità
4. Suono di pessima qualità
- controllare la connessione ISO o i cavi degli altoparlanti
5. Cattiva ricezione radio
- controllare la connessione dell’antenna radio
SPECIFICHE TECNICHE:
Radio FM Si
Frequenza 87.5 - 108.0 MHz
Sensibilità <= 20 dB
Separazione stereo >= 25 dB
Rapporto segnale-rumore >= 60 dB
Riproduzione le audio MP3, WMA
Distorsione <= 0.3%
Rapporto segnale-rumore >= 60dB
memoria stazioni radio 18 stationi FM
Massima potenza audio 4x45W
Orologio digitale Si
Connettore ISO Si
Dimensioni 188x150x58 mm
Alimentazione 12V maximum 10 mA
Temperatura di lavoro -26°C~+50°C
AVVERTENZE:
L’installazione di questo lettore su un’auto deve essere eseguita da personale qualicato
(installatore / elettricista) dopo aver controllato il tipo di connettori di alimentazione /
audio sull’auto.
Alcune auto sono dotate di prese congurate in modo diverso rispetto agli standard ISO
(posizionamento del lo diverso nei jack).
Se il veicolo non è dotato di connettori ISO standard internazionali, le modiche necessarie
devono essere apportate a prese / connettori del personale qualicato prima di montare
il lettore.
IT

20
RADIO MP3 CAR PNI CLEMENTINE 8440 INSTRUKCJA OBSŁUGI
Dziękujemy za twój zakup.
Przed użyciem produktu należy uważnie przeczytać instrukcje zawarte w niniejszej instrukcji.
PRZESTROGI:
1. Nie używaj produktu w warunkach bardzo wysokiej lub bardzo niskiej temperatury.
2. Nie wkładaj metalowych przedmiotów (śrub lub monet) do wnętrza urządzenia, aby uniknąć
zwarcia.
3. Urządzenie może odtwarzać pliki MP3 / WMA. Nie próbuj odtwarzać zdjęć lub plików wideo.
Typ odtwarzanego pliku zostanie wyświetlony na ekranie urządzenia.
4. Zalecamy skontaktowanie się z wyspecjalizowanym instalatorem car audio w celu uniknięcia
jakichkolwiek usterek, które mogą wystąpić z powodu nieprawidłowej instalacji. Specjalista
asembler posiada niezbędne doświadczenie i wiedzę, aby sprawdzić każde złącze w
samochodzie, zgodność ze schematem złącza ISO przedstawionym w niniejszej instrukcji i na
obudowie produktu, a także w razie potrzeby dokonać niezbędnych modykacji.
OPIS PANELU PRZEDNIEGO:
1. Przycisk włączania / wyłączania
2. Ekran
3. Odbiornik pilota na podczerwień
4. Potencjometr regulacji głośności
5. Przycisk wyboru źródła odtwarzania
6. Regulacja wyświetlania i zegara
7. Wybierz pasmo radiowe
8. Strojenie stacji radiowych, przewijanie do
przodu i do tyłu
9. Wycisz dźwięk
10. Odtwórz / wstrzymaj melodię
11. Zagraj w Intro
12. Powtórz bieżący utwór
13. Przetasuj utwory
14. Skocz poprzednie 10 utworów
15. Skocz następne 10 utworów
16. Gniazdo karty SD
17. Wejście pomocnicze
18. Gniazdo USB 2.0
PL
Table of contents
Languages:
Other PNI Clementine Car Receiver manuals