manuals.online logo
Brands
  1. Home
  2. •
  3. Brands
  4. •
  5. Premier
  6. •
  7. Car Receiver
  8. •
  9. Premier SCR-4606TVD User manual

Premier SCR-4606TVD User manual

Other Premier Car Receiver manuals

Premier SCR-29MP3 User manual

Premier

Premier SCR-29MP3 User manual

Premier SCR-2070TFT Operating and maintenance manual

Premier

Premier SCR-2070TFT Operating and maintenance manual

Premier SCR-4710TVD User manual

Premier

Premier SCR-4710TVD User manual

Premier SCR-0934MR User manual

Premier

Premier SCR-0934MR User manual

Premier SCR-4329DUSD User manual

Premier

Premier SCR-4329DUSD User manual

Premier SCR-513TFT User manual

Premier

Premier SCR-513TFT User manual

Premier SCR-5381USDR User manual

Premier

Premier SCR-5381USDR User manual

Premier SCR-2067TFT Operating and maintenance manual

Premier

Premier SCR-2067TFT Operating and maintenance manual

Premier SCR-60 User manual

Premier

Premier SCR-60 User manual

Premier SCR-4709TVD User manual

Premier

Premier SCR-4709TVD User manual

Premier SCR-1510 User manual

Premier

Premier SCR-1510 User manual

Premier SCR-5552USID User manual

Premier

Premier SCR-5552USID User manual

Premier SCR-0471MP3 User manual

Premier

Premier SCR-0471MP3 User manual

Popular Car Receiver manuals by other brands

Linear Series LS5050 Operation and installation manual

Linear Series

Linear Series LS5050 Operation and installation manual

Kenwood KRC-160 instruction manual

Kenwood

Kenwood KRC-160 instruction manual

Sony XR-CA430X Service manual

Sony

Sony XR-CA430X Service manual

T+A Elektroakustik K1 CD-RECEIVER operating instructions

T+A Elektroakustik

T+A Elektroakustik K1 CD-RECEIVER operating instructions

SoundMax SM-CDM1052 instruction manual

SoundMax

SoundMax SM-CDM1052 instruction manual

Xtrons HD107HD user manual

Xtrons

Xtrons HD107HD user manual

Mopar RB3 manual

Mopar

Mopar RB3 manual

Clarion ADDZEST DMZ615 owner's manual

Clarion

Clarion ADDZEST DMZ615 owner's manual

Sony XAV-601BT Specifications

Sony

Sony XAV-601BT Specifications

PIE GM12-POD/S Operation manual

PIE

PIE GM12-POD/S Operation manual

Hyundai H-910H instruction manual

Hyundai

Hyundai H-910H instruction manual

Sony XR-C6100 Service manual

Sony

Sony XR-C6100 Service manual

Sony CDX-L600X - Fm/am Compact Disc Player Installation/connections

Sony

Sony CDX-L600X - Fm/am Compact Disc Player Installation/connections

Motorola VWA63 Service manual

Motorola

Motorola VWA63 Service manual

Sound Storm STM93R user manual

Sound Storm

Sound Storm STM93R user manual

Nextar D3201 instruction manual

Nextar

Nextar D3201 instruction manual

Alpine CDE-163BT owner's manual

Alpine

Alpine CDE-163BT owner's manual

Kenwood KDC-X303 quick start guide

Kenwood

Kenwood KDC-X303 quick start guide

manuals.online logo
manuals.online logoBrands
  • About & Mission
  • Contact us
  • Privacy Policy
  • Terms and Conditions

Copyright 2025 Manuals.Online. All Rights Reserved.

DEAR CUSTOMER
In order to achieve the best performance of your product, please read this
instruction manual carefully before using, and keep it for future reference.
If you need extra support, please write to info@premiermundo.com
-
+
INSTRUCTION MANUAL
SCR-4606TVD
Car Audio/Video System
P-1
PREMIER CUSTOMER SERVICE
NOTE
This unit may be submitted to changes in specifications, characteristics and/or operation without prior
notice to the user, in order to continue improving and developing its technology.
Venezuela: 0800 ELECTRIC (353-2874)
Panama: 300-5185
Website www.premiermundo.com
E-mail: servicioalcliente@ premiermundo.com
P-2
Avoid Moisture :
To reduce the risk of fire or electric shock, do not expose this equipment to rain or
moisture .
Use Recommended Accessories :
to reduce the risk of fire or electric shock, and annoying
interference, use only the recommended accessories.
POWER SUPPLY :
the appliance should be connected to power supply only of the type described
in the operating instruction or as marked on the appliance .
Protect the disc mechanism :
Avoid inserting any foreign objects into the slot of this player. Failure to observe
this may cause malfunction due to the precise mechanism of this unit .
Important safety
P-3
Content.............................................
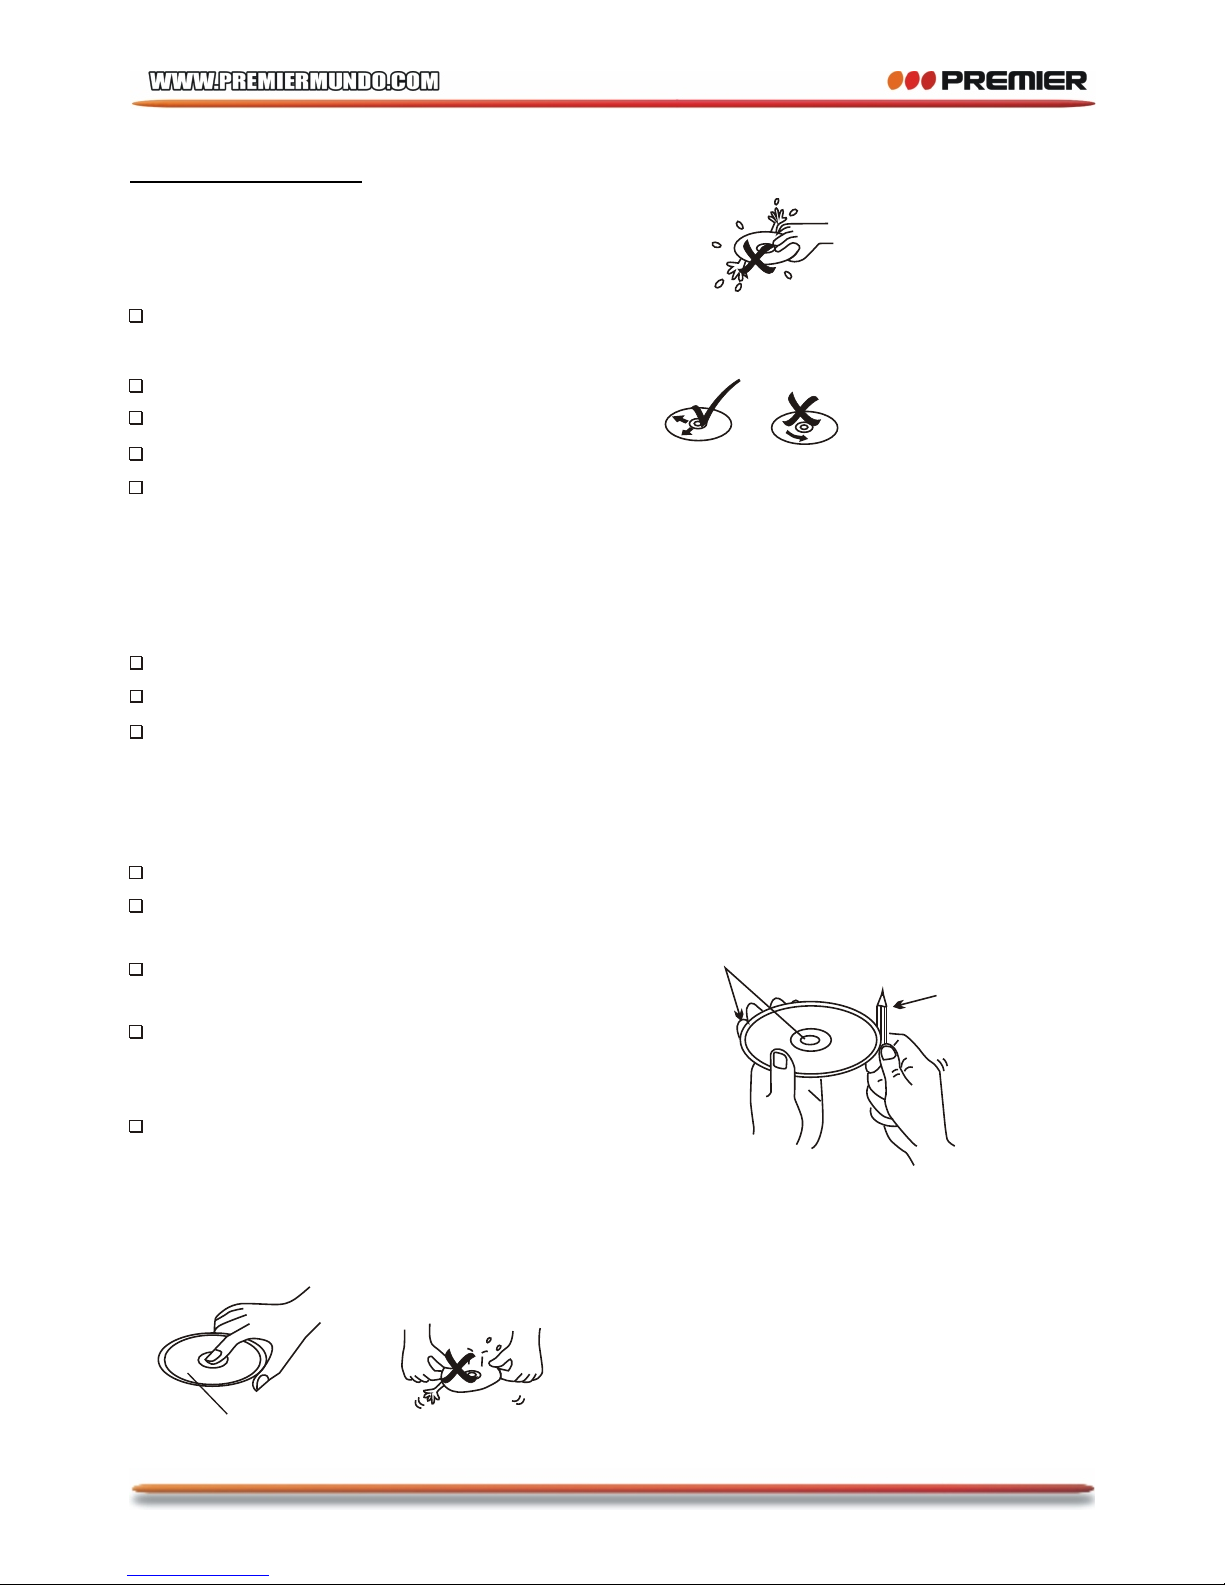
Disc Note..........................................
Installation ........................................
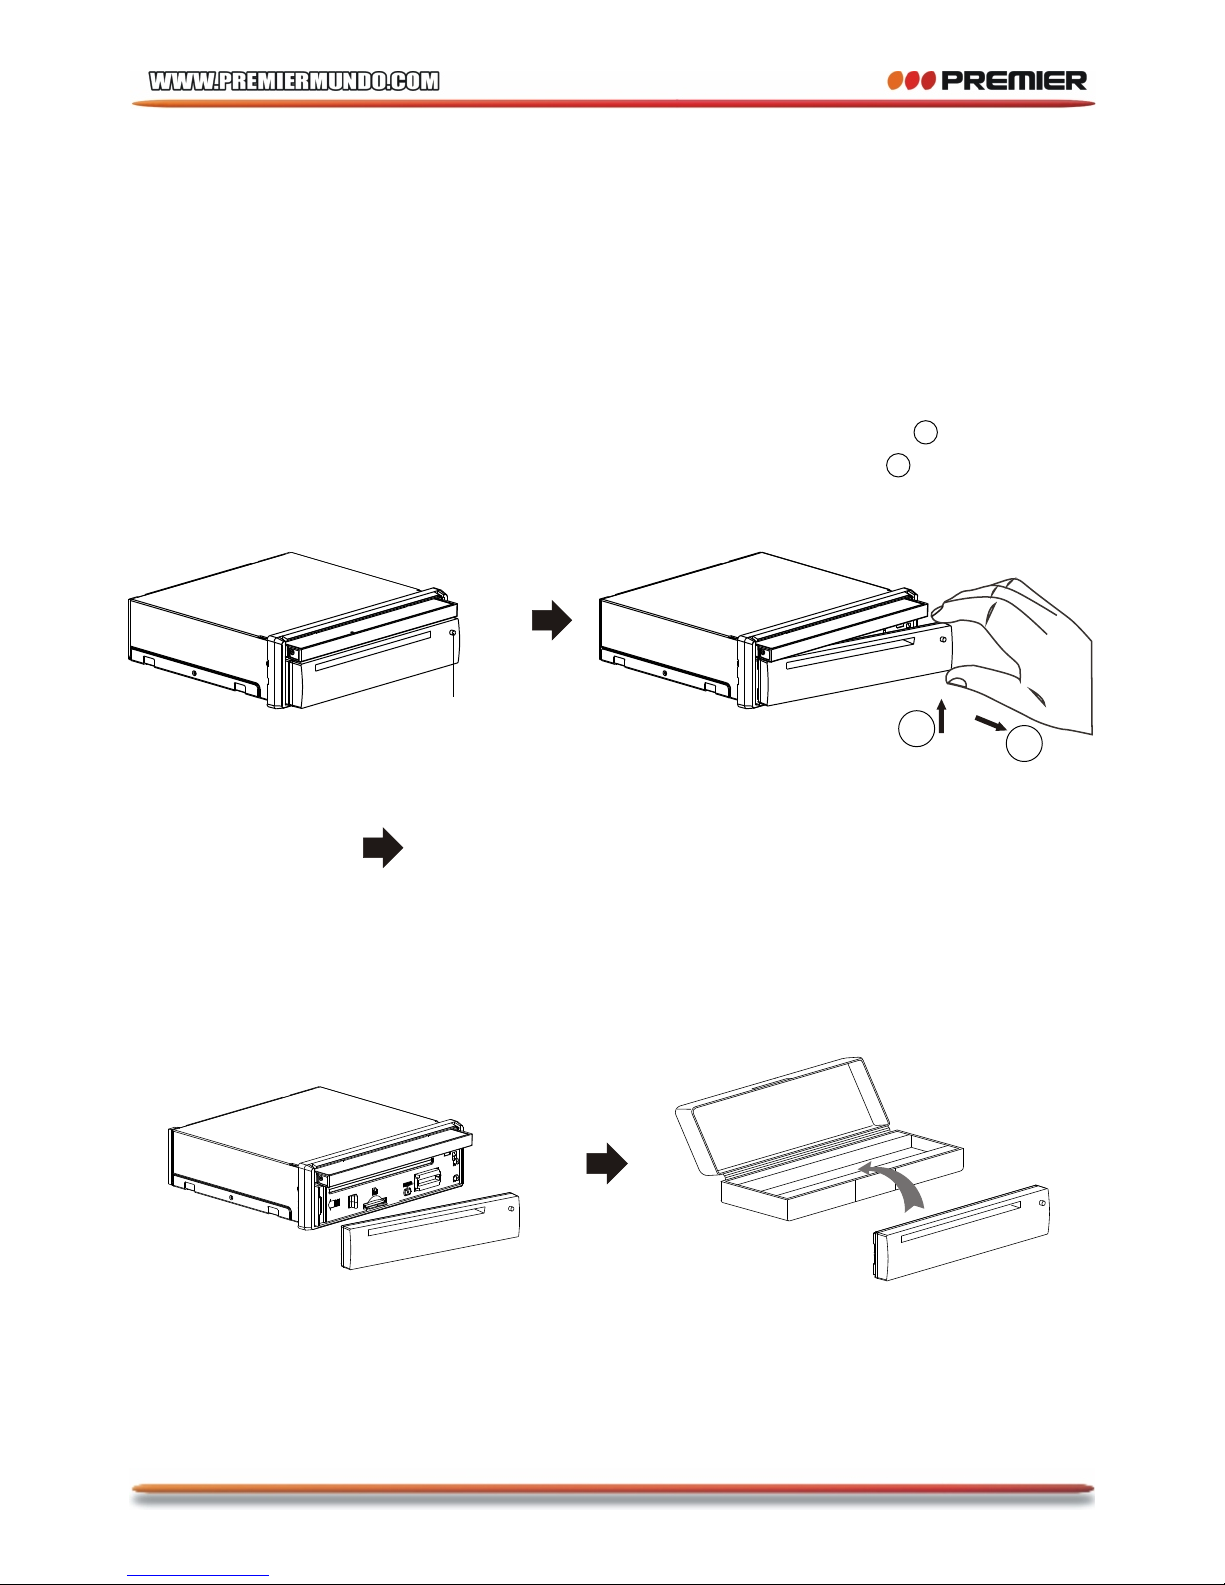
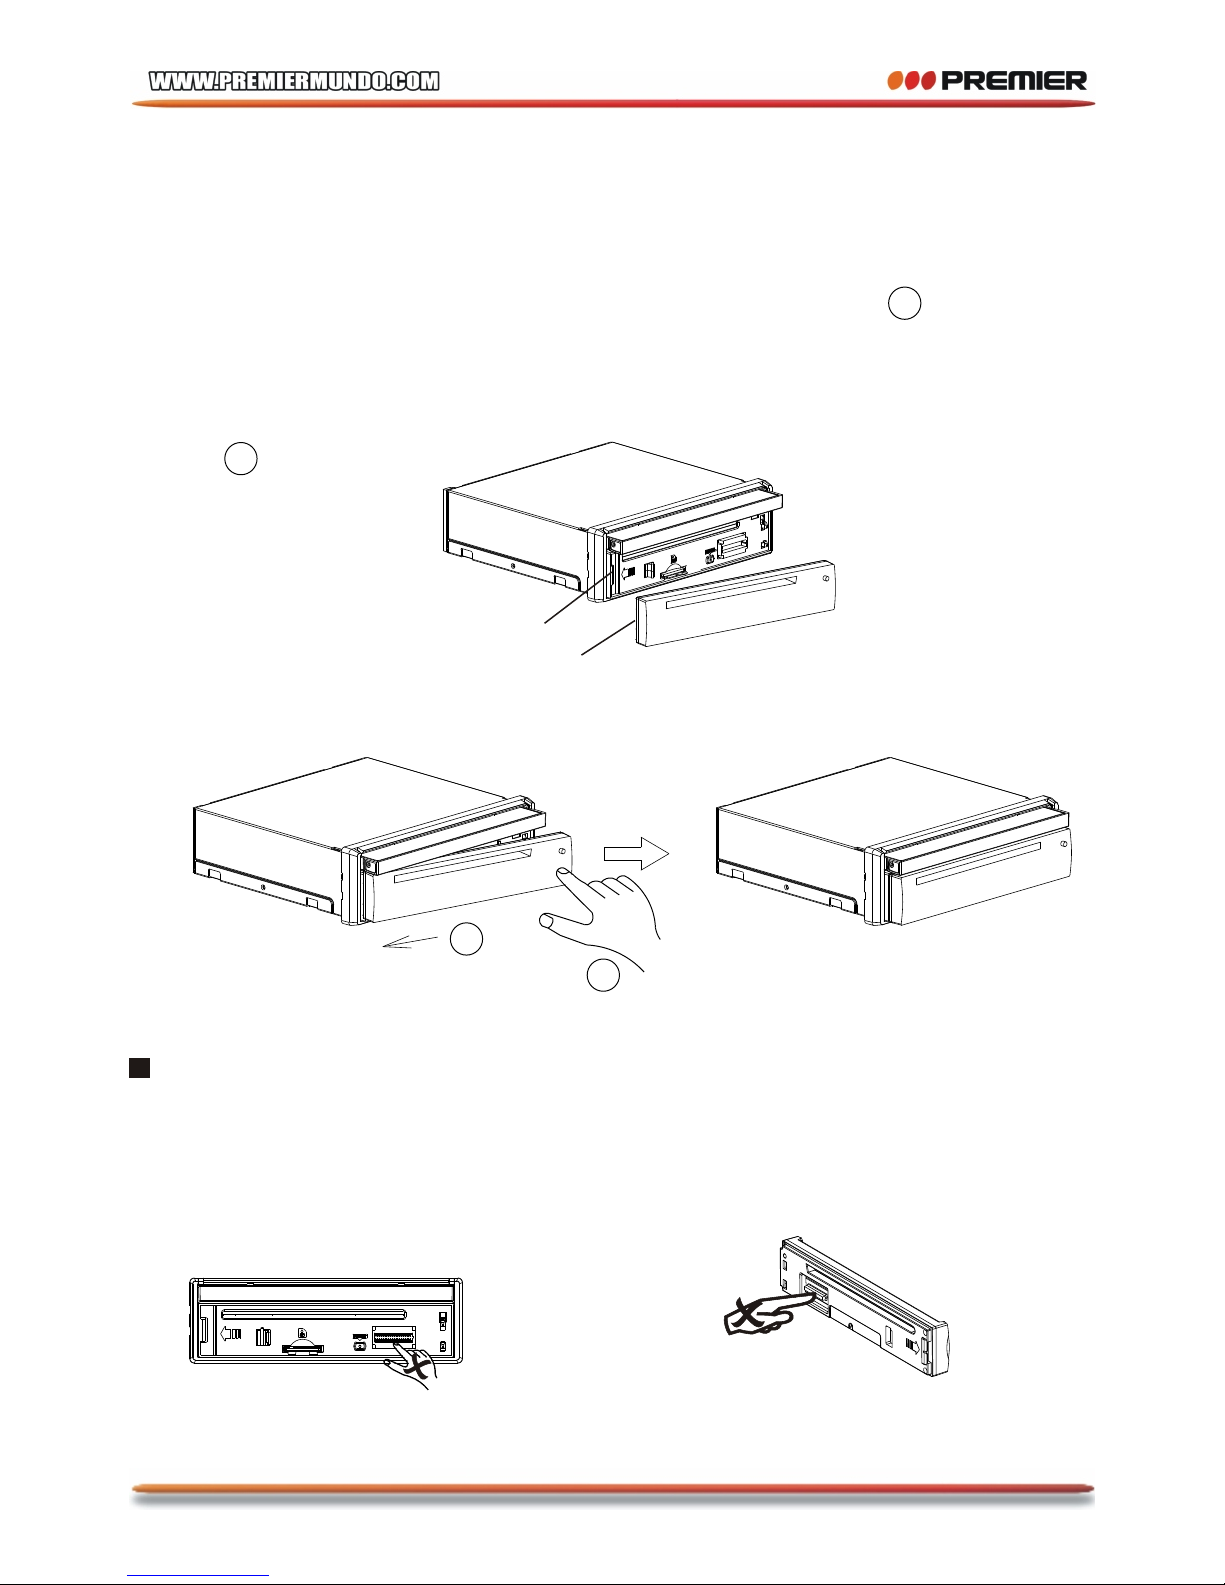
Detaching control panel......................
Attaching control panel.......................
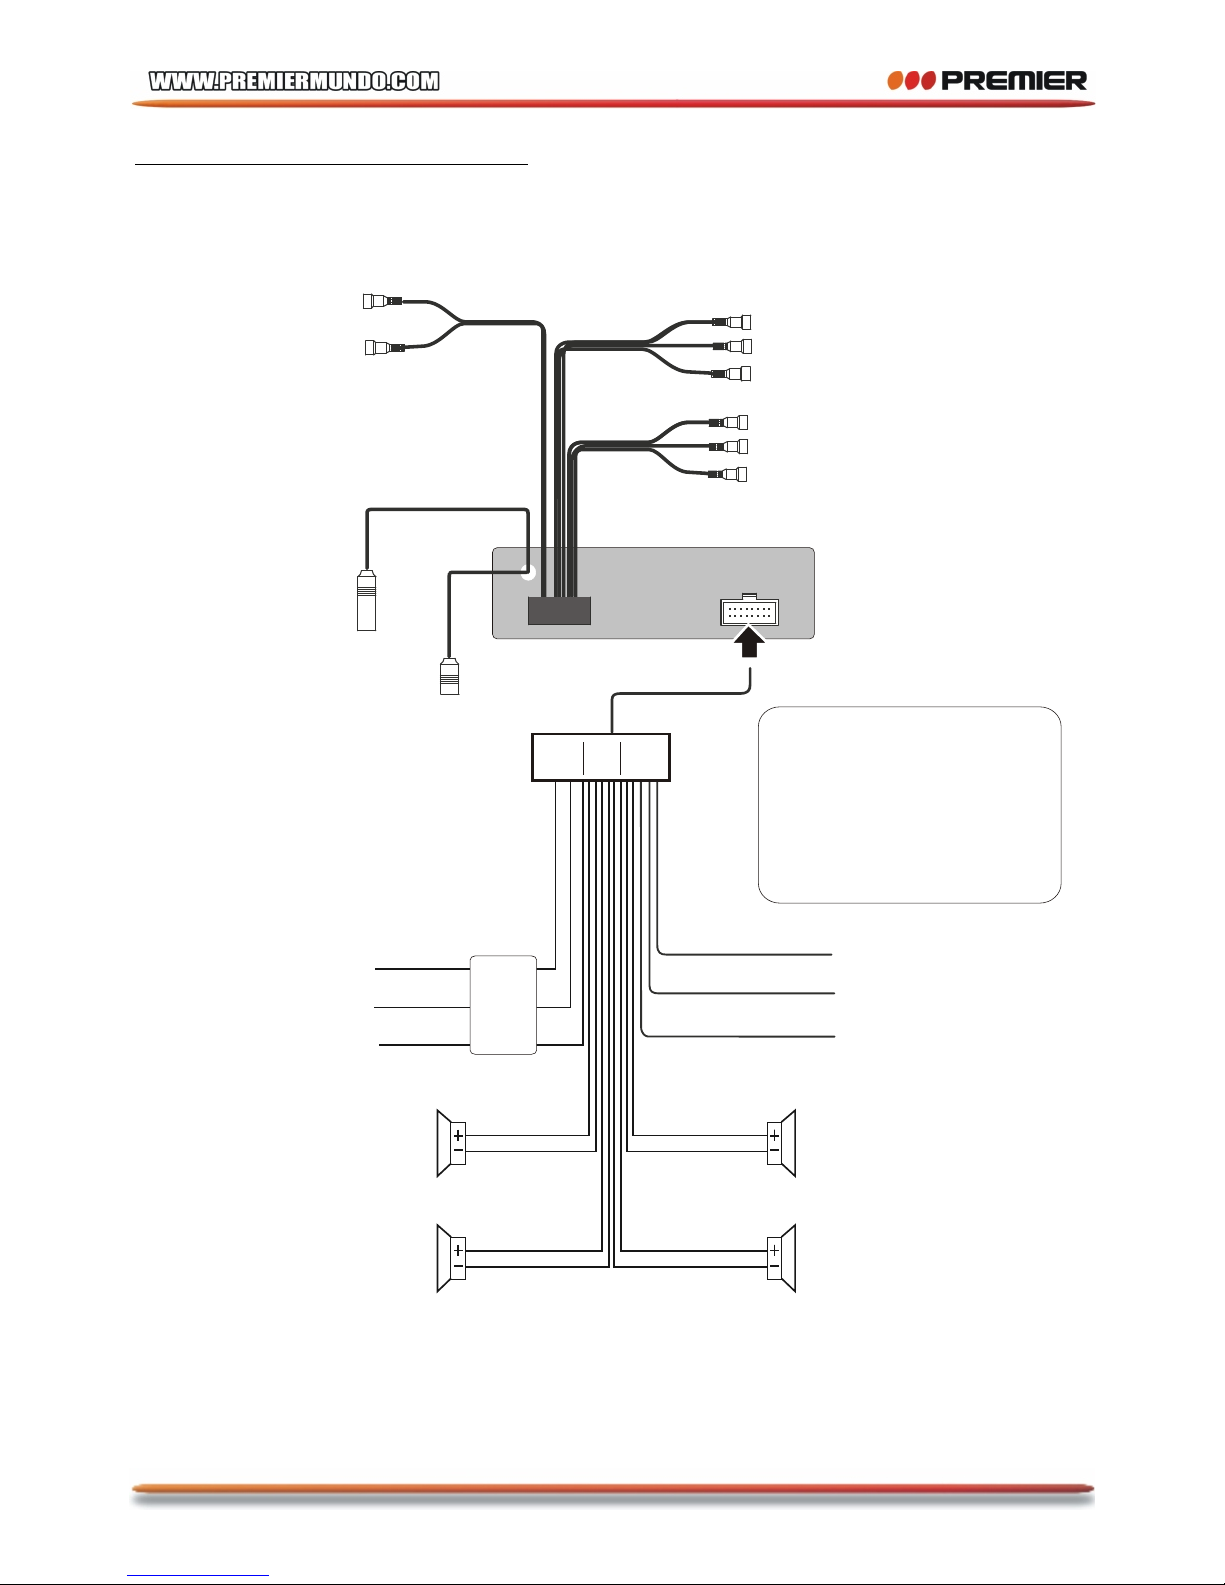
Electric Connection ...........................
Remote Control ...............................
Basic Operation................................
Loading/Ejecting a DISC .................
Open/Close Monitor and Angle
Adjustment......................... ........
TFT Monitor Adjustment ..................
Setting animation...........................
Setting wallpaper............................
Setting LED Light...........................
Audio Quality Adjustment..................
Setting Time.....................................
Setting Audio Mode ..........................
Reset Factory Settings.......................
Rear View Camera.............................
Control Panel ...................................
Unit keys..........................................
Radio Operation...............................
Listening to radio...............................
Storing stations in memory ................
Automatic Memory Storing &
Program Scanning........................
Media Operation...............................
23
23
25
26
26
26
26
26
27
27
29
30
31
32
33
35
36
37
38
39
40
3
4
5
7
8
9
10
13
13
13
14
14
15
15
15
15
16
16
16
17
17
20
20
20
21
22
Basic Operation................................
Selecting Play Mode.........................
On-Screen Display Function..............
Digital Video Special Function............
Multi-subtitle language function.........
Multi-audio language function............
Multi-angle function...........................
Title menu function ............................
Media Setup Menu............................
System Setup....................................
Language Setup................................
Video Setup ......................................
Digital Setup .....................................
AUX Operation..................................
BT Operation.....................................
TV Operation.....................................
USB Operation..................................
SD/MMC Card Operation....................
MP3/WMA/JPEG/MPEG4 Play.............
Specification.....................................
Troubleshooting ................................
Content
P-4
Disc Note
Supported Formats
The following 12 cm discs are supported:
Digital Video (single-side discs
single-double discs)
Video CD
CD Audio
MP3
MPEG4
Discs Which Can Not Be Played
Digital Video-RAM
CDV
CDG
Do not warp discs.
Dirt, dust, scratches and warping disc
will cause malfunction .
Do not place stickers or make
scratches on discs.
A disc should always be kept in its
case when not in use to prevent from
damaging.
Always ensure that discs are clean
and dry before inserting .
Precautions For Disc
Wipe the disc from center
toward the outside edge
Do not touch the underside
of the disc
Label side up
Do not bend
Handling DISC
DISC CLEANING
use a dry soft cloth to wipe the surface .
If the disc is quite dirty, use a soft cloth
slightly moistured with isopropyl (rubbing)
alcohol .
Never use solvents such as benzine,
thinner or conventional record cleaners
as they may mar the surface of the disc.
Preparing new discs with rough
spots
Roughness
Ball- point pen
New discs may have some roughness
around the edge . The Digital Video player
may not work properly or the video/sound
reproduction may skip if such discs
are used .
Note: use a ballpoint pen, etc ., To
remove roughness from the edge of
the disc .
P-5
NOTES:
Before finally installing the unit, connect the wiring temporarily and make sure
it is all connected up properly and the unit and the system work properly.
Use only the parts included with the unit to ensure proper installation. The use
of unauthorized parts can cause malfunctions.
Consult with your nearest dealer if installation requires the drilling of holes or
other modifications of the vehicle.
Install the unit where it does not get in the driver s way and cannot injure the
passenger if there is a sudden stop, like an emergency stop.
Choose the mounting location where the unit will not interfere with the normal
driving function of the driver.
If installation angle exceeds 30 from horizontal, the unit might not give its
optimum performance.
Avoid installing the unit where it would be subject to high temperature, such
as from direct sunlight, or from hot air, from the heater, or where it would be
subject to dust, dirt or excessive vibration.
DIN FRONT/REAR-MOUNT
This unit can be properly installed either from "Front"(conventional DIN
Front-mount) or "Rear"(DIN Rear-mount installation, utilizing threaded
screw holes at the sides of the unit chassis). For details, refer to the following
illustrated installation methods.
'
Installation
30
P-6
If you want to take CHASSIS out of the SLIDE BRACKET HOUSING, first remove
the PLASTIC TRIM OUT of the both sides away, then insert the two KEY PLATE into
left and right side of chassis as above illustration.
Installating the unit
DASH BOARD
METAL MOUNTING
STRAP
HEX NUT
SPRING WASHER
PLAIN WASHER
TAPPING SCREW
CONSOLE
SLIDE BRACKET
HOUSING
HEX BOLT
SCREWDRIVER
TABS
KEY PLATE
PLASTIC TRIM OUT
KEY PLATE
P-7
How To Remove And Install The Front Panel
When detaching or attaching the control panel, be careful not to damage the
connectors on the back of the control panel and on the panel holder.
Detaching Control Panel
Before detaching the control panel, be sure to turn off the power.
1). Press the “REL” release button and the right hand side of front pane will release
REL button
2). Put the front panel in the protective case for safe keeping.
protective case
12
1
2
First pull up the panel as the direction indicated by the arrow (See )And then
taking out the panel as the direction indicated by the arrow (See ).
Hollow
Bulge
ATTACHING CONTROL PANEL
P-8
1). First, insert the left side of the front panel into the main unit(SEE ).
(Note: the “Hollow ” point on the front panel must be attached into the “Bulge”
point of the unit . )
2). Gently push the right-down hand side of the front panel until you feel a “ Click” .
(SEE )
Precautions
Do not touch the contacts on the front panel or the unit body, since this may
result in poor electrical contact. If dirt or dust accumulates on the contacts ,
wipe them with a clean, dry cloth .
1
2
1
2
WIRING CONNECTION
P-9
Note:
the earth connection cable (parking brake B-) must be connected in order for
pictures to be played back to the monitor. If the cable has not been correctly
connected, the message “PARKING BRAKE” appears on the monitor.
RCA CABLE
SUBWOOFER GREY
VIDEO IN YELLOW
RCH RED
LCH WHITE
REAR RCA OUTPUT
CABLE
FRONT RCA WHITE L
FRONT RCA RED R
VIDEO OUT YELLOW
FRONT RCA OUTPUT
CABLE
REAR CAMERA INPUT YELLOW
PINK (B+)12V
REAR CAMERA SWITCH
(B-)PARKING BRAKE
GREY
GREY/BLACK
FRONT
RCH SPK.
VIOLET
VIOLET/BLACK
WHITE
WHITE/BLACK
GREEN
GREEN/BLACK
REAR
LCH SPK.
AUTO ANTENNA
BLUE
GROUND(B-)
MEMORY BACK-UP(B+)
IGNITION SWITCH(B+) RED
YELLOW
BLACK
REAR
RCH SPK.
FRONT
LCH SPK.
CHOKE
BOX
RADIO ANTENNA JACK
TV ANTENNA JACK
Electric Connection
Note:
the Parking Brake wire must be
connected in order to watch
video on this unit . If that wire
has not been connected , then
the message “PARKING BRAKE”
will appear on the LCD screen .
BROWN