PNI SafeHome Cleaner PTV35 User manual

PNI SafeHome Cleaner PTV35
Smart robot cleaner / Robot aspirator inteligent
EN User manual ............................................. 3
RO Manual de utilizare ................................... 13


3User manual
English
Tuya Smart APP
Download the Tuya Smart app by accessing Google Play or the App Store or
scan the QR codes below:
Android iOS
Add device in Tuya Smart application
1. Open the application, create an account and log in.
2. Add your device by pressing the +icon in the upper right corner of the
screen or by clicking the Add device button (this button appears when
you have no device added to the application).
3. Select the option Small Home Appliances on the left side of the screen.
4. From the list of devices on the right side of the screen, select Robot
vacuum
5. Select the WiFi network you want to connect to and add the password.
6. Turn on your smart robot cleaner and long press the WiFi button on the
remote control , until the CLEAN button on the robot starts flashing.
7. Check the option Confirm indicator rapidly blinks in the application.
8. The application will scan the devices within its range.
9. After you identify your device, you will receive the confirmation Added
successfully.
10. To finish, click the Done button.

User manual 4
English

5User manual
English
Device control via the application
Select your robot from the list of devices added to the application and choose
the desired command:
• Start/Stop: turn on / o the robot
• Auto: the robot will start and stop depending on the preset time schedule
• Auto Charging: the robot will move towards the loading base
• Settings:
• Suction - set the suction power (maximum, normal)
• Timer - add one or more operating schedules
(the robot will start at the set time and day)
• Voice switch - enable / disable voice confirmation
• Manual: manually control the robot and its direction of travel.
• Spiral: the robot starts and executes a circular motion.
• Record: the history of operations will be displayed here.

User manual 6
English

7User manual
English
Product description
Bumper
on/o
key
Charging contacts
Wheels
Dust tank
Water tank
Wheels
Wheels
Suction area
Brushes Brushes
Battery compartment
Dust tank release button Water tank release button
Sylicon
insulation
Water supply area
• Charging base
• Remote control
Contact pins
LED indicator
Voice alerts
On/O
Zigzag
Clean the edges
Increase suction power
Charging
Move forward
Turn left
Pairing button
WiFi
Enable/Disable
Sleep mode
Start / Pause
Spot cleaning
Turn right

User manual 8
English
Charging the robot cleaner
• Connect the 230V power adapter to the charging base.
•Place the charging base on the floor against the wall. Leave a free space
of at least 2 meters in front of the charging base and at least 1 meter on
either side of it.
Charging methods
1. Direct charging: connect the 230V power adapter directly to the robot
cleaner.
2. Charging command from remote controller: Press the key to send the
robot cleaner to the charging base.
3. Automatic charging: when the battery level drops below 20%, the robot
cleaner will go to the charging base on its own.
Notes:
•Keep the charging base always powered, otherwise the robot cleaner will not
be able to find it.
•To extend battery’s life, use the battery as it is charged by the factory for the
first time. After discharging, charge the battery at least 5 hours before the
next use.
CLEAN LEDindicator
• Low battery: red led
• Charging in progress: the red LED flashes
• Fully charged battery: green led

9User manual
English
Note: if the robot is turned o from the on / o (I/O) button on the side of the
robot, the CLEAN LED indicator will remain o regardless of the battery status.
On / Pause / O
1. Turn the on / o button on the side of the robot to the On (I) position.
The robot will turn on and enter standby mode. The CLEAN LED will
turn green. You will also hear the voice confirmation ”Welcome to use
robot cleaner. I’m happy to serve you.”
2. Press the CLEAN button or the on / o key on the remote control. The
robot will start working. You will hear the audio confirmation “Begin to
clean”.
3. Pause the robot by pressing the CLEAN button or the key on the
remote control again. You will hear the voice confirmation “Cleaning is
suspended”.
4. If you do not use the robot for a while, it will enter Sleep mode. If the
battery drains below 20%, you will receive a voice warning. We recommend
that you turn o the robot from the on / o (I / O) button if you do not
use it for a long time.
Sleep mode
When the robot is in Sleep mode, the LED on the CLEAN button is o.
• If the robot is not used for 60 seconds, it will enter Sleep mode.
• If you briefly press twice the key on the remote control, the robot will
enter Sleep mode.
When you want to clean the floor, make sure the robot is not in Sleep mode.
To awake the robot from Sleep mode, press the CLEAN button on the robot
or the key on the remote control.
The remote control
Power the remote control with 2 AAA batteries (not included).
Move the on / o (I / O) button on the robot to the on (I) position.

User manual 10
English
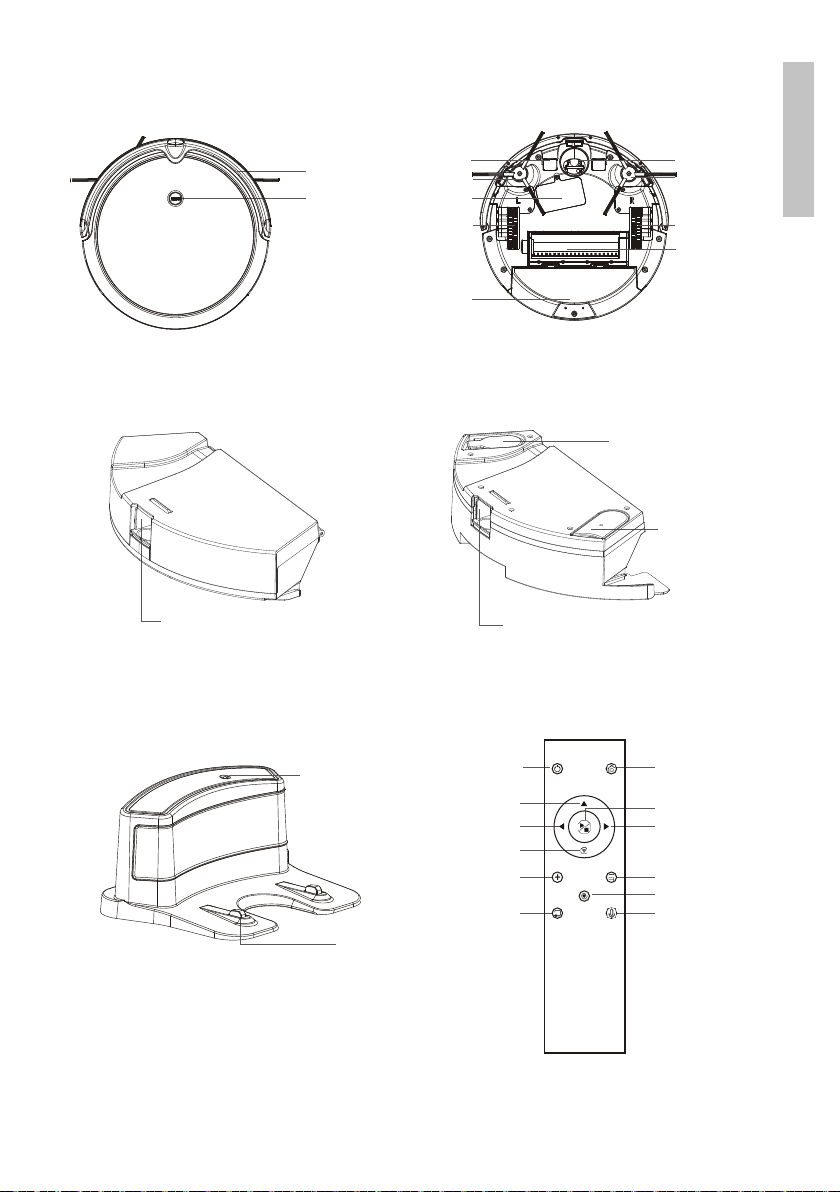
1. Press the key (on/o). The robot will exit Sleep mode and enter Standby
mode. Press again the key , the robot will return to Sleep mode.
2. Press the key . The robot will head to the loading base. The LED on the
CLEAN button flashes.
3. Press the key . The robot begins to move and vacuum.
4. Press the keys , , to move the robot in all three directions.
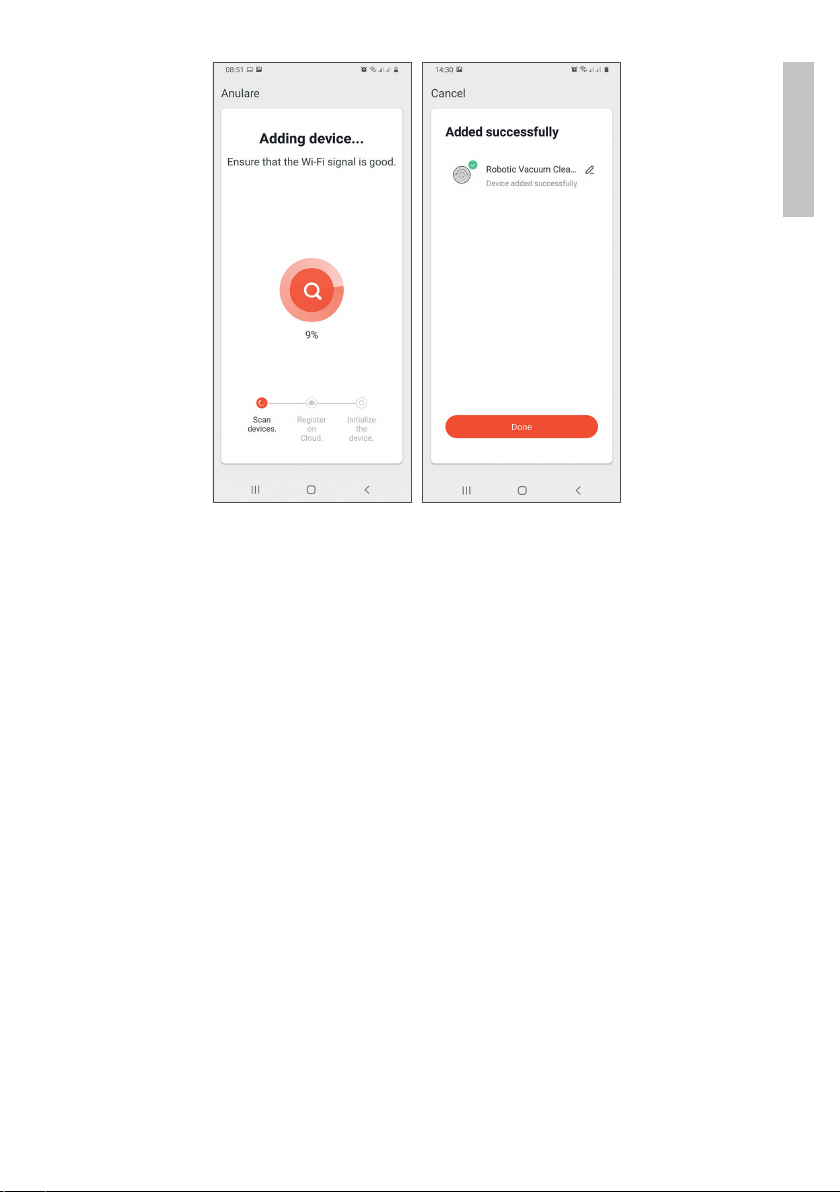
5. The key is only used to add the robot to the Tuya Smart application.
Read the chapter Add device in Tuya Smart application for more details.
6. Press the key to increase the suction power.
7. Press the key . The robot will perform zigzag movements with a radius
of 1 meter. This method of cleaning is recommended for small rooms.
8. Press the key . The robot will perform small Z-shaped movements. This
method of cleaning is recommended for rooms with a lot of dust and dirt.
9. Press the key . The robot will clean along the edges of the room.
10. Press the key to enable / disable voice alerts.
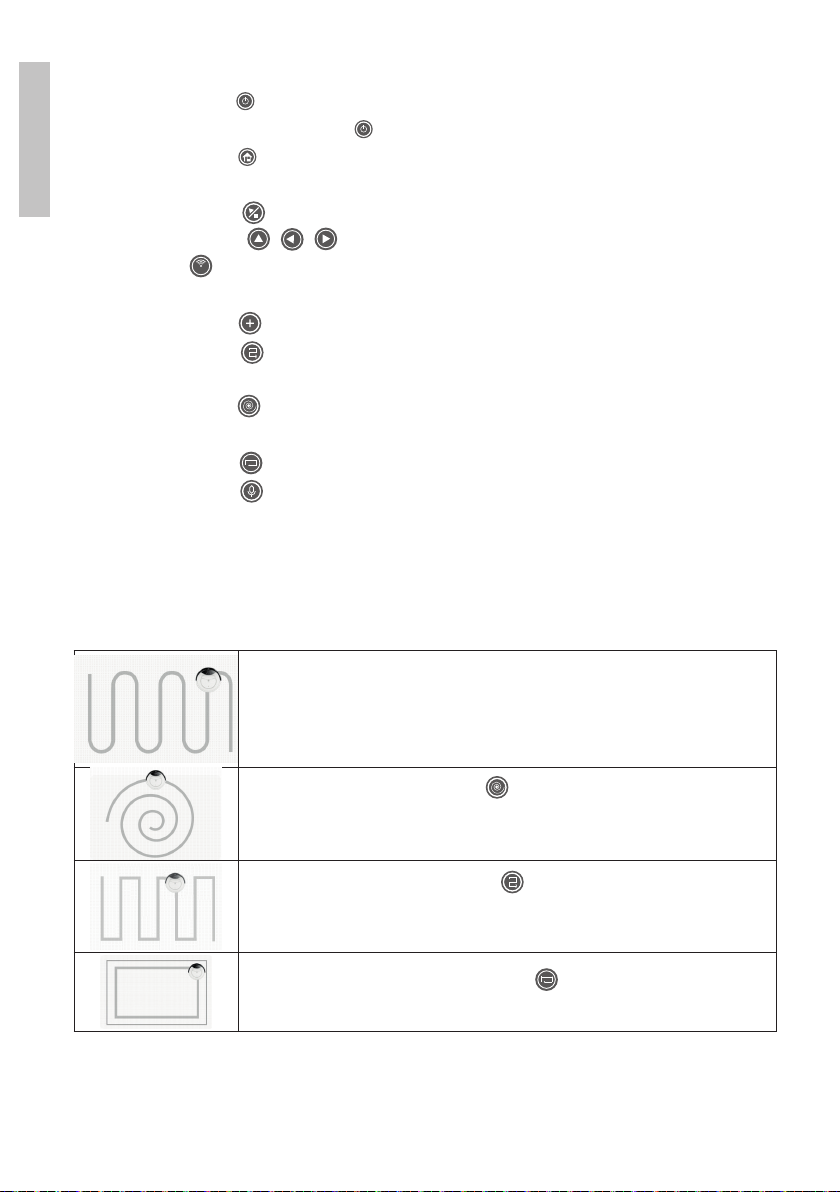
The route of movement of the robot during the various
cleaning methods
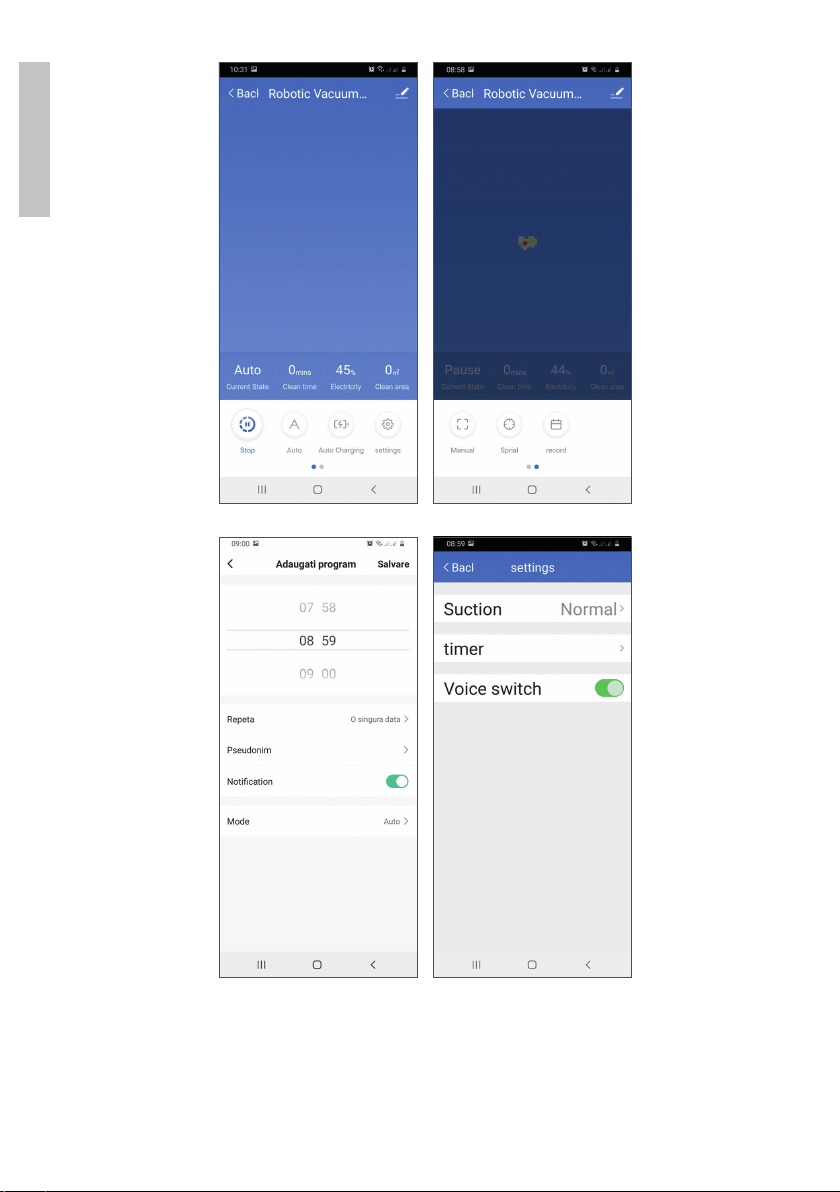
Automatic mode (default):
It is the most commonly used cleaning method. The robot
executes zigzag movements and changes direction when
it encounters an obstacle.
Spot cleaning mode. Key
The robot focuses on cleaning a small area in detail. The
robot performs a spiral motion.
Zigzag cleaning mode. Key
The robot will perform Z-shaped movements with a radius
of 1 meter.
Perimeter cleaning mode. Key
The robot will clean along the edges of the room.

11 User manual
English
Scheduled cleaning:
The cleaning program can only be set from the Tuya Smart
application. The default cleaning mode for scheduled
cleaning is Auto mode.
Device maintenance
Tasta eliberare
compartiment praf
(culoare galbena)
Cleaning the dust compartment
Press the yellow button to remove the dust
compartment from the robot.
After removing the compartment, press the
yellow button again and pull the compartment
cover up.
Wash the filters and the compartment with
water. Dry them well before putting them back.
Before removing the dust compartment, turn
o the robot with the on / o (I / O) button.
The filters have a maximum lifespan of 24
months. We recommend washing the filters
after every 15-30 days of use.
Cleaning the brushes
Turn the robot with the wheels up.
First remove the yellow frame, then pull up the
end of the brush to remove the brush.
Clean the brush with water and replace it after it
has dried completely.
Warning: Do not use detergents or solvents to clean the robot and its
components.

User manual 12
English
Technical specifications
Supply voltage 14.8V
Power 30W
Built-in battery Li-Ion 2600mAh
Charging base output voltage 22V
Charging base output current 1A
Working temperature -26°C ~ +60°C

Manual de utilizare
Romana
13
Aplicatia Tuya Smart
Descarcati aplicatia Tuya Smart accesand Google Play sau App Store sau
scanati codurile QR de mai jos:
Android iOS
Adaugare dispozitiv in aplicatia Tuya Smart
1. Deschideti aplicatia, creati-va cont si autentificati-va.
2. Adaugati dispozitivul dvs. apasand pictograma +din coltul dreapta sus al
ecranului sau apasand butonul Add device (acest buton apare atunci cand
nu aveti nici un dispozitiv adaugat in aplicatie).
3. Selectati din partea stanga a ecranului optiunea Small Home Appliances.
4. Din lista de dispozitive din partea dreapta a ecranului, selectati Robot
vacuum
5. Selectati reteaua WiFi la care doriti sa va conectati si adaugati parola.
6. Porniti dispozitivul dvs. (robotul inteligent) si apasati lung pe telecomanda
butonul WiFi , pana cand butonul CLEAN de pe robot incepe sa
clipeasca.
7. Bifati in aplicatie optiunea Confirm indicator rapidly blinks.
8. Aplicatia va scana dispozitivele din raza sa.
9. Dupa ce va identifica dispozitivul dvs., veti primi confirmarea Added
successfully.
10. Pentru a finaliza, faceti click pe butonul Done.

Manual de utilizare
Romana
14

Manual de utilizare
Romana
15
Control dispozitiv din aplicatie
Selectati din lista de dispozitive adaugate in aplicatie robotul dvs. si alegeti
comanda dorita:
• Start/Stop: porniti/opriti robotul
• Auto: robotul va porni si se va opri in functie de programarea orara
presetata
• Auto Charging: robotul se va indrepta spre baza de incarcare
• Settings:
• Suction - setati puterea de aspirare (maxim, normal)
• Timer - adaugati unul sau mai multe programe de functionare
(robotul va porni la ora si in ziua setata)
• Voice switch - activati/dezactivati confirmarea vocala
• Manual: controlati manual robotul si directia acestuia de deplasare.
• Spiral: robotul porneste si executa o miscare circulara.
• Record: aici va fi afisat istoricul operatiunilor.

Manual de utilizare
Romana
16

Manual de utilizare
Romana
17
Descriere produs
Bara de
protectie
Buton
on/o
Contacte
incarcare
Roti
Compartiment praf
Rezervor apa
Roti
Roti
Zona aspirare
Perie Perie
Compartiment
alimentare
Buton eliberare compartiment praf Buton eliberare rezervor apa
Izolatie
silicon
Zona alimentare
cu apa
• Baza de incarcare
• Telecomanda
Pini de contact
Indicator led
Alerte vocale
On/O
Zigzag
Curatare margini
Marire putere aspirare
Incarcare
Deplasare inainte
Deplasare spre stanga
Buton de imperechere
WiFi
Activare/Dezactivare
mod Sleep
Start / Pauza
Curatare pe loc
Deplasare spre
dreapta

Manual de utilizare
Romana
18
Incarcarea dispozitivului
• Conectati adaptorul de alimentare 230V la baza de incarcare.
• Amplasati baza de incarcare pe podea lipita de perete. Lasati un spatiu
liber de cel putin 2 metri in fata bazei de incarcare si de cel putin 1 metru
de o partea si de alta a acesteia.
Metode de incarcare
1. Incarcare directa: conectati adaptorul de alimentare 230V direct la
aspirator.
2. Comanda incarcare din telecomanda: apasati tasta pentru a trimite
aspiratorul catre baza de incarcare.
3. Incarcare automata: cand nivelul bateriei scade sub 20%, aspiratorul se va
indrepta singur catre baza de incarcare.
Note:
• Tineti baza de incarcare tot timpul alimentata la curent, altfel, aspiratorul nu
o va putea gasi.
• Pentru a extinde durata de viata a bateriei, la prima folosire consumati bateria
asa cum vine incarcata din fabrica. Dupa ce s-a descarcat, incarcati bateria
cel putin 5 ore inainte de urmatoarea utilizare.
Indicatorul led CLEAN
• Baterie descarcata: led rosu
• Incarcare in curs: ledul rosu clipeste
• Baterie complet incarcata: led verde

Manual de utilizare
Romana
19
Nota: daca robotul este oprit din butonul on/o (I/O) de pe partea laterala a
robotului, indicatorul led CLEAN va ramane stins indiferent de starea bateriei.
On / Pauza / O
1. Puneti butonul on/o din partea laterala a robotului pe pozitia On (I).
Robotul se va aprinde si va intra in modul standby. Ledul CLEAN va deveni
verde. Veti auzi si confirmarea vocala”Welcome to use robot cleaner. I’m
happy to serve you”.
2. Apasati butonul CLEAN sau tasta on/o de pe telecomanda. Robotul va
incepe sa functioneze. Veti auzi confirmarea audio”Begin to clean”.
3. Puneti in pauza robotul apasand din nou pe butonul CLEAN sau pe tasta
de pe telecomanda. Veti auzi confirmarea vocala”Cleaning is suspended”.
4. Daca nu folositi robotul o perioada de timp, acest va intra in modul Sleep.
Daca bateria se va descarca sub nivelul 20%, veti primi o avertizare vocala.
Va recomandam sa opriti robotul din butonul on/o (I/O) daca nu il folositi
o perioada lunga de timp.
Modul Sleep
Cand robotul se afla in modul Sleep, ledul de pe butonul CLEAN este stins.
• Daca robotul nu este folosit timp de 60 de secunde, va intra in modul
Sleep.
• Daca apasati scurt de doua ori tasta de pe telecomanda, robotul va
intra in modul Sleep.
Cand doriti sa curatati podeaua, asigurati-va ca robotul nu este in modul
Sleep. Pentru a scoate robotul din Sleep, apasati butonul CLEAN de pe robot
sau tasta de pe telecomanda.
Utilizarea telecomenzii
Alimentati telecomanda cu 2 baterii AAA (nu sunt incluse).
Mutati butonul on/o (I/O) de pe robot pe pozitia on (I).

Manual de utilizare
Romana
20
1. Apasati tasta (on/o). Robotul va iesi din modul Sleep si va intra in
modul Standby. Apasati din nou tasta , robotul se va intoarce la modul
Sleep.
2. Apasati tasta . Robotul se va indrepta catre baza de incarcare. Ledul de
pe butonul CLEAN clipeste.
3. Apasati tasta . Robotul incepe sa se deplaseze si sa aspire.
4. Apasati tastele , , pentru a deplasa robotul in cele trei directii.
5. Tasta se foloseste doar pentru adaugarea robotului in aplicatia Tuya
Smart. Cititi capitolul Adaugare dispozitiv in aplicatia Tuya Smart pentru
mai multe detalii.
6. Apasati tasta pentru marirea puterii de aspirare.
7. Apasati tasta . Robotul va executa miscari in zigzag cu raza de 1 metru.
Aceasta metoda de curatare este recomandata pentru incaperi mici.
8. Apasati tasta . Robotul va executa miscari in forma de Z cu raza mica.
Aceasta metoda de curatare este recomandata pentru incaperi cu mult
praf si mizerie.
9. Apasati tasta . Robotul va curata de-a lungul marginilor incaperii.
10. Apasati tasta pentru a activa/dezactiva alertele vocale.
Traseul de deplasare a robotului in timpul diferitelor
metode de curatare
Modul automat (implicit):
Este modul de curatare cel mai des folosit. Robotul
executa miscari in zigzag si schimba directia cand
intalneste un obstacol.
Modul curatare locala. Tasta
Robotul se concentreaza pe curatarea in detaliu a unei
zone restranse. Robotul executa o miscare in spirala.
Modul de curatare in zigzag. Tasta
Robotul va executa miscari in forma de Z cu raza de 1
metru.
Modul de curatare perimetrala. Tasta
Robotul va curata de-a lungul marginilor incaperii.
This manual suits for next models
1
Table of contents
Languages:
Popular Vacuum Cleaner manuals by other brands

Hoover
Hoover WindTunnel Wind Tunnel Bagless Canister... owner's manual

Allaway
Allaway C 40 PREMIUM Instructions for use and maintenance

Makita
Makita VC3012M Original operating instructions

Miele
Miele S 2131 Operation instructions

Bissell
Bissell LITTLE GREEN PROHEAT 50Y6 SERIES user guide

Numatic
Numatic NVQ-450 instructions