Podab C 34-66 DGT User manual

Dishwasher C 34-66 DGT
Installation and operation manual

D
C
EH
B2
B1
B3
F
B
1 mt MAX
+
-
1 mt MAX
+
-
6
10
7
2
4
6
7
3
9
1,2 mt MAX

machine on
1sec.
automatic start preset
3sec.
QUICK GUIDE
open tap; turn main power swith on
choose cycle
manual start
automatic start
2 31
2 31
2 31
2 31
2 31

drain pump start
2sec.
drain pump stop
MANUALLY
2minutes and 20 seconds
AU OMA ICALLY
2cm
machine off
1sec.
2 31
2 31
2 31
2 31

INDEX
TECHNICAL INSTALLATION INSTRUCTIONS
Introduction....................................................................................................................................10
Setting up the appliance................................................................................................................10
Plumbing connections....................................................................................................................10
•Water supply.............................................................................................................................10
•Draining....................................................................................................................................10
Electrical connections.....................................................................................................................11
Accessories....................................................................................................................................11
Maintenance of the peristaltic dispensers: replacing the internal tube: .........................................11
Safety provisins and user training..................................................................................................11
Detergent injector in the tank.........................................................................................................12
INSTRUCTIONS FOR USE AND SERVICING
Introduction....................................................................................................................................13
Description of the machine............................................................................................................13
Switching the machine on..............................................................................................................13
Switching the machine off..............................................................................................................14
Washing program...........................................................................................................................14
Function.........................................................................................................................................14
•Washing...................................................................................................................................14
•Water dripping pause...............................................................................................................14
•Rinsing.....................................................................................................................................14
Hydraulic rinse-aid dispenser.........................................................................................................14
Electric detergent dispenser (optional)..........................................................................................14
Electric rinse-aid dispenser (optional)............................................................................................15
Leveling of the water......................................................................................................................15
Washing cycle................................................................................................................................15
Selecting the automatic or manual start mode...............................................................................15
Selecting the cycle times...............................................................................................................15
Continuous cycle............................................................................................................................15
Opening the hood during the cycle................................................................................................15
Manual draining (if present)...........................................................................................................15
Procedure in case of mains power down ......................................................................................16
Security devices.............................................................................................................................16
•water temperature....................................................................................................................16
•Hood security...........................................................................................................................16
•Tank heating element protection..............................................................................................16
Alarm messages and machine state..............................................................................................16
Thermometer alarm (where fitted)..................................................................................................16
Check-list.......................................................................................................................................16
Washing tips...................................................................................................................................17
Routine maintenance.....................................................................................................................17
Periodic maintenance....................................................................................................................17
Machine idle...................................................................................................................................17
Sterilization....................................................................................................................................18
Information for users......................................................................................................................18

INSTALLATION
INTRODUCTION
This appliance is equipped with following technical documents:
- Manual “INSTALLATION AND USE” (which you are reading)
- technical sheet
- wiring diagram
- Declaration of Conformity to EC Directive
The instructions contained in this manual provide important information regarding safety for installing, operating and
maintaining the appliance. The manufacturer recommends to carefully store this manual near the machine where it can
be consulted by technicians and operators.
The installation must be carried out according to the manufacturer's instructions and by professionally qualified and
expert personnel.
This appliance must be connected to supply mains through a fix main switch only.
Never leave packaging materials (plastic bags, polystyrene, nails, etc.) within reach of children since it can be potentially
dangerous.
Install the electric, water and drain lines in the wash area according to the instructions given in the technical sheet of the
machine.
SETTING UP THE APPLIANCE
Carry the machine to the installation site and remove its packaging materials. Check that the appliance is in perfect
condition. If it shows signs of damage, immediately inform the seller and the forwarder about this damage.
If there is any doubt do not use the appliance until it has been checked by authorised personnel.
THE MANUFACTURER CANNOT BE HELD LIABLE FOR DAMAGE CAUSED BY THE FORWARDER. THE PERSON
ACCEPTING THE DELIVERY IS RESPONSIBLE FOR CHECKING IT FOR DAMAGE AND SHOULD SEND ANY
CLAIMS DIRECTLY TO THE FORWARDER RESPONSIBLE FOR THE DAMAGE.
Place the machine in position and level it by rotating the adjustable feet.
To prevent damage caused by steam coming out of the appliance during normal operation, make sure that the materials
nearby will not deteriorate if exposed to steam.
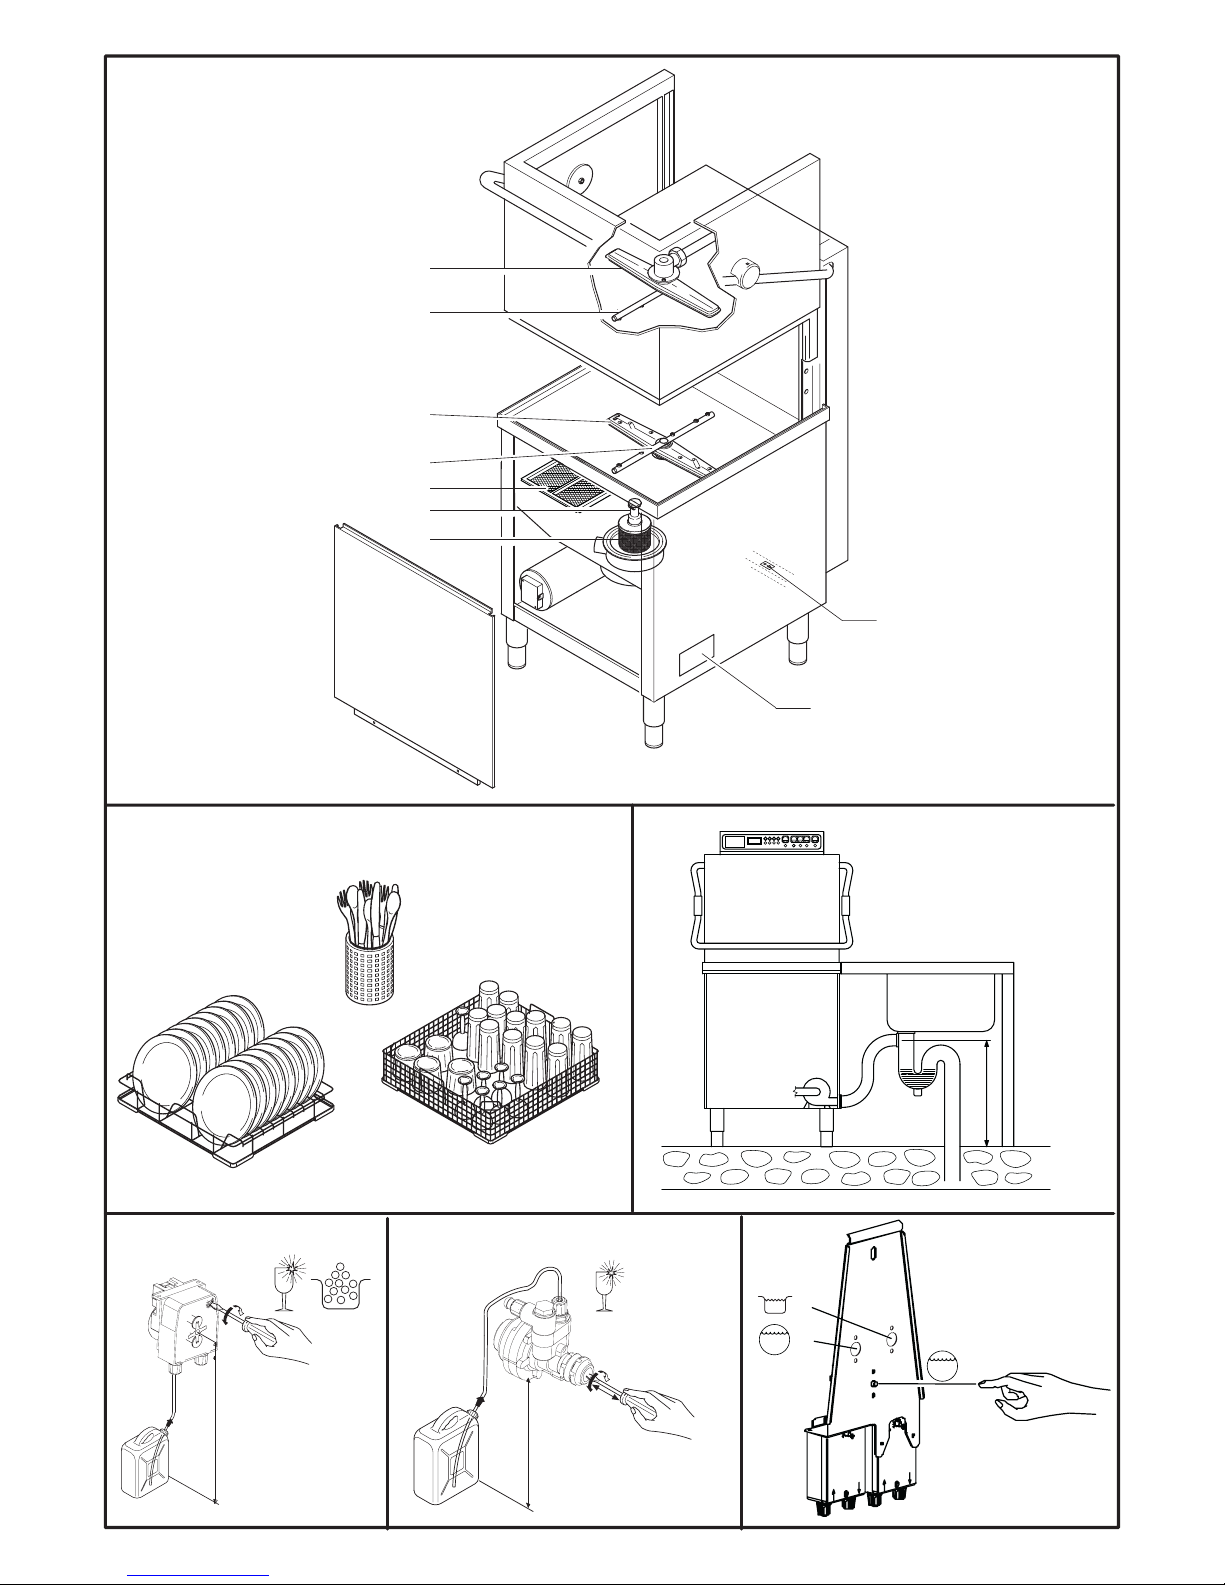
Before connecting the machine to the water supply and the electric mains, make sure that the general characteristics
and technical data indicated by the manufacturer on the data plate (C-3) and the technical sheet, have been taken into
due consideration during the preparation of the installation site. Operations must be carried out exclusively with original
parts. Only these, in fact, can guarantee perfect conformity of our machines with the project data.
Unauthorised maintenance which is not carried out by qualified personnel and with non original spare parts, will
invalidate the guarantee.
PLUMBING CONNECTIONS
Water supply
Before connecting the appliance to the water supply, make sure that there is a gate valve in between in order to be able
to interrupt the water supply whenever necessary or in case of maintenance works.
The minimum water supply pressure, measured at the machine water intake during final rinsing (flow pressure), must not
be lower than 180 kPa (1,8 bar) or higher than 400 kPa (4 bar), even with other open taps on the same supply line.
To prevent pressure or charge drops, we recommend that each machine should be connected to its own supply pipeline,
which should be sufficiently short and of adequate section. A booster rinse pump, available as an option, must be
installed in case the supply pressure is lower than the minimum pressure required.
If the static pressure is higher than 600 kPa (6 bar), then a pressure reducer must be installed upstream from the supply
pipeline.
Make sure that the supply water temperature is equal to the values given in technical sheet.
To obtain good washing results, we recommended to use supply water with a hardness of 7 to 12°F. If the hardness is
higher than 12°F and the machine has no built-in water softener, we recommend to install a water softener upstream
from the fill-up solenoid valve, rated for a residual hardness of 5/7°F.
GOOD MACHINE OPERATION DEPENDS ENTIRELY ON COMPLIANCE WITH THESE VALUES.
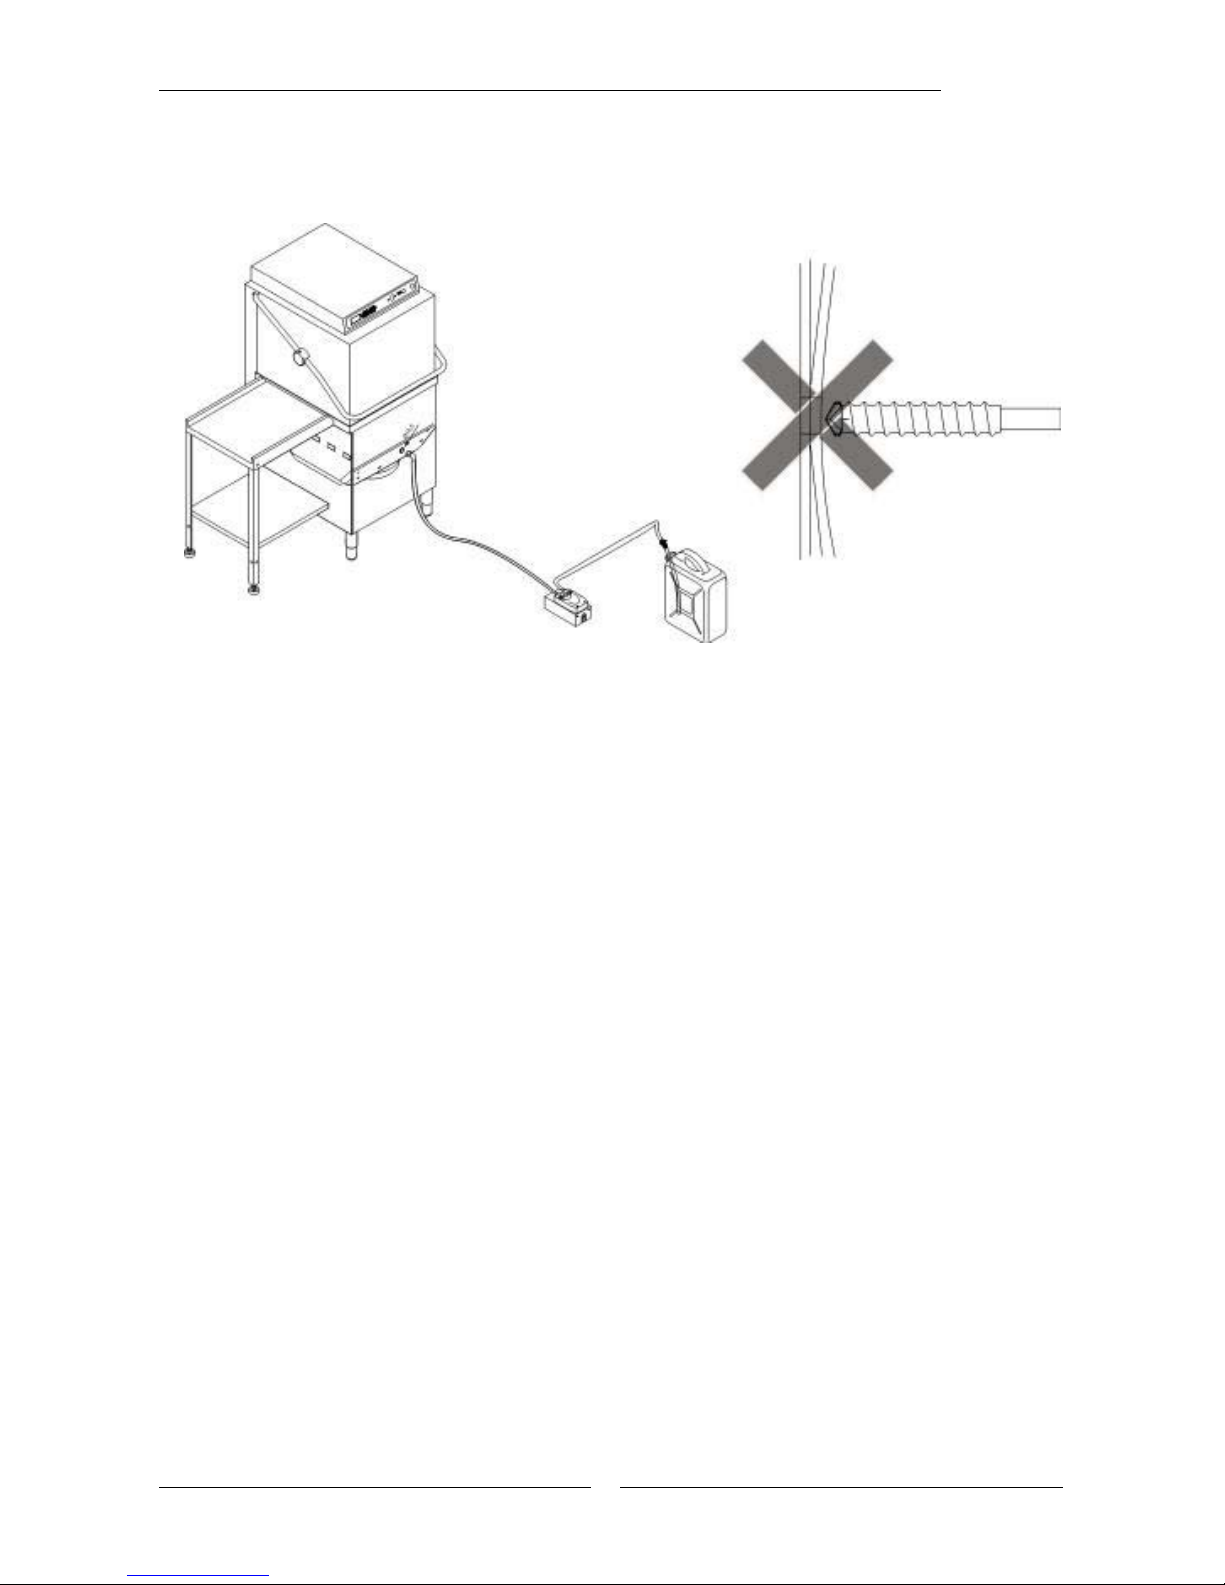
Use a flexible hose to connect the fill-up solenoid valve to the water supply tap.
Respect all current National or Regional regulations.
Draining
The drain pipe must be connected to a well or to an air-trap on the floor. Make sure that the drain pipelines in the wash
area are not choked and that they guarantee a quick water outflow. The wall drain pipe must withstand at least 70°C.
This appliance has a gravity drain, therefore the drain should be lower than the tank outlet. If the machine is equipped
with a drain pump, the position of the drain can be on a wall but its position cannot be higher than the value indicated in
fig.D.
10

INSTALLATION
ELECTRICAL CONNECTIONS
AN EFFICIENT EARTHING SYSTEM GUARANTEES THE SAFETY OF THE OPERATOR AND THE APPLIANCE.
This is an essential requirement that must be checked and, if in doubt, have the entire electric system checked by the
qualified personnel which made the connections to the electric mains. THE MANUFACTURER WAIVES ALL
RESPONSIBILITY FOR ANY DAMAGE CAUSED BY LACK OF AN ADEQUATE EARTHING SYSTEM FOR THE
APPLIANCE.
It is strictly forbidden to use plug adapters, multiplication plugs and extension cords.
Verify that the electric power supply complies with the technical specifications. The machine must be part of an
equipotential system, in accordance with European regulations. Connect it using the screw (C-9) with the mark, on the
back of the machine.
The connection to the electric mains must be done using a multi polar magnetothermic differential switch rated with a
contact gap equal to or larger than 3 mm.
When selecting the type and size of the power cable consider: the distance between the machine and the power
connection point, the installed power indicated on the ratings plate and the mains tension. The cross section of the
cables must not be less than 2,5 mm2. Use a H07RN-F cable and connect it to the provided terminal board and block
with cable clamp. Both components are as standard equipment. Avoid any strain on the power cable.
Verify the safety thermostat of the boiler F-B3 (if mounted) by pressing the reset button. The machine is set with a boiler
temperature of 85°C. To change the temperature turn the regulation screw of the thermostat F-B1.
ACCESSORIES
The machine can be fitted with retrofit accessories at a later date even on standard versions and available upon request:
- peristaltic detergent dispenser
- peristaltic rinse-aid dispenser
- drain pump
- rinse pump
Maintenance of the peristaltic dispensers: replacing the internal tube:
1) remove the transparent cover.
2) to remove it place the roller case vertically;
3) remove the coupling on the left of the pump from its seat by pulling the tube upwards and following its full length, then
turn the roller case clockwise until the coupling on the right of the pump can be extracted;
4) to mount it place the roller case horizontally;
5) push down the coupling on the left of the pump, with the curved part facing the bottom.
6) press the tube into its seat, gradually along its full length, and then manually turn the roller case clockwise until the
right-hand coupling is also inserted correctly;
7) fix the protection cover again then place the dispenser in the appropriate seat.
Use the regulation screw of the dosing unit (Fig.H.). By turning it clockwise or anti-clockwise the product quantity is
increased or decreased. The dosing times go from 1 to 25 seconds.
A 0.2 g quantity of rinse-aid corresponds to 2 cm in the transparent feed tube (cross-section 4x7 mm).
The dispensers must never be used when empty, or allowed to become empty.
Read the unit “Peristaltic dispensers” in the section “Use” to fill the dispenser and the dispenser/tank connection tube.
SAFETY PROVISIONS AND USER TRAINING
The skilled personnel performing the installation and the electric connections are requested to instruct the user aptly
about the functions of the appliance and the safety provisions to respect.
The personnel installing the machine must give the end user a practical demonstration of how to use the appliance and
hand out the written instructions which are delivered together with the appliance.
11

INSTALLATION
Detergent injector in the tank
The machine is ready to be equipped with a detergent injector through a hole with a diameter of 8,5 on the front side of
the tank. We reccomend not to add other holes and, if absolutely necessary, remove the external panels before drilling.
12

------------------------------------------- USE
INTRODUCTION
Carefully read the instructions contained in this manual: they provide important information regarding operating safety
and cleaning. Store the manual properly.
This appliance is designed only for the function for which it is specifically conceived: to wash dishes, glasses, cups and
similar objects as well as the baskets that carry them. Any other use should be considered as improper, dangerous and
not recommended. The appliance must only be used by properly trained personnel.
The appliance is not to be used by children or persons with reduced physical, sensory or mental capabilities, or lack of
experience and knowledge, unless they have been given supervision or instruction.
Children should be supervised to ensure that they do not play with the appliance.
Afew basic rules must be observed when using the appliance:
-The appliance must never be removed from its original installation site;
-Make sure the water supply gate valve is open before starting the appliance;
-Never clean with corrosive products, acids, steel wool or steel brushes;
-Never wash the appliance with direct jets or high pressure water jets.
-Every day, at the end of the work session, disconnect the mains power by turning the appliance off using the
main switch installed upstream from the appliance;
-Never leave the machine in any environment where the temperature is near or lower than 0°C.
The noise level of the appliance recorded at the front and side panels is less than 70 dB(A).
The manufacturer waives all liability for any injury to persons or damage to property caused by:
-disregard of these instructions;
-maintenance, regulations or repairs not performed by professionally qualified personnel;
-modifications, fitted devices or dispensers which somehow could alter the original operation of the appliance.
After turning off the electric current with the mains switch on the wall, only qualified personnel may remove the panels.
Description of the machine
Control panel: on the upper part of the machine
1) line button
2) cycle start button / drain start button
3) cycle selection button
4) automatic start LED
5) line LED
6) cycle selection LED
7) boiler thermometer
8) tank thermometer
9) machine ready LED
Switching the machine on
Switch the machine on with the mains selector on the wall: the LED A-5 goes on. By pressing the A-1 button for at least 1
13

------------------------------------------- USE
second the machine is switched ON. The A-5 LED goes off and the first leveling of the water begins.
Switching the machine off
Switch the machine off by pressing the A-1 button for at least 1 second; all system functions are interrupted, all LEDs on
the control panel go off and the thermometers go off apart from the A-5 LED which goes on again (no blinking).
Washing program
The dishwasher offers various washing programs which can be selected from the control panel
Program Description Lengths
Short washing cycle For hardly dirty dishes 1 min.
Normal washing cycle For normally dirty dishes 2 min.
Long washing cycle For heavily dirty dishes 3 min.
Continuous washing cycle For small pots or kitchen ware Max. 8 min.
Tank draining (if drain pump is present) To drain the water from the tank Max. 2 min. 20 sec.
Function
After having switched the mains power on by turning the mains selector on the wall the A-5 LED goes on to indicate that
the machine is connected to the mains power. By pressing and holding the ON/OFF button A-1 for at least 3 seconds the
machine starts filling the tank and the boiler and when the correct level has been reached the heating is activated (the
two heating systems are regulated by a changeover switch), the thermometers (where fitted)on the control panel indicate
the temperature and the normal washing cycle LED (A-6) is on.
Wait for some minutes until the temperature on the thermometers A-7 and A-8 (where fitted), correspond to
approximately 85°C for the boiler and approximately 60°C for the tank or verify that the A-9 LED goes on (where
fitted).
At this point the cycle program can be selected by pressing the A-3 button. The startup of the program is not linked to the
tank or boiler temperature. The machine works with automatic washing programs including washing, water dripping
pause, rinsing. The quantity of rinse-aid is regulated through the rinse-aid dispenser unit inside the machine and is
charged through the external bin. The quantity of the detergent may be regulated either by hand or by an internal or
external detergent dispenser.
Washing
The pump brings the washing water from the tank to the dishes through the pipe system and the upper and lower
washing arms. During the circulation, the washing water passes through a filter system which holds back small solid
particles and protects the pump impeller.
Water dripping pause
After the washing cycle the machine stops for some seconds to assure that the washing water drips from the dishes.
Rinsing
During the last part of the program the washed dishes are rinsed with hot clean water from the boiler to remove the
residues of the washing water. The rinsing water is used to heat up the dishes in order to let them dry as they are taken
out of the machine and it is also used to regenerate the washing water in the tank.
Hydraulic rinse-aid dispenser
The hydraulic rinse-aid dispenser is activated during each rinsing phase to inject a certain quantity of rinse-aid into the
boiler (1cc to 3cc) which is equal to a length of about 8 cm to 24 cm in the feeding tube. The quantity of rinse-aid can be
regulated by turning the regulation screw on the front (E) after having removed the front panel. If the screw is completely
turned in the quantity corresponds to 1cc. When the dispenser is installed for the first time it is necessary to fill up the
feeding tube by repeatedly pressing the regulation screw.
Attention: the minimum feeding pressure, measured at the connection of the water mains of the machine
during final rinsing ( flow pressure) must never be below 180 kPa (1,8 bar) even when other machines connected or taps
are opened on the same water supply line. An excessive quantity of rinse-aid may leave bluish strains on the glasses
and causes an excessive foam formation in the tank. Whereas dishes covered by water drops or a long drying period
indicate that there is not enough rinse-aid or that there is a light layer of amid which can be removed by putting the
dishes into a basin with water and enough detergent (1:10) for some minutes.
Electric detergent dispenser (optional)
During rinsing the peristaltic dispenser is activated to inject the detergent into the tank. Before using the machine, the
dispenser and the feeding tube have to be filled up. Make sure that the detergent reserve bin is full. To fill up the plastic
tube of the detergent feeding: run the first water charging without the overflow pipe in its place until the feeding tube is
full. To calibrate the correct quantity contact a qualified technical assistance service.
14

------------------------------------------- USE
Electric rinse-aid dispenser (optional)
During washing, the peristaltic dispenser is activated to inject the rinse-aid into the boiler. The rinse-aid dispenser and its
feed tube must be filled before using the machine. To do this, make sure that the rinse-aid reserve bin is full. During the
washing phase open and close the machine door briefly for a few times and alternate with at least 10 seconds pauses
until the feeding tube is filled up. To calibrate the correct quantity contact a qualified technical assistance service.
Leveling of the water
To fill up the tank or when the water level in the tank is too low, the solenoid valve and the electric rinsing pump (if fitted)
are activated. Once the water reaches the correct level, the leveling is stopped (the rinsing solenoid valve goes off with a
15 seconds delay only after the first filling). During the entire filling phase the cycle start button A-2 is deactivated.
Washing cycle
The washing cycle includes 3 phases: WASHING, PAUSE, RINSING and is activated by pressing the A-2 button. The
lengths of the washing phase (short, normal and long cycle) can be selected by using the A-3 cycle selection button.
During the entire cycle lengths the cycle LED A-6 of the selected lengths is blinking (freq. 1 second).
The cycle is not started if:
–the water level is not correct (or if the machine is filling up)
–the door is opened
–the machine is off
–the machine is in regeneration phase
Selecting the automatic or manual start mode
The washing cycle can be activated in manual or automatic mode. The machine is preset for the manual start mode. To
enable the automatic start mode press and hold the A-3 button for 3 seconds while the machine is on. If the automatic
mode is active the A-4 LED is on. To return to the manual mode press and hold the A-2 button again for 3 seconds. The
automatic mode remains active if the machine is switched off with the A-1 button, whereas if the machine is switched off
through the mains selector on the wall or if the mains power is missing the manual mode is active at startup (A-4 LED
off).
–When the automatic mode is selected, the machine starts 1 second after the hood has been closed.
–When the manual mode is selected, the A-2 button must be pressed to start the cycle after the hood is closed.
The cycle is not activated when the manual draining is running.
If the hood is closed when the machine is switched on the cycle does not start automatically until the hood is lifted and
closed again.
Selecting the cycle times
The short, normal and long washing cycle can be selected by pressing the A-3 button. Each time the A-3 button is
pressed the relating LEDs A-6 go on and off to indicate the selected cycle time. By pressing the A-2 button the washing
pump is activated; the cycle LED A-6 of the selected time blinks during the cycle operation (freq. 1 second). At the end of
the washing phase the pause is activated for 5 seconds. The washing phase time can be automatically extended due to
following conditions:
Should the boiler heating element still be heating while the washing cycle is started, the cycle runs normally but the
count-down of the cycle is interrupted 10 seconds before its normal end and will only be restarted when the heating
element is off. The cycle continuous normally with the next phase.
Note: If the boiler heating element does not switch off, the cycle continuous for max. 8 minutes, after which the pause
and the rinsing phases are activated; the A-5 LED blinks (freq. 0,3 seconds) and continues to blinking also after the cycle
ends. To reset the LED it is necessary to switch the machine off and on again (A-1 button). Please contact customer
service to verify the problem.
Continuous cycle
To activate a continuous cycle it is necessary to press the A-3 button until all A-6 LEDs are on at the same time. At this
point it is possible to press the A-2 button to run the continuous cycle. For the continuous washing cycle the limit is 8
minutes, after which pause and rinsing are activated. Only the continuous cycle may be manually shortened by pressing
the A-2 button to switch to the pause phase before the 8 minute washing phase is completed.
Opening the hood during the cycle
If the hood is opened during the washing cycle, the cycle is interrupted and when the hood is closed again the cycle
continuous from the previous point.
Manual draining (if present)
The manual draining can be activated only with the machine in idle-on and with the hood lifted. In this condition (hood
lifted), the drain pump is activated for 2 minutes and 20 seconds when the A-2 button is pressed for 3 seconds. To stop
the drain pump before the normal time elapses press the A-2 button again or press theA-1 button to OFF. During the
draining phase, the cycle LEDA-6 and the A-5 LED (hood open) blink.
15

------------------------------------------- USE
Procedure in case of mains power down
No specific procedures need to be observed in case of interruption of mains power. When the mains power returns the
machine switches to idle-off (A-5 LED on).
Security devices
Water temperature
The machine is equipped with a boiler waiting device. If the boiler hasn't reached the preset temperature the washing
cycle continues until the preset value is reached. This means:
1) the rinsing will always be done at the correct temperature not considering the feeding water temperature
2) the washing cycle may last longer than the preset cycle time if the feeding water temperature is lower than the
one indicated in the technical data sheet of the machine.
Hood security
If the hood is lifted during a washing cycle or during regeneration, the program is interrupted and will only resume when
the hood is closed again. This device has no influence on the tank or boiler heating element and no effects during the
tank draining program.
Tank heating element protection
If the water level gets lower, the tank heating element is deactivated before it is reached by the water level to avoid
overheating the exposed heating element and to prevent user's from touching the hot heating element. This protection
device deactivates also the power supply to the boiler heating elements.
Alarm messages and machine state
The LED's may blink to indicate a technical problem or a machine state (phase running). The alarms do not block the
running cycle. It is recommended to call a qualified technical assistance to solve the inconvenience.
Machine state LED 5 LED 6
Cycle: washing, pause, rinsing OFF Blinking 1 sec. period
Alarm no boiler heating Blinking 0,3 sec. period.
Alarm hood lifted during cycle Blinking 0,5 sec. period. Blinking 1 sec. period.
Manual draining Blinking 1 sec. period.
Regeneration cycle Blinking 1 sec. period.
Continuous washing cycle Blinking 1 sec. period.
Machine off (stand by) ON
Alarm regeneration Blinking 1 sec. period.
Thermometer alarm (where fitted)
If the temperature probe is disconnected or interrupted the tank or boiler display
(A-3 or A4) show
If the temperature probe is in short circuit or the temperature is higher than 107°C
the tank or boiler display (A-3 or A4) show
Check-list
Before starting to use the machine, check the following:
1) The water level and its temperature.
2) The detergent level.
3) The rinse-aid level.
4) The temperature of the water supply.
5) The washing agents (supply tube filled, tank holes are clean).
Water must be distributed, at high pressure, from all the sprayers. The rotary wash and rinsing arms must be free to
rotate by the water pressure. With every wash cycle the dispensers must draw the proper amount of rinse-aid and
detergent. Check the levels of the liquids in the containers and, if necessary, replace them or top them up.
The pump filter must be clean.
When the wash cycle is finished, the clean dishes must dry almost instantly by evaporation when the basket is removed
16

------------------------------------------- USE
from the appliance.
Each time the machine is turned off with the A-1 button, it will start again from the last selected washing cycle when
turned on again. This occurs also when programs such as regeneration are used which automatically turn the machine
off at the end of the cycle. The continuous washing cycle is never started automatically when the machine it turned on. If
the machine is turned off by turning the mains power selector on the wall, the machine will restart from the normal
washing cycle when turned on again. The cycle may only be selected when the machine is not performing a cycle.
During all cycles the A-3 buttons (cycle selection) is deactivated.
Washing tips
Never put bare hands into the washing water. If this should happen, rinse immediately and thoroughly with cold water.
Put dishes, cups, glasses or cutlery in the appropriate baskets (B). The machine can be equipped with different types of
baskets, even stackable ones on request. Place the dishes in the relating basket with supports, making sure that the
dishes face upwards. Place cutlery and coffee spoons with their handles facing down. Do not mix silver plated cutlery
with stainless steel cutlery as the two materials would react and this would harm the surfaces. When possible, wash
glassware before other object or wash with renewed tank water. To save on detergent and electricity wash only when the
baskets are full, but do not overload them. Do not stack the dishes. WE RECOMMEND pre-cleaning the dishes in order
to minimise machine maintenance. The quality of final wash results will be greatly improved by first removing paper, food
particles, lemon peels, toothpicks, olive pits, etc. which could partially clog the tank filter and impair washing efficiency.
We recommend washing the dishes before food particles dry on their surface. It is good practice, when dried food scraps
are involved, to first soak the dishes in soapy water before introducing them into the machine.
MAINTENANCE
Routine maintenance
The tank MUST be cleaned at least twice a day or whenever there are solid particles in the tank filter. Remove the tank
filters (C-10) (if fitted) and clean them. Drain the water by unplugging the overflow pipe (C-2). Remove the pump filter (C-
4) and clean it. Clean the tank and remove any small residues and solid particles. Make sure that the rotary wash arms
are free to rotate. If the nozzle holes are clogged by solid particles, remove them with a fine tipped tool. Put all the
removed parts back into their position in reverse order. Leave the hood open after the working session. To avoid possible
oxidation or chemical attack hazards in general, keep the steel surfaces of the appliance clean.
NEVER USE THE MACHINE WITHOUT THE PUMP PROTECTION FILTER.
Periodic maintenance
(to be done at least every 2-3 days)
NOTE: do not wash the appliance with high pressure or direct jets of water since water could penetrate into electrical
devices and prejudice the efficient operation of the appliance and its safety systems. Non-observance of this instruction
invalidates the guarantee.
- Drain the water completely from the appliance.
- Turn the appliance off by pressing the button ON/OFF button.
- Turn off the electric power supply by disconnecting the main switch installed upstream from the appliance.
- Clean the tank filters and the pump filter.
- Dismantle the upper and lower washing and rinsing arms by unscrewing their central fastening ring nut.
- Check and clean all the sprayers.
- Thoroughly clean the tank.
- Place again all the parts that were removed, proceeding in the reverse order.
- Leave the hood open for the entire period that the appliance is at rest.
- Clean the outer surfaces of the appliance with soap and water. Rinse the surfaces and dry them carefully.
NOTE:never clean stainless steel with steel shavings, wool or brushes. Lime deposits and scale will build up on the
inner surfaces of the boiler tank, the pipelines and tank due to calcium and magnesium salts present in the water. These
scales and deposits can prejudice proper appliance operation. The appliance must be periodically descaled by expert
personnel. If the machine fails to operate correctly or breaks down, disconnect from the electricity mains and call a
qualified service centre.
Machine idle
Whenever the appliance will be inactive for a long period of time, follow these steps for hygiene purposes:
- fill the machine with water but without any detergent
- make a few wash cycles without any dishes
- drain the machine completely
Repeat these steps until the drained water is clean and free of any residues of dirt or detergent. Protect the outer
surfaces with vaseline oil if the machine will be inactive for a very long period. Have an expert draining all the water out
from the boiler and the internal circuits to avoid the danger of ice formation.
17

------------------------------------------- USE
Sterilization
At least once a week, sterilize the machine by using specific disinfectants, finishing with repeated rinsing for several
minutes (fill the tank without the over-flow).
All rights reserved. This manual may not be reproduced or transmitted in any way, in optical, electronic or mechanical
forms, including photocopies and recordings with computers or computer networks, nor reduced, completely or partially,
without the written authorization of the manufacturer.
18
RAEE-INFORMATION FOR USERS
under the terms of art. 13of legal decree 25/07/2005, n.151 "Application ofdirectives 2002/95/CE, 202/96/CE and 2003/108/CE,regardin
g
the reduction of usage of hazardous substances in electicand electronic equipment and the waste disposal"
The illustrated symbol attached to the appliance indicates that the device has to be disposed separately from other waste at the end of
the life cycle.
The separate collection of the present appliance is organized and managed by the manufacturer. Theuser that wants to dispose of the
appliance may contact the manufacturer for information on thedisposal system introduced by themanufacturer to allow the separate
collection of the appliance.
Illegal disposal of theappliance by user will leadto application of the fines provided for in the national trasposition of the valid directive.

Notes

AB PODAB, Ekonomivägen 9, 436 33 Askim, SWEDEN
©PODAB 2009-02-03
SERVICE/SUPPORT
Phone +46 31-752 01 00
Fax +46 31-752 01 50
www.podab.se
Table of contents