Pokini E11C User manual

Pokini E11C
Manual
English

Deutsch
2
Index
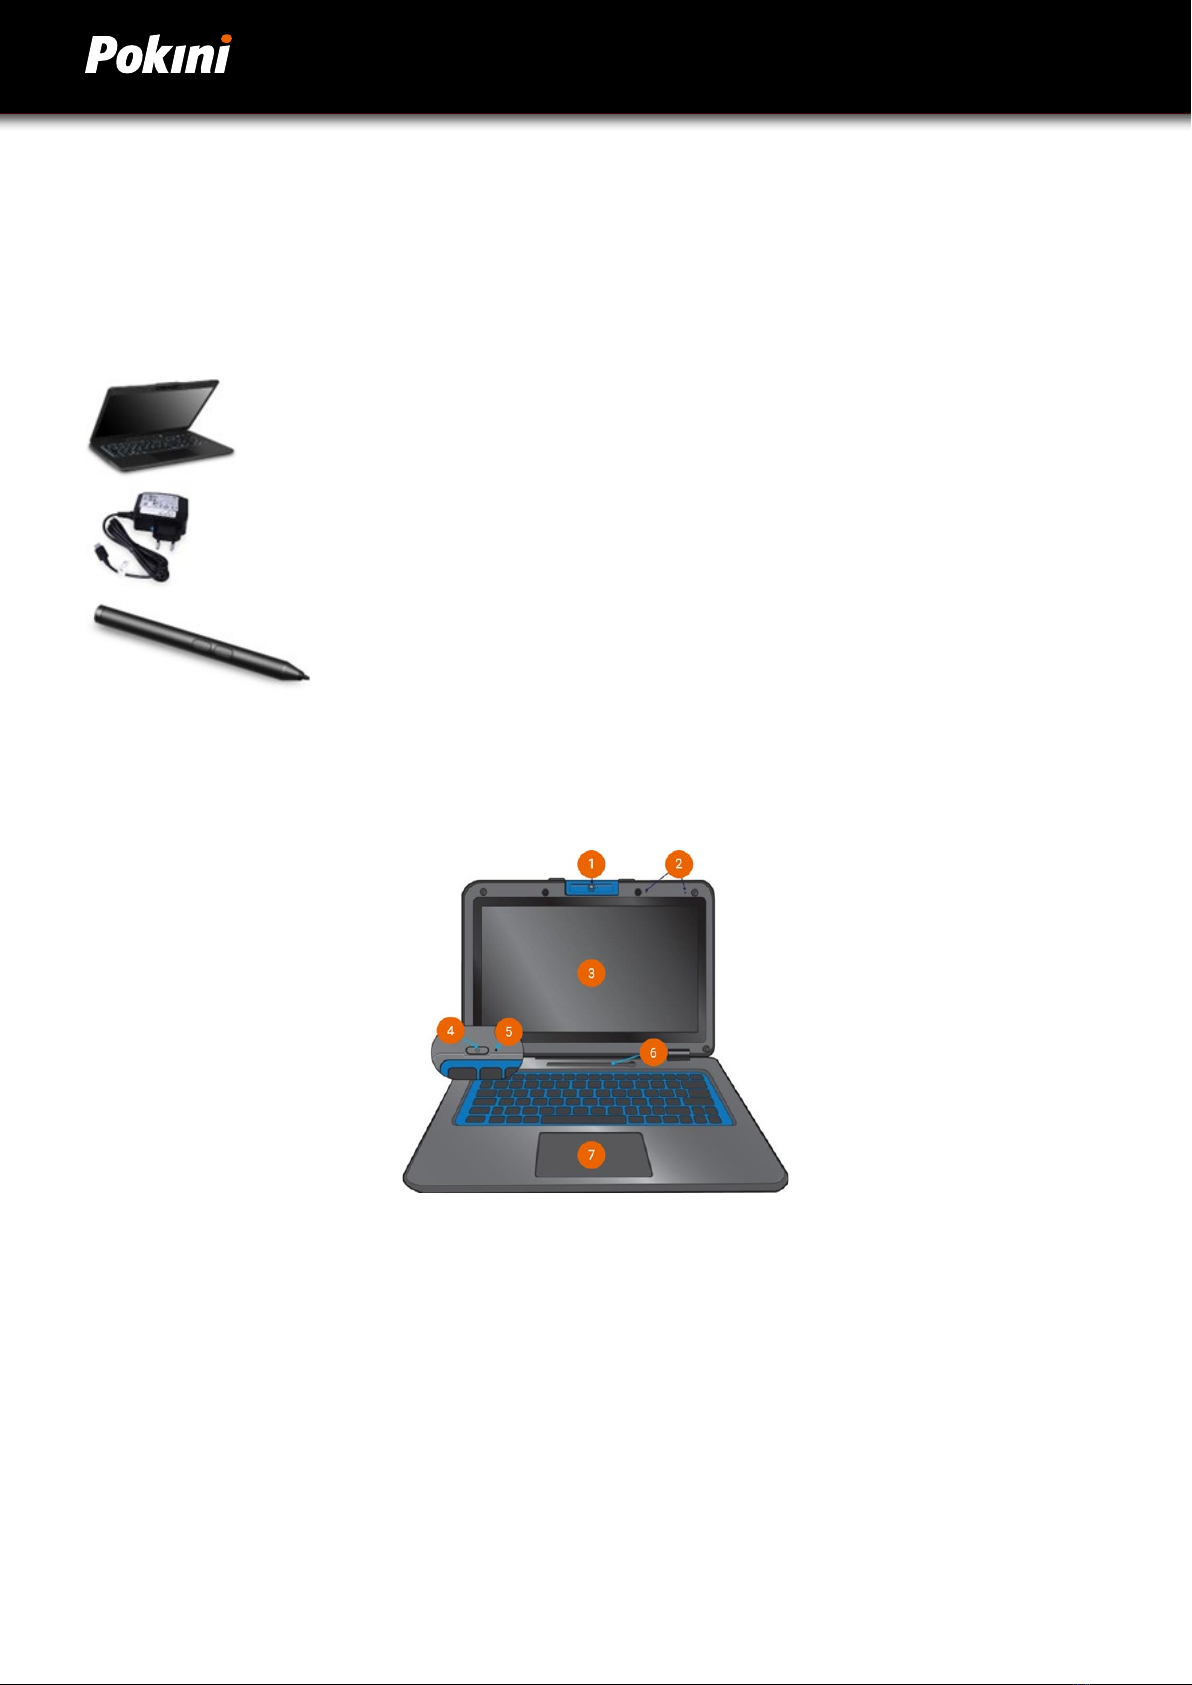
1. Get to know your Pokini E11C 2
1.1. Content of package 2
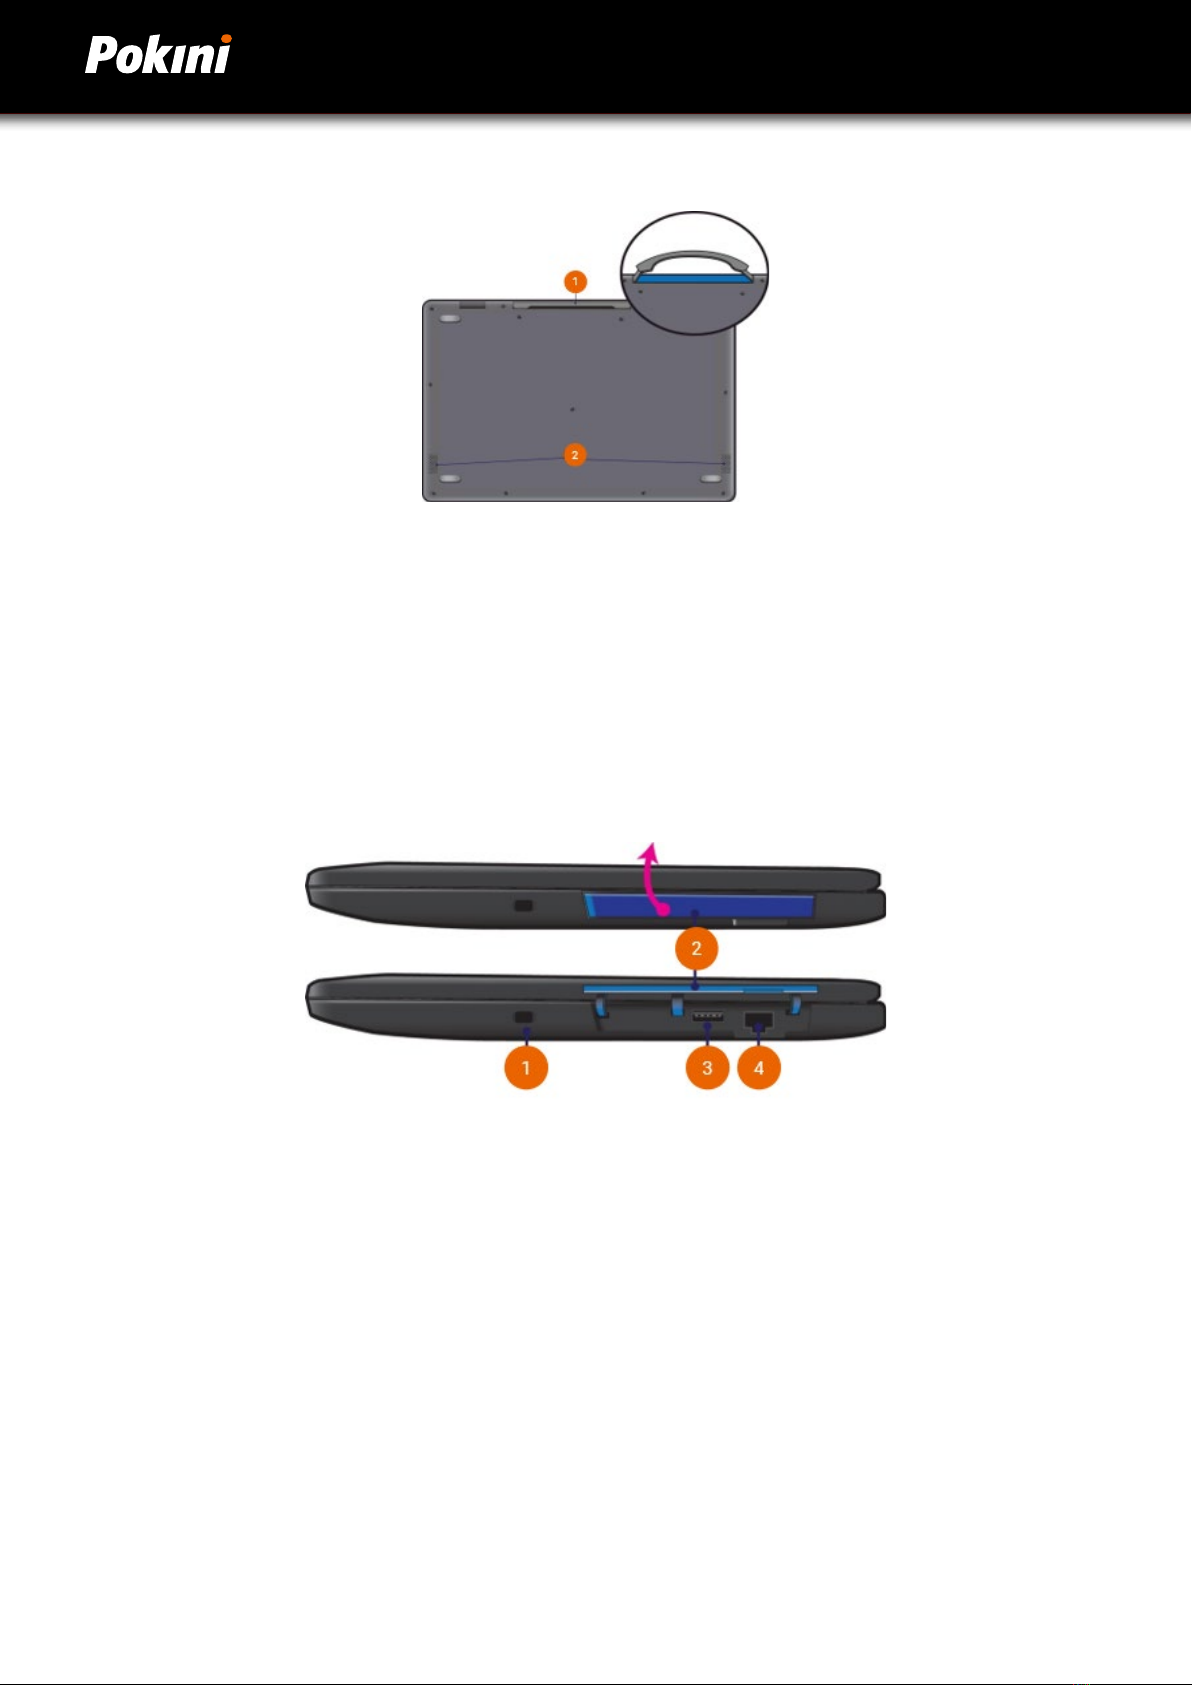
2. Perspectives 2
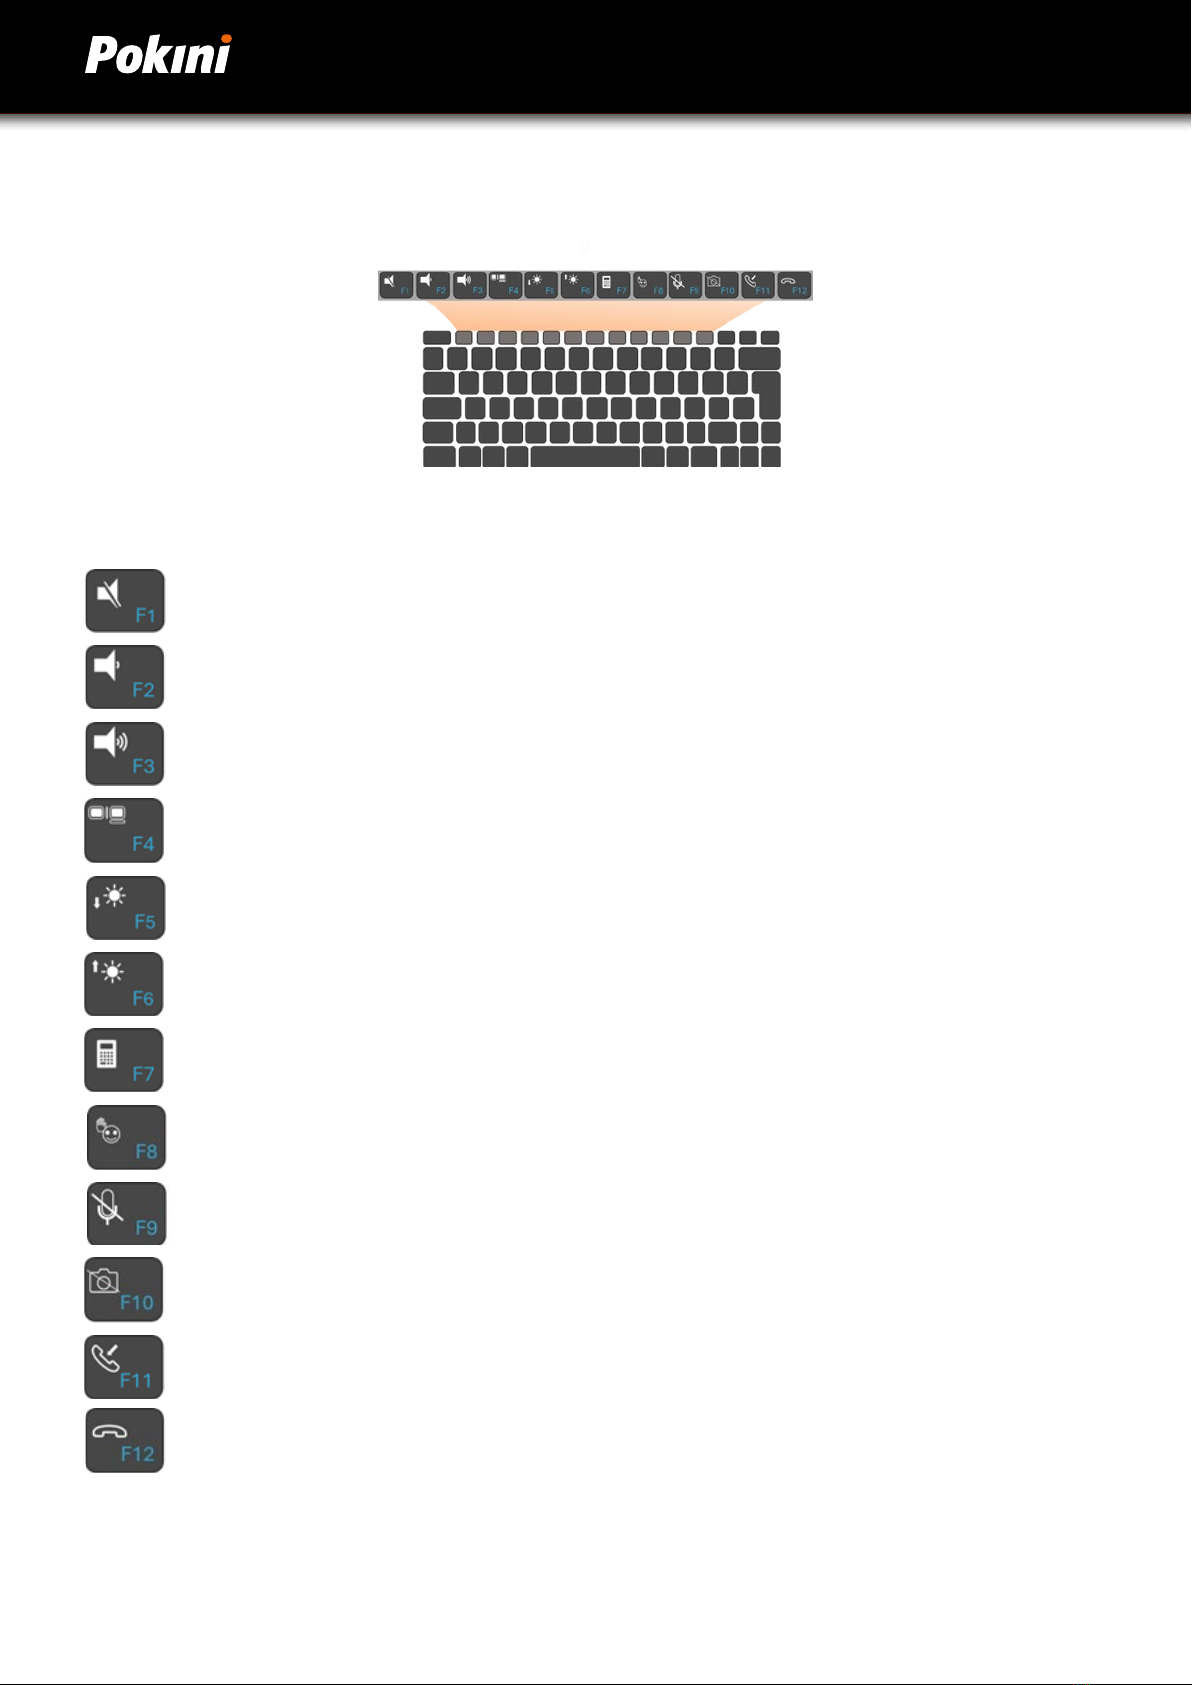
2.1. Function keys 7
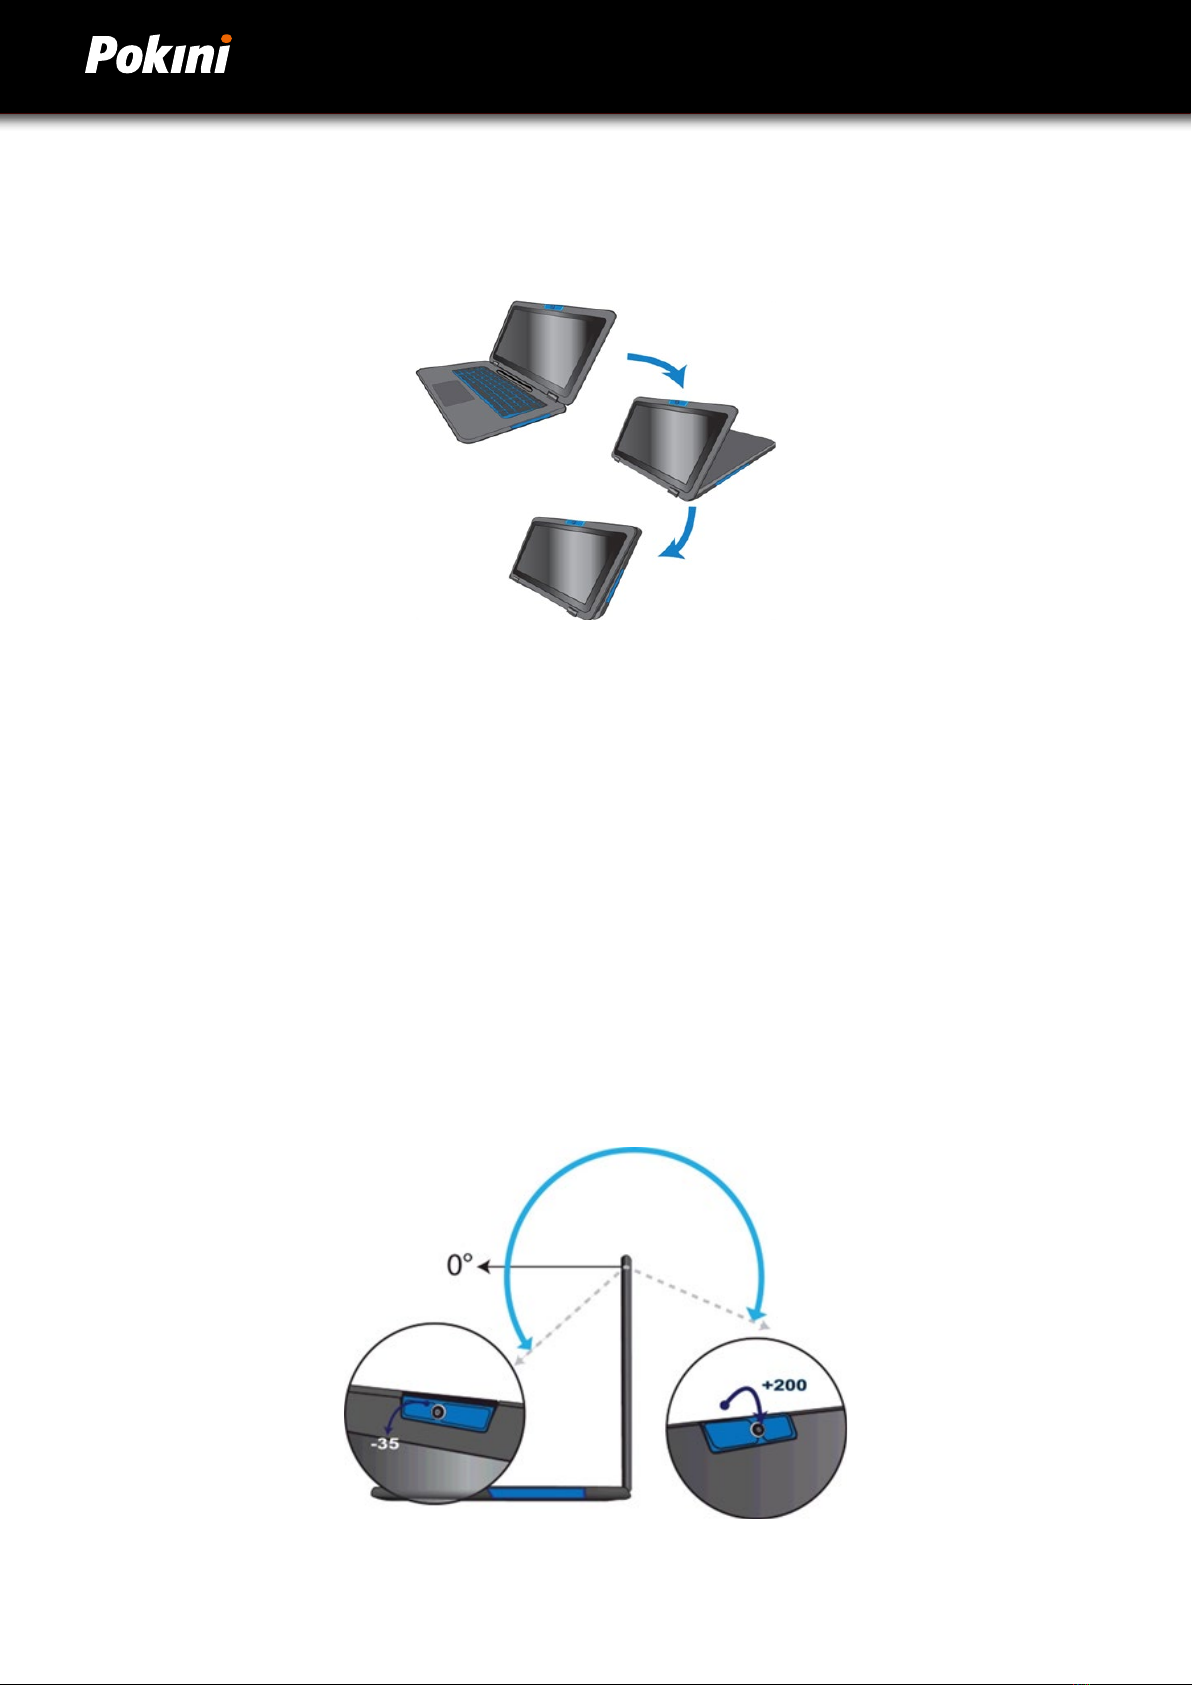
2.2. Folding the Pokini E11C 8
2.3. The rotatable camera 8
2.4. Stylus pen battery replacement 9
3. Set up your Pokini E11C 10
3.1. Initial start-up of the Pokini E11C 10
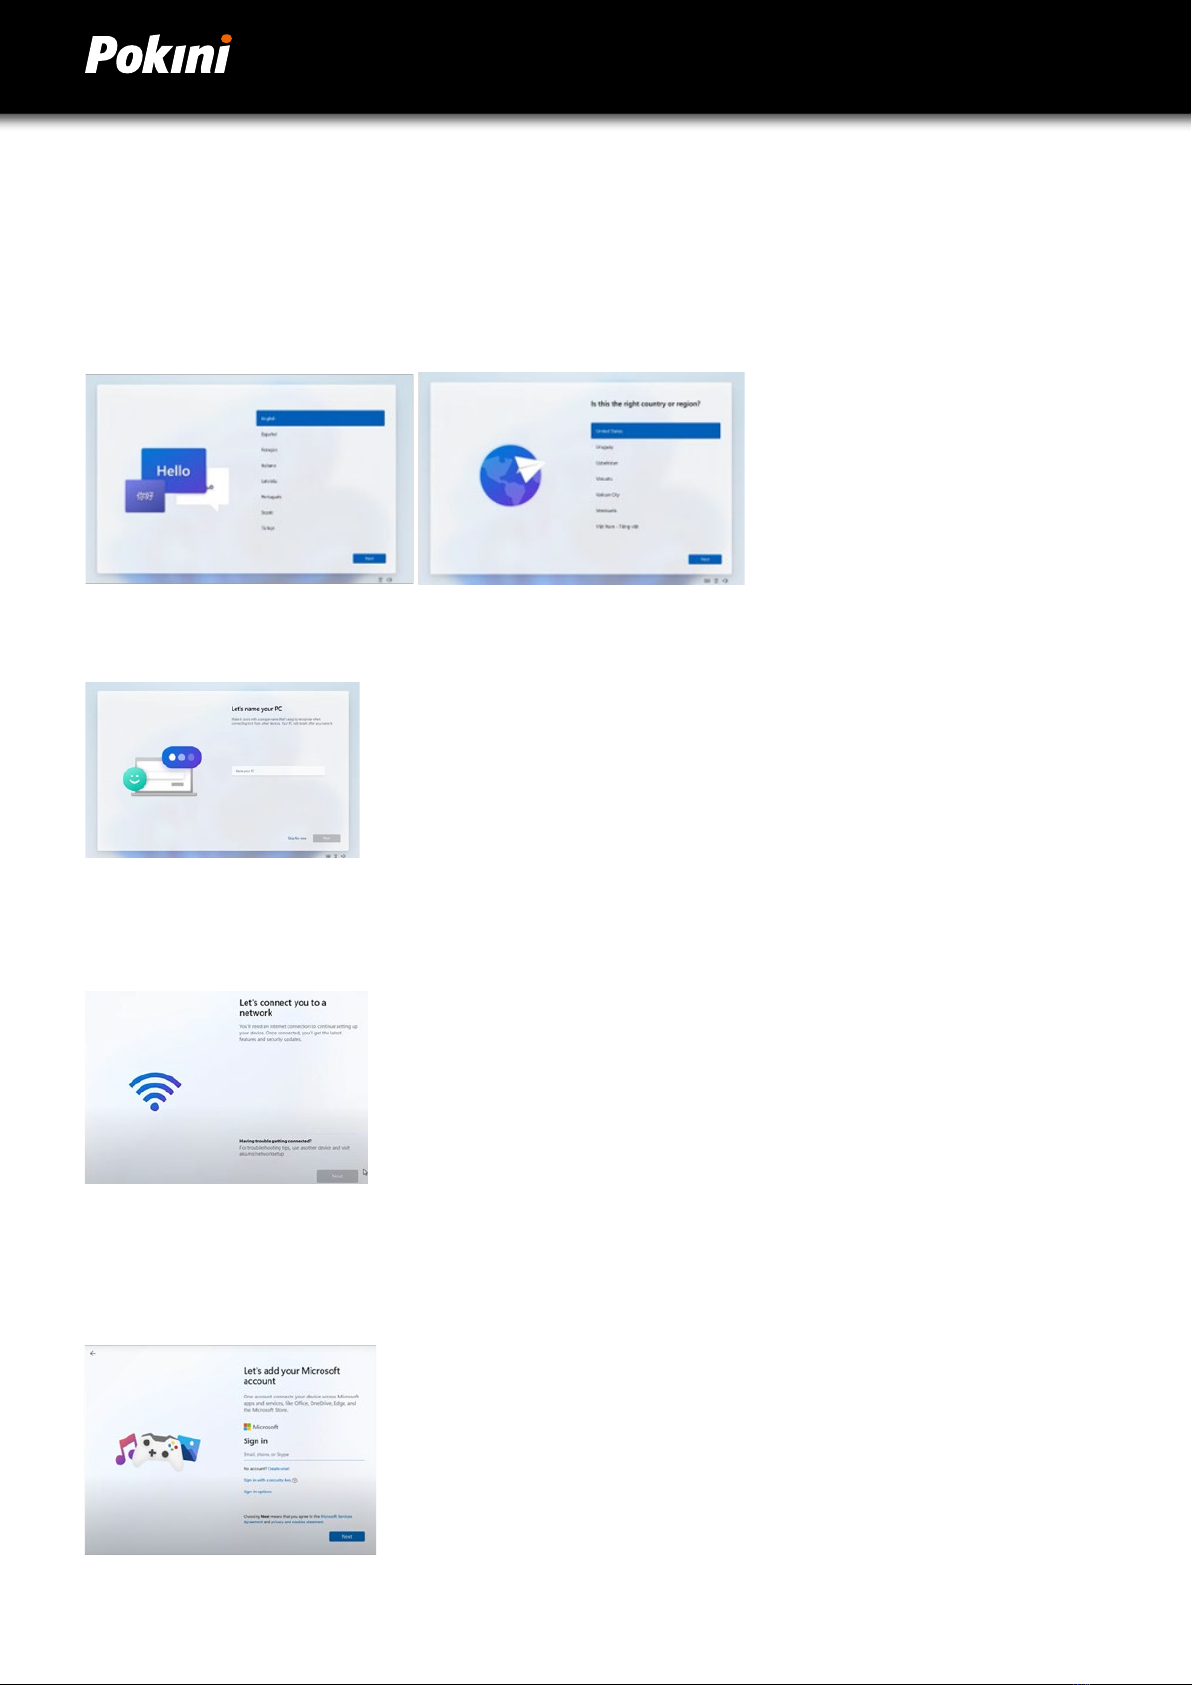
3.2. Windows 11 Setup 11
4. Basic use 13
4.1. Power off Pokini E11C 13
4.2. Activate hibernation mode 14
4.3. Wake up your Pokini E11C 14
4.4. Basic Touchpad operation 15
4.5. Taskbar 17
5. Settings and Connections 18
5.1. Pinning and unpinning apps 18
5.2. Connect to a Wi-Fi Network 16
5.3. Using the MicoSD Card slot 16
5.4. Connecting an external Device 17
6. Battery 18
6.1. Charging the Battery 18
6.2. Checking the Battery status 19
7. Windows help and troubleshooting 20
7.1. Problem solving 20
7.2. Problems with the display 21
7.3. Problems with Sleep Mode 21
7.4. Problems with the sound 22
7.5. Other problems 22
7.6. Inatedlithium-Ionbattery 23
8. Technical data of the Pokini E11C 24
9. Recieve help and contact EXTRA Computer 25
9.1. Contact EXTRA Computer 25

3
1. Get to know your Pokini E11C
1.1. Content of package
Carefully unpack your packaging and remove the items listed below. If any of the items are missing or damaged, please
contact your retailer immediately:
1. Perspectives
Front
1. Tiltable camera: The tiltable camera gives you options for video calling, video recording, and photo taking.
2. Microphones: The microphones give you audio recording and voice input capabilities.
3. Touchscreen: ThemainscreenofyourPokiniE11Callowsyoutooperateitusing10-ngertouch
gestures as well as input with the included digitizer stylus.
4. Power button: Press this button to turn your Pokini E11C on or off.
5. Status indicator: The status indicator shows the current power status of your Pokini E11C.
6. Stylus holder: The stylus holder allows you to attach the included stylus.
7. Touchpad: The touchpad allows precise operation of your device using gesture control.
1x Pokini Rugged Notebook E11C
1x AC-Adapter und ein Netzkabel
1x Stylus

Deutsch
4
Bottom side
1. Carrying handle: The integrated rubber handle allows you to carry your Pokini E11C comfortably and safely.
2. Audio playback: The sound system includes two 1.1W stereo speakers for high-quality playback of music,
noticationsoundsandotheraudio.
Right side
1. Rubberized cover:LiftandiptoaccesstheI/Ointerface.
2. Kensington-Lock: The Kensington Lock allows you to securely lock your notebook.
3. USB 3.2 Gen1 Type-A: This port is used to connect devices such as external storage media and printers. It
enables data transfer speeds of up to 5 Gbps.
4. RJ45 port: By plugging in the RJ45 cable, you can establish a wired network connection at speeds of
up to 1 Gbps.

5
Left side
1. Rubberized cover:LiftandiptoaccesstheI/Ointerface.
2. USB 3.2 Gen1 Type-C: This port allows connecting devices like external storage media and printers.
In addition to transferring video and audio content via DisplayPort, it also supports Power Delivery.
It achieves a data transfer rate of up to 5 Gbps.
3. HDMI port: This port allows connection to HDMI-enabled devices. It provides both video and audio output.
4. microSD card slot: This slot supports various microSD card types, including:
• SD card (Secure Digital)
• SDHC card (Secure Digital High Capacity)
• SDXC card (Secure Digital eXtended Capacity)
5. Combined audio connector for microphone/headphones: This port allows you to connect external
speakers or headsets via 3.5 mm jack plug.
6. SIM card slot: This slot allows inserting nano-SIM cards. The functionality requires a built-in LTE modem.
Screen back
1. System status LED: This LED indicator shows the current system status.
2. Wi-Fi status LED: This LED indicator shows the current Wi-Fi connection status.

Deutsch
6
2.1. Funktion keys
The following function keys do not need to be combined with the Fn key to perform their function.
Mute or enable sound output.
Decreases the volume
Increases the volume
Changing the display output
Decreases the display brightness
Increases the display brightness
MS Teams: Open calendar
MS Teams: Hand lift
Microphoneson/off
MS Teams: Disables Camera
Answer call
Reject/endcall

7
2.2. Folding the Pokini E11C
This notebook is equipped with a tilting 11.6-inch touchscreen display that offers versatile usage options. Opening the
device in traditional notebook style gives you access to the keyboard and touchpad. Folding the keyboard behind the
screen turns it into a tablet. Additionally, there is the option to set up the notebook‘s screen in stand mode, which is
particularly suitable for watching videos and presentations.
2.3. The rotatable camera
Depending on the angle of the front-facing camera, you have the option to adjust the camera angle downward by 35
degrees. Alternatively, you can rotate it a full 200 degrees to use it like a rear-facing camera.
Mute or enable sound output.
Decreases the volume
Increases the volume
Changing the display output
Decreases the display brightness
Increases the display brightness
MS Teams: Open calendar
MS Teams: Hand lift
Microphoneson/off
MS Teams: Disables Camera
Answer call
Reject/endcall

Deutsch
8
2.4. Stylus pen battery replacement
3. Set up your Pokini E11C
3.1. Initial start-up of the Pokini E11C
Switching on the E11C
1. Twist off the end part of the stylus.
3. Screw the end part of the stylus back in place.
Note:
Theillustrationsinthismanualmaydifferfromyouractualdevicedependingonthecongurationofyourdevice
Whenyouturnonthecomputerforthersttime,connecttheACadapterandfullychargethebattery.
Press the Power button (usually 1 to 2 seconds) to turn on the device.
2. Insert the AAAA battery with the positive (+) contact side of the battery facing the writing tip. Dispose of the
empty battery properly, for example at collection points at retailers or recycling centers.

9
3.2 Windows 11 Setup
Note: Please note that the setup process for Windows 11 may vary from the images provided due to differences in
versions and other factors.
Select language and region: Select your preferred language, region and keyboard layout.
Rename PC: AssignanametoyourPC,withwhichyourPCcanbeidentiedinthenetwork.
Connect to the Internet: Connect your computer to the Internet when prompted. This is important to download up-
dates and link your Microsoft account.
Set up Microsoft account: If you already have a Microsoft account, you can log in with it. Otherwise, you can create
a new account.

Deutsch
10
4. Basic use
4.1. Power off Pokni E11C
1. Click the Windows icon in the taskbar or on your keyboard to open the Start menu.
2. Click the Power icon at the bottom right of the Start menu.
3. Im angezeigten Menü wählen Sie „Ausschalten“.
3.In the menu that appears, select „Shut down“.
The notebook will now shut down. Please wait until the process is complete before closing.
Alternatively: You can also shut down the notebook by pressing the Windows key and the „X“ key simultaneously.
You can then select „Shutdown“ in the menu that opens.

11
4.2. Activate hibernation mode
If you are away from your notebook for a short time, it is recommended to activate the hibernation mode to save
energy.
You can do this in the following ways:
• Close the display
• PresstheOn/Offkeyoncebriey.
Click the Windows icon in the taskbar or on your keyboard to open the Start menu. Click the Power icon at the bot-
tom right of the Start menu. In the menu that appears, select „Sleep“. Click the Power icon at the bottom right of the
Start menu. In the menu that appears, select „Sleep“.
4.3. Wake up your Pokini E11C
Justpressthepowerbuttononcebrieytowakeupyournotebook.

Deutsch
12
4.4. Basic Touchpad operation
The touchpad works like a conventional mouse. You can use it to move the cursor and perform left-click, right-click,
and double-click actions. However, the actual actions available depend on the application.
Tap once on the touchpad surface or press once on the lower left corner of the touchpad
to achieve the same effect as left-clicking with a mouse.
Press the lower right corner of the touchpad once to achieve the same effect as right-cli-
cking with a mouse.
Pressandholdtheleftcorner.Thenmoveyourngeracrossthetouchpadsurfacetodrag
(move) an item on the desktop.
Tap once on the touchpad surface to achieve the same effect as right-clicking with a
mouse.
Movetwongerstogetherorapartonthescreen.Thisallowsyoutozoominoroutinvisu-
al applications such as images and maps.
Movetwongersverticallyacrossthetouchpadtoscrollvertically.
Movetwongershorizontallyacrossthetouchpadtoscrollhorizontally.

13
Athree-ngerclickcanopentheCortanaapp.
Presswiththreengersanddragupwardstoshowalreadyactivewindowsonthedesktop.
Pressdownwiththreengersanddragtominimizeallwindowsthatarealreadyactiveand
display the desktop.
Press and drag to the right or left to switch between active windows.
Clickingwithfourngerscanopentheactioncenter.

Deutsch
14
4.5. Taskbar
At the bottom of the desktop is the taskbar, which offers a variety of essential functions for smooth use:
Start menu: Click the Start Menu icon to access your apps, documents, and settings. You can also use it to quickly
search for programs.
Search box: Thesearchboxinthetaskbarallowsyoutosearchapplications,lesandsettingsdirectly.Pressthe
Windows key and start typing to get started right away.
App shortcuts area: In this area, you can store shortcuts to frequently used apps for quick access. Simply drag and
drop to add or remove them.
Notication area: TheNoticationspanelkeepsyouinformedaboutsystemmessages,updates,appointments,and
more.Clicktheicontoviewyournoticationsorusethequickactioniconforfrequentlyusedsettings.

15
5. Settings and connections
5.1. Pinning apps
1. Open the Start menu and select <All Apps>.
2. Right-click the app you want to add to your Start menu or Taskbar.
3. Left-click <pin to „Start“> or <more> and <pin to „Taskbar“>.
Unpinning apps
1. Right-click the app you want to remove from your Start menu or taskbar.
2. Click <Remove from Start> or <Remove from Taskbar> to remove it from your Start menu or Taskbar.

Deutsch
16
5.2. Connect to a Wi-Fi network
Enable Wi-Fi connection
1. Open the Settings menu and select <Network & Internet>.
2. Select <Wi-Fi> and enable the function as shown below.
3. Makesurethattheairplanemodeisturnedoff.ToconrmthatAirplaneModeisoff,gotothedesktopand
checkthenoticationarea.Ifyouseeanairplaneiconatthebottomright,pleasedisableAirplaneModerst.
Connecting to a wireless network (wireless LAN)
After the wireless connection is enabled, the computer automatically searches for available wireless networks and
displays them in the wireless LAN networks list. To connect to your desired wireless network, click the name of the
network in the list and then click Connect.
Note: Some networks require a network security key or password to connect. If necessary, ask the network administ-
rator or Internet service provider (ISP) for the required information.
5.3. Using the microSD card slot
You can use your microSD cards as removable media and conveniently exchange data with digital devices such as a
digital camera, digital camcorders, MP3 players, etc.
To insert your microSD card:
1. Insert the microSD card into the card slot as shown in the image.
2. Followtheon-screeninstructionandselecttheoptiontoopenandviewles.
3. AWindowsExplorerislaunchedandshowsallfoldersandlesonthemicroSDcard.Youcansave,move
and delete data as if you were working with a storage device.
To remove your microSD card:
1. Press the card and release it. The card will pop out.
2. Gently pull out the end of the card to remove it.

17
5.4. Connecting an external device
Connecting to the USB port:
Your notebook has USB ports that are compatible with USB devices. Once you plug a USB device into a USB port on
your notebook, Windows automatically loads a driver for that device. Once the driver is loaded, you can reconnect
and disconnect the same device without any additional steps.
Note: If Windows requires you to install the driver before connecting to your Pokini E11C, we recommend that you
review the device manufacturer‘s documentation before connecting.
TodisconnectaUSBstoragedevice,makesuretoclicktheSafelyRemoveHardwareiconinthenoticationareaof
the taskbar to remove the device before disconnecting it
Note: If your USB device requires a power adapter, connect the device to a power source before connecting it to your
Pokini E11C.

Deutsch
18
6. Battery
6.1. Charging the battery
1. Plug the USB-C charging cable into the USB-C power adapter.
2. Connect the USB Type-C plug of the charging cable to the USB Type-C port located on the left side of
your notebook.
3. The system status LEDs light up red to indicate that the battery is charging.
4. When the indicators turn blue, the battery is fully charged.
Note:
If the remaining capacity of your battery is 90% or more, connecting the adapter will not fully charge your battery.

19
6.1. Checking the battery status
Status LEDs
Whenthepowerandsystemindicatorsashred,thisindicatesthatthebatteryhasalowchargelevel.Youshould
charge the battery immediately
Windows Taskbar
In the desktop, move the cursor to the battery icon in the taskbar. A pop-up dialog appears and shows you the remai-
ning battery level in percent, as shown below.
The battery icon indicates the status of your battery, which is described as follows:
The battery is fully charged
The battery starts to discharge.
The battery is about to be completely discharged. We strongly recommend that you stop
using your notebook and charge it immediately.
The battery is charging.
A battery is a wearing part, therefore, with prolonged use, the capacity and life may decrease. If the battery life de-
creases to less than half of its original time, we recommend purchasing a new battery. If you do not use the battery
for a long time, it is recommended to store it at 30-40% of its capacity after charging. This will help to extend the life
of the battery.

Deutsch
20
7. Windows help and troubleshooting
7.1. Problemlösung
This section describes common problems, recommended solutions, and ways to recover your notebook after a
crash.
Note: Pleasenotethattheproblemsandsolutionslistedhereareintendedonlyasaguide.Theyarenotdenitive
methods of resolution. For certain problems, you may need assistance from your vendor or service provider.
Note: If you notice a problem, immediately interrupt all operations, as further steps could result in data loss or dama-
ge. Record what activities the system is currently performing and what actions you performed before the problem
occurred. Provide your service provider with detailed information to enable prompt problem resolution.
For almost any problem that occurs, please follow these steps:
1. Restart your system.
2. Check your Wi-Fi connection.
3. Reset your Wi-Fi connection.
4. Connect your system to the power supply with the included power adapter and charge it for at least one hour.
7.2. Problems with the display
When the device is switched on, no image appears on the display
If after a few seconds of waiting the screen does not display anything, make sure that:
• The power adapter is connected to the device. As well as the power cable is connected to a working power outlet.
• If all the above plugs are connected correctly, have your device serviced or repaired.
My screen suddenly goes black while the notebook is running.
Your system is in hibernation mode. Perform one of the following actions to resume from sleep mode:
• Press any key on the keyboard for 2 to 3 seconds.
• Press the power button.
•Press the Windows key if a keyboard is connected.
Table of contents
Other Pokini Laptop manuals