Pokini N15b User manual

Rugged Notebook N15b
User Manual

2
Table of Contents
BEFORE YOU START ...................................................................................................................................................................................................................
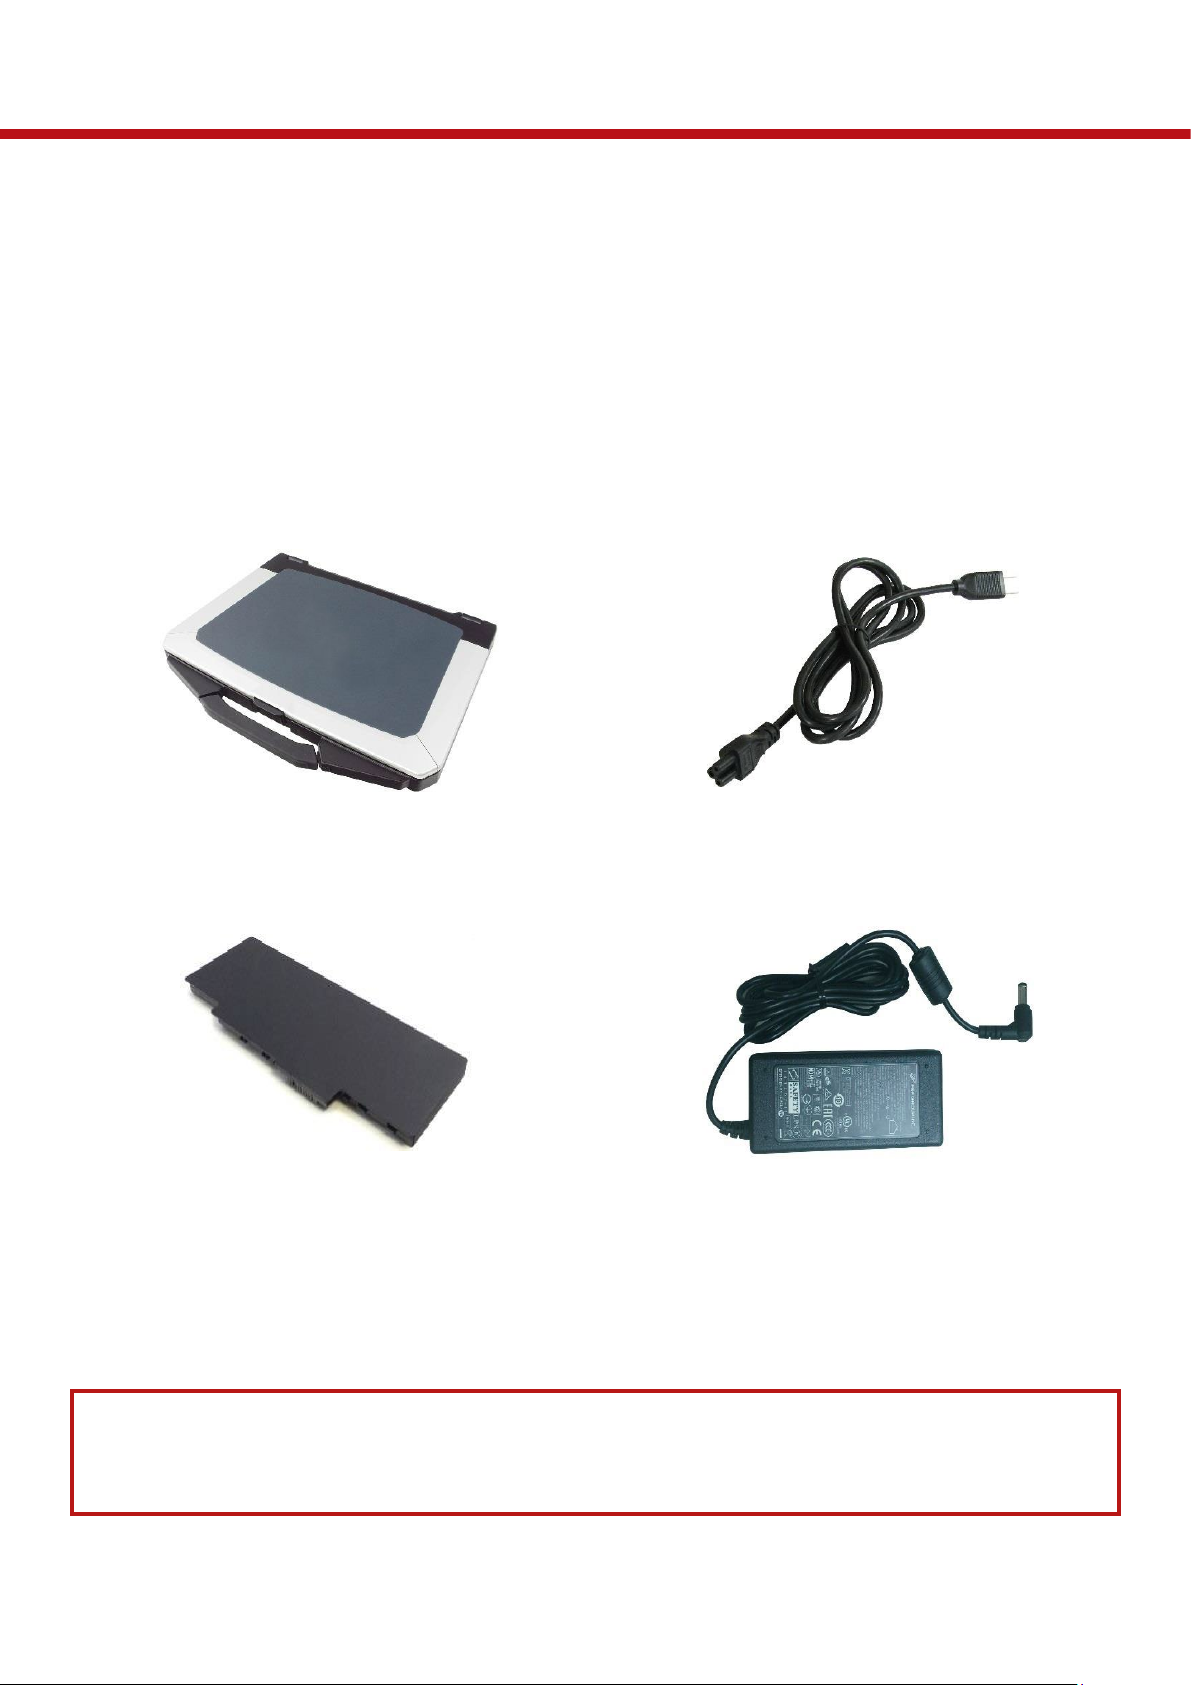
PACKAGE CONTENTS .................................................................................................................................................................................................................
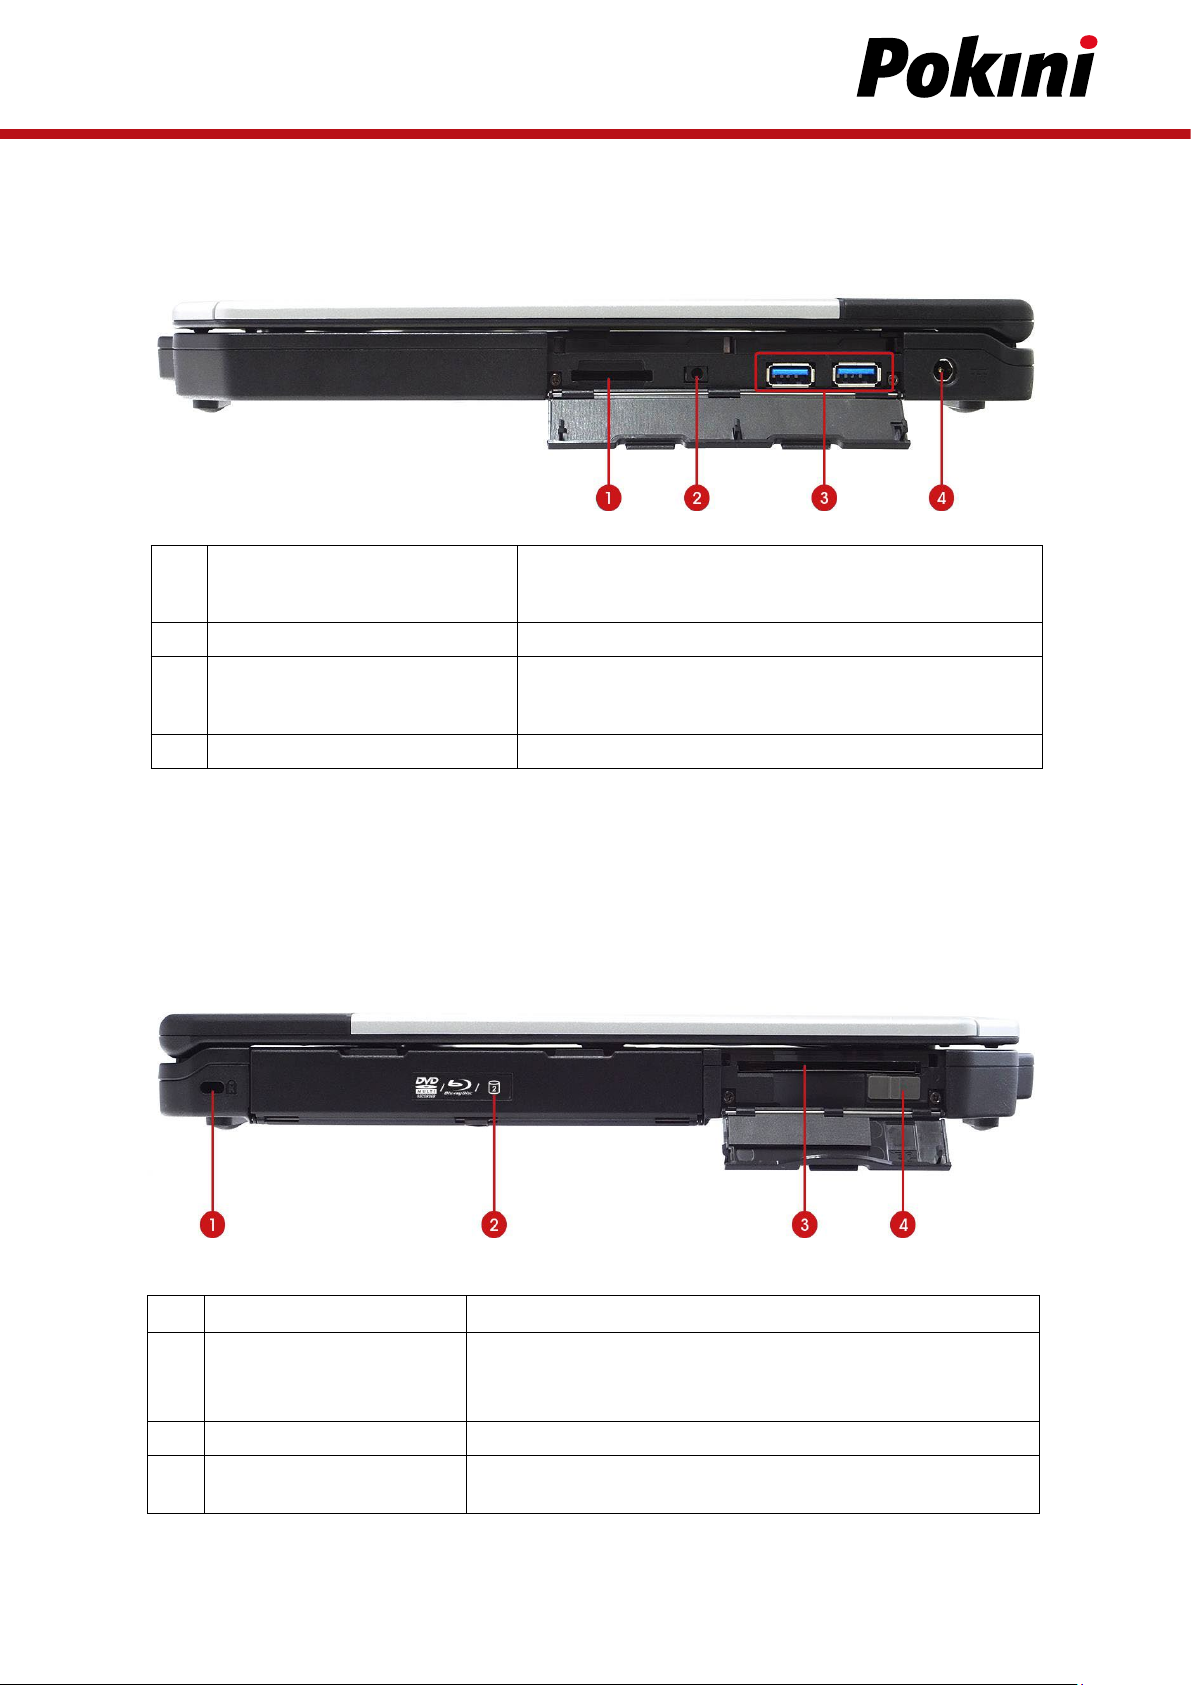
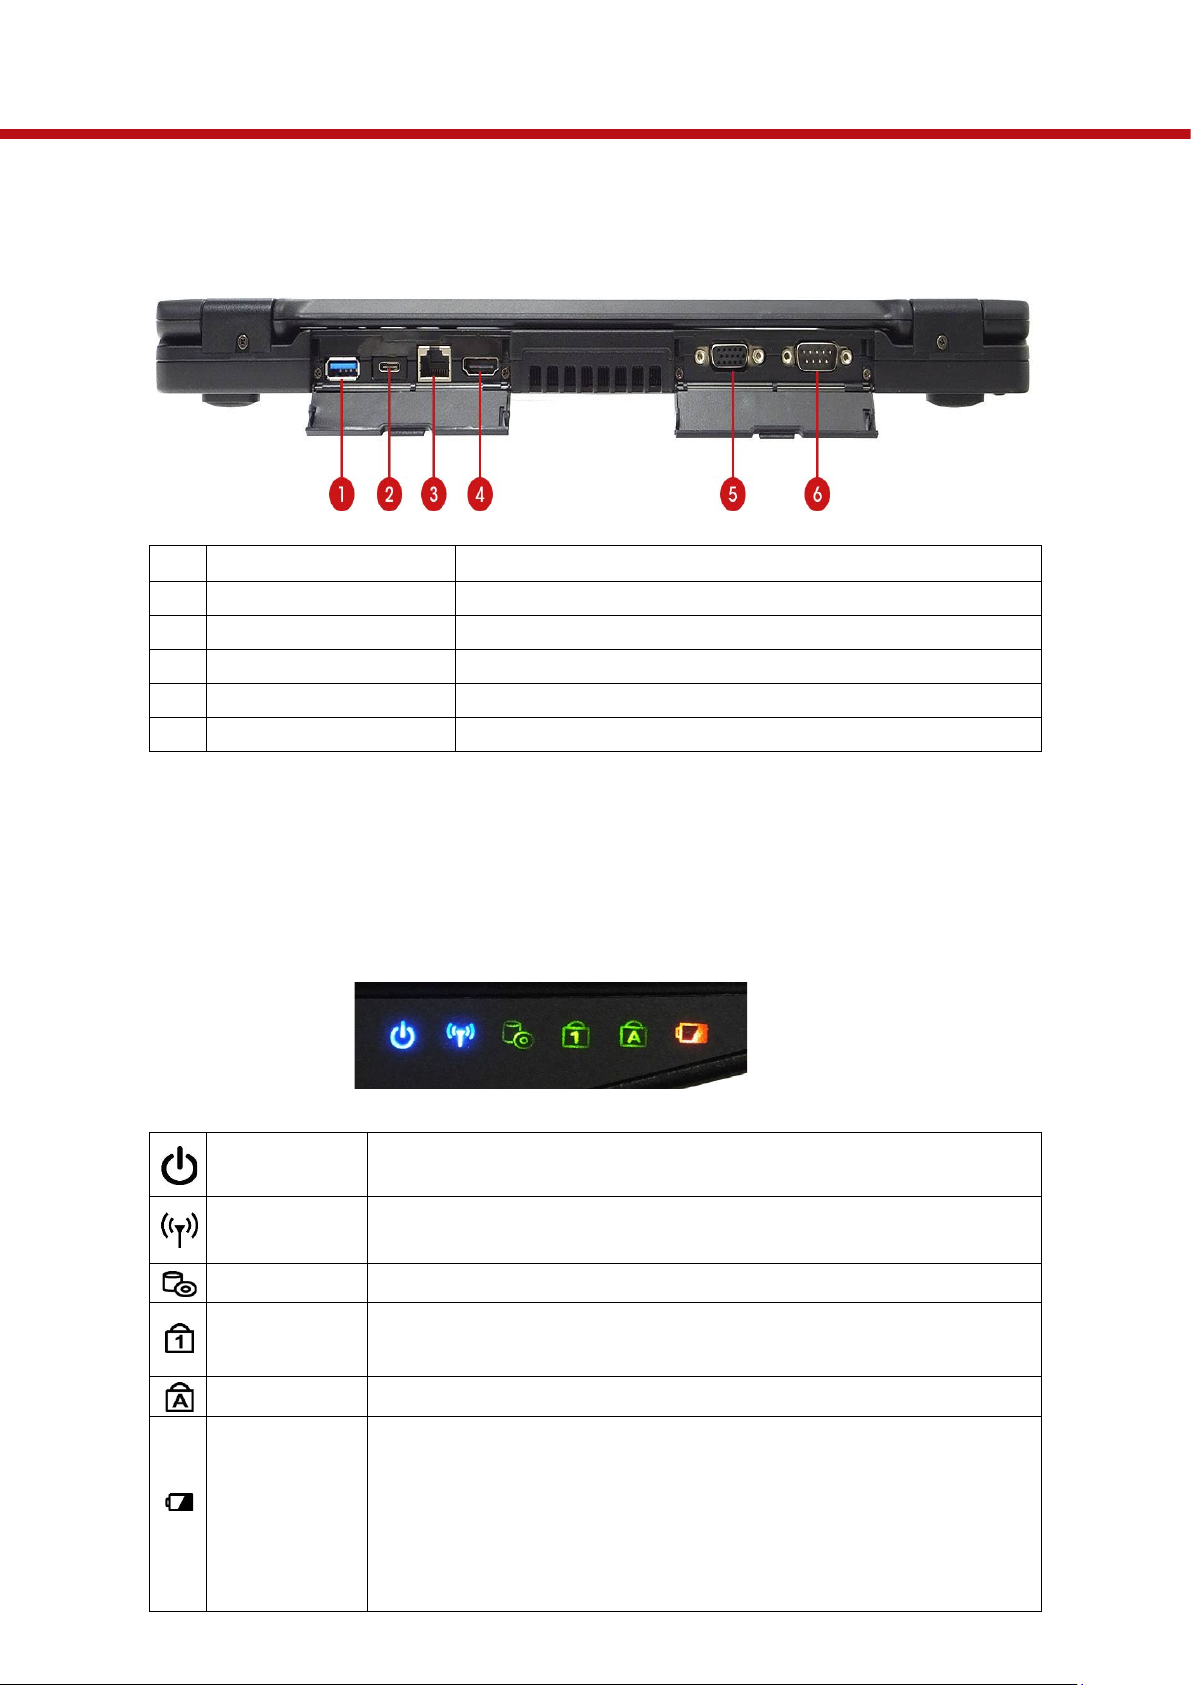
PRODUCT OVERVIEW ................................................................................................................................................................................................................
STATUS INDICATORS ..................................................................................................................................................................................................................
GETTING STARTED
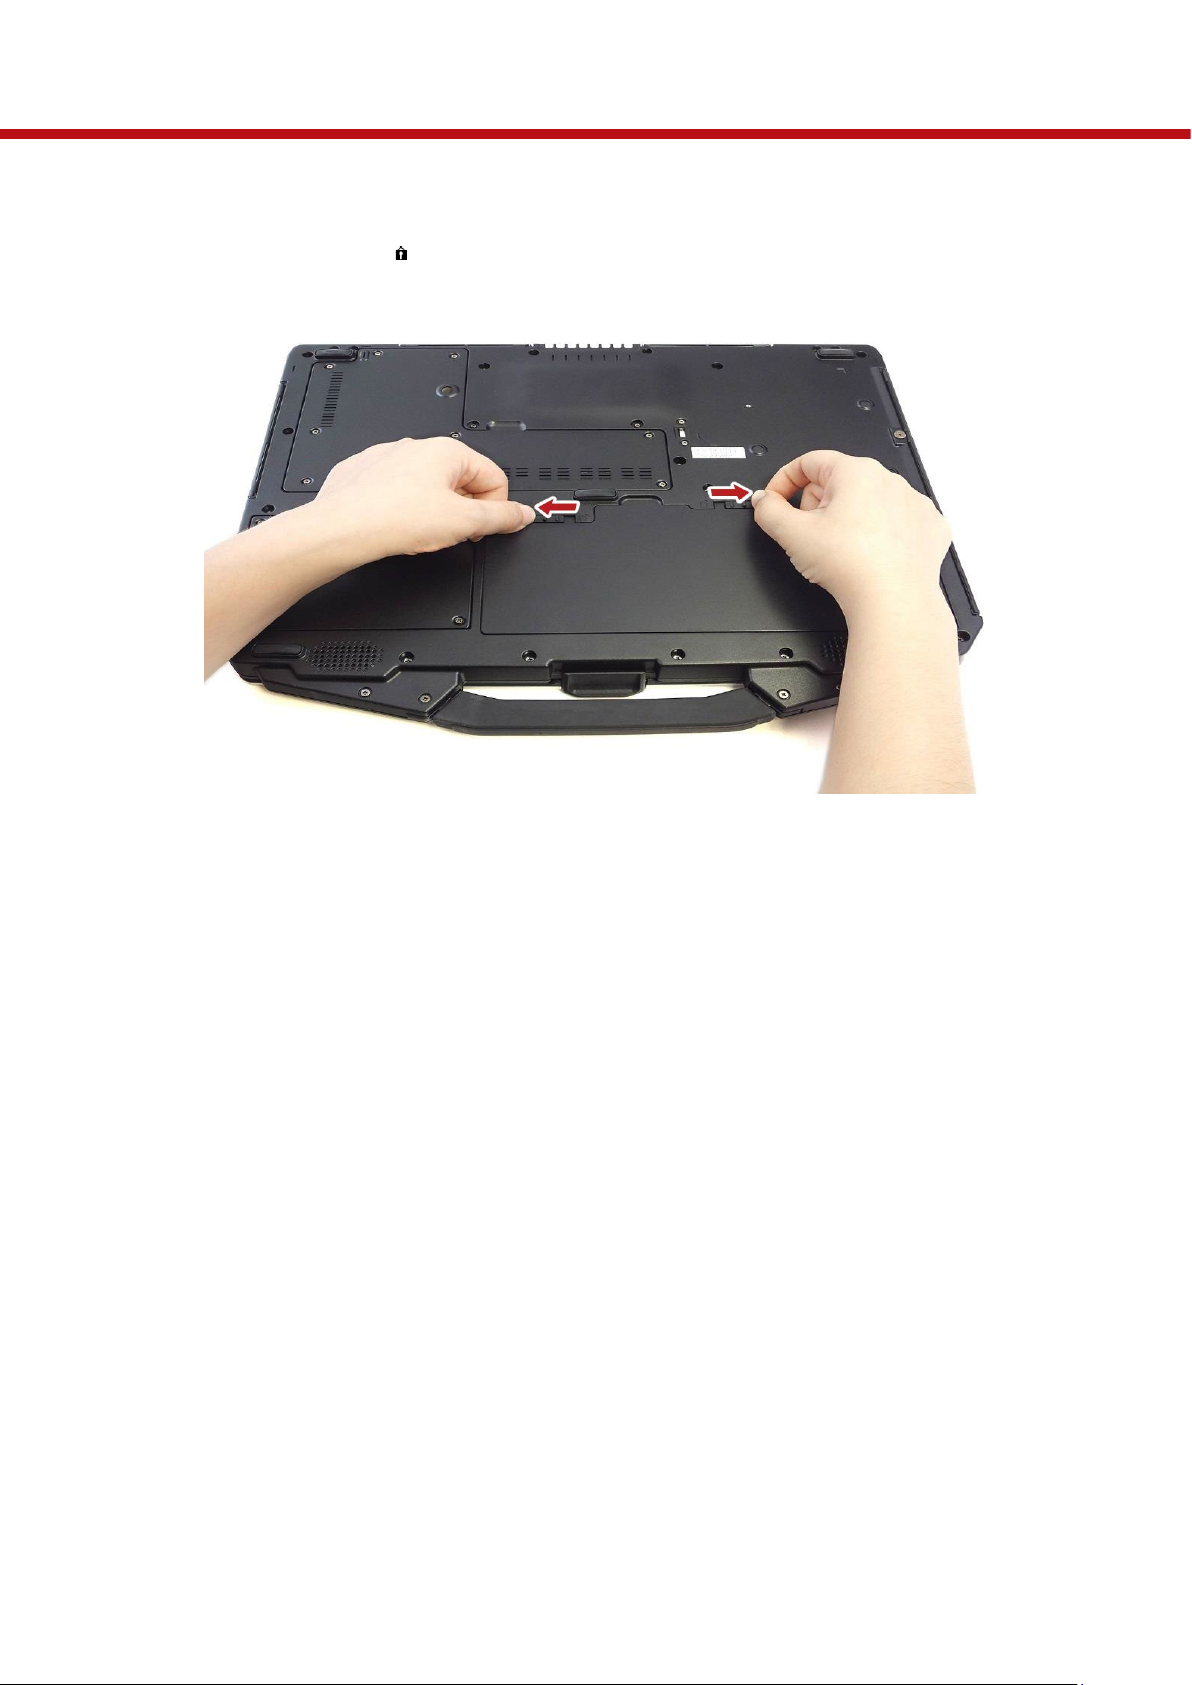
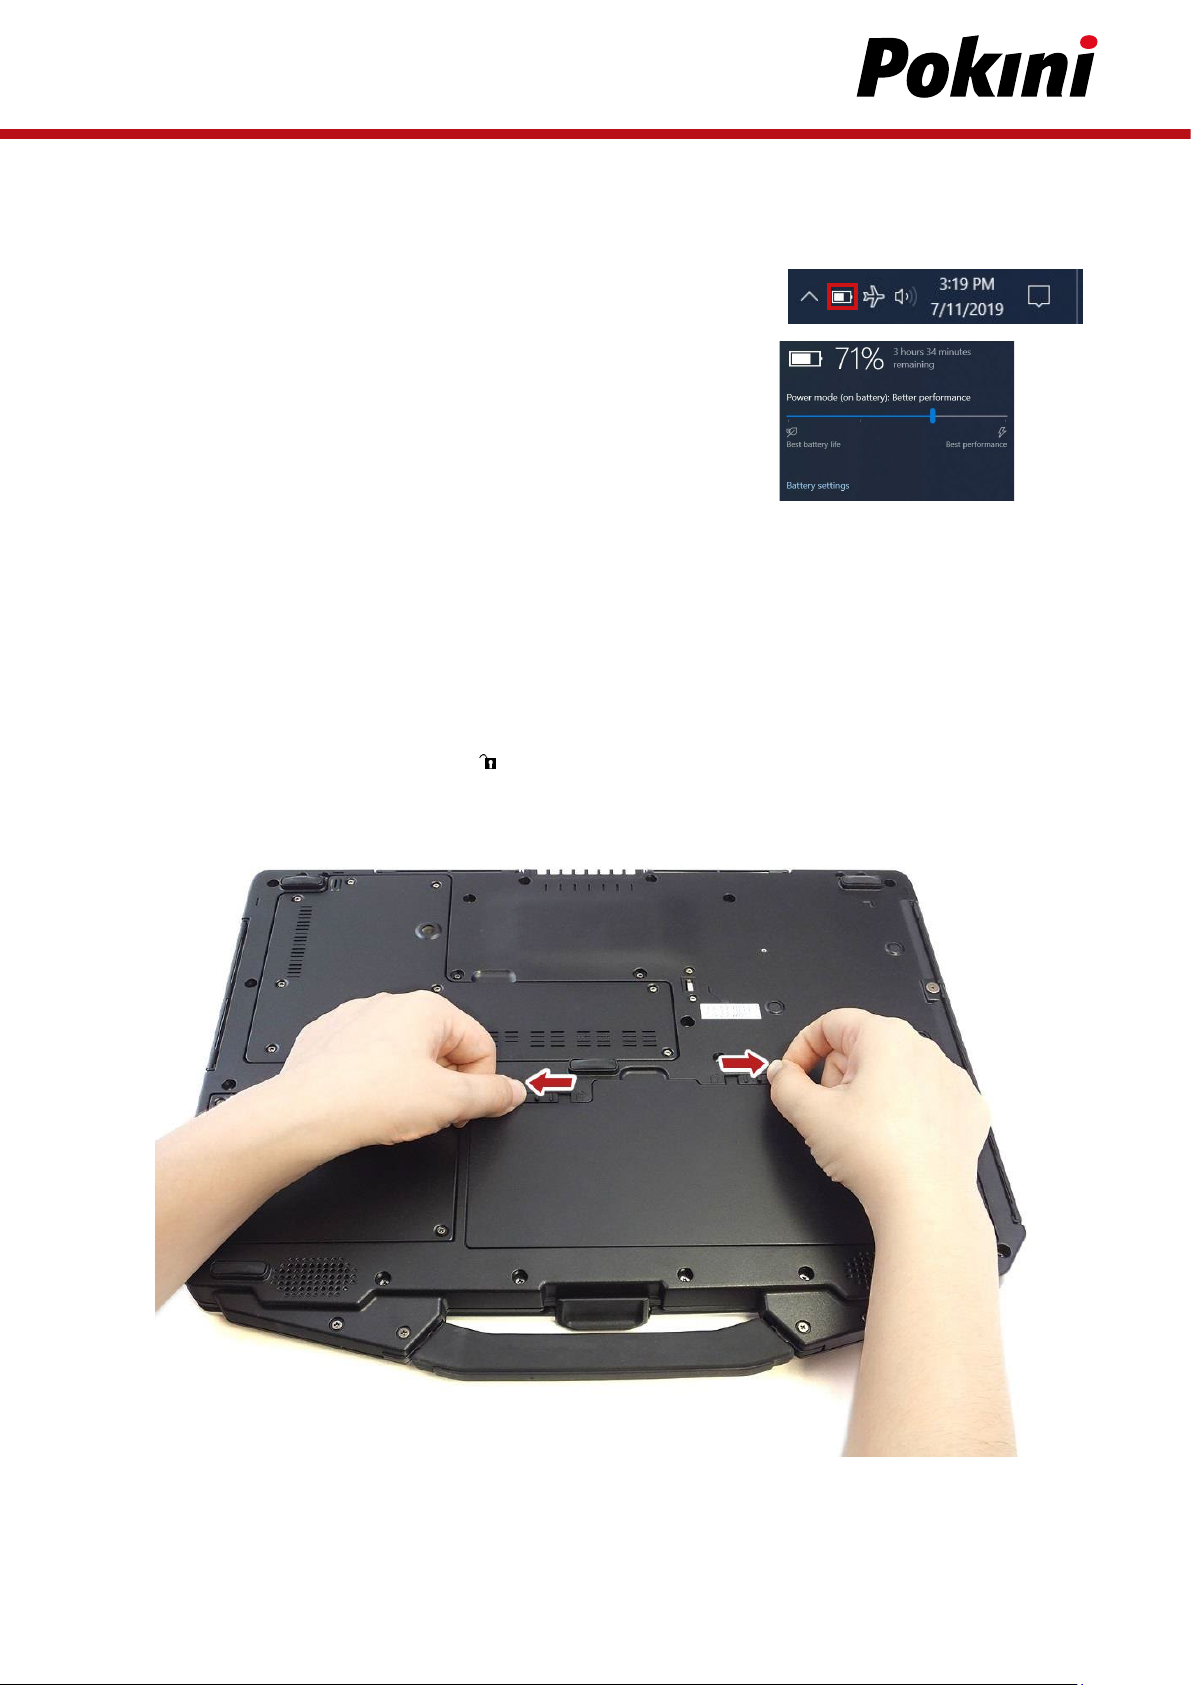
INSTALLING THE BATTERY ......................................................................................................................................................................................................
USING THE OPTICAL DISC DRIVE (ODD) ...........................................................................................................................................................................
USING THE STORAGE DRIVE .................................................................................................................................................................................................
CONNECTING THE POWER ......................................................................................................................................................................................................
STARTING YOUR NOTEBOOK ..................................................................................................................................................................................................
USING THE KEYBOARD ............................................................................................................................................................................................................
USING THE TOUCH PAD ............................................................................................................................................................................................................
OPERATING YOUR NOTEBOOK
USING THE CAMERA .................................................................................................................................................................................................................
MAKING CONNECTIONS
INSTALLING THE MEMORY CARD .........................................................................................................................................................................................
REMOVING THE MEMORY CARD ..........................................................................................................................................................................................
USING THE SIM CARD ...............................................................................................................................................................................................................
USING THE SMART CARD ........................................................................................................................................................................................................
CONNECTING THE MICROPHONE/HEADSET ...................................................................................................................................................................
CONNECTING USB DEVICES ...................................................................................................................................................................................................
CONNECTING TO EXTERNAL DISPLAYS ..............................................................................................................................................................................
CONNECTING TO A LOCAL AREA NETWORK (LAN) .......................................................................................................................................................
CONNECTING TO WIRELESS CONNECTIONS.....................................................................................................................................................................
USING THE BIOS SETUP UTILITY
BIOS SETUP MENU .....................................................................................................................................................................................................................
MAIN MENU...................................................................................................................................................................................................................................
ADVANCED MENU ......................................................................................................................................................................................................................
BOOT MENU .................................................................................................................................................................................................................................
SECURITY MENU .........................................................................................................................................................................................................................
SAVE & EXIT MENU ....................................................................................................................................................................................................................
MAINTAINING AND CARING FOR YOUR NOTEBOOK
PROTECTING YOUR NOTEBOOK ............................................................................................................................................................................................
STORING AND HANDLING YOUNOTEBOOK ......................................................................................................................................................................
CLEANING YOUR NOTEBOOK .................................................................................................................................................................................................
TRAVELRAVELING WITH YOUR NOTEBOOK ......................................................................................................................................................................
TROUBLESHOOTING
PRELIMINARY CHECKLIST .......................................................................................................................................................................................................
SOLVING COMMON PROBLEMS ..........................................................................................................................................................................................
DISPLAY PROBLEMS ..................................................................................................................................................................................................................
HARD DISK PRROBLEMS ..........................................................................................................................................................................................................
OTHER PROBLEMS .....................................................................................................................................................................................................................
APPENDIX
COPYRIGHT ...................................................................................................................................................................................................................................
SPECIFICATIONS ..........................................................................................................................................................................................................................
REGULATORY STATATEMENT....................................................................................................................................................................................................
SAFETY INSTRUCTIONS ............................................................................................................................................................................................................

3
ENGLISH
Before You Start
Congratulations on your purchase of this notebook .
This semi-rugged notebook is portable and provides users with maximum mobile computing experience in a wide range of
working environments. Before you begin using your notebook , read this chapter to familiarize yourself with the main
components installed in the system.
Package Contents
If any of the following items is damaged, please contact your retailer.
Notebook Power cord
DC 19V 65 W power adapter
Lithium Battery Pack
NOTE
• These pictures are for reference only Actual items may slightly differ.

4
Product Overview
Front View
1Microphones Record the surrounding sound.
2Web camera Use for video conference.
3Display screen Provide visual output.
4Power button Press to turn your notebook on or off.
5Keyboard Press the keys to input information.
6Touch Pad Use to point, select, drag, or scroll objects on the screen.
7Touch pad button Press to select objects or display a shortcut menu.
8Device Indicators (Power, Wireless,
HDD, Caps Lock, Num lock, Battery) Indicate the corresponding function status.

5
ENGLISH
Back View
1Battery latch Slide to the unlock position to release the battery.
2Battery compartment Install the battery.
3Speakers Emit sound.
4CTO door Remove the door to access the SIM card slot.

6
Right View
1Card reader
Use to insert memory cards to transfer pictures, music, and data
between your notebookand flash compatible devices. Thecard reader
supports SD (Secure Digital), SDXC, Mini-SD (with adapter).
2Earphone jack Connect headphones or external speakers.
3USB 3.1 (type A) ports(x2) Connect USB 3.1 (Gen.1) peripheral devices.
4DC-in jack Connect the power adapter.
Left View
1Kensington lock slot Connect to a Kensington-compatible notebook security lock.
2Media bay
Varies depending on SKU:
• Optical disk drive
• Secondary storage
3Smart card reader Use to insert smart cards.
4RF switch Slide it to the left to enable all wireless network (WLAN) and Bluetooth
communications.

7
ENGLISH
Rear View
1USB 3.1 (type A) port Connect USB 3.1 (Gen2) peripheral devices.
2USB 3.1 (type C) port Connect USB 3.1 (Gen2) peripheral devices.
3RJ 45 port Connect to a local area network (LAN) using an Ethernet cable.
4HDMI output port Connect an HDMI device such as an external HDMI LCD TV.
5VGA port Connect to a display device such as an external monitor or a projector.
6RS 232 port Connect a serial peripheral device.
Power The LED always lights on (blue) when the system is running. When the system is in stand-
by mode, the LED blinks. When the system is off or in hibernate mode, the light is off.
RF Indicate the status of RF (WLAN, Bluetooth, or WWAN/GPS) communication. The LED
always lights on (blue) when the function is enabled.
HDD A blinking HDD LED indicates HDD activity (data is being read or written).
Num Lock Lights on when Num Lock is activated.
Caps Lock Lights on when Caps Lock is activated.
Battery
Indicate the battery status:
• Green light means the battery is fully charged or the battery capacity higher than
95%.
• Orange light means the battery is being charged.
• Blinking orange light means the battery cannot be fully charged over 8 hours of
charging.
• Blinking red light means the battery power is low (less than 7%).
• When the light is off it means the battery is discharging.
Status Indicators
The status indicators light up when a particular function of the notebook is active. Each indicator is marked with a symbol .

8
Getting Started
This chapter will help you get started using the device.
CAUTION!
Before any internal installation procedures are carried out on the system, make sure the system is turned off and cooled down
for 5 minutes. Failing to turn off the system before opening it can cause permanent damage to the system and serious or fatal
inju ry to the user.
Installing the Battery
To install the battery, follow the steps below:
1. Align and insert the battery into the battery compartment.

9
ENGLISH
2. Push completely until the battery locks into place.
3. Slide the latch to the lock position ( ) to secure the battery.
Charging the Battery
The Lithium-ion battery is not fully-charged upon purchase.months of usage.
To charge the battery, follow the steps below:
1. Install the battery to your notebook. See procedures above.
2. Connect the AC adapter to the DC-in jack of your notebook.
3. Connect the AC adapter to the power cord.
4. Plug the power cord to an electrical outlet.
Charging Time
It takes approximately 3.5 hours to fully charge the battery.
NOTE
• The charging time may be longer if you are using your notebook while charging the battery.
CAUTION!
• DO NOT charge the battery if the temperature is below 0ºC or higher than 45ºC.
• Use only the supplied AC adapter. Using other AC adapters may damage the battery or your notebook.
ATTENTION!
• NE PAS charger la batterie si la température est inférieure à 0° C ou supérieures à 45º C.
• Utilisez uniquement l'adaptateur secteur fourni. L'utilisation d'autres adaptateurs secteur peut endommager la batterie ou
de votre tablette PC.

10
Checking the Battery Level
It is important that you monitor the battery status regularly to ensure you do not run out of power at a critical moment.
To check the remaining battery power, click the battery icon () on the system tray.
The battery screen appears, as shown on the right:
When to replace the Battery Pack
The battery performance gradually decreases over time and usage. We recommend you replace your battery pack 18 to 24
months after purchase.
Removing the Battery
To remove the battery, follow the steps below:
1. Slide the battery latch to the unlock position ( ).

11
ENGLISH
2. Remove the battery out of the battery compartment.

12
Using the Optical Disc Drive (ODD)
You can use the optical disk drive (ODD) to play or record DVD or CD disc.
Placing a Disk
To place a disk, follow the steps below:
1. Open the ODD cover.
2. Press the Eject button to eject the tray.
3. Place the disc on the tray.
4. Close the disc tray.
Manual Ejection
If the Eject button fails to work properly, insert a paper clip into the Pin Hole Eject to open the tray.
NOTE
• Be sure that the notebook is turned off before performing the manual ejection.

13
ENGLISH
Using the Storage Drive
Replacing the Storage Drive
To replace the storage drive, follow the steps below:
1. Remove the screws securing the HDD compartment door to the device.
2. Remove the HDD compartment door.

14
3. Use the pull tab to release the HDD module from the HDD compartment. DO NOT remove the HDD module yet!
4. Disconnect the HDD module from the mainboard connector.
5. Connect the HDD module to the mainboard connector (visible inside the HDD compartment).

15
ENGLISH
6. Lower the HDD module into its compartment.
7. Replace the HDD compartment cover.
8. Secure the HDD compartment cover to the device with the screws.

16
Connecting to Power
Your notebook can be powered up using the AC adapter or the Lithium-ion battery.
Connecting the AC Adapter
The AC adapter powers up your notebook and charges the battery.
1. Connect the AC adapter to the DC-in jack on your notebook.
2. Connect the AC adapter to the power cord.
3. Plug the power cord into an electrical outlet.
Using Battery Power
1. Install the charged battery in the battery compartment.
2. Remove the AC adapter (if plugged in). Your notebook will automatically use the battery power.
NOTE
• If you are using the notebook with the battery power for the first time, be sure that the battery is fully charged before you
operate the notebook.

17
ENGLISH
Configuring the Power Settings
1. Right-click the battery icon ( ) on the system tray. Then select Power Options.
2. Select Change plan settings to customize a power plan.
3. Change the desired sleep and display settings. Then select Save changes.

18
Starting Your Notebook
Turning On Your Device
1. To open the display panel, lift the cover lid up to upright position.
2. Press the button until the Power LED lights up.
Turning Off Your Device
It is important to properly shut down your notebook to avoid the loss of unsaved data. To shut down your notebook, do the
following:
Click > > Shut down.
Wait for your notebook to power off
completely before removing the power
source (if necessary).

19
ENGLISH
Using the Keyboard
NO. Keys Description
1Function keys These function keys are used to perform designated tasks. The tasks for each
key may vary from one application to another.
2
[Fn] Press the [Fn] key in combination with other keys to execute a command.
[Fn] + F1 Enables/Disables the Bluetooth function.
[Fn] + F2 Enables/Disables the 3G/GPS function.
[Fn] + F3 Enables/Disables the WLAN function.
[Fn] + F4 Switches to suspend mode (Suspend to RAM/HDD).
[Fn] + F5 Toggles between LCD, External display, or both.
[Fn] + F6 Decreases the brightness level.
[Fn] + F7 Increases the brightness level.
[Fn] + F8 Decreases the volume by one level.
[Fn] + F9 Increases the volume by one level.
[Fn] + F10 Turns on or mutes the volume.
[Fn] + F11 Toggles the touch pad to on/off.
[Fn] + F12 Toggles the keyboard backlight to on/off (only for backlit keyboard).
3Windows key Press to display the Start menu. This action is the same as clicking the Start
icon.
4Numeric keypad Press the Num Lk key to activate the numeric keypad. Press the keys on the
numeric keypad to enter numbers or operands as you would on a calculator.
5Application key Press to display an application shortcut menu. This action is the same as right
clicking a mouse button.

20
Using the Keyboard
The touch pad is a cursor-pointing device that provides all the features of a two-button mouse. Its primary function is to move
the cursor around the screen. You can also point, select, or drag items or objects on the screen.
Left button Right button
Main touchpad
Point
Slide your finger on the touch pad to point the cursor to an item or object on the screen.
Click
To left click, move the cursor to the item or object on the screen, then lightly tap the touch pad or press the left button.
To right click, move the cursor to the item or object on the screen, then press the right button.
Double-click
To double click, move the cursor to the item or object on the screen, then tap the touch pad twice or press the left button twice.
Scroll
To scroll through a page, press and hold the left button, then slide your finger on the touch pad to scroll.
Drag
To drag an item or object, press and hold the left button then slide your finger on the touch pad to move the item or object.
Table of contents
Other Pokini Laptop manuals