Polar Electro 520 CTH DB 2020 User manual

Instruction book
2020

Our dealers and service workshops do you nd
in:
www.polarvagnen.se
Your Polar
We would like to congratulate you on your new Polar!
Before starting to use the caravan you should read through this
instruction manual. The manual contains the information, tips
and advice you need in order to look after and make best use
of your Polar.
Like the car, the caravan is a vehicle that requires regular
servicing. You must therefore ask your dealer or workshop
approved by SoliferPolar AB to carry out the annual basic
and maintenance services.
We hope that you will get a great deal of pleasure and use
from your Polar for many years.
Good luck!
SoliferPolar AB, SE-917 82 Dorotea, Sweden. Tel. +46 (0)942-520 00
SoliferPolar AB reserves the right to make alterations to parts in the design. Minor deviations from the
information contained in the instruction manual can therefore occur in exceptional cases.
This instruction manual may not be duplicated or copied in whole or in part without SoliferPolar AB’s
permission. Legal action can be brought for breaches of copyright.
COPYRIGHT © SoliferPolar AB 2019

Contents
Contents
Tips and advice................................. 4
General .............................................. 5
Caravan information ............................................. 5
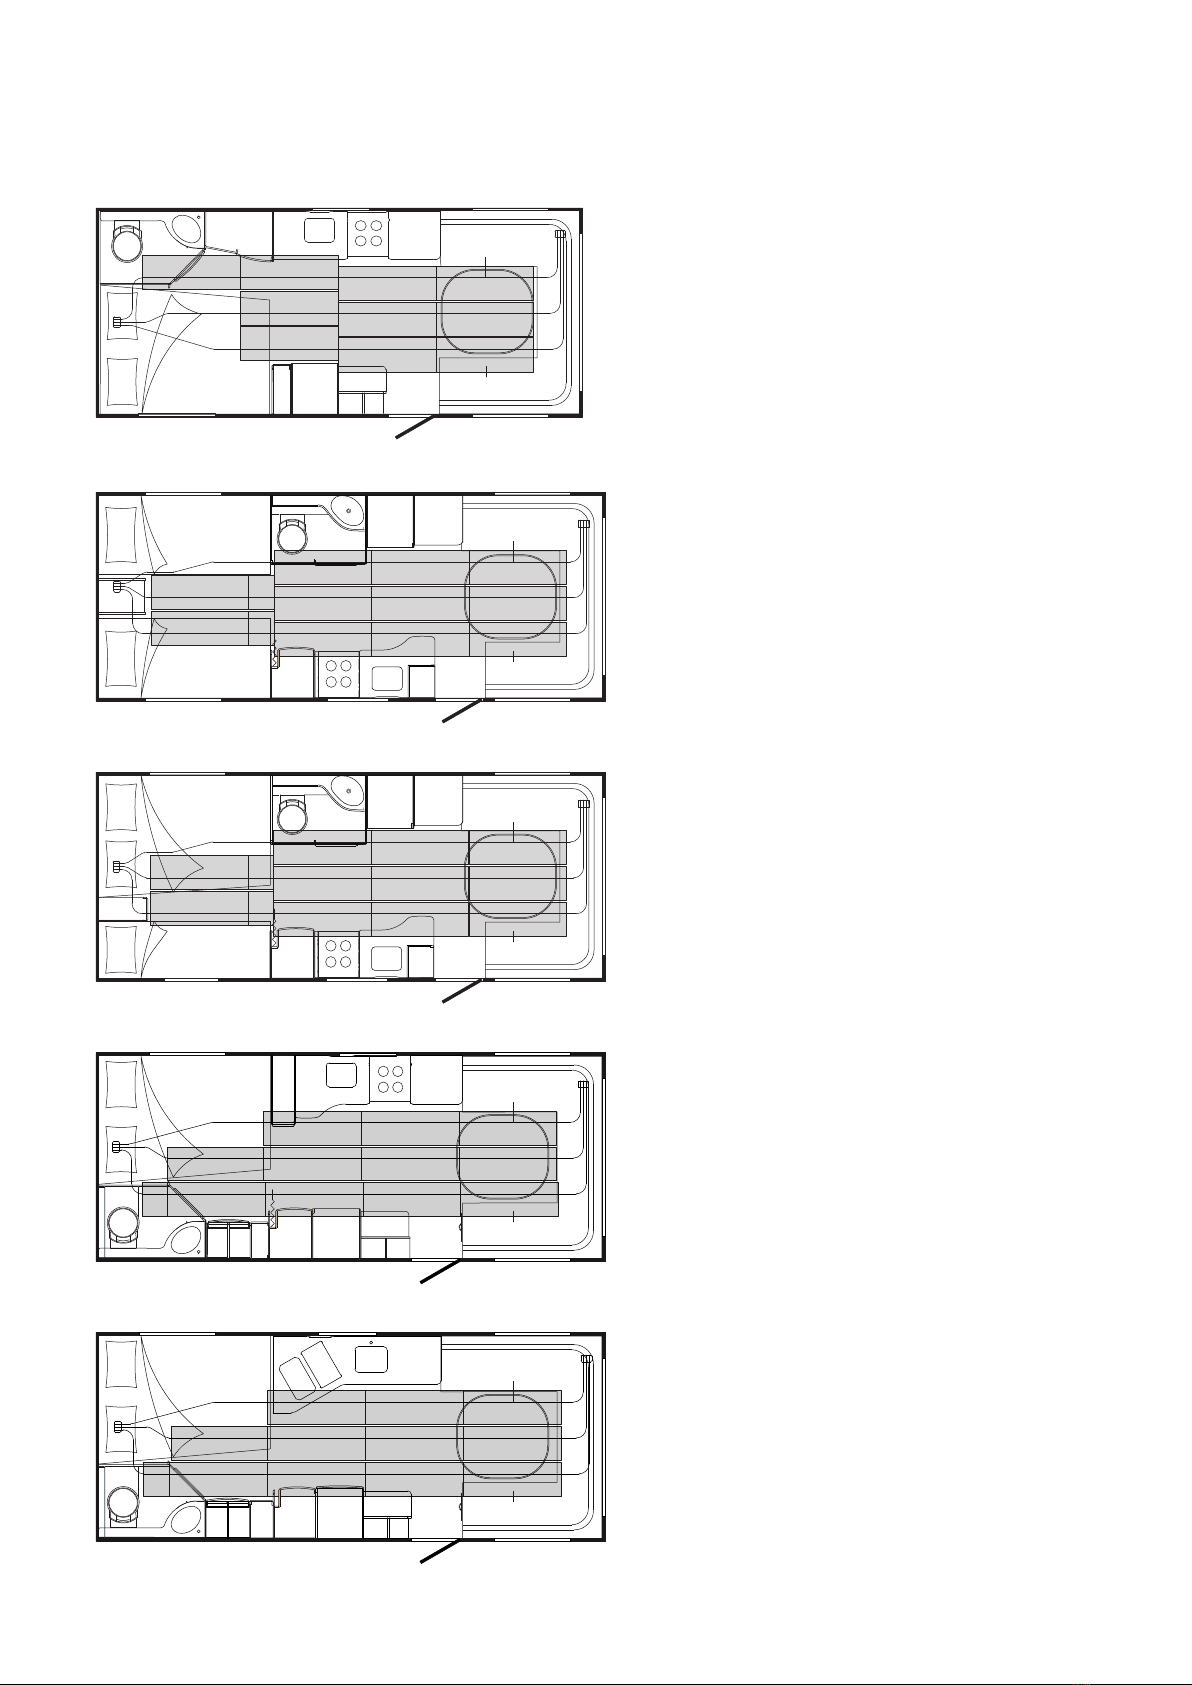
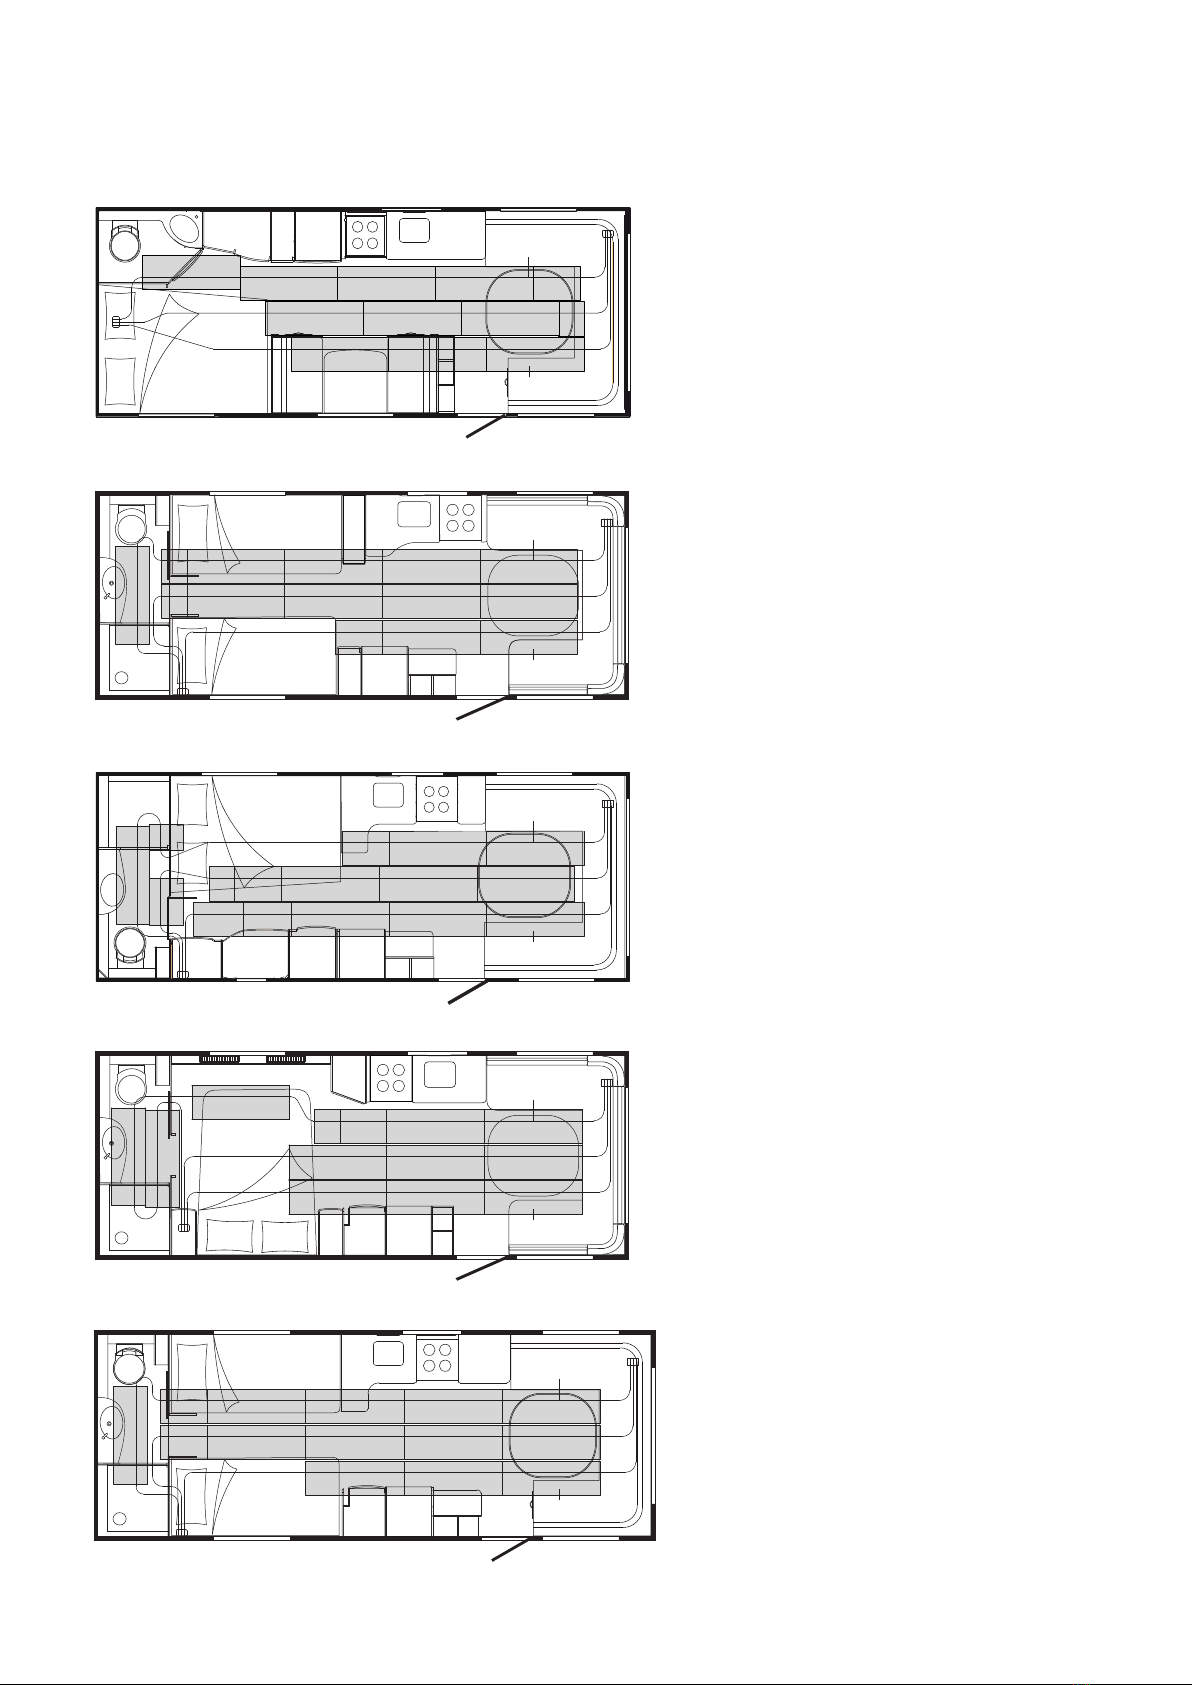
Dimensions ............................................................ 6
Loading the caravan ........................................... 14
Before driving ...................................................... 14
Safety coupling AKS 3004 .................................. 15
Coupling to the car.............................................. 15
Safety Indicators ................................................. 16
Overview safety coupling ................................... 16
When driving........................................................ 17
Pitching ................................................................ 17
Pitching for an extended period ........................ 18
Chassis............................................ 19
Stabiliser legs ...................................................... 19
Tyres ..................................................................... 19
In the event of a puncture................................... 19
Brakes .................................................................. 20
Maintenance and care......................................... 20
Mover.................................................................... 21
ATC ....................................................................... 21
Body................................................. 22
Door ...................................................................... 22
Windows............................................................... 22
Washing the caravan........................................... 23
Ventilation system............................................... 23
LPG box................................................................ 25
Cargo space front................................................ 25
Cargo space rear ................................................. 25
Spare wheel carrier ............................................. 25
Interior ............................................. 26
Cleaning ............................................................... 26
Converting the seating area into a bed ............. 27
Blacking out......................................................... 28
Roller blinds in roof hatches and skylights...... 29
Electrical system ............................ 30
Electrical system 230 V....................................... 30
Load guard........................................................... 31
Electrical system 12 V......................................... 31
Control panel 12 V............................................... 32
List of positions for wiring diagram 12 V.......... 33
Wiring diagram 12 V............................................ 34
Battery .................................................................. 35
Battery charger.................................................... 36
Battery booster.................................................... 36
Tent service output.............................................. 37
Kitchen fan........................................................... 37
Lighting ................................................................ 37
Facts and gures lighting................................... 38
Byte av lampor..................................................... 38
Connecting the cable TV .................................... 40
LPG system..................................... 41
What is LPG ......................................................... 41
LPG box................................................................ 41
Suspected LPG leak............................................ 41
Actions in the event of re ................................. 41
LPG bottles .......................................................... 41
Leak indicator ...................................................... 42
Shut-o valve....................................................... 42
LPG leak test........................................................ 42
Checking leak indicator ...................................... 42
Checking LPG system ........................................ 43
New/newly lled LPG bottles ............................. 43
Replacing LPG bottle .......................................... 43
Automatic LPG switch ........................................ 43
Gas outlet in LPG box / External gas outlet...... 43
Cooker and oven ............................ 44
Cooker .................................................................. 44
Lighting the cooker ............................................. 44
Cooker with oven and grill ................................. 45
Cooker 2-burner with induction hob ................. 45
Gas oven for induction hob................................ 45
Microwave oven................................................... 45
Heating system............................... 46
LPG boiler ............................................................ 46
Temperature sensor heating .............................. 46
Heating adjustment ............................................. 47
Winter connection function................................ 47
Underoor heating .............................................. 47
Underoor heating adjustment .......................... 47
Fan in washroom................................................. 48
Fan in the shower cabin ..................................... 48
Fan in entry wardrobe......................................... 48
Filling with uid ................................................... 48
Venting the heating system................................ 49
Refrigerator..................................... 50
Ventilation ............................................................ 50
Protective cover .................................................. 50
Water system .................................. 51
Filling with fresh water ....................................... 51
City water ............................................................. 52
Outside shower ................................................... 52
Emptying the fresh water ................................... 52
Cleaning the water tank ...................................... 53
Decalcication of the water system .................. 53
Drainage system............................. 54
Emptying the drainage system .......................... 55
Cleaning the drainage tank ................................ 55
Toilets .............................................. 56
Cassette toilet...................................................... 56
Combustion toilet................................................ 56
Notes................................................ 57
3

Tips and advice
Emptying the water and drainage tank
• Ifthecaravanistobeleftstandingforan extended
period,orifthetemperaturewhileitispitchedwillbe
below0°Candthecaravanistobeleftunheated,the
watersystemandthedrainagesystemmust be emptied.
Readmoreaboutthisinthesections”Emptying the
fresh water”page52and”Emptying the drainage
system”page55.
Connecting cable TV
• Incaravanswithtentserviceitispossibletoconnect
thecaravantocableTVviatheTVaerialinputin
thetentserviceoutput.Seethesection”Connecting
cable TV”onpage40.
Washing the caravan
• Neverusehigh-pressurewashorsolvents/degreasing
agentwhenwashing/cleaningthecaravan,asthiscan
damagethesealsaroundwindows,roofhatches,etc.,
withariskofleaksasaconsequence.Readmoreabout
washinginthesection”Washing”onpage23.
thereisariskofsnowpenetratingthroughtheroof
hatch’sventilation.You mustthereforeremember
toprotectthecaravan’sxturesandttingsandits
upholstery,particularlywhenthecaravanisdueto
bepitchedforanextendedperiod.
Cleaning water and drainage tank
• Afterthewateranddrainagesystemhasbeenused
foraperiodoftime,itmaybetimetocleanthewater
anddrainagetank.
Adecalcicationofthewatersystemshouldbemade
inconnectionwithcleaningofthewatersystem.
Readmore about this in the sections ”Cleaning
the water tank”onpage53, ”Decalcication of
the water system” onpage53and”Cleaning the
drainage tank”onpage55.
Condensation/misting in the caravan
• Condensationcanoccurifyoubringwetclothes,
dogs,etc.,intothecaravanundercertainweather
conditions.Ventilationandheatingareaneective
wayofcombatingcondensation ontheinsideof
thewindows.Readmoreaboutthisinthesection
”Windows, ventilation”onpage22.
Tips and advice
Pitching for an extended period
• Ifyouarenotgoingtousethecaravanforanextended
period,thereareanumberofstepsyoumusttakebefore
puttingthecaravanaway.Readmoreaboutthisinthe
section ”Pitching for an extended period”onpage18.
Before servicing the caravan.
• Tofacilitateservicingandmoisturetesting,remove
allcushionsandpersonalitemsfromthecaravan.
Snow on the roof
• Inorderfortheventilationinthecaravantowork,
itisimportantfortheventsandroofhatchestobe
freeofsnowandice.
• Itis important for the roof to beregularlycleared
ofsnowtoensurethattheweightontheroofisnot
excessive,causingtherooftobendinwards.Icecan
alsoform on the roof when thecaravanisheated
up,whichcanalsoresultinexcessiveweightonthe
roof.
• Snowcanberemovedfromtheroofwithaspadeor
broom.Whenusingaspade,takecaretoensurethat
youdonotdamagetheroof.Itisbestnottoclearthe
snowallthewaydowntotheroofpanel.
• Nevertrytoknockiceawaywithaspadeorbroom.
Thiscancausedentsinthepanels.
• Inunfavourableweatherconditionsinthewinter,
Astheowneranduserofthecaravan,therearemanythingsyouneedtothinkabout.Belowisashortcompilation
ofthemostcommonquestionspeoplemayhavebeforeusingthecaravan.
Winter connection function (Mountain
connection)
• Ifyouwanttoleavethecaravanforawhile,andwant
somebodyelsetostartuptheheatingbyconnecting
thecaravanto230V,thebuilt-in”winterconnection
function”canbeused.Readmoreaboutthisinthe
section ”Winter connection function”onpage47.
Loading the caravan
• Toachieve the optimum driving properties, it is
importanttodistributetheloadevenlyinthecaravan.
Readmoreaboutthisinthesection”Loading the
caravan”onpage14.
Ventilation system
• Freshairintakesandventsmaynotbeblockedunder
anycircumstances.
• Donotperformanymodicationsoractionsinthe
ventilationsystem.
• Whenyouhavepitchedthecaravan,makesurethat
thefreshairintakesarecompletelyfreeofsnowand
anythingelsethatcouldobstructcirculation.When
thecaravanisused,dirtanddustcollectintheven-
tilationopenings.Thesemustthereforebecleaned
atleastonceayearinorderfortheventilationto
functionproperly.
Readmoreabouttheventilationsysteminthesection
”Ventilation system”onpage23.
LPG system
• TheLPGbottlemustbeswitchedobeforedriving
withthecaravan. Youarenotallowedtodrivewith
theLPGapparatuslit.
• TesttheLPGsystemwiththeleakindicatoreverytime
itistobeusedandwheneveryouchangethebottle.Any
faultsmustberectiedbyanexpert.Readmoreaboutthe
LPGsysteminthesection”LPG system”onpage41.
Handling the box lid holder
• TheLPGboxisequippedwithaholderforthebox
lid.Itisimportanttousethisholderintherightway.
Readmoreaboutthisholderinthesection”LPG
box”onpage25.
4

General
∆
Important !!
WhenmanycampinggroundsmayrequireacerticateofthecaravanLPGsystempressuretest,youshouldensure
thatthecaravanhasavalidtestpressurisationcerticatefromanauthorisedworkshop.
Thefollowingdocumentsmustbesuppliedwiththecaravan:
• Testpressurisationcerticate.
• Correctinstructionmanual.
Owner:
Name..............................................................................
Address ..........................................................................
Telephone.......................................................................
Therearecertainthingsthatyouhavetoconsiderwhendrivingwithandusingthecaravan.Read
throughthisinstructionmanualbeforestartingtousethecaravan.Itisparticularlyimportantto
readthesewarningboxes,whichcontainwarningsandinstructionsthathavetobetakeninto
considerationwhenusingthecaravan.
Theyellowwarninglabelsoutsideandinsidethecaravanalsohavetobetakenintoconsideration
whenusingthecaravan.
Caravan information
Rememberthatanyadditionalequipmentthatisinstalledreducesthemaximumloadinsidethecaravan.
Allinstallationofadditionalequipmentontheexteriorofthecaravanmustbecarriedoutbyanauthorised
workshopinorderforthewatertightnessguaranteetoremainvalid.
General
Inallcorrespondencewiththedealer,itisimportantto
specifythefollowingdetails:
• Model
• Modelyear
• Chassisnumber
• Registrationnumber
Thisinformationcanbefoundontheregistrationor
warrantycerticate.
IfyousellyourPolarcaravantoanewowner,this
manualmustaccompanythecaravan.
∆
∆
Polarmodel:
Modelyear:
Chassisnumber:
Registrationnumber:
Keynumber:
5

General
Dimensions
Length with drawbar 711 cm
Length (incl. gas box and light holder) 568 cm
Internal length 507 cm
Width 254 cm
Internal width 236 cm
Height 265 cm
Internal height 195 cm
Living space 12,05 m2
A-dimension, tent 960 cm
Length with drawbar 767 cm
Length (incl. gas box and light holder) 624 cm
Internal length 563 cm
Width 254 cm
Internal width 236 cm
Height 265 cm
Internal height 195 cm
Living space 13,40 m2
A-dimension, tent 1015 cm
Polar 520 CTH DB
Polar 560 LB
Panels, underoor
heating
Hose, underoor
heating
Panels, underoor
heating
Hose, underoor
heating
Length with drawbar 711 cm
Length (incl. gas box and light holder) 568 cm
Internal length 507 cm
Width 254 cm
Internal width 236 cm
Height 265 cm
Internal height 195 cm
Living space 12,05 m2
A-dimension, tent 960 cm
Panels, underoor
heating
Hose, underoor
heating
Polar 520 CTV DB
Length with drawbar 767 cm
Length (incl. gas box and light holder) 624 cm
Internal length 563 cm
Width 254 cm
Internal width 236 cm
Height 265 cm
Internal height 195 cm
Living space 13,40 m2
A-dimension, tent 1015 cm
Panels, underoor
heating
Hose, underoor
heating
Length with drawbar 767 cm
Length (incl. gas box and light holder) 624 cm
Internal length 563 cm
Width 254 cm
Internal width 236 cm
Height 265 cm
Internal height 195 cm
Living space 13,40 m2
A-dimension, tent 1015 cm
Polar 560 CTH DB
Panels, underoor
heating
Hose, underoor
heating
Polar 560 CTH VK
6

General
Length with drawbar 767 cm
Length (incl. gas box and light holder) 624 cm
Internal length 563 cm
Width 254 cm
Internal width 236 cm
Height 265 cm
Internal height 195 cm
Living space 13,40 m2
A-dimension, tent 1015 cm
Length with drawbar 795 cm
Length (incl. gas box and light holder) 652 cm
Internal length 591 cm
Width 254 cm
Internal width 236 cm
Height 265 cm
Internal height 195 cm
Living space 14,05 m2
A-dimension, tent 1045 cm
Length with drawbar 795 cm
Length (incl. gas box and light holder) 652 cm
Internal length 591 cm
Width 254 cm
Internal width 236 cm
Height 265 cm
Internal height 195 cm
Living space 14,05 m2
A-dimension, tent 1045 cm
Polar 590 LB
Length with drawbar 795 cm
Length (incl. gas box and light holder) 652 cm
Internal length 591 cm
Width 254 cm
Internal width 236 cm
Height 265 cm
Internal height 195 cm
Living space 14,05 m2
A-dimension, tent 1045 cm
Panels, underoor
heating
Hose, underoor
heating
Panels, underoor
heating
Hose, underoor
heating
Polar 590 BK
Panels, underoor
heating
Hose, underoor
heating
Panels, underoor
heating
Hose, underoor
heating
Polar 560 CTV DB
Length with drawbar 795 cm
Length (incl. gas box and light holder) 652 cm
Internal length 591 cm
Width 254 cm
Internal width 236 cm
Height 265 cm
Internal height 195 cm
Living space 14,05 m2
A-dimension, tent 1045 cm
Polar 590 CTH DB
Panels, underoor
heating
Hose, underoor
heating
Polar 590 CTH VK
7

General
Length with drawbar 795 cm
Length (incl. gas box and light holder) 652 cm
Internal length 591 cm
Width 254 cm
Internal width 236 cm
Height 265 cm
Internal height 195 cm
Living space 14,05 m2
A-dimension, tent 1045 cm
Length with drawbar 795 cm
Length (incl. gas box and light holder) 652 cm
Internal length 591 cm
Width 254 cm
Internal width 236 cm
Height 265 cm
Internal height 195 cm
Living space 14,05 m2
A-dimension, tent 1045 cm
Length with drawbar 824 cm
Length (incl. gas box and light holder) 680 cm
Internal length 619 cm
Width 254 cm
Internal width 236 cm
Height 265 cm
Internal height 195 cm
Living space 14,72 m2
A-dimension, tent 1075 cm
Length with drawbar 824 cm
Length (incl. gas box and light holder) 680 cm
Internal length 619 cm
Width 254 cm
Internal width 236 cm
Height 265 cm
Internal height 195 cm
Living space 14,72 m2
A-dimension, tent 1075 cm
Polar 620 BK
Polar 620 LB
Panels,underoor
heating
Hose,underoor
heating
Panels,underoor
heating
Hose,underoor
heating
Panels,underoor
heating
Hose,underoor
heating
Polar 590 TR LB
Polar 590 TR DB
Panels,underoor
heating
Hose,underoor
heating
Length with drawbar 795 cm
Length (incl. gas box and light holder) 652 cm
Internal length 591 cm
Width 254 cm
Internal width 236 cm
Height 265 cm
Internal height 195 cm
Living space 14,05 m2
A-dimension, tent 1045 cm
Polar 590 CTV
Panels,underoor
heating
Hose,underoor
heating
8

General
Length with drawbar 824 cm
Length (incl. gas box and light holder) 680 cm
Internal length 619 cm
Width 254 cm
Internal width 236 cm
Height 265 cm
Internal height 195 cm
Living space 14,72 m2
A-dimension, tent 1075 cm
Length with drawbar 824 cm
Length (incl. gas box and light holder) 680 cm
Internal length 619 cm
Width 254 cm
Internal width 236 cm
Height 265 cm
Internal height 195 cm
Living space 14,72 m2
A-dimension, tent 1075 cm
Length with drawbar 824 cm
Length (incl. gas box and light holder) 680 cm
Internal length 619 cm
Width 254 cm
Internal width 236 cm
Height 265 cm
Internal height 195 cm
Living space 14,72 m2
A-dimension, tent 1075 cm
Polar 620 TR LB
Polar 620 TR DB
Polar 620 TR TDS
Panels, underoor
heating
Hose, underoor
heating
Panels, underoor
heating
Hose, underoor
heating
Panels, underoor
heating
Hose, underoor
heating
Length with drawbar 824 cm
Length (incl. gas box and light holder) 680 cm
Internal length 619 cm
Width 254 cm
Internal width 236 cm
Height 265 cm
Internal height 195 cm
Living space 14,72 m2
A-dimension, tent 1075 cm
Panels, underoor
heating
Hose, underoor
heating
Polar 620 CTVX
Length with drawbar 851 cm
Length (incl. gas box and light holder) 708 cm
Internal length 647 cm
Width 254 cm
Internal width 236 cm
Height 265 cm
Internal height 195 cm
Living space 15,38 m2
A-dimension, tent 1105 cm
Polar 650 TR LB
Panels, underoor
heating
Hose, underoor
heating
9

General
Panels, underoor
heating
Hose, underoor
heating
Polar 650 TDS BK
Length with drawbar 851 cm
Length (incl. gas box and light holder) 708 cm
Internal length 647 cm
Width 254 cm
Internal width 236 cm
Height 265 cm
Internal height 195 cm
Living space 15,38 m2
A-dimension, tent 1105 cm
Length with drawbar 851 cm
Length (incl. gas box and light holder) 708 cm
Internal length 647 cm
Width 254 cm
Internal width 236 cm
Height 265 cm
Internal height 195 cm
Living space 15,38 m2
A-dimension, tent 1105 cm
Polar 650 TR TDS
Polar 650 TR DB
Panels, underoor
heating
Hose, underoor
heating
Panels, underoor
heating
Hose, underoor
heating
Length with drawbar 851 cm
Length (incl. gas box and light holder) 708 cm
Internal length 647 cm
Width 254 cm
Internal width 236 cm
Height 265 cm
Internal height 195 cm
Living space 15,38 m2
A-dimension, tent 1105 cm
Length with drawbar 851 cm
Length (incl. gas box and light holder) 708 cm
Internal length 647 cm
Width 254 cm
Internal width 236 cm
Height 265 cm
Internal height 195 cm
Living space 15,38 m2
A-dimension, tent 1105 cm
Polar 650 TR LB VK
Panels, underoor
heating
Hose, underoor
heating
Length with drawbar 851 cm
Length (incl. gas box and light holder) 708 cm
Internal length 647 cm
Width 254 cm
Internal width 236 cm
Height 265 cm
Internal height 195 cm
Living space 15,38 m2
A-dimension, tent 1105 cm
Polar 650 TR TDS VK
Panels, underoor
heating
Hose, underoor
heating
10

General
Length with drawbar 871 cm
Length (incl. gas box and light holder) 736 cm
Internal length 675 cm
Width 254 cm
Internal width 236 cm
Height 265 cm
Internal height 195 cm
Living space 16,05 m2
A-dimension, tent 1130 cm
Polar 680 TR LB
Panels,underoor
heating
Hose,underoor
heating
Length with drawbar 871 cm
Length (incl. gas box and light holder) 736 cm
Internal length 675 cm
Width 254 cm
Internal width 236 cm
Height 265 cm
Internal height 195 cm
Living space 16,05 m2
A-dimension, tent 1130 cm
Panels,underoor
heating
Hose,underoor
heating
Polar 680 CTVX
Length with drawbar 871 cm
Length (incl. gas box and light holder) 736 cm
Internal length 675 cm
Width 254 cm
Internal width 236 cm
Height 265 cm
Internal height 195 cm
Living space 16,05 m2
A-dimension, tent 1130 cm
Polar 680 TR TDS
Panels,underoor
heating
Hose,underoor
heating
Length with drawbar 871 cm
Length (incl. gas box and light holder) 736 cm
Internal length 675 cm
Width 254 cm
Internal width 236 cm
Height 265 cm
Internal height 195 cm
Living space 16,05 m2
A-dimension, tent 1130 cm
Polar 680 TR LB VK
Panels,underoor
heating
Hose,underoor
heating
Panels,underoor
heating
Hose,underoor
heating
Length with drawbar 871 cm
Length (incl. gas box and light holder) 736 cm
Internal length 675 cm
Width 254 cm
Internal width 236 cm
Height 265 cm
Internal height 195 cm
Living space 16,05 m2
A-dimension, tent 1130 cm
Polar 680 TR DB
11

General
Polar 730 TR DB VK
Length with drawbar 927 cm
Length (incl. gas box and light holder) 792 cm
Internal length 731 cm
Width 254 cm
Internal width 236 cm
Height 265 cm
Internal height 195 cm
Living space 17,37 m2
A-dimension, tent 1185 cm
Length with drawbar 927 cm
Length (incl. gas box and light holder) 792 cm
Internal length 731 cm
Width 254 cm
Internal width 236 cm
Height 265 cm
Internal height 195 cm
Living space 17,37 m2
A-dimension, tent 1185 cm
Polar 730 TR DB
Polar 730 TR LB
Panels,underoor
heating
Hose,underoor
heating
Panels,underoor
heating
Hose,underoor
heating
Length with drawbar 927 cm
Length (incl. gas box and light holder) 792 cm
Internal length 731 cm
Width 254 cm
Internal width 236 cm
Height 265 cm
Internal height 195 cm
Living space 17,37 m2
A-dimension, tent 1185 cm
Panels,underoor
heating
Hose,underoor
heating
Polar 730 TR LB VK
Length with drawbar 927 cm
Length (incl. gas box and light holder) 792 cm
Internal length 731 cm
Width 254 cm
Internal width 236 cm
Height 265 cm
Internal height 195 cm
Living space 17,37 m2
A-dimension, tent 1185 cm
Panels,underoor
heating
Hose,underoor
heating
Length with drawbar 871 cm
Length (incl. gas box and light holder) 736 cm
Internal length 675 cm
Width 254 cm
Internal width 236 cm
Height 265 cm
Internal height 195 cm
Living space 16,05 m2
A-dimension, tent 1130 cm
Polar 680 TR TDS VK
Panels,underoor
heating
Hose,underoor
heating
12

General
Length with drawbar 927 cm
Length (incl. gas box and light holder) 792 cm
Internal length 731 cm
Width 254 cm
Internal width 236 cm
Height 265 cm
Internal height 195 cm
Living space 17,37 m2
A-dimension, tent 1185 cm
Length with drawbar 927 cm
Length (incl. gas box and light holder) 792 cm
Internal length 731 cm
Width 254 cm
Internal width 236 cm
Height 265 cm
Internal height 195 cm
Living space 17,37 m2
A-dimension, tent 1185 cm
Polar 730 BR
Length with drawbar 927 cm
Length (incl. gas box and light holder) 792 cm
Internal length 731 cm
Width 254 cm
Internal width 236 cm
Height 265 cm
Internal height 195 cm
Living space 17,37 m2
A-dimension, tent 1185 cm
Panels,underoor
heating
Hose,underoor
heating
Polar 730 TR TDS
Panels,underoor
heating
Hose,underoor
heating
Panels,underoor
heating
Hose,underoor
heating
Polar 730 CTVX BK
Length with drawbar 1036 cm
Length (incl. gas box 904 cm
and light holder)
Internal length 843 cm
Width 254 cm
Internal width 236 cm
Height 265 cm
Internal height 195 cm
Living space 19,89 m2
A-dimension, tent 1295 cm
Polar 840 TRX LB
Panels,underoor
heating
Hose,underoor
heating
Length with drawbar 927 cm
Length (incl. gas box and light holder) 792 cm
Internal length 731 cm
Width 254 cm
Internal width 236 cm
Height 265 cm
Internal height 195 cm
Living space 17,37 m2
A-dimension, tent 1185 cm
Polar 730 TR TDS VK
Panels,underoor
heating
Hose,underoor
heating
13

General
Checkthatthetowhitchpressureiscorrect.
Initiallyfollowthecar’srecommendations
regardingthetowhitchpressure.
∆
WhenyouloadtheLPGbox,rememberthat
ifyouaredrivinginrain,watercanpenetrate
intothebox.Thisdoesnotharmthecaravan,
butitcanbeunsuitableforthecargo.
∆
Donotoverloadthecaravan.Beforeloading
thecaravan,checkitstotalandserviceweight.
Theseweightsarespeciedontheregistra-
tioncerticate.
∆
Loading the caravan
Whenloadingthecaravan,takeintoconsiderationthetotalweight
andserviceweightofthecaravan.Theweightoftheloadplus
theserviceweight(theweightoftheemptycaravanincluding
40litresofwater)maynotexceedthetotalweight.Thetotal
andserviceweightsarespeciedontheregistrationcerticate.
• Positiontheheaviercargointhemiddleofthecaravan,
abovethewheelaxle.Toomuchcargoinfrontofthe
axlesgeneratesanabnormalloadonthecar.Toomuch
cargobehindtheaxlesmakesthecaravantail-heavy.
• Distributethe cargoevenly in thecaravan.Load
moreorlessequallyontherightandleft,andmore
orlessequallyfrontandrear.
• DonotoverloadtheLPGbox,asthiscangenerate
excessivetowhitchpressure.Thetowhitchpressure
isthepressurerestingonthecar’stowhitch.
Ifthetwohitchpressureistoolow,thecaravanwillbecome
unstable,resultinginimpaireddrivingcharacteristics.Ifthetow
hitchpressureistoohigh,thesteeringofthecarcanbecome
uncertain.Thetowhitchpressuredecreasesathigherspeeds.
Therecommendedtowhitchpressureis75-95kg,
unlessotherwiseindicatedinthecar’sinstructions.
TheLPGbottlemustbeswitchedobefore
drivingwiththecaravan.Youarenotallowed
todrivewiththeLPGapparatuslit.
∆
Before driving
Perform the following inside the caravan
• SwitchoallLPGapparatus.Youarenotallowed
todrivewiththeLPGlit.TheLPGbottlemustalso
beswitchedobeforedrivingwiththecaravan.
• Putawayalllooseitemsfromtables,kitchenetteand
shelves.
• Securetherefrigeratordoorusingthetransitsafetycatch.
• Securethefoldingdoor,thebedbottomandtheupper
bedcupboardusingthetransitsafetycatch.
• Closecupboarddoorsanddrawers.
• Closethewindowsandroofhatches.
• Checkthattheventilationshutterinthetoiletisclosed.
• TakedownandlocktheTVaerialinplace.
• Turnoalllamps.
• Putthepillartableandthewalltableinthebedposition
(see ”Converting the seating area into a bed”onpage27).
Polar 840 BR
Length with drawbar 1036 cm
Length (incl. gas box 904 cm
and light holder)
Internal length 843 cm
Width 254 cm
Internal width 236 cm
Height 265 cm
Internal height 195 cm
Living space 19,89 m2
A-dimension, tent 1295 cm
Panels,underoor
heating
Hose,underoor
heating
Length with drawbar 1036 cm
Length (incl. gas box 904 cm
and light holder)
Internal length 843 cm
Width 254 cm
Internal width 236 cm
Height 265 cm
Internal height 195 cm
Living space 19,89 m2
A-dimension, tent 1295 cm
Polar 840 TRX TDS
Panels,underoor
heating
Hose,underoor
heating
14

General
Thecaravansareequippedwithasafetycoupling.The
couplingisequippedwithfrictionlinings,whichmeans
thatthecaravanismorestablewithlessriskoflateral
movementswhen travelling.Thelinings are easy to
replace.Toprotectthecaravanagainsttheft,ananti-theft
lockthattsthecouplingcanbepurchased.
Itisimportantthatthetowingballonthecarisfreeof
grease,cleanandnotpainted.Greaseontheballreduces
thefrictionandconsequentlyimpairsfunction.Dirtand
paintclingtotheliningsandcanresultinnoise.
Thecouplinghavecouplinghandleandastabilization
lever(seepicturebelow).
Position1=Couplinghandleopen
Position2=Stabilizationlever open,stabiliserdiscon-
nected
Position3=Stabilizationleverclosed,stabiliseractivated
Safety coupling AKS 3004
1
2
3
Perform the following outside the caravan
• Bringinalloutdooritems,tentpins,chairs,etc.
• Unplugthe230Velectricalcablefromtheparking
placemainsoutput,aswellastheconnectorinthe
caravan’sinput,andplaceitintheLPGbox.
• Checkthatallexternalhatchesandlidsarelocked.
• Cleanaroundthecaravan.
• Bringinthefootstool.(notincludedinthecaravans).
• Locktheouterdoor.
• Windupthestabiliserlegs.
• SwitchotheLPGbottle.Youarenotallowedto
drivewiththeLPGapparatuslit.
• Ifyouaregoingtodriveinthewinterandyourcar
hasstuddedtyres,yourcaravanmustalsobetted
withstuddedtyres.
NOTE! Don’tforgettotakeinthefootstool.
Coupling to the car
1. Windupallthestabiliserlegsonthecaravan.
2. Reversethecartowardsthesafetycouplingonthe
drawbar. Pull the stabilizationhandleupwards to
position2(seepicturesabove)andliftthecoupling
handleonthesafetycoupling.
3. Disengagetheparkingbrake.Takecareifthecaravan
isonaslope.
Crank
Stabiliser legs
Cable for
safety
brake
Coupling
handle
Stabiliza-
tion lever
Electrical
connector
6. Checkthatthesafetycouplingisrmlyattachedto
thetowingball.Thesafety couplingisconnected
correctlywhenthegreenmarkonthesafetyindicator
(seepicture”Safety Indicators”page16)isvisible.
7. Connectthecableforthesafetybrakeintotheintended
placeonthecar’stowhitch,notroundtheneckoftheball.
8. Connecttheelectricalconnectortothecar.
4. Gripthecouplinghandleonthesafetycouplingand
liftthedrawbarbywindingdownthesupportwheel
(thedrawbarmaynotbeliftedusingthehandle).Then
lowerthesafetycouplingoverthecar’stowingball
bywindingupthesupportwheel.Thesafetycoupling
snapsinautomaticallyatsucientpressure.
5. Pressthestabilizationleverdowntoposition3(see
picturestotheleft).
15

General
Overview safety coupling
Forchecking purposes, the safety coupling
mustbecoupledandthestabiliserhandlemust
bepusheddownuntilresistancecanbefelt
∆
Coupling/
ball wear
indicator
Connec-
tion indica-
tor Soft Dock
1 2 3
Stabiliser
handle
Safety Indicators
Thesafetycouplingisequippedwithsafetyindicators
forcorrectcouplingoftheballandthefrictionlinings/
ballwear(seepicturesbelow).
Pict.1=Connection indicator - Green marking is
visible:
• Thecaravaniscorrectlyconnectedtotheball
Pict.2=Wear indication for clutch / ball - Green
marking visible:
• FrontandrearfrictionliningsOK
• ThecouplingballisOK
Green marking is no longer visible:
• Frontandrearfrictionliningsworn
Replace friction linings!
• Øcouplingball<49mm
Replace coupling ball!
Pict.3=Soft Dock - Arrow below the Soft Dock mark 1
- green:
• LeftandrightfrictionliningsOK
Arrow above the Soft Dock mark 1 - red:
• Leftandrightfrictionliningsworn
Replace friction linings!
Arrow on the Soft Dock mark – 2
• AKSisclosed
Thecouplinghandleonthesafetycoupling
mustnot be used for lifting etc.This can
causedamagetointernalparts.
∆
9. Makesurethatthecabledoesnotdragontheground.
10. Windupthesupportwheelandraisethesupportwheel
legas far as possible. Lock the support wheel leg
securelyintheraisedpositionwiththelockingknob.
Support wheel leg
Crank for raising and lowe-
ring the support wheel
Locking knob
for the sup-
port wheel leg
11. Checkthattheairpressureinthetyresiscorrect(see
page19).
12. Checkthattheairpressureinthetowingcar’srear
tyresis30kPa(0.3kp/cm2)higherthannormal.
13.
Checkthatalltheroadlightsonthecaravanareworking.
14. Checkthatthecar’sdoormirrorsarecorrectlyadjusted.
Theballmustbefreeofgrease,dirtandpaint
inorderforthecouplingtoworkproperly.
∆
Don’tforgettowindupthesupportwheeland
lockitsecurelyinplace.Makesurethatthesup-
portwheelisnotpressingagainstthebrakerod.
∆
Checkthatthecaravanandthecararecoup-
ledtogetherproperly.Thegreenmarkofthe
couplingindicatormustbevisible.
∆
16

General
Tap: Open = handle parallel with the caravan lengthways
Closed = handle at right angles to the caravan.
Floor
Venting
Cone
6. Disconnectthe12Velectricalconnectorfromthecar,and
laythecableonthedrawbarwiththeconnectorpointing
downtopreventwaterorsnowenteringtheconnector.
7. Drivethecaraway.
8. Adjustthecaravanintoahorizontalposition(lengt-
hways)usingthesupportwheel’scrank.
9. Winddownallthestabiliserlegs.Makesurethatthe
caravanishorizontal.
10. Ifyouhaveaccesstoa230Vmainscurrentoutput,
connectthecabletotheoutputandthecaravan’sinput.
11. Checkthattheventilationopeningsarenotblocked
withdirt,snow,etc.
12. Setupthedrain.Thevalvemustbeintheclosedposi-
tionunlessaclosedtankisconnectedtotheoutercone.
Whenemptying,connectaclosedtanktotheoutercone
andsetthevalveintheopenposition.Readmoreabout
”Emptying the drainage system”onpage55.
13. Ifthecaravanhastostandonaroad,youshould
lightthehazardlights.Theswitchislocatedonthe
12Vcontrolpanel.
Exhaust fumes
Thecar’sexhaustfumescanenterthecaravanthroughthe
ventilationopenings.Theseopeningsmaynotbeclosed.
Dieselexhaustfumesandsootinparticularcanbedif-
culttoclearoutofthecaravan.
Ifyouhaveadieselcar,youcantrytoangletheexhaust
pipesothatfumesdonotenterthecaravan.
Youcanalsotryinstallingaplateoraspoilerinfrontof
theventilationopeningsonthecaravan.
When driving
Consider the following when driving:
• Max.speed80km/h.
• Itisprohibitedtoremaininthecaravanwhendriving.
• Start,drive andbrakesmoothly, avoidingjerky
movements.Thissafeguardsboththecaravanand
thecar,andreducesfuelconsumption.
• Keeptothesideandreduceyourspeedwhenyou
arebeingovertaken.
• Keepcheckingbehindyou.Ifalonglineoftrachas
gatheredbehindyou,pullintothenearestparking
areaandallowthefastertractogetpast.
• Rememberthatyouaredrivingaheavycombina-
tion–thismeanslongerbrakingdistancesandlonger
accelerationdistances.
• Pulloutproperlywhenyouareovertakingsomebodyelse.
• Beprepared for air-waveswhen you meet large
vehicles-parryintime.
• Takeiteasy!
Freshairintakes and vents must not be
blockedunderanycircumstances.
∆
Pitching
1. Usethecartopositionthecaravanintheparking
place.
2. Applytheparkingbrakeifthecaravanisonaslope.
Remembertocheckthatthesupportwheel’scrank
isnot in the way of the handbrake lever, before
applyingthehandbrake.
3. Lowerthesupportwheellegandlockitinposition,
andwinddownthesupportwheel.
4. Firstliftupthehandleontheballjoint,thenmoveit
forwardstoreleasethecatchlockingtheballjoint.
Thenraisetheballjointstraightupfromthetowing
ballbywindingdownthesupportwheel.
5. Disconnectthesafetycable.
Whenyouhavepitchedthecaravan,make
surethatthefreshairintakesarecompletely
freeof snow and anything else that could
obstructcirculation.
∆
Neverpitchthecaravanonaroadwithout
puttingoutthewarningtriangle.
∆
Input, 230 V with tent service
17

General
Adry,clean,well-ventilatedcaravanremains
attractiveandvaluable.
∆
• Nevercoverthecaravanwithatarpaulinorsimilar,
asthispreventsventilationinthecaravan.
Pitching for an extended period
• Whenyouarenotgoingtousethecaravanforanexten-
dedperiod,youshouldplaceitinaprotected,lockable
locationifpossible.Thecaravanshouldideallybeona
levelsurfacesothatthereisnoneedtousetheparking
brake.Placeblocksinfrontofthewheels.
• Removeallfoodproducts.
• Cleantherefrigerator.Refertosupplier’sinstructions.
• Removethecushions,andstoretheminawarm,dry
place.
• Emptythe watersysteminaccordance with the
instructionsonpage52.
• Emptyandcleanthedrainagesysteminaccordance
withtheinstructionsonpage55.
• Emptyand clean the toilet. Refer to supplier’s
instructions.
• Tricklechargethebatteryandstoreitinacoollocation.
• RemovethereducingvalvefromtheLPGbottle.
• PlacetheLPGbottlesinaprotected,re-proofloca-
tion.RememberthatonlytwoLPGbottlesmaybe
storedindoorsinthesamelocation.Thismeanse.g.
thatwhen two caravans arestandingin the same
storagearea,theymayonlycontaintwoLPGbottles.
Itisnecessarytoapplytothereauthoritiesfora
permittostoremorethantwobottles.
• Leavecupboardandwardrobedoorsslightlyajar,
thebedcoverupandthedrawersslightlypulledout.
Alsoleavetherefrigeratordoorajaraftercleaning
it,topreventunpleasantsmells.
• Usea moistureabsorber (such as ”Torrboll”)to
eliminatemoistureinthecaravan.
• Lubricatethesupportlegsandwindthemdownto
reducetheloadonthewheels.Storethecrankfor
thesupportlegsinadierentlocation–thismakes
itmorediculttostealthecaravan.
• Covertheoverrunmechanism with plasticora
drawbarcover.
• Donotplacethesparewheeldirectlyontheoorcovering
insidethecaravan.Therubberfromthetyrecanmake
marksontheoorcoveringthatcannotberemoved.You
shouldthereforelaye.g.amatontheoorrst.
18

Chassis
Tyres
Stabiliser legs
Stabiliserlegsareinstalledatthefrontandrearofthe
caravan.Thestabiliserlegsarewoundupanddownusing
thecranklocatedintheLPGbox.
4. Unscrewthewheelnutsandchangethewheel.
5. Tightenthewheelnutssothatthewheelissecurely
mounted,lowerthejackandthenpost-tightenthe
wheelnutscrosswise.
6. Tightenthewheelnutsonemoretimeafterdriving
sometwentyorthirtykilometres.
3. Placethejackinasuitablyplaceunderthechassis
member(seepicture)andliftthecaravan.Incaseof
puncturethecaravanwillbelower,sothejackmust
beplacedunderthechassismemberabitfromthe
wheel.Afterwards,securewithaxlestands.
Thecaravan’ssupportlegsmustnotbeusedasjacks.
Thecaravanshaveachassisofstrongstructuralmembers
madeofgalvanisedsteel.
Thewheelhousingsaremadeofplastic.
Thewheelaxlehasrubbertorsionsuspensionandteles-
copicshockabsorbers.
Thechassisanddrawbararedesignedtobecoupledto
aprivatecar,withthesuspensioncharacteristicsitpos-
sesses.SoliferPolarABacceptsnoresponsibilityifthe
caravaniscoupledtoavehiclewhosesuspensionistoo
rigid,suchaslorries,busesandsomeolderjeeps.Modern
4-wheeldrivevehicleswithsuspensionsimilartothatused
inprivatecarscanbeusedtotowthecaravans,however.
In the event of a puncture
1. Applytheparkingbrake.
2. Undothewheelnutsalittle,butdonotremovethem.
Checktheairpressureinthetyresregularly
inordertoavoidunnecessarytyrewearand
impaireddrivingcharacteristics.
∆
SoliferPolarABacceptsnoliabilityforanyconsequences
ifothertyredimensionsortyredesignsareused.
Frictiontyresonthecaravanmaybeusedbothonsummer
andwintersurfaces,whichisnotthecasewithstudded
tyres.Inorderforthefrictiontyrestobeapprovedfor
winterroadsurfaces,theymustbemarkedwithM+S,
M.S.orM&SM-SMSorMud&Snow.
Thefollowingtyrecombinationsareapproved:
• Ifthetowingcarhasstuddedtyres,thecaravanmust
havestuddedtyres.
• Ifthetowingcarhasfrictiontyres,thecaravanmust
havefrictiontyresorstuddedtyres.
• Ifthetowingcarhassummertyres,thecaravanmust
havefrictiontyresorsummertyres.
Chassis
Alwaysusewheelnutsthatareintendedfor
thetypeofrimbeingused.
∆
Facts and gures
Tyres
Caravan model Dimensions Tyre pressure
520 205/70R15Csteelradial max450kPa(4,5kp/cm2)
560 205/70R15C ” max450kPa(4,5kp/cm2)
590 205/70R15C ” max450kPa(4,5kp/cm2)
620 205/70R15C ” max450kPa(4,5kp/cm2)
650 205/70R15C ” max450kPa(4,5kp/cm2)
680 195/6515XL ” max300kPa(3,0kp/cm2)
730 195/6515XL ” max300kPa(3,0kp/cm2)
840 195/6515XL ” max300kPa(3,0kp/cm2)
Tightening torque for the wheel nuts
Steelrim 80-100Nm(8-10kpm)
Aluminiumrim 110-120Nm(11-12kpm)
∆Alwayssecurethecaravanwithaxlestands
beforechanging a wheel or commencing
otherworkunderthecaravan.
Crank
Stabiliser legs
19

Chassis
Maintenance and care
Safety coupling AKS 3004
With the exception of the friction linings, AKS is main-
tenance free.
We still recommend that all moving components clean
thoroughly after use and moving parts may need to be
lubricated at regular intervals The surfaces may only be
tted with a thin grease lm.
Type of lubricant:
• Multi-purpose grease
Suitable for cleaning::
• Thinner, white spirit, brake cleaning uid.
Oil or grease must not enter friction surface and/or in the
safety coupling during lubrication.
The surface of the towing ball must always be free from
dirt, dust, rust, scratches, grease and color.
∆Do not clean the friction linings!
Cleaned friction linings have a greatly redu-
ced damping capacity.
Replace contaminated or worn friction
linings immediately!
Brakes
The brake system is mechanical and principally compri-
ses an overrun mechanism, brake rod, brake cable and
wheel brakes. The system has three functions: driving
brake, parking brake and safety brake.
The driving brake is an overrun brake with automatic
reverse. When you brake with the car, the overrun brake
is compressed by the weight of the caravan, and the
caravan is simultaneously braked.
The caravan is equipped with AL-KO Automatic Adjust-
ment (AAA), which automatically adjusts the brake shoes
in thewheel brake to permit an optimum braking eect.
To check and obtain the maximum braking eect, the AAA
requires stronger braking when commencing travel so that
the caravans overrun is clearly noticeable, especially after
maintenance on the braking system.
The parking brake is used when parking and pitching the caravan.
The safety brake is deployed by the cable that is secured to
the car’s tow hitch. In the event of the caravan becoming
detached from the car’s tow hitch, the caravan will brake.
Maintenance and care other
Support wheel:
• Lubricate the support wheel and the support wheel
leg with oil approximately once a month or after
driving around 2,000 km.
Remove the support wheel and lubricate the screw
threads with grease approximately once a year.
Overrun hitch:
• Lubricate or oil sliding and articulation points on the
overrun hitch 10000 - 12000 km or every 12 months.
Type of Lubricant: Multi-purpose grease as per
DIN 51825
Axle and brake system:
• Maintenance-free compact bearings have ll-forlife
grease and are sealed.
Maintenance intervals axle and brake system:
Every 5,000 km or every 12 months:
• Check the braking system (replace brake pads and
adjust brake system if necessary).
Every 10,000 km or every 24 months:
• Maintenance of the brake system
All maintenance and repair work should only be perfor-
med by an authorised workshop.
The adjustment of the brakes requires
accuracy and expertise, and should ideally
be performed by an authorised workshop.
∆
Stabiliser legs:
• Lubricate the four stabiliser legs approximately once
a month or after driving around 2,000 km.
• Clean the stabiliser legs of gravel and old grease and
lubricate the threaded screw with thin oil approxima-
tely once a year.
∆The overrun hitch is a component of the brake
system. Irrespective of the service intervals for
the overrun hitch, the brake system must be
checked by a specialist workshop after 1500
km or 6 months.
20
This manual suits for next models
22
Table of contents