Polaroid BI65-120400-E2 User manual

User Manual
Manual de usuario
At-Home Instant Photo Booth
Fotomatón instantáneo en casa

Photo Booth is designed for indoor and personal use only. It must not be installed permanently outdoors.
The following conditions must be avoided.
1. Direct exposure to sunlight, high humidity, direct water contact, dust, high heat, or extreme cold.
2. Vibration. Photo Booth must be installed on a level surface. Do not install in an area such that the Photo Booth would present an obstacle in case of an emergency
(i.e., near fire equipment or emergency exits).
WARNING: Tastemakers Asia Limited assumes no liability for improper installation or excessive loads placed on screws or bracket.
This wall anchor is not a substitute for proper adult supervision.
IMPORTANT SAFETY INSTRUCTIONS
INSTALLATION
READ BEFORE USING THE PHOTO BOOTH
SAFETY PRECAUTIONS
The following symbols are used in labels on the Photo Booth to draw attention to potentially hazardous situations:
WARNING : Failure to avoid the risk may result in death or serious injury.
Electrical Shock Hazard. Disconnect power before removing cover.
Should only be done by a qualified technician.
This device complies with Part 15 of the FCC rules. Operation is subject to the following two conditions: (1) This device may not cause harmful interference, and (2) this
device must accept any interference received, including interference that may cause undesired operation.
Warning: Changes or modifications to this unit not expressly approved by the party responsible for compliance could void the user's authority to operate the equipment.
This equipment has been tested and found to comply with the limits for a Class B digital device, pursuant to Part 15 of the FCC rules. These limits are designed to provide
reasonable protection against harmful interference in a residential installation. This equipment generates, uses, and can radiate radio frequency energy and, if not installed
and used in accordance with the instructions, may cause harmful interference to radio communications. However, there is no guarantee that interference will not occur in a
particular installation. If this equipment does cause harmful interference to radio or television reception, which can be determined by turning the equipment off and on, the
user is encouraged to try to correct the interference by one or more of the following measures:
• Reorient or relocate the receiving antenna.
• Increase the separation between the equipment and the receiver.
• Connect the equipment into an outlet that Is on a circuit different from the receiver.
• Consult the dealer or an experienced radio / TV technician for help.
FCC STATEMENT
WARNING : To reduce the risk of fire or electric shock, do not expose this apparatus to rain or moisture.
1. Please read and comprehend all warnings stated in this manual.
2. Do not get product wet when cleaning.
3. The AC/DC adapter and apparatus shall not be exposed to dripping or splashing and that no object filled with liquids, such as vases, shall be placed on apparatus.
The AC/DC adapter is used as disconnect device.The AC/DC adapter of apparatus should not be obstructed OR should be easily accessed during intended used.
To completely disconnect the power input, the AC/DC adapter of the apparatus shall be disconnected from the main power outlet.
4. If appliance is provided with protective earth terminal, it should be connected to main outlet with a protective earth connection.
5. Minimum distances 10 cm / 3.94 inches around the apparatus for sufficient ventilation.
6. The ventilation should not be impeded by covering the ventilation openings with items such as newspaper, table-cloths, curtains etc.
7. No naked flame sources such as lighted candles should be placed on the apparatus.
8. The apparatus should only be used in moderate climates.
1. Read these Instructions.
2. Keep these Instructions.
3. Heed all Warnings.
4. Follow all Instructions.
5. Do not use this apparatus near water.
6. Clean only with a dry cloth.
7. Do not block any ventilation openings. Install in accordance with the manufacturer’s instructions.
8. Do not install near any heat sources such as radiators, heat registers, stoves, or other apparatus (including amplifiers) that produce heat.
9. Do not defeat the safety purpose of the polarized or grounding - type plug. A polarized plug has two blades with one wider than the other. A grounding type plug
has two blades and a third grounding prong. The wide blade or the third prong are provided for your safety. When the provided plug does not fit into your outlet,
consult an electrician for replacement of the obsolete outlet.
10. Protect the power cord from being walked on or pinched particularly at plugs, convenience receptacles, and the point where they exit from the apparatus.
11. Only use attachments/accessories specified by the manufacturer.
12. Unplug this apparatus during lightning storms or when unused for long periods of time.
13. Refer all servicing to qualified service personnel. Servicing is required when the apparatus has been damaged in any way, such as power-supply cord or plug is
damaged, liquid has been spilled or objects have fallen into the apparatus, the apparatus has been exposed to rain or moisture, does not operate normally, or has
been dropped.
14. The equipment shall be used at working ambient temperature 32° - 95°F (0° - 35°C).
WARNING
To ensure safe operation of the product, be sure to read this User Manual before use.
Keep this User Manual in a safe place for easy reference when needed.
WARNING
This product can expose you to chemicals including Styrene and Benzene, which are known to the State of California to cause birth defects or other reproductive harm.
For more information go to www.P65Warnings.ca.gov

Photo Booth está diseñado para uso personal y en interiores únicamente. No debe instalarse permanentemente al aire libre.
Deben evitarse las siguientes condiciones.
1. Exposición directa a la luz solar, alta humedad, contacto directo con el agua, polvo, altas temperaturas o frío extremo.
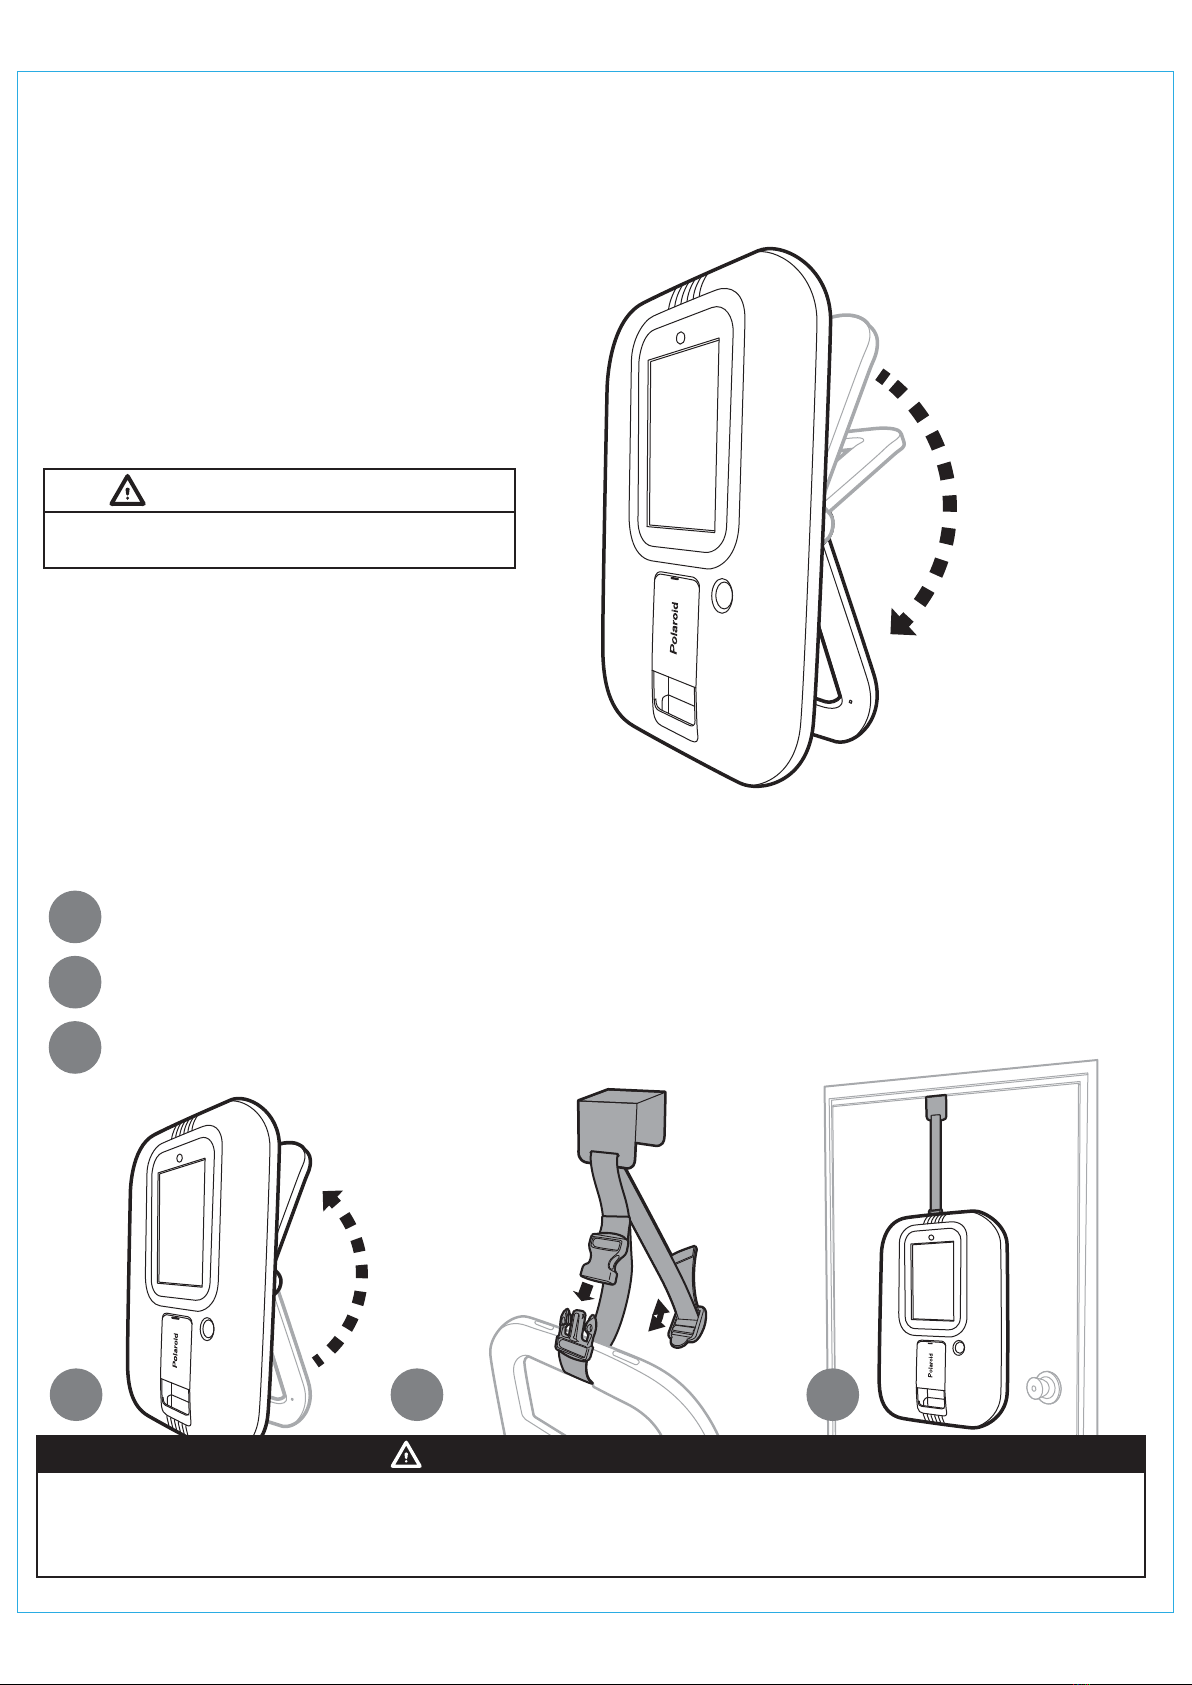
2. Vibración. El fotomatón debe instalarse en una superficie nivelada. No lo instale en un área en la que el juego represente un obstáculo en caso de emergencia.
(es decir, cerca de equipos contra incendios o salidas de emergencia).
ADVERTENCIA: Photo Booth no asume ninguna responsabilidad por una instalación incorrecta o cargas excesivas colocadas en los tornillos o el soporte.
Este anclaje de pared no sustituye a la supervisión adecuada de un adulto.
IMPORTANTES INSTRUCCIONES DE SEGURIDAD
INSTALLATIÓN
LEA ANTES DE UTILIZAR LA CABINA DE FOTOS
PRECAUCIONES DE SEGURIDAD
Los siguientes símbolos se utilizan en las etiquetas del juego para llamar la atención sobre situaciones potencialmente peligrosas:
ADVERTENCIA: No evitar el riesgo puede resultar en muerte o en lesiones graves.
Peligro eléctrico. Desconectar la corriente antes de quitar la tapa.
Solo lo debe hacer un técnico cualificado.
Este dispositivo cumple la parte 15 de la normativa FCC. El funcionamiento está sujeto a las siguientes dos conditciones: (1) Puede que este dispositivo no cause
interferencias perjudiciales, y (2) esta dispositivo debe aceptar cualquier interferencia recibida, incluidas referencias que pueden causar un funcionamiento no deseado.
ADVERTENCIA: Los cambios o las modificaciones a esta unidad que no estén expresamente aprobados por la parte responsable del cumplimiento pueden invalidar la
autoridad del usuario de manejar el equipo.
Esta equipo se ha probado y cumple con los límites para un dispositivo digital Clase B, de conformidad con la Parte 15 de la normativa FCC. Estos límites están diseñados
para proporcionar protección razonable contra interferencias perjudiciales en una instalación residencial. Este equipo genera, usa y puede radiar energía de radiofrecuencia
y, si no se instala ni se usa de conformidad con las instrucciones, puede causar interferencias perjudiciales para las comunicaciones por radio. Sin embargo, no hay garantía
de que no se produzcan interferencias en una instalación específica. Si este equipo causa interferencias perjudiciales a la recepción de radio o de televisión, lo cual se
puede determinar encendiendo y apagando el equipo, se anima al usuario a intentar corregir la interferencia siguiendo una o más de las siguientes medidas:
• Reoriente o recoloque la antena receptora
• Aumente la separación entre el equipo y el receptor
• Conecte el equipo a un enchufe que esté en un circuito diferente del receptor
• Consulte con el distribuidor o con un técnico de radio / TV experto para pedir ayuda
DECLARACIÓN DE LA COMISIÓN FEDERAL DE COMUNICACIONES
ADVERTENCIA: Para reducir el riesgo de fuego o de descarga eléctrica, no exponga ete aparto a liuvia o humedad.
1. Lea y comprenda todas las advertencias de este manual.
2. No moje el arcade cuando lo limpie.
3. El adaptador AC/DC y el aparato no se debe exponer a goteo o salpicaduras y ningún objeto lleno de líquido, como floreros, se debe colocar sobre el aparato. El
adaptador AC/DC se usa como dispositivo desconectado. El adaptador AC/DC del aparato no se debe obstruir NI debe ser de fácil acceso durante el uso previsto.
Para que la potencia absorbida se desconecte por completo, el adaptador AC/DC del aparato se debe desconectar de la red.
4. Si el aparato está provisto de un terminal de tierra de protección, debe conectarse a la toma de corriente con una conexión a tierra de protección.
5. Distancia minima 10 cm / 3.94 pulgadas alrededor del aparato para tener suficiente ventilación.
6. No se debe impedir la ventilación cubriendo las aberturas de ventilación con artículos como periódicos, manteles, cortinas, etc.
7. No se deben colocar fuentes de llamas al descubierto sobre el aparato.
8. El aparato solamente debe usarse en climas moderados
1. Lea estas instrucciones.
2. Guarde estas instrucciones.
3. Preste atención a todas las advertencias.
4. Siga todas las instrucciones.
5. No use este aparato cerca del agua.
6. Limpie solamente con un trapo seco.
7. No Bloquee ninguna abertura de ventilación. Instale de conformidad con las instrucciones del fabricante.
8. No lo instale cerca de ninguna fuente de calor como radiadores, calefactores, estufas u otros aparatos (incluidos amplificadores) que produzcan calor.
9. No anule el propósito de seguridad del enchufe polarizado o con conexión a tierra. Un enchufe polarizado tiene doa hojas con una más ancha que la otra. Un
enchufe con conexión a tierra tiene dos hojas y una tercera clavija con conexión a tierra. La hoja ancha o la tercera clavija están pensadas para su seguridad.
Cuando el enchufe proporcionado no encaje en su enchufe, consulte con un electricista para sustituir el enchufe obsoleto.
10. Proteja el cable de corriente de que se pise o se pince especialmente en los enchufes, los receptáculos y el punto en el que salen del aparato.
11. Utilice únicamente los accesorios especificados por el fabricante.
12. Desenchufe este aparato durante tormentas eléctricas o cuando no se utilice durante un periodo prolongado de tiempo.
13. Toda reparación debe ser realizada por personal cualificado. Será necesaria la reparación de esta aparato cuando presente algún daño, por ejemplo, en el cable o
en enchufe de alimentación, cuando se produzca derrame de líquido o caída de objetos sobre el aparato, exposición a la lluvia o a la humedad, funcionamiento
anómalo o caída del producto.
14. El equipo debe usarse a temperatura ambiente de trabajo 32 ° - 95 ° F (0 ° - 35 ° C).
ADVERTENCIA
Para garantizar un funcionamiento seguro del producto, asegúrese de leer este manual de usuario antes de usarlo.
Guarde este manual de usuario en un lugar seguro para poder consultarlo fácilmente cuando sea necesario.
ADVERTENCIA
Este producto puede exponerlo a productos químicos como el estireno y el benceno, que el Estado de California sabe que causan defectos de nacimiento u otros daños reproductivos.
Para obtener más información, visite www.P65Warnings.ca.gov

Contents Included
Contenido incluido
Door Mount Set
Conjunto de montaje en puerta
Wall Bracket
Soporte de pared
At-Home Instant Photo Booth
Fotomatón instantáneo en casa
Mounting Hardware
Accesorios de montaje
ZINK®Paper
Papel ZINK®
Power Cord
Cable de alimentación
User Manual
Manual de usuario
Page 01
Quick Start Guide
Guía de inicio rápido
At-Home Instant Photo Booth
Fotomatón instantáneo en casa
Getting Started
Empezando
Plug in the power supply on the back of Photo Booth
Enchufe la fuente de alimentación en la parte posterior
de Photo Booth.
Powering on your Photo Booth
Encendido de su fotomatón
Pressthe shutter button to
takea photo
Presione el botón del
obturador para tomar una
foto
Pressthe bu tton onthe to p ofyour Polaroid At-Home Instant Photo Booth to power it on
Presione el botón el la parte superior de su Polaroid fotomatóninstantáneo en casa para encenderlo
Quick Start Guide
Guía de inicio rápido

Micro SD Card Slot
(Micro SD Card is NOT included)
External Battery Holder
(Battery NOT Included)
Front View
Vista Frontal
Back View
Vista Trasera
Product Features
Características del producto
ON/OFF Switch
Tiltable Camera
LED Light Ring
Shutter Button
Printer Door
Photo Tray
Anillo de luz LED
Botón del
Obturador
Cámara Inclinable
Interruptor
Encendido/Apagado
10.1” Capacitive
Touch Screen
10.1” Capacitivo
Pantalla Táctil
Puerta
Impresora
Bandeja para
Fotos
Ranura para Tarjeta Micro SD
(La tarjeta Micro SD NO está
incluida)
Soporte de Batería Externa
(Batería NO Incluida)
Adjustable Stand
Soporte Ajustable
Power Cord Port
Puerto de Cable
de Alimentación
Page 02

Always place Photo Booth on level surface to avoid tipping and serious injury or damage /
Coloque siempre el Photo Booth en una superficie nivelada para evitar vuelcos y
lesiones o daños graves.
WARNING / ADVERTENCIA
B
A
01.
Table Top
Mesa
02.
Door Mount
Montaje en Puerta
Mounting Options
Opciones de montaje
Fold Adjustable Stand to the UP position until you hear it lock in place.
Rote el soporte ajustable hacia arriba hasta que escuche que se traba en su lugar.
Attach Adjustable Strap to top of Adjustable Stand and click the buckle closed.
Coloque la correa ajustable en la parte superior del soporte ajustable y cierre la hebilla.
Place Door Hook Set over the top of door.
Coloque el gancho para puerta sobre la parte superior de la puerta.
Adjustable
Strap
Correa
Ajustable
C
B
A
Page 03
C
- FAILURE TO FOLLOW THESE INSTRUCTIONS CAN RESULT IN DEATH OR INJURY TO CHILDREN AND ADULTS / EL NO SEGUIR ESTAS INSTRUCCIONES PUEDE RESULTAR EN LA MUERTE O LESIONES A NIÑOS Y ADULTOS
- MAKE SURE THE INSERTED BUCKLE CLOSES WITH A "CLICK" SOUND AND THE PRODUCT HANGS FIRMLY ON THE DOOR / ASEGÚRESE DE QUE LA HEBILLA INSERTADA SE CIERRE CON UN SONIDO DE "CLIC" Y QUE EL
PRODUCTO CUELGUE FIRMEMENTE DE LA PUERTA
- NEVER ALLOW CHILDREN TO CLIMB OR HANG ON PHOTO BOOTH / NUNCA PERMITA QUE LOS NIÑOS ESCALEN O CUELGUE EN CABINA DE FOTOS
- NEVER PLACE HEAVY ITEMS ON PHOTO BOOTH / NUNCA COLOQUE ARTÍCULOS PESADOS EN CABINA DE FOTOS
- ADULT ASSEMBLY REQUIRED / ASAMBLEA DE ADULTOS REQUERIDA
WARNING / ADVERTENCIA

- READ AND FOLLOW ALL INSTRUCTIONS BEFORE USE / LEA Y SIGA TODAS LAS INSTRUCCIONES ANTES DE USAR.
- SERIOUS INJURY CAN OCCUR IF IMPROPERLY INSTALLED / PUEDEN OCURRIR LESIONES GRAVES SI SE INSTALA INCORRECTAMENTE.
- INSTALL ONLY IN WOODEN STUD WALLS / INSTALAR ÚNICAMENTE EN PAREDES DE MADERA.
- NEVER ALLOW CHILDREN TO HANG OR CLIMB ON PHOTO BOOTH / NUNCA PERMITA QUE LOS NIÑOS COLGEN O SUBEN EN LA CABINA DE FOTOS.
- ALWAYS INSTALL LOCKING LEVER / INSTALE SIEMPRE LA PALANCA DE BLOQUEO.
WALL MOUNT MUST BE INSTALLED IN A WOODEN STUD; FAILURE TO FOLLOW INSTRUCTIONS COULD RESULT IN SERIOUS INJURY OR DAMAGE TO WALL AND PHOTO BOOTH /
EL MONTAJE DE PARED DEBE INSTALARSE EN UN PERNO DE MADERA; EL NO SEGUIR LAS INSTRUCCIONES PODRÍA RESULTAR EN LESIONES GRAVES O DAÑOS A LA PARED Y A LA CABINA FOTOGRÁFICA.
WARNING / ADVERTENCIA
Page 04
Serious injury can occur if improperly installed /
Pueden producirse lesiones graves si se instalan incorrectamente.
Always lock unit when hanging /
Bloquear siempre la unidad al colgar.
WARNING / ADVERTENCIA
HELPFUL HINT / CONSEJO ÚTIL:
Use a stud finder to locate stud within the desired area. If stud cannot be found please install other mounting or have installed by a professional.
Utilice un buscador de vigas para ubicar las vigas dentro del área deseada. Si no puede encontrar la viga, instale otro montaje o hágalo instalar por un profesional.
Wall Bracket
Soporte de Pared
Mount Wall Bracket to the wall with included hardware.
Monte el soporte de pared en la pared con los accesorios incluidos.
C
Place Photo Booth on Wall Bracket and secure with the Safety Strap.
Coloque el Photo Booth en el soporte de pared y asegure la correa
de seguridad.
Fold Adjustable Stand to the UP position until you hear it lock in place.
Rote el soporte ajustable hacia arriba hasta que escuche que se
traba en su lugar.
B
A
03.
Wall Mount
Montaje en Pared
AA
B
ADULT ASSEMBLY REQUIRED / SE REQUIERE ADULTO PARA ARMAR
Wall Bracket
Soporte
de Pared
CC
Wall
Pared Wall
Pared
1.5 in.
(38 mm)
Ø9/32 in.
(7 mm) Ø9/32 in.
(7 mm)
Stud
Viga de Madera

NOTE: External battery pack minimum requirement is 12 Volt 4.0A
NOTA: Los requisitos minimos de la batería externa son 12 voltios 4,0A
Page 05
This product is intended for use only with the adapter provided
Este producto está diseñado para usarse solo con el adaptador provisto:
Manufacturer: Blue Iron Holdings Ltd. Model: BI65-120400-E2
Fabricante: Blue Iron Holdings Ltd. Modelo: BI65-120400-E2
• The AC/DC adapter is used as disconnect device
El adaptador de AC/DC se utiliza como dispositivo de desconexión
• The AC/DC adapter of apparatus should not be obstructed OR should be easily accessed during intended use
El adaptador de CA / CC del aparato no debe obstruirse O debe ser fácilmente accesible durante el uso previsto
• To completely disconnect the power input, the AC/DC adapter of the apparatus shall be disconnected from the main
power outlet
Para desconectar completamente la entrada de energía, el adaptador de CA / CC del aparato debe desconectarse de
la toma de corriente principal
POWER SUPPLY:
AC/DC Adapter
FUENTE DE ALIMENTACIÓN:
Adaptador AC/DC
INPUT POWER: AC 100-240V, 50/60Hz 2A Max POTENCIA DE ENTRADA:
AC 100-240V, 50/60Hz 2A Max
OUTPUT POWER: DC12.0V --- 4.0A POTENCIA DE SALIDA:
DC12.0V --- 4.0A
MONITOR:
10” Capacitive Touch Screen Pantalla táctil capacitiva de 10”
ASSEMBLED DIMENSIONS: 23.75” x 15.75” x 7.5” (60.3 x 40 x 19 cm)
DIMENSIONES MONTADAS:
23.75” x 15.75” x 7.5” (60.3 x 40 x 19 cm)
─
─
For PLUGGABLE EQUIPMENT, the socket-outlet shall be installed near the equipment and shall be easily accessible
Para EQUIPOS ENCHUFABLES, la toma de corriente debe instalarse cerca del equipo y debe ser fácilmente accesible
The applied nameplate is located at the back of the product
La placa de identificación aplicada se encuentra en la parte posterior
del producto.
Equipment is only suitable for mounting at height ≤ 2 meter
El equipo solo es adecuado para el montaje a una altura ≤ 2 metros.
Getting Started
Empezando
Plug in the power supply on the back of Photo Booth
Enchufe la fuente de alimentación en la parte posterior
de Photo Booth.
External Battery Pack Holder
Used to hold open market battery packs (sold separately) that support 12 Volt 4.0A
Soporte para batería externa
Se utiliza para contener paquetes de baterías de mercado abierto (se venden por separado)
que admiten 12 voltios 4.0A
Cable Management:
Wrap excess power cable around
cable management slot
Mantenimiento de Cable:
Envuelva el cable de alimentación
sobrante alrededor de la ranura de
administración de cables

Loading Photo Paper
Carga de papel fotográfico
Lift up on printer door
Levante la puerta de la
impresora
Pull forward to open
Tire hacia adelante para
abrir
Load your Polaroid At-Home Photo Booth with 2”x 3” (50 x 76mm) ZINK® Photo paper (included)
Cargue su Polaroid fotomatón instantáneo en casa con papel ZINK® de 2”x 3” (50 x 76mm) (incluido)
NOTE: Polaroid At-Home Instant Photo
Booth only holds maximum 10 sheets (one
pack) of photo paper at a time.
Excess photo paper could cause your Photo
Booth to jam and/or not function properly.
NOTA: El Photo Booth Polaroid instantáneo
solo admite un máximo de 10 hojas de papel
fotográfico a la vez.
El exceso de papel fotográfico podría hacer
que su Photo Booth se atasque y no funcione
correctamente.
Page 06

Place the photo paper in the printer with the
“Blue” barcode calibration paper facing inward
Coloque el papel fotográfico en la impresora con
el papel de calibración de código de barras “Azul”
hacia adentro
Hold the photo paper in place and close the
printer door
Sostenga el papel fotográfico en su lugar y
cierre la puerta de la impresora
You will see a slight gap
when closed & locked
correctly
Una ligera brecha sera
visible cuando estácerrado
y bloqueado correctamente
Slightly lift up on the printer door
while pressing inward until the printer
door lays flush with the Photo Booth
housing
Levante ligeramente la puerta de la
impresora mientras presiona hacia
adentro hasta que la puerta de
impresora quede alíneada con la
carcasa del Photo Booth
When printer door is laying flush
with the Photo Booth housing,
slide downward to lock the door
shut
Cuando la puerta de la impresora
estéalíneada con la carcasa del
Photo Booth, deslícela hacia abajo
para cerrar la puerta
After the paper is loaded and the
door is closed and locked correctly,
the “Blue” calibration paper will
eject out from the printer
Una vez que se haya cargado el
papel y la puerta estécerrada y
bloqueada correctamente, el papel
de calibración “Azul” se expulsaráde
la impresora
NOTE: Failure to lock the door correctly in place will prevent the photos from printing
NOTA: Si no cierra la puerta correctamente en su lugar, evitaráque las fotos se impriman
Page 07

Press the button on the top of your Polaroid At-Home Instant Photo Booth to power it on
Presione el botón el la parte superior de su Polaroid fotomatón instantáneo para encenderlo
Powering on your Photo Booth
Encendido de su fotomatón
Page 08
Press the shutter button to
take a photo
Presione el botón del
obturador para tomar una
foto

Page 09
Advanced Setting
Configuración avanzada
TURN ON
ENCENDER
TURN OFF
APAGAR
Timer (OFF/3 /5/10 Seconds)
Temporizador
(OFF/3/5/10 segundos)
Camera light
Luz de Cámara
Gallery
Galería
Settings
Ajustes
Delete
Eliminar
Print
Impresión
Exit
Salida
Edit
Editar
Upload
Subir

StrongMediumWeak FuerteMedioDébil
Settings
Network Settings
Check for Updates
Device Serial Number
Auto Print
Connected Wifi
HOME WIFI
JOIN OTHER NETWORK
Settings
Network Settings
Check for Updates
Device Serial Number
Auto Print
Connected Check for Update
You already have the latest version
Version: 1.0.1
Check for Update
An update is available
Current Version: 1.0.0
New Version: 1.0.1
File Size: 34.1MB
UPDATE NOW
NEW
WIFI ON /OFF
WIFI Encendido/
Apagado
WIFI network info
Información de La
Red WIFI
WIFI Signal Strength
Intensidad de La Señal WIFI
Page 10

Settings
Network Settings
Check for Updates
Device Serial Number
Auto Print
Connected
Settings
Network Settings
Check for Updates
Device Serial Number
Auto Print
Connected
NEW
Serial Number:
JNTHEMAX96
Auto Print ON /OFF
Impresión Automática
Encendido/
Apagado
Page 11
Settings
Network Settings
Check for Updates
Device Serial Number
Auto Print
Connected
When Auto Print is turned ON, Photo Booth will
automatically print after several seconds upon taking
a picture.
Cuando la impresión automática está activada, el
Photo Booth imprimirá automáticamente después de
varios segundos al tomar una foto.

Filter
Filtro
Frame
Marco
Save Picture
Guardar Imagen
Stickers
Pegatinas
Brush
Pincel
• None
Ninguno
• Blur
Difuminar
• Grayscale
Escala de grises
• Invert
Invertir
• Pixelation
Pixelación
• Sepia
Sepia
• Sketch
Bosquejo
• Toon
Póster
• Vignette
Viñeta
Color Picker
Selector de Color
Brush
Pincel
Eraser
Borrador
Exit
Salida
Undo
Deshacer
Redo
Rehacer
Page 12
Editing
Edición

Page 13
Quick Share
Compartir ahora
SCAN
CODE
Scan QR code with your smart phone camera to download the photo
to your smart phone and share it via your favorite App.
(Older phones may require a QR code reader App.)
Escanee el código QR con la cámara de su teléfono inteligente para
descargar la foto a su teléfono inteligente y compartirla a través de su
aplicación favorita.
(Los teléfonos más antiguos pueden requerir una aplicación de lector
de códigos QR).
Photo is ready to download
please scan the QR-code
Assistance or Service
Asistencia o servicio
Share your photo online!
¡Comparte tu foto en línea!
Before contacting us for assistance or service, please check the “Troubleshooting” section in the User Manual.
If you still have questions regarding your Photo Booth product or require technical support,
contact Polaroid At-Home Instant Photo Booth Customer Service at
www.tastemakersllc.com/polaroidsupport
Antes de ponerse en contacto con nosotros para obtener asistencia o servicio, consulte la sección
"Solución de problemas" del Manual del usuario.
Si aún tiene preguntas sobre su producto Photo Booth o necesita soporte técnico,
comuníquese con el Servicio de atención al cliente de Polaroid At-Home Instant Photo Booth en
www.tastemakersllc.com/polaroidsupport

-Photo Booth will not turn on.
-Power cord is not plugged into wall outlet.
-Wires/ Plugs are hooked up incorrectly.
-ON/Off button wasn’t pressed on top of unit.
-Make sure power cord is plugged into the wall outlet and
there is power to that outlet. (Plug other electrical equipment
into the power outlet to make sure the outlet normally works.)
-Make sure all wires/ plugs are properly connected and all the
way set in as directed in assembly instructions.
-Push ON/OFF button on top of unit to power on.
-The Photo Booth screen is frozen.
-The screen looks pixelated or there
are lines running through the image.
-The Photo Booth encountered a problem when
processing the data.
-You may need to RESET the Photo Booth.
Unplug the Photo Booth from the wall outlet and wait
60 seconds to RESET the Photo Booth.
Plug the Photo Booth back in and press the ON/OFF button
on top of unit to power on.
-The printer is not printing.
-The printer may be out of paper.
-The printer door may not be closed properly.
-The paper was inserted backwards.
-Check to make sure you have paper in the printer.
-Make sure the printer door is closed properly and locked in
place by sliding the door downward until you hear a click
sound. (Refer to User Manual)
-The printer is printing paper, but there
is no image on the paper after it has
printed.
-Make sure the printing surface is facing forward.
The text side of paper should be facing inward.
(Refer to User Manual)
-The paper may have been placed in backwards.
-The Photo Booth will not connect to the
internet.
-The Photo Booth may be located too far away
from your wireless router.
-Your WIFI on the Photo Booth may be turned off.
-You may need to reestablish a new connection
to your WIFI router.
-You may be entering the wrong password to
your WIFI network.
-Try moving your Photo Booth closer to your WIFI internet router.
-Make sure the Photo Booth WIFI is turned on under Network
Settings.
-Under the Network Settings choose your network name and
click “Forget Network” then reestablish a new connection by
selecting your network name and entering in your WIFI
password again.
-Make sure you are using the correct password to your WIFI
network. (Always check to make sure your WIFI password works
on your other devices.)
-The photos that print look too dark.
-You may not have adequate lighting in the
environment that you have your Photo Booth
set up.
-Your photo paper wasn’t calibrated when you
loaded the new paper.
-Try moving the Photo Booth to a well lit room.
-Make sure to use the blue calibration paper when loading
new paper in your Photo Booth. (See User Manual)
-After each photo my Photo Booth
automatically prints.
-This is a feature to the Photo Booth that is
found under the Settings Menu.
-If you would like to turn this feature OFF, click on the Settings
Menu and unselect the Auto Print feature.
-The on screen User Interface does not
match the instructions in my user manual.
-After a software update some of the icons and
features may have changed to enrich the user
experience.
-Visit www.tastemakersllc.com/polaroidusermanual for a list of
the most recent features and user interface.
-My Photo Booth is not functioning
correctly. -You may need to update your software. -Click on the Settings tab on your Photo Booth to check for
software updates.
-My photos appear out of focus.
Page 14
-Your Photo Booth has an auto focus feature
and it is picking up surrounding objects.
-Try centering yourself in the middle of the screen to maintain
a strong focus on your face/ faces.
Troubleshooting
Problem Possible cause Solution

-Photo Booth no se enciende.
-El cable de alimentación no está enchufado a la
toma de corriente.
-Los cables / enchufes están conectados
incorrectamente.
-No se presionó el botón ON / Off en la parte
superior de la unidad.
-Asegúrese de que el cable de alimentación esté enchufado al
tomacorriente de la pared y que haya energía en ese
tomacorriente. (Enchufe otros equipos eléctricos en la toma de
corriente para asegurarse de que la toma funcione normalmente).
-Asegúrese de que todos los cables / enchufes estén conectados
correctamente y completamente insertados como se indica en las
instrucciones de montaje.
-Presione el botón ON / OFF en la parte superior de la unidad para
encender.
-La pantalla de Photo Booth está congelada.
-La pantalla se ve pixelada o hay líneas que
atraviesan la imagen.
-El Photo Booth encontró un problema al procesar
los datos.
-Es posible que deba REINICIAR el Photo Booth.
Desenchufe el Photo Booth del tomacorriente y espere 60
segundos para REINICIAR el Photo Booth.
Vuelva a enchufar el Photo Booth y presione el botón ON / OFF
en la parte superior de la unidad para encenderla.
-La impresora no imprime.
-La impresora puede no tener papel.
-Es posible que la puerta de la impresora no esté
cerrada correctamente.
-El papel se insertó al revés.
-Revise para asegurarse de tener papel en la impresora.
-Asegúrese de que la puerta de la impresora esté cerrada
correctamente y bloqueada en su lugar deslizando la puerta
hacia abajo hasta que escuche un clic.
(Consulte el manual del usuario)
-La impresora está imprimiendo papel, pero
no hay imagen en el papel después de que
se ha impreso.
-Asegúrese de que la superficie de impresión esté orientada
hacia adelante.
El lado del texto del papel debe mirar hacia adentro.
(Consulte el manual del usuario)
-Es posible que el papel se haya colocado al revés.
-El Photo Booth no se conectará a Internet.
-Es posible que Photo Booth esté ubicado
demasiado lejos de su enrutador inalámbrico.
-Su WIFI en el Photo Booth puede estar apagado.
-Es posible que deba restablecer una nueva
conexión a su enrutador WIFI.
-Es posible que esté ingresando una contraseña
incorrecta en su red WIFI.
-Intente acercar su Photo Booth a su enrutador de Internet WIFI.
-Asegúrese de que Photo Booth WIFI esté encendido en
Configuración de red.
-En Configuración de red, elija el nombre de su red y haga clic
en "Olvidar red", luego restablezca una nueva conexión
seleccionando el nombre de su red e ingresando nuevamente
su contraseña WIFI.
-Asegúrate de estar usando la contraseña correcta para tu red
WIFI (siempre verifique que su contraseña WIFI funcione en tus
otros dispositivos).
-Las fotos que se imprimen se ven
demasiado oscuras.
-Es posible que no tenga la iluminación adecuada
en el entorno en el que instaló su Photo Booth.
-Su papel fotográfico no estaba calibrado cuando
cargó el nuevo papel.
-Intente mover el Photo Booth a una habitación bien iluminada.
-Asegúrese de utilizar el papel de calibración azul cuando
cargue papel nuevo en su Photo Booth. (Ver manual de usuario)
-Después de cada foto, mi Photo Booth
imprime automáticamente.
-Esta es una característica de Photo Booth que se
encuentra en el menú de configuración.
-Si desea desactivar esta función, haga clic en el menú
Configuración y anule la selección de la función Impresión
automática.
-La interfaz de usuario en pantalla no
coincide con las instrucciones de mi
manual de usuario.
-Después de una actualización de software,
algunos de los íconos y características pueden
haber cambiado para enriquecer la experiencia
del usuario.
-Visite www.tastemakersllc.com/polaroidusermanual para obtener
una lista de las funciones y la interfaz de usuario más recientes.
-Mi Photo Booth no funciona correctamente. -Es posible que deba actualizar su software. -Haga clic en la pestaña Configuración en su Photo Booth para
buscar actualizaciones de software.
-Mis fotos aparecen desenfocadas.
-Su Photo Booth tiene una función de enfoque
automático y está recogiendo objetos
circundantes.
-Intente centrarse en el medio de la pantalla para mantener un
enfoque fuerte en su cara / caras.
Page 15
Solución de problemas
Problema Causa posible Solución

Stay Up To Date
Estar al día
User Manual Quick Link
Enlace rápido al manual del usuario
Important note to user:
We are constantly updating our product functionality and features to increase performance for the best
possible user experience. Always check for software updates under the Settings tab to download the latest
software to get the most from your Polaroid At-Home Instant Photo Booth.
Nota importante para el usuario:
Actualizamos constantemente la funcionalidad y las características de nuestros productos para aumentar el
rendimiento y brindar la mejor experiencia de usuario posible. Siempre busque actualizaciones de software
en la pestaña Configuración para descargar el software más reciente y aprovechar al máximo su Polaroid
At-Home Instant Photo Booth.
NOTE: Software updates may add, rearrange or update different features and icons to the user
interface that you will not find in this printed User Manual. To stay up to date on the most recent
features and user interface always view the latest USER MANUAL by visiting our website at
www.tastemakersllc.com/polaroidusermanual
NOTA: Las actualizaciones de software pueden agregar, reorganizar o actualizar diferentes funciones e
íconos a la interfaz de usuario que no encontrará en este Manual de usuario impreso. Para mantenerse
actualizado sobre las funciones y la interfaz de usuario más recientes, consulte siempre la MANUAL DE
USUARIO más reciente visitando nuestro sitio web en www.tastemakersllc.com/polaroidusermanual
Scan QR code below with your smart phone camera and follow on screen prompts to view the latest
Photo Booth User Manual for a full list of the most recent features
or visit www.tastemakersllc.com/polaroidusermanual
Escanee el código QR a continuación con la cámara de su teléfono inteligente y siga las instrucciones
en pantalla para ver el último Manual de usuario de Photo Booth para obtener una lista completa de las
funciones más recientes
o visite www.tastemakersllc.com/polaroidusermanual
SCAN
CODE

If you have questions regarding your product or require technical support,
contact Polaroid At-Home Instant Photo Booth Customer Service at
www.tastemakersllc.com/polaroidsupport
Visit us at tastemakersllc.com/polaroid
Tastemakers Asia Limited
Kensington Gardens, No U1317,
Lot 7616, Jalan Jumidar Buyong,
87000 Labuan F.T.
Malaysia.
MADE IN CHINA
HECHO EN CHINA
Table of contents