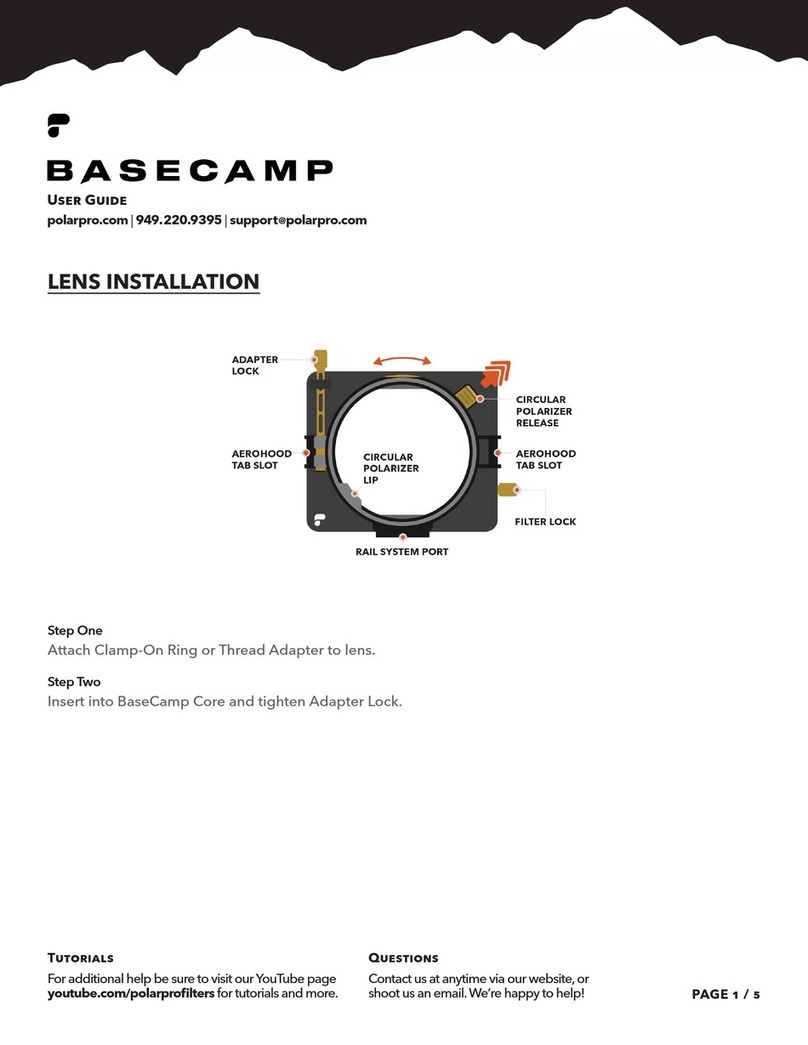
PolarPro Pivot PIVOT-SR User manual

U S E R G U I D E
/ V 1 / 2 0 2 2
01
Shoulder Rig.
Pivot

2x 100mm LWS Rods
100mm LWS Extension Rods
[PIVOT-SR-100MM]
1x 200mm Video Plate
200mm Video Plate
[PIVOT-200PLT]
1x 120mm Video Plate
120mm Video Plate
[PIVOT-120PLT]
1x Shoulder Pad
| 2x 400mm LWS Rods | 2x 120mm Video Plates
(one must be used for the Riser/Quick-Release)
1x Riser/Quick-Release | 1x Storage Pouch
Pivot Shoulder Rig - Base Only
[PIVOT-BSE]
1x Shoulder Pad | 2x Handles
| 2x 400mm LWS Rods | 2x 120mm Video Plates
(one must be used for the Riser/Quick-Release)
1x Riser/Quick-Release | 1x Storage Pouch
Pivot Shoulder Rig
[PIVOT-SR]
U S E R G U I D E
/ V 1 / 2 0 2 2
02
Parts & components.
What's Included

FRONT
BACK
LEFT
RIGHT
Video Plate
Quick-Release
Riser
Rods
Shoulder Pad
Handles
U S E R G U I D E
/ V 1 / 2 0 2 2
03
The following terminology will be used
throughout this manual when referring to
parts of the Pivot Shoulder Rig.
Parts & Orientation
Reference

Standard shoulder rig positioning with the camera weight
centered over the shoulder. This provides the most
comfort and stability when using heavy setups.
On-Shoulder
Flipping the handles and lower shoulder pad down allows
Pivot to be placed on the ground for easy rig adjustments
or changing camera settings quickly.
Setup/Pit-Crew
Designed to
t in the water bottle holder or strapped to
the side of most backpacks, this mode allows Pivot to
compress into a small footprint for easy travel.
Compact
U S E R G U I D E
/ V 1 / 2 0 2 2
04
Pivot aims to give a versatile experience
and provides a multitude of shooting
positions for different scenarios.
Shooting Modes

Essentially the same setup as "over-shoulder", but instead
of placing Pivot up and over the shoulder, the pad is used as
a contact point with the chest/stomach/hip.
Chest Press
By swinging the lower pad 90-degrees Pivot will wrap the
pad over the shoulder. This greatly improves stability and
helps tremendously with one-handed operation when needed.
Over-Shoulder
U S E R G U I D E
/ V 1 / 2 0 2 2
05
Pivot aims to give a versatile experience
and provides a multitude of shooting
positions for different scenarios.
Shooting Modes

By removing the shoulder pad and exposing the lower video
plate, Pivot can be quickly mounted to a video tripod
with an appropriate head.
On-Tripod
The riser can be detached from shoulder pad and positioned
forward to get the camera in front of the user's face to see
the built in monitor when an external monitor is not available.
Non-Monitor
U S E R G U I D E
/ V 1 / 2 0 2 2
06
Pivot aims to give a versatile experience
and provides a multitude of shooting
positions for different scenarios.
Shooting Modes

3.2.1.
3.
To lengthen the handles, open the gold latches by pressing with
your thumbs. Pull the handles down to desired length. Close
the gold latches to lock handles in place.
2.
Depress the gold buttons located on top of the handles
and rotate to desired handle angle.
1.
Rotate the handles outward until they lock into place,
horizontal to the rods.
Handles
U S E R G U I D E
/ V 1 / 2 0 2 2
07
Setting up the handles, shoulder pad,
camera installation, and riser.
Setup

2.1.
2.
With the gold buttons depressed, swing the bottom portion downward
until it locks into place at 90-degrees. It can also be rotated back completely
to 180-degrees if needed.
1.
The shoulder pad can be swung down 90-degrees to a vertical position
or swung 180-degrees to a horizontal position. This adjustability can aid
in some shooting scenarios and be used for Setup/Pit-Crew mode.
This is done by depressing the gold buttons on both sides of the back
of the shoulder pad.
Shoulder Pad
U S E R G U I D E
/ V 1 / 2 0 2 2
08
Setting up the handles, shoulder pad,
camera installation, and riser.
Setup

2.1.
2.
To attach your camera to the quick-release,
rst open the large gold latch
located on the left side of the quick-release by pressing the black secondary
lock button down and then swinging the latch open to a 90-degree position.
1.
Install the provided 120mm video plate onto your camera or camera
cage using the provided
¼
-20 or
⅜
-16 screws. Try to install the plate
in a position that places the center of mass over the plate. Long or
heavy lenses will need to be set further forward, while small/ lighter
lenses can be more centered on the camera body.
Camera Installation
U S E R G U I D E
/ V 1 / 2 0 2 2
09
Setting up the handles, shoulder pad,
camera installation, and riser.
Setup

2.1.
3.
When the desired height is found, close the gold latch. Note, latch
tension can be adjusted (see adjustments section).
2.
Next, raise the camera up until the lens is centered on the matte
box.
Be careful to keep your
ngers out from under the riser and
ensure a solid grip on the camera as this will create a pinch point
if the camera is released when not yet locked into position.
Available offset range 32.5mm to 54.8mm.
1.
When using a matte box mounted to the rods, the camera will need
to be raised to line up optical centers. Open the small gold latch on
the right side of the quick-release by depressing the black secondary
lock button on the latch and swinging it open 90-degrees.
Riser
U S E R G U I D E
/ V 1 / 2 0 2 2
10
Setting up the handles, shoulder pad,
camera installation, and riser.
Setup

2.1.
2.
Two(2) M6 ARRI Rosettes, located on the outward-facing portion
of the top of each handle. Simply remove the end-cap to reveal
each M6 ARRI mounting point by rotating the cap counter-clockwise.
1.
The Pivot Shoulder Rig has 4 built-in threaded accessory points.
Two(2) female 1/4"-20 inserts located at the bottom of each handle.
Mounting Points
U S E R G U I D E
/ V 1 / 2 0 2 2
11
Locating attachment points.
Mounting Points

E.
C.
A.
B.
D.
F.
U S E R G U I D E
/ V 1 / 2 0 2 2
12
How to make adjustments on the
Pivot Shoulder Rig.
Adjustments

With the latches closed, insert hex key into the silver screws located on the top of the shoulder pad assembly
and rotate clockwise until it reaches desired tension.
F. Shoulder Pad to Rod Tension
With the latch closed onto the video plate, insert hex key into the silver screw on the left side of the quick-release
through the latch and rotate clockwise until it reaches desired tension.
D. Quick-Release Plate Lock Tension
With each latch closed onto rod, insert hex key into the silver screw on the top side of the riser assembly
and rotate clockwise until it reaches desired tension.
C. Riser to Rod Tension
With the latches closed, insert hex key into the silver screws located on the top of the handle assembly
and rotate clockwise until it reaches desired tension.
B. Handle to Rod Tension
With the latches closed, insert hex key into the silver screws located on the front side of the handles
and rotate clockwise until it reaches desired tension.
A. Handle Length Tension
U S E R G U I D E
/ V 1 / 2 0 2 2
13
How to make adjustments on the
Pivot Shoulder Rig.
Adjustments

polarpro.com | support@polarpro.com | 949.220.9395
Reach out any time via live-chat on our website, or shoot us an email. We're happy to help!
Q U E S T I O N S ?
U S E R G U I D E
/ V 1 / 2 0 2 2
14
Questions and support.
More Info
This manual suits for next models
4
Other PolarPro Camera Accessories manuals