Polstar Road Mentor User manual

All-In-One Navigator
User's Manual
Ver.2.0
1

2
Polstar Technologies, Inc.
http://www.polstargps.com
© Copyright 2006 Polstar Technologies, Inc. All rights reserved.
Polstar™, The RoadMentor™ Series, The Polstar™ Logo are registered trademarks
of Polstar Technologies, Inc. in Taiwan and/or other countries. All other trademarks,
registered trademarks, trade names and service marks are properties of their
respective owners
No part of this user manual may be reproduced or transmitted by any means, for
any purpose other than for the user’s own use, without the prior written consent of
Polstar Technologies, Inc.
This document is subject to change without notice.
You must read the warnings and the disclaimer at the back of this manual prior to
using your RoadMentor.

3
Table of Contents
1. Introduction............................................................................................................4
1.2 Packing List....................................................................................................6
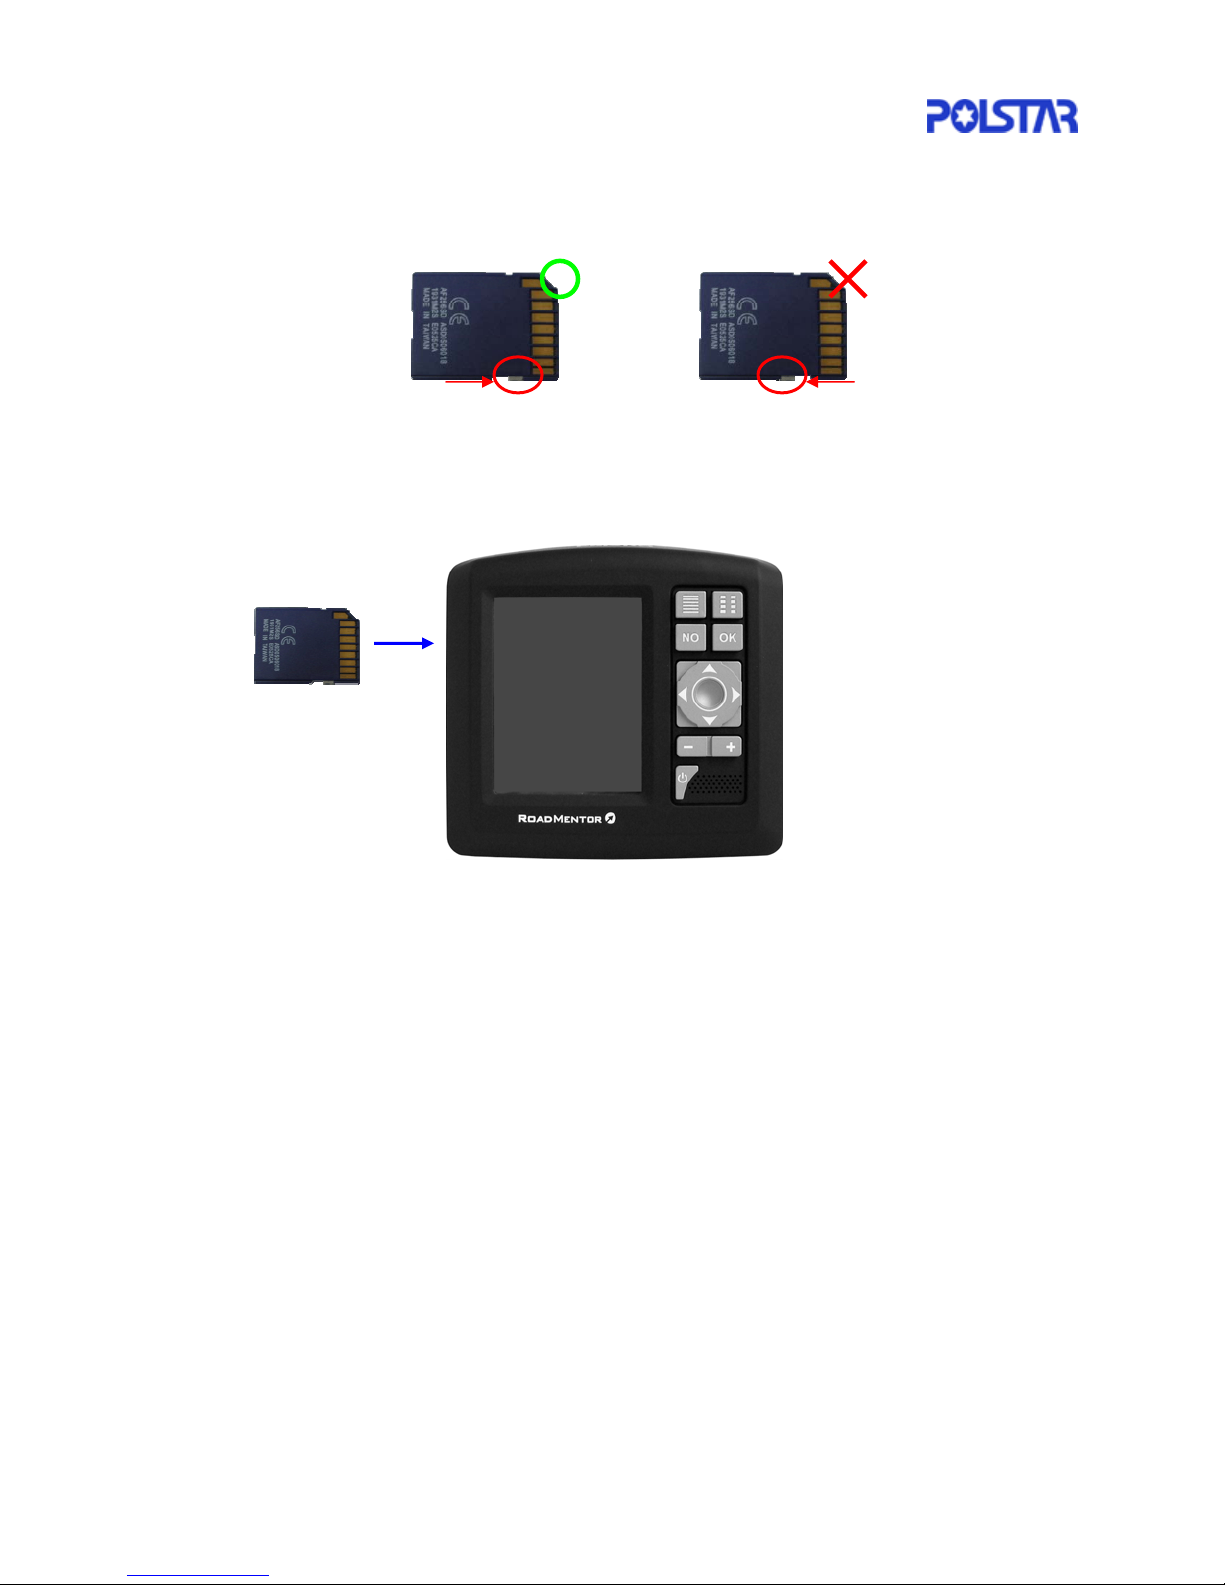
1.3 Before using your RoadMentor......................................................................7
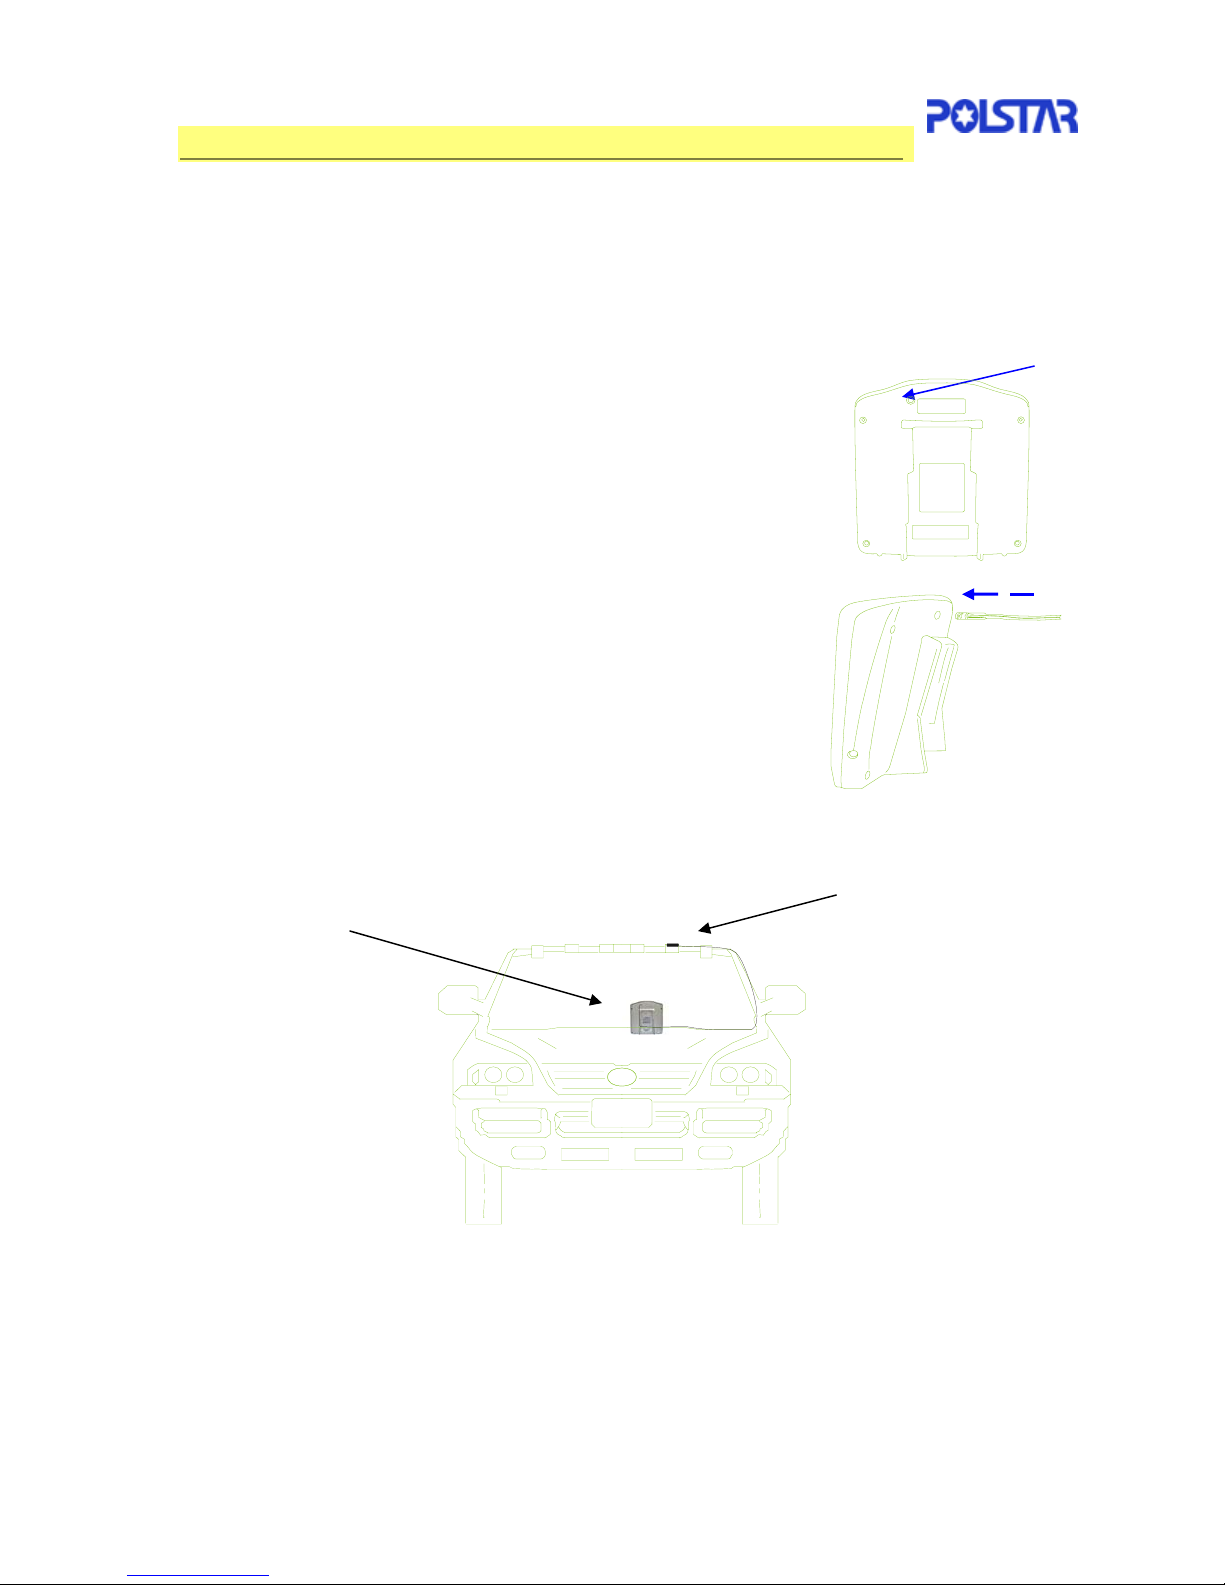
1.4 Installing Your RoadMentor in your Vehicle...................................................9
1.5 Using the external antenna with your RoadMentor (optional) ......................10
2. Getting Started.....................................................................................................11
3. Basic Information.................................................................................................16
3.1 Main Menu...................................................................................................16
3.2 Map Screen..................................................................................................17
3.3 Panning........................................................................................................18
3.4 Roads...........................................................................................................18
3.5 Map Scales..................................................................................................19
3.6 Points of Interest (POI) ................................................................................20
3.7 Using the 4-Way Arrow Keypad...................................................................21
3.8 Navigation Menu..........................................................................................23
3.9 Navigating Using your RoadMentor .............................................................24
3.10 Route List...................................................................................................25
4. Destinations Menu...............................................................................................26
4.1 Destinations By Address..............................................................................27
4.2 Destinations by Intersections.......................................................................29
4.3 Destination by City Center ...........................................................................31
4.4 Points of Interest..........................................................................................33
4.5 Point of Interest Categories..........................................................................33
4.6 Searching within 25 miles of your current location.......................................35
4.7 Searching for Points of Interest in a State/Region .......................................35
4.8 Favorites......................................................................................................36
4.9 Recent..........................................................................................................37
4.10 Destination Options....................................................................................38
5. Route Options......................................................................................................40
6. Display Options....................................................................................................41
7. GPS Info/ Almanac ..............................................................................................44
8. Localisation..........................................................................................................45
9. Volume.................................................................................................................45
10. Map Updates......................................................................................................46
10.1 Updating Map via a USB Card Reader ......................................................46
10.2 Updating Map via a USB link .....................................................................47
10.3 Installation of the USB driver......................................................................47
10.4 Installation of Microsoft ActiveSync............................................................49
10.5 Using Microsoft ActiveSync........................................................................53
11. Disclaimer..........................................................................................................54
12. Important Messages and Warnings ...................................................................54
13. Maintenance ......................................................................................................55
14. Storage..............................................................................................................55
15. FCC, CE and E-Mark Compliances ...................................................................55
16. Limited Warranty................................................................................................56
17. Specifications.....................................................................................................58

4
1. Introduction
Congratulations on purchasing the Polstar PRM-1000 RoadMentor All-In-One
Vehicle Navigator. Your RoadMentor is a state of the art navigation system
designed specifically for use in vehicles and employs the latest technologies in order
to make your journeys more efficient and productive. Your RoadMentor offers the
following features to make travelling and navigating through your neighbourhood
easier:
zDynamic route calculation
zAccurate moving map display
zTurn-by-turn voice instructions
zVoice output engine
zUp to 1GB storage space via SD card
zRegular software and map updates
zCompact, lightweight and easy to transport
zEasy to use and intuitive interface
You can operate your RoadMentor using either the touchscreen interface, or the
keypad located on the right of the screen.
Polstar would like to thank you again for purchasing the RoadMentor, and hope that
it will assist you in your travels in the many years to come.
For the latest news and updates, product support, and information regarding
Polstar’s range of GPS products, please visit Polstar’s website at
http://www.polstargps.com.

5
1.1 The Polstar RoadMentor
Front View
1 On/Off Button Turns your RoadMentor on or off
2 Speaker Plays voice messages and maneuvering instructions
3 Power Socket Power socket connection for the power cable/adaptor
4 Zoom In/Out Button Zoom in/out of the map
5 4-Way Arrow keypad Scroll through Menu options/functions
6 Enter Button Confirm highlighted selections
7 Menu Button Access the Main Menu
8 Route Button Access the route list containing list of roads on the route
9 Cancel Button Cancel highlighted selections/exit from menus
10 GPS Antenna Built-in GPS antenna
Rear View
1 2
3
8
4
5
6
9
4
1
10
7
5
2
3
1 Mini USB Slot Mini USB connection for USB cables to PC
2 Vehicle Mount Slot Slot for mounting the shaft
3 Stand Stand for Standing Independently
4 SD Card slot Storage medium where you can store maps
5 MMCX connector Connector for the external antenna ( PAT-1000)

1.2 Packing List
Standard Package
You should find the following parts in the box with the purchase of a new
Polstar RoadMentor:
zPolstar RoadMentor GPS Navigation Unit x1
zIndoor Power Cable x1
zPower Adapter for use in Vehicles x 1
zStarter’s Guide x 1
zMounting Shaft x 1
zMini USB Cable x1
zCD-ROM x 1 (with Microsoft ActiveSync 3.7, USB driver, and User’s
manual)
zAnti-Slip Mat x1
zSD card (up to 1GB space) x 1
zUser’s Manual CD x1
If there is anything missing, contact your local Polstar retailer immediately.
Mini USB cable Power cable for vehicles
Mounting Shaft
Optional Accessories
The following accessories can be purchased separately to enhance the
performance of your RoadMentor:
zMap-Loader CD-ROM (distributors only)
zPMP-NA (North America mapping data, 5 CD’s)
zPMP-EU (European Union mapping data, 9 CD’s)
zPAT-1000 (optional external antenna)
6
PA
T
-
1000

7
1.3 Before using your RoadMentor
Your RoadMentor is a compact and portable device that can be easily installed and
removed in a matter of seconds, allowing you to take it anywhere. For safety
reasons, you should secure your RoadMentor to the Vehicle Mounting Shaft that is
included, which can be mounted either on the vehicle dashboard or on the
windscreen. An Anti-Slip Mat has been provided to allow you to place your
RoadMentor anywhere securely.
With Mounting Shaft Support Standing Independently
Caution: Do not place your RoadMentor where it is likely to interfere with the
controls of the vehicle or obstruct your view of the surroundings. Do not place your
RoadMentor in places where it is likely to cause personal injury and/or property
damage in the event of an accident. Do not place your RoadMentor unsecured.

8
Caution: Do not remove the SD card at any time while your RoadMentor is running.
Doing so may corrupt the data that is stored within the SD card. Also, the switch of
the SD card should be in unlock position, as shown below, which makes the SD card
writeable by the navigation software.
Unlock Lock
To insert the SD card, gently push it into the SD card slot with the label facing the
back of the RoadMentor as illustrated below.
To remove the memory card, gently push the edge of the card to release it and pull
it out of the SD card slot.
To optimize signal reception from satellites, mount your RoadMentor at a place
where it has a clear and unobstructed view of the sky, therefore improving the
accuracy of your coordinate and velocity readings.
Moreover, to prevent satellite signal obstruction, which is usually caused by thermal
filters or the roof of the car, it’s advisable for the RoadMentor users to install an
external antenna (PAT-1000). (Refer to “Using the external antenna with your
RoadMentor “ section)

9
1.4 Installing Your RoadMentor in your Vehicle
Step 1
Place the Suction End of the Vehicle Mounting Shaft on a flat surface in front of
the windshield glass that is unlikely to interfere with the controls of the vehicle,
obstruct the driver’s views, or may cause accidents/damage in the events of the
accidents.
Lift the Suction Lever up
Press the Suction Cup against the flat surface
Press the Suction Lever Down
Step 2
Secure your RoadMentor to the Vehicle Mounting Shaft. There is a Sliding
Slot behind your RoadMentor unit where you can slide the Vehicle
Mounting Shaft into.
Step 3
You can change the angle between the mounting shaft and your RoadMentor
unit to make it easier for you to operate and see. Simply bend it to the angle
you are most comfortable with.
Step 4
For additional stability, place your RoadMentor unit on the anti slip mat. The anti
slip mat is able to prevent slip on surfaces with slopes up to 70 degrees.
Step 5
Plug the power adaptor into your vehicle’s cigarette lighter receptacle, and the
power plug of the power adaptor into your RoadMentor’s power socket.

10
1.5 Using the external antenna with your RoadMentor (optional)
To prevent satellite signal obstruction, which is usually caused by thermal filters or
the roof of the car, it’s advisable for the RoadMentor users to install an external
antenna.
To install the PAT-1000 into your RoadMentor, just insert the antenna into the
MMCX connector at the back of RoadMentor as illustrated below. MMCX connector
Step 1: Turn the rear side of the RoadMentor toward yourself
and unpack the external antenna cable:
Step 2: Insert the connecting side of the external antenna
cable vertically into the MMCX connector of the
RoadMentor:
Step 3: Put the antenna side of the external antenna cable onto the roof out of the
automobile. Make sure that the magnet of the antenna side sticks to the roof.
PAT-1000
PRM-1000

2. Getting Started
Below is a basic tutorial that will get you started with your new RoadMentor. Before
you get started, please switch your RoadMentor on and allow the unit to have an
unobstructed view of the sky and leave it for approximately 2 minutes to establish a
valid GPS fix. Once you have a valid GPS fix, the map screen will automatically
centre to your current location.
Step 1:
Plug the power adaptor into your RoadMentor’s power socket and an external power
source. Insert the SD card containing your electronic maps if you have not already
done so. Once your RoadMentor has been connected to an external power source,
turn your RoadMentor on by pressing the power on/off button.
Plug the power connector to your RoadMentor.
Press the POWER ON/OFF button
11
Step 2:
After turning your RoadMentor on, you will be presented with a warning message.
Read this message then press OK to proceed to the Menu screen.
Note: The OK button won’t appear until you insert the SD card after powering on.
Read the warning message.
Press OK to proceed to the Map Screen

12
Step 3:
Once you have entered the Map Screen, press the Menu button on the keypad to
load the Main Menu. Press the Destinations icon under the Main Menu to load the
Set Destinations screen.
Step 4:
Under the Destination Menu, press the City Center icon. This will load the
Navigation by City Center screen.

13
Step 5:
Under the Navigation by City Center screen, press the By Distance icon. This will
load a list of all the city centers within a 25-mile radius from your current location.
By Distance
Step 6:
Select a city center from the City List. The selected city will be highlighted in blue.
Press the Nav button to calculate a route to the selected City Center based on your
Route Options.
Selected City Center
Press Nav

14
Step 7:
The route to the destination you have just selected will be displayed on the map
Screen, which is marked in dark blue. Your RoadMentor will enter navigation mode
once a route has been calculated.
Map
Orientation/Compass
See Display Options
for more information.
Destination
Name of Current
Street
Press to access the
information page.
Current Location
Journey Information.
If you have established valid GPS fixes with satellites, you can now navigate to your
destination using your RoadMentor. If not, you can still use the Demo feature that is
discussed later in this manual to show you how to get to your destination.
Note: Do not remove the SD card at any time while your RoadMentor is running.
Doing so may corrupt the data that is stored within the SD card or cause abnormal
navigation behavior even you re-insert the SD card. We strongly suggest you to
restart your RoadMentor. A Warning message will appear if you remove the SD
card.
Warning after re-inserting the SD card
Warning after removing the SD card

15
Starting your RoadMentor by Cold Start
To switch your RoadMentor on, press the power button at the bottom of the keypad
once it has been connected to an external power source.
Please place your RoadMentor in a place where it has a clear and unobstructed
view of the sky. If you have not used your RoadMentor for some time, or has moved
it over 500 miles after the last power off, you should Cold Start to get a GPS fix.
Cold start takes effect simply by pressing “—“ keypad continuingly for 10 seconds
immediately after turning on the RoadMentor. You will see a message “Cold Start
OK” at the bottom of the warning screen on power up.
Once you have a valid GPS fix, subsequent GPS fix times after switching the power
on; known as Time-To-First-Fix (TTFF) will be lower. Below are the typical times to
get a GPS fix:
PRM-1000 PRM-1000SCold Start
(Using your RoadMentor for the first time/Moving the unit over 500
miles from the last location/Switched for prolonged periods of time) 45
seconds 42 seconds
Warm Start
(Switching the unit off for a time within 1 week) 35
seconds 38 seconds
Hot Start
(Temporary loss of GPS fix/Immediate power off-power on, within 4
hours)
2 seconds 1 seconds
* PROM-1000 uses Sony GA-4 GPS chip; PRM-1000S uses SiRF Star III GPS chip.
Once you have turned your RoadMentor on, you will be presented with a warning
message. After reading the warning message, press OK and you will enter the Map
Screen. You are now ready to navigate using your RoadMentor.

16
3. Basic Information
3.1 Main Menu
You can access many functions of your RoadMentor from the Main Menu. To
access the Main Menu, press the Menu button on the keypad.
The following functions/submenus can be accessed from the Main Menu by
pressing the respective icons on the screen:
zDestination
Begin planning a route to a Point of Interest, Address, City Center, Intersection,
Favorite Place or a Recent Destination.
zSpeed Alert
Set the speed limit, above which a warning will prompt.
zRoute Options
Change your route selection preferences.
zDisplay Options
Change your Map Screen display Settings
zLocalization
Change the settings of your RoadMentor for use in different countries.
zVolume
You can change the volume of the voice messages from this Menu.
To return to the map screen, press the exit button on the top right hand corner of the
Main Menu.
For more information about each option, refer to the relevant sections later in this
user manual.

17
3.2 Map Screen
The map screen shows a map of your immediate surroundings, and allows you to
scroll to and view other locations on the map, provided there is map coverage of that
area. You will also be able to view different Points of Interest and the route to your
destination. The map screen will load automatically on power on.
Note: To navigate through a certain area, you must have the map of that area
stored in the SD card.
Map
Orientation/Compass
See Display Options
for more information.
Current Location
Journey Information
Name of Current
Street
The Map Screen contains the following functions/information:
zJourney Information
This box will show your current speed, estimated time at arrival (ETA),
remaining distance from your destination and the remaining time. Press
this box to alternate between the types of information.
Note: If your RoadMentor is not in navigation mode, only your current
speed will be displayed.
zCurrent Street Name
This box displays the name of the street you are currently on. Pressing
here will bring up the Location Information screen that gives you the
address, street name, city name and coordinates where applicable.

18
3.3 Panning
Panning allows you to view areas of the map that is
not displayed on the Map Screen. To do so, simply
touch the screen with your finger and drag it
oppositely to your desired direction. While in
panning mode, you will be zooming in/out from the
center of the screen, marked by the black
crosshair.
To exit panning mode, press the NO button on the
keypad and the Map Screen will return to the
original location. You can access the Navigation
Menu while in panning mode, which is discussed
later in this manual.
3.4 Roads
The RoadMentor classifies roads into 4 different categories and are represented by
different colored lines on the Map Screen:
Local Roads: Thin white line.
Major Roads: Thick orange line
Freeways/Highways: Thick red line.
Only Freeways/Highways will be displayed for all map scales. Local and major
roads will not be displayed once they exceed certain map scales.
After planning a route to a destination, your route will be marked by a dark blue line
on the map. Any road you choose to avoid will be marked in purple.

19
3.5 Map Scales
The map scales can be changed to show a more detailed map that covers a smaller
area, or a less detailed map that covers a greater area to meet your navigational
needs. The current map scale is displayed at the bottom of the screen, above the
current street name.
To change the map scale, press the zoom in/zoom out buttons on the keypad. The
RoadMentor will zoom in differently, as described below:
zZooming In/Out in Panning Mode
The map will zoom in/out on the center of the screen, which is marked by a
black crosshair.
zZooming In/Out at any other time
The map will zoom in/out on your current location, which is marked on the
Map Screen as a thick red arrow with a blue circle surrounding it.
The available map scales of your RoadMentor are:
Ft Miles
100 1
200 2
500 5
1000 10
2500
Meters KM
25 1
50 2
150 5
300 10
20

20
3.6 Points of Interest (POI)
Occasionally, you will see various icons on the map screen. These icons represent
local landmarks and are known as Points of Interests (POI). Clicking on one will
bring up all the POI at that particular location. You can display or hide POI icons by
changing the Display Settings.
After selecting a Point of Interest, you will be presented with the following options:
Nav-Plans a route to the destination and enters navigation mode.
Fav-Adds the destination to your Favorites Folder.
Map-Center the map on the selected POI and enters panning mode.
Destination Icon
Your destination or stopover is marked on the map by a target icon after your route
has been calculated.
Maneuver Arrow
The maneuver arrow shows the type of action required at the next point of
maneuver, and is marked on the map as a green arrow. This will only be displayed
when a route has been planned.
This manual suits for next models
1
Table of contents