Polstar PolNav Navigation User manual

PolNav Navigation Software
User’s Manual
Version 2008 R4.0
For use with PC/PDA/Personal Navigators

ii
Polstar Technologies, Inc.
http://www.polstargps.com
Tel: +886-3-552-5279
Fax: +886-3-552-5269
Address: 5F-1 No.28 Taiyuan St, Jhubei City, Hsinchu County 30288, Taiwan
© Copyright 2008 Polstar Technologies, Inc. All rights reserved.
Polstar™, The RoadMentor™ Series, PolNav™, The Polstar™ Logo are
registered trademarks of Polstar Technologies, Inc. in Taiwan and/or other
countries. All other trademarks, registered trademarks, trade names and
service marks are properties of their respective owners
No part of this user manual may be reproduced or transmitted by any means,
for any purpose other than for the user’s own use, without the prior written
consent of Polstar Technologies, Inc.
This document is subject to change without notice.
You must read the warnings and the disclaimer at the back of this manual
prior to using PolNav.

iii
Contents
1. INTRODUCTION..............................................................................................................................1
2. INSTALLATION AND HARDWARE SETUP...............................................................................2
2.1 SOFTWARE INSTALLATION..............................................................................................................2
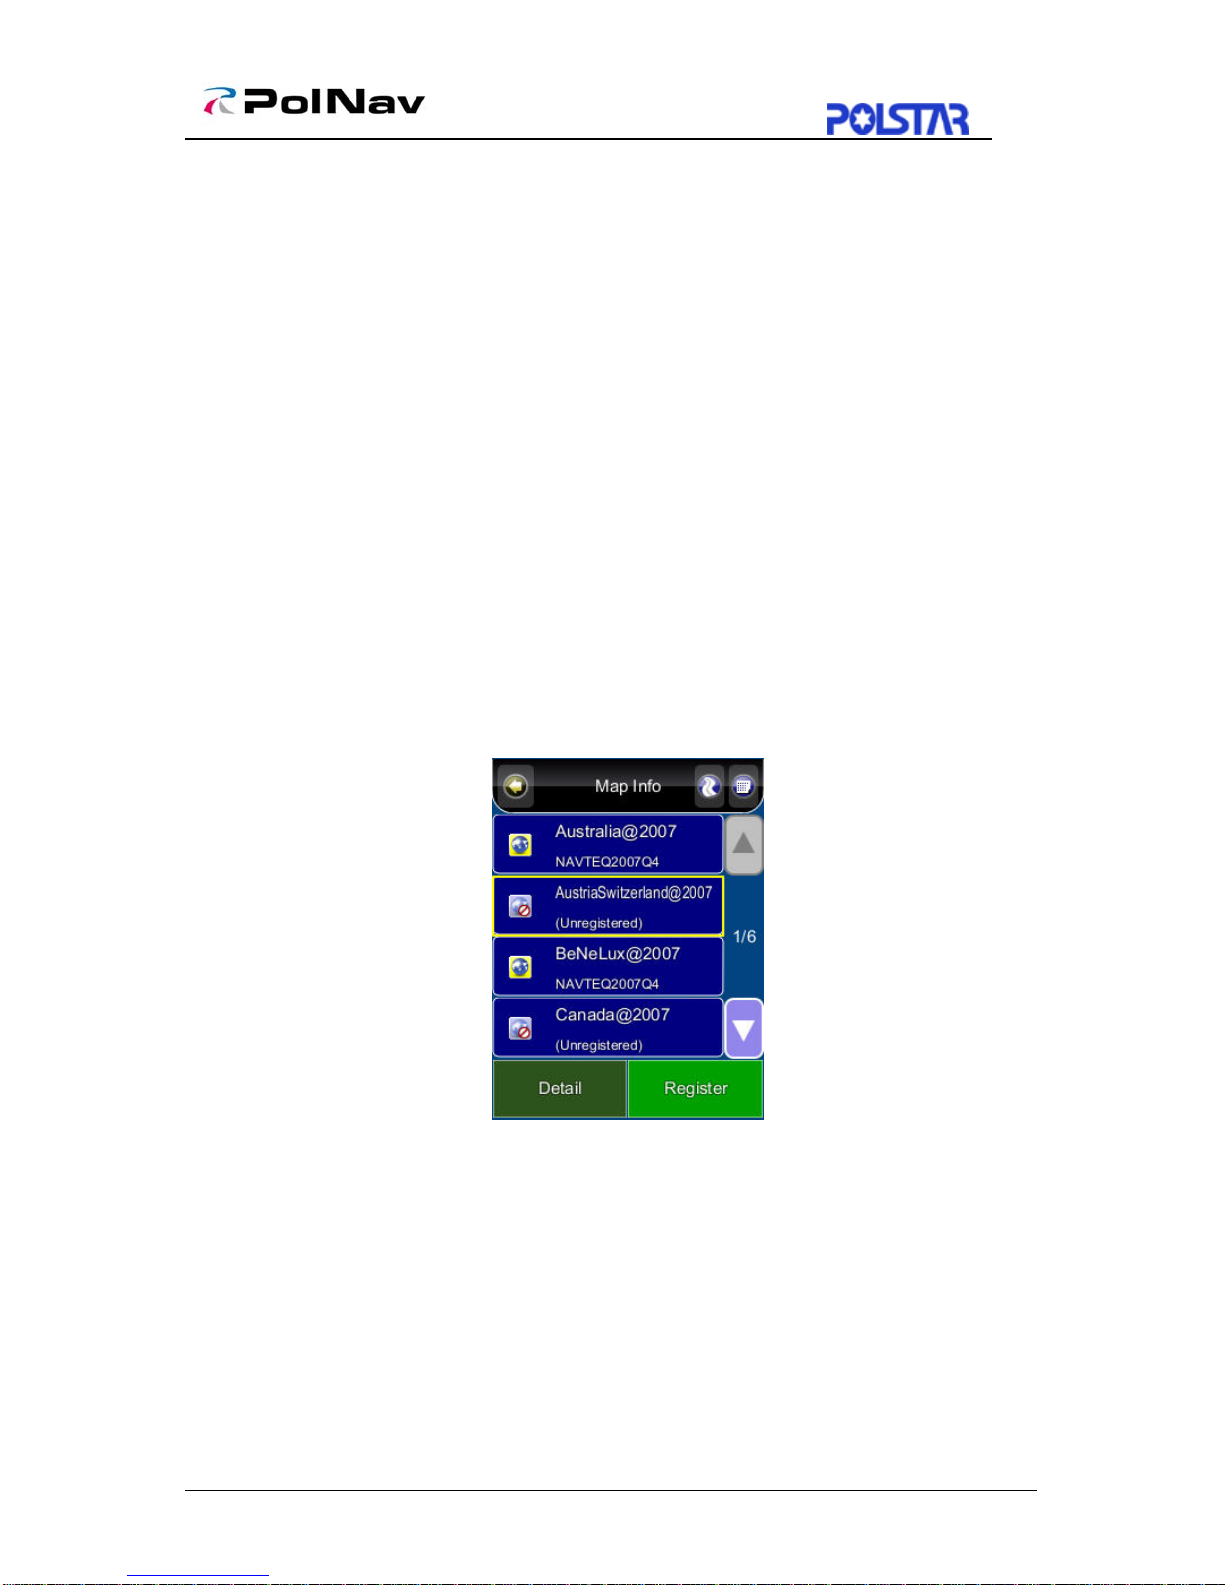
2.1.1 Map code................................................................................................................................2
2.1.2 Registration............................................................................................................................2
2.1.3 Device ID...............................................................................................................................3
2.1.3 Device ID...............................................................................................................................4
2.2 HARDWARE CONFIGURATION (PC/PDA ONLY) .............................................................................4
3. GETTING STARTED WITH GPS NAVIGATION AND POLNAV............................................5
4. USER INTERFACE...........................................................................................................................9
4.1 MAIN MENU ...................................................................................................................................9
4.2 MAP SCREEN ................................................................................................................................10
4.2.1 Functions..............................................................................................................................10
4.2.2 Map Displays......................................................................................................................10
4.2.2 Map Displays.......................................................................................................................11
4.3 ZOOM IN/ZOOM OUT ....................................................................................................................12
4.4 PANNING (BROWSING THE MAP)...................................................................................................12
4.5 LOCATION MENU..........................................................................................................................13
4.6 NAVIGATION SCREEN ...................................................................................................................14
4.7 FREE RUN SCREEN........................................................................................................................15
5. FINDING DESTINATIONS..................................................................................................................16
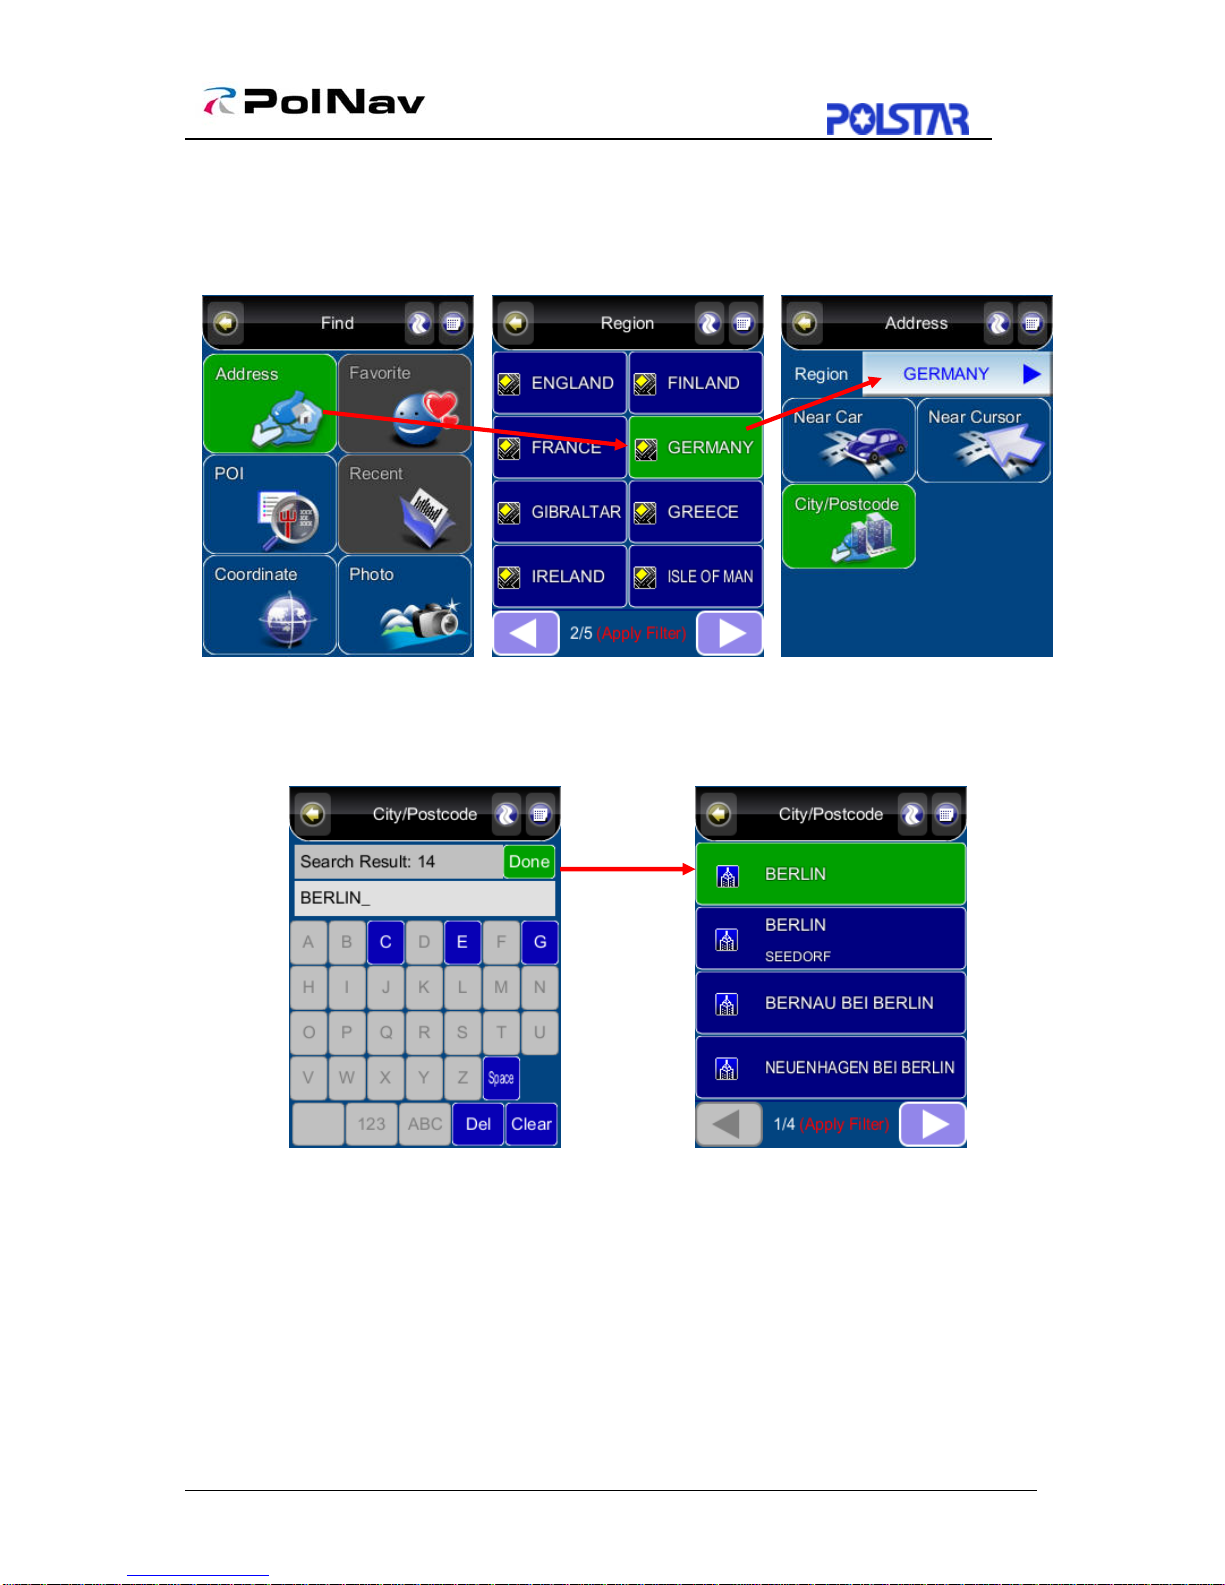
5.1 BY ADDRESS-CITY/POSTAL CODE FIRST......................................................................................16
5.2 BY POINTS-OF-INTEREST (POI) ....................................................................................................18
5.3 BY RECENT DESTINATIONS ..........................................................................................................21
5.4 BY GPS COORDINATES.................................................................................................................21
5.5 ENTERING INFORMATION..............................................................................................................22
5.6 SEARCHING IN DIFFERENT COUNTRIES.........................................................................................22
5.7 BY PHOTO.....................................................................................................................................23
6. ADVANCED ROUTING FEATURES...........................................................................................24
6.1 MAKING DETOURS........................................................................................................................24
6.2 ADDING INTERMEDIATE WAYPOINTS ...........................................................................................25
6.3 CHANGING THE END DESTINATION...............................................................................................25
6.4 SETTING STARTING LOCATIONS/CLEARING ROUTES/SETTING SIMULATED STARTING LOCATIONS
...........................................................................................................................................................26
6.5 ROUTE SIMULATION .....................................................................................................................26
6.6 CHANGING ROUTING OPTIONS .....................................................................................................27
7. ROUTE MANAGEMENT...............................................................................................................28
7.1 ROUTE INFORMATION ...................................................................................................................28
7.2 TURN LIST ....................................................................................................................................28
7.3 ITINERARY LIST............................................................................................................................29
8. MANAGING FAVOURITES, ITINERARIES AND TRAILS ....................................................30
8.1 MY FAVOURITES...........................................................................................................................30
8.2 MY ITINERARY .............................................................................................................................31
8.3 MY TRAIL.....................................................................................................................................31
8.4 CLEAR DATA ................................................................................................................................32
9. CONFIGURING THE POLNAV....................................................................................................33
9.1 GENERAL SETTINGS......................................................................................................................33
9.1.1 Volume .................................................................................................................................33

iv
9.1.3 Language..............................................................................................................................34
9.1.4 Unit ......................................................................................................................................35
9.1.5 Time Zone.............................................................................................................................35
9.1.6 Guidance..............................................................................................................................36
9.2 ADVANCED SETTINGS...................................................................................................................37
9.2.1 Safe Mode.............................................................................................................................37
9.2.2 Speed Alert...........................................................................................................................38
9.2.3 POI Icon...............................................................................................................................38
9.2.4 Factory Default....................................................................................................................39
9.3 ROUTE OPTIONS ...........................................................................................................................39
9.3.1 General ................................................................................................................................39
10. INFORMATION ............................................................................................................................41
10.1 GPS............................................................................................................................................41
10.2 STATISTICS .................................................................................................................................41
10.3 MAP............................................................................................................................................42
10.4 ABOUT........................................................................................................................................42
11. GPS SETTINGS..............................................................................................................................43
12. DISCLAIMER................................................................................................................................44
13. IMPORTANT MESSAGES...........................................................................................................44

1
1. Introduction
Congratulations on purchasing the Polstar PolNav Navigation Software. PolNav is a
state of the art navigation software designed to make your journey more efficient and
productive. PolNav offers the following features to make travelling and navigating
through your neighbourhood easier:
•Dynamic route calculation
•Set and manage multiple waypoints en route to your destination with ease
•Powerful and convenient address search (Postal code/street search)
•Accurate moving map display
•Turn-by-turn voice instructions and mini maps
•Voice output engine
•Comprehensive and detailed map and Points-of-Interest (POI) database
•Easy to use and intuitive interface
•Space efficient
•Compatible with PC, PDA and Personal Navigator Packages.
Polstar would like to thank you again for purchasing PolNav, and hope that it will assist
you in your travels in the many years to come.
For the latest news and updates, product support, and information regarding Polstar’s
range of GPS products, please visit Polstar’s website at http://www.polstargps.com.

2
2. Installation and Hardware Setup
2.1 Software Installation
To run the software legally, the user has to get a license key by registration process.
The license key is encrypted by the combination of the device ID, which could be your
SD card ID, and a map code. Also, please note that the license key is per map region.
Each map region has its own map code, and thus you should have different license key
for each map region. E.g. the map codes for BeNeLux, Germany and Taiwan could be
BeNeLux@2007, Germany@2007 and Taiwan@2007, respectively.
If the software you have is not equipped with legal map licenses, the security warning
pages will pop up to remind you of finishing the process to have legal licenses at the
beginning of running PolNav.
2.1.1 Map code
As explained above, the license key is encrypted by the combination of the device ID
and the map code.
To know your map code, enter Main Menu, choose Info ->Map.
As shown above, each entry has an icon, indicating if the corresponding map is legal or
not, a map code and the date code. As an example, the first two illustrates the region
Australia has a map code Australia @2007 and the region Austria/Switzerland has a
map code Australia@2007.
2.1.2 Registration
The software may not run with full functionalities and successfully if the map data is not
with legal license.
The license key is calculated based on map code and device ID. If you have not a legal
license of map data, you will be warned by the message “Unregistered map(s) found!”

3
at the moment you run the software as below. Press OK to check the illegal map data
you use, where a forbidden icon are shown below.
To get a license key, you need to send the Device ID and the map code to the original
distributor to request a legal license key to that map data once you have paid for it.
It would be strongly recommended to register your personal information to the server of
the original distributor once you have the license key in case you need to retrieve the
map data due to the SD card corrupted.
After having the license key for that map region, simply press Register button in Map
Info page to finish the activation process as shown below.

4
2.1.3 Device ID
To know your Device ID, entering Main Menu ->Info ->About
2.2 Hardware Configuration (PC/PDA Only)
After installing PolNav on your PC/PDA, please ensure your GPS hardware has been
correctly setup. For instructions on GPS hardware setup, please refer to your GPS
hardware manual. You will only need to do this once. Once the GPS hardware has been
setup, please take note of the Port Settings for your GPS. You will need this to
configure the settings in PolNav.
Press the Settings in the Main Menu and then press GPS Port. Now change the COM
Port and Baud Rate to the given values.

5
3. Getting Started With GPS Navigation and PolNav
This tutorial will get you started on using PolNav for navigation. Before you start, you
should ensure that the software has been installed and the necessary hardware
configured. Instructions for installation and configuration can be found in the Hardware
Configuration Section of this manual.
Step 1
Start PolNav and wait for your GPS receiver to obtain a position fix.
Press the center area on the touch screen to obtain the Main Menu, and press the Find
Button in the Menu.
If you do not have a GPS fix, or want to simulate a route, select a starting location
first using this tutorial up to Step 5, then select a destination using this tutorial a
second time.

6
Step 2
Press the Address Button in the Find Menu, the press the City/PostCode Button
once you are in the Address Menu. Press the Region Name Tab to switch the country
you are searching to Germany if you have not already done so.
Step 3
Enter BERLIN on the onscreen keyboard and press the Done Button. Select the first
entry in the Results Screen.

7
Step 4
Press the Street Center Button in the Location Menu, the press the Go To Button in
the Street Center Menu to begin navigation. PolNav will calculate a route to the
destination from your current location when you have a GPS fix.
If you are selecting a starting location for simulation, press the Set Start Button (Demo)
Button, and then return to Step 1 to find a destination and press the Go To Button
once the destination has been found. This will calculate a route from your starting
location to your destination.

8
Step 5
You can begin using your GPS system if you have a GPS fix. If you do not have a GPS
fix, you can use the Demo feature to simulate the route to your destination using Route
> Start Demo. You can now drive to your destination, and you will be guided by voice
commands at every turn and the Navigation Screen. For more information about
advanced functions, please read the rest of this manual.
Map screen Navigation screen

9
4. User Interface
4.1 Main Menu
The Main Menu provides access to PolNav’s many features. You can access the Main
Menu by pressing any where in the map screen. The following features can be
accessed from the Main Menu.
Find: Search for a destination
Map: Return to the map screen or Navigation/Free run screen
Route: Access the current route, itinerary, statistics and map information
Settings: Configure system and routing settings and manage favourites list
Info:Display GPS, driving information (Statistics) and information about PolNav version.
My Data: Maintain user specific information like Favourite, Itinerary, and Trail …etc.
Exit: Exit PolNav
All submenus contain the following features on the top panel at the top of the screen:
Back Button: Return to the previous screen
Map Button: Return to the Map Screen or Navigation/Free run screen
Menu Button: Return to the Main Menu

10
4.2 Map Screen
The Map Screen displays a map of your current location, as well as displaying nearby
POIs and information. You can also use it as an electronic map.
When in Navigation/Free Run Screen, by panning the map, you can enter the Map
Screen. Note that if you’re using Heading-up in Navigation/Free Run Screen, then the
Map Screen will follow the orientation. By click the North Indicator, the Map Screen
will change to North-up. Once in North-up, it can’t return to Heading-up.
The following features can also be accessed from the Map Screen.
4.2.1 Functions
Map screen Map screen
(heading up)
Information about the
selected location
Access the Main MenuReturn to Car Position
(Navigation/Free Run
Screen)
Change volume
Zoom out Zoom in
Ma
p
Scale
Orient map to North-up
Highlighted selected
location (road or POI)
Nearb
y
POI
Hide information bar

11
4.2.2 Map Displays
: Starting Point
: Waypoint
:Destination
:Next Turn
: Turn
: Selected Point of Interest
:Point of Interest
:Selected Location
:Selected Street
:Current Location/GPS Fix Location

12
4.3 Zoom In/Zoom Out
You can change the scale of the electronic map by pressing the Zoom In/Zoom Out
buttons. If you have a position fix, it will zoom in/out on your current location. If you are
in panning mode, it will zoom in/out on the selected location marked by the red dot.
Note: Local streets will not be displayed at large map scales. At large map scales, only
the main roads and freeways will be displayed. To view them you must increase the
map scale by zooming in.
4.4 Panning (Browsing the map)
You can browse different areas of the map in the map screen by dragging the map.
Simply hold your finger down on the screen and drag it in the opposite direction.

13
4.5 Location Menu
You can select locations (POI Icons) or streets on the map by pressing the icon or
location and pressing the Street/Place Information Panel. The Location Menu will
then appear. The Location Menu will also appear when you select a location from the
Find Menu.
Functions:
Nearby: Displays a list of POIs or streets nearby.
Save As: Save the location as your Favourite.
Info: Information about the selected location.
Set Start: Set the starting point for route planning/simulation.
Go To: Set the destination for route planning.
Add Via: Add intermediate waypoint in route to your destination.
Note1: Go To: If this is pressed after a destination has been set, you can either
calculate a new route from your starting location to the new destination, or append the
new destination to the existing route list.
Note2: Nearby: There are two options in the Nearby - POI and Street.
.

14
4.6 Navigation Screen
The Navigation Screen will appear whenever a route has been set. It is basically a Map
Screen with additional information about the route, such as distance until next turn,
travel time, and estimated time at arrival. The screen will be centred on your current
location (when you have a GPS fix, or else simulation will move at a constant velocity).
To exit the Guidance Screen, simply pan the map. To return to the Guidance Screen,
press the Car Position.
1: Current Turn Manoeuvre (Press to repeat voice instructions)
2: Distance to Current Turn
3: Manoeuvre at Next Turn
4: Total Distance Remaining
5: Total Time Remaining
6: Estimated Time at Arrival
7: Switch between Current Street/Current Town (Press to alternate)
8: If the sign shows in Green color, you could switch between Current Speed / Current
time. If the sign shows in Red color, it means it’s over the setting speed limit and user
could click on the sign to switch to speed limit options. (Please refer Section 9.2.2 )
9: Car position: with colour indicating GPS status
¾Green (GPS signal good)
¾Orange (GPS signal weak)
¾Red (GPS signal lost)
¾Gray (Simulation)
10: Switch between 2D North-up, 2D Heading-up, 3D Head-up views.
11. Instruction for Current Turn (Press to Access Turn List)
1
2
3
4
5
6
78
9
10
11

15
4.7 Free Run Screen
The Free Run Screen will appear whenever a route has NOT been set. It is basically a
Map Screen with additional information about the current road/city you’re driving on, and
driving speed. The screen will be centred on your current location (when you have a
GPS fix). To exit the Free Run Screen, simply pan the map. To return to the Free Run
Screen, press the Car Position.

16
5. Finding Destinations
PolNav offers many methods to search for a particular destination. This is useful as you
can pinpoint the search locations and minimising your search time. Once a destination
has been found, the Location Menu will appear, and PolNav will calculate a route to
the chosen destination when you press the Go To Button or the Add Via Button. You
can also use the Find Menu to set a Starting Point for route simulation, as explained
in the Getting Started Tutorial.
5.1 By Address-City/Postal Code First
Main Menu ->Find ->Address ->City/Postcode
Enter the city name of postal code using the onscreen keyboard. You can also enter a
key word if you are unsure of the location as PolNav will list all possible locations with
that key word. Once you have found the destination, PolNav will load the Location Menu.
Table of contents
Popular Software manuals by other brands

ACRONIS
ACRONIS TRUE IMAGE 9.1 - ENTERPRISE SERVER user guide

Novell
Novell IFOLDER 3.7 - CROSS-PLATFORM manual

Cisco
Cisco TELEPRESENCE MOVI 4.1 - FOR MAC OS X user guide

Extreme Networks
Extreme Networks Sentriant AG200 user guide

Canon
Canon OPTURA XI - Camcorder - 2.2 MP instruction manual

Lernout & Hauspie
Lernout & Hauspie DRAGON NATURALLYSPEAKING 5- quick start

HP
HP Integrity rx2800 - i2 user guide

HP
HP T5145 - Thin Client - Tower Administrator's guide

3Com
3Com IntelliJack NJ200 supplementary guide

ADS Technologies
ADS Technologies INSTAMEDIA - QUICK GUIDE 2 quick guide

HP
HP C7791C - DesignJet 130 Color Inkjet Printer printing guide

Allied Telesis
Allied Telesis AT-9400 user guide