POLYGROUP LIMITED TG90M3P07C02 User manual

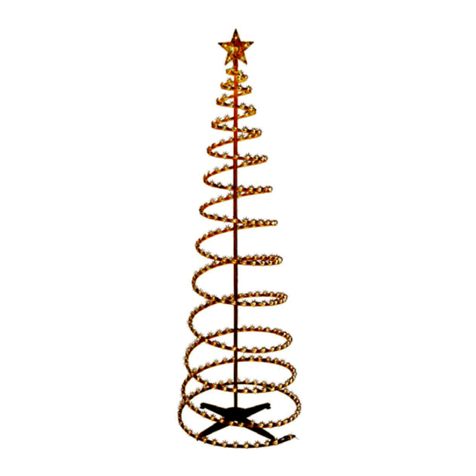
Christmas Tree
Model: TG90M3P07C02; 117625
b. Do not use seasonal products outdoors unless marked
suitable for indoor and outdoor use.When products
are used in outdoor applications, connect the product
to a Ground Fault Circuit Interrupting (GFCI) outlet. If
one is not provided, contact a qualified electrician for
proper installation.
c. This seasonal product is not intended for permanent
installation or use.
d. Do not mount or place the product near gas or electric
heaters, fireplaces, candles, or other similar sources of
heat.
e. Do not secure the wiring of the product with staples
or nails, or place on sharp hooks or nails.
f. Do not let lamps rest on the supply cord or on any
wire.
g. Unplug the product when leaving the house, when
retiring for the night, or if left unattended.
h.This is an electric product and not a toy! To avoid risk
of fire, burns, personal injury and electric shock it
should not be played with or placed where small
children can reach it.
i. Do not use this product for other than its intended use.
j. Do not hang ornaments or other objects from cord,
wire, or light string.
k. Do not close doors or windows on the product or
extensions cords as this may damage the wire insula-
tion.
l. Do not cover the product with cloth, paper, or any
material that is not a part of the product when in use.
m.This product has a polarized plug (one blade is wider
than the other) as a feature to reduce the risk of
electric shock.This plug will fit in a polarized outlet
only one way. If the plug does not fit fully in the outlet,
reverse the plug. If it still does not fit, contact a quali-
fied electrician. Do not use with an extension cord
unless plug can be fully inserted. Do not alter or
replace the plug.
n.This product is equipped with push-in type lamps. Do
not twist lamps.
o.This product employs overload protection (fuse). A
blown fuse indicates an overload or short-circuit
situation. If the fuse blows, unplug the product from
the outlet. Also unplug any additional strings or
products that may be attached to the product. Replace
the fuse as per the user servicing instructions (follow
product marking for proper fuse rating) and check the
product.
p .Read and follow all instructions that are on the prod-
uct or provide with the product.
q.
SAVE THESE INSTRUCTIONS
Package Contents
Pre-Assembly
Part Description Quantity
D Tree stand 1
A Tree top, tag 3 1
B Tree center, tag 2 1
C Tree bottom, tag 1 1
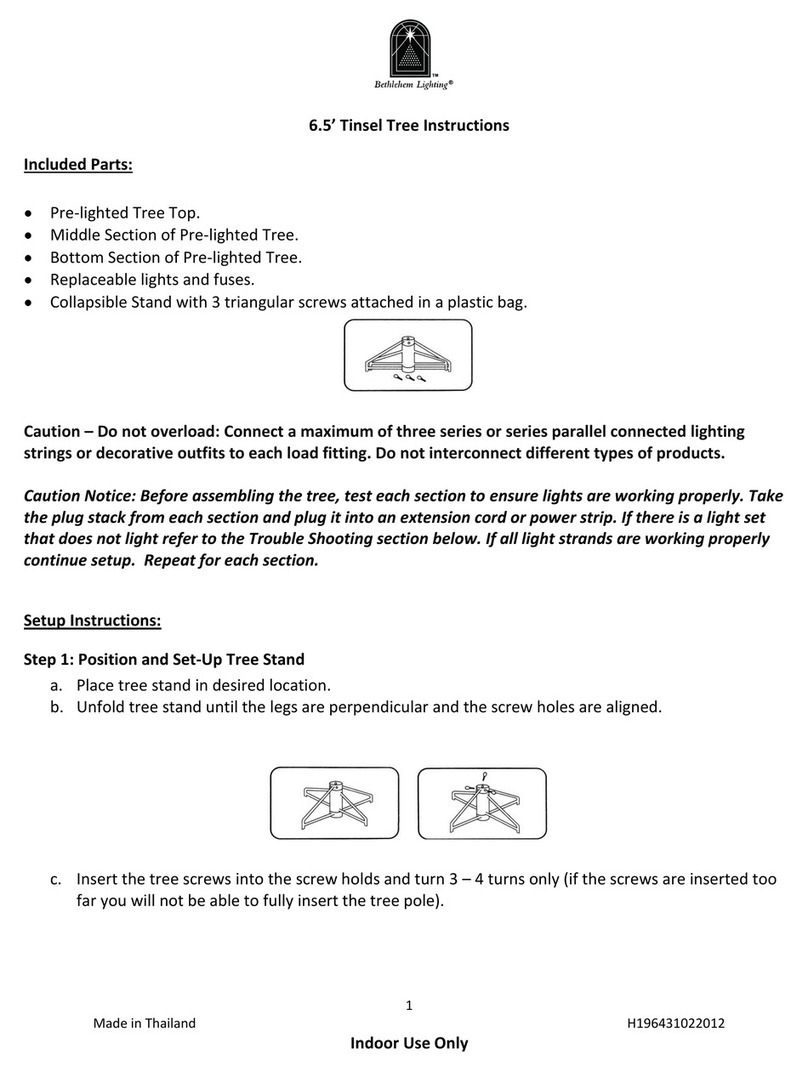
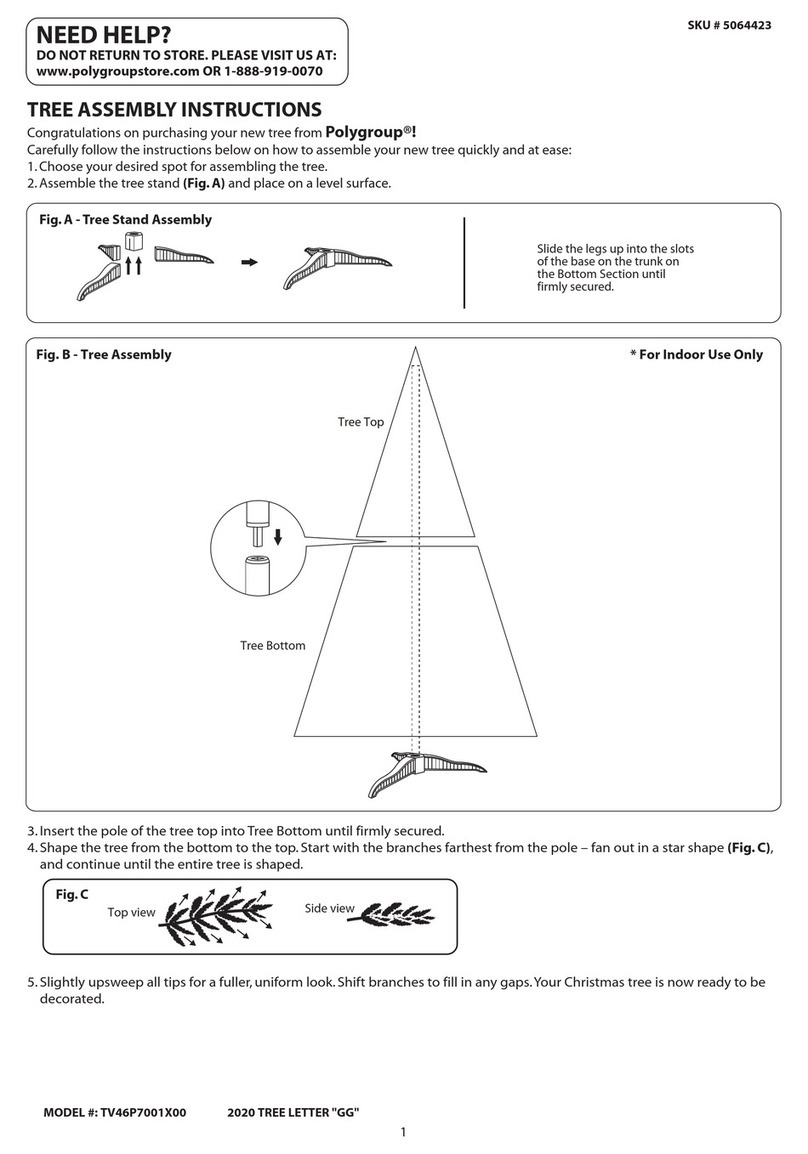
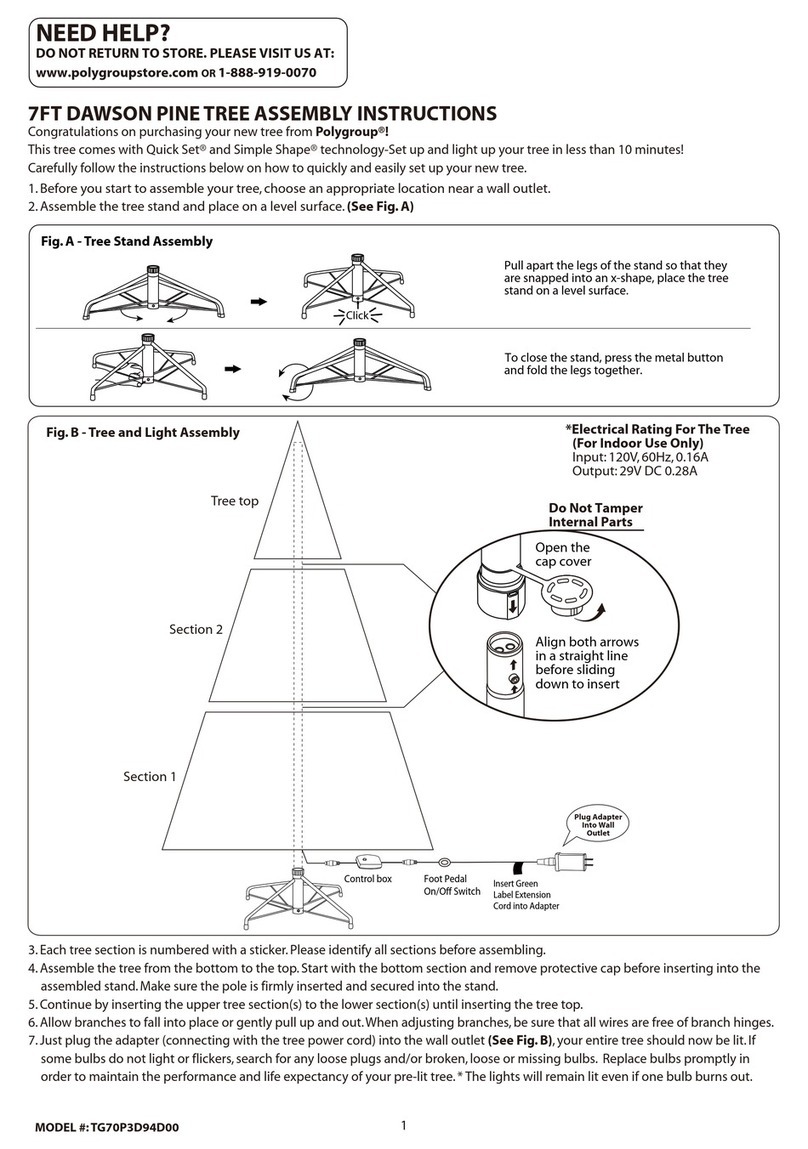
Assembling the tree stand
Assembly
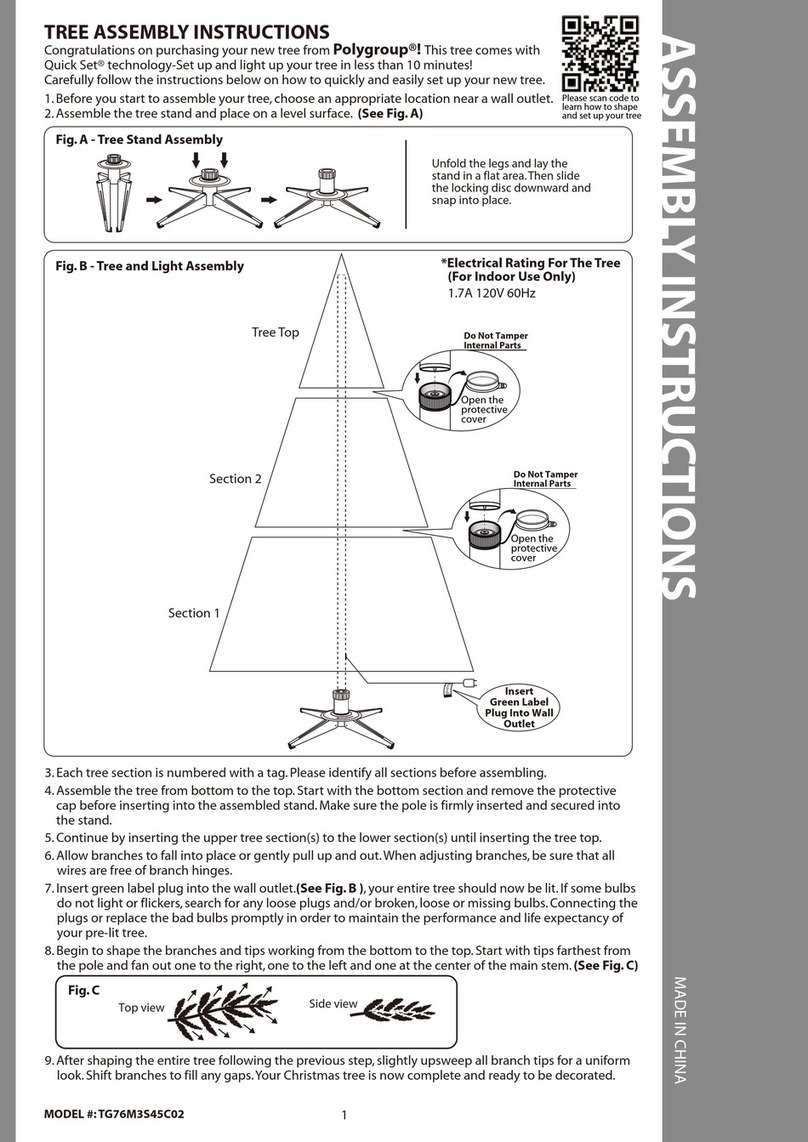
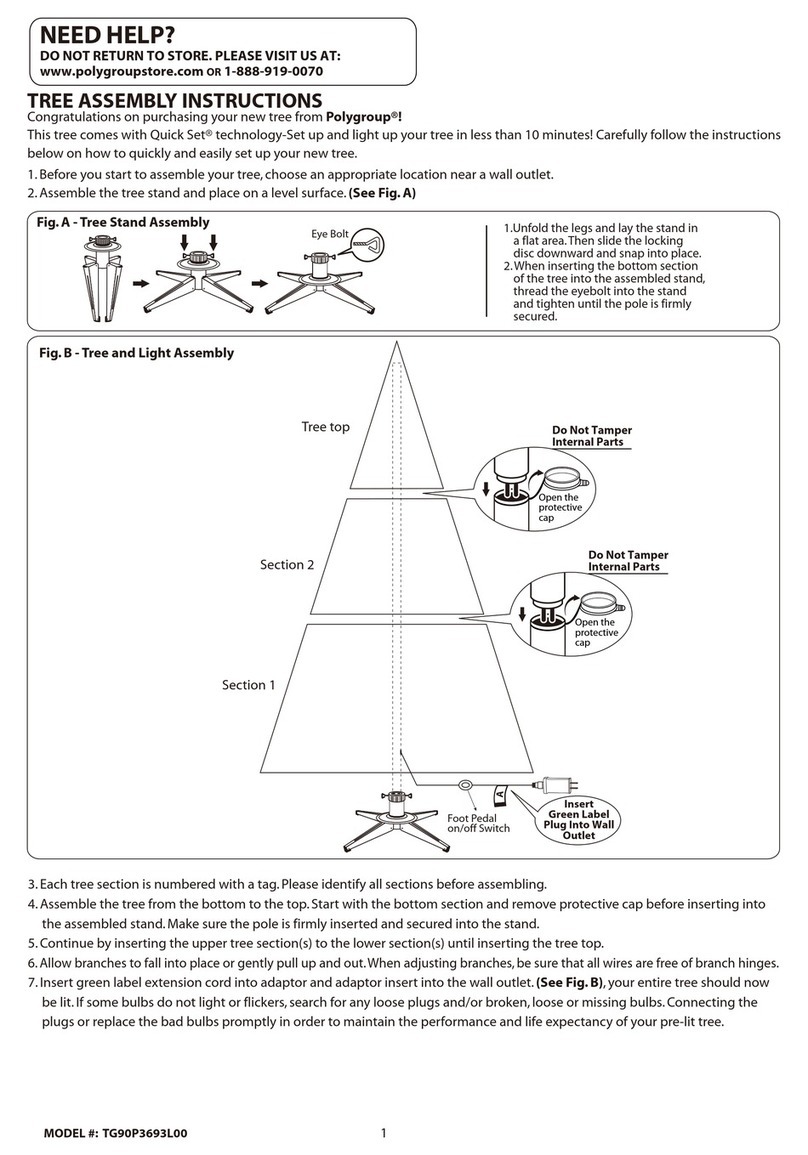
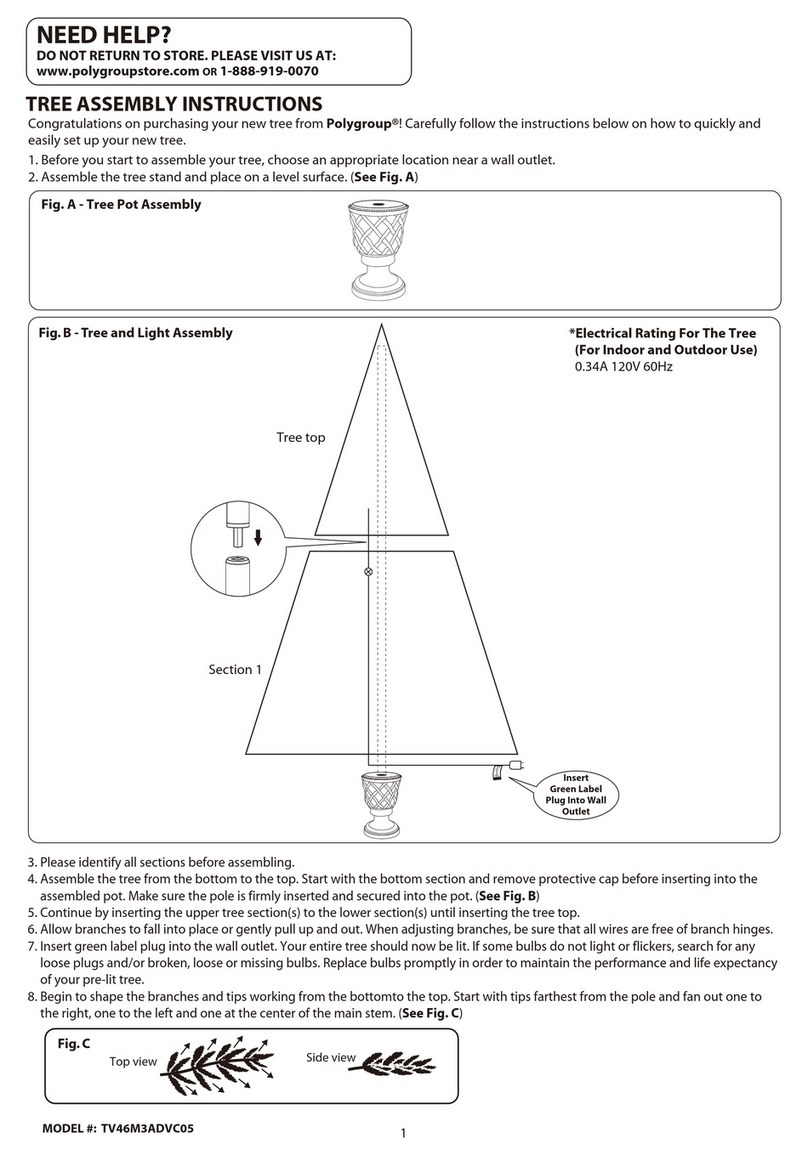
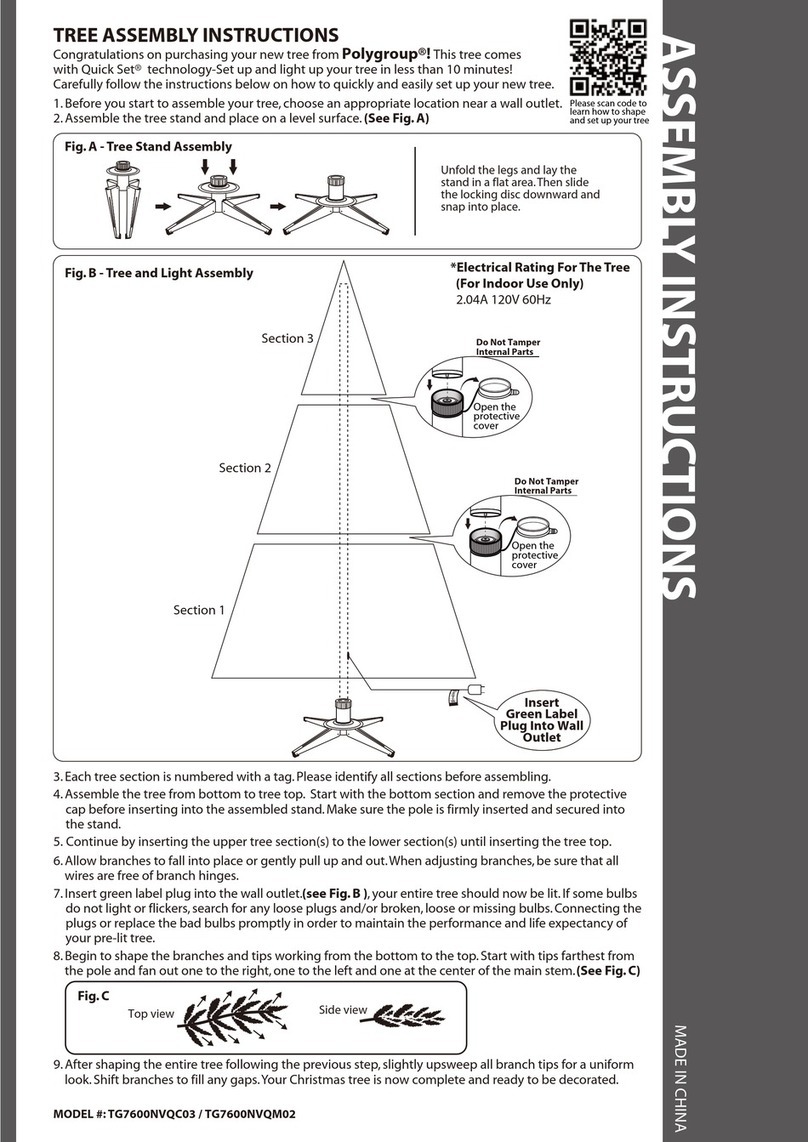
This tree assmebles with Quick Set® technology
---Set up and light up your tree in less than 10 min-
utes!
Step 1.Remove the protective caps from the tree bottom
(C) and insert the pole into the tree stand (D).
Step 2.Remove the protective caps from the tree center
(B) and insert the pole into the tree bottom (C) .
Step 3.Insert the tree top (A) into the tree center (B).
Step 4.Shape the branches to your preference by working
from the bottom to the top. When adjusting
branches, ensure that all wires are free of branch
hinges.
Step 5.Insert the green label extension cord plug into
the wall outlet. All your lights should now be lit.
Step 6.When finished shaping the branches, slightly
upsweep all branch tips for a uniform look.
Assembling the tree
Safety Information
IMPORTANT SAFETY
INSTRUCTIONS
a.
READ AND FOLLOW ALL
SAFETY INSTRUCTIONS.
When using electrical products, basic precautions
should always be followed, including the following:
The supply cord cannot be replaced.If the cord is damaged the appliance
should be scrapped.
Imported by: SERVICIOS HOME DEPOT, S.DE R.L. DE C.V.
Ricardo Margain 605. Santa Engracia, San Pedro Garza García, Nuevo León,México,
C.P. 66267 Phone 01 800 004 6633
Electrical ratings: 120V~ 60Hz 346.8W 2.89A
Click
Pull apart the legs of the stand so that they are snapped
into an x-shape, place the tree stand on a level surface.
To close the stand, press the metal button and fold the
legs together.

Operation
Turning on the tree
Maintenance
Spare parts
Repairing Loose Hinges
Troubleshooting
Problem Solution
The tree
does not
light
Ensure that all tree sections are plugged
into each other and that the tree is plugged
into the wall. If your tree came with a foot
pedal, step on the On/Off button.
Check for blown fuses at the light string and
power cord plugs. Replace as needed with
the replacement fuses provided.
Check for loose, broken, or missing bulbs
and replace as needed with the
replacement bulbs provided
NOTE: If some bulbs do not light or flicker, search for any
loose plugs and/or broken, loose, or missing bulbs.
Replace bulbs promptly with the replacement bulbs
provided in order to maintain the performance and life
expectancy of your tree.
Step 1. Connect the light strings of the tree together
and plug the power cord into a wall outlet.
Step 2. If the tree comes with a foot pedal, step on the
On/Off button.
This tree package includes hinge pins, washers, bulbs,
and fuses for any replacement or repair that you need to
perform on your tree. If extra parts are needed, contact
the Customer Service Team at 01 800 004 6633 between
the hours of 8 am and 5 pm EST, Monday through Friday.
Use and Care Instructions
1. Before using or reusing, inspect product carefully.
Discard any products that have cut, damaged or
frayed wire insulation or cords, cracks in the
lampholders or enclosures, loose connections, or
exposed copper wire.
2. Before disassembling the tree, unplug the tree and
remove all ornaments and decorations.
3. Gently lift the tree top straight up to remove from the
center section and fold all branches towards the pole.
4. Repeat this step for the center and bottom tree
sections.
5.When storing the product, carefully remove the
product from wherever it is placed, including tree,
branches, or bushes, to avoid any
undue strain or stress on the product
conductors, connections, and wires.
Cover the protective cap on the
poles to avoid damaging the internal
parts.
6.When not in use, store neatly in a cool, dry location
protected from sunlight.
Step 1. Place the branch into the slot of the bracket
Step 2. Insert a new hinge pin through the holes of the
bracket and secure with a washer.
Section 3
Section 2
Section 1
Insert
Green Label
Plug Into Wall
Outlet
S100
S100
S100
S100
S100
S100
Foot Pedal
on/off Switch
Christmas Tree
Model: TG90M3P07C02; 117625
Do Not Tamper
Internal Parts
Open the
protective
cover
Do Not Tamper
Internal Parts
Open the
protective
cover
a) Grasp plug and remove from the receptacle or other
outlet device. Do not unplug by pulling on cord.
b)Open fuse cover. Slide open fuse access cover on top
of attachment plug towards blades.
c) Remove fuse carefully.
d)Risk of fire. Light set. Replace
fuse only with 3A 125 Volt fuse
Power cord. Replace fuse only
with 5 Amp, 125 Volt.
e) Close fuse cover. Slide closed the fuse
access cover on top of attachment plug.
f) Risk of fire.Do not replace attachment plug. Contains
a safety device (fuse) that should not be removed.
Discard product if the attachment plug is damaged.
SPARE FUSE
User servicing instructions
Fuse replacement
S100
S100
S50
The appliance is not to be used by persons (including
children) with reduced physical, sensory or metal
capabilities, or lack of experience and knowledge, unless
they have been given supervision or instruction
Children should be supervised to ensure that they do
not play with the appliance

Árbol de Navidad
Modelo: TG90M3P07C02; 117625
Información de Seguridad
IMPORTANTES INSTRUCCIONES
DESEGURIDAD
a.
LEEY SIGUETODASLAS
INSTRUCCIONES DE SEGURIDAD.
b. No utilice productos de temporada en el exlerior a menos
que aparezca indicado en elproducto que esadecuado
para eluso interior y exterior.Cuando utilice el producto
para un uso en el exterior, conecte el producto a una toma
tierra con(GFCI) interrupcion automatica delcircuito por
fallo.Si no dispone de una toma de este tipo, pongase en
contacto con un electricista cualificadopara que proceda a
su instalacion.
c. Este producto de temporada noestá diseñadopara una
instalacióno uso permanentes.
d. No lo instales o coloques cerca de calentadores eléctricos o
de gas, chimeneas, velas uotras fuentes de calor similares.
e. No fijesloscables del producto con grapaso clavos, ni los
coloques sobre ganchos o clavos afilados.
f. No permitas que las lámparas descansen sobre elcable de
suministro eléctrico ni sobre cualquier otro tipo de cable.
g. Desenchufael producto cuando vayas a salir de casa,
cuando vayas a dormir o si nadie estará presente para
supervisar su uso.
h. Este es unproducto eléctrico, noun juguete! Para evitar el
riesgo de incendio, quemaduras, lesiones físicas y descar-
gas eléctricas, elproducto nodebe ser usado como un
juguete niestar alalcance de niños pequeños.
i. No utilices este producto para otra función distinta de la
concebida originalmente.
j. No cuelgues adornos u otros objetos en elcable oen la
guirnalda.
k. No cierres puertas o ventanas sobre los cables del
producto o extensiones eléctricas;esto podría dañar el
aislamiento de los cables.
l. Cuando esté en funcionamiento, nocubras este producto
con telas, papel o cualquier materialque no forme parte
del mismo.
m.Este producto tiene unenchufe polarizado(un diente es
mas largo que el otro) para evitar el riesgo de descarga
electrica. El enchufe podra introducirse en la toma electrica
de forma unica. Si no consigue introducir por completo el
enchufe en la toma, invierta la posicion del mismo. Si,a
pesar de ello, todov ano consigue enchufarlo, pongase en
contacto con un electricista calificado. Si no puede intro-
ducir el enchufe por completo en la toma, no utilice ningun
cable alargador. No altere ni cambie el enchufe.
n. Este producto está equipado con lámparas de presion. No
tuerza las lámparas.
o. Este producto utiliza proteccion frente a sobrecargas
(fusible). Un fusible fundido indicara que existe sobrecarga
oun cortocircuito. Si el fusible se funde, desenchufe el
producto de la toma electrica. Desenchufe tambien
cualquier enlace o producto adicional que este unido al
producto. Cambie elfusible siguiendo las instruccionesdel
producto (siga las caracter sticas del producto para selec-
cionar elfusible apropiado) y compruebe elproducto.
p. Lee ysigue todas las instrucciones que se encuentran en el
producto oadjuntas al mismo.
Cuando utilices productos eléctricos, siempre debes
observar precauciones básicas, incluyendo las siguien-
tes:
Contenido del Paquete
q.
GUARDA ESTAS INSTRUCCIONES
Preensamblaje
Cómo ensamblar la base del árbol
Ensamblaje
Pieza Descripción Cantidad
D Base del árbol 1
A Parte superior del árbol,etiqueta 3 1
B Parte media del árbol,etiqueta 2 1
C Parte inferior del árbol,etiqueta 1 1
Este árbol se ensambla con tecnología Quick Set®---
¡Ensambla y enciende el árbol en menos de 10
minutos!
Paso1. Retira las tapas protectoras de laparte inferior del
árbol (C)e insertalavara en labase delárbol (D).
Paso2. Retira las tapas protectoras de laparte mediadel
árbol (B) e inserta la varaen la parte inferior del árbol
(C).
Paso3. Insertaparte superior del árbol(A) en la parte media
delárbol (B).
Paso4. Dale forma a las ramassegún prefieras, comenzando
desde laparte inferior hastaarriba. Cuando arregles
las ramas, asegúrate de que los cablesnose
enganchenentre lasbisagrasde las ramas.
Paso5. Insertael enchufe con etiqueta verde enel
tomacorriente de pared. Todas las luces deberían
encenderse.
Paso 6. Cuando termines de arreglar las ramas, péinalas
suavemente hacia arriba para lograr una apariencia
pareja.
Cómo ensamblar el árbol
El cordón de alimentación no puede sustituirse. En caso de deterioro,
el aparato debe desecharse.
Importador: SERVICIOS HOME DEPOT, S. DE R.L. DE C.V.
Ricardo Margain 605.Santa Engracia, San Pedro Garza García, Nuevo León,
México, C.P. 66267 Tel.01 800 004 6633
Especificaciones eléctricas: 120V~ 60Hz 346.8W 2.89A
Hagaclic
Separe las patas de la base hasta que quedenfijas formando
una X, luego coloque la base sobre una superficie nivelada.
Para cerrar la base, presione el botón de metal y pliegue las
patas para unirlas .
Funcionamiento
Encender el árbol
Mantenimiento
Instrucciones sobre el uso y cuidado
Piezas de repuesto
Cómo Reparar las Bisagras Flojas
NOTA: Si algunas de los focos no encienden o titilan,
verifica que no haya conexiones flojas, focos rotos, flojos o
faltantes. Reem plaza de inmediato los focos con los de
reemplazo incluidos, para mantener el rendimiento y la vida
útil del árbol.
Paso 1. Conecta la guirnalda de luces del árbol y enchufa el
cable eléctrico en el tomacorriente de pared.
Paso 2. Si el árbol incluye un pedal, pisa el botón de On/Off
(Encendido/Apagado).
Este paquete de árbol incluye clavijas de bisagra, arandelas,
bombillas y fusibles de repuesto para reparar el árbol según
sea necesario. Si necesitas piezas adicionales comunícate
con el Equipo de Servicio al Cliente al 01 800 004 6633 de
Lunes a Viernes de 8 am a 5pm, EST (Hora Estándar del Este).
Paso 1. Coloca la rama en la ranura del soporte
Paso 2. Inserta una nueva clavija de bisagra en los orificios
del soporte y asegúrala con una arandela.
1. Antes de se utilizacion o reutilizacion, inspeccione el
producto. Descarte cualquier producto en el que el
aislamiento del cable o el cable este cortado, danado o
desgastado, el portalamparas o el receptaculo este
agrietado, las conexiones esten sueltas o el cable de cobre
este visible.
2. Antes de desmontar el árbol, el árbol de desconectar y
quitar todos los adornos y decoraciones.
3. Levanta con cuidado la parte superior del árbol para
separarla de la sección media y dobla todas las ramas
hacia la vara.
4. Repite este paso para las secciones media e inferior del
árbol.
5. Cuando desee guardar el producto, ret
relo con precau cion del lugar donde
este colocado, incluyendo el arbol, las
ramas, los arbustos, para evitar cualquier
tension sobre los conductores, las
conexiones y los cables del producto.
Cubre la tapa protectora de los postes para evitar dañar
las piezas internas.
6. Cuando no prevea utilizarlo, guarde el producto correcta
mente en un lugar seco, alejado de la luz directa del sol.
Árbol de Navidad
Modelo: TG90M3P07C02; 117625
Coloca el
Enchufe con
Etiqueta Verde en el
Tomacorriente
de Pared
Pedal de pie
para prender
y apagar
Sección 3
Sección 2
Sección 1
S100
S100
S100
S100
S100
S100
Solución de problemas
Problema Solución
El árbol no
enciende
Asegúrate de que todas las secciones del árbol
estén conectadas entre sí y que el árbol esté
enchufado a la pared. Si el árbol incluye un
pedal pisa el botón de On/Off
(Encendido/Apagado).
Revisa si los fusibles de los enchufes de la
guirnalda de luces y del cable eléctrico están
quemados. Si es necesario, reemplázalos con
los fusibles de repuesto incluidos.
Revisa si hay focos flojos, rotos o faltantes y, si
es necesario, reemplazalos con los focos de
repuesto incluidos.
Instrucciones De Servicio Sel Usuario
a) Sujete la clavija y retírela del receptáculo u otro disposi
tivo de toma de corriente. No desenchufe el cable tirando
de él.
b) Abra la tapa del fusible. Deslice la tapa de acceso al
fusible situada encima de la clavija de unión hacia las
hojas para abrirla.
c) Retire el fusible con cuidado.
Déle la vuelta a la clavija para
retirar el fusible.
d) Riego de incendios. El árbol se
compone de series de luces.
Reemplace los fusibles de cada serie por
fusibles de 3 A, 125 Volts. Para la alimentación general del
árbol. Reemplace los fusibles de la clavija por fusibles de 5
A, 125 Volts.
e) Cierre la tapa del fusible. Deslice la tapa de
acceso del fusible situada encime de la clavija
de unión para cerrarla.
f) Riesgo de incendios.No reemplace la clavija de unión.
Contiene un dispositivo de seguridad (fusible) que no
debería ser eliminado.Descarte el producto si se daña la
clavija de unión.
FUSIBLE DE
REPUESTO
Reemplace el fusible:
No Modifiques Las
Piezas Internas
Abra la
cubierta
protectora
No Modifiques Las
Piezas Internas
Abra la
cubierta
protectora
S100
S50
S100
El aparato no debe utilizarse por personas (incluyendo
niños) cuyas capacidades físicas, sensoriales o mentales sean
reducidas, o carezcan de experiencia o conocimiento, a
menos que dichas personas reciban supervisión o capacit-
ación para el funcionamiento del aparato por una persona
responsable de su seguridad.
Los niños deben ser supervisados para que no usen el
aparato como juguete
This manual suits for next models
1
Table of contents
Languages:
Popular Artificial Pine Tree manuals by other brands

Polygroup
Polygroup TV46M3I05C04 Assembly instructions

Holiday Living
Holiday Living TV40M3J14C03 manual

Home Accents Holiday
Home Accents Holiday TY273-1414 Use and care guide

Polygroup
Polygroup TG76M6010X00 Assembly instructions

Honeywell
Honeywell HW-T12322 user manual

Polygroup
Polygroup TG70M3V29X08 Assembly instructions

Polygroup
Polygroup TG90P3499L00 Assembly instructions

Honeywell
Honeywell W14L0694 user manual

Polygroup
Polygroup TV70M3AMGC00 Assembly instructions

Haute Decor
Haute Decor DCCT0903 manual

Polygroup
Polygroup TG76M2T20D00 Assembly instructions

North Light
North Light WX-31VLED44-260WW-10-2 instruction manual