manuals.online logo
Brands
  1. Home
  2. •
  3. Brands
  4. •
  5. Polytron
  6. •
  7. Portable Multimedia Player
  8. •
  9. Polytron FlashRip User manual

Polytron FlashRip User manual

Stereo Radio & MP3 Recorder with Multimedia Player
Instruction ManualInstruction Manual
Thank you for choosing our product.
POLYTRON
Stereo Radio & Multimedia Player
Manufactured by :
PT. Hartono Istana Teknologi
Read through these operating guide to optimize the performance of the system and become familiar with the
operating procedure.
SPECIFICATIONS
Unit section
Power Source :AC 220 V , 50/60 Hz
DC 8 x 1,5 V UM-1 Battery
Power Consumption :30 Watt maximum Dimension ( L x W x H ) :570 x 210 x 245 mm
Frequency Response :20 - 20.000 Hz Weight (without batteries) :4,8 kg
Audio Output :2 x 4 Watt rms Suhu Operasi :0 - 400C
Impedansi Speaker :3Ohm
DVD section
System :Digital Signal to Noise ratio :60 dB
Laser :Semiconductor Laser Dynamic Range :60 dB
Video System :PAL/NTSC
Radio section FM AM
Frequency Range :88 - 108 MHz 520 - 1650 kHz
Receiving Sensitivity :15 V1,3 mV/m
Image Rejection :20 dB 30 dB
IF Rejection :40 dB 35 dB
-3dB Limiting Sensitivity :3,5 V-
Stereo Indicator Sensitivity :10 V-
Stereo Separation :26 dB -
Video Output section
Composite Video Out (CVBS) :1 Vp-p (75 Ohm)
Line In section
Mic Sensitivity :3 mVrms (8 KOhm)
MP3 In Sensitivity :400 mVrms (10 KOhm)
Line Output section
CD (0 dB, 1 kHz) :1 Vrms
Tuner/Radio (99,9 kHz deviation) :700 mVrms
Multimedia device section
USB port :USB 1.1 (standard)
SD/MMC/MS Card Slot :3 in 1 card connector 26 mm
Docking terminal :30 pin dock connector
P.TGT0.00
20 1
TABLE OF CONTENTS
THE UNIT AND ACCESSORIES ................................................................................................... 1
FEATURES OF THE UNIT ........................................................................................................... 1
SAFETY INSTRUCTION ............................................................................................................. 2
INTRODUCTION OF THE COMPATIBLE DISC AND FILE FORMAT ....................................................... 3
PARTS OF THE UNIT ................................................................................................................ 3
INSTALLATION INSTRUCTION .................................................................................................... 5
OPERATING PREPARATION ...................................................................................................... 6
SOUND SETTING ..................................................................................................................... 7
DVD PLAYER OPERATING INSTRUCTION ..................................................................................... 7
DVD PLAYER SETUP INSTRUCTION ............................................................................................ 13
RADIO OPERATING INSTRUCTION .............................................................................................. 16
MP3 IN OPERATING INSTRUCTION ............................................................................................. 17
DOCKING OPERATING INSTRUCTION .......................................................................................... 17
KARAOKE OPERATING INSTRUCTION ......................................................................................... 17
MAINTENANCE INSTRUCTION .................................................................................................... 18
LANGUAGE CODE ................................................................................................................... 18
TROUBLESHOOTING ................................................................................................................ 19
SPECIFICATIONS ..................................................................................................................... 20
WE RESERVE RIGHT TO CHANGE THE TECHNICAL SPECIFICATIONS WITHOUT PRIOR NOTICE
THE UNIT AND ACCESSORIES
Take out the unit from the package and make sure you got the item as stated : a Player unit, Remote Control
and battery, RCA Cable, AM Loop antenna, Manual Instruction and Warranty Card (optional).
FASILITAS DAN KEUNGGULAN PESAWAT
1. DVD/SVCD/VCD/CD/MP3/MPEG4/MPG Player & JPEG Imager
2. DVD Function : Menu, Title, Program, Next/Previous, Fast Forward/Reverse, Repeat 1/All, OSD, Go To,
Audio, Subtitle. 11. SLEEPTIMER
3. Real VCD Ver 2.0 12. MIC terminal
4. 5 PRESET EQUALIZER (Rock/Pop/Classic/Jazz/Flat) 13. PHONES terminal
5. SURROUND 14. MP3 IN terminal
6. BAZZOKE (add the bass stability) 15. AUDIO OUT terminal
7. Automatic and Manual radio search 16. VIDEO OUT terminal
8. 40 preset memori for AM radio and 40 preset memori for FM radio 17. USB terminal
9. KARAOKE (AVC and MPX) 18. SD/MMC/MS Card terminal
10. FLASHRIP function (CDDA ripping) 19. DOCKING terminal
219
15 cm
15 cm
15
cm
15
cm
Place the unit on a safe, stable and flate surface.
Donot obstruct theunit ventilation openingswith paper, tablecloth,curtain,
etc. Place the unit approximately 15 cm away from other object.
Do not place any objects filled with liquid on or arroud the unit and keep it
away from splasing or dripping water.
Do not place any fire sources on or arround the unit, such as burning candle, match, etc.
Contact our service station when the unit does not work properly or
damaged. Do not try to repair by yourself.
Grip the AC Cord plug and do not pull the wire when you are connecting or
disconnecting the AC Cord. Unplug the AC Cord plug from kthe AC power
outlets if the unit is not operated for a long period of time.
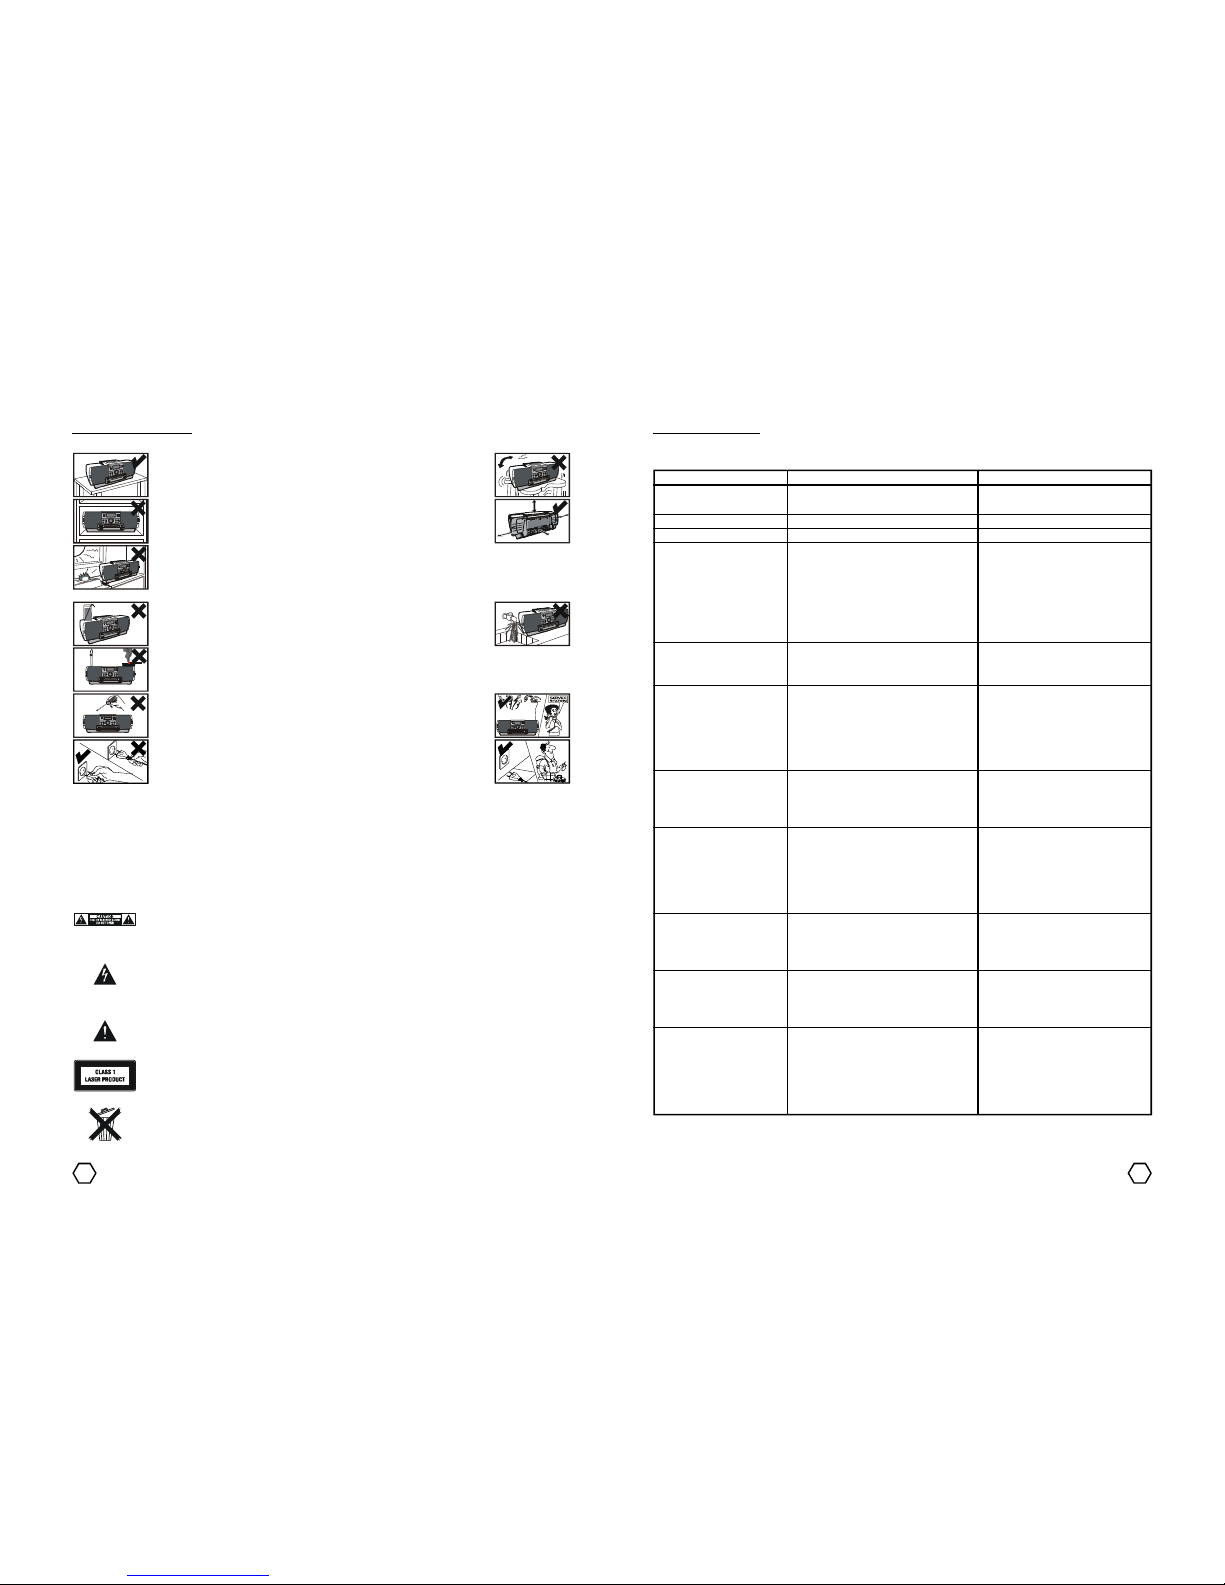
SAFETY INSTRUCTION
Before operating the unit please follow these advise and instruction below for safe and correct operation.
Do not place the unit on any exteremely hot (near a heater or fire place), cold, humid or dusty
areas. Do not expose the unit under the direct sunlight. Place the unit at temperature from
50C until 350C.
Safety Marking
CAUTION : To reduce the risk of electric shock, do not remove cover. No user-serviceable parts
inside. Refer servicing to qualified service personnel.
The lightning flash with arrowhead symbol, within an equilateral triangle, is intended to alert the
user to the presence of uninsulated DANGEROUS VOLTAGE within the product’s enclosure that
may be of sufficient magnitude to constitute a risk of electric shock to persons.
The exclamation point within an equilateral triangle is intended to alert the user to the presence
of important operating and maintenance (servicing) instruction in the literature accompanying
the appliance.
The unit uses a component that produces laser beam and it have been classified as CLASS 1.
This marking is placed on the exterior of the bottom of the unit.
ENVIRONMENT INFORMATION : Please take attention to the local regulation for packaging,
battery and ex-unit disposal. The dispose of battery should be separated from common trash
as chemical disposal.
Condensation
Condensation might occur on the following condition : the unit is moved from a cold place to the warmer one,
the unit is operated inside a steamed room or a room with a high humidity, the unit is operated near an Air
Conditioner, soon after a room heater is turned ON. If there is a condensation inside the unit, it probably enable
to operate temporarily. In this case, wait about 1 until 2 hours to evaporate the moisture.
TROUBLESHOOTING
If the unit can not perform normally, follow the instruction below. If can not be finished or the failure there is
no on the Problem column, unplug the AC Cord and contact our after sales service near of your place.
Problem
Thereisnopowerindication
or no sound.
Output sound is not stereo.
Emitted sound is low.
Disc can not be played.
There is no picture on the
TV screen.
Picture distortion.
Bad radio reception or
reception contains noise.
Remote control is does not
work.
MIC does not work.
There is interference when
COAXIAL OUT cable
connected to the other
equipment.
USB Flashdisk or SD/MMC/
MS Card is undetected.
Causes
-AC Cord plug does not connected
properly to the power source.
-There is active karaoke function.
-Volume is in minimum condition.
-Discisnotcompatible with theplayer.
-Disc is placed inversed.
-Disc is not put correctly.
-Disc is dirty.
-Disc is damaged or many scratch.
-Parental Lock function is active.
-AV Input setting is not appropriate
with used TV input terminal.
-Video cable is not firmly connected.
-Disc is dirty.
-Disc damaged or many scratch.
-Bad quality of video cable.
-DVD setup menu is incorrect.
-The antenna direction is not correct.
-There is interference from other the
near electric appliances.
-Battery polarity is incorrect or
inversed.
-Remote control is not directed to the
unit sensor on the front panel.
-Battery is exhaust.
-Microphoneswitch isin OFF position.
-If you use Wireless MIC, may be the
battery has exhaust.
-Maybe Microphone has damaged.
-There is signal interference from
COAXIAL OUT cable.
-Error or busy system.
-USB Flashdisk or SD/MMC/MS Card
does not connected or plug properly
to the USB terminal or Card Slot.
Solution
-ConnecttheACCord plug properly
to the power source.
-Matikan fungsi karaoke.
-Increase the Volume level.
-Use the disc/file format according
to the manual instruction.
-Insert the disc with label upside.
-Put the disc correctly.
-Clean up the disc.
-Use the undamaged disc.
-Deactivate the Parental Lock.
-Change the AV Input setting of
the TV.
-Connect the video cable properly.
-Clean up the disc.
-Use the undamaged disc.
-Use the video cable with a good
quality.
-SettheDVDsetupmenuaccording
to the manual instruction.
-Change the direction of the
antenna to get the best reception.
-Move away the unit from other
electric appliances.
-Insert the battery with the right
polarity.
-Point the remote control to the
unit sensor on the front panel.
-Change the battery with the new
ones.
-SwitchONtheMicrophoneswitch.
-Replace the battery with the new
one.
-Try other Microphone.
-Use good quality cable completed
with shield ground.
-RESET the unit.
-UnplugUSBFlashdiskorSD/MMC/
MS Card, then turn off the unit,
turn the unit on and plug USB
Flashdisk or SD/MMC/MS Card
correctly.
18 3
PARTS OF THE UNIT
Front Panel
Front Panel Description :
1. Speaker 9. USB Port terminal 15. Disc Tray
2. Remote Control Sensor 10. MIC terminal 16. “” (stop) button
3. “I/ ”(on/standby) button 11. “” (open/close) button 17. “SOUND”button
4. LCD screen 12. “”TUNING“”button 18. “” (play/pause) button
5. “AM/FM” button (fast reverse/fast forward) 19. “KARAOKE” button
6. “DVD M.MEDIA” button 13. “” PRESET “ ”button 20. PHONES terminal
7. “DOCKING” button (previous/next) 21. MP3 IN terminal
8. “MP3 IN” button 14. VOLUME control 22. SD/MMC/MS Card Slot terminal
1
1
43
6
7
2
5
8
10
11
12
151719 1822 21 20 16
9
13
14
MAINTENANCE INSTRUCTION
Cleaning the unit
Use a soft and dry cloth. If the surfaces are extremely dirty, use a soft cloth lightly moistened with mild
detergent solution. Do not use strong solvents, such as alcohol, benzine or thinner.
Disc Maintenance
Do not place the unit in oblique position when there is CD in the unit. Do not place and play the
player with two disc in a CD tray. After playing a disc, store the disc in its case. Do not leave
the disc in the unit because it can make disc become expand and humid. After playing a disc,
store the disc in clean case and do not leave the disc in places that are hot or humid. When
a disc become dirty, wipe the disc from center out with a cleaning cloth. Do not wipe the CD
by turning around, it can cause damage your CD. And do not clean the CD with chemical
liquid.
W
e
l
c
o
m
e
t
o
T
h
e
V
i
d
e
o
s
LANGUAGE CODE
Use the following codes to select preferred language for AUDIO/SUBTITLE/DISC MENU on the OTHERS option.
LANGUAGE CODE
Abkhazia 6566
Afar 6565
Afrika 6570
Albania 8381
Amharik 6577
Arab 6582
Armenia 7289
Assam 6583
Aymara 6588
Azerbaijan 6590
Bashkir 6665
Bask 6985
Belanda 7876
Belorusia 6669
Bengali-Bangla 6678
Bhutan 6890
Bihar 6672
Breton 6682
Bulgaria 6671
Burma 7789
Ceko 6783
China 9072
Denmark 6865
Esperanto 6979
Estonia 6984
Faroe 7079
Fiji 7074
Finlandia 7073
Frisia 7089
Galisia 7176
Georgia 7565
Greenlandia 7576
LANGUAGE CODE
Guarani 7178
Gujarati 7185
Hausa 7265
Hindi 7273
Hungaria 7285
Indonesia 7378
Inggris 6978
Interlingua 7365
Irlandia 7165
Islandia 7383
Italia 7384
Jawa 7487
Jepang 7465
Jerman 6869
Kambodia 7577
Kanada 7578
Kashmir 7583
Katalan 6765
Kazakh 7575
Kirghiz 7589
Korea 7579
Korsika 6779
Kroasia 7282
Kurdi 7585
Laos 7679
Latin 7665
Latvia, Lettish 7686
Lingala 7678
Lithuania 7684
Macedonia 7775
Malagasi 7771
Malayalam 7776
LANGUAGE CODE
Malta 7784
Maori 7773
Marati 7782
Melayu 7783
Moldavia 7779
Mongolia 7778
Nauru 7865
Nepal 7869
Norwegia 7879
Oriya 7982
Panjabi 8065
Pashto, Pushto 8083
Perancis 7082
Persia 7065
Polandia 8076
Portugis 8084
Quechua 8185
Rhaeto
-Romance 8277
Rumania 8279
Rusia 8285
Samoa 8377
Sansekerta 8365
Seltik
-Skotlandia 7168
Serbia 8382
Serbo-Kroasia 8372
Shona 8378
Sindhi 8368
Singhala
(Seilon) 8373
Slovakia 8375
LANGUAGE CODE
Slovenia 8376
Somalia 8379
Spanyol 6983
Sudan 8385
Swahili 8387
Swedia 8386
Tagalog 8476
Tajik 8471
Tamil 8465
Tatar 8484
Telugu 8469
Thailand 8472
Tibet 6679
Tigrinya 8473
Tonga 8479
Turki 8482
Turkmen 8475
Twi 8487
Ukarainia 8575
Urdu 8582
Uzbek 8590
Vietnam 8673
Volapuk 8679
Welsh 6789
Wolof 8779
Xhosa 8872
Yiddi 7473
Yoruba 8979
Yunani 6976
Zulu 9085
INTRODUCTION OF THE COMPATIBLE DISC AND FILE FORMAT
This unit is designed to be able to play DVD, SVCD, VCD Ver 1.0 - 2.0, CDDA, MP3, MPEG4, MPG and also
can be used to displaying picture in JPEG format.
Note : On the development forward, there will be MPEG4 disc with many extension file kind appears. There is
possibility this player can not support some MPEG4 disc with certain extension file. Not all JPEG files
compatible with this unit.
Kind Symbol Content Size Max. Duration
Digital Versatile Disc
Super Video Compact Disc
Video Compact Disc (Audio + Video)
Compact Disc Digital Audio (Audio)
Compressed Audio with MPEG Audio Layer 3
format
Audio + Video (Compressed Video MPEG4
format)
Compressedpicture /photowith JPEGformat
DVD
SVCD
VCD
CD Audio
MP3
MPEG4
JPEG
12 cm / 8 cm
12cm
12 cm / 8 cm
12 cm / 8 cm
12 cm / 8 cm
12 cm / 8 cm
240 / 180 min.
45 min.
74 / 20 min.
74 / 20 min.
910 / 246 min.
910 / 246 min.
Keterangan indikator layar LCD :
1. USB 13. AVC & MPX
2. REPEAT 14. L & R
3. SD/MMC/MS 15. STEREO
4. PBC 16. SLEEP
5. DVD 17. KARAOKE
6. Function, Status, Counter 18. SURROUND
7. VCD 19. RAND(random)
8. CD 20. PROG(program)
9. MP3 21. BAZZOKE
10. MPEG4 22. PLAY/PAUSE
11. kHz & MHz 23. DOLBY DIGITAL
12. JPEG 24. DTS
417
Rear Part Rear Part Description :
1. AUDIO OUT terminal
2. Antena AM terminal
3. VIDEO OUT terminal
4. FM Telescopic antenna
5. Handle
6. Battery compartment
7. AC CORD IN terminal
Top Part
Layar LCD (Liquid Crystal Display)
Top Part Description :
1. DOCKING terminal (inside the cover)
2. DOCKING cover
2
1
1
3
2
4
6
5
7
1 43 6 72 5
8
10 11 12
15
16
18
17
21 20 19
9
13
14
222324
KARAOKE OPERATING INSTRUCTION (sing along with a song)
Playing karaoke disc
1. Connect Microphone to MIC terminal and “ ” indicator appear on the LCD screen.
2. Set MIC level by pressing “KARAOKE” button once, LCD displayed :
Press “” button to increase and press “” to decrease MIC level.
3. Set ECHO to get the desired deepness of the ECHO, press “KARAOKE” button
twice, LCD displayed :
Press “ ” button to increase and press “” button to decrease ECHO level.
4. Select the one of the karaoke modes below by pressing “KARAOKE” button three times, then press
“”/“ ” to select karaoke mode.
-AVC R : AVC R indicator displayed on the LCD screen. If you are singing in
front of mic, your voice and and the accompanist music will comes out from
the both speaker, with original singer voice are lost. Select this mode if your
karaoke or cassette disc has singer voice on the right channel.
-AVC L : AVC L indicator displayed on the LCD screen. If you are singing in
front of mic, your voice and and the accompanist music will comes out from
the both speaker, with original singer voice are lost. Select this mode if your
karaoke or cassette disc has singer voice on the left channel.
-MPX L : MPX L indicator displayed on the LCD screen. The unit perform left
channel only on both speaker, with right channel is lost.
-MPX R : MPX R indicator displayed on the LCD screen. The unit perform right
channel only on both speaker, with left channel is lost.
Notes :
-The karaoke functions above only can be set if Microphone connected to the unit.
-While playing DVD karaoke disc, you can choose audio output without vocal (only music) by pressing
“AUDIO” button on the remote control.
DOCKING OPERATING INSTRUCTION
Choose the DOCKING function by pressing “DOCKING” button on the front panel or press
“FUNCTION” button on the remote control until LCD screen displaying DOCKING. Connect
MP3/MP4 player to the DOCKING terminal at the top of the unit. Unit will read the kind of connected MP3/MP4
player, then displaying it on the LCD screen.
If you are connecting POLYTRON “eMotion” MP3/MP4 player, LCD screen displaying
eMotion appearance. Whereas if you are connecting the others MP3/MP4 player that
compatible with the unit, LCD screen displaying the appearance according to the equipment id.
On DOCKING function, you may operate the MP3/MP4 player through button on the front panel or remote
control, according to the button that available on the MP3/MP4 player.
Notes :
1. If MP3/MP4 player had connect to the unit is not a POLYTRON product, so for the play/pause function you
shall use “ ” (play/pause) button on the remote control.
2. DOCKING terminal also can be used as a CHARGER when the unit is on or standby mode (if you are charging
a battery when the unit is on, you shall choose except the radio function).
1
3
5
7
9
11
2
4
6
8
10
12
24
23
22
21 20
19
17 18
16
15
14
13
Remote Control
Remote Control Button Description :
1. “I/ ”(on/standby) 13. “REPEAT”
2. “SELECT” 14. “KARAOKE”
3. “GO TO” 15. “SOUND”
4. “SLEEP” 16. “ENTER”
5. “PRG/MEM” 17. “TITLE”
6. “”(play/pause) 18. “- VOLUME +”
7. “”(next) 19. “”(previous)
8. “MENU/PBC” 20. “OSD”
9. “///”(navigator) 21. “” (stop)
10. “SETUP” 22. “0” - “9” numeric
11. “SUBTITLE/FLASHRIP” 23. “MUTE”
12. “AUDIO/FMMODE” 24. “FUNCTION”
MP3 IN OPERATING INSTRUCTION
Press “MP3 IN” button on the front panel once or “FUNCTION” button on the remote control
until LCD screen displaying MP3 IN to select MP3 IN function. Connect the Line Out/Audio
Out/Headphones of your MP3/MP4 player to the MP3 IN terminal using 3,5 mm stereo jack. Operate the MP3/
MP4 player that connected to the MP3 In terminal.
16 5
INSTALLATION INSTRUCTION
Important !
Connect the other equipments first before you connecting the unit with the power source.
AM loop antenna
Attach antenna loop AM to the AM ANTENNA terminal. Put and
adjust AM loop antenna position/direction to get the best AM
reception. Keep the others electrical equipment that affected
AM reception such as neon, komputer, dll.
MIC (microphone) terminal
With attaching Microphone to MIC terminal, you can use the unit
as MIC amplifier or for karaoke.
PHONES terminal
You can listen the sound of the unit through the stereo headphones, connect stereo headphones to Phones
terminal. The both speaker will mute when you connect a headphone to the headphone terminal.
Remote Control battery installation : Open the battery cover and insert two batteries size “CR 2032” with the
right polarity.
Effective operational distance of remote control is 6 metres. If operational distance is decrease, change the
batteries with the new ones.
-Do not use different kind batteries.
-Remove the batteries if remote control does not use for along time.
-Remote control will does not work well if :
*Between remote control and the remote sensor is blocked by something.
*There is bright lights like direct sunlight.
*You operate another remote near the remote.
MW
LOOP
REAR PART OF
THE UNIT
RADIO OPERATING INSTRUCTION
Choose the signal strength based receiving position
1. If the unit position is far from the radio transmitter, activate the FM DX function.
FM DX mode is used to strengthened the radio signal although the distance is far
away from the unit position. Press and hold “SELECT” button for more than 2 seconds on the remote
control to activate the FM DX mode. FM DX is active indicates by FM DX appearance for a moment and A
icon lights up on the LCD screen.
2. If the unit position is near from the radio transmitter, activate the FM LOCAL
function. FM DX mode is used to suppressed the excessive noise and humming
caused by the unit position is near the radio transmitter. Press and hold “SELECT” button for more than 2
seconds on the remote control to activate FM LOCAL mode. FM LOCAL is active indicates by FM LOCAL
appearance for a moment and B icon lights up on the LCD screen.
Manual Tuning
1. Press “AM/FM” button on the front panel once or press “FUNCTION” on the
remote control repeatedly to select TUNER/RADIO function. The unit will be in
FM function showed by FM appearance on the LCDscreen.
2. To change to AM radio mode, press “AM/FM” button on the front panel once
more or press “SELECT” button on the remote control. Radio frequency will
changed each time “ ”/“ ” button is pressed.
Automatic Tuning
Press “ ” / “ ” button more than 3 seconds until the unit start searching for the radio broadcast. The
searching will stop when the unit find a radio station. The searching will not stop if the signal of the radio station
is too weak.
Presetting the Radio station
The unit can saved 40 radio station for AM and FM band. If you are saved a radio station, a number will
represent it. Use the memori preset number to select the radio broadcast.
1. Select the AM or FM frequency band, then press “” / “ ” button to search for a radio station.
2. After caught a broadcast, press “PRG/MEM” button
on the remote control. For FM radio, LCD screen
displayed F _ _ blinking appearance. Then for AM
radio, LCD screen displayed A _ _ blinking appearance.
3. Press “0” - “9” button to insert the memory number.
4. Press “PROG/MEM” button again on the remote
control to save the memory number.
5. To delete the memory program, press and hold “ ” (stop) button for 2 seconds.
Select the Preset Radio Station
Select TUNER/RADIO function. Select the preferred frequency band (AM or FM). Press “0” - “9” numeric
buttons or press “ ” / “ ” button on the remote control or on the front panel.
Notes :
-Adjust AM LOOP antenna position and direction to get the best AM reception.
-Adjust FM TELESCOPIC atenna to get the best FM reception.
-FM stereo indicator will lights up on the LCD screen if the unit received Stereo FM broadcast and will lit if
the unit received Mono FM broadcast.
-If FM stereo reception contains noise, press “FM MODE” button to select MONO mode, noise are decreased
although the reception become MONO. To back to STEREO mode, press “AUDIO/FM MODE” again.
VIDEO OUT dan LINE OUT terminal
You can enjoy the picture of the unit’s DVD player through the TV. Connect VIDE OUT and LINE OUT terminal
to the AV IN terminal of the TV using RCA cable. If you connect this unit to the TV using VIDEO OUT and LINE
OUT terminal, you should select VIDEO AV as TV input.
MP3 IN terminal
If you has MP3/MP4 player, you can use the unit as amplifier by connecting MP3/MP4 player output terminal
to the MP3 IN terminal of the unit using 3.5 mm stereo jack.
TV
Video & Audio Input
Video & Audio Out
REAR PART OF THE UNIT
MP3 IN
MP3/MP4 PLAYER
LINE OUT / AUDIO OUT
/ HEADPHONES
615
SD/MMC/MS card slot
You can play MP3/MPEG4/JPEG files that are stored on the SD/MMC/MS Card by
inserting it to the SD/MMC/MS Card slot on the front panel of the unit.
Note :If you are using/inserting card except SD/MMC/MS card, you should use a
included bracket/adapter.
USB terminal
You can play MP3/MPEG4/JPEG that are stored on the USB
Flashdisk/MP3/MP4 player byt inserting it to the USB port of the
unit.
DOCKING terminal
You can us the unit as Amplifier for your MP3/MP4 player or other
compatible devices, by connecting it to the DOCKING terminal on the top
paneloftheunitwithDOCKADAPTERaddition.TheshapeofDOCKADAPTER
are different each to other, depends to the MP3/MP4 player you had buy.
Note : Generally, the Dock adapter included in the purchase packet of the
MP3/MP4 player.
SD/
MMC
/MS
FRONT
PANEL
OF THE
UNIT
OPERATING PREPARATION
Turn ON, standby and turn OFF the unit
1. Turn On : Connect the AC Cord plug to the power outlets according to the unit’s voltage specification and
the unit is ready to operate. Press “I/ ” (on/standby) button and the unit is in the last operated function
before the unit brought to the standby.
2. Standby : Press “I/ ” (on/standby) button to make the unit standby that is indicated by POLYTRON
appearance on the LCD screen. While the unit is in standby mode, still there are a few electric current to
the unit.
3. Turn OFF : To turn off the unit permanently, unplug the AC Cord plug from the power outlets. Placed the AC
Cord plug so it is easy to be reached and plug/unplug.
Note :When you are using the battery as power source and you make the unit standby by pressing “I/ ”
button, so inside the unit still there are a few electric current.
Sleep Timer
Use this function to brought the unit into standby mode automatically according to the preferred set time.
1. Press “SLEEP” button to determine sleep timer in minute unit. AUTO - OFF - 10 -
20 - 30 - ........ and 120 displayed each time you press “SLEEP” button.
2. Auto Sleep choice only available if the unit is in DVD and DOCKING function
(docking is in empty condition). If you select SLP AUTO (auto sleep), the unit will
become standby 10 minutes after disc stop and there is no pressed button on the
unit or remote control. Auto Sleep does not work if Microphone connected to the MIC
terminal.
Preference
PREFERENCE menu consist of : TV SYSTEM, AUDIO, SUBTITLE, DISC MENU, PARENTAL, PASSWORD and
DEFAULT. TV SYSTEM, AUDIO, SUBTITLE, DISC MENU and PARENTAL menu only can be adjusted when the
unit is in STOP, OPEN or NO DISC condition.
TV System
You can adjust TV SYSTEM to PAL, AUTO or NTSC. Match with your TV.
Audio
Usedtoselectthe language asaudiooutputlanguage.There are :ENGLISH,
FRENCH, SPANISH, CHINESE, JAPANESE, KOREAN, RUSSIAN, THAI and
OTHERS. If you select unavailable language on the disc, the unit will
automatically select the one of available language for audio language,
this caused not all DVD disc recorded in language mentioned above. For
OTHERS selection, you can insert the Language Code refer to the
LANGUAGE CODE Table according to your preferred language.
Subtitle
Used to select language as subtitle text on the screen. Available language option : ENGLISH, FRENCH,
SPANISH, CHINESE, JAPANESE, KOREAN, THAI, INDONESIAN, MALAY, OTHERS and OFF. If you select OFF,
the unit will not displayed subtitle on the TV screen. For OTHERS selection, you can insert the Language Code
refer to the LANGUAGE CODE Table according to your preferred language.
Disc Menu
Used to select language as disc menu message or instruction on the TV screen. Available language option :
ENGLISH, FRENCH, SPANISH, CHINESE, JAPANESE, KOREAN, RUSSIAN, THAI and OTHERS. If you select
unavailable language on the disc, the unit will automatically select the one of available language for disc menu,
this caused not all DVD disc recorded in language mentioned above. For OTHERS selection, you can insert the
Language Code refer to the LANGUAGE CODE Table according to your preferred language.
Parental
Enable you to set the limit of parental protection movie according to the age level. PARENTAL can only be
changed by entering a correct PASSWORD. Select ADULT if you want to deactivate PARENTAL function.
PARENTAL function only works if DVD disc support this facility.
Password
Select CHANGE to replace the old Password with new Password (5 digit password). If the inserted Password
is wrong because of forget or replace by someone else, you can use “13579” SUPER PASSWORD. Then insert
the new PASSWORD (5 digit password).
Default
Select RESET to return all setting to the FACTORY DEFAULT.
FRONT
PANEL
OF THE UNIT
USB FLASHDISK
DOCKING
terminal
Dock
Adapter
MP3/MP4
player
14 7
SOUND ADJUSTMENT
Volume
Turn the VOLUME control on the unit or press “-VOLUME+” button on the remote
control to set the volume level. Volume level is displayed in numeric shape from 0 until
30. Each time the unit is turned on, the volume level will be the same before the unit
brought to the standby mode.
Preset Equalizer
There are 5 preset equalizer available : ROCK, POP, CLASSIC, JAZZ and FLAT. Press “SOUND” button once to
enter to the equalizer mode option. Press “”/“ ” button to select the one of preset equalizer,
selected equalizer mode will be displayed on the LCD screen.
Bazzoke
BAZZOKE used to add the steadiness of the bass sound. Press “SOUND” button 2x to
enter to bazzoke option, press “”/“ ” button to activate (ON) or deactivate
(OFF). When Bazzoke is active, BAZZOKE indicator is displayed on the LCD screen.
Note :When the unit using battery as power source, BAZZOKE does not work.
Surround
This unit also has surround facility to expanded the stereo effect. Press “SOUND” button
3x to enter to surround option. Press “”/“ ” to select SURR OFF (surround
inactive) or SURR ON (surround active). Surround is active indicates by indicator on
the LCD screen. Surround does not active if there is mic connected to the unit.
Mute
Press “MUTE” button on the remote control to muting the sound, mute indicator will come up on
the LCD screen and TV. Press again “MUTE” or “VOL+” button to return to normal.
DVD PLAYER OPERATING INSTRUCTION
Playing DVD/SVCD/VCD disc
1. Press “FUNCTION” button on the remote control or press “DVD M.MEDIA” button on the front
panel to select DVD function if the previously function is not DVD. Press “” (open/close)
button to open the disc tray. Insert the desired disc you want to play. Press “” (open/close) button
again to close the disc tray, DVD LOAD displayed on the LCD and TV screen for a
moment. Player will directly playing the disc.
-For DVD disc, will be displayed disc menu on the TV screen and DVD symbol on the LCD screen will
lights up.
-For VCD 2.0 disc, will be displayed disc menu on the TV screen and VCD & PBC symbol on the LCD
screen will lights up.
-For VCD 1.1/CDDA disc, automatically go to the track and play.
2. To freeze the picture for a moment (pause), while play press “” once, the picture will freeze, press
“” to back to play condition.
3. To stop play, press “ ” (stop) button once, player will remember the last position when “ ” (stop) button
is pressed (resume function is active). On the TV screen displayed “ ” (stop) symbol and “PRESS PLAY
KEY TO CONTINUE” appearance, press “ ” to play from the point when “ ” (stop) button is pressed.
To truly stop the play permanently, press “” (stop) button twice (deactivate resume function).
Note :
When the unit using the battery power source, DVD mode only can read USB, SD/MMC/MS and can not loading
a disc.
Audio
AUDIO setup menu consist of : DOWNMIX and DRC.
Downmix
1. LT/RT : When the disc is played with DOLBY DIIGITAL PRO LOGIC
stereo effect, signal decoder will produces 2 channel L (left) and R
(right) simulation effect.
2. STEREO : When playing 5.1 channel disc, the output signal will
become stereo signal 2 channel L (left) and R (right).
DRC
Used to set the different between the highest and lowest level on the
audio output. Press “ ” / “ENTER” button to enter to DRC option and
press “/” navigator to select the option, then press “” / “ENTER” button to activate.
Video
Video setup menu consist of : TV MODE, SHARPNESS, BRIGHTNESS and CONTRAST.
Sharpness
To set the pictures sharpness level. Generally, excessive sharpness
adding will reduce the picture detail. There are 3 Sharpness option setting
: HIGH, MEDIUM and LOW.
Brightness
To set the pictures brightness level. You can set brightness level from -
20 until +20.
Contrast
To set the pictures contrast level (differences between black and white
color). You can set contrast level from -16 until +16.
813
Playing MPEG4/MP3/JPEG disc
MP4 is a compression system of the digital video data with MPEG4 international standard and use MP3/AC3
or others audio format. MPEG4 itself is a compression system of digital video data that produced almost equal
MPEG2 (DVD) picture quality with smaller size. As sample, used extension is “*.avi”.
MP3 is a compression system of digital audio data with MPEG audio layer 3 format that produces data savings
12 - 14 times more than conventional system with equalize CDDA quality that be able to save more than 600
minutes play time. While JPEG disc is a disc that contains many pictures in JPEG format (Joint Photographic
Expert Group).
Operation Mode of MPEG4/MP3/JPEG disc
When playing MPEG4/MP3/JPEG disc, there are 2 operation mode : FILELIST and FOLDER, then for CDDA only
available FOLDER mode. When in stop condition press “PRG/MEM” button repeatedly to select the one of the
operation mode. If in one disc contain MPEG4/MP3/JPEG files, to display MPEG4/MP3/JPEG files on browser
menu, when in stop condition press “PRG/MEM” button repeatedly .
1. FILELIST mode :Used to play MPEG4/MP3/JPEG disc continuously,
not per folder. Press “/” navigator button to select track, then
press “ ” button or “ENTER” to play it. Track also can be selected
using “0” - “9” numeric buttons, press “0” - “9” numeric buttons
according to the track number.
2. FOLDER mode : In folder operation, TV screen will displayed menu of the disc content.
-Highlight preferred directory using “/” navigator button, then
press “ENTER” button to select. Or directly select the folder using
“0-9” numeric buttons.
Example : To select “01” press “1” button, then press “ENTER”.
-After you select a folder, the content will be displayed.
-Press “/” navigator button to select track, press “ENTER”
button to play it. You also can select track using “0-9” numeric
buttons. Press numeric buttons according to the track number.
Example :To select the 4th track “DISCO INFERNO - 50 CENT”,
press “5” button once (as sequence line from top), then press
“ENTER”.Toselectthe168thtrack,press “1”, “6”,and“9”numeric
button in sequence.
-Press “” navigator button to back to source folder.
Another functions : Another function like VOLUME control, PAUSE, FAST FORWARD, FAST REVERSE, NEXT,
PREVIOUS and others, also can be used during playing MPEG4/MP3/CD disc.
Additional functions while playing JPEG disc :
“” button used to display the next picture continuously.
“” / “ ” button used to go to the next or previous picture.
“” navigator button used to inverting the picture.
“” navigator button used to mirroring the picture.
“” navigator button used to rotate the picture clock wise.
“” navigator button used to rotate the picture counter clock wise.
DVD PLAYER SETUP INSTRUCTION
SETUP is used to set up the player configuration. Consist of : GENERAL, AUDIO, VIDEO and PREFERENCE.
1. Press “SETUP” button to enter to SETUP main menu.
2. Press “ /” navigator button to select the one of SETUP menu that
will be set (GENERAL / AUDIO / VIDEO / PREFERENCE).
3. Press “ ” / “ENTER” button on the remote control to enter to the
selectedsetup menu (GENERAL/ AUDIO /VIDEO / PREFERENCE)and
press “/” navigator button to select the one of submenu (TV
Display / Angle Mark / Captions / Screen Saver).
4. Press “ ” / “ENTER” button on the remote control to enter to the
selected submenu and press “/” navigator button to select (Pan
Scan / Letter Box / Wide), then press “ ” / “ENTER” button on the
remote control.
5. Press “SETUP” button again to exit from SETUP menu.
General
GENERAL setup menu consist of : TV DISPLAY, ANGLE MARK, CAPTIONS and SCREEN SAVER.
TV Display
1. Pan Scan : Select this if the player connected to normal ratio TV
screen (4:3), picture will fulfill the screen but will sliced on the right
and left of the picture.
2. Letter Box : Select this if the player connected to normal ratio TV
screen (4:3), you will watch the picture’s source aspect ratio with
black border on the top and bottom.
3. Wide : Select this if the player connected to wide screen (16:9).
Notes :
-Picture’s aspect ratio is depends to the disc recording format, not all DVD disc can display the picture on
the selected aspect ratio.
-You should select TV Display setting according with the TV type.
Angle Mark
Only can perform if the DVD disc recorded in many camera angle.
1. ON : When playing DVD disc, OSD will display the angle mark on the right top corner of the TV screen.
2. OFF : The angle mark not be displayed.
Captions
1. ON : To displaying text on the TV screen.
2. OFF : Captions not displayed on the TV screen.
Screen Saver
When the player without activity or does not receive signal for 4 minutes, Screen Saver will appear. This
facility is used to prevent the damage of the display screen.
1. ON : To activate the Screen Saver option.
2. OFF : Screen Saver is not active.
12 9
Playing MP3/MPEG4/JPEG files through USB, SD/MMC/MS or DOCKING terminal
You can playing MPEG4/MP3/JPEG/certain files that storage previously on the USB Flashdisk, SD/MMC/MS
card or MP3/MP4 player through USB connector, SD/MMC/MS card slot or DOCKING terminal of the unit. Plug
the storage media that you used to stored MPEG4/MP3/JPEG files to the according terminal.
1. USB terminal :
a. Plug the USB Flashdisk contains MPEG4/MP3/JPEG files to USB terminal.
b. Press “DVD M.MEDIA” button on the front panel or “FUNCTION” button on the remote control several
times to select DVD function, then press “DVD M.MEDIA” button on the front panel to select USB mode,
LCD screen will displayed USB LOAD. The unit will read the attached device for
a moment.
c. For next operational, please refer to the “Playing MPEG4/MP3/JPEG disc” topic.
2. SD/MMC/MS card terminal :
a. Insert SD/MMC/MS card contains MPEG4/MP3/JPEG files to the SD/MMC/MS card slot of the unit.
b. Press “DVD M.MEDIA” button on the front panel or “FUNCTION” button on the remote control several
times to select DVD function, then press “DVD M.MEDIA” button on the front panelto select CARD
input, LCD screen will displayed CARD LOAD. The unit will read the attached
device for a moment.
c. For next operational, please refer to the “Playing MPEG4/MP3/JPEG disc” topic.
3. DOCKING terminal :
a. Set MP3/MP4 player contains MPEG4/MP3/JPEG files to the DOCKING terminal of the unit.
b. Press “DOCKING” button on the front panel or press “FUNCTION” button on the remote control several
times to select DOCKING function. The unit will read the attached device for a moment.
c. For next operational, please refer to the “DOCKING OPERATING INSTRUCTION” topic.
Menu Play (DVD disc)
Disc menu will displayed automatically after DVD disc is loading. When TV screen displayed menu, use “/
//” navigator button on the remote control to select, then press “” / “ENTER”. If there is number
optional, use “0-9” numeric buttons on the remote control to select directly. To display disc menu while
playing, press “MENU” button on the remote control, so TV screen will displayed disc menu.
Title Play (DVD disc)
When playing DVD disc, press “TITLE” button on the remote control to go to DVD title. Use “///”
navigator button on the remote control to select, then press “ ” / “ENTER”. And what is more, you can use
“0-9” numeric buttons to select directly.
OSD (on screen display)
OSD will display information about elapsed time (ELAPSED) and remain time (REMAIN) through TV screen.
DVD disc
1. Press “OSD” button once to display the elapsed time of played title (TITLE ELAPSED).
2. Press “OSD” button twice to display the remain time of played title (TITLE REMAIN).
3. Press “OSD” button three times to display the elapsed time of played chapter
(CHAPTERELAPSED).
4. Press“OSD” button four times todisplay theremain timeof played chapter (CHAPTER
REMAIN).
5. Pressing “OSD” button for the fifth times will turn off the OSD (DISPLAY OFF).
SVCD/VCD disc
1. Press “OSD” button once to display the elapsed time of played track (SINGLE
ELAPSED).
2. Press“OSD”button twice todisplaytheremain timeofplayedtrack (SINGLE REMAIN).
3. Press “OSD” button three times to display the elapsed time of played disc (TOTAL
ELAPSED).
4. Press “OSD” button four times to display the remain time of played disc (TOTAL
REMAIN).
5. Pressing “OSD” button for the fifth times will turn off the OSD (DISPLAY OFF).
Note :
1. For MP4 and SVCD/VCD disc with PBC is ON (active), OSD will only displayed SINGLE ELAPSED and
SINGLEREMAIN.
2. For SVCD/VCD disc with PBC is OFF (unactive), OSD will only displayed SINGLE ELAPSED, SINGLE
REMAIN, TOTAL ELAPSED and TOTAL REMAIN.
Go To / Search
When playing DVD/SVCD/VCD disc you can use this function to go to the certain title/chapter/track/time.
DVD disc
1. GO TO TITLE/CHAPTER : Press “GO TO” button once when play, use “ /”
navigator button to select title/chapter, then insert preferred title/chapter
number.
2. GO TO TITLE TIME : Press “GO TO” button twice when play, insert preferred
title time (hour/minute/second) using “0-9” numeric buttons.
3. GO TO CHAPTER TIME : Press “GO TO” three times when play, insert
preferred chapter time (hour/minute/second) using “0-9” numeric buttons.
SVCD/VCD/CD disc
1. DISC GO TO : Press “GO TO” once when play, insert preferred disc time
(minute/second) using “0-9” numeric buttons.
2. TRACK GO TO : Press “GO TO” twice when play, insert preferred tracktime
(minute/second) using “0-9” numeric buttons.
3. SELECT TRACK : Press “GO TO” three times when play, insert preferred
track number using “0-9” numeric buttons.
CDDA rip using the FLASHRIP function
With this features, enable you to rip the CDDA to be MP3 file format that is stored to the USB Flashdisk.
1. Plug the USB Flashdisk to the USB terminal.
2. Insert the CDDA disc to be converted to the disc tray.
3. After CDDA had read, press “FLASHRIP” button on the remote control.
On the TV screen will displayed FLASHRIP menu.
4. Set the SPEED and BITRATE by entering them using “ ” / “ENTER”
and use “ /” button to confirm the desired SPEED and BITRATE.
5. Select the track to be converted using “ ///” navigator button and
“” / “ENTER” button, if you want to converted all available tracks,
choose SELECT ALL.
10 11
Program Play
Used to playing programmed chapter or track with preferred sequence, maximum until 20 program.
1. Press “PRG/MEM” button on the remote control to enter to PROGRAM mode.
2. On PROGRAM menu, use “ ///” navigator button to highlight, then press “0-9” numeric buttons to fill
in title, chapter or track number. To fill-in 1st-9th title, chapter or track number, the filling should begin with
zero number, example : for 5th title, chapter or track, press “0” and “5” sequencely.
3. To start playing PROGRAM, use “///” navigator button to go to the START option, then press
“” / “ENTER” button on the remote control.
4. If you are playing a DVD disc, on the TV screen will appear :
5. If you are playing SVCD/VCD disc, on the TV screen will appear :
6. To exit from PROGRAM, press “ ///” navigator button to point cursor
to the EXIT, then press “ ” / “ENTER” button on the remote control.
Note :
1. If only there is 1 title on the DVD disc, program menu display will same as
SVCD/VCD.
2. To exit from PROGRAM play, press “PRG/MEM” button to enter to program menu, select STOP, then select
EXIT. Other way, press “ ” (stop) button twice.
3. RESUME function can works in PROGRAM mode.
4. Program only works when playing DVD/SVCD/VCD disc.
Track/Chapter selection
When playing disc, you can select track/chapter directly using “0-9” numeric buttons. For VCD 2.0 disc, turn
off PBC function first (by pressing “PBC” button on the remote control).
Example : To play track 8th, press “8” numeric button. On the
TV screen displayed :
Example : For track 18th, press “1” followed by “8” numeric
button. On the TV screen displayed :
For DVD disc on stop condition, numeric button pressing will go to the GO TO TITLE and CHAPTER menu. Then
you should fill-in preferred title and chapter number.
Next/Previous
When play, press “ ” (next) button to go to the next chapter (DVD) or track (SVCD/VCD/
CD/MPEG4/MP3). Previous : When beginning play, press “” (previous) to go to the
previous chapter (DVD) or track (SVCD/VCD/CD/MPEG4/MP3).
Note : For DVD/SVCD/VCD, you can go to the previous title/chapter/track (by “ ” button)
if played time is less than 3 seconds, if more than 3 seconds the current title/chapter/track that will be played
again.
Fast Forward/Fast Reverse
You can find a certain part of the disc/chapter/track using this fucntion. Press
“” / “ ” button to search forward/reverse the certain part of the disc,
repeat the pressing of the button to select 2x, 4x, 8x, 16x and 32x search
speed. Press “” button to back to play normal.
Note :-While playing SVCD/VCD/MPEG4 disc, if fast forward reach the beginning part of the next track, it
will back to normal play.
-While playing SVCD/VCD/MPEG4 disc, if fast reverse reach the beginning part of the current track,
it will back to normal play.
-While playing DVD/SVCD/VCD/MPEG4 disc, while fast forward or fast reverse there will be no
sound (mute).
Repeat Play
This function is used to repeat certain title/chapter/track or entire disc.
DVD disc :While playing DVD
disc, title/chapter or all entire
disc can be repeated. Press “REPEAT” button repeatedly to select repetition mode : CHAPTER, TITLE, ALL and
OFF (off REPEAT function).
SVCD/VCD disc :While playing SVCD/VCD disc,
track or all entire disc can be repeated. Before
using this function, make sure you has turn off PBC (play back control) function. Press “REPEAT” button
repeatedly to select repetition mode : TRACK, ALL and OFF (off REPEAT function).
MPEG4/MP3/JPEG/CD disc :While playing MPEG4/MP3/JPEG disc, there are 4 play mode : REPEAT ONE
(continuously repeat the selected track), REPEAT FOLDER (continuously repeat all tracks in entire played
folder), RANDOM (play all tracks in entire played folder by randomly) and CONTINUE (play all tracks in entire
played folder sequencely). Press “REPEAT” button repeatedly to select the one of the repetition mode.
Audio language
Many DVD disc has soundtrack that recorded in many language. “AUDIO/FM
MODE” button is used to select the different audio language. This button can be
used to select SURROUND sound format that is recorded on the disc (example :
DOLBY DIGITAL, STEREO and DTS). To change the language while playing DVD
disc, press “AUDIO/FM MODE” button until displayed Audio language info on the TV screen.
Subtitle (on the screen text)
Many DVD disc recorded with multi-subtitle. “SUBTITLE” button is used to select
your preferred subtitle. When playing DVD disc, press “SUBTITLE” button until
appear preferred subtitle language. To deactivate subtitle, press “SUBTITLE” button repeatedly until displayed
SUBTITLE OFF on the TV screen.
Note :Note all DVD disc recorded in multi-language subtitle.
6. To start RIPPING process, press “///” button to select START
tab, then press “” / “ENTER” button. Wait the RIPPING process
until it finish.
7. After done, to get out from the RIPPING menu, select the EXIT tab then
press “ ” / “ENTER” button or by pressing “FLASHRIP” button once
more.
Note :
The result of the conversion with MP3 format will be placed on the FLSHRIP
folder with POLY_XX.MP3 names format, XX is the sequence number of the conversion. The maximum
conversion files can be done on the FLSHRIP folder are 99 files.

Popular Portable Multimedia Player manuals by other brands

Emtec Movie Cube K220 Product features

Emtec

Emtec Movie Cube K220 Product features

E-matic EJam user manual

E-matic

E-matic EJam user manual

Cowon A2 user guide

Cowon

Cowon A2 user guide

Plextalk POCKET PTP1 user guide

Plextalk

Plextalk POCKET PTP1 user guide

Freecom MediaPlayer Drive-In Kit manual

Freecom

Freecom MediaPlayer Drive-In Kit manual

IRiver Astell&Kern AK 380 quick start guide

IRiver

IRiver Astell&Kern AK 380 quick start guide

Philips GoGear SA065104S quick start guide

Philips

Philips GoGear SA065104S quick start guide

Ophit MSV2 user manual

Ophit

Ophit MSV2 user manual

Yoo Digital YOOMOVE 6001 user manual

Yoo Digital

Yoo Digital YOOMOVE 6001 user manual

PQI Multimedia Player user manual

PQI

PQI Multimedia Player user manual

Philips SA5285/37 quick start guide

Philips

Philips SA5285/37 quick start guide

Creative ZEN user guide

Creative

Creative ZEN user guide

Philips SA1ARA08KS/37 user manual

Philips

Philips SA1ARA08KS/37 user manual

MSI MEGA VIEW 566 user guide

MSI

MSI MEGA VIEW 566 user guide

bon BMQ-100 user guide

bon

bon BMQ-100 user guide

Archos XS100 - Gmini 4 GB Pocket Music Player user manual

Archos

Archos XS100 - Gmini 4 GB Pocket Music Player user manual

Polaroid PMP430-4 user manual

Polaroid

Polaroid PMP430-4 user manual

Rollei ea2020G user manual

Rollei

Rollei ea2020G user manual

manuals.online logo
manuals.online logoBrands
  • About & Mission
  • Contact us
  • Privacy Policy
  • Terms and Conditions

Copyright 2025 Manuals.Online. All Rights Reserved.