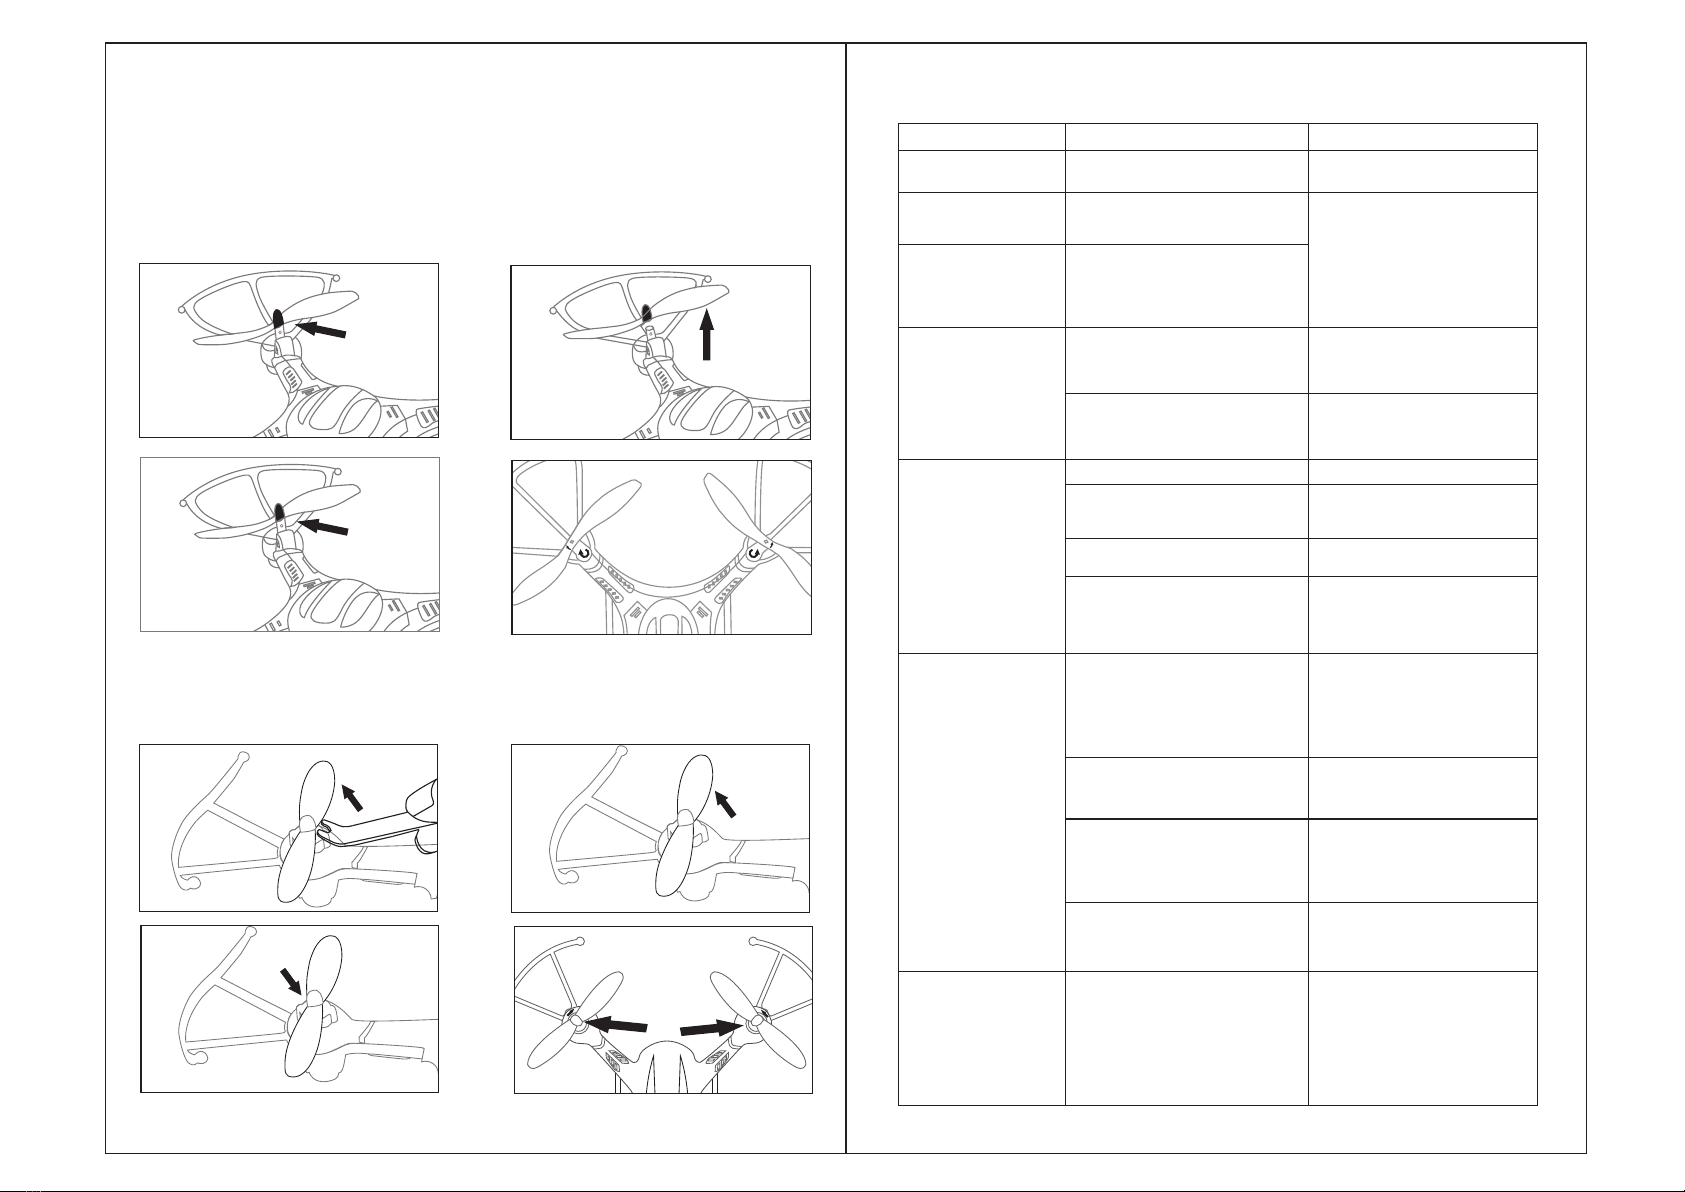
Potensic F186WH User manual

Contents
Important Statement·······················03
Safety Precautions················ ··· · · · · 0 3
Safe Notice on the Li-Po Battery··············04
Charging Method of Li-Po Battery·············05
Flyer Warnings···························0 5
Definition of the Flyer and the Controller········0 6
Flying Operation··························0 9
Function of the Flyer·······················1 2
Flip Mode ·······························13
Headless Mode···························13
Installation/Replacement of Motors/Blades······13
Method of Using the Phone APP···············14
Icon Function Introduction ···················15
One-hand Operation ······················· 17
3D Flip ································· ·18
Installation Blades··· ········ ········ · ····19
Problems Guidance·······················2 0
02
14
User Manual
Contact E-Mail:support@ipotensic.com

Important Statement
Thank you for purchasing the item with Potensic. This is a toy drone, not a professional
drone, but also need skills to control/play it.
(1) This drone is suitable for those experienced RC drone user aged 14 years or more.
(2) Please read the user manual carefully before flying.This product is a complicated
equipmentintegrated with professional knowledge of mechanic, electronic, air
mechanics,etc., so it should be installed and adjusted correctly to aviod accidents.
(3) The user must always operate in a safe manner. Potensic undertake no liability for
human injury or property damage caused by improper operation as we could not control
the procedure of installation, usage and operation of this drone.
(4) Potensic undertakes no liability for those accidents caused by improper operation,
usage and control fo the drone after sale of the product.
(5) We provide technology support and after-sale service. If you have any questions
about usage, operation, repairment etc., please contact support@ipotensic.com.
03 04
Safety Precautions
This drone is suitable for those experienced RC drone user aged 14 years or more.
This product includes small parts, please keep it away from kids under 3.
(1) Flying field
The flying field must be legally approved by local government. Areas around airport
of radius of 5000m are not allowed for flying all kinds of remote controlled quadcopters.
Flying fields must be spacious enough and we suggest at least 8m(length)*8m(width)
*5m(height).
(2) Correct Usage
For safety, please use the Potensic parts to replace the damaged. Improper assembly,
broken main frame, defective electronic equipment or unsilled operation all may cause
unpredictable accidents such as drone damage or human injury.Starters are recommended
to learn from others who are experienced in operating a drone.Please pay special
attention to safety operation and have a good knowledge of accident
responsibility that the user may cause.
(3) Keep away from obstacles and crowds
The speed and status of a flying RC drone is uncertain and it may casue potential danger.
For security, we strongly suggest that the user must keep away from crowds,buildings,
power lines etc. Forbid flying the drone in rainy,storm, thunder and lighting weather for
the safety of user, people around and property.etc.
(4)Do not look straight into the highlighting nevigation LED lights , which may cause
discomfort to the eyes.
(5) Keep away form humid environment
The drone inside is consisted of precise electronic components. Humidity or water
vapor may damage electornic components and cause accident.
(6) Safe operation
Please operate the RC drone in accordance with your physical status and flying skill.
Fatigue,listlessness and improper operation may increase the rate of accident.
(7)Keep away from the rotating parts
Please control and operate the drone within your sight.Keep your face, body and
other spectators away from rotating parts, otherwise, it may casue serious injury
and damage.
(8) Keep away from heat
The drone is made of metal, fiber, plastic and electronic components. Keep away from
heat and sunshine to avoid distortion and damage.
(9) Controller range
The best control distance is 30 meters line of sight and altitude. Do not fly the drone
in area with tall buildings,power line etc. around that may influence the drone signal
to avoid any unexpected accident due to out of signal and control.
(10) Only Potensic battery charger can fit this drone. Please diconnect the charger with
the drone before cleaning. Check the charger wire, plug, fuselage and other components
on a regular basis to make sure they are in good condition. Please do not operate the
drone if there's any parts damaged.
Safe Notice on the Li-Po Battery
*Do not put the battery on high temperature place, such as fire or heating device to
avoid damage or explode.
*Do not use the battery to crash or hit hard surface.
*Do not put the battery into the water. Keep it in dry place.
*Do not detach the battery.
*Do not leave the battery without supervision when charging.
*Check the power supply connection before charging to make sure it works.

06
Drone Battery
Discarded lithium batteries can not be thrown in the trash,
please contact the battery recycling center.
Disposal and Recycle of Lithium Battery
Charging by
USB Adapter
Charging by USB
Ports of Computer
Charging by
Car charger
Name of Parts
Transmitter
17
Charging Method of Li-Po Battery
Flyer warnings
It is recommended to select the output 5V2A current adapter, which will be faster
for charging. The maximum current can not exceed 5V, otherwise the battery
could be damaged.
(1) Confirm that the battery is fully charged.
(2) Confirm that the left throttle is in the middle position before power on.
(3) Before flight, please turn on the controller, first and then power on the drone. While
after flight, power off the drone first and then turn off the controller. Incorrect steps
may result in the drone out of control.
(4) Make sure the drone parts are connected strickly and securely. The continuous
vibration during flight may loosen the connection between the drone parts which
may result in hard control.
(5) Incorrect operation may result in crashing and make the drone parts damaged
/fau lty. We suggest that the user should purchase the drone parts to replace
immediately for sustainable flying.Should you need any information or help with
replacing the parts, please feel free to contact us at support@ipotensic.com .
We will be standing by all the time for you!
Definition of the Flyer and the Controller
*Use Potensic original charger only.
*Check the charger wire, plug, fuselage and other components on a regular basis to
make sure they are in good condition. If any of those parts damaged, please do not
use them until they are repaired.
*If not using the drone for over a week, please make sure that the power of the battery
remains above 50% to keep its performance and utility.
05
1. Plug the USB charging cable to your computer USB interface, the light will indicate red.
2. Then connect it with the battery, the red light will off which indicates that the battery
is being charged.
3. If the red light comes on again, then the battery is fully charged. Charging time is
about 50 minutes.

07 08
1. Antenna Transmit Signal to the drone
2. Side Lights On/Off Turn on or turn off the side lights of the drone
3. Flip Make the drone 360 degree roll over
4. Power On/Off Push up to turn on the transmitter, down to turn off.
5. Power On/Off Indicator Light Indicates the states of the transmitter and low
voltage alarm
6. Throttle Up/Down Push the throttle Stick Up or Down, left or right and
the drone flies to up or down, rotate to left or right
synchronously.
Transmitter Battery Installation
Open the battery cover on the back of transmitter and put 4 alkaline batteries
(excluding) into the box in accordance with electrode instructions.Pictures as below.
Battery cover
AA alkaline batteries
Notice:
1.Make sure the electrodes are correct.
2.do not mix using new and old batteries.
3.do not mix using different kinds of batteries.
4.Non-rechargeable batteries can not be charged
7. Left/Right/Forward/
Back Flying Stick
Push the Left/Right/Forward/Back Flying Stick up
or down, left or right, the drone flies forward or
backwards, left or right synchronously.
8. Move Head Left/Right
Steering Trim
Adjust the trim to right if the drone head rotates to
left when taking off, and vice versa.
9. Throttle Trim Adjust the flying speed of the drone.
10.Side Trim In Hover Adjust the trim to right if the fuselage drifts to left
when taking off, and vice versa.
11.Forwards/Backwards Trim Adjust the Trim to backwards if the drone fuselage
drifts to forward when taking off, and vice versa.
12.Picture This button doesn't apply to this drone.
13.Video This button doesn't apply to this drone.
14.Start/Landing
Press the button to take off the drone after binding.
Press the button during flight to slowly landing the
drone.
15. Headless Mode
(RETURN)
Pr ess t he butt on an d th e transmit ter will
continuously issue "beep beep beep" sound,
press the button again and the drone will exit
headless mode.
16.Speed Adjustment
Press the button and the transmitter issues a
"beep" sound, the percentage of speed output
on the LED screen will flash,turn it around left
or right to adjust the percentage. Press the
button again and output speed you choose will
take effect.
17.LED Screen Display the power of the transmitter and other
adjustment parameters.
Replace/Install the Drone Battery
1.Open the bottom battery cover of the drone(Picture 1).
2.Take out the battery carefully, avoid using too much force,it may damage the power
cable of the drone(Picture 2).
3.Pinch the buckle on the battery wire connection,then disconnect the battery with
the cable of the drone(Picture3).
4.Replace with a new battery,put it into the drone, cover the back.
Phone Installation
1.Open the phone holder fully, then put the phone in and fasten it.(Picture4)
2.Insert the phone holder (with phone installed) into the card slot on the remote.(Picture 5)
3.Loosen the bottom screw of the phone holder, adjust the angle of the phone, and
then tighten the screw.(Picture6)
Picture 1 Picture 2 Picture 3

09
Additional Instruction before Flying
1.The camera lens is front(head).Players should keep away from the head of the drone.
2.After frequency pairing,press the Start/Landing button and check the rotating blades.
The left front/right rear blades(blades A) rotates towards clockwise direction while
the right front/left left rear blades(blades B)rotates towards counterclockwise direction.
3.Slowly push the left throttle stick up, the drone flies upwards, then push the left stick
slowly down to end, the drone flies downwards and landing.
4. Adjust relative transmitter Trim button to adjust the rudder if the drone tilts to one
side when flying.
Calibration Instruction
Please follow the below steps to calibrate the drone if the drone wouldn't hover after
taking off, and can not be adjusted by trim button and cause difficult operation.
1.Turn off the drone switch and then turn off the transmitter switch.
2.Turn on the transmitter switch, then power on the drone switch and put it on the
horizontal ground, after successful frequency piaring, press the fip button (Picture11),
you will hear "beep,beep,beep" sound from the transmitter. Push the left stick and
right stick to left rear positon about 45 degrees at the same time( Picture12),the
percentage displayed on the transmitter LCD screen turns to 0.0%(Picture 13).
3.After 8 seconds later, the side lights stop flashing and stay solid, which indicates
that the calibration is done and the drone is ready to fly.
Flying Control
1.Left and Right flying
Pu sh Lef t/R igh t/F orw ard /Ba ck Fly ing Sti ck ( R i g h t
stick) left or right and the drone flies to le ft or right
synchronously.
2.Upwards and Downwards Flying
Push the left throttle Up or Down and the drone flies
to up or down synchronously.
Push the left throttle Stick left or right
and the drone rotates to left or right
synchronously.
Flying Operation
Pair your drone with the transmitter
1.Turn on the transmitter(Picture 7),then turn on the Drone,the side lights of the drone
flash slowly, move the left throttle up and down(Picture 8/9),the side lightsof the
dro ne st op flash ing and stay b rig ht, at th is mome nt, the dron e is suc ces sfu lly
connected to the transmitter.
2.Put the drone on the flat ground, press the switchhover button on the controller(Picture 10),
the blades begin rotate and you can operate your drone with the transmitter.
Important Notice: Please make sure the gyro of the receiving board is placed on the
horizontal position after powering on the drone, so that the drone can be controlled.
Picture7 Picture 8 Picture 9 Picture10
Picture 11 Picture 12 Picture13
10
Picture4 Picture 5 Picture 6
3.Rotate to Left or Right

forwards backwards
Rotate to Left Rotates to Right
Drift to Forward Drift to Backwards
drift to leftdrift to right
Push the Left/Right/Forward/Back Flying
Stick(Right stick)Up or Down and the
drone flies to forwards and backwards
synchronously.
Adjust the Trim to right if the drone head
rotates to left when taking off, and vice
versa.
Function of the Flyer
1.Take Off: Turn on the transmitter and then power on the drone, push the left throttle
to the utmostcontrol distance and then to the low end, release the throttle, the side
lights stop flash and stay solid, which indicates successful frequency pairing. Press
the start/landing button and the drone begin to fly.
2.Landing: Push the left throttle down to the end while flying, the drone will slowly flies
downwards to the ground until the motors stop rotating.
3.One key to landing: Press the Start/Landing button while flying, the drone will fly down
to the ground until the motors stop rotating.(Forbid to move the left throttle when using
the the one key to landing function or it will not take effect.
4.Immediate landing: Push the left throttle and right stick to internal angle of 45 degree
at the same time when immediate landing is need in urgent condition(Picture 14), the
motors will stop rotating and the drone will fall to the ground directly.(Please keep away
from clowds while using the function, the drone may generate some impact in the process
of immediate landing.)
Variable Gain
Before flight,turn on the transmitter and press the Speed Adjustment button, the
transmitter will issue "beep" sound, the percentage displayed on the LCD will flash
(Picture15), turn around it to left or right to adjust the speed(Picture16),ch oos e a
proper speed and press the button again, the percentage on the LED screen will stay
solid and the speed is set.Percentage below 50% will reduce the sensitivity of the
drone, starters are advised to set the speed percentage between 30% and 50% to
practice it. Percentage above 50% will increase the drone's sensitivity and its operation
difficulty,recommand not try speed percentage above 50% until you are completely
get the hang of it.
+
-
11
Picture14
Picture 15 Picture 16
5.Adjust Move Head Left/Right Steering Trim
Adjust the Trim to backwards if the drone
fuselage drifts to forward when taking off,
and vice versa.
6.Adjust Forward/Backwards Trim
Adjust the trim to right if the fuselage drifts
to left when taking off, and vice versa.
7.Adjust Side Trim In Hover
4.Forwards/Backwards Flying
12

Flip Mode
Press flip mode button of the transmitter(Picture 17) when flying and the transmitter
will issue sound of "beep beep...”which indicates the drone enters flip mode. Push
the Left/Right/Forward/Back Flying Stick(Right stick) to left/right/forward/back
(Picture 18),t h e dr o n e w il l d o 3 60 de g r ee fl i p p in g t o c or r e s po n d in g d i r ec t i on
synchronously.
Headless Mode
By using headless mode, players are not needed to tell the front or rear of the drone
when operate it. Suitable for situations that the drone in sunshine or the drone over
a long distance and can not recognize the drone head and tail.The drone is set as
"head mode" by default.
Press the Headless button to enter the headless mode. While in Headless mode, no
matter which way the quad copter is facing, the right lever will move the quad copter
in the same direction the lever is being pushed - left for left, right for right, forward for
forward, or backwards for backwards - "Headless" mode. The controller will continue
to beep while in Headless mode.Press the Headless button again if you want to exit
the headless mode.
14
Picture 17 Picture 18
Method of Using the Phone APP
1. Download and Install the APP:VS-UFO(Picture 19).
2.Operate the Drone with APP
(1). Turn on the drone and place it on a level surface.
(2). Enter phone "setting", turn on WIFI(WLAN) and choose“DFD-******”,then return
to the phone home screen after successful connection.(Picture 20)
Important Notes:
Please ensure that the ground is level when you calibrate the gyro in the receiving
board, then the drone can be operated normally.(Picture 22)
13
Android System IOS System
This App is suitable for mobile phone with IOS8.0+ or Android 4.4+ system, please
download and install the APP by scaning the QR code below.
(3). Open the APP by clicking "VS-UFO" icon, and enter real-time image transmission
interface.(Picture 21)
(4). Click to enter joystick interface, the LED light of the drone will stop flashing
and stay solid, meaning the drone is paired successfully with APP, and the drone
is ready to fly.
Play
Picture 19
Picture 20
Picture 21
Picture 22

16
Icon Function Introduction
3.1 Phone Control Interface Icon
Reback Icon:
Record Video Icon:
This function can only be used in joystick interface. By clicking this Icon, the joystick on
the right will change into gravity induction ball. At this time, when the phone shakes
to left/right,the ball will move to left/right, and the drone will fly to left/right.
Only when using the joystick interface can you use this icon. By clicking the icon, you
will see two small icons - " one key take off " and " one key landing ". You can
control the drone via phone after clicking " one key take off ". On the contrary, by clicking
" one key landing",the drone will land slowly.
“30%, 60%, 100%" 3 rates can be selected, the greater the value,the higher sensitivity
of the drone, and the corresponding operation difficulty will be increased.
Click this Icon to enter joystick interface and control the drone by using the phone.
Click this Icon to reverse the picture received on the phone.
Click this Icon to enter 3D dual-screen mode.
By clicking this Icon, the drone will disconnect and fall down
suddenly. This function should only be used in emergency situations. Click once to
lock the joystick interface, and all other functions are unusable, click again to resume
operation.
Click this Icon to enter 3D flip mode. Push the direction Icon to any direction, then the
drone will make 3D flips to the corresponding direction. When using this function,the
flying speed rate needs to be adjusted to 100%. One click for one 3D flip. Please don't
try this function before getting the hang of the APP,otherwise the drone can be damaged
easily.
Move the center touch point to adjust
throttle response.
Move the center touch point to control
the flying direction. Turn on the gravity
induction icon, the flying direction can
be controlled by adjusting the balance
of your phone.
Click this icon to adjust the trim to right
if the drone rotates to left when taking
off, and vice versa.
Click this Icon to adjust the trim to right
if the drone drifts to the left when taking
off, and vice versa.
15
Directly return to the entering interface of the APP by clicking this Icon.
Click once to take photo, and saved directly on your phone.
Take Photo Icon:
Click once to record video, click again to end and save recording.
*Please note the recorded video is without sound.*
APP File Icon:
Click to view photo and video.
Speed Adjustment Icon:
Take off /Land Icon:
Gravity Induction Icon:
Joystick Icon:
Lens Reverse Icon:
3D Icon:
Emergency Stop Icon:
360 Flip Icon:
Throttle Control Icon:
Direction Control Icon:
Left/Right Rotation Trim:
Left/Right Flying Trim:
Forward/Backward Flying Trim:
Click this icon to adjust the trim to
backward if the drone drifts to forward
when taking off,and vice versa.

One-hand Operation
1. With the phone and App paired successfully, turn on joystick interface, click start
icon to make the propeller spin, then the drone is ready to fly.
18
3D Flip
1.Click speed adjustment icon to adjust the speed rate to 100%.
17
2.Adjust the throttle control Icon to control the drone at a suitable height.
3.Click gravity induction Icon to change the direction control Icon into gravity
induction ball.
4.Hold the phone with one-hand, control the flying direction by adjusting the horizontal
position of the phone. Under emergency situations, click the emergency stop icon
to stop flying.
2.Keep the drone at an altitude of no less than 2 meters to ensure that there are no
obstacles around.
3.Click 3D flip Icon and then push the direction icon to any direction, the drone will
make a 3D flip to the corresponding direction.
4.Due to inertia,the drone may lose some altitude. Please adjust the throttle to ensure
the drone is at a proper height.
Attention: Please don't try this function until you get the hang of the APP,
otherwise the drone can be damaged easily.
2 M

Installation Blades
19 181/186WH-EN
20
Problem phenomenon Cause Solution
One or more blades
stop spinging One or more motors were damaged Swap with new motors
blades spin slowly or
can't spin.
The larger white gear and the mental
motor gear are not meshed together,
it usually result from a strong crash.
Grindy sound from the
gear shaft
The gears were worn out. The gear
shaft disformed after crahses
that result in tight mesh of the blades
gear with the motor gear, further
ware out the gears.
Change the gears and
base.
Fly to one side
The original program of the aircraft
has changed slightly during
operation, or the gyro is not reset
after a violent impact.
The motor has been crashed
damaged.
If it can't be fixed by fine tuning or
ca l ibra t ion rese t ting , then the
motors should have been damaged,
please replace the abnormal parts.
Use the tuning button on the
transmitter or calibration function,
please refer to the User Manual
for how.
Can't lift off ground
The blades are severely deformed. Change with the same type blades.
The drone battery is low in power.
Charge the battery follow the
instruction or try again with another
fresh battery.
incorrect installation of the props. Reinstall the blades in accordance
with the instruction.
The drone won't be ready to fly until
you press the Start/Landing button
Switchover button) after successful
pairing.
Before take flight, press the left
rear button on the remote control
to make the blades rotate. More
details please refer to the User
Manual.
There is no pictures
showingon the phone.
Loose connection of the camera
wire with the drone.
Ensure that the camera wire has
been strickly connected with the
drone wire at the bottom, if there's
no issue with the camera, there
will be solid blue indicator light lit
up in the camera box when t h e
drone is powered on.
The camera is damaged(No blue
light in th e came r a b o x e v en i f it
has been full attached to the drone
bottom and the drone is powered on)
Change with a new camera.
There's interference signal around
that affect the transmission of the
drone signal.
Avoid flying the drone in fields around
with power lines,radar and others
that could release radio signal.Play
in a clear wide field with no to little
interference.
Failed connection between the
phone and drone WIFI.
Open phone "setting",turn off the
WIFI and restart,the wifi signal of
drone will show up on the the
searching column,reconnect with it.
Can't bind.
There's signal interferences nearby.
The interval between switch on the
transmitter and the drone is too long
(more than 8 seconds).The drone
battery or tra nsmitter batte ry is
low in power.
Plea se try aga in in area wi th no
sign a l i n t e r f e n c e ; R e s t a r t t h e
dr on e a nd the tra ns mit t e r, tu r n
on t h e t ra nsm itt er firs t a nd t h e n
turn on the drone, th e two steps
should be done quickly(no longer
th an 4 seco nd s ); ens ure the re 's
enough power in the drone battery
an dt h e m o n i t o r.
Problems Guidance
1.Remove the screws by counterclockwise rotate the screwdriver.
2.Upwards pull out the blades.
3.Install the blades with the same rotate direction,then tighten the screws by clockwise
rotate the screwdriver.
4.Make sure the blade be accordant with its rotate direction
C1
D1
F186 Blades Installation
1. Put the blade changer to the base of the blades.
2.Push up the blades.
3.Put the new blades into its correct position.
4.Make sure the blade be accordant with its rotate direction
F181 Blades Installation
This manual suits for next models
1
Table of contents
Other Potensic Quadcopter manuals