POWER ELEKTRONIK PWR GOLD POWER User manual

PWR GOLD POWER DC CHARGER
40kW-120kW User Manual
POWER ELEKTRONİK SAN. TİC. A.Ş.
Power Plaza, Armağan Evler Mh. Diriliş Cd, İpekçi Sk. No:12 PK : 34760 Ümraniye/İstanbul, TURKEY

PWR GOLD POWER DC CHARGER 40kW-120kW
User Manual
Copyright Information
Power Elektronik SAN. A.Ş. Copyright, all rights reserved. The content is subject to change without notice.
No part of this manual can be reproduced, copied, translated or transmitted in any form or by any means
without the prior written permission of the original manufacturer. Information provided in this manual is
intended to be accurate and reliable. However, the original manufacturer assumes no responsibility for its
use, or for any infringements upon the rights of third parties that may result from its use.
POWER ELEKTRONİK SAN. TİC. A.Ş.
Power Plaza, Armağan Evler Mh. Diriliş Cd, İpekçi Sk. No:12 PK : 34760 Ümraniye/İstanbul, TURKEY

Danger
Some parts of the power system are operated with high voltage. Direct contact or indirect contact
with these parts through wet objects can be fatal.
Caution
Static electricity generated by the human body can damage static-sensitive components on the
board, such as large-scale integrated circuits (ICs). Before touching the device, holding the card,
circuit board, IC chip, etc., in order to prevent the human body from damaging the sensitive
components, you must wear an anti-static wrist and ground the other end of the ESD-preventive
wrist.
Danger
It is strictly forbidden to short-circuit the positive and negative poles of the power distribution
system DC power supply or short-circuit the non-grounding pole to the ground. The power supply
equipment is a constant voltage DC power supply equipment, and short circuit will cause
equipment burnout and personal safety hazard.
Danger
It is strictly forbidden to carry out high voltage and alternating current in thunderstorms.
Danger
Construction operations on high voltage lines may result in fire or electric shock. The area where
the AC cable is routed and routed must comply with local regulations and specifications. Only
those with qualifications for high voltage and AC operation can perform high pressure operation.
Safety Precautions
Please read the operating instructions and precautions carefully before starting the operation to reduce the accident. The
“Caution, Warning, and Danger” items in the product and product manuals do not represent all safety precautions that
should be followed, and are only supplementary to various operational safety precautions.
In the operation of our products and equipment, we must abide by the safety regulations of relevant industries and
strictly abide by the relevant equipment precautions and special safety instructions provided by Power Elektronik SAN.
A.Ş.
Electrical Safety
High Voltage
The installation of AC power equipment must comply with the safety regulations of relevant industries. Personnel
performing AC equipment installation must have high-voltage, AC, and other operational qualifications.
It is strictly forbidden to wear conductive objects such as watches, bracelets, rings, etc. on the wrist during operation.
When you find that the cabinet is watered or wet, turn off the power immediately. When operating in humid environment,
moisture should be strictly prevented from entering the equipment.
On the switches and buttons that are not allowed to be operated during installation, the prohibition operation sign must be
hung.
Tools
Warning
Special tools must be used for various operations of high voltage and alternating current
Thunderstorm
In thunderstorms, strong electromagnetic fields are generated in the atmosphere. Therefore, in order to avoid lightning
damage to the equipment, it is necessary to do a good grounding of the equipment in time.
Short Circuit
PWR GOLD POWER DC CHARGER 40kW-120kW User Manual
Static Electricity
POWER ELEKTRONİK SAN. TİC. A.Ş.
Power Plaza, Armağan Evler Mh. Diriliş Cd, İpekçi Sk. No:12 PK : 34760 Ümraniye/İstanbul, TURKEY
T: (+90) 216 481 66 99 W: https://www.powerelektronik.com E:[email protected]

The polarity of the cables and interface terminals must be strictly checked during DC live working.
DC power distribution operation space is compact, please pay attention to choose operating space before any operation.
Operation must use insulation tools.
When charging operation, you must pay attention to the tension of the hands, wrists and arms to prevent the tool or the
human body from moving too much and causing accidents.
Others
Sharp corner of object
Warning
Wear protective gloves when handling equipment by hand to prevent cuts from sharp objects.
Power cable
Caution
Make sure the cable label is correct before connecting the cable.
Signal line
Caution
The signal cable should be bundled separately from the power cable. The distance between the
straps is at least 150mm.
PWR GOLD POWER DC CHARGER 40kW-120kW User Manual
POWER ELEKTRONİK SAN. TİC. A.Ş.
Power Plaza, Armağan Evler Mh. Diriliş Cd, İpekçi Sk. No:12 PK : 34760 Ümraniye/İstanbul, TURKEY
T: (+90) 216 481 66 99 W: https://www.powerelektronik.com E:[email protected]

Table of Contents
1. Overview................................................................................................................................................................................................. 1
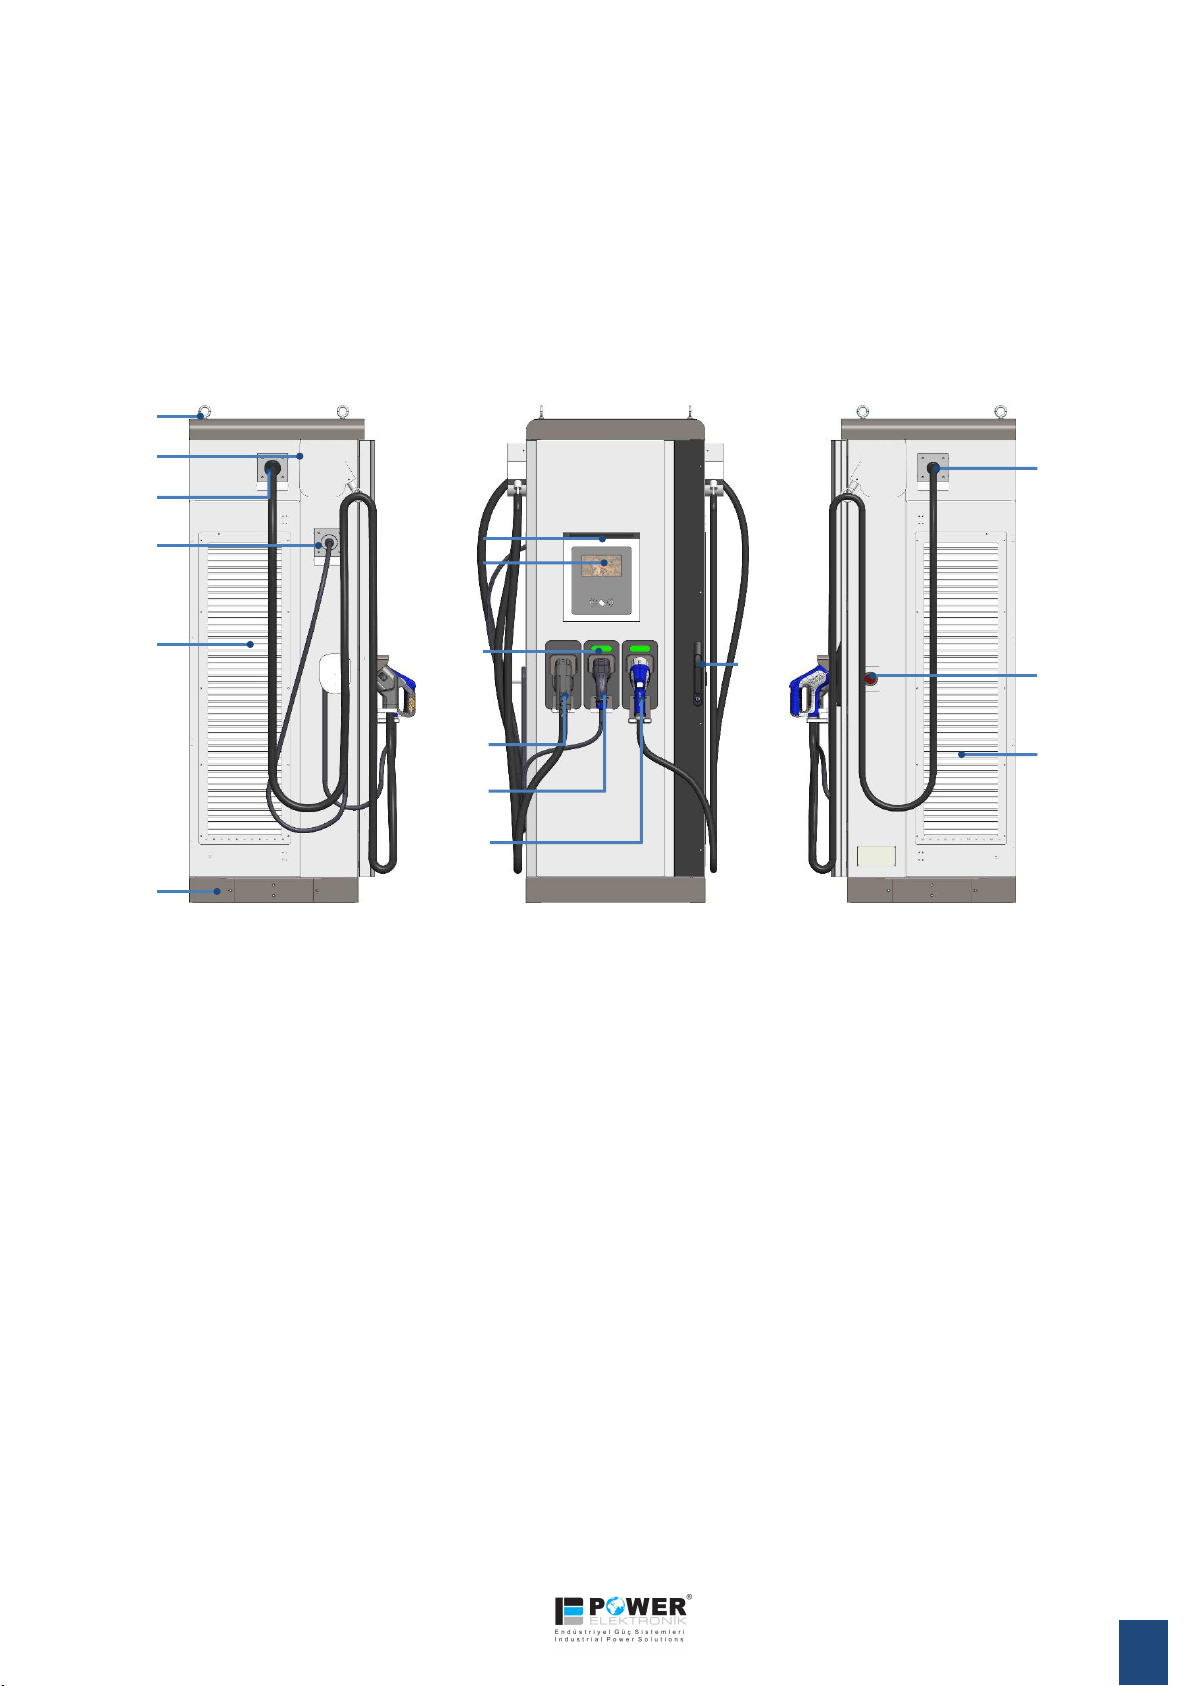
1.1 Main features..............................................................................................................................................................................1
1.2 Model description........................................................................................................................................................................2
1.3 Dimensions.................................................................................................................................................................................2
1.4 Technical parameters..................................................................................................................................................................3
2. Installation.............................................................................................................................................................................................. 4
2.1 Safety regulations.......................................................................................................................................................................4
2.2 Distance requirements................................................................................................................................................................4
2.3 Installation preparations..........................................................................................................................................................4-6
2.4 Charger Installation………………………………………………………………………………………………………………………7
2.5 Wiring………………………………………………………………………………………………………………………………………7-8
2.6 Charging module Installation………………………………………………………………………………………………………………9
2.7 4G wireless router/modem connection………….…………………………………………………………………………………………9
2.8 Power on the charger………………………………………………………………………………………………………………………..9
3. Operation..............................................................................................................................................................................................10
3.1 Beacons....................................................................................................................................................................................10
3.2 Boot up......................................................................................................................................................................................10
3.3 Standby.................................................................................................................................................................................10
3.4 How to charge………………………………………………………………………………………………………………………......11-13
3.5 Simultaneous charging……………………………………………………………………………………………………………………..14
3.6 How to stop…………………………………………………………………………………………………………………………………15
3.7 Maintenance……………………………………………………………………………………………………………………………..16-18
3.7.1 How to enter maintenance interface……………...................................……………………………………………………16
3.7.2 What parameters to configure………………………………………………………………………………………………17-18
General settings………………………………………………………………………………………………………………….17
Network and OCPP settings…………………………………………………………………………………………....……17-18
Meter Management settings……………………………………………………………………………………………………18
Charging record……………………….…………………………………………………………………………………………18
Fault record………………….………………………………………………………………………………………….………….18
4. Routine maintenance............................................................................................................................................................................ 19

❶ Overview
The GOLD POWER CHARGER DC fast charging station is a dual DC outlets (CHAdeMO and CCS) 60 to 120kW (max
up to 160kW) fast charger with an optional Type-2 AC output up to 22kW that can be configured to meet different
charging needs of both European and North American customers. It supports simultaneous charging and balancer reel
for advanced cable management.
With user-friendly interface display and control guidance function, customers can complete the charging process easily.
It is IP54 rated which makes it suitable for outdoor & indoor public charging, and commercial places charging application.
1.1 Main Features
•Modular design, convenient for daily system upgrade and maintenance. Each module has undergone repeated
iterations and long-term verification to ensure the stability and reliability of the system.
• Its metal casing and semi-gross coating ensure the appearance of the texture and meet the long-term outdoor use.
• Compliant with OCPP 1.6 and above enables it to connect to the global EV charge management platform without
additional integration and matching.
• It CCS, CHAdeMO and AC multiple charging outlets option which make it suitable for various EV charging
simultaneously and reduce unnecessary extra charger purchase costs.
• The 7-inch display and unique UI offer good user-friendly and convenient charging operation. It can display at
outdoor high-brightness environment and adapt to -30~70°C environment.
• The lit LED light strip allows users to quickly find the location of the charger at night and perform accurate operations.
•Mobile app integration feature provides users the convenience of remote operation and real-time charging status
reminders.
•Linux embedded operating system, with 32-bit embedded processor as the core unit, supports Ethernet, 3/4G
communication.
•Remote upgrade and local upgrade functions, which can upgrade the charger software locally or remotely when
needed.
• Adopts 1.0S multi-function watt-hour meter to accurately measure the charging.
Balancer reel
Power module
air inlet
Lift up slots
Exit CCS cable
Exit AC cable
CCS
connector
AC
connector
CHAdeMO
connector
7” display
Exit CHAdeMO
cable
Emergency
button
Power module
air outlet
LED strip
1
Handle
Beacons
PWR GOLD POWER DC CHARGER 40kW-120kW User Manual
Lift eyebolts
POWER ELEKTRONİK SAN. TİC. A.Ş.
Power Plaza, Armağan Evler Mh. Diriliş Cd, İpekçi Sk. No:12 PK : 34760 Ümraniye/İstanbul, TURKEY
T: (+90) 216 481 66 99 W: https://www.powerelektronik.com E:[email protected]

1.2 Model Description
The model description of the charging system is shown as below.
GOLD POWER CHARGER
122kW Total Output
CHAdeMO Connector
CCS Combo Connector
Charger cabinet model
DC POWER CHARGER
1.3 Dimensions
Dimensions in mm.
2
PWR GOLD POWER DC CHARGER 40kW-120kW User Manual
POWER ELEKTRONİK SAN. TİC. A.Ş.
Power Plaza, Armağan Evler Mh. Diriliş Cd, İpekçi Sk. No:12 PK : 34760 Ümraniye/İstanbul, TURKEY
T: (+90) 216 481 66 99 W: https://www.powerelektronik.com E:[email protected]

1.4 Technical Parameters
Specification
Model
PWR GOLD POWER DC CHARGER 40kW-120kW User Manual
Structure
Description
Application scenes
Parking lot/Public charging station
Housing material
Metal case
Dimension (L x W x H)
700 x 725 x 1900mm
Installation method
Floor-stand type
Cable routing
Bottom inlet wiring, top outlet wiring
Weight
320kg
Cable length
5m
Compliance
IEC 61851, IEC 62196, CHAdeMO
Outlet numbers
3
Electrical
Specification
Input voltage
400V +/-10% 3-phase + PE + N
Input frequency
50Hz/60Hz
Connector type
AC: Type-2 tethered cable, DC: CHAdeMO JEVS G105, CCS Combo-2
Rated power
CHAdeMO: 60kW, CCS Combo: 100kW, AC up to 22kW
Measuring accuracy
Level 0.5
Output voltage
CCS: 200-750V, CHAdeMO: 200-500V, AC: 400V
Output current
CCS: 0-200A DC, CHAdeMO: 0-125A DC, AC: 32A
Efficiency
≥94%
Power factor
≥0.99
Function
Design
User Interface
7” touch screen, Emergency button, LED indicator,
RFID reader
Communication
CAN, PLC, PWM
Ethernet
10/100 BaseTX (TCP-IP)
Cellular
LTE modem, GPRS/3G/4G
Interface protocol
OCPP 1.6 JSON
Environment
Condition
Application place
Indoor/Outdoor
Working temperature
-30 °C – +55 °C
Working humidity
5% – 95% without condensation
Altitude
< 2000m
Protection grade
IP54
Cooling
Fan cooling
MTBF
17520 hours
Security design
Over/under voltage protection, overload protection, current leakage protection,
grounding protection, over temp protection, lightening surge protection
3
PWR GOLD POWER DC CHARGER 40kW-120kW User Manual
POWER ELEKTRONİK SAN. TİC. A.Ş.
Power Plaza, Armağan Evler Mh. Diriliş Cd, İpekçi Sk. No:12 PK : 34760 Ümraniye/İstanbul, TURKEY
T: (+90) 216 481 66 99 W: https://www.powerelektronik.com E:[email protected]

The working voltage inside the charging system is very high and the current is very big. To ensure personal safety, the
following regulations should be observed at all times:
1. Only those who have been trained in the charging system and have a good knowledge of the charging system can
install the charging system. Always observe the precautions for safety precautions and local safety regulations during
installation.
2. To operate inside the charging system, make sure the charging system is cut off the power supply. The mains input of
the charging system must be disconnected.
3. Put the power supply unit in a locked room, and keep the key by the person in charge of the power supply unit.
4. Distribution cable routing should be reasonable and protective, avoid touching these cables when operating power
supplies.
1. Unpacking inspection
When the goods arrives, inspect the charger carefully to see if any damage during the shipping.
2.1 Safety regulations
❷ Installation
2.3 Installation preparation
4
2.2 Distances requirements
The minimum distances surrounding the charger should be followed to allow proper circulation of air flow:
• The obstacles on the left and right side of the charger should be more than 500 mm away from the cabinet.
• The obstacles in front and rear of the charger should be more than 1000 mm.
Unpack the wooden case following below steps.
I. Open the crate and remove all boards except the one at the bottom of the charger in red.
PWR GOLD POWER DC CHARGER 40kW-120kW User Manual
Note:
If any damage caused by the forwarder is not indicated in the delivery note during the receipt of the
charger station, Power Elektronik will not be held responsible for the cost of repair/replacement.

5
After unpacking completed, check the items inside one by one following the packing list enclosed.
Items included:
Charger cabinet
CCS combo-2
connector
CHAdeMO
connector
AC charging
connector
EV
charging
module
Mounting
screws
Access
key
RFID
card
1
1
1
1
5
4
2
10
II. Unscrew the 4 bolts from the last board. And then remove it.
III. Unscrew the 2 bolts at the top of the charger from the crate. Remove the fixed metal panel.
IV. Stand up the charger.
PWR GOLD POWER DC CHARGER 40kW-120kW User Manual

Connectors
Maximum
current
allowed
Minimum cross-
sectional area
0.5V pressure drop and
maximum length under the
minimum cross-sectional
area
Maximum cross-
sectional area
0.5V pressure drop
and maximum length
under the maximum
cross-sectional area
DC charging cabinet AC
input
250A
70mm2
5m
120mm2
10m
Note: When the wiring distance is less than 30m, it is recommended to estimate the cross-sectional area of the line according to the
current density of 2.5A/mm2.
The cross-sectional area of the system ground cable should be the same as the largest distribution cable, but not less
than 35mm2. Ground bus terminal block is M10 screw.
3. Concrete foundation
6
Unit: mm
2. Cable
Cable selection should comply with relevant electrical industry specifications.
The AC cable is recommended to be RVVZ type cable with a voltage rating of 550/750V or higher and a temperature
rating of at least 70°C. The user determines the cross-sectional area of the input and output cables of the charging
cabinet according to table below.
PWR GOLD POWER DC CHARGER 40kW-120kW User Manual
Note:
When installing the Charger, respect the minimum distances space for maintenance and safety reasons.
I. To prevent any accidental water leaching, need to add the concrete foundation.
a. The recommended dimension of concrete foundation is 900mm (L) x 900mm (W) x 200mm (H)
b. The foundation is no less than 200mm +/-5mm above the horizontal level.
c. The vertical inclination of the foundation is no more than 5%.
II. 4 x M12 stainless steel expansion studs embedded into the foundation in advance.
III. An input wire hole is required to be reserved on the foundation, and the dimensions are indicated in the figure below.
Front
Front
Unit: mm
Charger
POWER ELEKTRONİK SAN. TİC. A.Ş.
Power Plaza, Armağan Evler Mh. Diriliş Cd, İpekçi Sk. No:12 PK : 34760 Ümraniye/İstanbul, TURKEY
T: (+90) 216 481 66 99 W: https://www.powerelektronik.com E:[email protected]

Steps:
1. Lift the charger with the forklift at the bottom slots or raise it up with eyebolts at the top.
2. Place the charger onto the concrete base of the final location against the holes at the bottom of the charger.
3. Fix with 4 screws against the expansion studs at bottom of the charger.
2.4 Charger installation
2.5 Wiring
• Make sure the main switch wiring (MCCB or fuses) of the AC power supply are cutting the electricity supply
during installation.
• Have a qualified electrician perform power distribution operations.
• Ensure that all electrical components are in good condition.
Note:
I. The AC input cable is selected according to Current Regulations according to the maxim DC Charger
output power configuration (120kW), nominal site AC voltage and AC distribution cable overcurrent
protection device.
II. The site AC distribution shall be equipped with protection devices against AC cable overcurrent, short
circuit and lightning strike. The AC distribution overcurrent protection device rating shall not be less than
1.5~2 times the actual DC Charger input power rating.
7
PWR GOLD POWER DC CHARGER 40kW-120kW User Manual
Holes (in red) at the bottom of the charger
Unit: mm
POWER ELEKTRONİK SAN. TİC. A.Ş.
Power Plaza, Armağan Evler Mh. Diriliş Cd, İpekçi Sk. No:12 PK : 34760 Ümraniye/İstanbul, TURKEY
T: (+90) 216 481 66 99 W: https://www.powerelektronik.com E:[email protected]

Steps:
1. Lead the AC power cord into the bottom of the charging pile from the cable entry hole reserved on the cement base
2. Use a hole diameter of 10.5mm metallic electric terminal aligned with the required cable cross section according with the
power of the Charge Point (100kW DC).
3. Use the M10 screw and washer provided in order to connect the electric terminals.
4. Check all safety labels are correctly placed. Close the Charger’s door. The Charger has a security switch (anti-tamper
protection) installed that will avoid any charging session if the doors are opened.
8
1
2
3
4
5. Fix 2 metal panels at the charger bottom. Fasten with screws.
PWR GOLD POWER DC CHARGER 40kW-120kW User Manual
Note:
The three-phase L1, L2, L3 wiring sequence must be consistent with the electricity standard of the located country.
Otherwise it will case some equipment inside display failure/alarm.
POWER ELEKTRONİK SAN. TİC. A.Ş.
Power Plaza, Armağan Evler Mh. Diriliş Cd, İpekçi Sk. No:12 PK : 34760 Ümraniye/İstanbul, TURKEY
T: (+90) 216 481 66 99 W: https://www.powerelektronik.com E:[email protected]

Steps:
1. Switch on the MCCB to power on AC
input. Check whether the voltage is
normal with multimeter.
2. Switch on the Lightning Protector
Breaker.
3. Switch on System Power Supply
Breaker. Check whether the voltage is
normal with multimeter
4. Check whether all the beacons are
illuminated in green, the screen display
is .
2.8 Power on the charger
2.7 4G wireless router/modem connection
The system has been installed the controller (TCU) which can support the 3G/4G
Wireless communication. Customers can insert the local SIM card and 3G/4G network
card into the controller to activate this function. The wireless 3G/4G communication
needs to be set and configured according the local telecom operator environment.
9
2.6 Charging module installation
Steps:
1. Internal side lock pulls outside to open ventilation covers on the
both side of the charger.
2. Install the charging modules into the slots which have the
same address mark as the modules, see the right figure.
3. Tighten the modules with the screws on both sides.
4. Place the ventilation cover back and fix to the cabinet.
5. Charger module address dialing
a. The modules are divided into two groups, Group A and
Group B.
b. For 100kW DC output, need to install 3 modules into the
slots of Group A from top to bottom and 2 modules into
Group B.
c. Group A, the dialing address from top to bottom is 80, 88, 90.
d. Group B, the dialing address from top to bottom is 60, 68, 98.
1
2
3
4
Group A
Group B
PWR GOLD POWER DC CHARGER 40kW-120kW User Manual
Note:
When power on the charger, please double check the displayed dialing address is consistent with the label attached
to the module. See the address in above figure for more info.
12
3
TCU

The DC Charger is operated via the LCD Touch screen on the front panel. Charging progress can be started by RFID
Card, scanning a QR Code and Smartphone Applet control (need operation platform and Ethernet support and
smartphone applet) or manually.
When the charger powers on, the below Boot Up interface shows the customer Logo.
10
❸ Operation
3.1 Beacons
Over each connector there is a beacon light, it indicates the state of charge in which the connector is located.
CCS
LED Beacon
CHAdeMO
LED Beacon
AC
LED Beacon
3.2 Boot up
3.3 Standby
After boot up self-checking completed, the display automatically enters the Standby interface.
PWR GOLD POWER DC CHARGER 40kW-120kW User Manual
Colors
Action
Status
Always on
Standby
Always on
Connected
Flicker
Charging
Always on
Completed
Flicker
Fault
Press the START
button to enter
connection interface.

1. Press the START button of Standby Interface to enter Connection interface.
2. Select the plug compliant with your vehicle on the display and connect the charger to your car. Wait for
connection status checking completed successfully.
Note:
I. The system leaves user 180s for connection, if times out, display will return to Standby interface.
II. If press Cancel button, display will return to Standby interface.
3.4 How to Charge
4. You can choose to use RFID card or mobile app for authentication by pressing the corresponding icon on
the authentication selection interface.
11
PWR GOLD POWER DC CHARGER 40kW-120kW User Manual
3. After connection is established, the display will enter authentication selection interface.
4.1 If you choose RFID card for authentication, swipe your membership card at hand.
Press this icon to
choose RFID card
authentication
Press this icon to
choose mobile app
authentication
POWER ELEKTRONİK SAN. TİC. A.Ş.
Power Plaza, Armağan Evler Mh. Diriliş Cd, İpekçi Sk. No:12 PK : 34760 Ümraniye/İstanbul, TURKEY
T: (+90) 216 481 66 99 W: https://www.powerelektronik.com E:[email protected]

4.2 If you choose mobile app for authentication, scan the QR code with your smartphone application.
Note:
I. User CARDS are uniformly issued by operators.
II. If you choose QR code scanning, the authorization will be performed on your smartphone application.
5. After authentication passed, the charging will start. The display will show the charging details interface.
Press the info icon for more
detailed charging data
Press the info icon, more detailed charging data will be displayed on the screen.
12
Note:
I. The detailed data table will automatically disappear after shown up for 60 seconds.
II. User can return to the charging information interface by pressing the info icon again.
PWR GOLD POWER DC CHARGER 40kW-120kW User Manual
Use this slider to view
more detailed data
Press the info icon again
to return to charging
details interface
POWER ELEKTRONİK SAN. TİC. A.Ş.
Power Plaza, Armağan Evler Mh. Diriliş Cd, İpekçi Sk. No:12 PK : 34760 Ümraniye/İstanbul, TURKEY
T: (+90) 216 481 66 99 W: https://www.powerelektronik.com E:[email protected]

If another user comes to start another charging, follow below steps to initiate.
1. Select the plug which is compliant with your car and not popped out. Connect the charger to your car.
Note:
I. Simultaneous charging is only available for the EV which has different charging plug compared to the first
charging car.
II. Both AC and DC charging support simultaneous charging.
3.5 Simultaneous Charging
13
PWR GOLD POWER DC CHARGER 40kW-120kW User Manual
3. After connection is established, the display will enter authentication selection interface.
Press this icon to
choose RFID card
authentication
Press this icon to
choose mobile app
authentication
The plug icon which is
not popped out
2. Wait for connection status checking completed successfully.
4. Follow the same authentication steps in “How to Charge” section to complete charging process.
POWER ELEKTRONİK SAN. TİC. A.Ş.
Power Plaza, Armağan Evler Mh. Diriliş Cd, İpekçi Sk. No:12 PK : 34760 Ümraniye/İstanbul, TURKEY
T: (+90) 216 481 66 99 W: https://www.powerelektronik.com E:[email protected]

14
3.6 How to Stop
A. Card swiping to start charging mode.
1. Swipe the card again to stop charging.
2. Enter Billing interface automatically.
B. Smartphone APP to start charging mode.
1. Operate on the mobile APP to stop charging.
2. Enter Billing interface automatically.
3. Press the information icon on, the display will show more detailed information.
PWR GOLD POWER DC CHARGER 40kW-120kW User Manual
3. Press OK button to complete charging process. Charger connection interface displays. Unplug the connector and
return it to the charger holster.
Press OK button to
complete charging process.
4. Unplug the connector and return it to the charger holster.
POWER ELEKTRONİK SAN. TİC. A.Ş.
Power Plaza, Armağan Evler Mh. Diriliş Cd, İpekçi Sk. No:12 PK : 34760 Ümraniye/İstanbul, TURKEY
T: (+90) 216 481 66 99 W: https://www.powerelektronik.com E:[email protected]

1. Click the top left area of the screen to initiate Maintenance interface.
15
3.7 Maintenance
The hidden
Maintenance interface
button is here.
Press and hold this
area for 1 second to
enter Maintenance
interface.
2. Input password for verification to enter Maintenance interface.
-At Maintenance interface, you can perform parameter setting query, charging record of the charging facility, fault
record query, management card binding and data export and etc.
-The modified value will be saved after clicking Save button, and will be effective after clicking Back button to restart.
-Maintenance interface can only be accessed in the non-charging state.
3.7.1 How to enter maintenance interface
PWR GOLD POWER DC CHARGER 40kW-120kW User Manual
Note:
• The default password of all interfaces is 12345678.
• You can customize the password for each permission in the subsequent settings interface.
POWER ELEKTRONİK SAN. TİC. A.Ş.
Power Plaza, Armağan Evler Mh. Diriliş Cd, İpekçi Sk. No:12 PK : 34760 Ümraniye/İstanbul, TURKEY
T: (+90) 216 481 66 99 W: https://www.powerelektronik.com E:[email protected]
Table of contents
Popular Batteries Charger manuals by other brands

Sony
Sony WCH10 manual

Turnigy
Turnigy MEGA 1000W operating manual

GSL electronics
GSL electronics REC25HV operating instructions

EINHELL
EINHELL Power-X-Twincharger Original operating instructions

Associated Equipment
Associated Equipment 6080A Operator's manual

Scanstrut
Scanstrut SC-CW-09F installation instructions