Power Fist 8925521 User manual

V4.0 8925521
Please read and understand all instructions before use. Retain this manual for
future reference.
User Manual
20 in. 4-in-1 Self-Propelled
Lawn Mower

8925521 20 in. 4-in-1 Self-Propelled Lawn Mower V4.0
2 For technical questions call 1-800-665-8685
SPECIFICATIONS
HP Rating 4.5 HP
Engine Displacement 173cc
Fuel Capacity 1.3 quarts
Oil Capacity 0.53 quarts
Power Rating 3,300 W
Cutting Height Adjustment Centre adjustment
Cutting Height 7 heights: 0.98 to 2.95 in.
Cutting Width 20 in.
Cutting Range/Yard Size 1,913 sq. yds.
Mulching Capable Yes
Bagger Included Yes
Blade Engagement Type Straight blade
Transmission Type Gear
Number of Blades 2
Blade Type Straight
Blade Size
20 in.
Blade Material
Steel
Handle Type Soft grip
Max. Forward Speed 2.23 MPH
Start Type Recoil
Overall Length 61.81 in.
Overall Width 27.56 in.
Wheel Size (front/rear) 8 and 10 in.
20 in. 4-in-1 Self-Propelled
Lawn Mower

V4.0 20 in. 4-in-1 Self-Propelled Lawn Mower 8925521
Visit www.princessauto.com for more information 3
INTRODUCTION
The 20 in. 4-in-1 Self-Propelled Lawn Mower has a 173cc, 6 HP gas engine with
recoil start and a soft handle grip.
A separate engine manual is included. Please consult it when necessary.
SAFETY
WARNING! Read and understand all instructions before using this tool. The
operator must follow basic precautions to reduce the risk of personal injury
and/or damage to the equipment.
Keep this manual for safety warnings, precautions, operating or inspection and
maintenance instructions.
HAZARD DEFINITIONS
Please familiarize yourself with the hazard notices found in this manual. A notice
is an alert that there is a possibility of property damage, injury or death if certain
instructions are not followed.
DANGER! This notice indicates an immediate and specific hazard that will
result in severe personal injury or death if the proper precautions
are not taken.
WARNING! This notice indicates a specific hazard or unsafe practice that
could result in severe personal injury or death if the proper
precautions are not taken.
CAUTION! This notice indicates a potentially hazardous situation that may result
in minor or moderate injury if proper practices are not taken.
NOTICE! This notice indicates that a specific hazard or unsafe practice will
result in equipment or property damage, but not personal injury.
WORK AREA
1. Operate in a safe work environment. Keep your work area clean, well-lit
and free of distractions. Place lights so you are not working in a shadow.
2. Keep anyone not wearing the appropriate safety equipment away from the
work area.

8925521 20 in. 4-in-1 Self-Propelled Lawn Mower V4.0
4 For technical questions call 1-800-665-8685
3. Store unused tools properly in a safe and dry location to prevent rust or
damage. Lock tools away and keep out of the reach of children.
4. Do not install or use in the presence of flammable gases, dust or liquids.
5. Inspect and remove objects from the area that can be thrown by the lawn
mower’s spinning blade.
6. Never mow when there are bystanders or animals in the same area.
PERSONAL SAFETY
WARNING! Wear personal protective equipment approved by the Canadian
Standards Association (CSA) or American National Standards Institute (ANSI).
PERSONAL PROTECTIVE EQUIPMENT
1. Always wear impact safety goggles that provide front and side protection
for the eyes. Eye protection equipment should comply with CSA Z94.3-07
or ANSI Z87.1 standards based on the type of work performed.
2. Wear gloves that provide protection based on the work materials or to
reduce the effects of tool vibration.
a. Do not wear gloves when operating a tool that can snag the material
and pull the hand into the tool.
3. Wear protective clothing designed for the work environment and tool.
4. Non-skid footwear is recommended to maintain footing and balance in the
work environment.
5. Wear the appropriate rated dust mask or respirator.
PERSONAL PRECAUTIONS
Control the tool, personal movement and the work environment to avoid
personal injury or damage to tool.
1. Do not operate any tool when tired or under the influence of drugs, alcohol
or medications.
2. Avoid wearing clothes or jewelry that can become entangled with the
moving parts of a tool. Keep long hair covered or bound.
3. Do not overreach when operating a tool. Proper footing and balance enable
better control in unexpected situations.

V4.0 20 in. 4-in-1 Self-Propelled Lawn Mower 8925521
Visit www.princessauto.com for more information 5
4. Keep your feet well away from the blade at all times, including when
starting the lawn mower.
SPECIFIC SAFETY PRECAUTIONS
WARNING! DO NOT let comfort or familiarity with product (gained from
repeated use) replace strict adherence to the tool safety rules. If you use
this tool unsafely or incorrectly, you can suffer serious personal injury.
1. Use the correct tool for the job. This tool was designed for a specific
function. Do not modify or alter this tool or use it for an unintended
purpose.
2. Do not use the tool if any parts are damage broken or misplaced. Repair or
replace the parts.
3. Check municipal by-laws to determine if there is a minimum age
requirement for operating a lawn mower.
4. Replace any faulty or missing noise abatement devices.
5. Use caution when rotating one blade, as this could cause the other blade to
rotate.
6. Avoid cutting wet grass. Watch your footing if you are cutting on wet grass
or a slope.
7. Avoid cutting straight up or down a steep slope. Cut across the slope to
avoid tipping over the lawn mower.
8. Stop the blade when tilting the lawn mower for transport across a surface
other than grass, and when transporting the lawn mower to and from the
area you are mowing.
9. Never operate the lawn mower with any missing or damaged safety
guards, including deflectors and grass catchers.
10. Disengage all blade and drive clutches before starting the engine.
11. If you need to tilt the lawn mower when starting, keep the tilt angle as
small as possible
12. Do not stand in front of the discharge chute when starting the engine.
13. Never pick up or carry the lawn mower while it is running.
14. Reduce the throttle setting before turning the engine off.

8925521 20 in. 4-in-1 Self-Propelled Lawn Mower V4.0
6 For technical questions call 1-800-665-8685
15. Keep the lawn mower clean and free of grass, leaves, excessive grease, or
any other flammable substance.
UNPACKING
WARNING! Do not operate the tool if any part is missing. Replace the
missing part before operating. Failure to do so could result in a malfunction
and personal injury.
Remove the parts and accessories from the packaging and inspect for damage.
Make sure that all items in the Identification Key are included.
IDENTIFICATION KEY
A Drive/Clutch Lever
B Throttle
C Upper Handle
D Fixing Knob/Bolt
E Grass Clipping Bag
F Height Adjustment Handle
G Rear Wheel
H Side Discharge Chute
I Side Discharge Cover
J Deck
K Front Wheel
L Front Cover
M Engine
N Starter Handle
O Rear Discharge Cover
P Lower Handle
Q Brake/Stop Lever
R Soft Grip
ASSEMBLY & INSTALLATION
Dashed numbers in parenthesis (Fig. 1-1) refer to a specific point in an
illustration or image.
Fig. 1
V4.0 20 in. 4-in-1 Self-Propelled Lawn Mower 8925521
Visit www.princessauto.com for more information 7
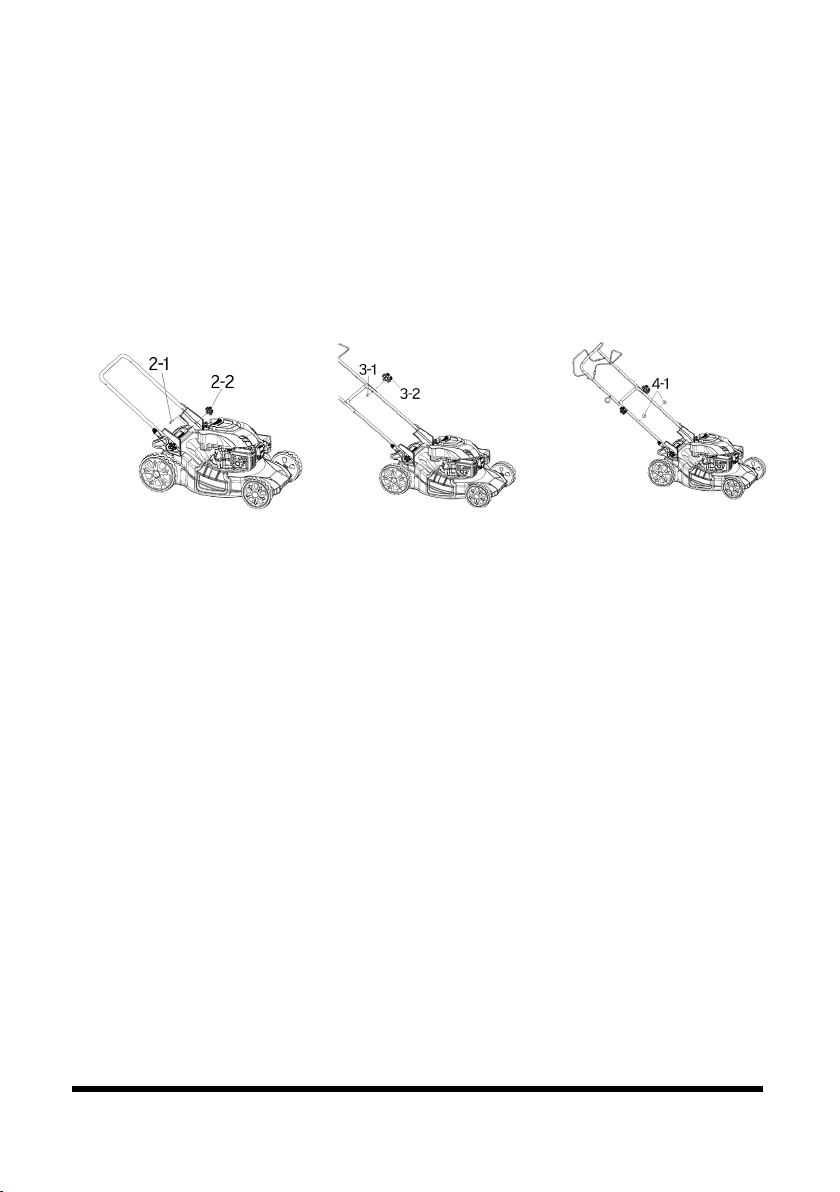
HANDLE
1. Attach the lower handle to the deck using two small bolts (Fig. 2-1), washers
and knob (Fig. 2-2), one set on either side.
2. Attach the upper handle using two large bolts (Fig. 3-1) and large knob
(Fig. 3-2), one on either side. Make sure that the rope guide is on the right
side, as seen from behind the lawn mower.
3. Secure the starter cord to the handle using cord clips (Fig. 4-1).
TRAY
1. Position the tray on the upper handle. The cup holders are on the side
closest to the mower.
2. Fit the slot on the right side of the tray over the throttle lever, so it can still
be accessed.
3. Align the bolt holes on either side of the tray with the bolt holes in the
upper handle. There is one bolt hole on the right and two on the left. Insert
a bolt through each bolt hole. Secure hand-tight with the included nut.
4. Check that the cables can move freely. If they are pinched by the tray,
loosen the bolt and reposition the cables. Once they move freely, tighten
the nuts with a wrench.
STARTER HANDLE
1. Pull the start handle and cord out slowly to avoid starting the motor.
2. Place the handle into the handle holder on the right side of the upper
handle. It will remain there until used.
Fig. 2
Fig. 3
Fig. 4
8925521 20 in. 4-in-1 Self-Propelled Lawn Mower V4.0
8 For technical questions call 1-800-665-8685
CONFIGURATION
You may configure the lawn mower in one of four ways:
•Rear Discharge: Remove the grass bag, mulching plug, and side discharge
duct.
•Rear bagging: Remove the mulching plug and side discharge duct, then
attach the grass bag.
•Mulching: Remove the grass bad and side discharge duct, then add the
mulching plug.
•Side discharging: Remove the grass bag, then add the mulching plug and
side discharge duct.
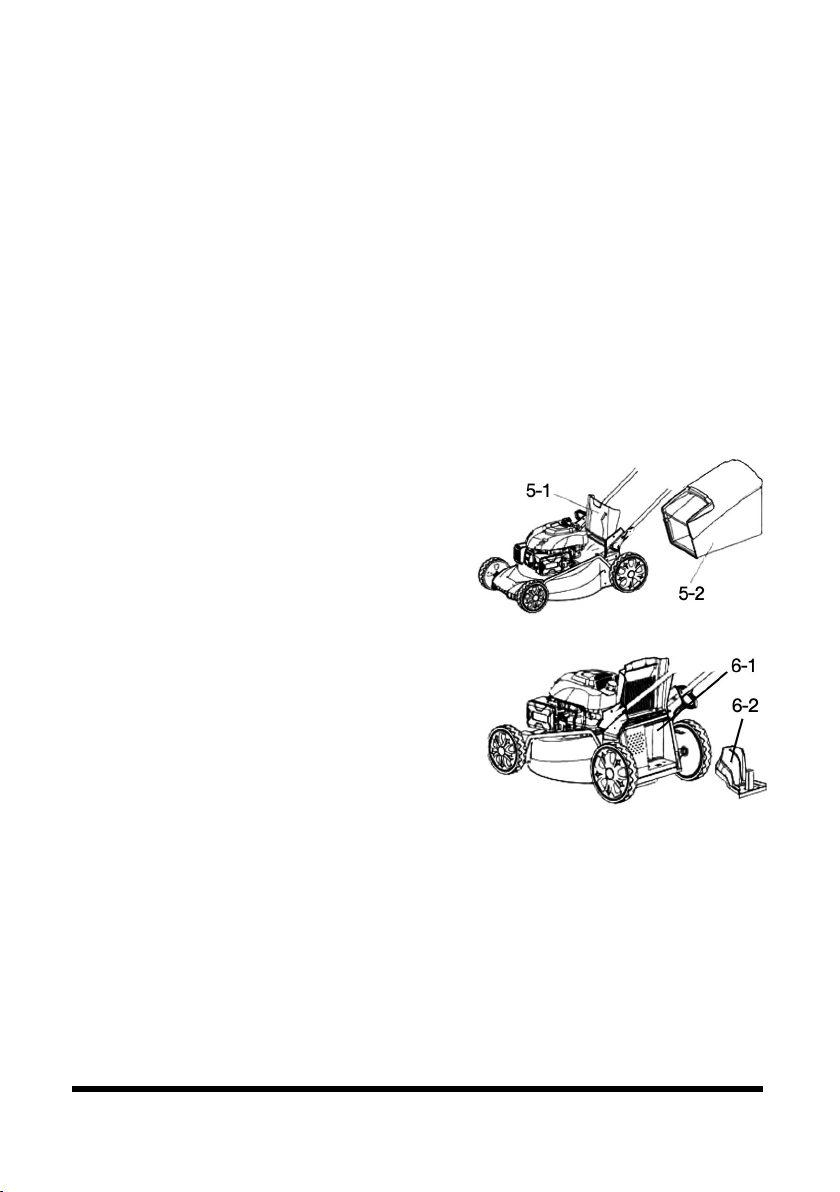
GRASS BAG
If you are using a grass bag:
1. Lift the rear discharge cover (Fig. 5-1)
with one hand, and then hook in the
grass bag’s plastic clips to the metal
frame (5-2).
2. Release the rear discharge cover to
secure the grass bag in position.
MULCHING PLUG
If you are using the mulching plug:
1. Remove the grass bag.
2. Hold the rear discharge cover open with
one hand (Fig. 5-1).
3. Push the plastic mulching plug (Fig. 6-2) into the discharge chute (Fig. 6-1)
until it locks in pace.
4. Release the rear discharge cover.
Fig. 5
Fig. 6

V4.0 20 in. 4-in-1 Self-Propelled Lawn Mower 8925521
Visit www.princessauto.com for more information 9
SIDE DISCHARGE CHUTE
To use the side discharge chute:
1. If needed, remove the grass bag, and then
insert the mulching plug.
2. Lift the side discharge cover (Fig. 7-1)
with one hand, and then hook in the side
discharge chute (Fig. 7-2) with the other
hand.
3. Release the side discharge cover to secure the side discharge chute in position.
OPERATION
WARNING! Always wear eye and ear protection, long trousers and closed toe
shoes when operating the lawn mower.
WARNING! Always perform the "Before Each Use" procedure under Care and
Maintenance before operating the lawn mower.
CUTTING HEIGHT
1. Turn the engine off if is running.
2. Pull the adjusting handle out, select the desired
cutting height, and then let the adjusting handle snap
into position. The lawn mower includes seven (7)
cutting heights from 0.98 to 2.95 in. (25 mm to
75 mm).
STARTING AND STOPPING THE ENGINE
1. Push the primer bulb 3 to 5 times when starting a cold engine.
2. Move the throttle lever into the start position.
3. Pull the brake/stop lever down to the upper handle and hold it there during
use. The engine will stop if the brake/stop lever is released.
4. Remove the starter handle from the handle holder.
5. Pull the starter handle slowly until you feel resistance, then pull the cord
quickly. This will start the engine.
Fig. 8
Fig. 7

8925521 20 in. 4-in-1 Self-Propelled Lawn Mower V4.0
10 For technical questions call 1-800-665-8685
a. You may need to pull the starter cord multiple times before the motor.
Press the primer bulb 3 to 5 times after several attempts to make sure
there is fuel available.
6. Place the starter handle back into the handle holder once the engine is
running.
7. Release the brake/stop lever to stop the engine.
SELF-PROPELLED MOVEMENT
The lawn mower has an optional self-propelled function that will move the lawn
mower forward without any effort from the user.
1. Pull the drive/clutch lever upward and hold against the handle while
mowing.
2. The lawn mower will move forward, as long as the drive/clutch lever is
held.
3. Release the lever to disengage the function. The lawn mower will continue
to run and you can still push it forward or backward.
MOWING
1. Push the lawn mower at a steady walking pace. Never run while the engine
has power.
2. Mow across slopes. Do not mow up or down, as you may lose control of
the lawn mower.
3. Mow when the grass is dry. Wet or damp grass can clog the blade and
force the engine to work harder, causing it to wear more quickly.
4. Cut long grass in stages to avoid clogging the blade. Lower the blade
height between each stage until you reach the desired height.
5. Empty the grass bag when clippings begin to trail behind the mower.
Clippings are expected when mulching.
a. Shut the motor off.
b. Lift the rear discharge cover.
c. Pull the bag upward to unhook the bag and let the rear discharge
cover down.

V4.0 20 in. 4-in-1 Self-Propelled Lawn Mower 8925521
Visit www.princessauto.com for more information 11
d. Empty the bag, then reinstall it onto the mower.
6. Shut the engine off before removing stuck clippings. Use a brush or similar
tool when removing clippings from any discharge chute or the main
casing. Do not use your hands or feet.
CARE & MAINTENANCE
1. Maintain the tool with care. A tool in good condition is efficient, easier to
control and will have fewer problems.
2. Inspect the tool components periodically. Repair or replace damaged or
worn components. Only use identical replacement parts when servicing.
3. Keep the tool handles clean, dry and free from oil/grease at all times.
4. Maintain the tool’s labels and name plates. These carry important information.
If unreadable or missing, contact Princess Auto Ltd. for replacements.
WARNING! Only qualified service personnel should repair the tool. An
improperly repaired tool may present a hazard to the user and/or others.
REPLACE THE BLADE
CAUTION! Wear gloves to avoid a cutting your hands while replacing the
lawn mower blade.
NOTICE! Do not flip the lawn mower over to change the blade. This can
cause fuel and/or oil to leak. Tip the lawn mower upward and reach under
the unit.
1. Shut the engine off and allow it too cool.
2. Lift the lawn mower front enough to access the glad from underneath.
a. You can place the lawnmower on sawhorses for easier access. Make
sure the wheels are not on the sawhorses to avoid unwanted
movement.
3. Hold the blade by gloved hand or brace it with a chunk of wood. Loosen
the nut with a wrench, then remove the nut and washer by hand.
4. Remove the blade for sharpening or dispose of it.
5. Place the washer on the bolt in preparation for the following steps.

8925521 20 in. 4-in-1 Self-Propelled Lawn Mower V4.0
12 For technical questions call 1-800-665-8685
6. Fit the replacement or resharpened blade onto the two studs. Make sure
the upward sweep on the blade is towards the lawn mower underbody.
7. Hold the blade in place and screw the bolt and washer through the blade
and into the engine’s shaft until hand tight.
8. Tighten the bolt with a wrench to secure the blade.
CLEANING
Clean all grass clippings from the body and discharge ports with a brush or
similar tool before storing the lawn mower.
Follow the instruction for replacing the blade to access the lawn mower’s
underbody to remove stuck clippings.
MAINTENANCE SCHEDULE
Follow the maintenance schedule in the engine manual.
STORAGE
Clean all grass clippings from the body, discharge ports and engine surfaces.
Follow the storage instructions in the engine manual, in addition to these
instructions.
DISPOSAL
Recycle a tool damaged beyond repair at the appropriate facility.
Contact your local municipality for a list of disposal facilities or by-laws for
electronic devices, batteries, oil or other toxic liquids.
IMPORTANT! DO NOT pollute the environment by allowing uncontrolled
discharge of waste oil.

V4.0 20 in. 4-in-1 Self-Propelled Lawn Mower 8925521
Visit www.princessauto.com for more information 13
TROUBLESHOOTING
Visit a Princess Auto Ltd. location for a solution if the tool does not function
properly or parts are missing. If unable to do so, have a qualified technician
service the tool.
Problem(s) Possible Cause(s) Suggested Solution(s)
Loud while
running, machine
vibrates heavily
1. Screws are loose.
2. Blade fasteners are loose.
3. Blade is unbalanced.
1. Check and tighten all screws.
2. Check blade fasteners.
3. Suggested solution.
Uneven mowing
results
1. Blade is blunt.
2. Cutting height is too low.
1. Sharpen the blade
2. Set correct height.
Grass bag is not
filled sufficiently
1. Blade is worn
2. Grass bag is clogged
3. Wet grass sticking to
lawnmower.
4. Discharge opening is
blocked.
1. Replace or sharpen the blade
2. Empty the grass bag
3. Wait for lawn to dry before
mowing. Remove stuck
grass.
4. Clean grass clippings from
opening.

8925521 20 in. 4-in-1 Self-Propelled Lawn Mower V4.0
14 For technical questions call 1-800-665-8685

V4.0 8925521
Please read and understand all instructions before use. Retain this manual for
future reference.
SPECIFICATIONS
Engine Displacement
173 cc
Start Type Pull
Torque 6.8 ft-lb
Shaft Diameter 0.985 in.
Shaft Rotation (From PTO Shaft Side) Counterclockwise
Shaft End Tapped
(Diameter (in.) / Threads Per Inch)
0.8668 in.-3/8 UNF
Number of Cylinders 1
Cylinder Bore 2.76 in.
Stroke 1.77 in.
Compression Ratio 8.5:1
Cooling System Air
Fuel Tank Metal
Fuel Type Gasoline
Fuel Tank Capacity
1.26 quarts (1.2 litres)
Fuel Filter Yes
Oil Capacity 0.53 quarts (0.5 litres)
Lubrication System Splash
Low Oil Alert No
Low Oil Shutdown No
Governor System Mechanical
Ignition System Transistorized Magneto
Max. Speed 2,800 RPM
Muffler Included
Yes
Engine for 20 in. 4-in-1
Self-Propelled Lawn Mower

8925521 Engine for 20 in. 4-in-1 Self-Propelled Lawn Mower V4.0
2 For technical questions call 1-800-665-8685
Spark Plug
Gap
0.028 ~ 0.031 in. (0.7 ~ 0.8 mm)
Torque 18 ~ 22 N-m
Air Cleaner Type Foam
Intake Valve Clearance 0.08 ~ 0.12 mm (0.0031 ~ 0.0047 in.)
Exhaust Valve Clearance 0.13 ~ 0.17 mm (0.0051 ~ 0.0067 in.)
INTRODUCTION
The instructions and safety rules in this manual are in addition to the safety
rules in manual SKU 8925521.
SAFETY
WARNING! Read and understand all instructions before using this engine.
The operator must follow basic precautions to reduce the risk of personal
injury and/or damage to the equipment.
Keep this manual for safety warnings, precautions, operating or inspection and
maintenance instructions.
HAZARD DEFINITIONS
Please familiarize yourself with the hazard notices found in this manual. A notice
is an alert that there is a possibility of property damage, injury or death if certain
instructions are not followed.
DANGER! This notice indicates an immediate and specific hazard that will
result in severe personal injury or death if the proper precautions
are not taken.
WARNING! This notice indicates a specific hazard or unsafe practice that
could result in severe personal injury or death if the proper
precautions are not taken.
CAUTION! This notice indicates a potentially hazardous situation that may
result in minor or moderate injury if proper practices are not
taken.
NOTICE! This notice indicates that a specific hazard or unsafe practice will
result in equipment or property damage, but not personal injury.

V 4.0 Engine for 20 in. 4-in-1 Self-Propelled Lawn Mower 8925521
Visit www.princessauto.com for more information 3
SPECIFIC SAFETY PRECAUTIONS
WARNING! DO NOT let comfort or familiarity with engine (gained from
repeated use) replace strict adherence to safety rules. If you use this
engine unsafely or incorrectly, you can suffer serious personal injury.
1. Use the correct engine for the job. This engine was designed for a specific
function. Do not use it for an unintended purpose.
2. All users must understand the operation of all controls and learn how to
stop the engine quickly in case of emergency.
3. Do not tamper with governor spring, links or other engine parts to increase
speed or power.
4. The engine and exhaust become very hot during operation. Severe thermal
burns can occur on contact, especially with the muffler.
a. Keep the engine at least 1 feet (0.3 meter) away from buildings and
other equipment during operation.
b. Remove accumulated debris from the muffler and cylinder area.
Combustible debris, such as leaves, grass, brush, etc. can catch fire if
they come in contact with a hot engine.
c. Do not place anything on the engine while it is running.
d. Allow the muffler, engine cylinder and fins to cool before touching.
5. The manufacturer of the equipment on which this engine is installed
specifies the top speed at which the engine will operate. DO NOT exceed
this speed.
CARBON MONOXIDE POISONING
WARNING! Never operate a gas engine indoors or in a confined space as the
exhaust contains carbon monoxide gas. Inhalation of carbon monoxide gas
can lead to illness or death. The area must be well ventilated. Opening
windows and doors is not enough to ventilate an area.
Carbon monoxide is a colourless and odourless gas that is difficult to detect.
Carbon monoxide poisoning results from inhalation of the gas and may be lethal
if left untreated. Evacuate all people to an area with clean air and seek
immediate medical attention for any person experiencing the following
symptoms:

8925521 Engine for 20 in. 4-in-1 Self-Propelled Lawn Mower V4.0
4 For technical questions call 1-800-665-8685
• Headache
• Confusion
• Shortness of breath
• Weakness
• Chest Pain
• Dizziness
• Blurred Vision
• Nausea and vomiting
• Unconsciousness
ASSEMBLY & INSTALLATION
Dashed numbers in parenthesis (Fig. 1-1) refer to specific point of an
illustration or image.
1. The engine comes assembled.
2. The engine is not shipped with oil. Starting the engine without oil will
damage the engine beyond repair. Add oil per the maintenance
instructions.
3. Replace oil cap for shipping with the vented/breather oil cap.
4. Check that the filter is in place. See Maintenance – Service the Air Filter
OPERATION
PRE-OPERATION CHECKS
NOTICE! The engine is not shipped with oil. Before starting the engine, add
oil according to the instructions in this manual. Starting the engine without
oil will damage the engine beyond repair.
Check the engine’s condition before operating to maximize the user’s safety and
the service life of the engine. Ensure that the engine is level and the switch is in
the OFF position before beginning the pre-operation checks.
BEFORE STARTING THE ENGINE
WARNING! Do not start or run engine in an enclosed area, even if the doors
or windows are open. Engine exhaust contains carbon monoxide (see Carbon
Monoxide Precautions).
1. Make sure spark plug, muffler, fuel cap and air cleaner are in place and
secured.
2. Ensure the spark plug lead is securely connected to the spark plug, otherwise
unintentional sparking can result, causing a fire or electric shock.
3. Check the air filter. A dirty air filter will reduce engine performance.

V 4.0 Engine for 20 in. 4-in-1 Self-Propelled Lawn Mower 8925521
Visit www.princessauto.com for more information 5
4. Check that all protective covers and guards are in place.
5. Check that all nuts, bolts and screws are tight.
6. Check the fuel level.
7. Check the engine oil level. Running the engine without enough oil can
damage the engine.
8. Look around and underneath the engine for signs of oil or gasoline leaks.
a. Do not start the engine until any spilled fuel has evaporated.
9. Remove any excessive dirt or debris, especially around the muffler and
recoil starter.
10. Look for signs of damage.
11. Check the equipment powered by this engine.
12. Review the instructions provided with the equipment powered by this
engine for precautions and procedures that should be followed before
starting the engine.
STARTING THE ENGINE
WARNING! Direct-coupled equipment components such as, but not limited
to, blades, impellers, pulleys, sprockets, etc., must be securely attached
before the engine is started to avoid injury or damage.
CAUTION! Failure to follow the steps below will result in rapid retraction of
the starter cord faster than the user can let go. This will pull the user’s hand
and arm toward the engine, possibly resulting in an injury.
1. Move the fuel valve to the ON position.
2. Move the choke lever to the CLOSED position if the engine is cold. The
choke is unnecessary when restarting a warm engine.
3. Move the throttle lever away from MIN. position, about 1/3 of way toward
the MAX. position.
4. Push the primer 3 to 5 times.
a. Priming is usually unnecessary when restarting a warm engine.
5. Pull the starter handle lightly until you feel resistance, then pull the starter
handle briskly. The engine should turn over and start running.

8925521 Engine for 20 in. 4-in-1 Self-Propelled Lawn Mower V4.0
6 For technical questions call 1-800-665-8685
a. Do not allow the starter handle to snap back against the engine.
Instead, return the starter grip gently by hand.
6. If the engine floods, set the choke to the OPEN/RUN position, place the
throttle in FAST and attempt to start the engine again.
7. If the choke lever was moved to the CLOSED position to start the engine,
gradually move it to the OPEN position as the engine warms up.
The engine may make a metallic rapping noise (spark knock, ping) while
running under a heavy load. This is normal. Replace the fuel with premium
quality gasoline if the metallic rapping noise continues under normal load.
Contact a qualified mechanic if the pinging continues as this may indicate
existing engine damage.
STOPPING THE ENGINE
CAUTION! Do not choke carburetor to stop engine. In an emergency turn the
engine switch to the OFF position to stop the engine.
Stop the engine by following this procedure:
1. Move the throttle lever to the MIN. position.
2. Turn the engine switch to the OFF position.
3. Turn the fuel valve to the OFF position.
CARE & MAINTENANCE
WARNING! Always ensure that the engine is off before you begin any
maintenance or repairs. An active engine part can cause a severe injury,
amputation or death if a mishap occurs.
The following section includes a maintenance schedule, routine inspection
procedures and simple maintenance procedures using basic hand tools. Service
tasks that are more difficult or require special tools are best handled by a
technician or other qualified mechanic.
1. Maintain the engine with care. A well-maintained engine is more efficient
and less likely to have problems.
2. Follow instructions for servicing.
3. Inspect the engine components periodically. Check fuel lines, tank, cap and
fittings frequently for cracks or leaks. Have damaged or worn components
repaired or replaced by an authorized technician.
Table of contents
Languages:
Other Power Fist Lawn Mower manuals

Popular Lawn Mower manuals by other brands


Poulan Pro
Poulan Pro POGT20T48STA owner's manual

Meec tools
Meec tools 011233 operating instructions

Grillo
Grillo FD 2200 STAGE 5 Operator's manual

MTD
MTD 128-350A owner's manual

Scag Power Equipment
Scag Power Equipment SWZT-36H-14FS Operator's manual

Scheppach
Scheppach MS226-53 Translation of original instruction manual

Dixie Chopper
Dixie Chopper Zee 2 2348 Operation & maintenance manual

Stiga
Stiga SILENT 33 EL LADYBIRD Specifications

Cub Cadet Commercial
Cub Cadet Commercial 55AI4HPR750 Operator's and service manual

Ozito
Ozito LWE-1400 instruction manual

Fieldmann
Fieldmann FZR 4210 B manual

Jonsered
Jonsered YT42 Operator's manual