POWER8 JS05 Jisaw User manual

2
5
78
9
10
6
3
1
4
4
Quick Release Blade Holder
Adjustable Sole Plate
Blade (sold separately)
Motor Vents
Orbital Cut Scale
Mounting Rails and Contacts
Direction Switch - Both Sides
UniGrip Release Slider - Both Sides
Trigger
Battery(sold separately)
JS05 Jisaw
1
2
3
4
5
6
7
8
9
10

Additional Safety Warnings for Jigsaws
• When operating the saw, use safety equipment including
safety goggles, ear protection, suitable dust mask and protective
clothing including safety gloves.
• Check the workpiece for any protruding nails, screw heads or
anythin that could damage or obstruct the blade.
• Do not force the Jigsaw. let the jigsaw do the work.
• Do not try and cut a curve that is too tight. This will put undue
pressure on the blade causing it to snap. • Never use the saw
near ammable liquids or gases..
• Allow the jigsaw to stop completely before removing it from the
workpiece.
• Keep hands away from cutting area and blade.
• Do not reach underneath the workpiece.
• If you are interrupted when operating the saw, complete the
process and switch o before looking up.
• Always hold the saw on parts that are insulated. If you
accidentally cut into hidden wiring or the saw’s own cable, the
metal parts of the saw will become “live’.
• Ensure the blade is held tightly by the quick release system
but can run freely in the blade guide. Adjust the blade guide as
necessary for each blade.
No person should use these products without rst reading and
understanding all documentation and warning labels. Keep these
instructions safe and provide them to all users. For use only as outlined
in this document, any other use will be considered as misuse.
If you experience any problems with the product please contact
email: [email protected]
www.cel-global.com
- 12 -
TECHNICAL SPECIFICATIONS JIGSAW SAFETY WARNINGS
PRODUCT CODE JS05
BATTERY 20Volts_max LI-ion
NO LOAD SPEED 0-2800 SPM
ORBITAL MOTION 4
CUTTING CAPACITY:
STEEL 13mm (½”)
WOOD 35mm (1-½”)
CUTTING ANGLE 0° to 45°
BLADE SHANK TYPE T
WEIGHT WITH UNIGRIP
(BARE TOOL WEIGHT)
1.74kg

- 13 -
• Measure and mark cuts allowing for the width of
the cut, KERF.
• Let the saw reach full speed before allowing blade
to contact work piece.
• Choose a sharp good quality blade that is suitable
for your material and type of cut, see below.
NOTE! Before using briey activate the jigsaw to ensure
the blade is centred and secure. If there is any binding or
unusual movement then loosen and re-t.
To start the Jigsaw
Press the Safety Switch from either side and hold while
pressing the Variable Trigger. The safety switch can be
released once the jigsaw is running.
NOTE! Always secure your work in a way that allows
the blade to move freely below the cut material and so
that the work piece does not jam the blade between cut
edges.
NOTE! Firm pressure keeping the sole plate on the work
piece will prevent the jigsaw from kicking back if the teeth
on the blade suddenly catches in the work piece.
WARNING! Take extra care to prevent ngers and other
objects coming into contact with the blade, especially on
the other side of materials being cut.
ALWAYS WEAR SAFETY EQUIPMENT WHEN
OPERATING POWER TOOLS
OPERATING THE TOOL OPERATION TIPS
READ ALL
INSTRUCTIONS
•Keep sandpaper handy to nish cut surfaces.
• To reduce kickback make sure your blade is long enough so
that even at the top of the up stroke it is visible on the other
side of the material.
• Clamp your work so it cannot be moved by the stroke of the
jigsaw, this will make it safer and your cut will be cleaner
and more ecient.
• Check both sides of the cut, blades can ex in the material
and go o line easily. Also check for objects in the path of
the blade.
•Wood
For fast straight cuts with a rough nish use a THICK blade
with large
~3mm~ TOOTH SPACING (~10TPI).
For a smooth nish use a blade with more teeth (20-30TPI)
•Metal
Soft metals can sometimes be cut with a wood blade.
Harder metals and pipes can require a specialized blade.
Usually over 20TPI, with a MILLED WAVY tooth pattern for
a good nish and long life.Heat buildup may harden some
metals, use oil or water to keep cool.
•Plastic, Perspex, Plexiglass
Cover the sole plate with masking tape or similar to prevent
scratching.
Support with a plywood or similar to prevent sagging. Cover
the cut area with masking tape to prevent splitting and aid
in marking up. Use a GROUND tooth blade ~24TPI keep
pressure and speed constant to prevent melting, pausing
with the motor running will cause heat buildup.
Use water to keep the blade and the material cool.

- 14 -
With an appropriate attachment tted in the Blade Holder
this tool is intended for cutting wood, metal and plastic
in straight lines or curves up to the ability of the tted
attachment and within the specication of the tool.
Sharp blades, heat buildup, harmful dust and ying
debris are a danger to user and bystanders. Use of
Read and understand all safety warnings and all
instructions before operating this product. Failure to
follow the warnings and instructions may result in electric
shock, re and/or serious injury.
WARNING! When changing battery, bit or whenever the
tool is not in immediate use the direction switch must
be in its central locked position to prevent accidental
starting. Ensure the tool will not be accidentally started
by pressing the trigger.
NOTE! Remove any debris from the area that joins
the POWERhandle to the tool. Damage to contacts
or mechanical controls could occur if debris is caught
between them.
Align the rails on the tool so they will slide smoothly into
the rails on the UniGrip. Once aligned, slide the two
parts together rmly until there is a “click” as the locking
catch engages. Test the catch is secure and the electrical
contacts are engaged by selecting a direction and briey
pressing the trigger.
Removing the UniGrip.
Hold down the UniGrip Lock Button while sliding the two
UniGrip Release Switches to the rear of the handle and
slide the UniGrip out of the tool from the rear.
INTENDED USE
FITTING A UniGrip
suitable protective clothing gloves, footwear, lung, eye
and ear protection as well as safe working practices can
reduce these risks. Always switch the tool o prior to any
adjustment.
Release Slider
(both sides or
on rear of some
POWERhandles)
Safety Switch
(both Sides)
Quick Release
Blade Clamp
Blade Guide
Adjuster
Sole Plate
Locking Screw
Variable Trigger
Rails
Blade Guide
FITTING/REMOVING A BLADE
8
7
9
6

- 15 -
Choosing the right blade
TPI means Teeth Per Inch,
also know as TOOTH
SPACING measured
tip to tip. KERF is the
width of the cut. DRAFT indicates the
blade is thicker at the teeth edge than
the back edge, this helps to prevent
jamming and allows the blade to cut
curves but will also make it harder to
cut a straight line. Blades described
as THIN indicate the distance from
teeth edge to back edge, a THICK
blade will assist in a straight cut. Tooth
patterns: MILLED, longer lasting, good
for general use and hard woods, give
a rougher cut than; GROUND, sharper
teeth that wear quickly but give a clean
nish and a faster cut; GROUND
TAPERED and GROUND SIDE give
good and excellent curve capabilities
respectively; REVERSE CUT, cut on
the down stroke. These reverse cut
blades are ideal for laminated surfaces
such as kitchen work surfaces but
make the jigsaw much harder to control
as they push the sole plate away from
the work piece.
CHOOSE THE CORRECT TOOL
To Fit a jigsaw blade
Before placing hands near the blade, ensure that the
Unigrip and/or battery are removed from the tool. Turn the
saw upside down with the black sole plate facing upward.
Open the blade receiver on the Jig saw’s main shaft by
twisting the receiver lock clockwise. Insert the T-shank
end of the blade. Before releasing the receiver lock,
ensure the blade is fully inserted. After releasing the blade
lock, gently tug on the blade to conrm that it is secure.
FITTING A UniGrip
U
T

This
1
1
2
3
4
2
3
4
NOTE! This page refers to parts not included in all packages.
- 16 -
CARE AND ENVIRONMENT ASSEMBLE A SCROLL SAW
These instructions should be read in
conjunction with those for the case used.
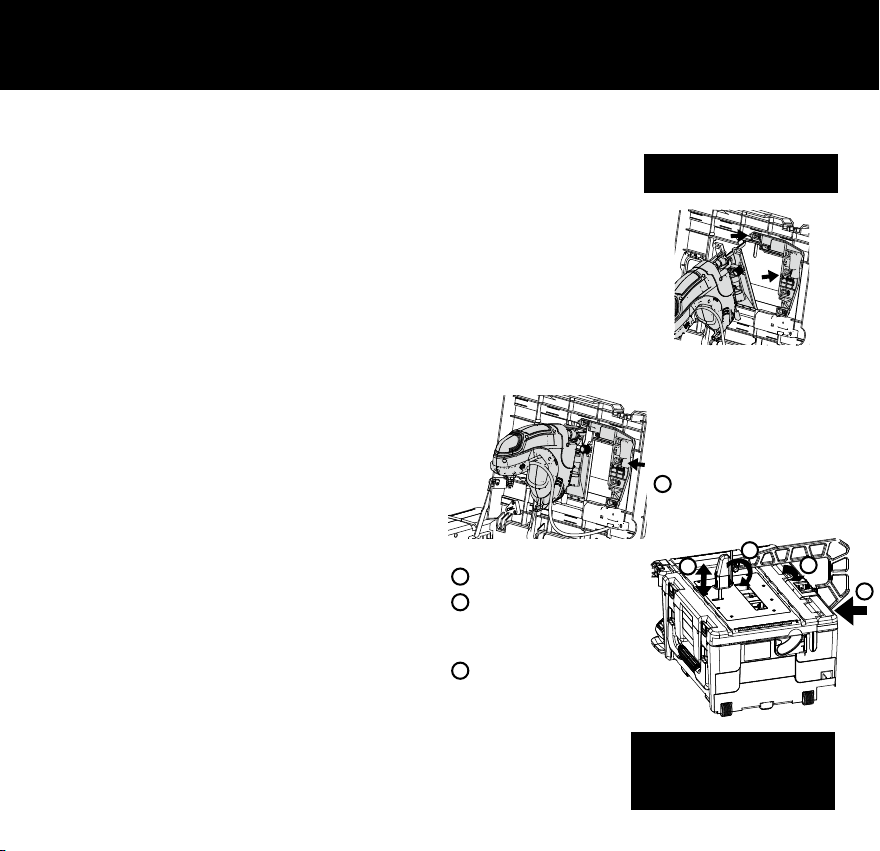
Fit the Jigsaw to the Case Lid
Open the case lid and
remove any tted tools.
Slide the Locking Slider
out of the way. Fit the rear
of the Sole Plate into the
recess at the bottom of the
opening in the case lid and
the blade through the
small slot in the case lid.
Rotate the saw into place
and release the Locking
Slider, ensure it slides
back to hold the saw in
place securely.
General inspection
Regularly check that all the xing screws are present and
tight, they may vibrate loose over time. Keep the tool’s air
vents unclogged and clean at all times.Remove dust and
dirt regularly.Cleaning is best done with compressed air or
a rag.
CAUTION, Do not use cleaning agents to clean the
plastic parts of the tool. A mild detergent on a damp cloth
is recommended. Water must never come into contact
with the tool.After each use, carefully clean the tool with
a brush or rag.Clear any debris from around the battery
mount, moving parts and clips.
Lubrication
No internal lubrication is necessary, the bearing area is
sealed. A coating of machine oil on the metal parts will
help prevent corrosion.
Storage
Store the tool, instruction manual and accessories in a
secure, dry place.In this way you will always have all the
information and parts ready to hand. Lithium ion batteries
should ideally be stored with 40 to 80% capacity between
10ºC and 20ºC (50ºF and 68ºF).
WARNING! Always charge Li-ion batteries before storage
and at least every 3 months to prevent permanent
damage.
Environment
When the time comes to dispose of this product please
consider the environment and take it to a recognised
recycling facility instead of disposing with general
household waste.
Call your local council, civic amenity site, or recycling
centre forinformation on the recycling and disposal of
electrical products andbatteries. If you do not have access
to suitable disposal facilities in your area please contact
your place of purchase, they will advise you on the best
way to dispose of your product.
Maintenance
All electrical parts should be regularly serviced by an
approved engineer.
Fit the Internal Power
Coupling onto the Rails on
the saw in where the Unigrip
connects for handheld use.
Set Blade Angle then close
and latch the lid.
Insert the Scroll Saw
Guide horizontally into the
rear of the case.
Close the lock latch,
adjust the transparent
blade shield up or down
to t dient thickness or
wood piece,
turn the knob to lock
the shield in position.
START / STOP
Use the GREEN (start) and RED (stop)
buttons to start or stop the tools tted in
the case.
Table of contents