Powerfix Profi Z31174 User manual

Z31174
7
Multi-Function Detector
Operation and Safety Notes
MultiFunktionsDetektor
Bedienungs- und Sicherheitshinweise
VišenaMjenski Detektor
Upute za posluživanje i za Vašu sigurnost
Ανιχνευτής γενικής
χρήςής
Υποδείξεις χειρισμού και ασφαλείας
Detector MultiFuncţional
Instrucţiuni de utilizare şi de siguranţă
Мултифункционален
детектор
Инструкции за обслужване и безопасност

GB/CY Operation and Safety Notes Page 9
HR Upute za posluživanje i za
Vašu sigurnost Stranica 27
RO Instrucţiuni de utilizare şi
de siguranţă Pagina 44
BG Инструкции за обслужване
и безопасност Cтраница 62
GR/CY Υποδείξεις χειρισμού
και ασφαλείας Σελίδα 81
DE/AT/CH Bedienungs- und
Sicherheitshinweise Seite 101

3
LASER DETECTOR DISTANCE
READ
M
RM
MODE
=/+
STUD ACWIRE METAL
1
2
3
5
11
12
8
4
6
9
7
10

4
A
13

5
B
14

6
C
16 15

7
D2

8
E

9GB/CY
Intended use...................................Page 10
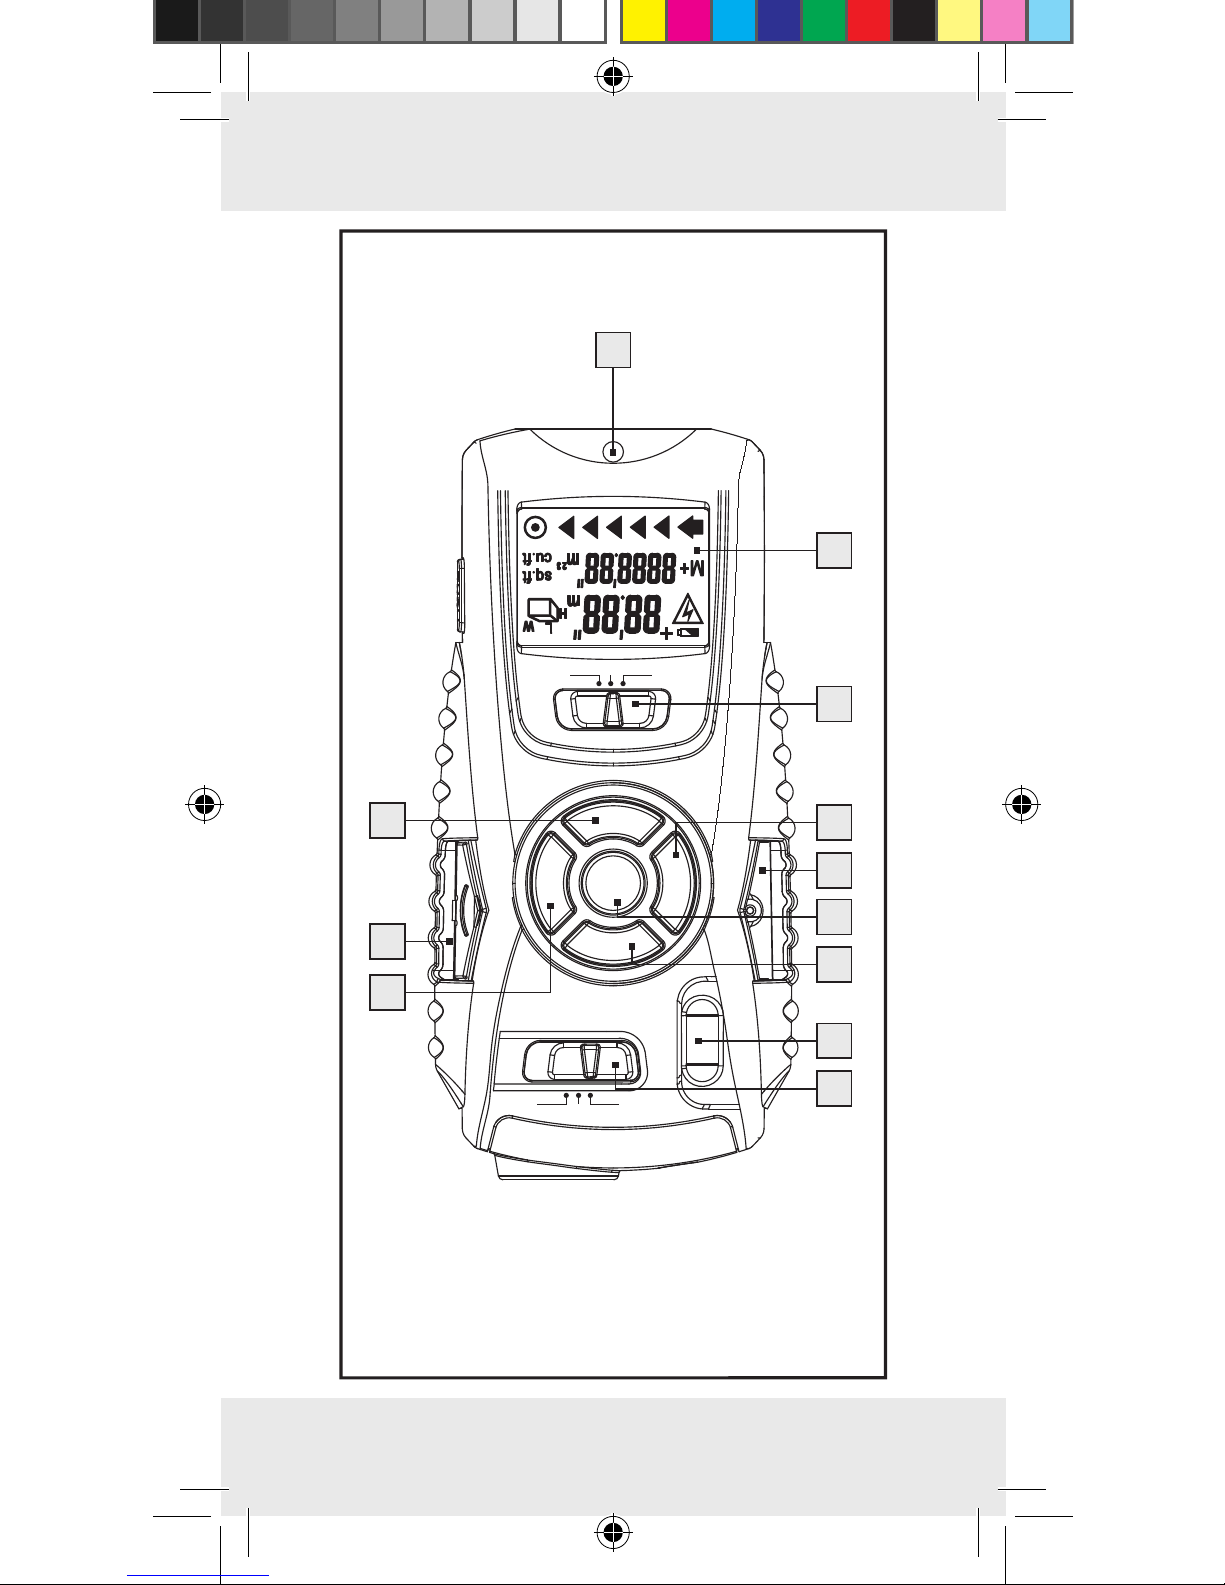
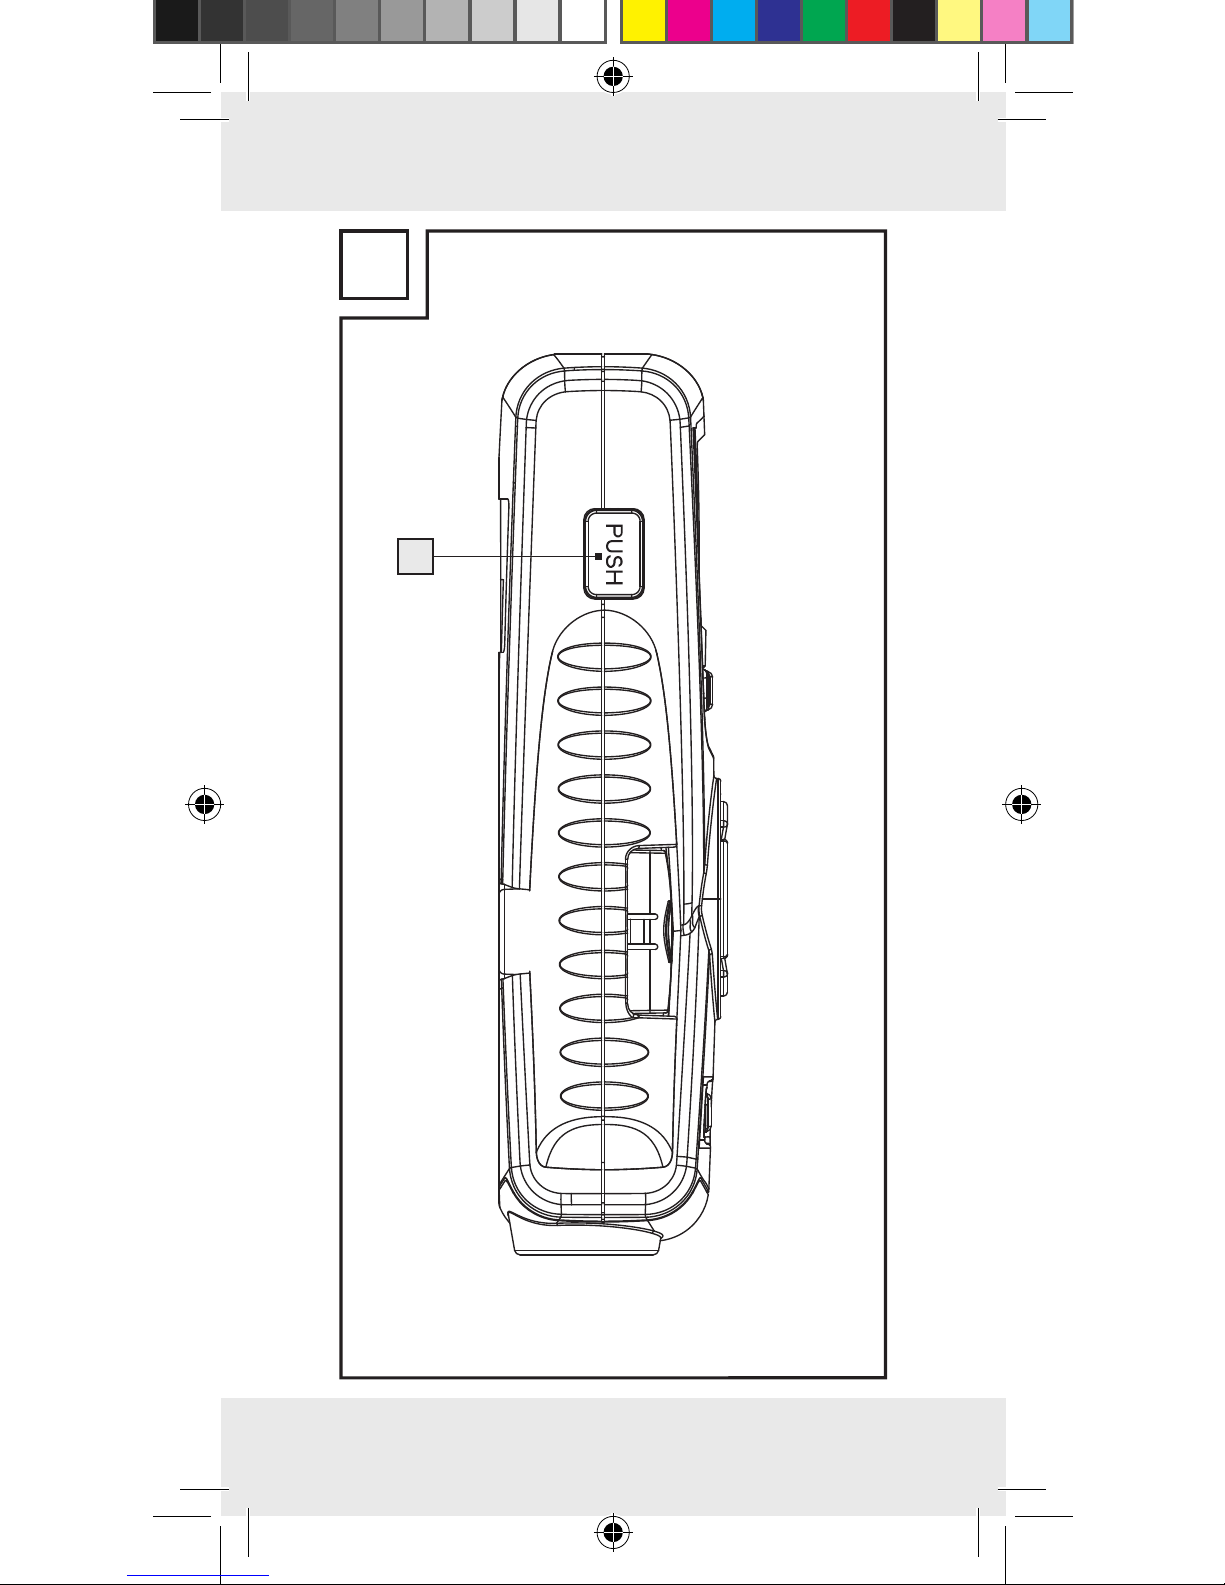
Description of parts..................Page 10
Technical data................................Page 11
Scope of delivery........................Page 11
Safety instructions
General safety information...................Page 11
Information regarding inaccurate
measurement results..............................Page 14
Safety instructions for batteries.............Page 15
Preparing for use
Inserting/replacing the battery ...........Page 16
Use
Measuring distances.............................Page 17
Setting the measuring unit ....................Page 17
Addition of distances ............................Page 18
Measuring surface areas......................Page 19
Addition of surface areas.....................Page 19
Measuring volumes...............................Page 20
Addition of volumes ..............................Page 21
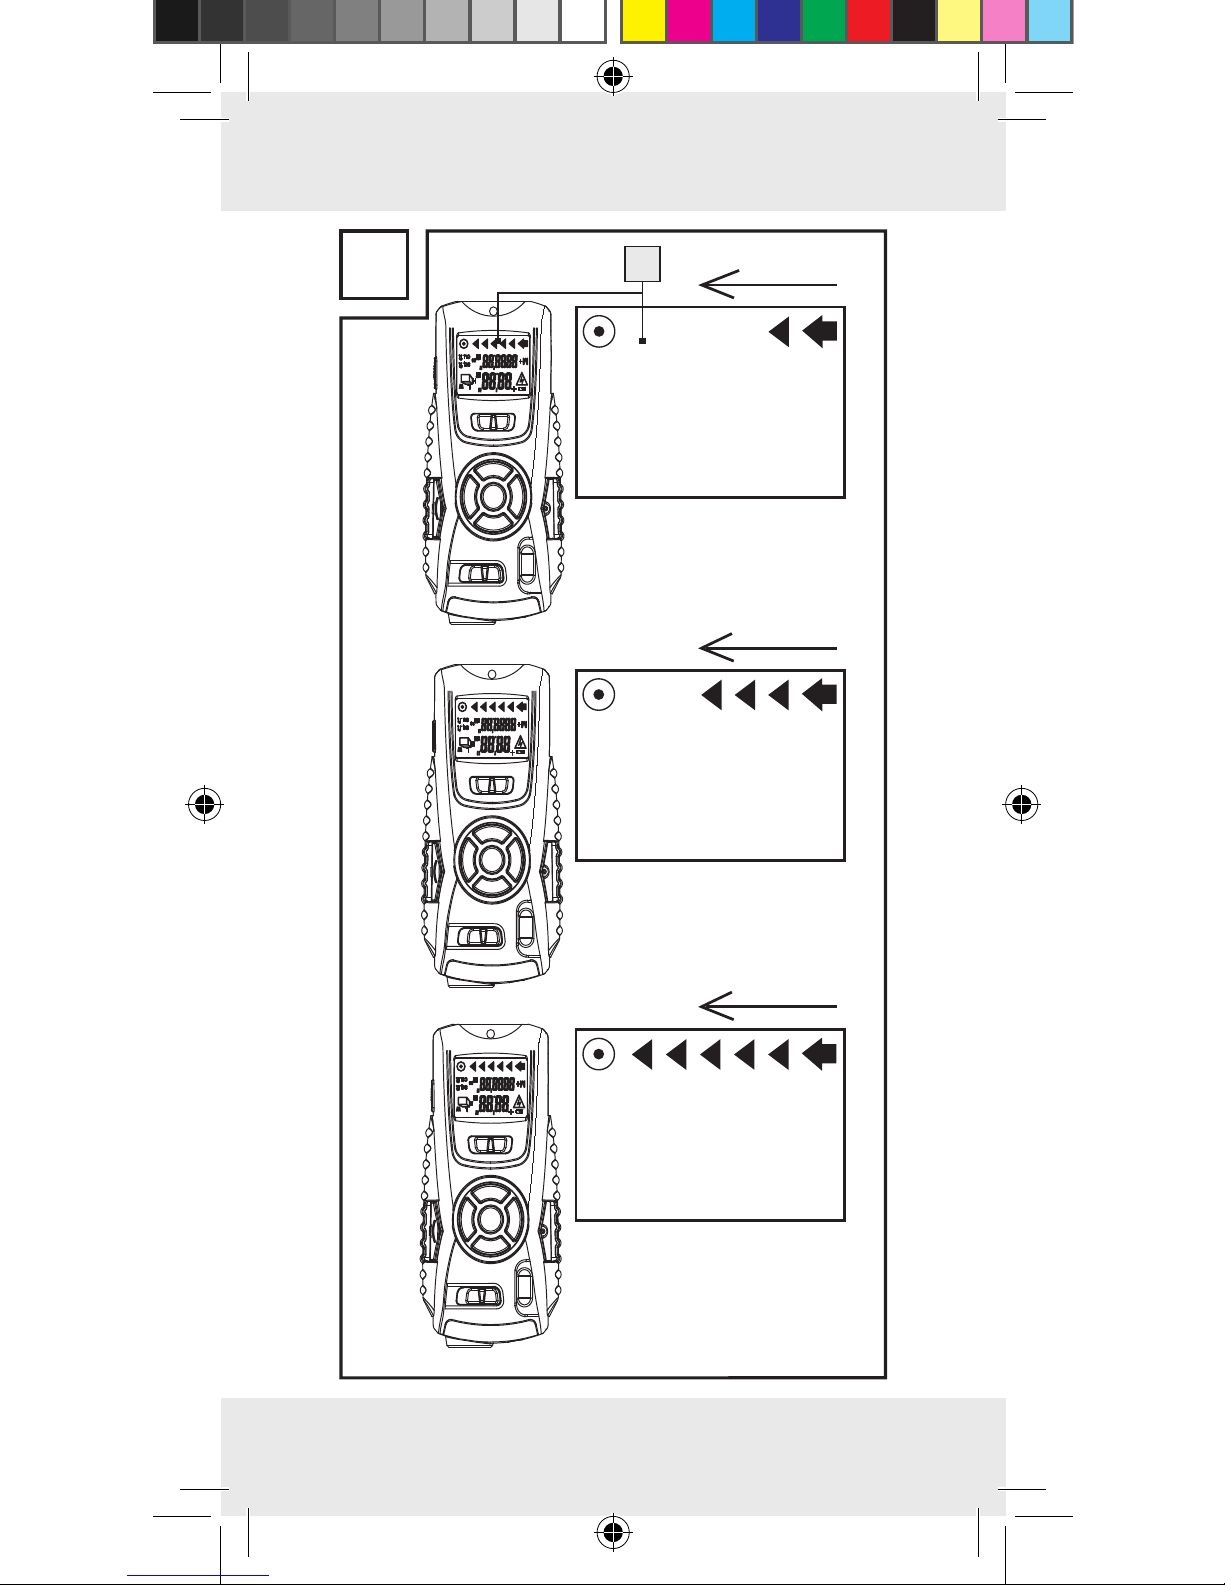
Detection of various objects .................Page 22
Detection of wooden objects ...............Page 23
Laser marking ........................................Page 23
Troubleshooting ..........................Page 24
Cleaning and care......................Page 25
Disposal..............................................Page 25

10 GB/CY
Multi-Function Detector
Intended use
This device is intended for the detection of metal,
wood and live wires. The instrument is not intended
for commercial use.
Description of parts
1Measurement point
2Display
3Material switch STUD/AC WIRE/METAL
(wood/AC wire/metal)
4MODE button
5Stud button
6READ button
7M button (save)
8Vial
9Function switch LASER/DETECTOR/
DISTANCE
10 RM button (read memory)
11 Stud button
12 +/=-button
13 Battery compartment
14 PUSH button
15 Laser beam opening
16 Ultrasonic sender/ receiver

11GB/CY
Technical data
Ultrasonic distance measurement
Detects: Wood, AC wires,
metal
Laser class: 2
Max. power output (Pmax): < 1 mW
Wave length: 635-660nm
Power supply: 9 V block battery
LASER RADIATION
DO NOT STARE INTO BEAM
CLASS 2 LASER PRODUCT
Scope of delivery
1 Multi-purpose detector
1 9V block battery
1 Operating instructions
Safety instructions
General safety
information
Children or persons lacking knowledge or
experience in handling the device or with
limited physical, sensory or mental abilities
must not use the device without supervision or
instruction by a person responsible for their

12 GB/CY
safety. Children must be supervised at all times
to prevent them from playing with the device.
Do not expose the product to
– extreme temperatures,
– strong vibrations,
– strong mechanical stresses,
– direct sunlight,
– magnetic fields,
– moisture.
These can cause damage to the product.
Never immerse the product in water. Never
hold the product under running water. This
may lead to the product becoming damaged.
Do not use the appliance in hospitals or other
medical facilities. The appliance may affect
the function of life support systems.
Check the product for damage before use.
Never use a damaged product.
CAUTION! Never open the product casing.
This can result in injury and damage to the
product. Repairs must only be carried out by
a qualified electrician.
The device contains a class 2 laser.
Never point the device at yourself,
other persons or animals. Never
look into the laser beam. Even a weak laser
beam can cause eye damage.
Never direct the laser beam onto reflective
surfaces or materials. Reflected lasers beams
are dangerous and can get into the eyes. This
could result in serious eye injuries.

13GB/CY
The product is not a toy and should be kept
out of the reach of children. One misapplica-
tion can lead to irreparable eye damage.
Only use the device in areas of application
for which it was designed!
The device may neither be manipulated nor
modified as they can influence the safety of
the device.
No responsibility is assumed for accidents that
may result from improper use and non-compli-
ance with these Safety Instructions.
Do not open the device housing. The guaran-
tee lapses in cases of unauthorised tampering.
Your product does not require any specific
maintenance.
Do not use the appliance to detect alternating
current in exposed or uninsulated wires.
Do not use the appliance as a replacement
voltmeter.
Exercise caution with studs. These are sharp
and can cause injury.
WARNING! Be careful when press-
ing the stud buttons 5, 11 . The sharp
needles can cause injury (see Fig. E).

14 GB/CY
Information regarding
inaccurate measurement
results
Please note that inaccurate measurement
results can be obtained under certain condi-
tions. The following conditions can cause
inaccurate measurement results:
– very thick walls
– weak battery
– deep-lying wires or pipes
– shielded AC wires
– thick walls with thin pipes or wires
– metal-clad walls
– very damp conditions
Using this appliance you cannot detect wires
in an electric circuit
– that are insulated from the mains power
supply.
– that have a direct current flowing through
them.
– that are used for computer or telecommuni-
cation systems.
This appliance is only suitable for detecting
metal pipes. You cannot detect pipes made
of plastic or other non-metallic materials with
this appliance.

15GB/CY
Safety instructions
for batteries
DANGER TO LIFE! Batteries
are not intended for children. Do not leave
batteries lying around. They could potentially
be swallowed by children or pets. In the event
a battery is swallowed seek immediate medical
attention.
EXPLOSION HAZARD! Never
recharge, short-circuit and/or open
batteries. Battery may overheat,
ignite or explode. Never throw batteries into
fire or water. The batteries might explode.
Avoid extreme conditions and temperatures
that could have an adverse effect on the bat-
teries, e.g. radiators. Batteries otherwise have
a higher risk of leaking.
Check the battery regularly for leaks.
Leaking or damaged batteries may
result in chemical burns upon con-
tact with the skin; always wear suit-
able safety gloves!
If fluid is leaking from the battery, avoid con-
tact with the skin, eyes and mucous membranes.
If you come into contact with corrosive battery
fluids, flush the affected area thoroughly with
clean water and seek medical advice immedi-
ately.

16 GB/CY
Remove light dirt from the battery and product
contacts with a dry, non-fluffing cloth before
inserting the batteries.
Remove the battery if the product is not going
to be used for an extended period.
When inserting the battery ensure the correct
polarity! This is shown inside the battery com-
partment. Otherwise the battery can explode.
Insert the battery with care. Otherwise the
product can be damaged.
Please do not dispose of used batteries in
your household waste but take them to a
designated collection depot for special waste.
Preparing for use
Inserting/replacing the
battery
Open the battery compartment 13 on the
back of the appliance.
Remove the spent battery, if necessary.
Insert a new 9 V block battery into the battery
compartment. Check the polarity of the bat-
tery during insertion!
Ensure that the band for easy removal of the
battery lies under the 9 V block battery. Press
the battery firmly into battery compartment.
Close the battery compartment again. The
battery compartment lid locks noticeably and
audibly into place.

17GB/CY
Note: When the battery symbol appears in the
display 2, replace the battery. With a weak
battery you may receive an inaccurate or false
measurement result.
Use
Measuring distances
1. Slide the function switch 9to the position
„DISTANCE“. The display 2is turned on.
2. Hold the appliance horizontally to the wall at
the distance you wish to measure. The ultra-
sonic - transmitter/ receiver 16 must point at
the wall at a right angle. Use the vial to do
this 8: direct the appliance so that the air
bubble in the vial lies between the two marker
lines.
3. Press the READ button 6. The measured
distance appears in the display.
Note: Hold down the READ button and move
the appliance and move the appliance further
over the surface to be measured. The appli-
ance measures the distance continuously.
These are displayed in the display.
Setting the measuring unit
You can choose between the measuring units of
metre (m) and foot (‘…“).

18 GB/CY
Measure a distance as described in the section
„Measuring distances“. As an example, „2m“
will appear on the display.
In order to set the measuring unit of foot,
proceed as described in step 1 to 3:
1. Press the MODE button 4and keep it
pressed.
2. Press the READ button 6while keeping the
MODE button pressed.
3. To set the measuring unit of foot release the
READ button first, followed by the MODE but-
ton. As an example,“6’07“” will appear on
the display if you have measured a distance
of 2 m.
4. In order to switch between the measuring
units of foot and metre once again, proceed
as described in step 1 to 3.
Addition of distances
With the appliance you can add the measured
distances together:
1. Measure the first distance as described in the
section „Measuring distances“.
2. Press the +/= button 12 . The message „+“
appears in the display 2and the measured
distance in the row below.
3. Measure the next distance. The new distance
measured is shown in the upper row of the
display.

19GB/CY
4. Press the +/= button again. The new meas-
urement is added to the old in the lower row.
5. Repeat steps 3 to 4 to add further measure-
ments.
6. Press the MODE button 4to leave the
addition mode. All the measurements will be
deleted.
Measuring surface areas
1. Slide the function switch 9to the position
„DISTANCE“. The display 2is turned on.
2. Press the MODE button 4once. The message
„L“ (length) appears in the display.
3. Press the READ button 6to measure the
length. The measured length appears in the
upper row of the display and the message
„W“ (width) starts to blink.
4. Press the READ button to measure the width.
The measured width appears in the upper
row of the display. The results of the surface
area calculation appear in the lower row.
Addition of surface areas
1. Measure an area as described in the section
„Measuring surface areas“.
2. Press the M button 7. The message „M+“
appears in the display 2. The measured
surface area is saved.

20 GB/CY
3. Press the MODE button 4. The appliance is
now ready for the second measurement.
4. Measure the next surface area.
5. Press the +/= button 12 . The message „+“
appears in the display.
6. Press the RM button 10 . The result of the first
measurement is shown in the lower row of the
display.
7. Press the +/= button again. Both measure-
ments are added and the result is shown in
the lower row of the display.
8. Repeat steps 2 to 7 to add further measure-
ments.
9. Press the MODE button 4to leave the
addition mode. All the measurements will be
deleted.
Measuring volumes
1. Slide the function switch 9to the position
„DISTANCE“. The display 2is turned on.
2. Press the MODE button 4twice. The message
„L“ (length) appears in the display.
3. Press the READ button 6to measure the
length. The measured length appears in the
upper row of the display and the message
„W“ (width) starts to blink.
4. Press the READ button to measure the width.
The measured width appears in the upper
row of the display and the message „H“
(height) begins to blink.
Table of contents
Languages:
Other Powerfix Profi Metal Detector manuals