Powerhorse 109270 User manual

Owner’s Manual
Instructions for Assembly, Testing, Operation, Servicing, and Storage
Water Pump: Outdoor agricultural product used for general
purpose water pumping, field irrigation and trash
applications.**
WARNING
READ and UNDERSTAND the Owner’s Manual completely before using this water pump. Assemble,
test, and use only in accordance with the Owner’s Manual instructions.
WEAR personal protective gear when filling, using, cleaning, and servicing the water pump.
DO NOT START water pump until ready to spray in order to avoid unintentional spray release.
Improper use of the water pump could result in serious injury or illness to the operator or nearby
persons/animals, or could cause damage to the environment.
** This water pump is recommended for use in spraying non-flammable liquids such as water.
Solids capacity will depend on model.
Any Questions, Comments, Problems, or Parts Orders
Call Powerhorse Product Support 1-866-443-2576
ITEM NUMBER: 109270, 109280, 109290
SERIAL NUMBER: _______________
MWPG

Hazard Signal Word Definitions
2

Table of Contents
3
About Your Water Pump ............................................................................................................ 4
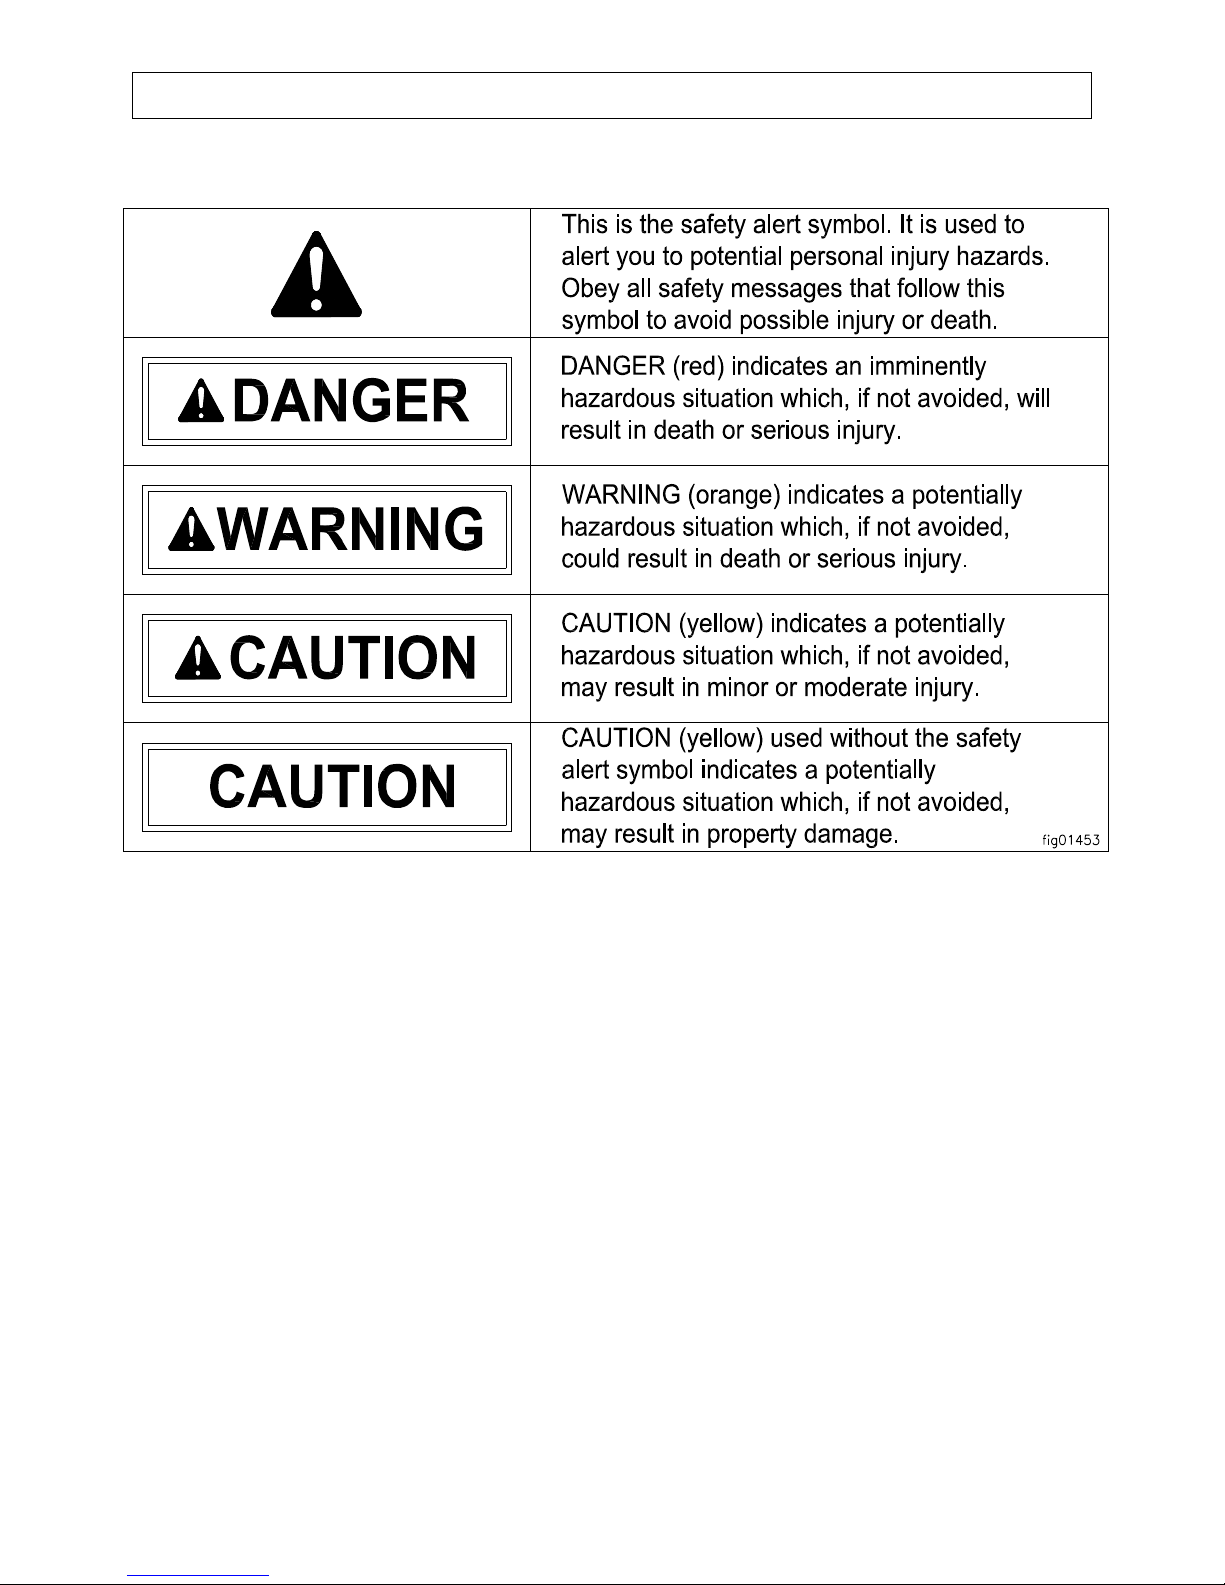
Summary of Important Safety Information................................................................................5
During Assembly
During Operation
During Storage / Troubleshooting
Warning Label Locations..............................................................................................................6
Unpacking..................................................................................................................................................7
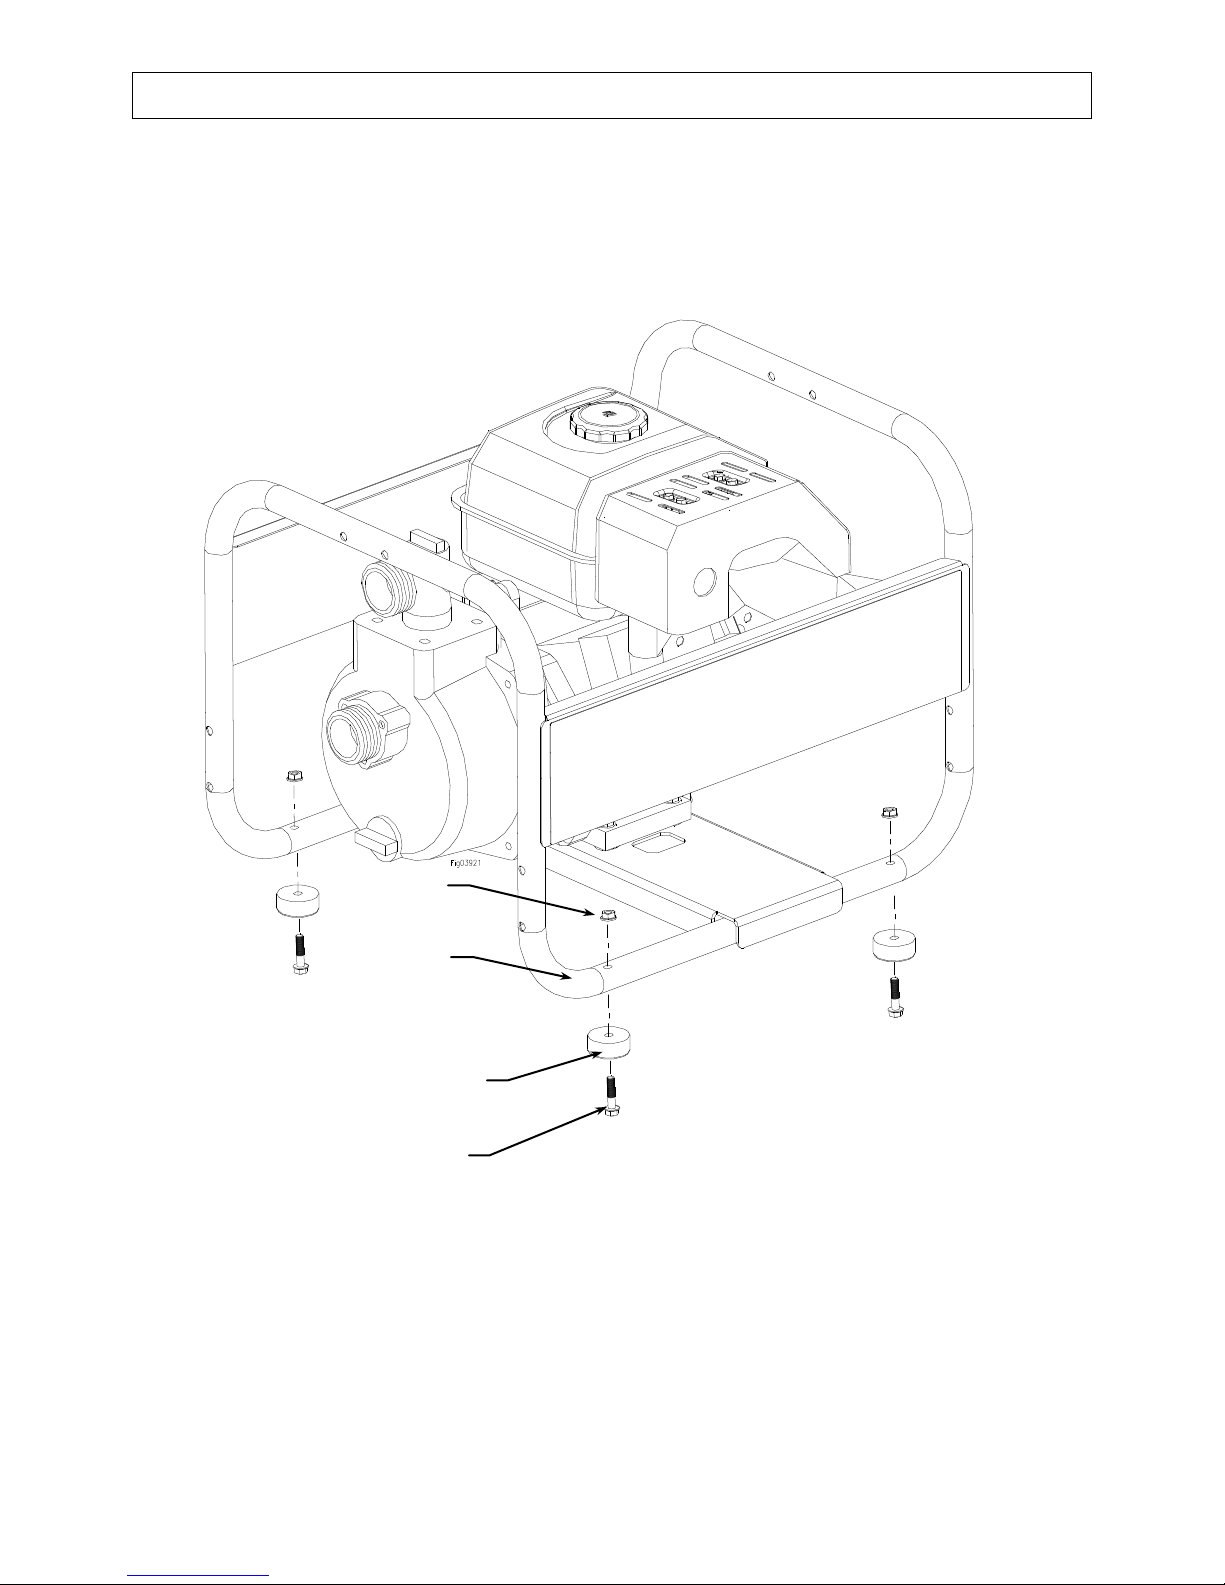
Assembly.................................................................................................................................................................. 8
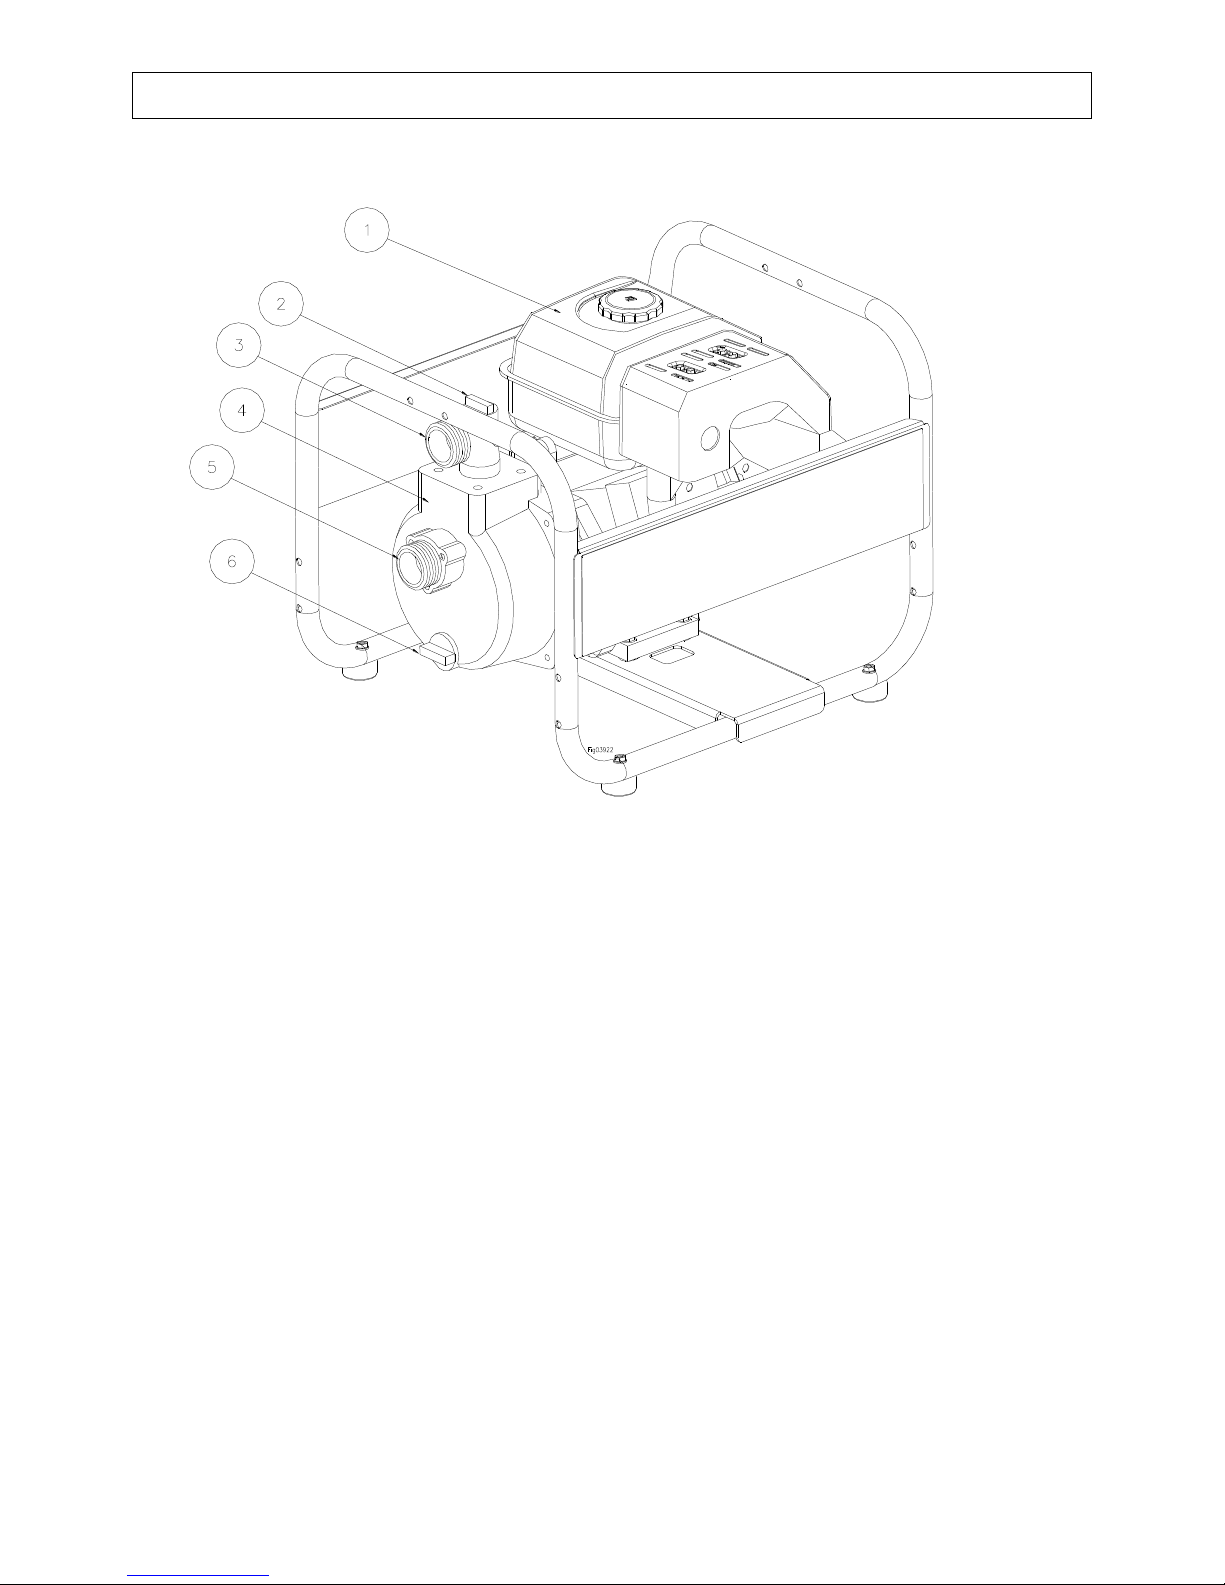
Machine Components....................................................................................................................9
Operation
Operation - Preparing the Water Pump for Each Use
Step One: Inspect/Repair...................................................................................................................10
Step Two: Fueling.........................................................................................................................................11
Step Three: Attach a suction strainer .........................................................................................................12
Step Four: Place the water pump................................................................................................................12
Operation - Using the Water Pump.................................................................................................13
Storage ..........................................................................................................................................14
Troubleshooting ...........................................................................................................................15
Specifications................................................................................................................................16
Water Pump Exploded View.......................................................................................................19
109270 Pump Exploded View .....................................................................................................20
109280 Pump Exploded View .....................................................................................................21
109290 Pump Exploded View .....................................................................................................22
Engine Exploded View.................................................................................................................23
Engine Operation.........................................................................................................................26
Engine Maintenance ....................................................................................................................35
Engine Specs.................................................................................................................................41
Engine Troubleshooting ..............................................................................................................41
Limited Warranty........................................................................................................................46

About Your Water Pump
4
Thank you for purchasing your Powerhorse water pump!
About Your Water Pump
This water pump is a machine designed for outdoor, agricultural, general purpose water
pumping, field irrigation and trash pumping applications.
This water pump is capable of handling suspended soft solids, up to a capacity determined by the
model.
Up to 5/8” solids (Model #109270).
Up to 5/8” solids (Model #109280).
Up to 1-1/8” solids (Model #109290).
This water pump has an optional wheel kit (Part #109292), which includes:
Axles
Wheels
Handle and Handle Mount
The technical specifications for your water pump are provided in the “Specifications” section of
this manual.
Follow all safety precautions presented throughout this manual. A summary of important safety
information can be found at the end of the manual.
Contact Powerhorse Product Support at 1-866-443-2576 for any questions
about the appropriate use of this water pump and/or optional accessories.
Warranty Registration:
Please fill in the warranty registration information and have it on hand when you call in on a
warranty claim.
Attention: All Rental Companies and Private Owners who
loan this equipment to others!
All persons to whom you rent/loan this water pump must have access to and read this manual.
Keep this owner’s manual with the water pump at all times and advise all persons who will
operate the machine to read it. You must also provide personal instruction on how to safely
operate the water pump and be available to answer any questions a renter/borrower might have.

Summary of Important Safety Information
5
WARNING
Read and understand this owner’s manual completely before using the water pump.
Improper use of the water pump could result in serious injury or illness for the operator
or nearby persons/animals, or cause damage to the environment.
LISTED BELOW is a summary of safety information of particular importance. See individual
sections of this owner’s manual for more details.
-------------------------------------- DURING ASSEMBLY -------------------------------
CHECK and TEST completed assembly as directed in this manual. Serious injury could result from water
leaks if water pump is improperly assembled.
DO NOT MODIFY water pump design.
------------------------------------- DURING OPERATION ------------------------------
INSPECT and PREPARE water pump before each use as directed in this manual.
DO NOT USE flammable or corrosive chemicals in the water pump.
FOLLOW INSTRUCTIONS for SAFELY FUELING the engine. Gasoline is flammable and can explode.
Always use caution when handling gasoline.
DO NOT START water pump until ready to spray in order to avoid unintentional release.
SEE Troubleshooting section of this manual before attempting any repairs. Wear personal protective
equipment and follow safety instructions.
------------------- DURING STORAGE / TROUBLESHOOTING ------------------
PREPARE THE WATER PUMP FOR STORAGE according to the instructions in this manual.
SELECT a well-ventilated STORAGE AREA away from sources of heat, flame, or sparks. Gasoline
vapors can ignite and cause a fire.
READ and FOLLOW the safety rules for troubleshooting / servicing the water pump to avoid accidental
exposure to chemical and risk of electric shock.

Warning Label Location
6
Call PowerHorse Product Support at 1-866-443-2576 to order new labels.
Item # 109270 Order Part No. 780949 warning decal
Item # 109280 Order Part No. 780950 warning decal
Item # 109290 Order Part No. 786728 warning decal
All pumps: Order Part No. 785261priming plug warning decal

Unpacking
7
Closely inspect all contents in the shipping carton.
Note that some parts are shipped inside the manual bag.
If you have damaged components: Contact the freight company that delivered the unit and file a claim.
If you have missing components: Contact Powerhorse Product Support at 1-866-443-2576.
The following items are found in the manual bag.
Bolts (4)
Rubber Feet (4)
Nuts (4)

Assembly
8
Attach rubber feet to the base.
Using a 3/8” socket, attach the rubber feet to the base with the bolts and nuts.
Axle Pin (2)
Rubber Foot
Base
Screw
Nut

Machine Components
9
1. Engine: The air-cooled engine powers the pump.
2. Prime Port: Fill the priming port to prime the pump.
3. Discharge Fitting: Connect the discharge hose to the discharge fitting.
4. Pump: The pump moves the liquid.
5. Suction Fitting: Connect the suction hose to the suction fitting.
6. Drain Port: Drain the liquid in the pump through the drain port.

Operation –Preparing the Water Pump for Each Use
10
Step One: Inspect/Repair
If the water pump has been used previously, it must be prepared BEFORE EACH SUBSEQUENT USE.
WARNING
Read instructions below carefully for inspecting and preparing the water pump.
Damaged or clogged equipment could result in leaks or uncontrolled spray.
Important safety rules:
Turn off engine. Turn off engine and remove spark plug cap before cleaning, inspecting, or
servicing the water pump.
Guards / shields. Make sure all guards and shields are replaced after servicing the water pump.
Replacement parts. If a part needs replacement, only use parts that meet the manufacturer’s
specifications. Replacement parts that do not meet specifications may result in a safety hazard or
poor operation of the water pump.
1. Ensure water pump
casing is empty
Ensure the water pump has been thoroughly flushed with fresh
water and drained from prior use.
2. Clean suction strainer
Clean the suction strainer of any material residue.
It is important to clean the suction strainer of debris before each use, to
ensure it is not clogged.
3. Inspect & repair
Inspect and test the water pump thoroughly
a. Inspect fittings for cracks and leaks. Replace all damaged fittings
with original Powerhorse parts.
b. Check to be sure all nuts, bolts, and screws are tight.
c. Check oil level in engine. See engine owner’s manual.
d. Check for fuel leaks. Any fuel leak is a fire hazard. Fix any fuel
leaks before starting engine.

Operation –Preparing the Water Pump for Each Use
11
Step Two: Fueling
WARNING
Gasoline is highly flammable and explosive. You can be burned or seriously injured when handling
fuel. Use extreme care when handling gasoline.
1. Engine off / cool
The engine must be off and allowed to cool at least two minutes before adding
fuel.
WARNING: A running engine is hot enough to ignite fuel. Never add fuel
or remove gas cap if engine is running or still hot.
2. Outdoor location
Fill fuel tank outdoors –never indoors.
WARNING: Gasoline vapors can ignite if they collect inside an enclosure.
Explosion can result.
3. Check engine oil
level
Check engine oil level as specified in the engine manual.
4. Remove gas cap
Remove engine gas cap.
5. Add gasoline
Add gasoline through fill opening from a UL-approved container.
Important Safety Instructions:
Use approved container. NEVER pump fuel directly into engine at gas
station. Static charge can build and ignite fuel. Use a UL approved fuel
container to transfer gas to the engine.
Don’t overfill. DO NOT overfill the gas tank. Allow at least 1/2” of empty
space below the fill neck to allow for fuel expansion
Heat / flames / sparks. Stay away from sources of heat, flame, or sparks
while adding fuel.
6. Spills / splashes
Clean up fuel spills /splashes immediately.
Move water pump away from spilled fuel on the ground.
1. Wipe fuel off engine and wait 5 minutes for excess fuel to evaporate before
starting engine.
2. Gas soaked rags are flammable and should be disposed of properly.
3. If gasoline is spilled on your skin or clothes, change clothes and wash skin
immediately.
7. Replace gas cap
Replace gas cap securely before starting engine.
8. Gasoline storage
Store gasoline in a cool, dry place in a UL approved, tightly sealed container.

Operation –Preparing the Water Pump for Each Use
12
Step Three: Attach a suction strainer
WARNING
This pump is design to pump water only. Never use the water pump to pump flammable liquids.
1. Attach suction
strainer
A suction strainer should be attached to the suction hose. A suction strainer has
holes or slots small enough to prevent large debris from working through and
damaging the pump.
2. Keep the strainer
clean
Keep the strainer clean.
If possible, suspend the strainer to keep it from working into sediment.
-OR-
A) Prepare a bed of large stones on which the strainer will rest.
B) Tie the strainer inside a basket or pail.
Step Four: Place the water pump
1. Place the water
pump near liquid
surface
Place the water pump in a location as near to the liquid surface as possible, this will
ensure proper pump suction.
All hoses must be kept as straight as possible, avoid sharp bends.
NOTE: 23ft is the maximum height of suction head.
2. Use flexible hose
Use at least 12” of flexible hose to make plumbing connections to the pump body.
Rigid piping may put stresses on the pump, causing damage
3. Place unit on
secure footing
Always be sure the unit is on a secure footing. Keep the immediate pump area free
of all unauthorized personnel. If the water pump is sitting beside a pit, be sure it is
well anchored so that it does not fall in.
4. Do not run the
pump dry
Do not run the pump dry. Always fill the pump body with water before starting. It
is not necessary to drain the pump body after each use, unless there is danger of
freezing, settling of solids, or crystallization.
5. Fill the pump
with water
Fill the pump with water utilizing the priming port on the top of the pump.
(The pump self primes only when it is first filled with priming water.)
All hoses and pipe connections must be airtight.

Operation –Using the Water Pump
13
Operate the water pump
1. Review safety
information
Review the “Operation – Important Safety Information” provided in this manual.
2. Priming
Using the priming port on the top of the pump, completely fill the pump chamber
with water before starting the engine.
3. Engine operation
precautions
Heed the following safety rules with regard to running the water pump engine:
Hot muffler. If you are starting a warm engine, stay clear of muffler. It may still
be hot enough to burn you.
Hot exhaust. Hot exhaust fumes from engine can cause fire. Position muffler at
least 7’ from combustible objects during operation.
Fire extinguisher. Have a Class B fire extinguisher available as a precautionary
measure when operating the water pump engine in dry areas.
Carbon monoxide. The running engine gives off carbon monoxide, a poisonous
gas that can kill you. You CANNOT smell it, see it, or taste it. ONLY run the
water pump engine OUTDOORS and away from air intakes. NEVER run the
water pump engine inside homes, garages, sheds, or other semi-enclosed spaces.
These spaces can trap poisonous gases, EVEN if you run a fan or open windows.
If you start to feel sick, dizzy, or weak while using the water pump, shut off the
engine and get to fresh air RIGHT AWAY. See a doctor. You may have carbon
monoxide poisoning.
4. Start engine
Consult the engine Owner’s Manual for starting the engine.
5. Throttle control
When operating the water pump much higher than the water surface, you may need
to speed up the engine, using the throttle. When the pump is near the water surface,
a slower engine speed can be used. This will save engine fuel and life.
Consult the engine Owner’s Manual for throttle location.
6. Secure flexible
hose
Never allow a vehicle to run over the flexible hose. This sudden shut off pressure
can cause “hydraulic shock”.
If your flexible hose must be laid across a high traffic area, it is advised to protect the
flexible hose with planking.
7. Keep pump
from freezing
Never allow water to freeze in the pump. Freezing water can be extremely
dangerous to the pump, always drain the water from the pump if freezing
temperatures are a factor.
8. Flush the pump
Flush the pump with fresh water after each use is advised. Some liquids being
pumped may leave a solid or sticky residue. This may shorten the life of your pump.

Storage
14
Prepare the water pump for end-of-season storage by running pure water through the system. This will
flush out any contaminants and clean the water pump internals. After the water pump has been flushed
with pure water, completely drain the water pump of all water to protect from freezing.
WARNING
Gasoline vapors can ignite and cause a fire. Select a well-ventilated storage area away
from sources of heat, flame, or sparks.
CAUTION
The water pump will be damaged if it freezes.
Protect the water pump from freezing during storage by following the instructions below.
Preparing for storage:
1. Pump pure
water
Briefly run the water pump while pumping pure water.
2. Drain the
water pump
Using the water pump drain plug, drain the water pump completely of water to
prevent freezing.
3. Engine
storage
Refer to the engine manual for proper engine storage instructions.
- Always disable the engine for storage by unplugging the spark plug wire.
CAUTION: Gasoline will oxidize and deteriorate in storage. Old gasoline in the
engine will cause hard starting and leave gum deposits that can clog the fuel
system. Deterioration problems may occur within a few months, or even less if
gasoline was not fresh when you filled the fuel tank.
Short-Term Storage:
Consider adding a fuel stabilizer to extend fuel storage life.
Long Term Storage: (between infrequent uses and at end of season)
Drain the fuel tank and carburetor as instructed in the engine owner’s manual.
Important Safety Instructions:
Always drain fuel from tank in outdoor, well-ventilated area.
Stay away from sources of heat, flame, or sparks while handling fuel.
Clean up fuel spills/splashes immediately.
4. Water pump
storage
location
Store the water pump in a location away from corrosive material, sources of
heat, open flames, sparks or pilot lights.
WARNING: Never store water pump inside where there is a source of heat or
an open flame, spark, or pilot light as on water heaters, space heaters, furnaces,
clothes dryers, or other gas appliances EVEN IF the water pump’s gas tank is
empty.
5. Gasoline
storage
Store gasoline in a cool, dry place in a UL approved, tightly sealed container.
WARNING:Gasoline vapors can ignite if they collect inside an enclosure and
an explosion can result.

Troubleshooting
15
WARNING
Before troubleshooting or attempting to service, read the following safety rules.
Before attempting to service the water pump:
1. Review
troubleshooting
table
Review the Troubleshooting Table below for the type of problem you are
experiencing. However, DO NOT attempt to repair until the steps listed below are
followed.
2. Flush the pump
Pump pure water briefly to clean out the pump.
3. Drain the water
pump
Drain the water pump completely of water using the water pump drain plug, to
prevent freezing.
4. Disconnect
power
Switch off the engine and unplug the spark plug wire.
5. Perform repairs
Follow the directions provided in the troubleshooting table to repair the water
pump.
PROBLEM
CAUSE
SOLUTION
Pump doesn’t revolve
1. Engine will not turn over
See engine owner’s manual
2. Rusting/Sticking of impeller
Disassemble and clean
Pump fails to prime
1. Priming chamber not full enough
Add more water to priming chamber
2. Air leaks on suction line joints
Check for loose screws or broken hoses
3. Quick coupling gaskets worn
Replace gaskets
4. Loose or broken hose clamps
Tighten or replace hose clamps
5. Priming chamber is over heated
Pour cold water in chamber or let cool
6. Engine speed is too slow
Increase engine speed
7. Worn or broken volute or impeller
Replace worn or broken component
8. Worn or broken mechanical seal
Replace mechanical seal
Low capacity
1. Clogged suction hose
Clear obstruction
2. Dirty suction strainer
Clear suction strainer
3. Flow restriction due to hose kinks
Straighten suction and discharge hoses
4. Suction lift too high
Move pump closer to water surface
5. Engine speed too low
Increase engine speed
6. Worn or broken mechanical seal
Replace mechanical seal
7. Reduced engine performance
See engine owner’s manual
8. Clogged impeller
Remove clog
9. Worn impeller
Replace impeller

Specifications
16
Performance Curve
0
10
20
30
40
50
60
70
80
90
100
01000 2000 3000 4000 5000 6000 7000 8000 9000 10000
Flow (GPH)
Total Head (ft)
109270 –2” Semi-Trash
Engine
Powerhorse 208cc
Suction & Discharge Size
2” NPT
Maximum Flow
7860 GPH
Maximum Suction Head
23 FT
Maximum Total Head
98 FT
Maximum Pressure
43.5 PSI
Passable Solid Size
5/8”
Mechanical Seal
Silicon Carbide
Overall Dimensions (L x W x H)
21.5" x 17.6" x 16.7"
Dry Weight
60 lbs

Specifications
17
Performance Curve
0
10
20
30
40
50
60
70
80
90
100
02000 4000 6000 8000 10000 12000 14000 16000 18000
Flow (GPH)
Total Head (ft)
109280 –3” Semi-Trash
Engine
Powerhorse 208cc
Suction & Discharge Size
3” NPT
Maximum Flow
14,160 GPH
Maximum Suction Head
23 FT
Maximum Total Head
98 FT
Maximum Pressure
43.5 PSI
Passable Solid Size
5/8”
Mechanical Seal
Silicon Carbide
Overall Dimensions (L x W x H)
23.5” x 19.1” x 18.7”
Dry Weight
65 lbs

Specifications
18
Performance Curve
0
10
20
30
40
50
60
70
80
90
100
02000 4000 6000 8000 10000 12000 14000
Flow (GPH)
Total Head (ft)
109290 –3” Full-Trash
Engine
Powerhorse 208cc
Suction & Discharge Size
3” NPT
Maximum Flow
11,820 GPH
Maximum Suction Head
23 FT
Maximum Total Head
82 FT
Maximum Pressure
36 PSI
Passable Solid Size
1-1/8”
Mechanical Seal
Silicon Carbide
Overall Dimensions (L x W x H)
23.5” x 19.1” x 18.7”
Dry Weight
90 lbs
The manufacturer reserves the right to make improvements in design and/or
changes in specifications at any time without incurring any obligation to install
them on units previously sold.
Any Questions, Comments, Problems or Parts Orders
Call Powerhorse Product Support 1-866-443-2576

Water Pump Exploded View
19
Item
Part Number
Description
Model
Qty.
1
784991
Powerhorse 208cc Engine
All
1
786751
Water Pump 109270 Frame
109270
1
2
786754
Water Pump 109280 Frame
109280
786762
Water Pump 109290 Frame
109290
3
780948
Powerhorse Decal
All
1
109271
2” Semi-Trash Pump
109270
1
4
109281
3” Semi-Trash Pump
109280
109291
3” Full-Trash Pump
109290
5
786775
Rubber Feet
All
4
6
786776
M8-1.25 x 35mm Flange Bolt
All
4
786777
M8 Flange Nut
109270
4
7
109280
4
109290
6
780949
109270 Warning Decal
109270
1
8
780950
109280 Warning Decal
109280
786728
109290 Warning Decal
109290
786778
M8-1.25 x 60mm Flange Bolt
109270
4
9
109280
4
109290
6
10
785261
Priming Plug Warning Decal
All
1
*109290 shown

109271 Pump Exploded View
20
Item
Description
Part #
Qty.
Item
Description
Part #
Qty.
1
Pump Cover
781234
1
18
Outlet Flange
782566
1
2
Large O-ring
781235
1
19
Inlet Flange
782565
1
3
Sealing Washer
781236
5
20
Inlet Check Valve
781250
1
4
Mount Bolt
781237
4
21
Inlet Connection Bolt
788866
3
5
Mechanical Seal
781238
1
22
Pump Body Bolt
788865
4
6
Impeller
781239
1
24
Inlet Hose Clamp
781254
1
7
Volute
781240
1
25
Suction Strainer
781255
1
8
Small O-ring
781241
1
26
Shaft Bolt
781256
1
9
Pump Body
781242
1
27
Shaft Bolt Washer
788988
1
10
Outlet Seal
781243
1
28
Key
788989
1
12
Outlet Connection Bolt
788864
4
13
Plug O-ring
782854
2
14
Drain/Prime Plug
2
This manual suits for next models
7
Table of contents
Other Powerhorse Water Pump manuals
Popular Water Pump manuals by other brands

GinSan
GinSan SGS327 quick start guide

Grundfos
Grundfos MAGNA1 D Installation and operating instructions

Edwards
Edwards E-LAB 2 instruction manual

Aspen Pumps
Aspen Pumps Universal quick start guide

ITT
ITT ST31 Installation, operation and maintenance instructions

Wilo
Wilo Helix2.0-VE Installation and operating instructions