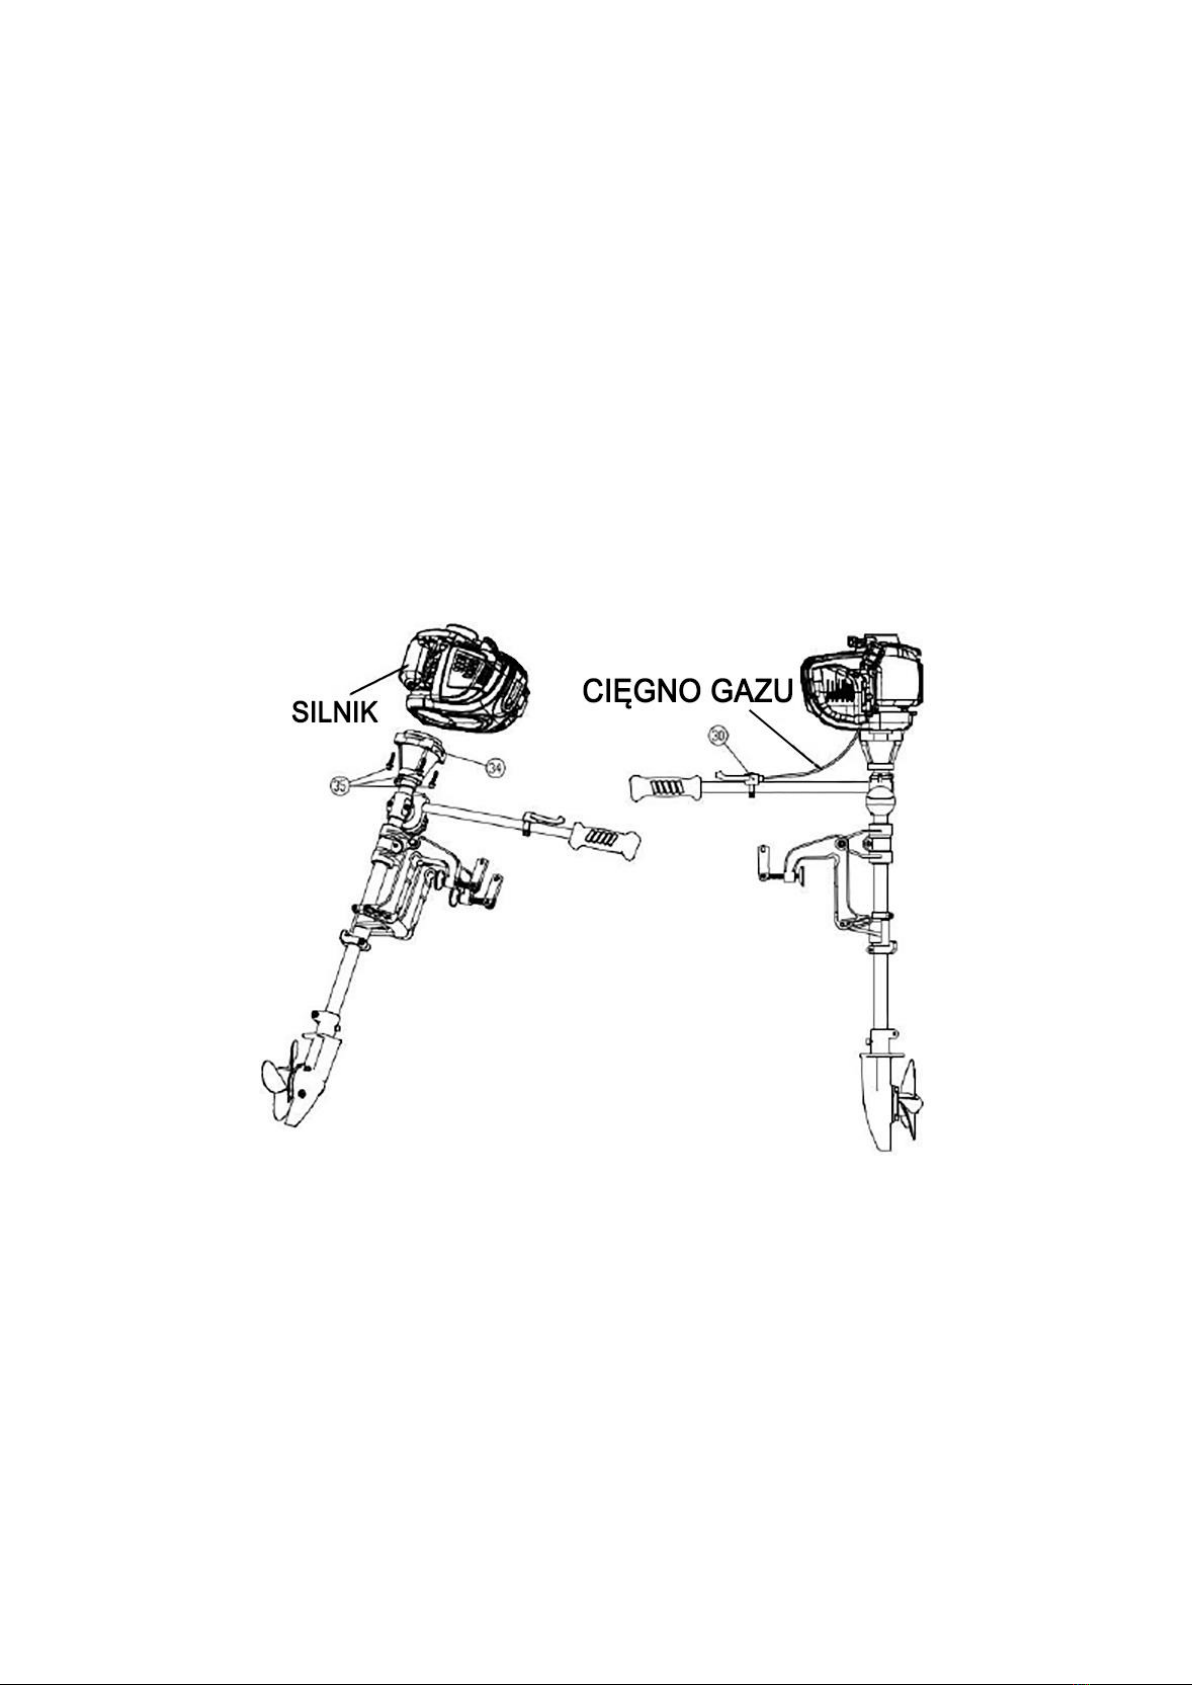
Powermat PM-SSZ-600 User manual

1
USER MANUAL
Outboard engine
PM-SSZ-600

2
Table of Contents
SYMBOLS WARNING / INFORMATION .............................................. ........................................... 3
APPLICATION EQUIPMENT ................................................ .................................................. ............... 3
TECHNICAL DATA ................................................ .................................................. ................................ 4
SAFETY ................................................. .................................................. ................................ 4
GENERAL THOUGHTS ................................................ .................................................. .................................... 4
PREPARATION ................................................ .................................................. ........................... 6
INSTALLATION AND OPERATION .............................................. .................................................. .......... 6
Mounting the engine ................................................ .................................................. ................................... 6
Refueling ................................................ .................................................. ............................ 6
Starting a cold engine ............................................... .................................................. ........... 7
Starting warm engine ............................................... .................................................. ............ 7
Check before departure ............................................... .................................................. ............. 7
Before embarking on any journey carrying the motor control of the state. ................................... 7
Flushing the engine ................................................ .................................................. ........................... 7
Cleaning the fuel tank ............................................... .................................................. .............. 8
Maintenance of the fuel filter ............................................... .................................................. ................... 8
In the event of flooding the engine .............................................. .................................................. .................... 8
Checking spark plug ............................................... .................................................. ........ 8
Replacing the oil in the gearbox screw ............................................. .................................................. .... 10
Propeller ................................................ .................................................. .............................. 10
Storage ................................................. .................................................. ............................. 11
INSTALLATION AND USE THE BOAT ............................................. .................................................. ...... 11
Periodic maintenance ............................................... .................................................. 13
MAINTENANCE AND SERVICE ............................................... ...................... Error! Bookmark not defined.MAINTENANCE AND SERVICE ............................................... ...................... Error! Bookmark not defined.
Maintenance ................................................. ................................... Error! Bookmark not defined.Maintenance ................................................. ................................... Error! Bookmark not defined.
Service ................................................. ............................................. Error! Bookmark not defined.Service ................................................. ............................................. Error! Bookmark not defined.
Storage ................................................. ............................. Error! Bookmark not defined.Storage ................................................. ............................. Error! Bookmark not defined.
REMOVAL OF USED ............................................... .................................................. ....... 13
COMPANY INFORMATION ................................................ .................................................. ............................ 14
SCHEME ................................................ DEVICE .................................................. ....................... 15
DECLARATION OF CONFORMITY ................................................ .................................................. .................... 16

3
SYMBOLS WARNING / INFORMATION
APPLICATION EQUIPMENT
Outboard engine POWERMAT is intended for consumer use in boats and pontoons designed for up to four people. It
is not intended for professional work, lucrative.
Any other use than described in this manual is the improper use of the device. For resulting from misuse or changes
in the design of equipment damage or injuries responsibility of the user / operator and not the manufacturer. As part
of the continuous improvement of its products the company reserves the possibility of small differences in these
instructions on what you need to pay attention.
The device can be repaired and maintained only by an authorized service.
ATTENTION: Before using the device please read the instruction manual and safety ATTENTION: Before using the device please read the instruction manual and safety
instructions. Keep these instructions.
ATTENTION: Keep hands and feet away from rotating parts. ATTENTION: Keep hands and feet away from rotating parts.
Class II insulation

4
TECHNICAL DATA
Model PM-SSZ-600
engine type 4-stroke, one cylinder
Number of cylinders 1
Capacity 196 cm 3 196 cm 3
maximum speed 7000rpm
Idle 3000rpm
maximum power 4,9kW / 6,5
Fuel gasoline 95
Fuel tank 1 l
oil tank 0.6 l
postponement 2.08
racing Forward / neutral
Max. transom height 42cm
Weight 20kg
SECURITY
Before starting work carefully to become familiar with the manual internal combustion outboard hereafter referred to
as outboard. Keep them for future reference. For damages resulting from non-compliance with this
instructions, the manufacturer can not be held
responsibility.
The greatest danger is prohibited to perform the following steps:
and) Use of the device by children and persons with reduced physical abilities and and) Use of the device by children and persons with reduced physical abilities and
mental.
b) The use of the device by a person not familiar with the instruction manual, as well as persons b) The use of the device by a person not familiar with the instruction manual, as well as persons
lacking knowledge on the use of vehicles and water move through the water reservoirs.
c) Using a damaged engine. c) Using a damaged engine.
GENERAL THOUGHTS
and) Before first starting the engine, carefully read this manual to and) Before first starting the engine, carefully read this manual to
familiarize yourself with all its features and functions, safety requirements, and how to operate and maintain.
b) Before each voyage should be carried out so-called. daily overviewb) Before each voyage should be carried out so-called. daily overview
c) Never run the engine in closed rooms. The exhaust gases contain poisonousc) Never run the engine in closed rooms. The exhaust gases contain poisonous
carbon monoxide that could lead to loss of consciousness and even death.
d) Never operate a boat while under the influence of alcohol or drugs. d) Never operate a boat while under the influence of alcohol or drugs.
e) Test your boat on small and medium speed until you learn it thoroughly e) Test your boat on small and medium speed until you learn it thoroughly
operate and does not understand her behavior in different situations. Never swim with maximum speeds, if
you do not know exactly the behavior of the boat on the water.

5
f) Make sure that all passengers on board are wearing life jackets. f) Make sure that all passengers on board are wearing life jackets.
g) When loading a boat, make sure that the weight is evenly distributed. g) When loading a boat, make sure that the weight is evenly distributed.
h) Follow the terms of executing the inspection h) Follow the terms of executing the inspection
and) Do not make any alterations or modifications to the engine or its components. This may threatenand) Do not make any alterations or modifications to the engine or its components. This may threaten
engine damage and result in an accident.
j) Know and follow the shipping regulations in force on the waters, after which j) Know and follow the shipping regulations in force on the waters, after which
you are going to swim.
k) Make sure that you have adequate safety equipment and signaling, as life k) Make sure that you have adequate safety equipment and signaling, as life
Life jackets for each passenger, light flares, fire extinguisher, anchor, paddle, bilge pump, rope, first aid kit,
tool kit, starter rope emergency supply of fuel, oil and so on.
l) Instruct all passengers on the rules of conduct in case of emergency. l) Instruct all passengers on the rules of conduct in case of emergency.
Make sure that you know the rules of use of the boat, they can
m) use safety equipment and know how to act in case of m) use safety equipment and know how to act in case of
problems.
n) When climbing or descending from the boat, do not stand on the hood or other n) When climbing or descending from the boat, do not stand on the hood or other
its parts.
about) Before departure to check the weather forecast. about) Before departure to check the weather forecast.
p) Take particular care when changing any part of the engine or the selection and installation p) Take particular care when changing any part of the engine or the selection and installation
additional equipment. Use of counterfeit or poor quality parts may cause damage to the engine and lead to
danger. The use of non-original parts will result in the immediate loss of warranty.

6
PREPARATION
and) To open the packaging and remove the device. and) To open the packaging and remove the device.
b) Remove the protective film and the transport protection (if any). b) Remove the protective film and the transport protection (if any).
c) Check whether the package parts are removed and keys. c) Check whether the package parts are removed and keys.
d) Check the device and the equipment was not damaged during transport. d) Check the device and the equipment was not damaged during transport.
e) Keep the packaging. e) Keep the packaging.
ATTENTION! The device and packaging are not toys! Keep away from children, danger of choking or suffocation.ATTENTION! The device and packaging are not toys! Keep away from children, danger of choking or suffocation.
INSTALLATION AND OPERATION
engine assembly
Mounting the motor with the drive takes place by means of four screws (point 34 on the print). Then, the throttle cable
to be installed along with the throttle on the handle.
Refueling
Attention! The use of leaded gasoline can cause engine damage. Use only unleaded gasoline 95.
Refueling fuel engine when the engine is on the boat can lead to pollution of water body or water can damage the
skin. Therefore, refueling on the boat is categorically prohibited.
To avoid the trip after refueling, make sure that the engine is bolted to the transom well.

7
Starting a cold engine
ATTENTION! The default engine is not flooded with oil. Before commissioning pour motor oil. Then you
should regularly check the oil level.
and) Loosen the bleed screw on the fuel tank by turning it 2-3 full turns. and) Loosen the bleed screw on the fuel tank by turning it 2-3 full turns.
b) Switch / move (depending on model) switch (6) on the handle to the "I" position. b) Switch / move (depending on model) switch (6) on the handle to the "I" position.
c) Gently push the primer pump several times (7 - 10 times) until fuel comes into the primer and c) Gently push the primer pump several times (7 - 10 times) until fuel comes into the primer and
will be in the carburetor.
d) Move the lever (12) to close the choke ( upper position).d) Move the lever (12) to close the choke ( upper position).d) Move the lever (12) to close the choke ( upper position).
e) Pull on the starter handle (13) until the initial engine start-up. e) Pull on the starter handle (13) until the initial engine start-up.
f) Move the lever (12) to open the choke ( in the lower position) - ( excessive f) Move the lever (12) to open the choke ( in the lower position) - ( excessive f) Move the lever (12) to open the choke ( in the lower position) - ( excessive f) Move the lever (12) to open the choke ( in the lower position) - ( excessive
keeping the engine with closed suction factorial cause flooding or hinder its proper launching).
g) Pull the starter handle to start the engine proper ( "Engine enters g) Pull the starter handle to start the engine proper ( "Engine enters g) Pull the starter handle to start the engine proper ( "Engine enters
RPM ").
h) Allow the engine to warm up for a few minutes before you start work. h) Allow the engine to warm up for a few minutes before you start work.
Starting warm engine
•If you did not return the fuel from the carburetor to the fuel tank and the engine is still warm, pull starter
handle (13) one to three times, the engine should start.
Lacked FUEL / REBOOT:
•If you run out of fuel and the addition of its engine will not start / cooled engine, start the steps from 3 to
7 STARTING A COLD Sinik.7 STARTING A COLD Sinik.
TURNING OFF Sinik:
•Slide the switch in the handle to "O".
Check before departure
Before embarking on any journey carrying the motor control of the state.
and) Make sure that you have enough fuel for the planned expedition. and) Make sure that you have enough fuel for the planned expedition.
b) Check all bolts and nuts for tightness. b) Check all bolts and nuts for tightness.
c) Check if you have enough life jackets. c) Check if you have enough life jackets.
flushing the engine
After each use of the motor in sea water or polluted water, or if the engine is stored over a long period of time should
be washed with clean water. Failure to do so will result in the salt which entered the engine will produce corrosion
shortening the life of the unit.
In addition, you need to pay attention to the condition of the engine cooling fins. In the case of soil, dirt or mud is
impaired heat transfer through the engine is necessary to clean contaminants from the ribs.

8
Cleaning the fuel tank
Remove the cover of the fuel filter, empty fuel tank, the fuel filter pull out and remove the water, mud and other debris
by rinsing tank chemicals.
Fuel tank cleaning should be done once every six months.
Maintenance of the fuel filter
Download the spark plug, fuel tank Delay. Pull out the fuel filter and clean it (if necessary, replace with a new one).
Fuel filter maintenance should be performed every 20 hours of operation.
In the event of flooding the engine
A motor that has flooding must be immediately subjected to detailed inspected in the workshop, to prevent corrosion.
In the event of flooding, the engine should immediately do the following:
1. Remove the engine cover and rinse with clean water. 1. Remove the engine cover and rinse with clean water.
2. Disconnect the spark plugs and remove the plugs. 2. Disconnect the spark plugs and remove the plugs.
3. Disconnect the fuel lines, empty and clean the fuel tank and fuel lines. 3. Disconnect the fuel lines, empty and clean the fuel tank and fuel lines.
4. Put the engine in the horizontal position (holes spark plug down), slowly spinning wheel 4. Put the engine in the horizontal position (holes spark plug down), slowly spinning wheel
the flywheel to get rid of water from the system (about 20 rpm)
5. Empty the carburetor: the engine to vertical position, remove the carburetor and clean it. 5. Empty the carburetor: the engine to vertical position, remove the carburetor and clean it.
6. Clean the starter, all the electrical connectors and electrical components, if necessary 6. Clean the starter, all the electrical connectors and electrical components, if necessary
rinse with clean, fresh water. Then, using compressed air to blow the remaining water and dry thoroughly
before assembly.
7. Verify that the sand and dirt from entering the engine (sand under the cover 7. Verify that the sand and dirt from entering the engine (sand under the cover
engine, disturbing sound while turning the flywheel. In this case, it is forbidden to start the engine. It
should then spin the engine and get rid of all impurities.
8. After drying of the engine and its components must be made whole. Put the engine in the sweet8. After drying of the engine and its components must be made whole. Put the engine in the sweet
water and let it run idle for 30min.
9. If the engine does not start, re-download spark plugs and check if the water is not present on the
electrodes. If water is present to blow her candles and reinstall with cables, if there is a need to replace
them with new ones.
In case of problems, please contact an authorized service center.
Checking spark plug
At the spark plug may appear greasy black coat. This can cause a problem with the firing of the engine and correct or
even prevent the starting of the engine.
The spark plug should be checked every 20 hours of operation or at least once a month. If the plug is dirty, clean it or
replace it with a new one.
If the motor rotates but does not start, check that the candle gives a spark.
You can check the spark plug special tester or by the following method.
• Make sure that you are in a well-ventilated area, free of fuel vapors.
•Remove the spark plug from the engine and connect it to a pipe plug.

9
• Rest it on any metal part of the engine to the ground, but away from the fuel tank.
•Rotate the engine.
Observing the spark plug electrodes can be seen if there is a spark between them once every full rotation of the
crankshaft. Spark will be difficult to see in the sunlight, but it occurs accompanied by a characteristic sound like the
sound of the breaking of the accompanying match or very thin, dry stick.
If the spark appears:
• jack plug is dry - check fuel lines, filters and ignition wires.
• Wires are dirty - clean or replace the ignition wires.
• Jack plug is wet - the engine is flooded.
No spark:
• Loose or wet wiring - check the cables and their connections for leaks, should be clean and
dry.
• Efficient cabling - worn spark plug, replace the spark plug.
If there are further problems starting the engine contact an authorized service center.
To ensure proper engine operation, the spark gap between the electrodes must be correctly set and the candle itself
can not be covered with Nagare.
If the engine has been running, the muffler will be very hot, be careful not to touch the hot muffler.
Never use a spark plug of incorrect heat capacity.
and) Loosen by means of the screw, and then remove the upper cover of the engine. and) Loosen by means of the screw, and then remove the upper cover of the engine.
b) Remove the spark plug and using a suitable spark plug wrench, remove the candle b) Remove the spark plug and using a suitable spark plug wrench, remove the candle
plug.
c) Visually check the condition of the spark plug. If you see a worn or the insulator isc) Visually check the condition of the spark plug. If you see a worn or the insulator is
cracked or broken off, throw the candle. Clean the candle with a wire brush if it is suitable for reuse.
d) Feeler gauge, measure the distance between the electrodes. If adjustment is necessary, veryd) Feeler gauge, measure the distance between the electrodes. If adjustment is necessary, very
gently dognij side electrode. The gap should be measured: 0.60 - 0.70 mm.

10
e) Check that the spark plug washer is in good condition and replace the candle by hand to prevent e) Check that the spark plug washer is in good condition and replace the candle by hand to prevent
turning the thread.
f) After the initial manual screwing the spark plug wrench to tighten the spark to carefully push f) After the initial manual screwing the spark plug wrench to tighten the spark to carefully push
washer .If installing new spark plug, tighten after screwing it manually key 1/2 turn to compress the washer.
If you are installing a candle used, tighten it with a wrench 1/8 to 1/4 turn. If the spark plug is tightened too If you are installing a candle used, tighten it with a wrench 1/8 to 1/4 turn. If the spark plug is tightened too
lightly, it may overheat and damage the engine.
g) Replace the spark plug. g) Replace the spark plug.
ATTENTION! Removing the hot candle head made of light alloy, and the cold screwing the candle in a hot head may ATTENTION! Removing the hot candle head made of light alloy, and the cold screwing the candle in a hot head may
cause damage to the threads of the sockets candles. In addition, cold candles in a hot head screwed tight and often
do not give up when heated to remove. Ideally, the temperature was close to the candle head temperature in which
they will be screwed.
Replacing the oil in the gearbox screw
Oil in the gearbox should be replaced after a maximum of 100 hours.
and) Empty oil reservoir by unscrewing the oil drain plug and a level plug. and) Empty oil reservoir by unscrewing the oil drain plug and a level plug.
b) After pouring the engine oil must be filled with new gear oil, should be added until the b) After pouring the engine oil must be filled with new gear oil, should be added until the
sailing the oil stopper.
c) Replace the plug and the level plug and tighten them. c) Replace the plug and the level plug and tighten them.
Propeller
The propeller may be exposed to mechanical damage from impact against the bottom or objects in the water during
operation of the engine. Not even the big engine damage can affect the culture of work and boat speed. The screw is
fitted with a special pin which is designed in such a way alb burst in case of impact against a hard object. Replacing
the pin is very simple.

11
Even minor damage to the screws can cause a decrease in speed.
In case the propeller is bent, chipped or cracked, replace it with a new one recommended by the manufacturer.
Every three months, you should download and lubricate the screw shaft.
Storage
Before the start of storage, you should empty the fuel tank and thoroughly clean the engine. Keep the engine in a dry
clean room.
INSTALLATION AND USE THE BOAT
To mount the motor on boat used screw terminals. Before each departure, check the condition of the motor assembly
(eliminate any backlash). In addition, the engine must be protected by a rope or a chain, in case of failure of fixing. In
most engines mounting bracket is usually bolted to the transom. This is a more secure method but requires more
frequent and more accurate validation mount.
angle trim
After mounting the engine prow of a ship may sink or float. Correct trim angle depends on the boat, outboard motor
size, load and sea conditions. Pay attention to each time to adjust the angle trim for the conditions. In this type of
outboard angle trim is adjusted manually by means of locking the rod at appropriate positions.
Remove the two screws (item 37), adjust the angle of the motor, then tighten the screws.

12
Install the bracket 27 as shown in the figure. Prior to assembly, loosen the screw 37, the bracket 27 and the bolt 38
together with the mount shaft 41. Then mount 4 of the gasket 42 as illustrated, and the screws 37. Ensure that the
whole assembly no backlash.
Install properly submitted to the stern of the boat engine, and well become twisted.

13
Periodic maintenance
It should be guided by the table below for maintenance outboard and extend its life. In the case of intensive use and,
if necessary, these activities should be done more frequently.
One month 3 months 6 months 1 year
Rinse engine
pure water X
Fuel filter Check and clean Fuel filter Check and clean X
Candle Spark
check the condition, clean or
replace if is
needed
X
Screw driving
check the condition, download and
lubricate the shaft
X
The cylinder head check the The cylinder head check the
condition of clean if
necessary
X
Replacing the engine oil X
Tank fuel
Clean with chemicals X
Gear Clean and replace oil Gear Clean and replace oil X
pump impeller replace and pump impeller replace and
lubricate the rotor shaft X
REMOVAL OF USED
End of life do not dispose of this product by normal household waste, but take it to a
collection point and recycling of electrical and electronic equipment. This is indicated by the
symbol on the product,
user manual or packaging. Thanks
re-use, or use of materials other forms
of old appliances, you make an important contribution to protecting our environment.

14
COMPANY DETAILS
PH Powermat TMK Bijak Sp. General Partnership Ul.
Defenders of the Gdansk Post 97 42-400 Zawiercie

15
SCHEME DEVICE
Lp. part Name Lp. part Name number
1 propeller 1
Two mounting screw 1
3 screw with a plain washer 2
4 oil seal 1
5 a gear housing 1

16
6 bearing 1
7 output axis 1
8 pin axis 1
9 a large gear 1
10 bearing 10 bearing 1
11 flange bearings 11 flange bearings 1
12 low gear 12 low gear 1
13 gear housing 13 gear housing 1
14 a screw with a flat pad 14 a screw with a flat pad 2
15 screw 15 screw 1
16 screw 16 screw 1
17 bearing 17 bearing 1
18 oil seal 18 oil seal 1
19 oil seal 19 oil seal 2
20 drive shaft 20 drive shaft 1
21 drum cover 21 drum cover 1
22 stop angle 22 stop angle 1
23 screw 23 screw 3
24 cover 24 cover 1
25 stop ring 25 stop ring 1
26 frame 26 frame 1
27 bracket 27 bracket 2
28 supporting frame 28 supporting frame 1
29 cover 29 cover 2
thirty switch thirty switch 1
32 the handle assembly 32 the handle assembly 1
33 screw 33 screw 2
34 gear 34 gear 1
35 screw 35 screw 4
36 set screws 36 set screws 2
37 screw 37 screw 2
38 screw 38 screw 1
39 nut 39 nut 1
40 pin axis 40 pin axis 2
41 roller 41 roller 1
42 gasket 42 gasket 4
43 nut 43 nut 1
44 clamping handle 44 clamping handle 1
45 set screw 45 set screw 1
46 gasket 46 gasket 1
DECLARATION OF CONFORMITY
Table of contents
Other Powermat Outboard Motor manuals