Powertrain DVR1080MC User manual
Part No: DVR1080MC
WITH REVERSING MIRROR
Instruction Manual
Thank you for purchasing Powertrain Portable DVR.
In order to help you operate the unit correctly, please
read this instruction carefully before using.

Appearance Description
1. DVR Display
11. AV output jack
2. Function Lights
12. Micro SD Card Slot (card not included)
3. Charge Indicator
13. HDMI output jack
4. Menu key
14. Power button / Mode button
5. Up Key
15. Reset hole
6. Down key
16. Shot
7. Enter/ok
17. MIC port
8. Button pull twist
18. Mounting bracket
9. USB jack
19. Speaker
10. GPS antenna jack (Antenna not included DVRGPSANT)
Note: The POWER button / MODE button is a compound key, short press the POWER button for 1 second to turn unit on, long press for 3
seconds to shut down. Short press POWER button for MODE switching function.

Charging Options
1. Connect device to car charger through USB port, the device will power on automatically, enter standby
mode and start charging with green indicator light on.
Once the device is fully charged, the green indicator light will go out.
2. Connect device to PC via USB cable, device will power on automatically. Turn device off to begin
charging, the status light will turn green. Once the device has been fully charged the green indicator light
will turn off.
Power capacity
For the power capacity of the battery, refer to the following icons:
Full Middle Low
Installation and Removal of SD Card
1. Insert the SD Card in the direction indicated on back of device until it is held firmly in device.
2. To remove SD Card lightly press the SD Card and the card will eject out.
[Note]
1. Observe the direction to insert the SD Card. If inserted incorrectly the device and the SD Card may be
damaged.
2. When the SD Card is inserted into the device, the machine will set the SD card as a pre-set storage unit
and any data on the original SD card will be erased.
3. If device reports the SD card is incompatible with the device please eject and try again. If still
incompatible then please buy compatible card.
4. Max 32GB Supported. Must be high speed memory card such as class 10 or higher, slower SD cards may
not be compatible.

Operating Instructions
Power On/Off Device
1. Press the POWER key for 1 second to switch on and hold for 3 seconds to switch off the device manually.
2. While device is connected to the car, the device will turn on automatically when engine is started. When
car engine shuts off or car charger been disconnected, the device automatically switches off after 10
seconds (unless feature is turned off).
System Settings
In video or image mode press the MENU key and then the UP/DOWN key once followed by OK to enter the
“System Setup”. Navigate through options using UP/DOWN key and press OK to select. Press
POWER/MODE button (top of unit) to change selection.
•G-Sensor: On/Off.
•File Type: Emergency video, circular video and image.
•Sounds: Video with/without sound, buzzer on/off and sound adjustment.
•Power Save: Off / 1min / 3min / 5min.
•Flash: On/Off.
•Date & Time: Date and time adjustment.
•Language: Choose the desired language from various languages.
•Light Freq: On/Off.
•TV Out: NTSC/PAL (Should be set to PAL)
•Format: Format the SD card.
•System: Restore factory settings, system info and SD card info.
•Delay shutdown: On/Off. A 10 second delay before shutdown.
Video settings
After powering on the device the default mode is video mode. When in video mode the video mode icon
will be displayed in the upper-left corner of screen. Press the OK key to start video recording. Please
note a SD card must be inserted prior to use (not included).
During recording, the red icon flashes on the top left of the screen.
The GPS icon will show white when no GPS signal is present & green when a GPS signal is present.
If no GPS signal is present, check to ensure GPS antenna is connected.
Press the OK key to stop recording.

Set Video Menu
In video or image mode press the MENU key then OK to enter the “Video menu”. Navigate through options
using UP/DOWN key and press OK to select. Press POWER/MODE button (top of unit) to change selection.
- Movie size: FHD (1080P) / HD (720P)
- Seamless: Off / 1min / 3min / 5min.
- Date stamp: On / Off.
- Motion detection: On/Off.
Take Photo and Set Photo Menu
1. Take Photos
Press the POWER/MODE key to power on unit, device defaults to video mode. Press the POWER/MODE
key again to enter photo mode, once in photo mode the photo mode icon will be displayed on the
upper left corner of the screen. Press OK key to take photos, photos will be saved onto memory card
automatically.
2. Set Photo Menu
During photo mode press MENU then OK to enter photo menu settings.
•Resolution: 12M/10M/8M/5M/2M
•Exposure: EV -2.0, EV -1.0, EV +0.0, EV +1.0, EV +2.0
Tip:
1. In any of the modes press the MODE button to switch between modes.
Playback Mode
1. Browse files
After the device powers on and enters video mode press the mode key twice to enter playback mode,
press the UP/DOWN key to browse the video files or photo files and press OK to start playback.
During playback press the UP/DOWN key to fast forward or skip backwards.
2. Delete files
In playback mode choose the file to be deleted and press the MENU key to show the Delete/Protect menu.
Press OK then choose from either single or all using UP/DOWN keys.
[Note] The important video files that have been locked by G-sensor or Emergency key can’t be deleted
unless they are unprotected first.
3. Protect/Unprotect
In playback mode choose the file to be protected or unprotected and press the MENU key to show the
Delete/Protect menu. Press DOWN/UP key followed by OK then choose from either ‘single’, ‘protect all’ or
‘unprotect all’ using UP/DOWN keys. Press OK followed by UP/DOWN key and OK once more to execute.
Computer Playback (For use with optional GPS antenna)
DVR unit can also be used to record and report location. Optional GPS Antenna (not included) is required
to do this, part number DVRGPSANT
Visit the below link to download and install application CarDVR player_SIRI_2.1.7.rar. If file can’t be opened
Winrar or similar will also need to be installed.
http://www.shendian.co.nz/downloads.html
Please note some versions of anti-virus software may pick application up as a virus due to the way
application links to Google maps. If this happens you will need to change permissions in your anti-virus
software to allow application to be downloaded and run.
Once software has been installed:
1. Connect the device to the computer using the supplied USB cable, DVR will power on and display 2 options:
MSDC / PC-CAM. Highlight MSDC using the UP/DOWN keys and press OK key.
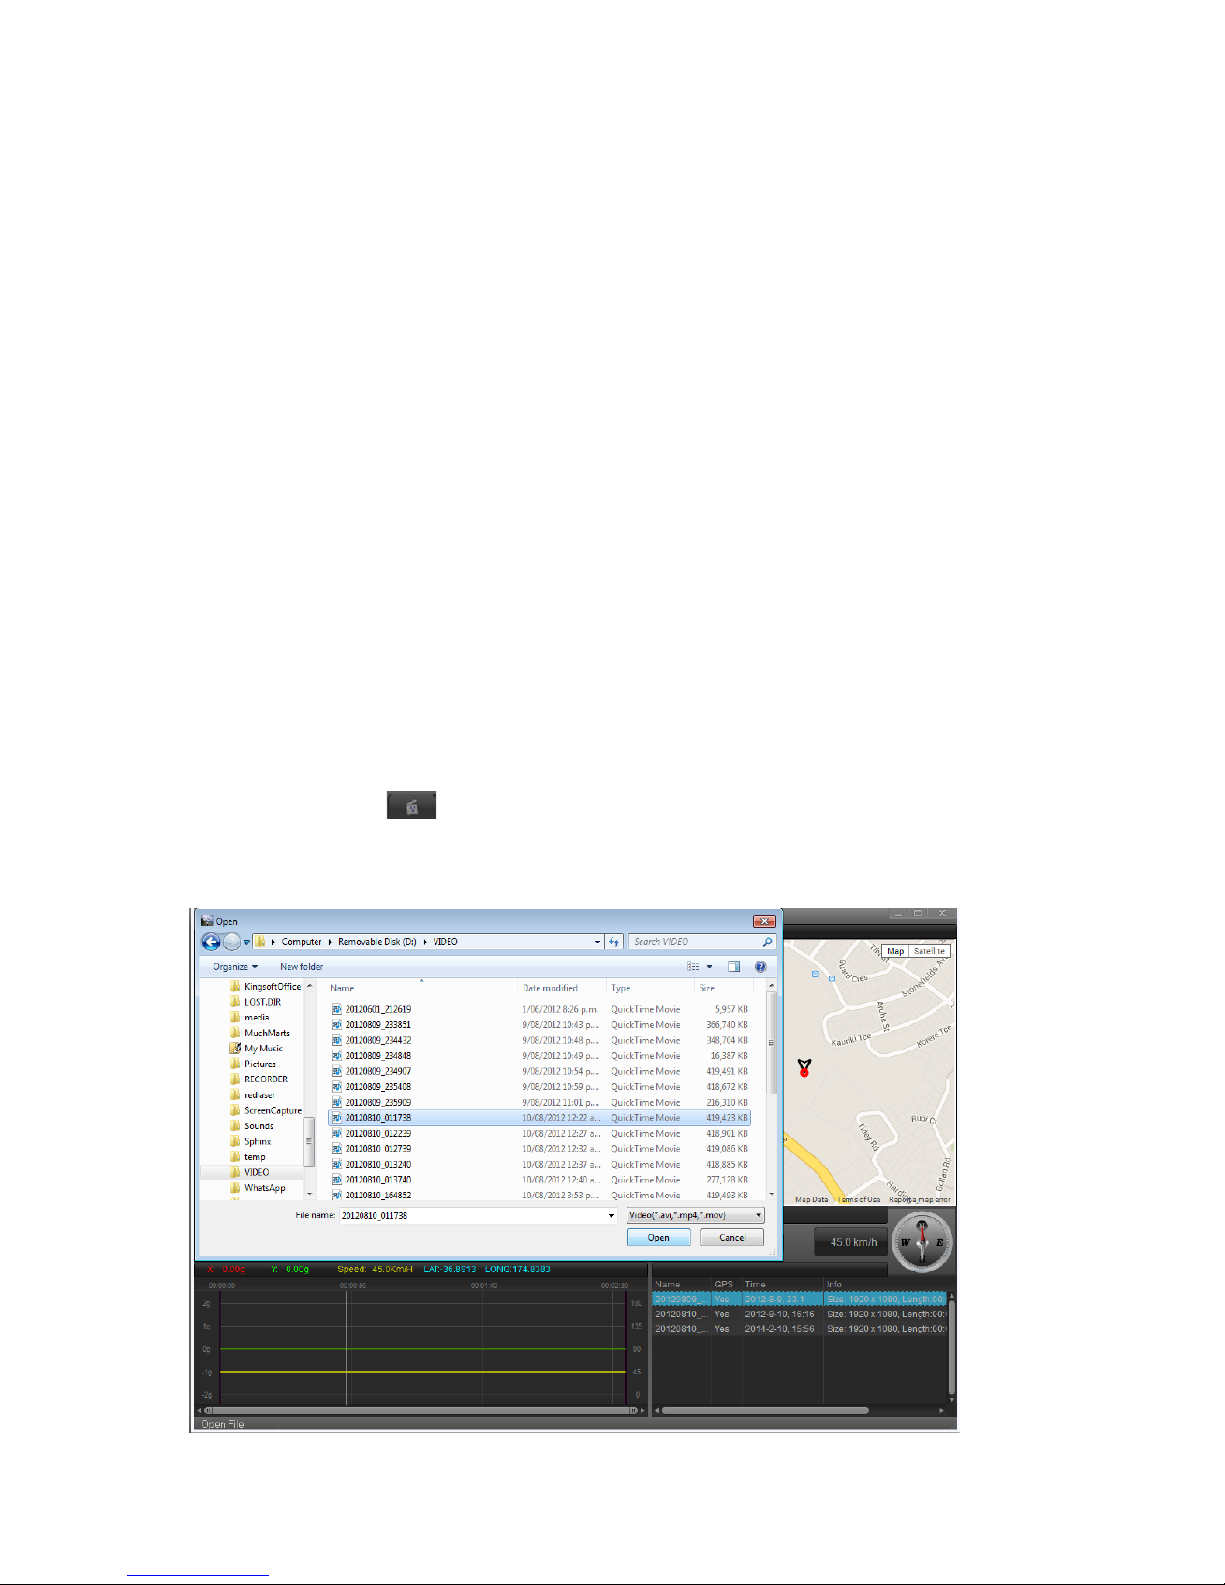
2. Open CarDVR player
3. Click on folder button
4. Locate file to import into play list and double click on it to import. Video files will be located in
‘Removable Disk (Drive Letter:)/VIDEO’ as shown below. File will appear in play list at bottom right of screen,
please note multiple files can be added to play list.

5. Double click on the file to be played. Video will play in left window, location and drive speed as at the end of
recorded segment will be displayed in right hand window as below.
HDMI / TV Function Operation
Can be connected to TV using a HDMI cable for playback of high-quality video
Connecting to a Computer
If CarDVR player software can not be used on your computer, video can be viewed using other installed
players. Location will not be shown on the map however drive speed and GPS co-ordinates will be shown in
video (if optional GPS antenna is used).
Connect the device to the computer using the supplied USB cable, DVR will power on and display 2 options:
MSDC / PC-CAM. Highlight MSDC using the UP/DOWN keys and press OK key.
Open ’My Computer’ and double click on the removable disk icon. Video will be stored in ‘VIDEO’ folder,
photos will be stored in ‘JPG’ folder. You can now copy the files from device onto computer or select for
playback.
Using as a PC Camera
Connect the device to the computer using the supplied USB cable, DVR will power on and display 2 options:
MSDC / PC-CAM. Highlight the PC-CAM by using UP/DOWN keys and press OK key. You are now able to use
the devise as a web cam.
Trouble Shooting Guide

Fault
Remedy
Anti virus software detects software as a
virus
Enable permissions in anti virus software. See anti
virus software help menu on how to do this.
Device reports error when SD card is
inserted
Check spec of card. Must be a high speed SD card
class 10 or higher is recommended. 32G or less.
Software will not download/install
Play files using alternative video player
GPS not reporting location or speed
Check to ensure GPS antenna is plugged into
recorder (Optional, not included)
Move unit so antenna has a clear view of satellites
Turn unit off and back on again
Unit hangs or freezes during operation
Reset unit through RESET hole at bottom of the unit
Poor battery life
This is normal. Battery is to support G sensor
operation only
Technical Specifications
Screen Size
3.5 Inch LCD
Lens
A Grade high-resolution wide-angle lens
OSD Language
Eight languages
Video Resolution
Video 1080P/720P
Video Format
Decoding H.264 MOV format
Photo Resolution
12M/10M/8M/5M/2M
Photo Format
JPG
Memory Card
SD card 4G-32G/Class 4 and above. Class 10 or higher recommended.
Infrared Light Function
Supported
Bluetooth
Not Supported
GPS Function
Optional (GPS Antenna required DVRGPSANT)
TV Output
NTSC / PAL
Power Interface
5V 1.5A
Battery
3.7V / 600mAh Lithium Battery
Operation System Requirements
Windows 2000/XP/Vista/Win 7/Win 8,MAC OSX 10.3.6 or above
Table of contents


