PowerTrainer PT-333 User manual

TREADMILL PT-333
OWNER’S MANUAL
Powertrainer
20155 Ellipse
Foothill Ranch, CA 92610
Tel: (886) 325-2339 Revision Date: 10/20/2004

2
TABLE OF CONTENT
Content Overview Page
PRODUCT OVERVIEW ......................................................2
IMPORTANT SAFETY INSTRUCTIONS...........................3-4
PRE-ASSEMBLY CHECK LIST..........................................5
ASSEMBLY INSTRUCTIONS ............................................6-9
OPERATION OF POWERTRAINER PT-333......................10-13
PROGRAM PROFILE..........................................................14-15
EXPLODED VIEW PT-333..................................................16
PART LIST PT-333 ...............................................................17
SAFETY PRECAUTIONS & MAINTENANCE .................18
TROUBLESHOOTING........................................................20-21
WARRANTY ........................................................................22

3
PRODUCTOVERVIEW

4
IMPORTANT SAFETY INSTRUCTIONS
When using an electrical appliance, basic precautions should be followed, including the following:
Please read, understand, and carefully follow all warnings, instruction, and procedures on the treadmill
and in the owners/users manual before using this treadmill.
– To reduce the risk of electric shock:
Always unplug this appliance from the electrical outlet immediately after using and before cleaning.
– To reduce the risk of burns, fire, electric shock, or injury to persons:
1. Inspect the treadmill for incorrect, worn, or loose components and correct, replace, or tighten any
component prior to treadmill use.
2. An appliance should never be left unattended when plugged in. Unplug from outlet when not in
use, and before putting on or taking off parts.
3. Close supervision is necessary when this appliance is used by, on, or near children, invalids, or
disabled persons.
4. Use this appliance only for its intended use as described in this manual.Do not use any attachment
not recommended by the manufacturer.
5. Never operate this appliance if it has a damaged cord or plug, if it is not working properly, if it has
been dropped or damaged. Return the appliance to a service center for examination and repair.
6. Keep the cord away from heated surfaces.
7. Never drop or insert any object into any opening.
8. Do not use outdoors.
9. Do not operate where aerosol (spray) products are being used or where oxygen is being
administered.
10. To disconnect, turn all controls to the off position, then remove plug from outlet.
11. Connect this appliance to a properly grounded outlet only.
DANGER!
WARNING!
DANGER!
Indicates an imminently hazardous situation which if not avoided,willresult in death orserious injury.
WARNING
!
Indicates a potentially hazardous situation, which ifnot avoided,could result in death orserious injury.
CAUTION!
Indicates a potentially hazardous situation, which ifnot avoided,may result in minorormoderate injury.

5
IMPORTANT SAFETY INSTRUCTIONS (CONT’D)
12. This appliance is intended for household use only.
13. Please obtain a medical exam before beginning any exercise program, If at any time you feel faint,
dizzy or experience pain stop and consult your physician.
14. Always keep children away from exercise equipment.
15. Do not wear loose or dangling clothing while using your treadmill.
16. Care should be used when mounting or dismounting your treadmill.
17. Always disconnect all power to the treadmill before servicing or cleaning.
18. Read, understand, and test the emergency stop before using your treadmill
19. Do not operate your treadmill in damp or wet conditions.
20. Do not exceed the maximum user weight to maintain safe use of your treadmill.
SAVE THESE INSTRUCTIONS

6
IMPORTANT SAFETY INSTRUCTIONS (CONT’D)
GROUNDING INSTRUCTIONS
This product must be grounded. If it malfunctions or breaks down, grounding provides a path of least
resistance for electric current to reduce the risk of electric shock. This product is equipped with a cord
which has an equipment-grounding conductor and a grounding plug. The plug must be plugged into an
appropriate outlet that is properly installed and grounded in accordance with all local codes and
ordinances.
– Improper connection of the equipment-grounding conductor can result in a risk
of electric shock. Check with a qualified electrician or serviceman if you are in doubt as to whether the
product is product is properly grounded. Do not modify the plug provided with the product - if it does
not fit the outlet, have a proper outlet installed by a qualified electrician.
This product is for use on a nominal 120-volt circuit and has a grounding plug that looks like the plug
illustrated in the figure. Make sure that the product is connected to an outlet having the same
configuration as the plug. No adapter should be used with this product.
Grounding methods
GROUNDING
PIN
GROUNDED
OUTLET
DANGER!

7
MOTORIZED TREADMILL PRE-ASSEMBLY CHECK LIST
ITEM Description Qty ITEM Description Qty
A Frame 1 K Water Holder 1
B Handrail(L) 1 a Screws M8xP1.25x15 8
C Handrail(R) 1 b Screws M5xP0.8x10 4
D Computer Console 1 c Screws K-299 4
E Upright(L) 1 d
Screws ∅5x25 2
F Upright(R) 1 e 5mm Wrench 1
G Cover(L) 1 f 6mm Wrench 1
H Cover(R) 1 g Safety Key/Clip 1
I Handrail Upper Cover(L) 1 h Power Cord 1
J Handrail Upper Cover(R) 1 i Silicon Oil 1

8
ASSEMBLY INSTRUCTION
Please read, understand, and follow all of the safety precautions along with the assembly instructions for
safe and easy assembly of your treadmill.
A minimum of two people are required
to assemble this treadmill. Also, read
and understand all instructions
thoroughly before assembling the
treadmill.
Failure to do so could result in injury.
1. First, pull the control cord bottom from the
right upright insert (F) and connect it with
the cord connector from the right upright
frame base. Secure the left and right upright
inserts onto the upright frame bases with 8
(a) bolts.
2. Insert the Bracket (L) between the uprights
(E) and (F) and secure with 4 screws (k).
CAUTION!

9
ASSEMBLY INSTRUCTION (CONT’D)
3. Press the left and right covers (G and H) into
position and secure them with 4 (b) bolts as
shown.
4. Insert left and right handrails (B and C) onto
computer console (D) as shown in arrows,
make sure that holes are line up with each other.

10
ASSEMBLY INSTRUCTION (CONT’D)
5. Raise the assembled computer console,
connect the control wire (upper) with the
control wire (bottom). Then place the console
on the upper portions of the uprights as
shown.
Note:Confirm that no cables are
pinched while raising the unit.
Then, tighten the console and the
uprights with 4 of K-299 screws (c).
6. Then, press left screw cover and right screw
cover (I and J) into place and secure them
with 2 (d) screws.
7. Finally Screw in the bottle holder into the
consoledisplay
Assembly is now completed

11
ASSEMBLY INSTRUCTION (CONT’D)
7. If the running belt tracks off center to
the right or left deck
a. Turn the power off
b. Use a 6mm wrench to tighten the
rear roller bolt on the side of the
treadmill toward which the belt is
moving as shown.
c. Tighten about 1/4 of turn
(clockwise).
Note: If the belt does not move
back to the center of the treadmill,
make another adjustment to the
samebolt.
Once the running belt has been
adjusted closer to the center, the
treadmill can be powered on again.
8. This treadmill is foldable for easy
storage.
Note:Disconnect all power before
folding.
Folding:
a. Lift the deck by holding the end
caps.
b. Make sure the retaining shaft is
locked by the unfolding pedal.
Unfolding:
a. Hold the end caps with both
hands.
b. Step on the unfolding pedal.
Lower the deck down gently with
your hands until the deck is on the
floor.
To move the treadmill, the treadmill
should be at the folded upright position.
Hold the end caps tightly and push the
deck down slowly until the casters can be
moved.
Rear Roller Bolt
6 mm wrench
End Cap
Unfolding Pedal
Retaining Shaft
For example, if the belt moves to the left and the deck becomes
exposed on the right, tighten the bolt on the left side of the frame.
Casters

12
I. General Operation
1. Plug 3-prong power cord to the wall outlet and turn on the power. There is a circuit breaker
button next to the on/off switch to reset the treadmill.
Glossary:
Pulse – It is measured in terms of BPM Speed – Rate of motion
Incline – Gradient measured in terms of % Distance – Workout range within a time frame
Time – Workout duration
Calories – Calories burned during workout
Speed Keys – Preset programs available for
immediate access to certain speed levels
Incline Pulse
Calories
6 Quick-Set
Programs
Speed
Distance
Speed Keys
Time
OPERATION OF POWERTRAINER PT-333
13
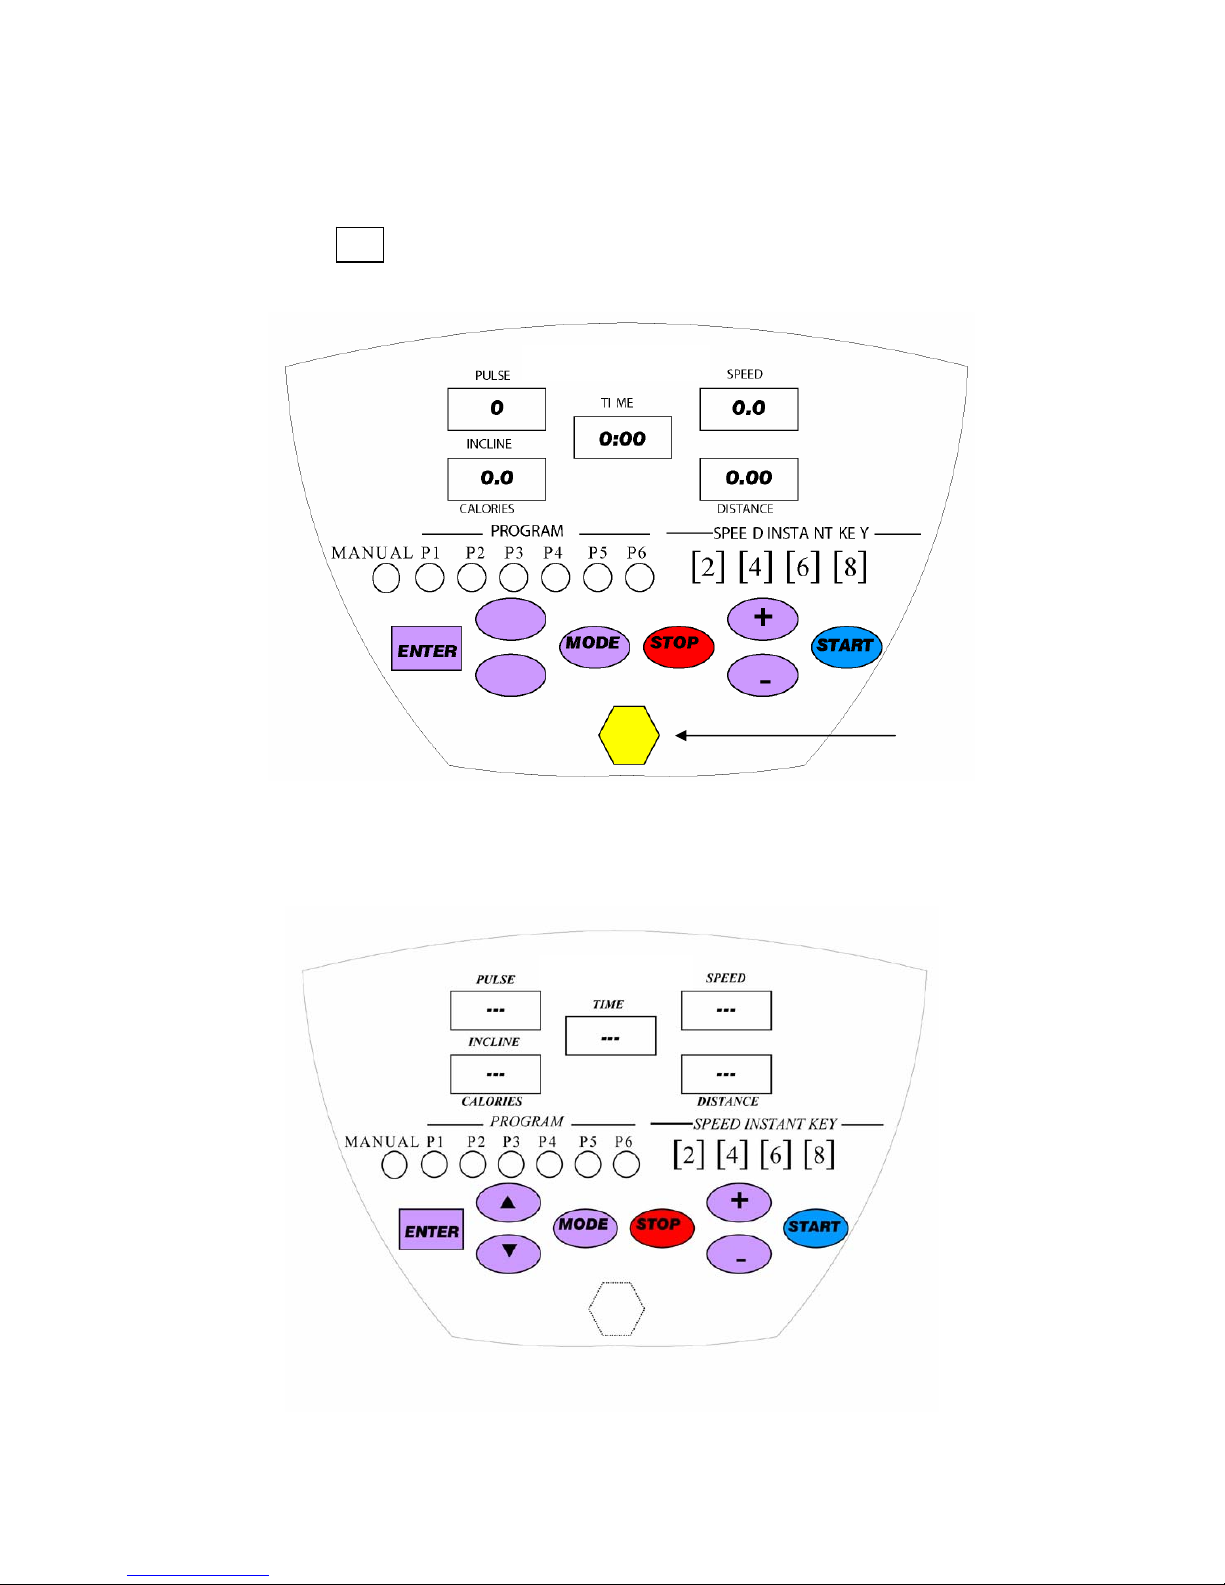
2. Put the safety key into the recess of the console. A warning noise will sound and all displays
will indicate 0 . This means the treadmill is in ready mode.
S
T
If the safety key is not in the recess area, you will see --- on all display windows.
Safety Key
in Recess
14
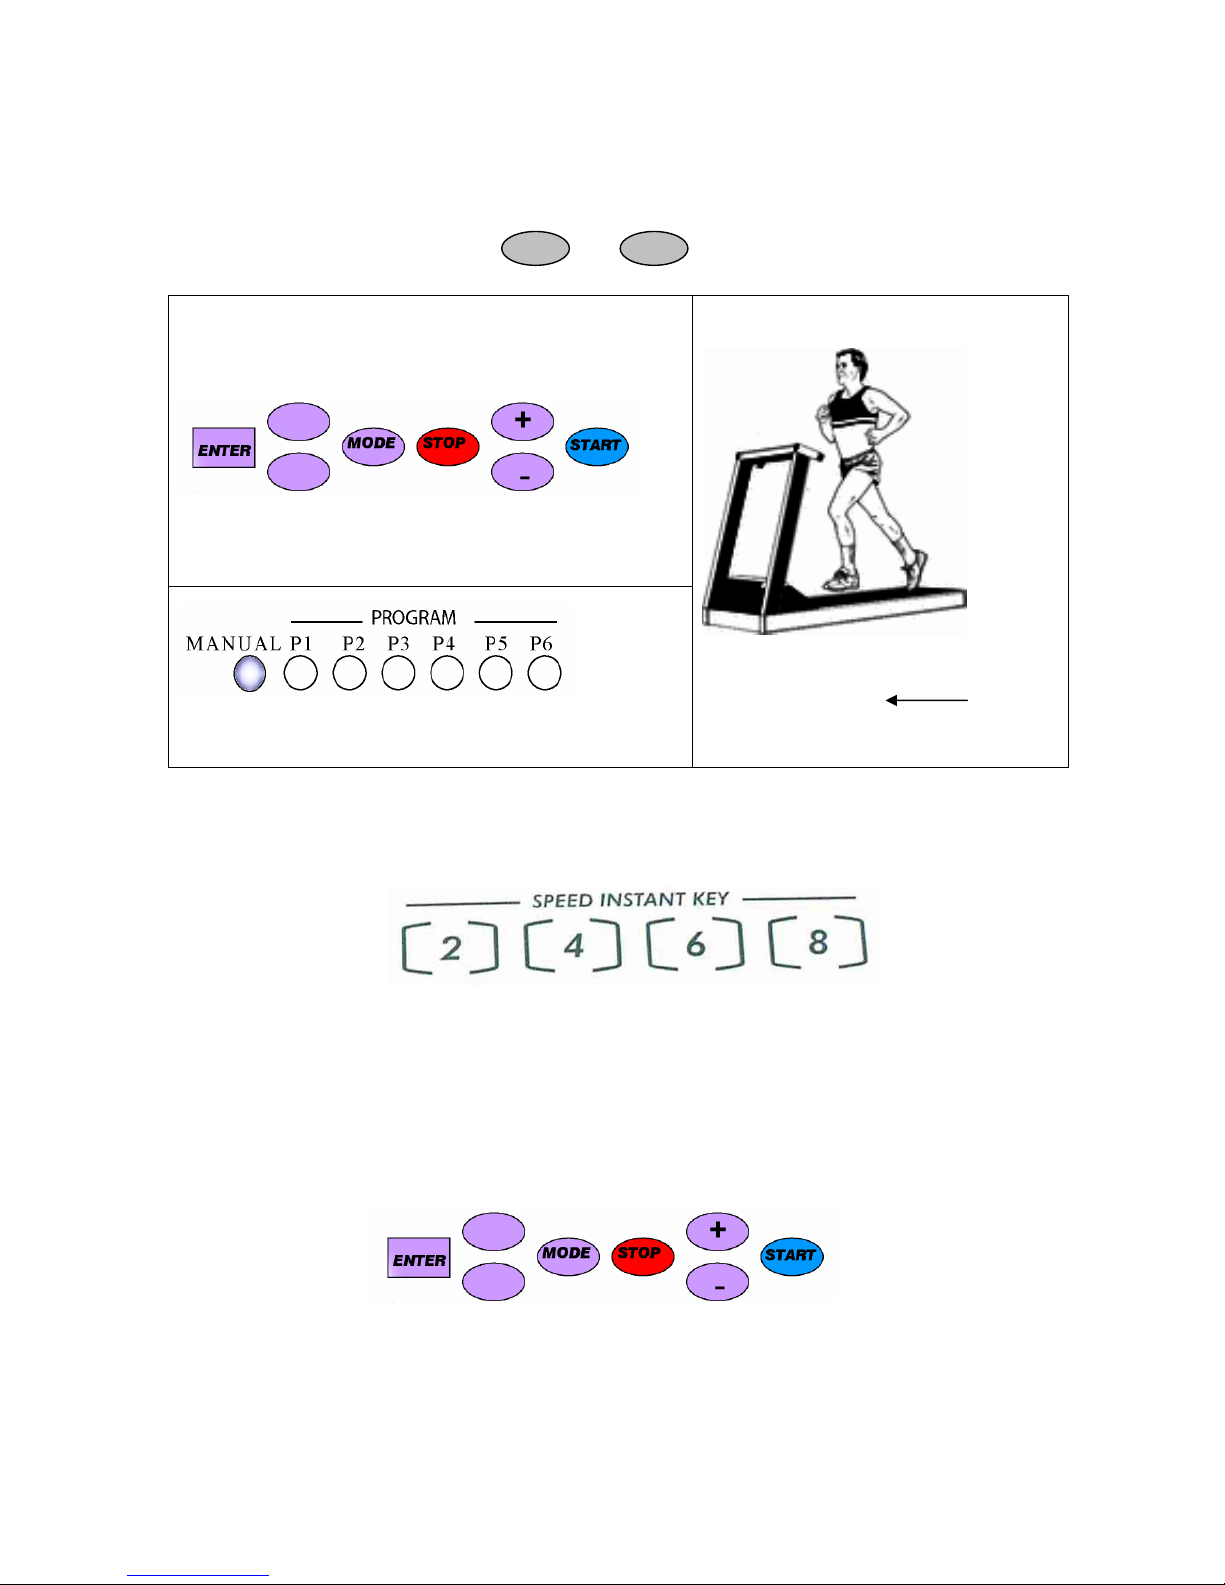
3. Press “START” to begin. “MANUAL” LED will light up, and the treadmill will start to move at
the speed of 1.0 mph. In manual mode, you can press “+” to accelerate, “-“ to decelerate, or
“STOP” to stop. You can press Sor Tto control the elevation.
MANUAL indication lit up
4. You can use the “speed instant keys” to activate your desired speed program immediately. They
are pre-programmed in intervals of 2, 4, 6 and 8 mph.
Press STOP once to end the current operation, wait 60 seconds and the treadmill will return to ready
mode.
Press and hold STOP button for 3 seconds and the treadmill will RESET at any time.
1.0 mph
Press START to Begin
)
)
Press for Elevation
Press for speed
*
)
)
Press STOP once to end current operation
Press and hold STOP for 3 seconds to reset the treadmill

15
Function of MODE key - In Ready Mode, you can press MODE to enter Program Setup to
manually change both the Incline and Heart Rate value. The MANUAL LED will flash and you
can press “+” or “-“, Sor Tto select the desired programs P1 – P6. Then press
“ENTER” to confirm the selection and “START” to activate the selected program.
II. P1~P6 Program Setup Mode
After entering the program you choose, the CALORIES window will display L1-L3 level for
selection. You can then choose which level (L1-L3) you prefer by pressing S, T,
or “+”, “-“. Confirm by pressing ENTER.
After selecting the level (L1-L3,) TIME indication will flash, and display “25:00.”. Press S,
T, “+” or “–“ to set up the time, and press ENTER to confirm. TIME indication will stop
flashing after confirmation. The setup range of TIME is from 5 ~ 99 minutes.
NOTE: The above condition does not apply to P1 9 HOLE program as that program is executed
based on distance only.
If START is pressed in Program Setup Mode (P1-P6), the treadmill will set to defaults, and begin the
program immediately. All the defaults will adopt the preset parameters automatically.
)
Press for program selection
*
*
When pressing “+/-“ or /, LED light will flash
according to programs P1-P6 being selected, press
“ENTER” to confirm and “START” to activate the
desired program
Press MODE for Program Set

16
PROGRAM PROFILES
The following is a dot-matrix level scale display showing INCLINE and SPEED windows of PowerTrane
PT-422. Each pre-set program P1-P6 has 3 levels of workout choices as shown in the following profiles.
P1 9 HOLE: This program simulates the motion of golfers
walking in a golf course and the resistance level is based on
uphill and downhill movement. The entire program is
approximately 3828 yards or 2 miles and will stop
automatically once the distance is reached.
P1 9 HOLE
Elevation Speed Elevation Speed
P2 CARDIO

17
PROGRAM PROFILES (CONT’D)
NOTE: The user can manually adjust any of the preset-programs (P1-P6) at any time during
the workout by pressing “+” to accelerate, “-” to decelerate or “STOP” to stop. Press S
or Tto control the elevation. Once the change is made to the program (P1-P6), it will
stay at that level until the user makes another change.
Elevation Speed
P3 RUNNING Elevation Speed
P4 FAT BURN
Elevation Speed
P5 INTERVALS Elevation Speed
P6 HILL INTERVALS

18
EXPLODED VIEW P
T
-333

19
PART LIST PT-333

20
SAFETY PRECAUTIONS & MAINTENANCE
Keep all items away and avoid contact with the
cylinder as it may cause damage. If it is hit, the
cylinder will not function smoothly and will
not easily lower down when unfolding.
Preventive Maintenance:
WARNING! Always unplug the treadmill
from the electrical outlet before cleaning,
lubricating, or servicing the unit.
It is recommended that the deck be
lubricated every 6~12 months according
to the frequency of usage.
1.0~3.6 Mile lubricate every 1 year
3.6~7.2 Mile lubricate every 6 months
7.2~10.0 Mile lubricate every 3 months
1. Use wrench to loosen the bolts in
the end caps as shown. Remove
excessive accumulations of dust, dirt,
and other substances from running deck.
Use a clean soft cloth and non-abrasive
cleaner.
Warning! Do not use cleaner under the
running belt.
2. Pull up running belt, dispense lubricant
on deck, and spread evenly.
3. After lubricating deck, center the belt,
and tighten the end caps. Check belt
tension, adjust if necessary as in step 5
in assembly instruction section.
Cylinder
Table of contents


