PR Lighting PR-6617 User manual

2
PRODUCTSPECIFICATIONS
TANGO1800 FRAMING
PR6510-1100FS656

3
INDEX
1.
SAFETYANDWARNINGS……………………………………………………………………………………
4
2.
INSTRUCTIONS………………………………………………………………………………………………
5
3.
INSTALLATION………………………………………………………………………………………………
6
4.
SETUPANDCONFIGURATION………………………………………………………………………………
10
5.
OPERATIONMENU……………………………………………………………………………………………
11
6.
DMXPROTOCOL………………………………………………………………………………………………
15
7.
ERROR MESSAGES…………………………………………………………………………………………
22
8.
TECHNICALDATA……………………………………………………………………………………………
23
9.
COMPONENTORDERCODES………………………………………………………………………………
25
The followingitemsaresuppliedwith aprojector andpleasecheck:
Name
Quantity
Unit
Remark
User manual
1
Pc
Safetycord
1
Pc
Please note that as part of our ongoing commitment to continuous product development, specifications are subject
to change without notice. Whilst every care is taken in the preparation of the manual we reserve the right to change
specifications in the course of product improvement. The publishers cannot be held responsible for the accuracy of
the information herein, or any consequence arising from them.
Every unit is tested completely and packed properly by the manufacturer. Please make sure the packing and / or the
unit are in good condition before installation and use. Should there be any damage caused by transportation,
consult your dealer and do not use the unit. Any damage caused by improper use will not be assumed by the
manufacturer and / or dealer.
Note: For the products made by Guangzhou PR lighting Ltd, the warranty for the whole product is one year starting from the
delivery datebutthelightsource isnot withinthewarranty.

4
1.SAFETYANDWARNINGS
NOTE
Before a projector’s installation, power-on, operation and maintenance, please carefully read
thesafetyinformationhereinafter!
Thefollowingsafetysignsareused intheusermanual.
Warning
User
Manual
Electrical
shock
Goggles
Protective
Gloves
Flames
High
Temperature
●When unpacking , check if there is any damage caused by transportationbefore usinga projector. Should there
be anydamage, consult yourdealer anddonotuse it.
●The manufacture is not responsible for any loss caused by a user not following the manual or changing a
projector ashe/shelikes.
●Please be noted that anydamage causedby changingthe projector at will isnotwarranted.
●Do nothesitateto contactthedealer or the manufacturer ifanyquestionsor advice.
●AprojectorratedforIP65orhighercanbe usedindoorsandoutdoors.
●For a projectorwithlower IPclass ,itis forbiddentocontactwithwater oranyotherliquidsdirectlyorindirectly.
●A projector should be kept away from high temperature, fire, electrical surge, vibration and strong light while
beingoperated.
●A projector is only intended for installation, operation and maintenance by a qualified person. And the
operationmuststrictly followtheproceduresinthe manual.
●A projector is not for a user to make any replacements and the user shouldn't open a projector for repair and
maintenance.
●Don’t look straightly into the light sources especially for epileptics, otherwise eyes willbeburned..
●Do notconnectthisdevicetoanytypeofdimmerpack.
●If the lamp, lens and screen protective cover of the a projector have obvious damage, i.e., to the extent that it
hurts the performance like cracking or deformation, please stop using it and replace them with the original parts,
otherwise itsperformance willbecompromised.
●Forthe locationofaprojector, it shouldn’t be seen in the distance of less than 4 meters.
●Before operation, please confirm that all covers(housing) are on and screws tightened. It’s forbidden to use a
projector whileitscovers(housing)areoff.
●Keep thelamp cleanand do nottouchit withbare hands.
●While operatingit,wearprotective items like goggleand gloves.
●Anyelectrical connectionmustbe carriedoutbyaqualifiedperson.
●Beforeinstallation,pleaseconfirmthe voltagesupplied matcheswhatisrequired foraprojector.
●Eachprojector mustbeproperlyearthedand installed asper relatedelectrical standards.
●Do notuse power cord withits insulator damaged andconnectthepower cordwithother cables.
●If a projector is not used or under cleaning,, please hold its plug and unplug it. Do not unplug it forcefully or by
pullingthepower cable.
●Allpowercords mustconformtorelatedsafetyand regulations.
●While being operated, if a projector is not waterproof and dust-proof, it should not be under rains or in humidity
toavoidbeing short.
●Do not switch on and off a projector constantly in very short intervals, otherwise its light source’s and other
electrical parts’ life will be shortened .

5
●There are safety cord holes at the bottomof the base of a projector. In view of safety, please run the safety cord
supplied throughthe safetycordholes for safetysupport.
●Beforeanyinstallation, maintenance and cleaning work,pleaseensureaprojectorisdisconnected from power
mains.
●While being in stable working state under normal ambient temperature, the temperature of the surface of the
metallic housingofaprojectorincludingheatsinkwillreach75℃.
●While itslamp is stricken for the first time, there will be smoke and strange smell. It’s normal and does not mean
aprojector has some defects.
●While aprojectorrunning,donot touchthe metallic housingtoavoid being burned.
●Do notmounta projectordirectlyoninflammable surface.
●Do notprojectthebeamstraightly oncombustible items andthe minimumdistancebetweenit
and illuminated itemsis10m.
●Aprojector should be installed with good ventilation and the minimum distance between it and walls is 50cm.
At thesame time,please ensurethe fans andair inlets andoutletsare workable.
●Do not let the front lens expose to sunlight or other strong light sources at any angle, otherwise the focused
beaminside canresultin firepotentially.
2.INSTRUCTIONS
●CLEANINGANDMAINTENANCE
If a projector can’t start. Please check if the fuse is blown up. If it does, replace it with a new fuse with same ratings. And it has
over-temperatureprotectivedevice.Ifthe temperature is toohigh,theprotectivedevicewillbetriggeredtoshutit off.Whenithappens,
please checkifthe fansrunnormallyorfan shield isblockedbydust.Afterthe issueissolved, restartit.
The accumulationof oil, smoke and dust on the lens willcompromise the light output. Cleaning a projector is very necessary to ensure
a reliableuse ofit. Cooling fans needto be cleaned every15days. Internal lens, reflector and hot mirror need to be cleanedperiodically
tooptimize lightoutput.
Cleaning frequencyis to bedecided by operationsand its environment. Use soft cloth and normaldetergent forglass for cleaning work.
It’s advised external optical system be cleaned every 20days and internal optical systems every 30/60days. Keep lens clean and do not
touch opticalparts withbare hands.
●Before any maintenance and cleaning, please ensure aproject isoff thepower.
●Only a qualified personis allowed todomaintenance.
●During maintenance and before maintenance,a projector mustbeoffpower.
●To avoid sunlight or other light penetrating into the head via the front lens, resulting in high temperature internally
causingdamagesto a projector.Before power-off,please useTiltchanneltomovethe headand makeitfacingdownward.
● Do not usealcohol or other organicsolvent to cleanthe housingtoavoid damage.
● Do not useany solvent withchemicalelementsto clean color filtersor hot mirror.
SPECIALNOTE
Whilewater-proofprojectorsare inuse, it’s normaltherewill be some minormistonthefrontlens.

6
●LUBRICATION
To ensure smooth movement of gobos and zoom and focus lens, it’s advised rotators’ bearings and 2 sliding bars for zoom and focus
lensbelubricatedevery2months. Highqualityand hightemperaturelubricant/greaseisadvised..
●TROUBLESHOOTING
PROBLEM
ACTION
Aprojectorcan’t be switched on
Check if the fuse is burned
Check ifthe powercord isconnected well
Check if the switching power supply is bad or not connected well. A
professional technicianisrequired for therepair
Check if the control board is connected well. .Aprofessional technician
isrequired for therepair
Aprojector canbeswitched on,butthe LED
lamp’s brightness can’t be controlled
Check if the LED driver board is connected well. A professional
technicianisrequiredfor the repair
Aprojector canbeswitchedonnormally,but not
controlledbythe DMXcontroller
Makesurethatits startaddress isright
Replaceorrepair the XLRsignalcable.
The beamis notbright and itsbrightness
decreasessharply
Makesurethefansareworkingwellor fansandtheirshieldsarenotblocked
bydust.
Makesurethattheinternalopticsareclean.
Aprojectimageappearsto have ahalo
Carefullycleanthe LEDlamp, opticallensesand othercomponents.
HeavilyDefectiveBeam
Check if lensare in goodcondition(notcracked)
Cleandustorgreaseonthelens.
3. INSTALLATION
●PLACEDONAFLATSURFACE
While placing a projector on a flat surface, tighten the head after loosening its screw and adjusting its angle till desired. For the version
with wirelesscontrol,whileitisonaflat surfaceitsantennashould face upward.
NOTE
It’s advised to use hexagon screws coupled with anti-slipping
washerstoensurefirminstallation.Whateverscrewsmaybeused,
theyshould notbeless than2pairs.

7
The size of the screws are to be decided bythe customer basedonthe sizeof mounting holes in the arms, the followingsizes in the table are
onlyforreference.
●POWERCONNECTION
Connectthe power cord as follows:
L(live)=brown
E(earth)=yellow/green
N(neutral)=blue
Before power connection, please ensure the power supplied must match what the nameplate says. It is recommended that each
projector be connected withpowerseparatelyso that theymay be individuallyswitchedonand off.
●The earth wire(yellow/green) mustbeconnected to theground. And electrical connection
mustbeinaccordancewiththestandardsconcerned.
●If any questions about the electrical installation, do not continue but consult a qualified
electrician.
●A projector uses naked wires. For wiring please use waterproof junction box with IP
classnotlowerthanIP66.
●THEWIRINGOFCONTROLSIGNAL
Thecolors ofsignalwiresresponds to their respective functions:
Bluecolor–A+
Whitecolor–B-
Black color–Shield wire
Theshielded2-core wirebetween aprojector and acontrolleror betweenprojectors shouldbenotless than 0.5mmin diameter and
the maximumnumberofprojectorsinaDMX chain should belessthan32 pieces.
Projector
Earth wire(yellow and green)
Neutral wire(blue)
Live wire(brown)
Signal + wire(red/blue)
Signal - wire(white)
Shield wire(black)
Mains cable
Signal cable
(Input)
Signal + wire
Signal - wire
Shield wire
Earth wire
Neutral wire
Live wire
Mains cable
Signal cable
NO
NAME
SIZE
QTY
REMARKS
1
Hexagonscrews
M12
8
Preparedbythe customer
2
Washer
Coupled with thescrews
8
Preparedby thecustomer

8
●DMXTERMINATOR
In the Controller mode, at the lastfixtureinthe chain, itsfemale DMXoutput has to be connected with aDMX terminator.
The DMX terminator is simply a Canon connector with a 120(ohm) resistor connected across pin A+ and pin B-, which prevents
electrical noise from disturbing and corrupting the DMX control signals. Before DMX terminator connection, please make proper
insulationand waterprooftreatment.
.The connectionsareillustratedbelow.
●GOBOFILTERREPLACEMENT
21
3
120
DMX TERMINATOR
CONNECTION
Connect a 120 (OHM) resistor
across pins 2 and 3 in an XLR plug
and insert into the DMX out socket
on the last unit in the chain.
PIN 3
PIN 2
固定图案盘
旋转图案盘
颜色盘
Fixedgobowheel
Rotatinggobowheel
Colorwheel

9
图案片安装 滤色片安装
11
2
2
Lockthe tiltand loosenthe 4 fast-fitscrews on the upper cover ,After removing thecover, youwill see the structuresas the figureabove.
To replace a gobo on the rotating gobo wheel: take the rotator from the wheel in the sequence of 1→2 , take the goboout fromthe rotator
by removing the tightening spring. Put the new gobo back to the rotator, then tighten it with the spring. Please ensure the spring is inthe
narrow location of the rotator, which is the internal ring of it and flatten it. At last, pull up the spring strip using proper tool and put the
rotatorbackto the wheel withtheassistancebyanother hand.Its installationisoftheoppositesequenceofremoval((2→1).
Installationofgobos
NOTE: Donottouchthe glassgobo withbarehand.Placecleanand softpaperorclothbetween handand glass gobos.
Tighten4 hexagon screws after the cover ison. Unlockthe tilt.
●FIXINGTHEFRAMINGMODULE
Remove the small cover after locking Tilt after adjusting the framing blades. Unplug the plug on the left after tightening the
screw against the module till it can’t move.Atlast,install thesmallcover.
If the framing blades need to be adjusted, plug the plug into its original place after loosening the tightening screw, then repeat
Step1.
DANGER!
BEFOREREPLACEMENTOFGOBOS/COLORFILTERS,APROJECTORMUSTBE OFFTHE POWER!
Plug
Tightening screw for
module rotation

10
4. SETUPANDCONFIGURATION
●FRONTPANELOPERATION
Aprojector’s configurationcanbesetconvenientlyviapush buttonand LCDdisplay.
Launch the projector and press button ENTER for more than 5 seconds to unlock the panel, the LCD will show the function menuof the
projector, each main menu has its submenusand eachsubmenu has a specific function. For details, please see the “OPERATION
MENU” section.
To set up or browse through its functions, press button UP or DOWN
Pressbutton ENTER to save your settings orenter thesubmenu.
Pressbutton UP or DOWN tochangevalues(plusor minus)
Pressbutton FUNC, it will returnto the uppermenu.Ifbutton FUNC notpressed,the defaultwillshow display statusautomatically.
●DMXSTARTADDRESS
Each unit must be givena DMX start address so that the correct projector responds to the correct controlsignals. This DMX startaddress is
the channel number from which the projector starts to “listen” to the digital control information being sent out from the controller. The unit
has3 DMXmodes.Therearestandard mode,shortmodeand extendedmode.Forexample standard mode has31channels,so setthe No.1
projector’s address 001, No. 2 projector’s address 032, No. 3 projector’s address 063, No. 4 projector’s address094,andsoon.
Launchtheprojector. Pressbutton ENTER morethan5secondsto unlockpanel.
Pressbutton ENTER todisplayDMX address;
Pressbutton UP and DOWN,youcansettheaddress;
Pressbutton ENTER to confirm; after poweredonnexttime,the default willbelast value saved
Pressbutton FUNC,it willreturnto theuppermenu
.
●STAND-ALONEMODE
Operate the projector without connecting with a controller, enable the master mode through the operation panel, the
projector will run in Stand-Alone mode automatically.
DMX address can be set at any number within 512.
●MASTER/SLAVEMODE
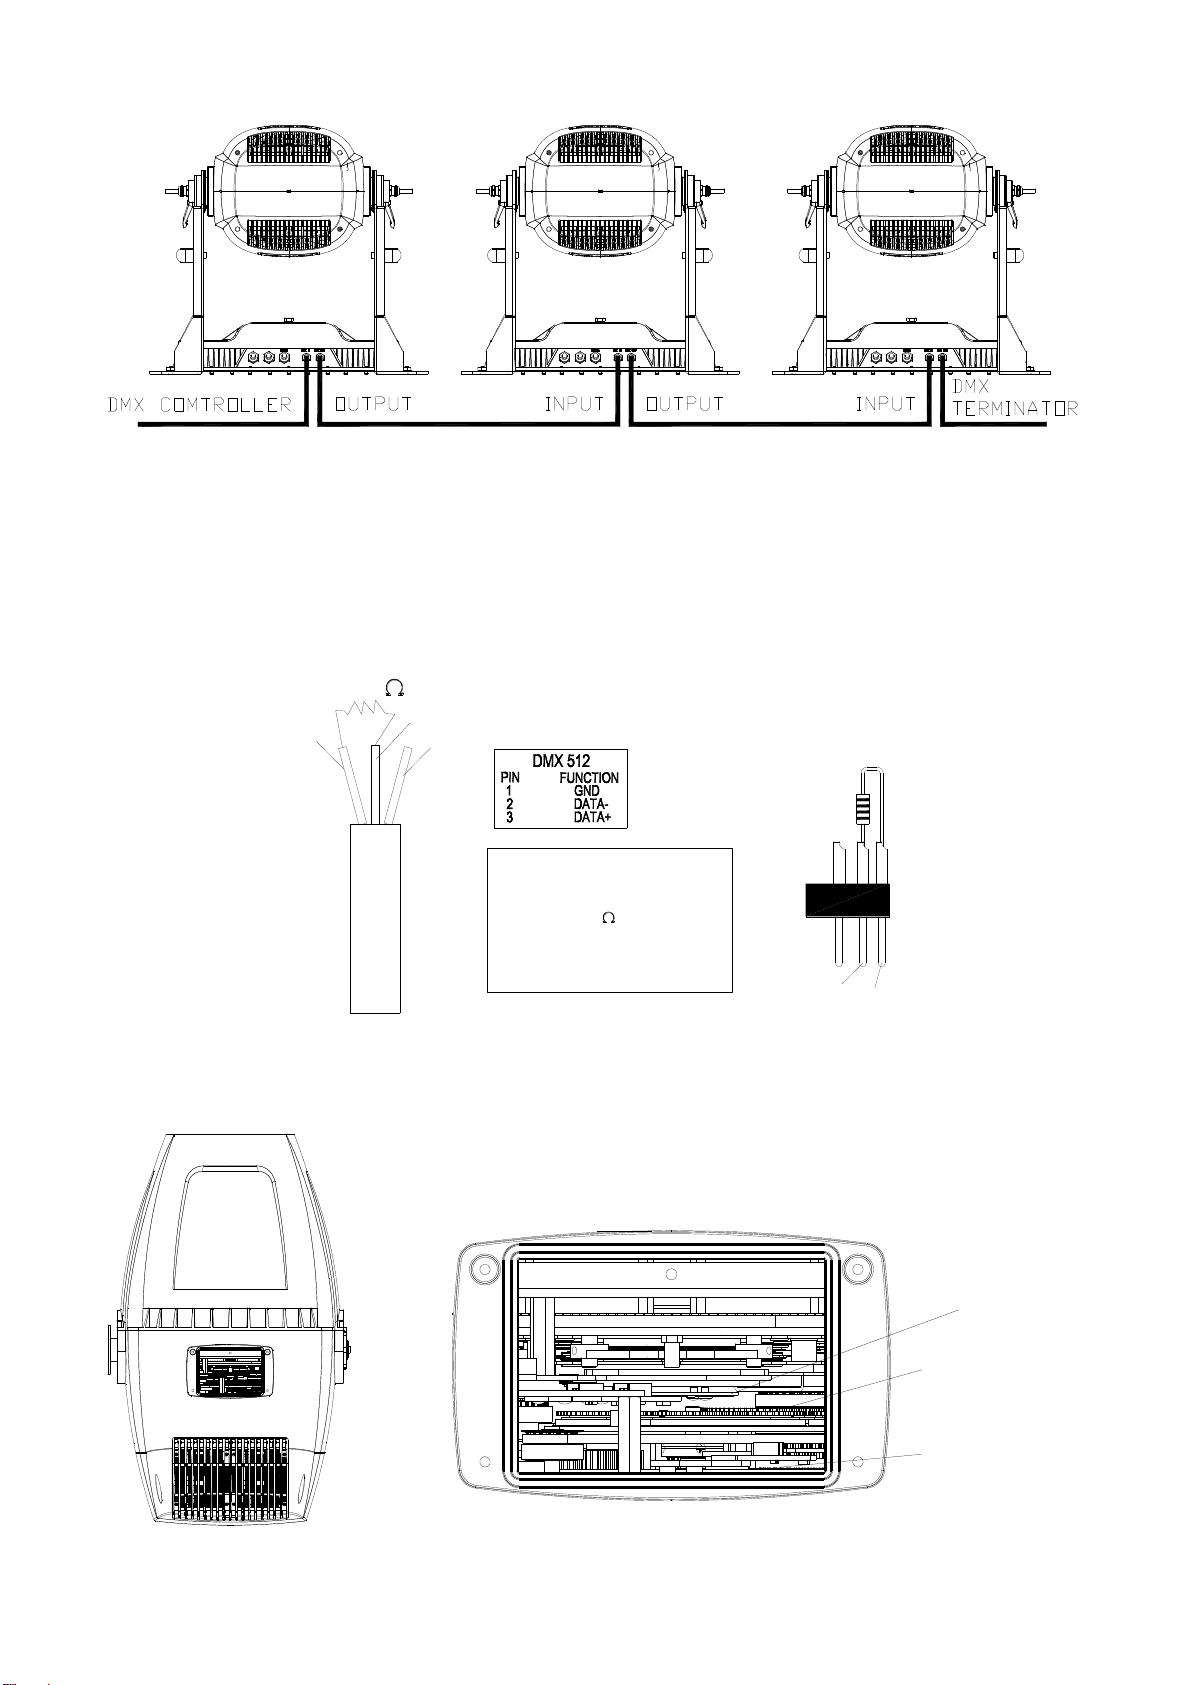
Many projectors can run synchronously in the Master/Slave mode by linking them with each other. First,
connect the first fixture’s DMX output to the second fixture’s DMX input using XLR-XLR control cable and then connect the second
fixture’s DMX output to the third fixture’s DMX input, and so on until all projector are connected in this way. Eventually connect the last
fixture’s DMX output to a DMX terminator. Set 1st projector as the master and others are Slaves. It’s advised thatthe
maximum quantity of projectors in a DMX chain is less than 32.
Start Addresses of all Slavesare 001; Operation mode of the Master can be set any mode for a Master’ and Slaves’ operation mode can be
set accordingly.
AfterPoweredon, the group willrun in Master/Slave Mode

11
5. OPERATIONMENU
1st LEVEL
2ndLEVEL
3rd LEVEL
4thLEVEL
5thLEVEL
Product model
DMXaddress
SignalMode
Channel mode
DMX setting
DMX Address
ShortMode:1-485
StandardMode:1-482
ExtendedMode:1-67
Reset
Total Reset
ReallyReset?
Confirm/Cancel
ColourSystemReset
ReallyReset?
Confirm/Cancel
Gobo Reset
ReallyReset?
Confirm/Cancel
Zo.Fo.Pr.Reset
ReallyReset?
Confirm/Cancel
OtherReset
ReallyReset?
Confirm/Cancel
ConfigSettings
DMX ChannelMode
ShortMode 28CH
StandardMode31CH
ExtendedMode46CH
ViewMode
001 Strobe
…
LossofDMX
Normaltimeout
Hold LastValue
DisplayConfig
DisplayMode
OffAfterDelay
OnAlways
DisplayInvert
InvertOFF
InvertON
LanguageSetting
English
Chinese
TemperatureUnit
CelsiusDegree
Fahrenheit Degree
FactoryDefaults
Restore Defaults?
Confirm/Cancel
InvertSet
ZoomInvert
OFF/ ON
CYM Invert
OFF/ ON
CTO Invert
OFF/ ON
DimmerSet
Gamma 2.0/2.2/2.4/2.6
MASTER SLAVE SLAVE

12
Gamma Curve
LED Ref.Rate
1200/2400/4800/10000/1200
0/15000/20000/25000Hz
DimmerSpeed
Fast/Medium/SlowSpeed
Fan Set
Standard/Theatre
BladeDetect
Detect Disable/DetectEnable
Information
ViewDMXValues
Channel Value
Strobe XXX
Dimmer XXX
DimmerFine XXX
CMYMacro XXX
Cyan XXX
CyanFine XXX
Yellow XXX
YellowFine XXX
Magenta XXX
MagentaFine XXX
CTO XXX
CTOFine XXX
ColorWheel XXX
ColorWheelFine XXX
Fixed GoboWheel XXX
Rot. Gobo Wheel XXX
Rot. GoboRotation XXX
Rot. Gobo RotationFine XXX
Blade1Left XXX
Blade1LeftFine XXX
Blade1Right XXX
Blade1RightFine XXX
Blade2Left XXX
Blade2LeftFine XXX
Blade2Right XXX
Blade2RightFine XXX
Blade3Left XXX
Blade3LeftFine XXX
Blade3Right XXX
Blade3RightFine XXX
Blade4Left XXX
Blade4LeftFine XXX
Blade4Right XXX
Blade4RightFine XXX
Framingmodulerotation XXX
Framing module rotation Fine
XXX
Prism XXX
PrismRotation XXX
EffectWheel XXX
Effect Wheel Rotation XXX
Frost XXX
Focus XXX
FocusFine XXX
Zoom XXX
ZoomFine XXX
Control function XXX.
Total Hours
XXXXH
Temperature
Display XXX
Driver 1XXX
Driver 2XXX
Driver3XXX
Driver4XXX
FanboardXXX
LED XXX
SoftwareVersion
Display
XXX
Driver 1
XXX

13
Driver 2
XXX
Driver 3
XXX
Driver 4
XXX
FanBoard
XXX
Electronic SN
Electronic SN=
************
RDM Device Label
RDM Device Label
ANSIE1.20RDM
Fan Status
Head Fan XXX×/√
Service
ManualEffect Control
Channel Value
Strobe XXX
Dimmer XXX
DimmerFine XXX
CMYMacro XXX
Cyan XXX
CyanFine XXX
Yellow XXX
YellowFine XXX
Magenta XXX
MagentaFine XXX
CTO XXX
CTOFine XXX
ColorWheel XXX
ColorWheelFine XXX
Fixed GoboWheel XXX
Rot. Gobo Wheel XXX
Rot. GoboRotation XXX
Rot. Gobo RotationFine XXX
Blade1Left XXX
Blade1LeftFine XXX
Blade1Right XXX
Blade1RightFine XXX
Blade2Left XXX
Blade2LeftFine XXX
Blade2Right XXX
Blade2RightFine XXX
Blade3Left XXX
Blade3LeftFine XXX
Blade3Right XXX
Blade3RightFine XXX
Blade4Left XXX
Blade4LeftFine XXX
Blade4Right XXX
Blade4RightFine XXX
Framingmodulerotation XXX
Framing module rotation Fine
XXX
Prism XXX
PrismRotation XXX
EffectWheel XXX
Effect Wheel Rotation XXX
Frost XXX
Focus XXX
FocusFine XXX
Zoom XXX
ZoomFine XXX
FactoryTest
Operation
Mode
DMX Mode
ChangeOperationMode?
Confirm/Cancel
MasterMode
Preset Memory
ChangeOperationMode?
Confirm/Cancel
UserMemory1
ChangeOperationMode?
UserMemory2
Change OperationMode?
Stand-AloneMode
Preset Memory
ChangeOperationMode?
UserMemory1
ChangeOperationMode?
UserMemory2
ChangeOperationMode?
StaticScene
ChangeOperationMode?

14
User
Memories
Edit UserMemory
Edit UserMemory 1
/EditUserMemory2
SceneXX
(1~16Scenes)
Channel Value
Strobe XXX
Dimmer XXX
DimmerFine XXX
CMYMacro XXX
Cyan XXX
CyanFine XXX
Yellow XXX
YellowFine XXX
Magenta XXX
MagentaFine XXX
CTO XXX
CTOFine XXX
ColorWheel XXX
ColorWheelFine XXX
Fixed Gobo Wheel XXX
Rot. Gobo Wheel XXX
Rot. GoboRotation XXX
Rot. GoboRotation Fine XXX
Blade1Left XXX
Blade1LeftFine XXX
Blade1Right XXX
Blade1RightFine XXX
Blade2Left XXX
Blade2LeftFine XXX
Blade2Right XXX
Blade2RightFine XXX
Blade3Left XXX
Blade3LeftFine XXX
Blade3Right XXX
Blade3RightFine XXX
Blade4Left XXX
Blade4LeftFine XXX
Blade4Right XXX
Blade4RightFine XXX
Framingmodulerotation XXX
Framing module rotation Fine
XXX
Prism XXX
PrismRotation XXX
EffectWheel XXX
Effect WheelRotation XXX
Frost XXX
Focus XXX
FocusFine XXX
Zoom XXX
ZoomFine XXX
FadeTime XXX
Holdtime XXX
DelayTime XXX
Delayunit (msec/s/m)
LinktoStep XXX
Edit Static Scene
Paste?
Enter
Channel Value
Strobe XXX
Dimmer XXX
Dimmer Fine XXX
CMYMacro XXX
Cyan XXX
CyanFine XXX
Yellow XXX
YellowFine XXX
Magenta XXX
MagentaFine XXX
CTO XXX
CTOFine XXX
ColorWheel XXX
ColorWheelFine XXX
Fixed Gobo Wheel XXX
Rot. Gobo Wheel XXX
Rot. GoboRotation XXX
Rot. Gobo RotationFine XXX

15
Blade1Left XXX
Blade1LeftFine XXX
Blade1Right XXX
Blade1RightFine XXX
Blade2Left XXX
Blade2LeftFine XXX
Blade2Right XXX
Blade2RightFine XXX
Blade3Left XXX
Blade3LeftFine XXX
Blade3Right XXX
Blade3RightFine XXX
Blade4Left XXX
Blade4LeftFine XXX
Blade4Right XXX
Blade4RightFine XXX
Framingmodulerotation XXX
Framing module rotation Fine
XXX
Prism XXX
PrismRotation XXX
EffectWheel XXX
Effect WheelRotation XXX
Frost XXX
Focus XXX
FocusFine XXX
Zoom XXX
ZoomFine XXX
Init User Memory
ResetUser Memory1
ResetUser Memory?
InputPassword123
ResetUser Memory2
ResetUser Memory?
InputPassword123
ResetStaticScene
ResetStaticScene?
InputPassword123
6. DMXPROTOCOL
Short mode
Standard
mode
Extended
mode
Description
Decimallow
DecimalHigh
1
1
1
Strobe
Close
0
Pulsestrobefromslowto fast
1
127
Strobefromslowtofast
128
225
2
2
2
Dimmer
Close
0
0
Lineardimmer(0-100%)
1
255
3
3
Dimmerin16bit
Dimmerin16bitadjustment
0
255
3
4
4
CYM macros
The followingfunctionswilldisableCMY,CTO,colorwheel
Nofunction
0
9
Colormacro1
10
11
Colormacro2
12
13
Colormacro3
14
15
Colormacro4
16
17
Colormacro5
18
19
Colormacro6
20
21
Colormacro7
22
23
Colormacro8
24
25

16
Colormacro9
26
27
Colormacro10
28
29
Colormacro11
30
31
Colormacro12
32
33
Colormacro13
34
35
Colormacro14
36
37
Colormacro15
38
39
Colormacro16
40
41
Colormacro17
42
43
Colormacro18
44
45
Colormacro19
46
47
Colormacro20
48
49
Colormacro21
50
51
Colormacro22
52
53
Colormacro23
54
55
Colormacro24
56
57
Colormacro25
58
59
Colormacro26
60
61
Colormacro27
62
63
Colormacro28
64
65
Colormacro29
66
67
Colormacro30
68
69
Colormacro31
70
71
Colormacro32
72
73
Colormacro33
74
75
Colormacro34
76
77
Colormacro35
78
79
Colormacro36
80
81
Colormacro37
82
83
Colormacro38
84
85
Colormacro39
86
87
Colormacro40
88
89
Colormacro41
90
91
Colormacro42
92
93
Colormacro43
94
95
Colormacro44
96
97
Colormacro45
98
99
Colormacro46
100
101
Colormacro47
102
103
Colormacro48
104
105
Colormacro49
106
107
Colormacro50
108
109
Colormacro51
110
111
Colormacro52
112
113

17
Colormacro53
114
115
Colormacro54
116
117
Colormacro55
118
119
Colormacro56
120
121
Colormacro57
122
123
Colormacro58
124
125
Colormacro59
126
127
Colormacro60
128
129
Colormacro61
130
131
Colormacro62
132
133
Colormacro63
134
135
Colormacro64
136
137
Colormacro65
138
139
Colormacro66
140
141
Colormacro67
142
143
Colormacro68
144
145
Colormacro69
146
147
Colormacro70
148
149
Colormacro71
150
151
Colormacro72
152
153
Colormacro73
154
155
Colormacro74
156
157
Colormacro75
158
159
Colormacro76
160
161
Colormacro77
162
163
Colormacro78
164
165
Colormacro79
166
167
Colormacro80
168
169
Colormacro81
170
171
Colormacro82
172
173
Colormacro83
174
175
Colormacro84
176
177
Colormacro85
178
179
Colormacro86
180
181
Colormacro87
182
183
Colormacro88
184
185
Colormacro89
186
187
Colormacro90
188
189
Colormacro91
190
191
Colormacro92
192
193
Colormacro93
194
195
Colormacro94
196
197
Colormacro95
198
199
CMYcolormixingfade fromslowtoast
200
255

18
4
5
5
Cyan
Cyan (Linear 0-100%)
0
255
6
Cyanin16bit
Cyan16bitadjustment
0
255
5
6
7
Yellow
Yellow (Linear0-100%)
0
255
8
Yellowin16bit
Yellow16bitadjustment
0
255
6
7
9
Magenta
Magenta (Linear 0-100%)
0
255
10
Magentain16bit
Magenta16bitadjustment
0
255
7
8
11
CTO
LinearCTOfromhightlow
0
255
12
CTOin16bit
CTO16bitadjustment
0
255
8
9
13
Colorwheel
Continuouspositioning
Indexing0-360°
0
63
Positioning
Open
64
67
Open /Color1
68
71
Color1
72
75
Color1/Color2
76
79
Color2
80
83
Color2/Color3
84
87
Color3
88
91
Color3/Color4
92
95
Color4
96
99
Color4/Color5
100
103
Color5
104
107
Color5Color6
108
111
Color6
112
115
Color6/Open
116
119
Open
120
127
Clockwiserainboweffectfromslowtofast
128
191
Anti-clockwiserainboweffect fromslowto fast
192
255
10
14
Colorwheelin16bit
Colorwheelcontinuouspositioning,16bitadjustment
0
255
9
11
15
Fixed gobo wheel
Open
0
16
Gobo1
17
31
Gobo2
32
47
Gobo3
48
63

19
Gobo4
64
79
Gobo5
80
95
Gobo6
96
111
Gobo7
112
127
Clockwiserainboweffectfromslowtofast
128
149
Anti-clockwiserainboweffectfromslowto fast
150
171
Gobo1shake fromslowto fast
172
183
Gobo2shakefromslowto fast
184
195
Gobo3shakefromslowto fast
196
207
Gobo4shake fromslowtofast
208
219
Gobo5shakefromslowto fast
220
231
Gobo6shakefromslowto fast
232
243
Gobo7shake fromslowto fast
244
255
10
12
16
Rotatinggobo wheel
Open
0
31
Gobo1
32
47
Gobo2
48
63
Gobo3
64
79
Gobo4
80
95
Gobo5
96
111
Gobo6
112
127
Clockwiserotationfromslowto fast
128
143
Anti-clockwiserotation fromslowtofast
144
159
Gobo1shakesfromslowtofast
160
175
Gobo2shakesfromslowtofast
176
191
Gobo3shakesfromslowtofast
192
207
Gobo4shakes fromslowtofast
208
223
Gobo5shakes fromslowtofast
224
239
Gobo6shakes fromslowtofast
240
255
11
13
17
Goborotation
Indexing 0-360°
0
128
Clockwiserotationfromslowto fast
129
188
Stop
189
195
Anti-clockwiserotation fromslowtofast
196
255
14
18
Goborotation in16bit
Goborotation16 bitadjustment
0
255
12
15
19
Framingblade1left
LinearFramingBlade1LeftChange0%-100%
0
255
20
FramingBlade1Leftchangein16bit
FramingBlade1Leftchangein16bitprecision
0
255
13
16
21
FramingBlade1right
LinearFramingBlade1 RightChange0%-100%
0
255
22
FramingBlade1rightchangein16bit

20
FramingBlade1rightchangein16bitprecision
0
255
14
17
23
FramingBlade 2Left
LinearFramingBlade2LeftChange0%-100%
0
255
24
FramingBlade2Leftchangein16bit
FramingBlade2Leftchangein16bitprecision
0
255
15
18
25
FramingBlade2Right
LinearFramingBlade2RightChange0%-100%
0
255
26
FramingBlade2rightchangein16bit
FramingBlade2rightchangein16bitprecision
0
255
16
19
27
FramingBlade 3Left
LinearFramingBlade3LeftChange0%-100%
0
255
28
FramingBlade3Leftchangein16bit
FramingBlade3Leftchangein16bitprecision
0
255
17
20
29
FramingBlade3Right
LinearFramingBlade3RightChange0%-100%
0
255
30
FramingBlade3rightchangein16bit
FramingBlade3right changein16bitprecision
0
255
18
21
31
FramingBlade 4Left
LinearFramingBlade4Left Change0%-100%
0
255
32
FramingBlade4Leftchangein16bit
FramingBlade4Leftchangein16bitprecision
0
255
19
22
33
FramingBlade4Right
LinearFramingBlade4RightChange0%-100%
0
255
34
FramingBlade4rightchangein16bit
FramingBlade4right changein16bitprecision
0
255
20
23
35
FramingModulerotation
FramingModule Indexing(0-90degrees)
0
255
36
FramingModulerotation in16 bit
FramingModulerotation(0-90degrees)in16bit
0
255
21
24
37
Prism
No
0
16
Prismin
17
255
22
25
38
Prismrotation
Prismindexing
0
127
Stop
128
Clockwiserotationfromslowto fast
129
191
Stop
192
Anti-clockwiserotation fromslowtofast
193
255
23
26
39
Effectwheel
No
0
19
Effectwheelin
20
255
24
27
40
Effectwheelrotation
Clockwiserotationfromfasttoslow
0
127
Anti-clockwiserotation fromslowtofast
128
255
Table of contents
Popular Spotlight manuals by other brands

Sygonix
Sygonix Messina operating instructions

Robert Juliat
Robert Juliat SULLY 650SX Series quick start guide

Monacor
Monacor IMG STAGELINE PARL-32DMX instruction manual

ARRI
ARRI ST 1 Short instructions

Advanced Lighting Systems
Advanced Lighting Systems SAL151R manual

Harbor Freight Tools
Harbor Freight Tools 90048 Assembly and operating instructions