Pradotec HRT 700 User manual

0

1
Table of Contents
KNOWING YOUR DEVICE 3
DEVICE SPECIFICATION 5
BASIC INSTALLATIONS 6
GUIDELINE FOR INSTALLING SIM/SAM CARD 6
GUIDELINE FOR INSTALLING MICRO SD CARD 7
FIRST TIME USE 8
SCREEN CALIBRATION 8
TIME,DATE AND TIME ZONE CONFIGURATION 8
TOUCH SCREEN OPERATIONS 9
USING THE STYLUS 9
START MENU 10
SHELL TASKBAR 11
THE TASKBAR APPEARS ON THE TOP OF YOUR HRT700 SCREEN.11
SOFTWARE INPUT PANEL (SIP) 12
KEYPAD 13
CUSTOMIZING YOUR HRT700 14
LCD BRIGHTNESS CONTROL 15
KEYPAD LIGHT CONTROL 17
POWER 18
DISPLAY 19
MOUSE 19
KEYBOARD 20

2
AUDIO VOLUME 20
STYLUS PROPERTIES 21
NETWORK &DIAL –UP CONNECTION 21
REGIONAL SETTING 22
OWNER PROPERTIES 22
PC CONNECTION 23
STORAGE PROPERTIES 24
SYSTEM PROPERTIES 24
PASSWORD PROPERTIES 25
SCREEN ROTATION 25
TASKBAR &SECURE SHELL 26
BLUETOOTH DEVICE PROPERTIES 26
INPUT SELECTION PANEL 27
DATE &TIME PROPERTIES 27
INTERNET OPTIONS 28
REMOVE PROGRAMS 28
INTERNET EXPLORER 29
FEATURES 31
WIRELESS LAN (WI-FI)USAGE 31
BLUETOOTH USAGE 33
GSM USAGE 39
USING THE CONTACT CARD READER 41
USING THE FINGERPRINT SENSOR 41
USING THE PRINTER 42
APPENDIX: TROUBLESHOOTING GUIDE 43
RESET THE HRT700 AND CLEAR MEMORY 43
IF HRT700 RUNS OUT OF POWER 44
IF HRT700 RUNS OUT OF MEMORY 45
SCREEN FREEZES OR RESPONDS SLOWLY 45
INACCURATE RESPONSE TO STYLUS TAPS 46
ROUTINE MAINTENANCE 47
BATTERY GUIDELINES 47
TRAVEL GUIDELINES 48
SHIPPING GUIDELINES 48

3
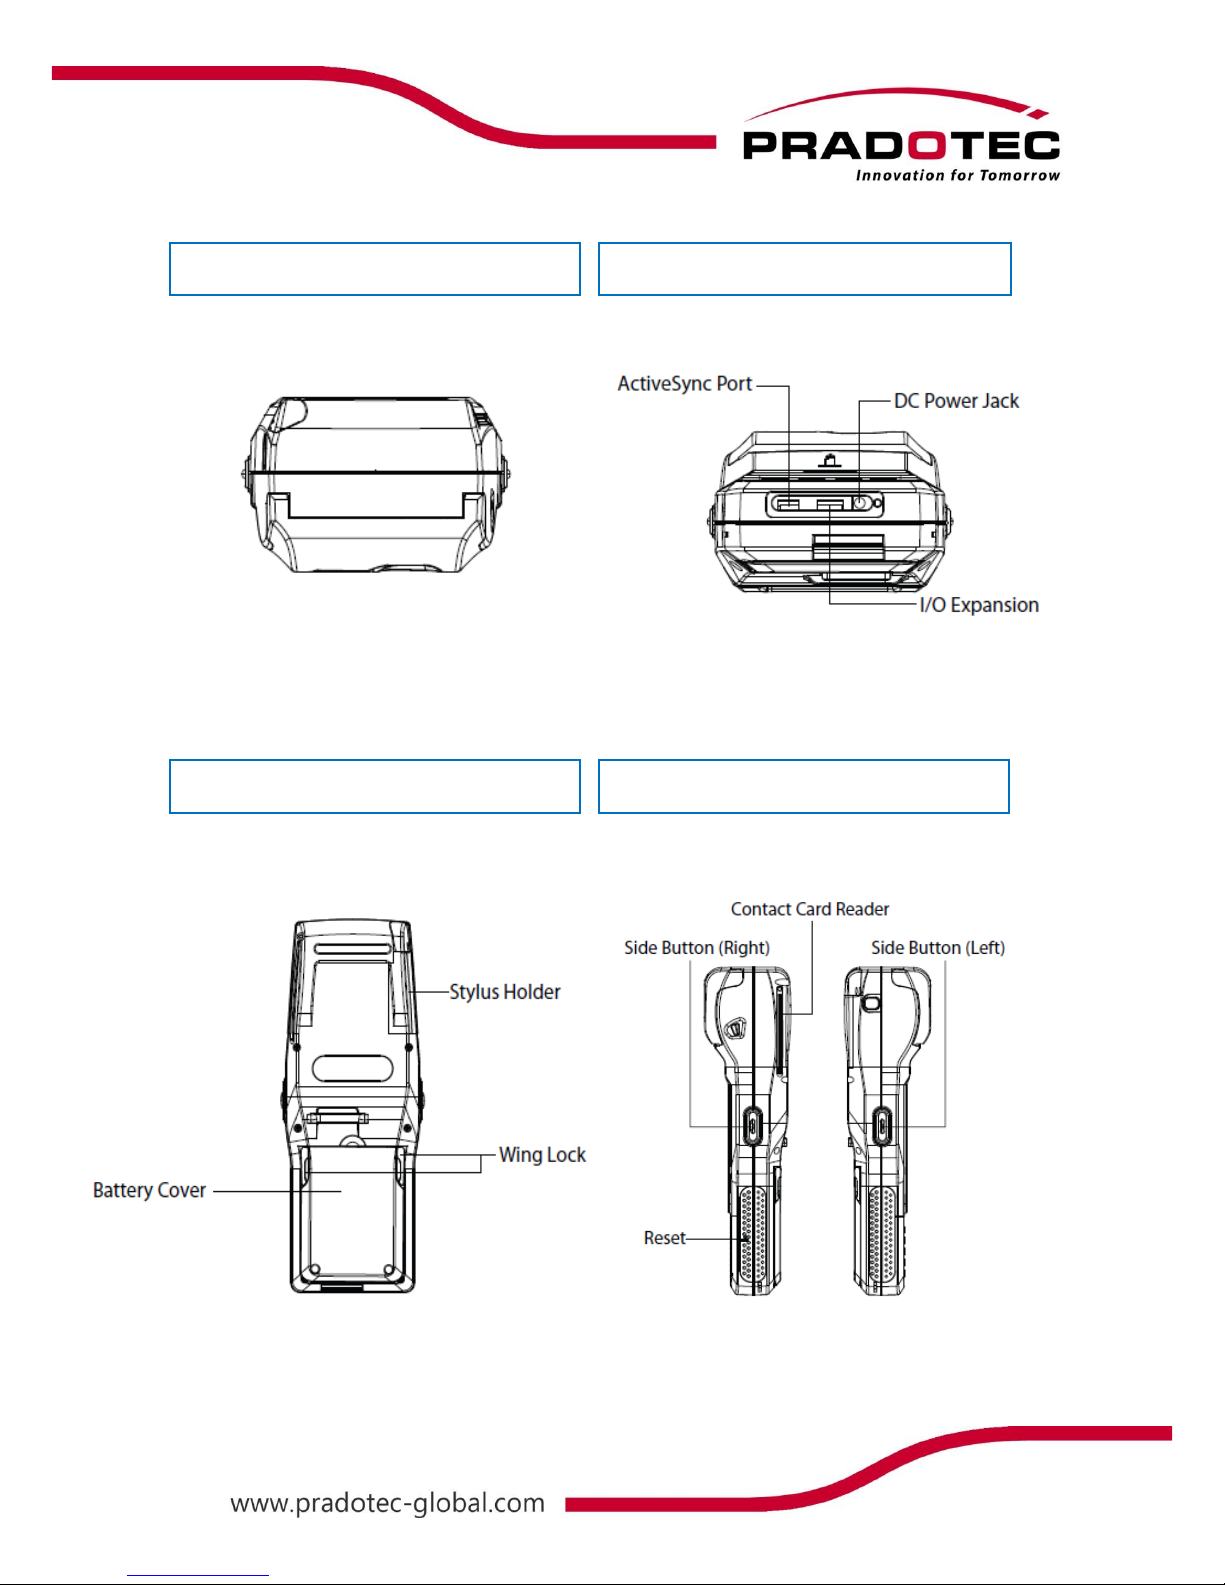
Knowing Your Device
FRONT
4
TOP
BOTTOM
BACK
SIDE

5
Device Specification
Memory 256MB DDR-2 RAM, 4GB Flash
Memory Expansion 1 x micro-SD Memory Slot (Support up to 32GB)
Device Operating System WinCE 6.0
Host PC Operating System Windows® 7/ Vista/ XP
Programming Language C++ Programming, NET Programming in Microsoft® Visual Studio 2005
Bluetooth Bluetooth Version 2.0
Wireless LAN IEEE 802.11 b/g Wi-Fi
Network 3.5G - W-CDMA, 850,900, 2100 MHz
GSM/ GPRS/ EDGE (1 X SIM Slot)
USB USB Client 1.1 (ActiveSync)
Display 3.5” (480x640) Transflective TFT Colour Touch Screen
Keypad 12 Alphanumeric Buttons, 3 Function Buttons and 1 Power On/Off Button
LED 1 x Power Status, 1 x Network Status, 1 x Charge status
Speaker Built-in Mono Speaker
Battery 7.4V 1850mAH Li-ion Battery
Operating Time 4 - 6 Hours
Dimension (LxWxH) mm Standard Model
Weight Less than 500g
Operating Temperature -100c to +500c
Storage Temperature -200c to +600c
Humidity 5% to 90% RH, Non-condensing
IP Rating IP65 (Dust & Water Resistance)
Drop Test 1.5m
Sensor Optical sensor
Resolution 500dpi
Active Area (mm) 14 x 22
Supported Template Sagem Algorithm
Template Formats Morpho Proprietary, ISO 19794-2, ANSI/ INCITS 378, RAW/Bitmap,
WSQ (Optional)
Standard ISO/IEC 7816 Part 1, 2, 3, (T=0, T=1)
Card Slot 1 x ID-1 Card Slot
3 x ID-0 SAM Slots
Communication Speed 9.6 kbps up to 115.2kbps
Card Type Class A & B
Standard EADER Integrated 2” Thermal printer
FINGERPRINT SENSOR
PRINTER
CONTACT CARD READER
SYSTEMS
COMMUNICATION INTERFACES
HUMAN INTERFACES
MECHANICAL
POWER
ENVIRONMENT
6
Charge the Battery
Your battery has been partially charged at the factory, but you may need to recharge it for 4
hours before you can switch on your device for the first time.
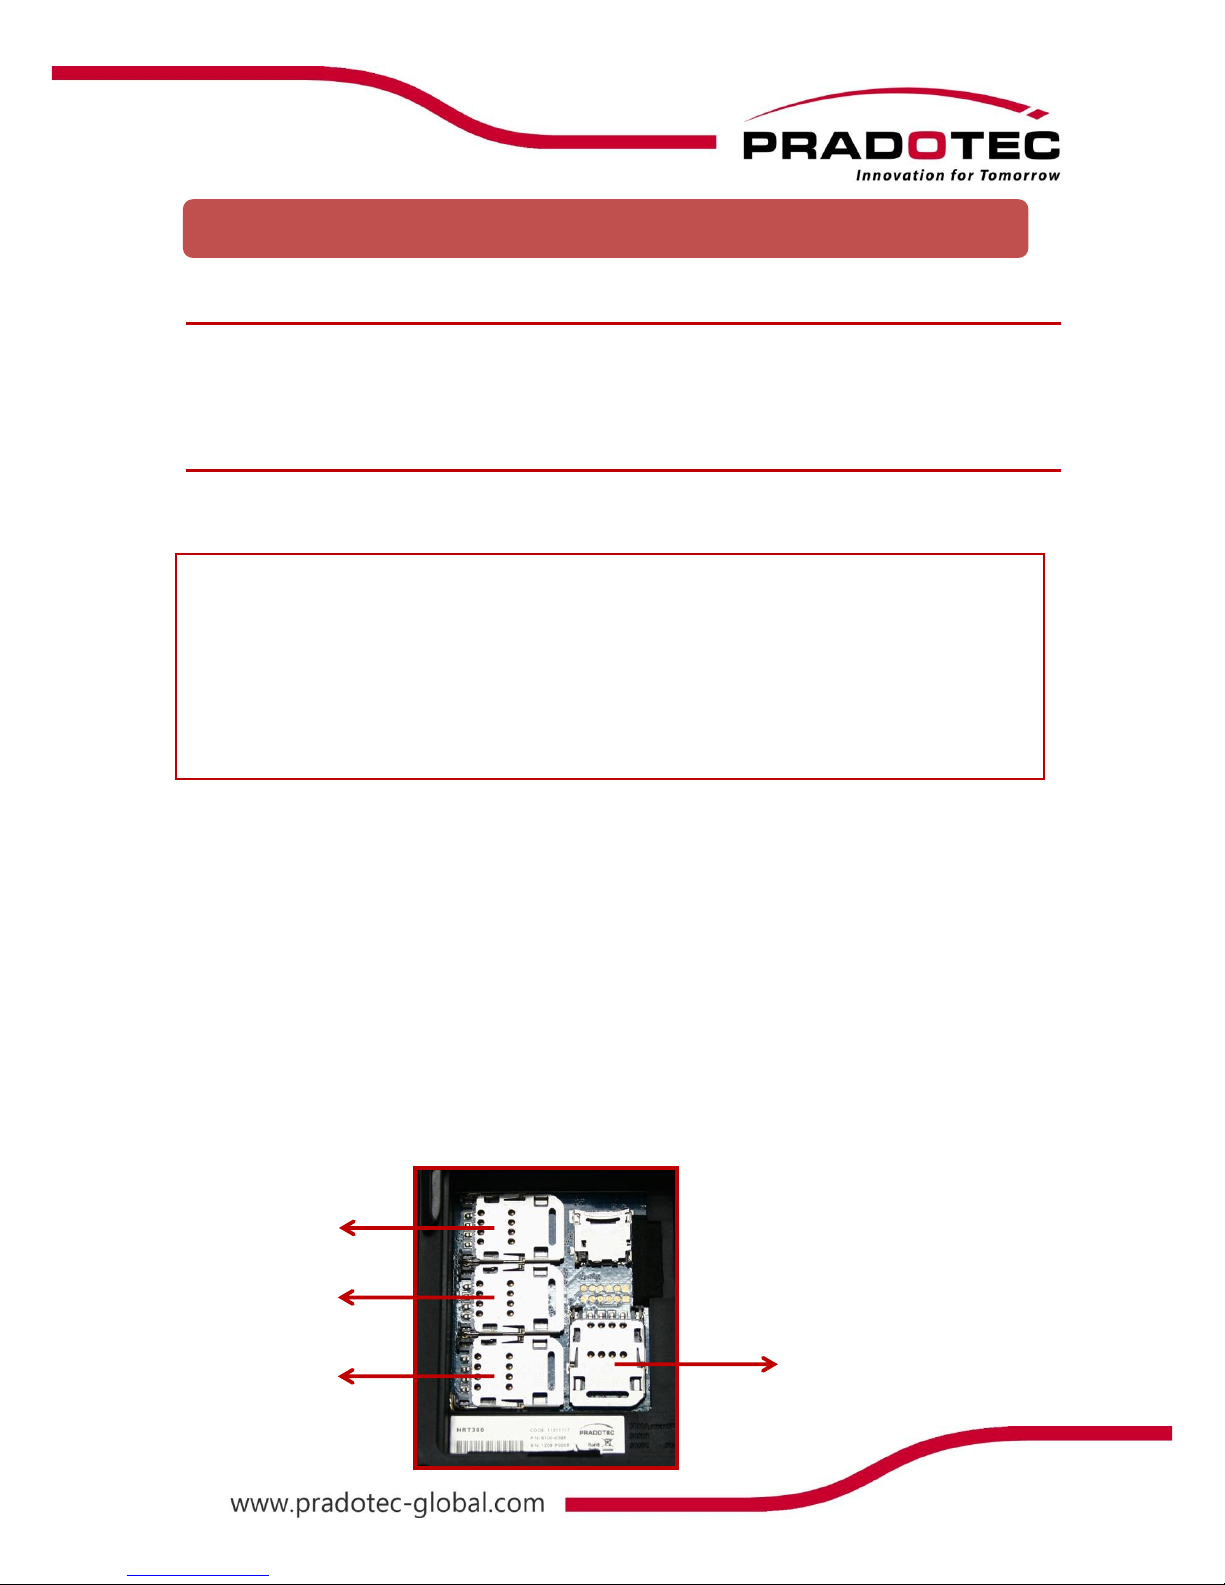
Guideline for Installing SIM/SAM card
When you subscribe to a Cellular Network, you are provided with a SIM card loaded card
loaded with your subscription details (PIN, optional services available and etc).
WARNING
Keep all SIM cards out of the reach of children.
The SIM card and its contacts can be easily damaged by scratches or bending.
Be careful when handling, inserting or removing the card.
Before installing the SIM card, always make sure that the HRT700 is fully charged as the
application will not work properly with insufficient amount of power.
To insert the SIM card
1) Firstly closed all the programs and switch off the unit
2) Removed the hand strap
3) Unlock both wing lock
4) Removed the Battery cover
5) Removed the Battery pack
6) Unlock the SIM Slot and pull back the cover until easy for insertion.
7) When inserting the SIM card, ensure that the cut corner faces top right
and the gold contacts of the card face into the unit
SAM A
SAM B
SAM C
SIM
(Slot 0)
(Slot 2)
(Slot 3)
Basic Installations
7
8) Push down the SIM slot cover and slide outward to lock it
9) Place the battery pack followed by battery cover
10) Push the wing lock to secured the battery cover and finally install back the hand
strap
To insert the SAM cards
1) It will be the same as inserting the SIM card, but on the others three slots
2) SAM card is for internal security
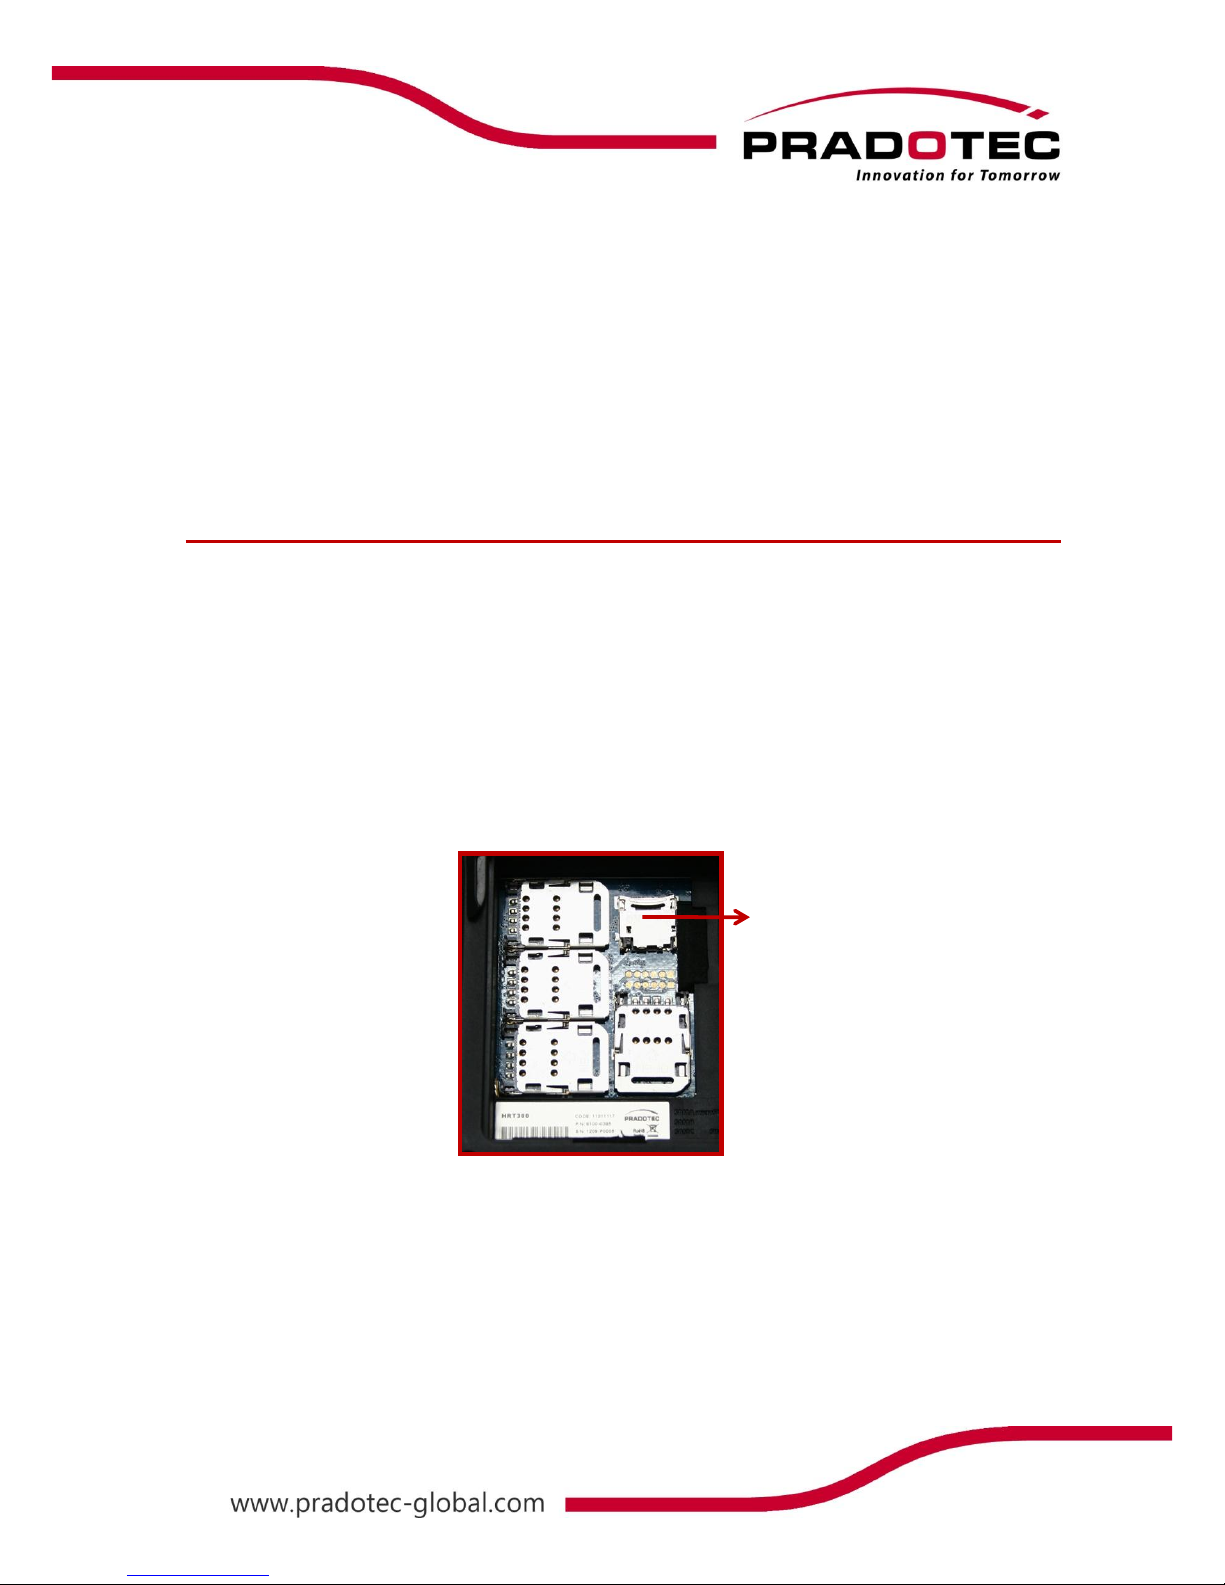
Guideline For Installing Micro SD Card
1) Firstly closed all the programs and switch off the unit
2) Removed the hand strap
3) Unlock both wing lock
4) Removed the battery cover
5) Removed the battery pack
6) Unlock the Micro SD slot and pull back the cover until easy for insertion.
7) When inserting the Micro SD card, ensure that the gold contacts of the card face
into the unit
8) Push down the Micro SD slot cover and slide inward to lock it
9) Place the battery pack followed by battery cover
10) Push the wing lock to secured the battery cover and finally install back the hand
strap
MICRO SD
8
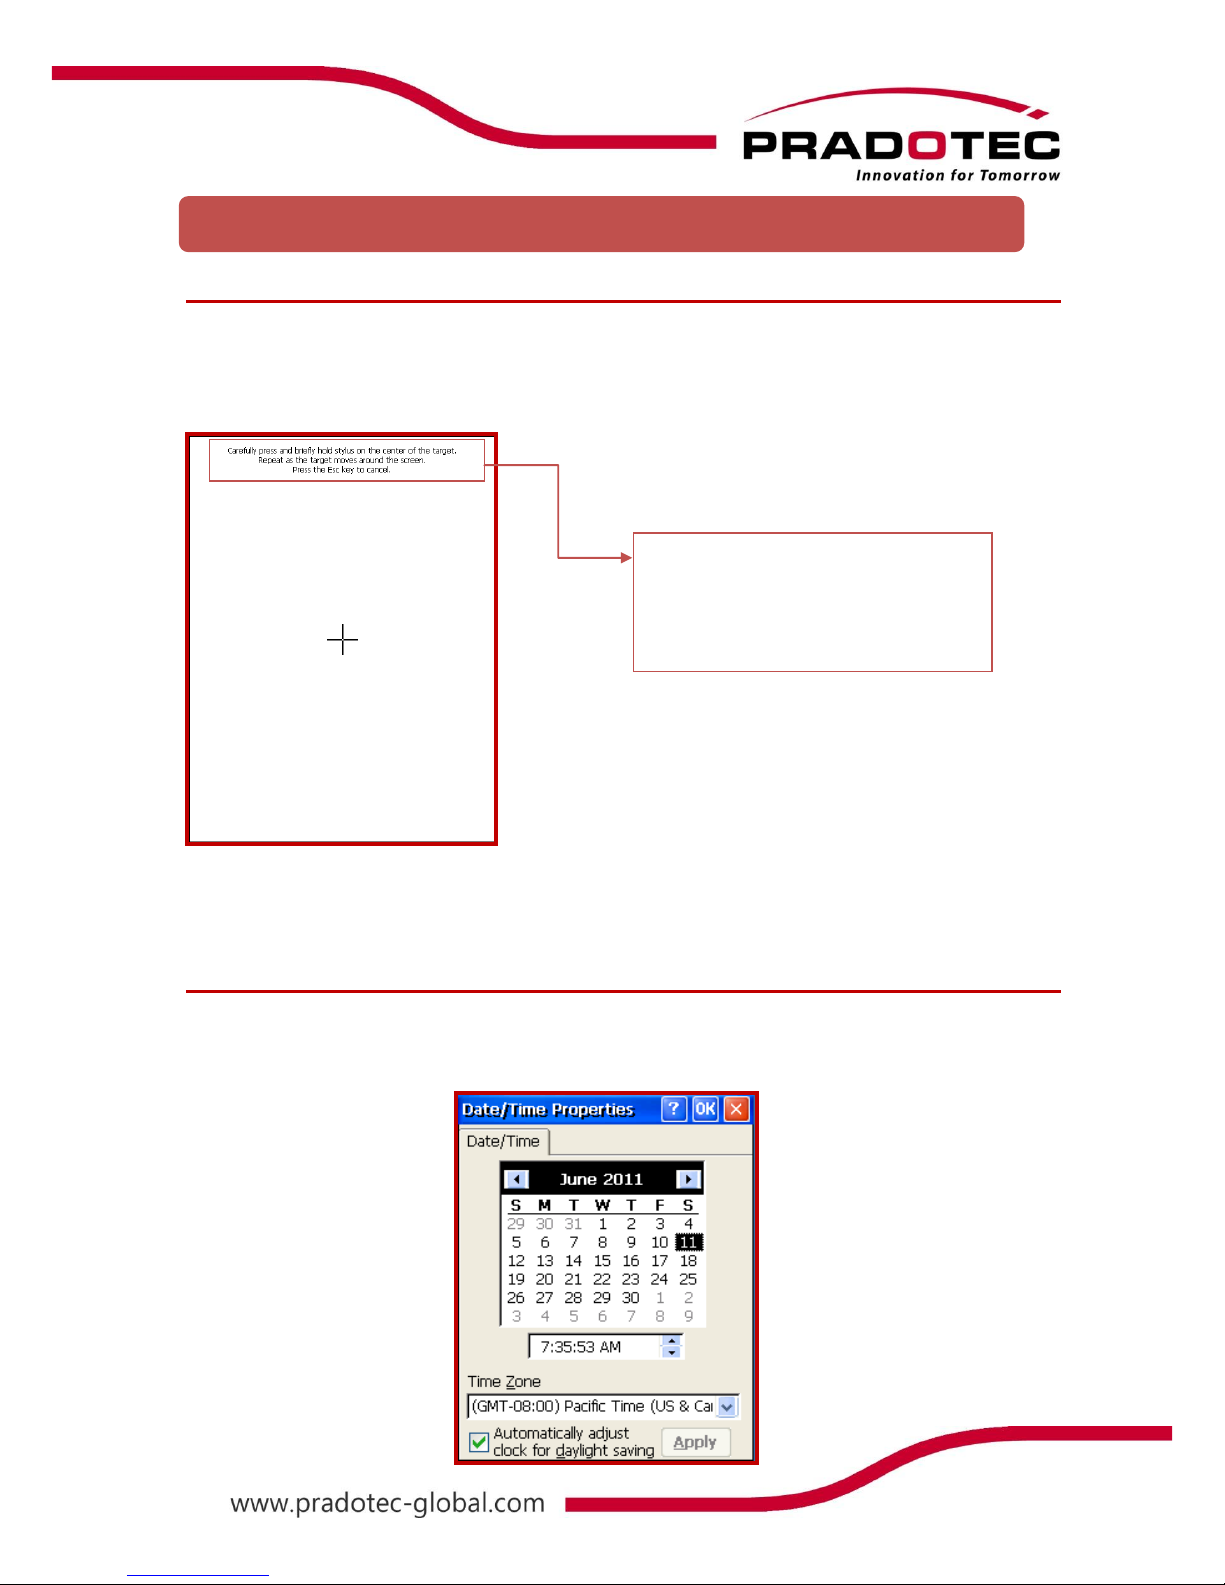
Screen Calibration
Once the charging has completed, turn on the unit by pressing the power button.
On the first time basis, it is advisable to calibrate the screen by going to:
Start -> Settings -> Control Panel -> Stylus.
Follow the cursor and tap on it. After this, Time, Date and Time Zone configuration screen will
be required to be set as the default time, date and time zone differ from places to places.
Time, Date and Time Zone configuration
Go to Start -> Settings -> Control Panel -> Date/Time.
“Time, Date and Time Zone configuration” application will be shown as below.
First Time Use
Carefully press and briefly hold
stylus on the centre of the target.
Repeat as the target moves around
the screen. Press ESC key to cancel
9
The following defines the various operations that you can perform with the stylus.
Tap
Touch the screen once with the stylus to select items or options
Double Tap
Tap the item twice to open or execute a program
Drag
Hold the stylus on the screen and drag across the screen to select text and
images. Drag in a list to select multiple items
Data input and virtually all other operations are performed using a stylus, which is housed
inside the stylus holder at the right corner (left corner) of the HRT700.
IMPORTANT
Avoid misplace or lose the stylus by always storing it in the stylus holder when not in
use.
Avoid breaking the tip of the stylus.
Use only the stylus that comes with the HRT700, or some other stylus type instrument
with a soft, blunt point to perform touch screen operations. Never use a pen, pencil, or
other sharp writing element.
Touch Screen Operations
Using the Stylus
10
Your HRT700 is pre-installed with a collection of useful programs. These include Microsoft
WordPad and customized programs. You can select the program you want from the Start
button or by tapping on the screen; a list of customized programs will be shown.
Taskbar Items
The Control Panel includes the following standard items which allow user to customize
system wide properties.
Status Icon Meaning
Start Menu, Tap to switch to a program
Indicate unit connected to PC ActiveSync
Batteries are charging
Batteries are fully charged
Batteries are low
Tap for display or hide keyboard, tap and hold to choose other input
method
Quick launch menu
Start Menu
1
a
A
Current Keypad Input method
11
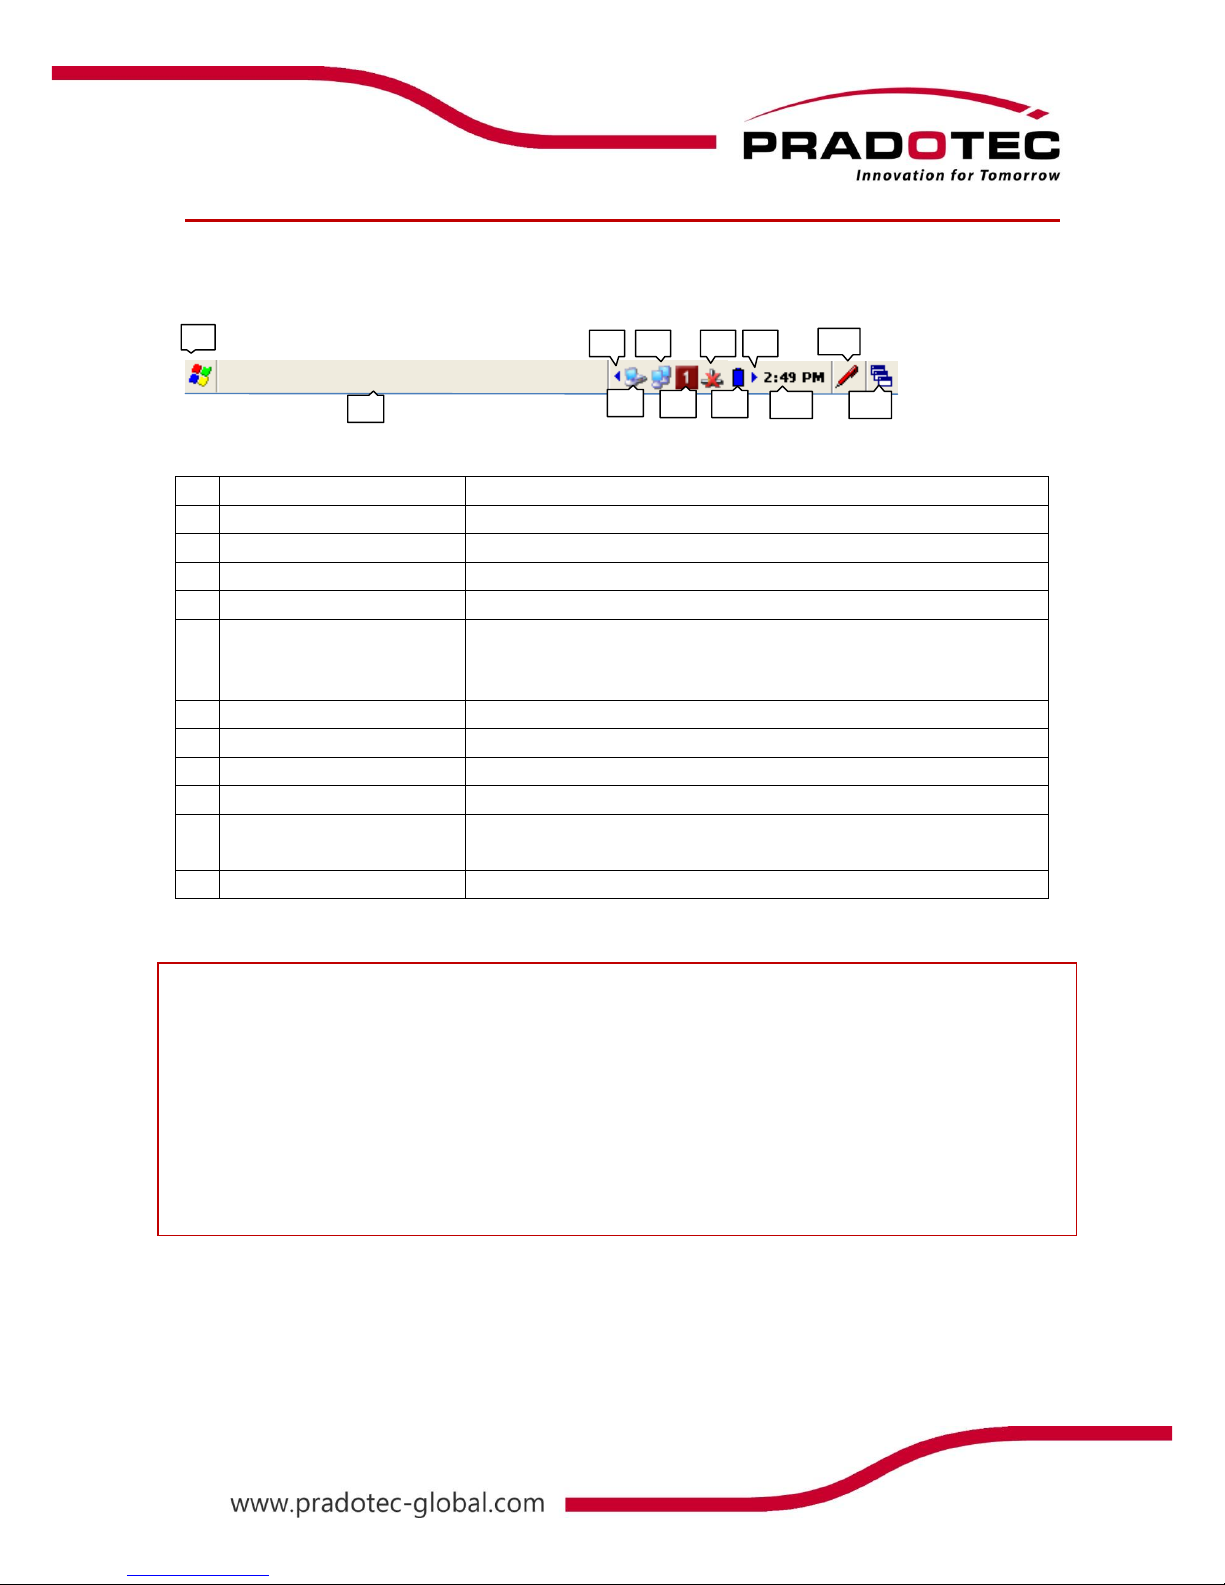
Shell taskbar
The taskbar appears on the top of your HRT700 screen.
1
Start button
Single tap to display the Start menu
2
Active application
Display the latest application running
3
Left
Single tap to see the hidden icon on the left
4
Direct Connection
Double tap to execute the direct network status dialog
5
WI-FI Connection
Double tap to execute the WI-FI network setting
6
Keypad Input Method
Single press on the ‘ALPHA’ to change mode of input by
keypad
Numerical (1) , Small Alphabet (a) , Capital Alphabet(A)
7
Bluetooth Network
Single tap to execute Bluetooth network setting
8
Power icon
Single tap to display the power status on your HRT700
9
Right
Single tap to see the hidden icon on the left
10
Time
Single tap to display the time, date and time zone menu
11
Software Input Panel
(SIP)
Single tap to display or hide the Keypad
12
Application switching
Single tap to display all the active application
NOTE:
●An internal battery icon appears in the status icon. See Taskbar Item for more
information about icons.
●Messages also appear on the screen to warn you when the battery power is
critically low.
You can check the current battery level at any time by tapping Start -> Settings -> Control
Panel -> Power to display Power Properties.
1
2
3
4
5
6
7
8
9
10
11
12
12
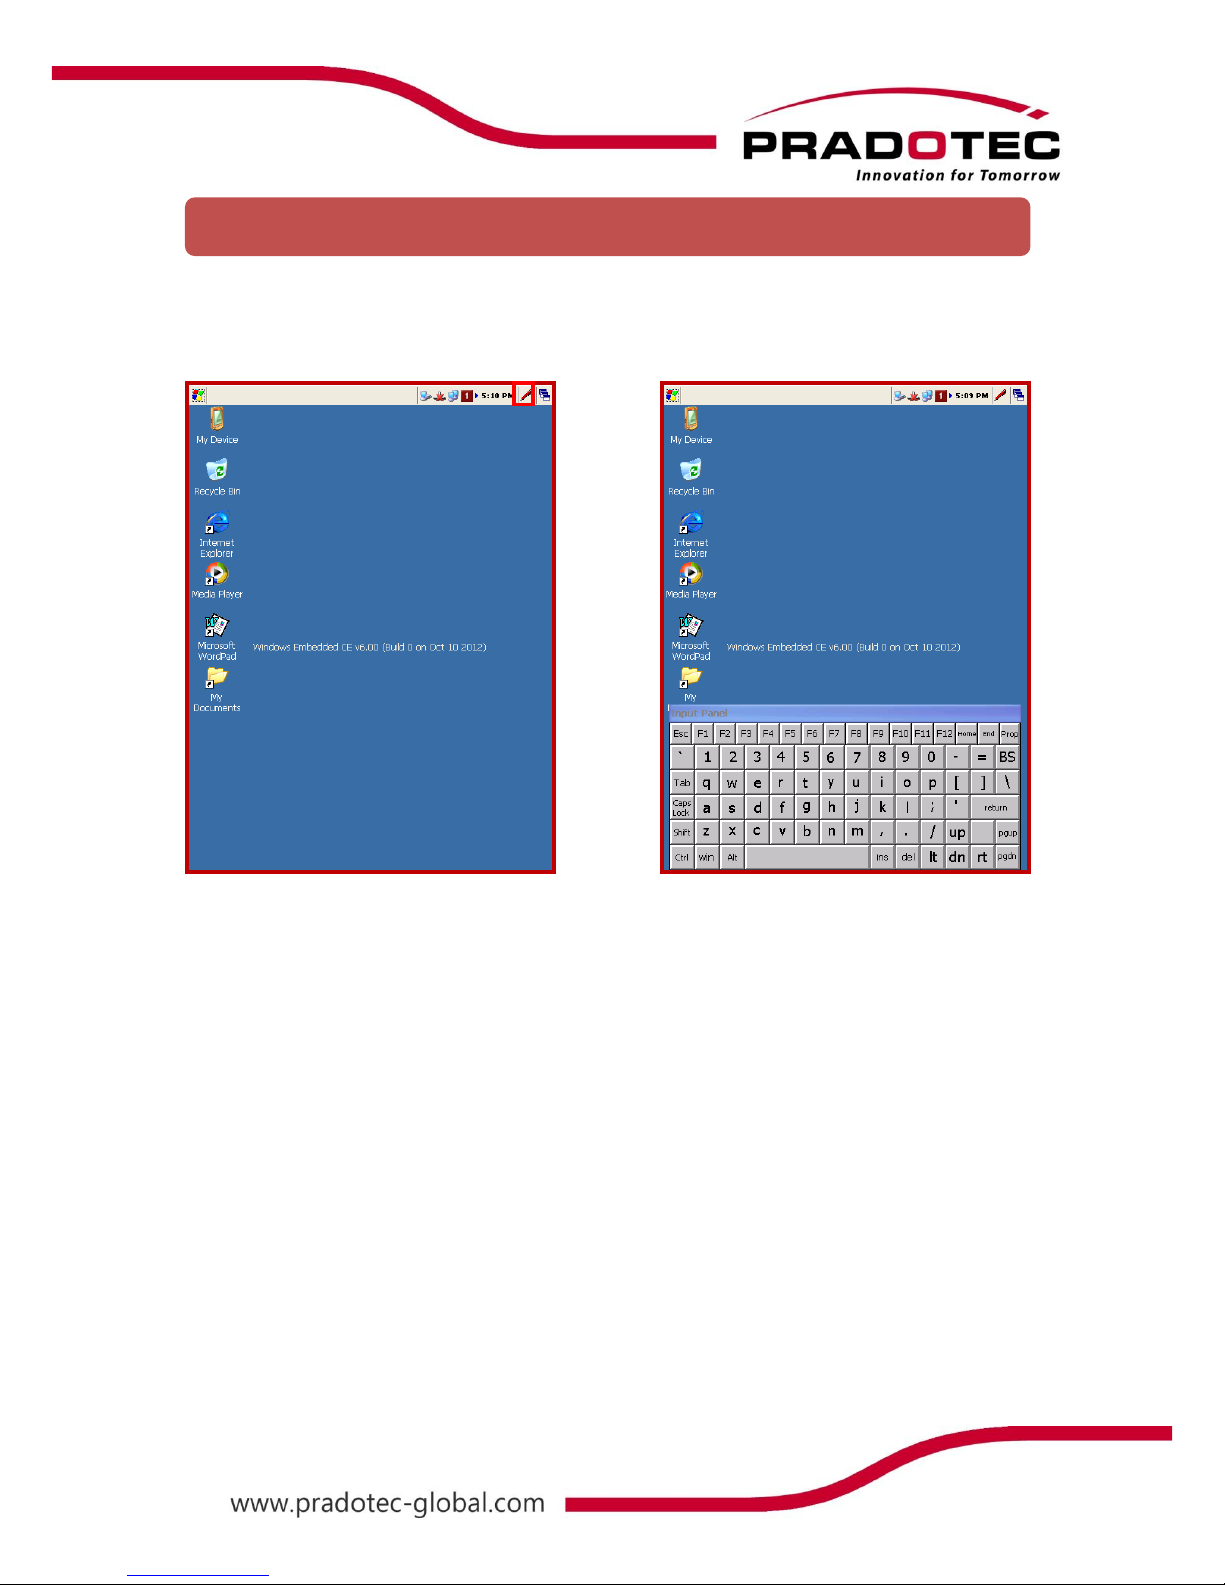
On the taskbar of the HRT700, tap on the SIP icon. The software input panel will be shown at
the bottom of the screen. Tap on the SIP icon again in order to hide the software input panel.
Software Input Panel (SIP)
13
Keypad
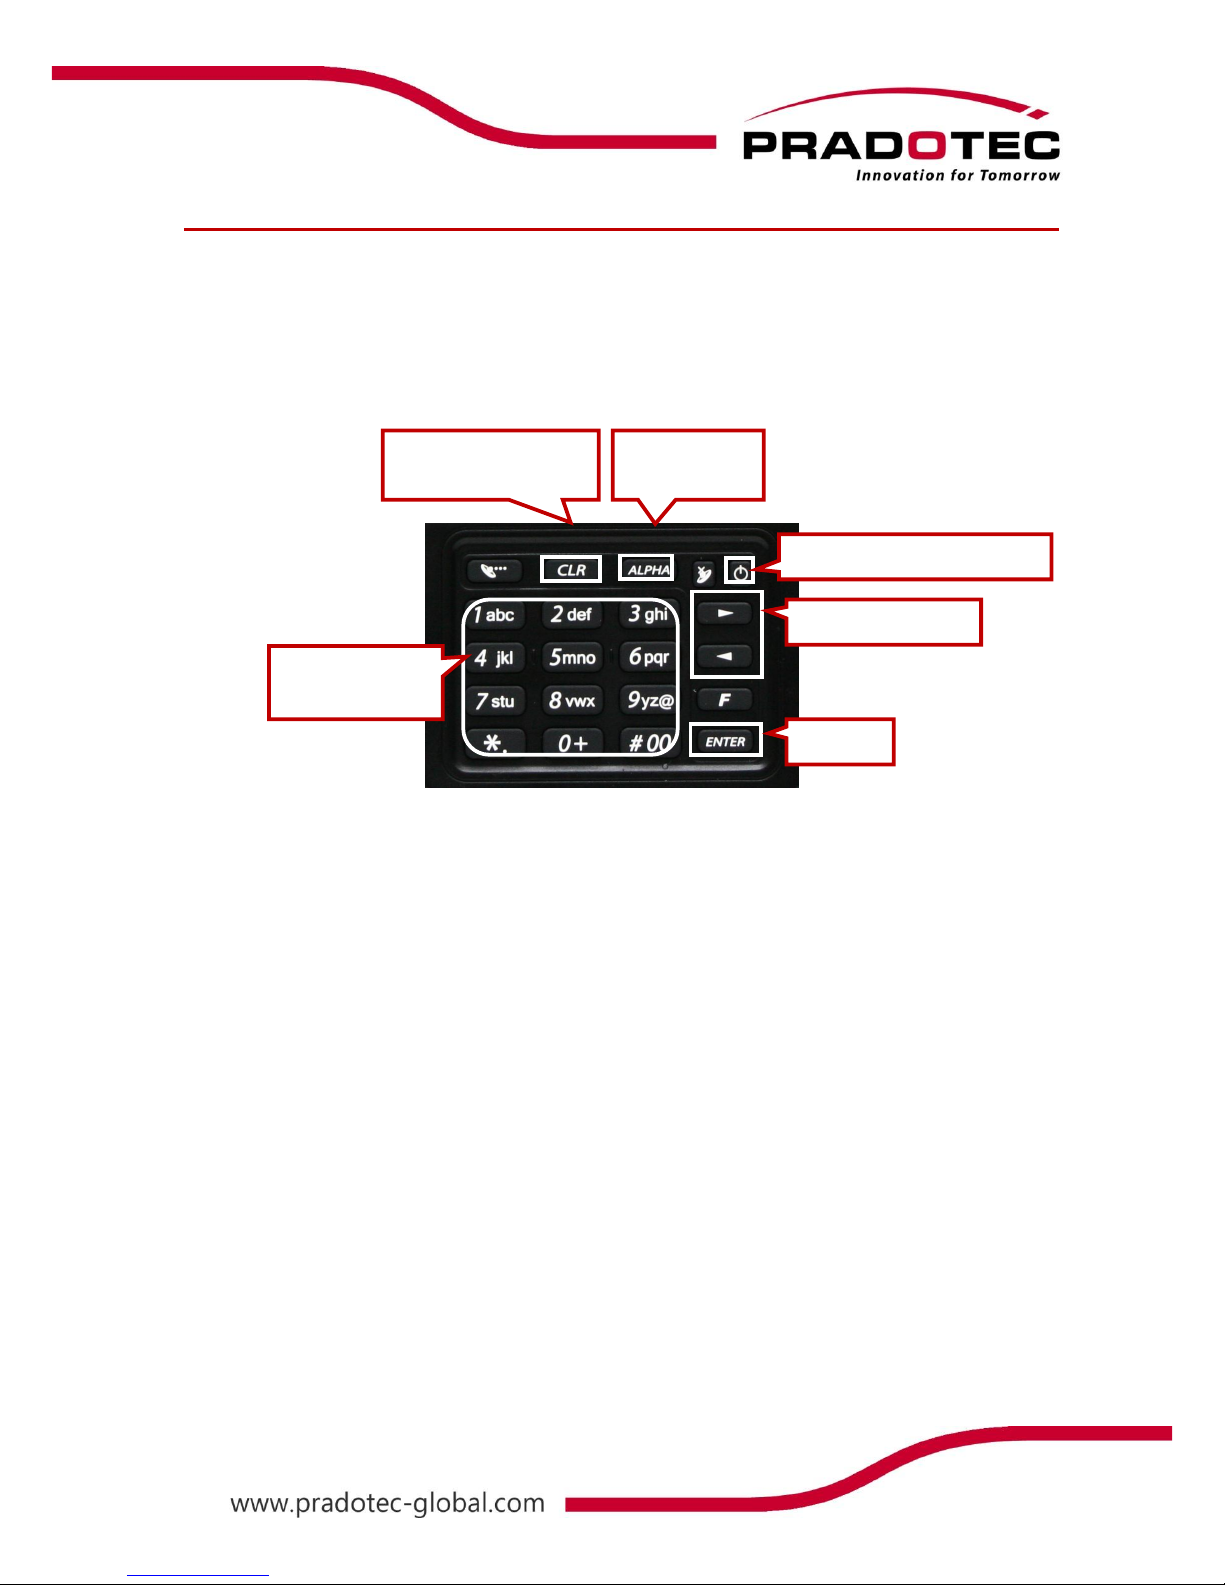
Learning to use your keypad is easy. This section will describe the basic concept of using the
keypad in writing a message or executing a task like increasing volume.
Controls and Interfaces
● Nav. Left & Right
Press to go to the left or right. Selecting the left or the right item / icon.
● Enter button
Pressing it will perform enter function or skip to the next line when writing.
● Power button
Press once to turn on / suspend the device. User may wake up the device by pressing
it too
● CLR
This button allows user to clear entry or use as backspace function.
● Alpha numerical keypad
It will act as numerical keypad when toggle function is OFF. Once ON, you can key in
any character just by pressing and holding on the button until the character appears.
● Alpha button
Press it to change the mode of entering characters by keypad. Sequences of the
modes are numerical characters, lower-case alphabets then upper-case alphabets.
Alpha Numerical
Keypad
Nav. Left & Right
Enter
Clear entry or
Backspace function
Keypad input
mode
Power on, Wake or Suspend

14
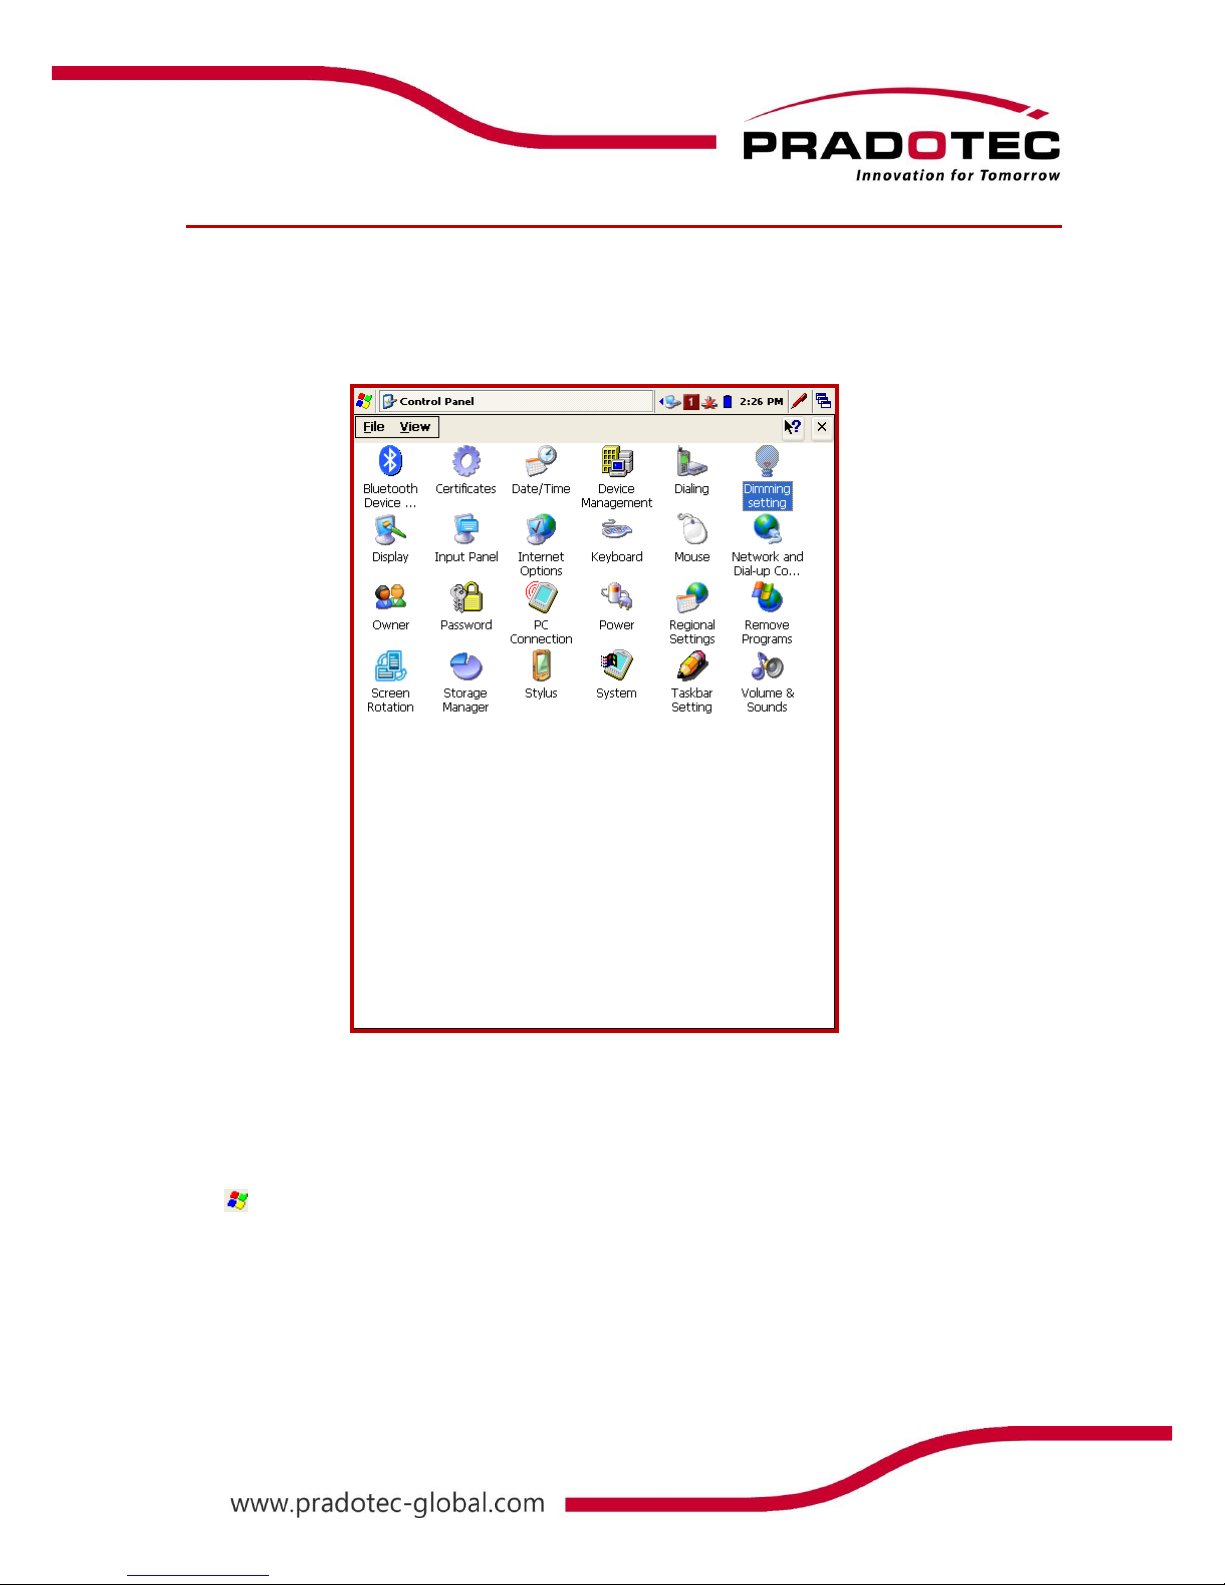
You can customize your setting of your HRT700 to suit your particular needs. E.g. Setting
password, so that nobody can use your handheld or change the background display and etc..
Tap on Start -> Settings -> Control Panel, as shown on the previous page. In the menu, it
contains icon showing different settings that can be customized.
Customizing your HRT700
15
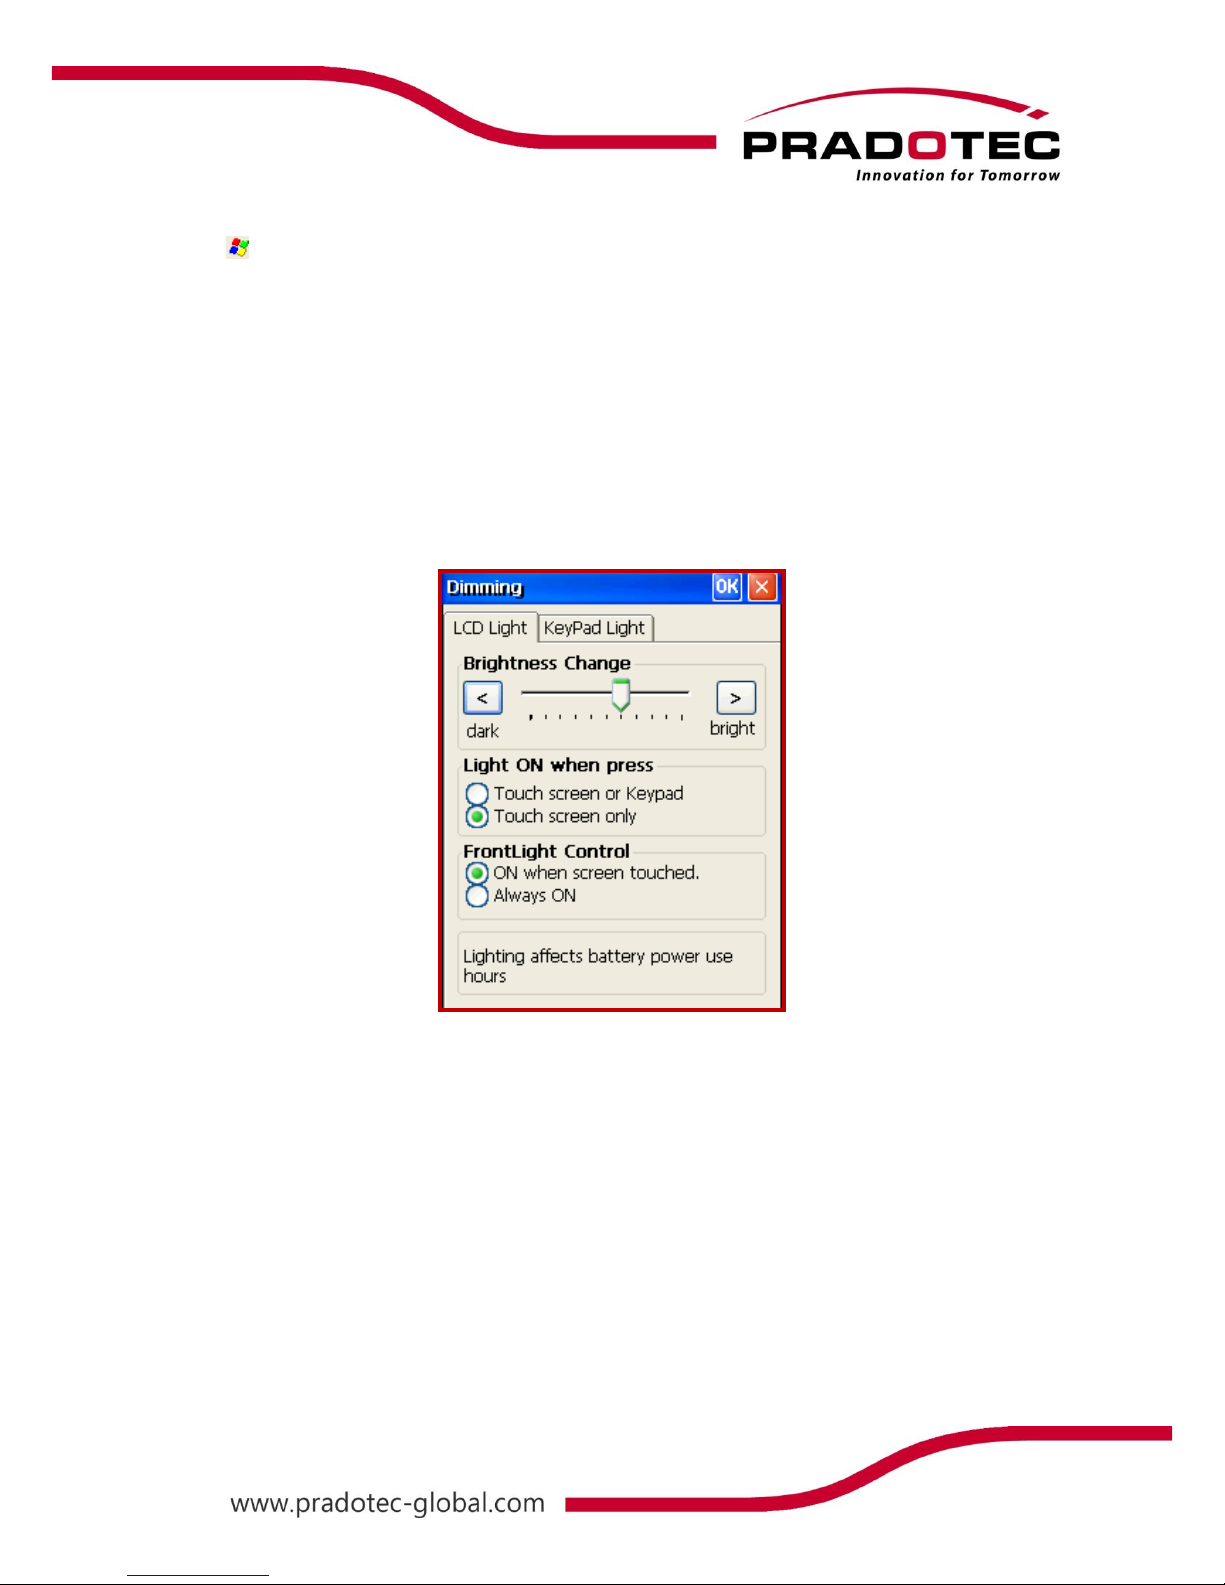
LCD Brightness Control
The unit can be powered by either battery or external power. Users may change the
brightness of the LCD backlight through the backlight control panel applet according to the
power mode.
Adjusting Display Brightness
Use the following operations to adjust display brightness to make it easier to read.
Tap and click Settings and choose Control Panel. On the Control Panel, tap Dimming
Setting. A screen box will appear. Make sure it is on the LCD Light tab. Tap the dark or
bright tab to control the brightness of the screen.
16
Adjust How the Screen Light can be Turned On
Tap and click Settings and choose Control Panel. On the Control Panel, tap Dimming
Setting. Select the LCD Light tab. Below the Brightness Change option, there is two more
option for screen light setting.
Select Touch screen or Keypad in order to turn on the light of the LCD by touching either
the touch screen or keypad, or select Touch screen only to turn on the light of the LCD by
touching the screen only. On the option below, choosing ON when screen touched is to let
the light to be off after certain time and turn on when the device is touched while choosing
Always ON is to let the light never off until the device is suspended.

17
Keypad Light Control
Adjust Light Emitting Duration for Keypad
Tap and click Settings and choose Control Panel. On the Control Panel, tap Dimming
Setting. Select the KeyPad Light tab. Select duration from 3 seconds to 30 seconds, as after
that selected duration, the keypad light will be off.
Adjust How the Keypad Light will be Turned On
Tap and click Settings and choose Control Panel. On the Control Panel, tap Dimming
Setting. Make sure the KeyPad Light tab is selected. Select Touch Screen or Keypad for
turning on the light of keypad by touching either the screen or the keypad or select Keypad
only to turn on the light of keypad by touching on the keypad itself.
Adjust the Keypad Light Control
Tap and click Settings and choose Control Panel. On the Control Panel, tap Dimming
Setting. Make sure the KeyPad Light tab is selected. Select ON when LCD or Keypad
pressed to enable the previous option. Select Always OFF, the keypad light will be turned off
the entire time else select Always ON, the keypad light will be turned on entire time until the
device is suspended.
18
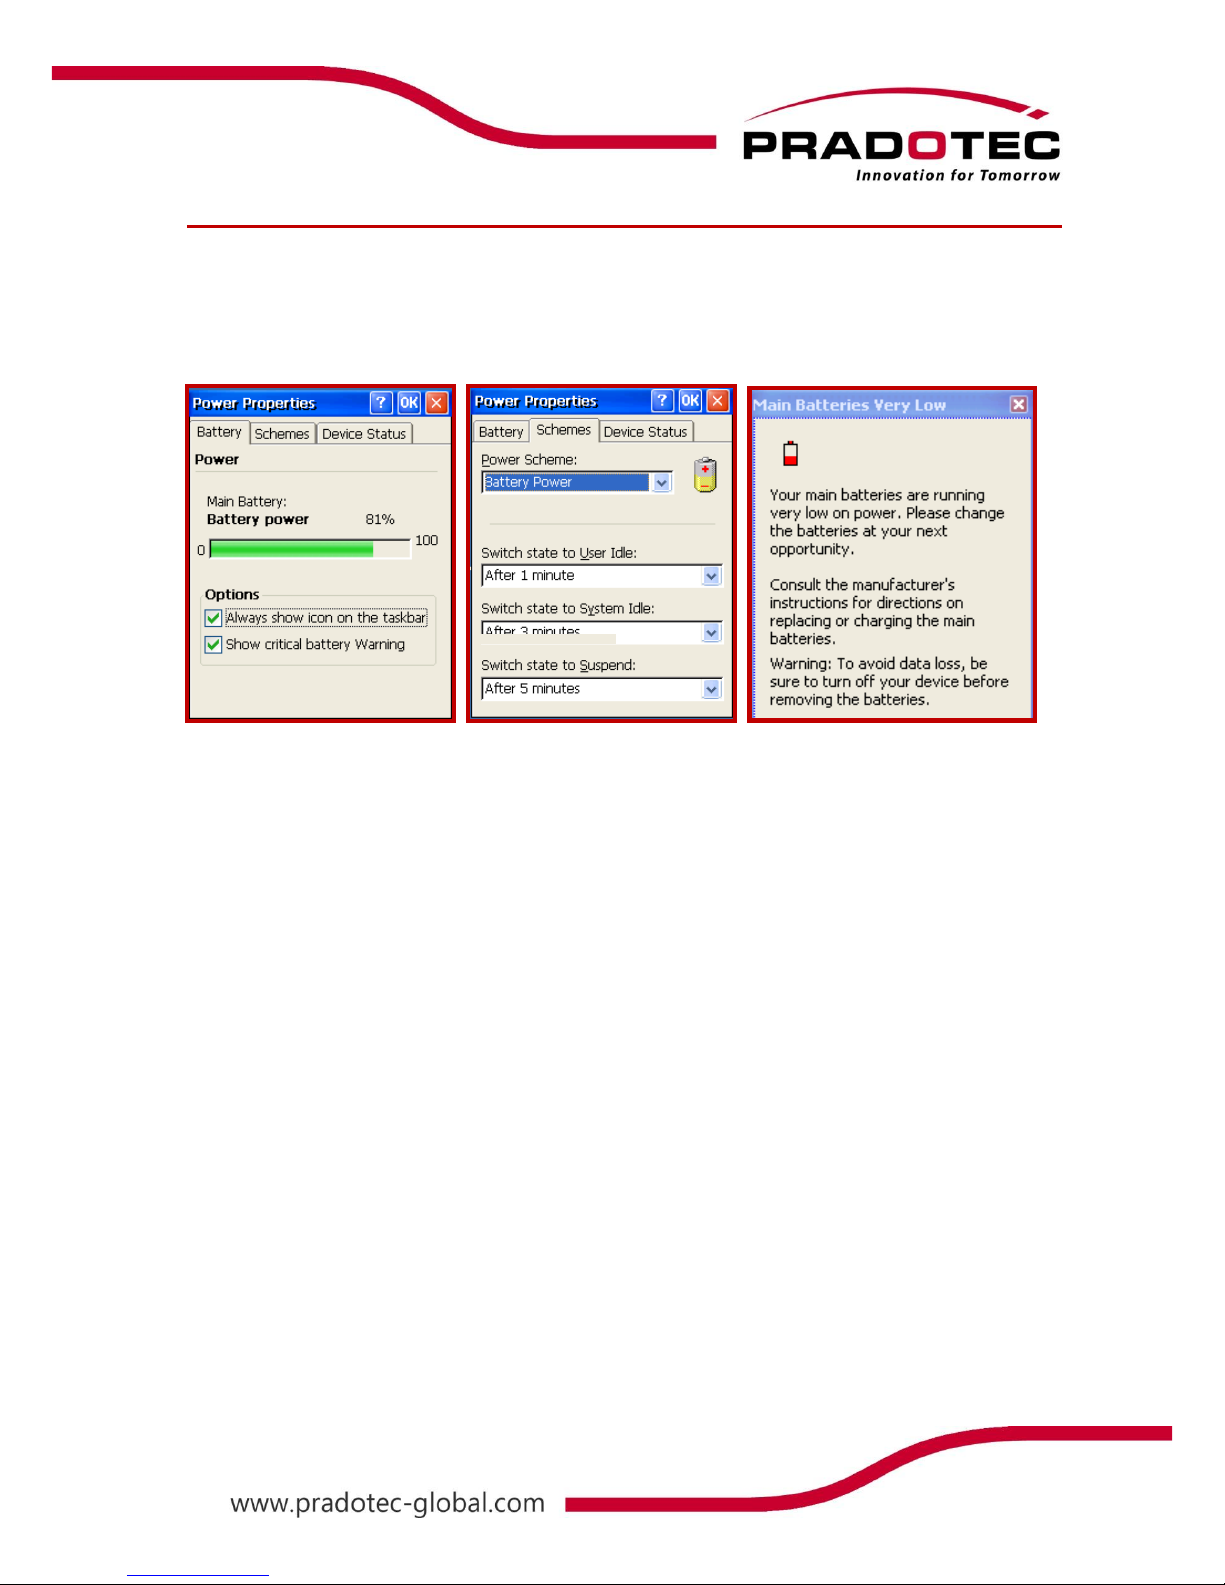
Power
User may check the power status of the main battery by clicking on the power icon. In the
power properties menu, for the Battery tab, user may check on the option to Always show
icon on the taskbar. Another option that user may check on is to Show critical battery
Warning, which means a window will be popped out when the device is low battery.
System Power States
The OS have 4 different power states that will be the four states of the internal power
manager state machine. The state transition will be linked to system conditions:
a) User activities
b) System activities
c) Application requests
d) Timers
The four states are:
On - In this state the device is full active and user can use all the different peripherals,
and by consequence the current consumption is maximum
User Idle - This state is reach when user is not using the device after a time out, the
power consumption can be reduced by, for example, decreasing the display backlight
intensity and disabling peripherals.
System Idle - after application inactivity, the power manager switch to this state.
Suspend - in this state the device is consuming the less power as possible, but the
device cannot be used, the processor clock is decreased (or turned in a suspend state
if supported), the peripherals are usually turned off and the SDRAM is still refreshed.
The transition from On to User Idle and User Idle to Suspend is done after timer’s expiration,
those timers value can be setup through the control panel’s Power applet to customize your
device.
19
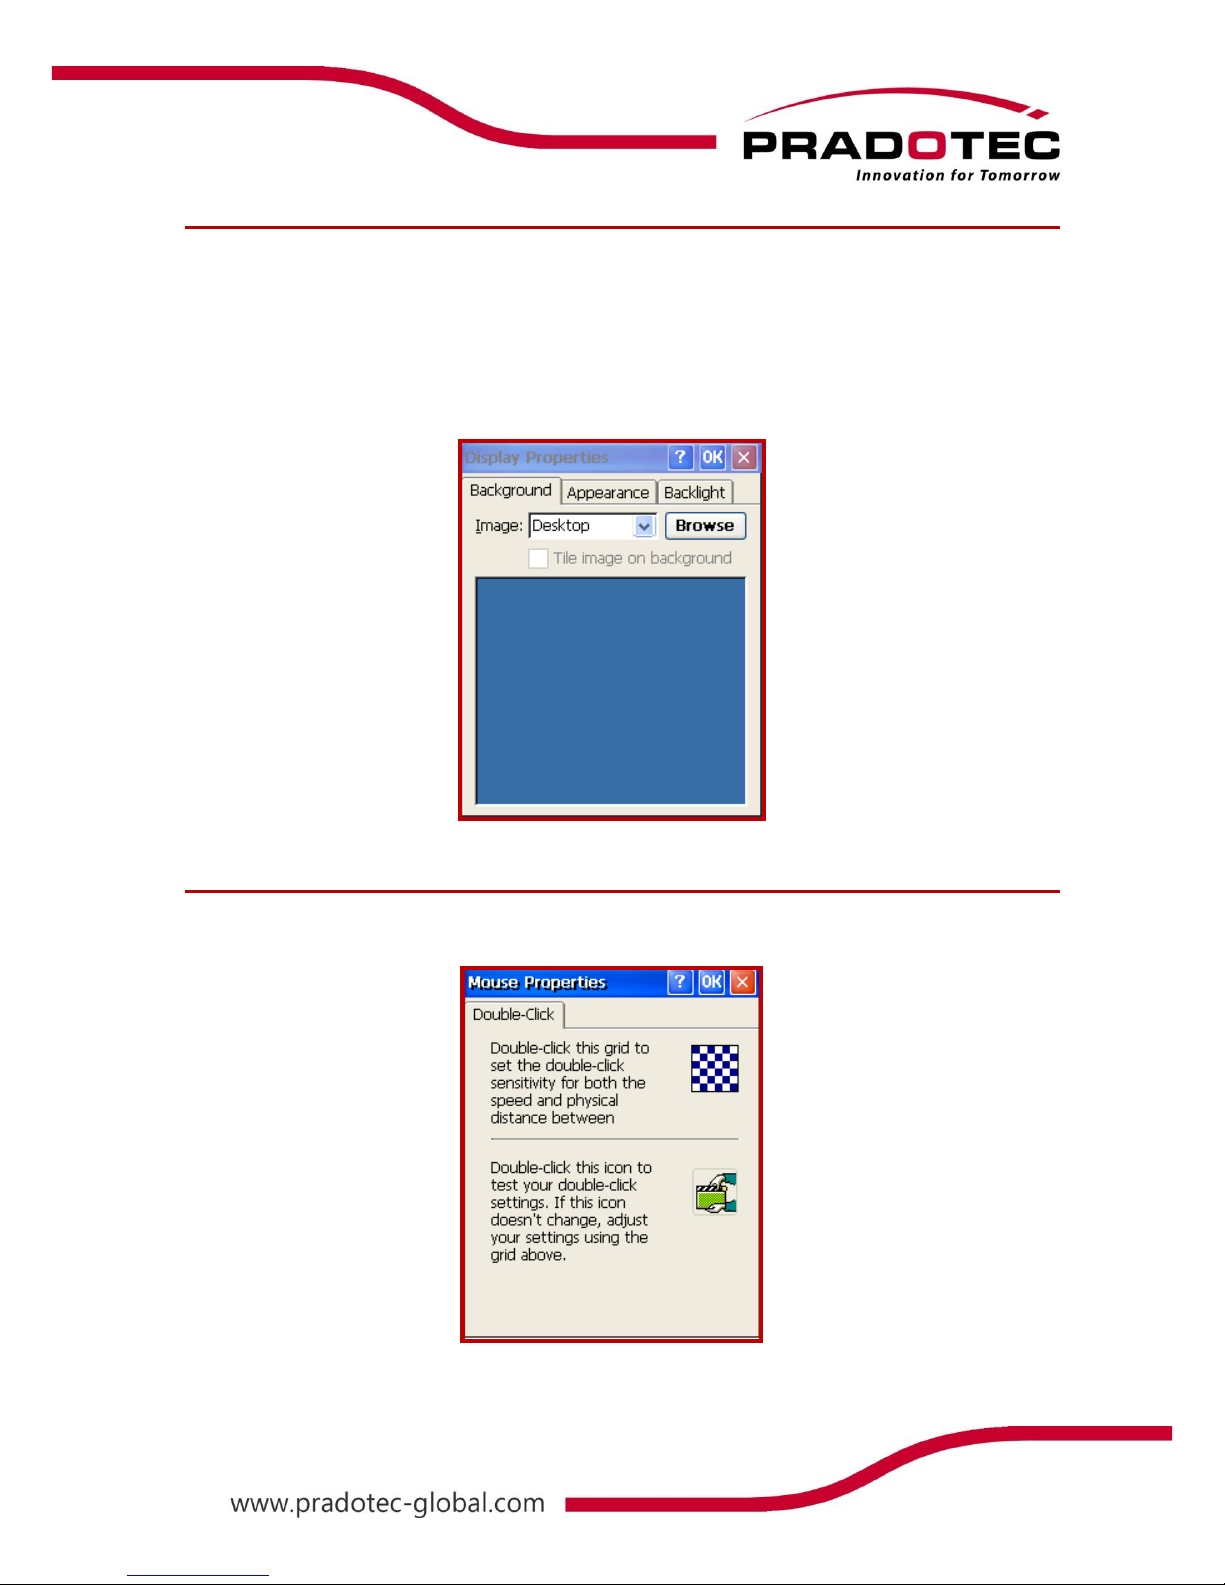
Display
The resolution for the device is 640x480. User can customize the screen display by changing
the picture on the Display Properties.
Or user may insert new picture just by transferring it from any personal computer. User may
select the Display Properties by holding the pointer on the desktop, and then select
Properties or go to Start -> Settings -> Control Panel -> Display Properties. User can tile
desired image on the display property.
Mouse
On the Mouse Menu, user can set and test the sensitivity and speed of double clicking.
Table of contents


