Alberici LAND User manual

LAND Multi-changer POS
Operator’s Manual
Rev. 1.04 EN
LAND
Money Changer / Token Dispenser
Progettazione e produzione di sistemi di pagamento e accessori per macchine Gaming, Vending e Car-Wash
Design and manufacture of payment systems and accessories for the Industries of Gaming, Vending and CarWash

2
This manual has been drafted with the utmost care. Nevertheless, it is not possible to guarantee at all times the
absolute correspondence of the descriptions contained therein with the actual characteristics of the product.
Alberici S.p.A. declines any and all responsibility towards the User with reference to damages, losses, or claims of
third parties, resulting from the use of the product or caused by incorrect interpretations of this manual.
Alberici S.p.A. reserves the right to modify, without prior notice and in any way, any part of this manual and the
technical specifications of this product, as part of the continuous pursuit of improvement of its products.
NOTICE

3
CONTENTS
1. Package content........................................................................................................................................ 4
2. Components description............................................................................................................................ 4
3. Product description.................................................................................................................................... 5
4. Warning..................................................................................................................................................... 5
5. Installation ................................................................................................................................................. 6
6. Operation................................................................................................................................................... 8
7. System configuration................................................................................................................................10
8. Messages .................................................................................................................................................22
9. Cleaning of the Note Validator...................................................................................................................25
11. Disposal of the product..............................................................................................................................28
12. Terms of Guarantee ..................................................................................................................................31
13. Customer Service......................................................................................................................................31
STORICO REVISIONI
Revisione n°
Data
Modifica
Note
Creazione 1.00
23.07.2018
Creazione
FW v. 1.01
Rev. 1.01
14.07.2020
Integrazione VPOS Touch Nayax e Valina
FW CMG v. 1.09 Nayax –v. 1.07 Valina
Rev. 1.02
11.12.2020
Time-out su POS e tabella pagamenti POS indipendente
FW CMG v. 1.11 Nayax –v. 1.11 Valina
Rev. 1.03
08.03.2021
Inserito errore ccTalk (luce gialla fissa)
FW CMG v. 1.11 Nayax –Valina - Payter
Rev. 1.04
30.08.2021
Reset of Remaining credit / Hopper adjustment by 5c steps
FW CMG v. 1.11 Nayax / Payter

4
Dear Customer,
we would like to thank you and congratulate for your choice. We trust that you will appreciate the quality and performace
of the LAND automatic Change Machine. This machine operates by cctalk protocol, the serial communication mode
that provides security and precision.
1. Package content
The package contains: 1. the Alberici “LAND” Money-change machine
2. one pair of keys
3. the power cable (see inside of money box)
4. the instruction manual (this manual)
This product has been packed with the utmost care. In the case that you receive it damaged or incomplete, please notify
immediately your findings to the Carrier, and ask him to record your findings on the delivery receipt.
All packaging material must be recycled or disposed of in compliance with your local applicable laws.
2. Components description
#
COD.
DESCRIPTION
A
AE-0806
Power Box RD-125 and Switch
B
SH-1D41-0010
ChangeOne CMG pcb, 5” blue display
C
S-020934-000
3 blue-led bar
D
K-02C-020047
4 x Hopper S11 CCT (no base) + Sector 75
extension (AA-0313)
E
LB-MU03-0004
OryOne UN1 ccTalk note validator, 600-
banknotes stacker
F
GE-66SU
AL66S coin acceptor
G
PN-MD0T-000H
3 x RGB Vandalproof pushbutton
H
IM-N000-0L10
PP coin entry slot
I
C-070103-000
Main lock with straight latch
L
AM-1305
Plastic coin box ‘A’
M
C-140102
Nayax VPOS Touch 3G Marshall
N’
A-CM0059
Nayax VPOS Interface pcb
N”
A-CM0068
Valina POS Interface pcb
H+F
A
L
B
E
D
G
The footstand (AA-0181-0600)
is not part of the unit.
L
C
I
Please read carefully this handbook, to obtain the most from your machine.
C
I
E
D
B
G
H+F
M
N
M
N
A

5
3. Product description
3.1 General technical specifications
Size max:
Size max. on floor-stand:
Weight:
Voltage:
Nominal power:
Operation temperature:
Installation:
Coin capacity:
Components:
Power supply unit
Control board
Note validator
Pay-out Hopper
Coin acceptor (optional)
Remote audit (optional)
547 mm (w) x 810 mm (h) x 360 mm (d)
547 mm (w) x 1595 mm (h) x 440 mm (d) [floor-stand 585 (w) x 785 (h) x 440 (d)]
55,5 kg (82 kg with floor-stand
110 - 230 Vac - 50 Hz
340 W max.
0°C ÷ +50°C
Desktop, or on floor-stand, or wall-mount, indoor
with 4 x Hopper S11: 7500 (various denominations)
with 3 x Hopper S11: 5600 (various denominations) + 1 x Hopper AH4: 1600 (mixed)
Power switching 340W
CHANGEONE CMG 120K with 5” GRAPHIC DISPLAY
ORYONE (600 banknotes capacity by default; 300 banknotes as option), or as option:
VEGA-RC with Recycler (300 banknotes capacity, 30+30 recyclable banknotes)
4 x HopperOne S11; or 3 x S11 + 1 AH; or 2 x S11 + 2 AH4; or 1 x S11 + 3 x AH4
AL66S cctalk
Alberici Hermes GSM-GPRS or GPS/GSM/GPRS (*)
Notice: Euro is the preset currency. If a different currency is required, please specify when placing your order.
(*) The system requires that the B-to-B Alberici SIM card is present into the Hermes module SIM slot, and that a subscription is
entered into the ARGO Portal, in order to control the machine via the Internet.
3.2 Available functions
- Change of notes and coins into various denomination coins, in various combinations
- Change of notes and coins into one or more denomination tokens, in various combinations, without or with
return change, without or with bonus (bonus will be available only when POS has been disabled)
- Purchase of tokens by POS transaction, without bonus
- Control of accounts via display (by on-board buttons or extension keypad)
- Programmable via menu (by on-board buttons or extension keypad)
- Courtesy button for display language change.
4. Warning
- Comply with the instructions in this manual
- Switch power off before any maintenance operation
- Use only within the recommended temperature/humidity range
- Do not expose the machine (and especially the mote acceptor front plate) to direct sun
light or to incandescent light (> 3000 Lux)
- When in presence of car exhaust gas or smoke, clean and check the components (the note acceptor in
particular) regularly and frequently.
- Do not favour contact with dusts or chemical moisture or sprays, water or other liquids
- Instal indoor
- Wipe clean by a dry piece of cloth (or slightly wet with alcohol)
- Do not use thinners or organic solvents
- The note acceptor could reject (or get jammed by) stained notes, or worn out, wet, wrinkled, torn, dog-
eared, oil-smeared, with sticking tape or similarly affected.
- Clean monthly the sensors of the note acceptor. Remove paper dust that has accumulated on the drive
wheels, by a clean piece of cloth or a cotton swab. Do not use alcohol nor solvents or scrapers.

6
5. Installation
5.1 Dimensions

7
5.2 Mounting the unit
PAY ATTENTION: IT IS ESSENTIAL TO FASTEN THE MACHINE TO A SOLID
WALL BY USING RELIABLE EXPANSION BOLTS.
IT IS RECOMMENDED TO FASTEN THE UNIT TO THE WALL BY
USING THE DEDICATED MOUNTING SLAB (ref. MT0-AM16-V06).
Put the Change Machine in place and fasten it to the wall by
expansion bolts, through the “x” holes in the rear side of the
cabinet. Take care not to obstruct the power socket. In addition,
the large holes at the rear foot of the floorstand allow to secure
the machine to the floor by binding chain or pass-through bar.
The fastening slab allows to easily secure
the Change Machine to the wall:
cnce fixed the slab to the wall (see below), the machine can be hung
upon the “w” slab’s hooks, and then comfortably fastened to it by
screws (“z” holes), or just left hanging so as to remove it at ease.
WALL-MOUNT SLAB:
5.3 PREPARATION FOR USE:
534
167
97
80
70
130
300
800
240
110
12
X
W
Z
X
X
X
X
X
Z
190
97
330
97
!
Rear view of the Change Machine:
‘x’ = fastening holes to the wall
‘z’ = fastening holes to the wall-mount slab
Z
X
X
Z
X
X
Prepare the tunnel for the power cable in
the wall (corresponding to “Y” hole in the
slab).
Slip the cable through the “Y” hole.
Fasten the slab to the wall by sturdy
expansion bolts, through the 6 “x” (12
mm) holes.
Connect the cable to its socket behind the
machine, and hang the latter on the “w”
supporting hooks.
Fix the LAND unit to the slab by M8 screws
through the three “z” threaded holes, unless
you plan to remove the machine from the
wall every evening to store it in a safer
place.
All measures in mm
Z
40
45
Y
Z
130
70
97
167
290
50
220
340
W
W
W
W
W
W
W

8
PAY ATTENTION:FILL THE HOPPERS ONLY WHEN THE MACHINE IS OFF.
Open the door and locate extensions capacity on top of the hopper.
Unlock the latch A (white slide) of the cover and slide
the latter fully out towards the outside, until is positioned as
a pilot chute: pour into the hopper the coins or tokens to be
dispensed as change.
Unlock again the latch A and slide the cover back
to “closed” position.
Close the tiltable front flap of the machine.
The coin denomination preset for all the single-coin hoppers is € 2. When the machine is equipped with banknote
recycler, the two default denominations for the recyclable banknotes are: € 50 and € 20. It is possible to modify
such default configuration through the setting menu: see section 7.3.6.2.
Plug the power cable in, and turn the main switch on. The ON/OFF switch is located at the left side of the power
box; remove the coinbox to get easy access to it.
The system shall start automatically self-check and the self-setting. At the end, a message will inform that the
machine is ready for operation, showing what coin(s) (tokens) value(s) will be paid in exchange for the notes and
the coins introduced.
The change machine will activate different procedures depending on whether it has been set up to
operate by AUTOMATIC MODE (factory setting) or in MANUAL 2P MODE.
In any of the two modes, the Operator can preset in advance the payout combinations that he wants to provide the
User with, depending on the amount that the User would insert (for details, see sections 7.3.6 A and 7.3.6 B):
AUTOMATIC MODE
MANUAL MODE
POS MODE
For each inserted amount out
of 6 programmable levels (to
be chosen among 0,10 - 0,20 -
0,50 –1 -2 -5 - 10 –20 - 50
- 100 €), the User will receive
the relevant combination of
Tokens/Coins preset by the
Operator.
If the note recycler is present,
the User will receive the preset
combination of Tokens/Coins
and Banknotes.
For each inserted amount out of 9
programmable levels (to be
chosen among. 0,10 - 0,20 - 0,50 –
1 -2 -5 - 10 –20 - 50 - 100 €),
the User will be able to choose
among 3 combinations of
Tokens/Coins preset by the
Operator.
If the note recycler is present, the
User will be able to choose among
3 preset combinations of
Tokens/Coins and Banknotes.
For each inserted amount out of 10
programmable levels (to be chosen
among. 0,10 - 0,20 - 0,50 –1 -2 -5 -
10 –20 - 50 - 100 €), the User will be
able to choose among 3
combinations of Tokens preset by
the Operator.
A
CHANGE
INSERT
COINS/BANKNOTES
or
PRESS SEL FOR
CARD
DISPENSING
2,00€
1,00€
0,50€
0,10€
CMG- Vers. 1.04
LAND

9
6. Operation
Three buttons are available: “SELECT-”, “LANGUAGE/SELECT+”, and “CONFIRM” allow the User to make his
choice when the unit is set to operate in MANUAL MODE. These buttons are lit up in blue colour when the unit is in
stand-by. The “LANGUAGE/SELECT+” button allows the user to choose his preferred interact language.
6.1 Manual 2P mode
When a note or coin is inserted (or when the smaller value available in the hoppers is reached), the “SELECT” and
“CONFIRM” buttons will lit up in green colour. At the same time, the display will show the first one among the various
pre-set change combinations proposed, out of the 1-to-3 pre-programmed by the Operator (see section 7.3.6.3 B
PAY-OUT TABLE IN MANUAL MODE). Press any “SELECT” button to get to the next page and check the second
combination, then press the button again and so on, to find the combination that best suits your wish. Once found it,
press the “CONFIRM” button to collect the changed amount or the purchased tokens.
At the end of the payout cycle, the display will show both the inserted amount and the total amount paid out.
6.2 Automatic mode
When a note or coin is inserted, the display shows the credited amount, and
the control board automatically starts topay-out the combination that the
Operator has pre-programmed for the amount inserted (see section 7.3.6 A
PAY-OUT TABLE IN AUTOMATIC MODE). At the end of the payout cycle, the
display will show both the inserted amount and the paid out total.
6.3POS mode
POS operation is allowed uniquely if the machine delivers Tokens only. Using the change machine to cash
from credit cards or debit cards is ILLEGAL, since the machine is not a licensed ATM.
The instruction on the machine display alternatively prompts the User to press the SEL (SELECT-) button if
purchase by credit/debit card is desired:
-
Lean your Credit/Debit Card against the POS Terminal:
you will be invited to select your product (that is, how
much money you will pay to purchase the tokens):
LEAN CARD AGAINST TERMINAL
press the “SELECT“
button, the display will
show:
SELECT AMOUNT OF PURCHASE
5,00€
CONFIRM TO COLLECT

10
-
touch any “SEL” button as many times as necessary to obtain the desired amount.
-then, press the “OK” button, to make the machine dispense the variety of tokens corresponding to the combination
that the Operator has pre-programmed for the amount inserted (see section 7.3.6.3 C POS PAY-OUT TABLE.
At the same time, the bank network will
deduct the equivalent amount from your
ChipCard account.
If, after starting the POS procedure by pressing the SEL key, the User does not want to continue, she/he
should press the crossed red symbol on the POS terminal. This action returns the system to stand-by mode.
Else, if no button is pressed within 30 seconds from POS activation, the machine itself will stop the
transaction and return to stand-by mode.
WARNING: if there are not enough pieces in the hopper to fulfil the whole change request, the remaining credit shall
be retained in memory. Switch off the machine, fill the hoppers, and switch on again to pay the remaining credit out.
An alternative option is to set the Remaining Credit Menu (see section 7.3.5) so as to cancel the remaining credit -
and at the same time record it in the Accounts menu - by switching the machine off and on again.
7. System configuration
7.1 Default configuration
The device parameters of the LAND Money-change machine / Token dispenser are preset by default as follows:
Control Board Parametres Pay-out mode = AUTOMATIC
Hopper S11 Parameters Hoppers nr. 1, 2, 3, 4 (*) = € 2.00
Hopper AH4 discriminator (upon request) Preset by default to 0,50 –1,00 –2,00 €
ORYONE / VEGA-RC Validator take € 5.00 - …. - € 100.00
VEGA-RC Recycler takes € 20 –10 = ENABLED
AL66 S coin acceptor takes € 0.05 - € 0.10 - € 0.20 = DISABLED € 0.50 = ABILITATO
€ 0.50 - € 1.00 - € 2.00 = ENABLED
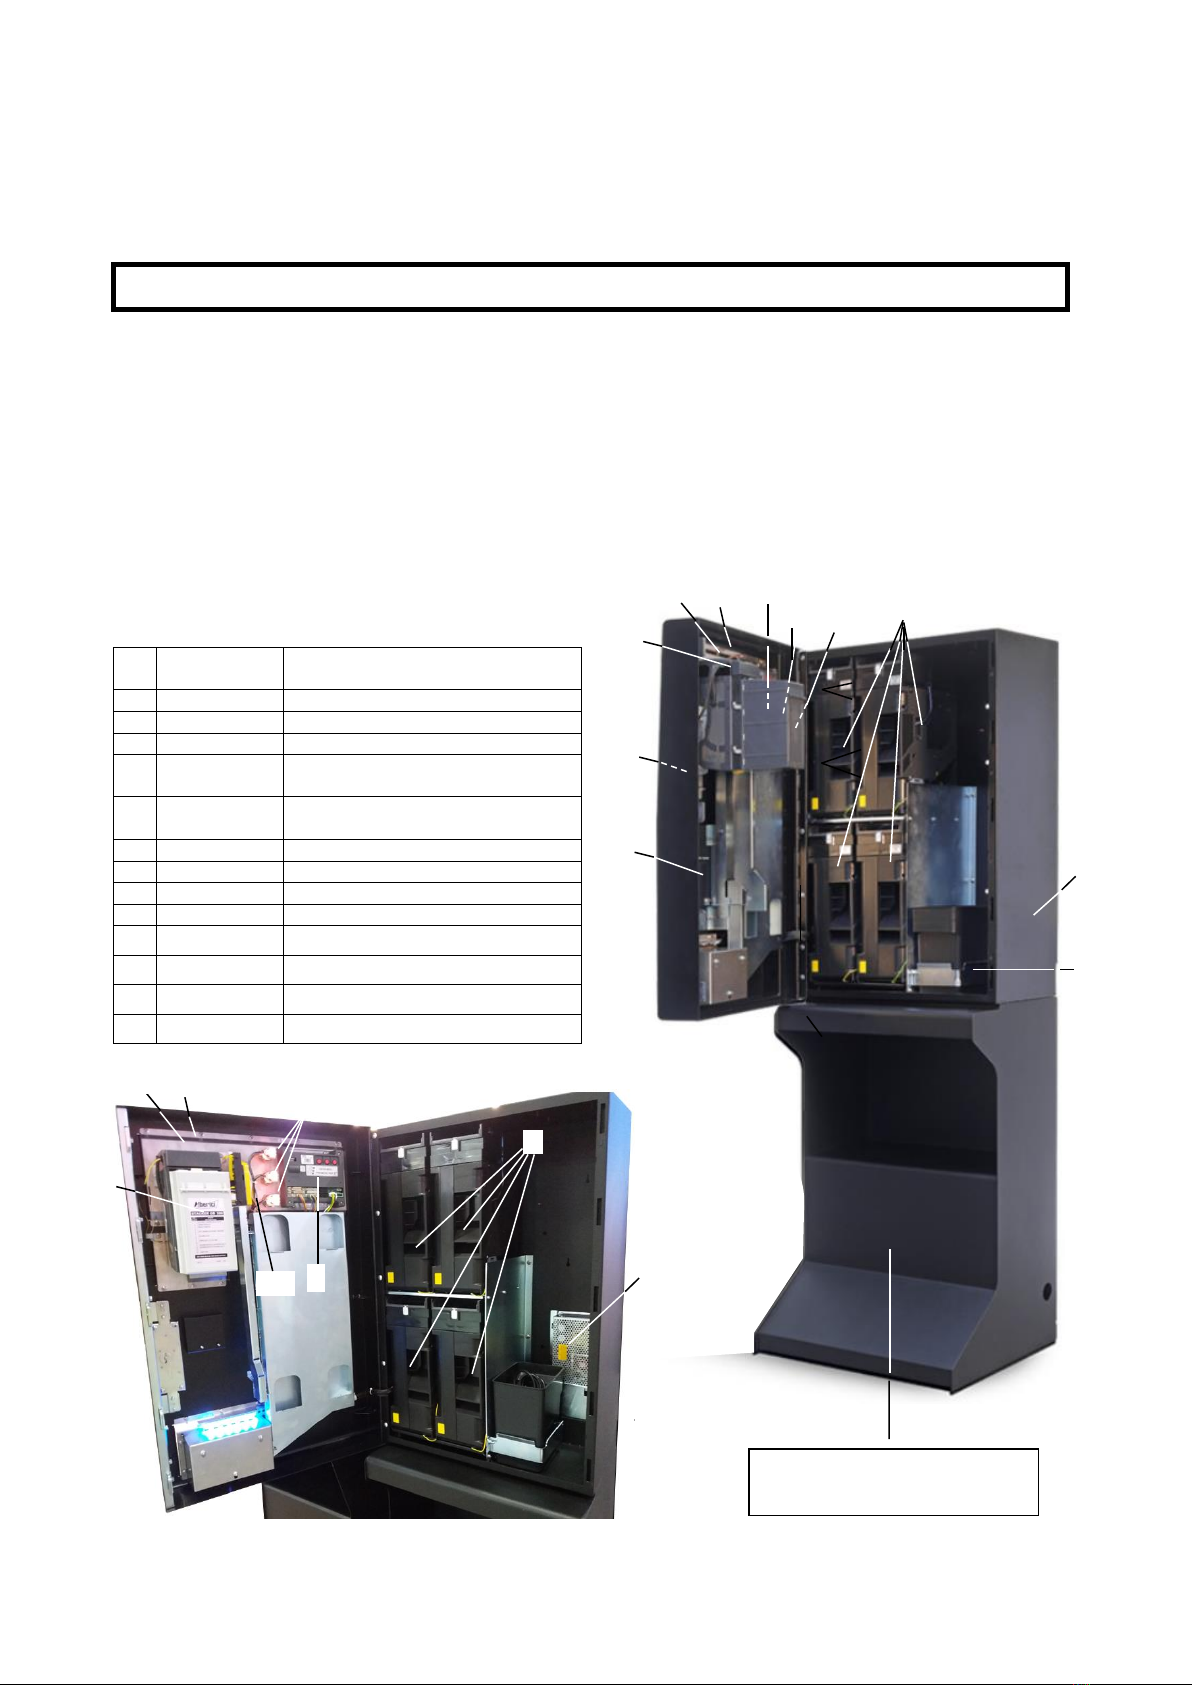
(*) The Hoppers are physically positioned in pairs, one pair above the other. It is possible to decide which
one among the 4 hoppers must work as the primary one (ex. when the machine is used for dispensing
tokens, or when the pay-out table is not in use). Each hopper has its own serial address; such serial
address is defined by the position of the dip-switches located in the hopper sliding base. The dip-switch
rows of the hoppers are set respectively to the following addresses:
Dip-switches in HP1: address 3 (all DS to OFF)
Dip-switches in HP2: address 4 (no. 1=ON, nos. 2=3=OFF)
Dip-switches in HP3: address 5 (no. 2=ON, nos. 1=3=OFF)
Dip-switches in HP4: address 6 (nos. 1=2=ON, no. 3=OFF)
SELECT AMOUNT OF PURCHASE
20,00€
CONFIRM TO COLLECT
SELECT AMOUNT OF PURCHASE
10,00€
CONFIRM TO COLLECT
SELECT AMOUNT OF PURCHASE
10,00€
CONFIRM TO COLLECT
SELECT AMOUNT OF PURCHASE
20,00€
CONFIRM TO COLLECT
“SEL“
SELECT AMOUNT OF PURCHASE
50,00€
CONFIRM TO COLLECT
“SEL“

11
Restore default configuration
If any unwanted variation is made, it will be possible to restore the default configuration as follows:
enter menu, scroll by UP and DOWN keys and choose RESTORE DEFAULT CONFIGURATION, then press OK;
the message DEFAULT CONFIG. RESTORED will be displayed and the unit shall return to its original setting.
NOTICE: the RESTORE DEFAULT CONFIGURATION command resets the default PIN code (0000) .
7.2 System connections
RGB1 = CONFIRM Button
RGB2 = SELECT- Button
RGB3 = LANGUAGE/SELECT+ Button
POS Terminal
J5 (Ser TTL 1)
TTL 2
TTL 1 = J5
FROM
POWER BOX
Optional K-P3N-
000006
programming
keypad:
provides external
operation of +, –,
and OK keys
RGB1
RGB2
RGB3

12
7.2.1 INSTALLING THE POS TERMINAL
Depending on the type of POS that the machine has
been requested, please find the relevant interface
cable among the accessories (inside the cashbox):
IF for VPOS Touch Nayax
IF for WORLDLINE VALINA
IF for PAYTER
Connect the 4p end of the POS Interface
cable to the TTL1 (J5) socket of the main pcb
Connect the 40p end of the POS
Interface cable and the aerial as
indicated
Connect the 40p end of the POS
Interface cable and the aerial as
indicated
Connect the black 6p (MDB) end
and the Ethernet connector
(LAN) of the POS Interface
cable as indicated.
Connect the white 6p (MDB) end
and the Ethernet connector
(LAN) of the POS Interface
cable as indicated.
Start the Service Menu: 1. Go to the option “Set up Peripheral units” in the Menu (see section 7.3.6.1)
2. Go to “Enable POS”Terminal (see section 7.3.6.1.C)
3. Enable POS Terminal and Exit
4. Go to “Set up Dispensing Mode”(see section 7.3.6.2)
5. Set to “AUTOMATIC MODE”
6. Set the values of the tokens to be dispensed by the hopper(s)
7. Program the “Pay-out Table in POS mode” (see section 7.3.6.3.C)
8. Exit the Menu
WL VALINA
Aerial
IN
6p
IN
NAYAX 3G
40p IN
40p IN
Aerial
IN
NAYAX ONYX
LAN
IN
6p
IN
PAYTER
LAN
IN
Aerial IN

13
7.3 Menu functions
7.3.1 SURF THE MENU:
Locate the in-line 3 button-keys on the p.c. board rear side. Get access to the menu by
holding the three buttons pressed at the same time for 5 seconds.
“OK” key confirm selection
“+” / “ –“ key navigate menu UP and DOWN; or, modify figures and letters
REG trimmer adjust display brightness
Else, it is possible to temporarily connect the external keypad (K-P3N-000006) to the ‘Program’ socket in
the rear side of the p.c. board.
7.3.2 MENU STRUCTURE
When switching to the menu, the following set of icons get diisplayed on the screen:
Use the “+” button-key to highlight the icon of the menu function you want to check: the description of the
highlighted icon will appear at the bottom of the screen (e.g. SHOW STATUS OF PERIPHERAL UNITS
for the first icon, EMPTYING DISPENSERS for the fifth, EXIT for the last one). Press the “OK” button-
key to access the function.
7.3.3 SHOW PERIPHERAL UNITS
This sub-menu allows to check the state of the peripheral units in the system (connected or not, in error, empty):
Press OK to return to the menu upper level.
7.3.4 SHOW ACCOUNTS
This menu allows to read the cashed totals and partials, the totals and partials paid out. Partials are made available
for banknotes and for coins/tokens. E.g., if Hopper 1 = 2 €, Hopper 2 = 1 €, Hopper 3 = 0,50 €, Hopper 4 = 0,10 €:
MENU
SHOW PERIPHERAL UNITS

14
Press OK to return to the menu upper level.
7.3.5 RESET ACCOUNTS
By this function it is possible to completely reset the registered Accounts records (eiher totals or partials).
To cancel the recorded totals it is necessary to enter the PIN code. It is also possible to choose how to
deal with the Renmaining credit amounts: maintain it or cancel it (and in which way).
7.3.6.1 Reset of partial and of total audits
The highlighted item appears on a white background: if you choose RESET PARTIALS, simply press OK to delete
these data (the message PARTIAL ACCOUNTS RESET will briefly appear);
If TOTAL ACCOUNTS RESET is chosen instead, after pressing OK the system will ask you to enter the PIN.
Press “OK” to highlight the first character, then press the “-“ or the “+” keys until the desired figure appears, and
confirm it by “OK”. The cursor will move to the next position. Repeat per each of the next 3 characters of the PIN.
Once entered the fourth character, the recorded Total Accounts data shall get automatically deleted.
SHOW ACCOUNTS
(*) Line available only if
the unit is equipped with
Banknote Recycler.
(**) Line avaiable only if
the RESET REMAINING
CREDIT (check section
7.3.5) option has been
enabled.
that has just been reset.
TOTALS IN: 50,00 €
TOTALS OUT: 50,00 €
BANKNOTES IN: 45,00 €
BANKNOTES OUT (*): 00,00 €
COINS IN: 5,00 €
COINS OUT HP1: 21,00 €
COINS OUT HP2: 5,00 €
COINS OUT HP3: 4,00 €
COINS OUT HP4: 10,00 €
CASHLESS IN: 0,00 €
LATEST PARTIAL IN: 0,00 €
LATEST PARTIAL OUT: 0,00 €
REMAINING CREDIT PAID (**) 0,00 €
(*) Whenever the Partials data
get cancelled, the previous value
recorded in “Last Partials
cancelled” gets replaced by the
amount that has just been reset.
RESET PARTIALS (*)
HANDLING OF REMAINING CREDIT
EXIT

15
7.3.5.2 Handling of the Remaining Credit
Should the hoppers not contain enough pieces to satisfy the entire request of purchase, the remaining credit is
shown on the display and stored in memory. Normally, if an operator is present, it will be sufficient for him to switch
off the machine, fill the hoppers and switch on again: the residual credit will then be paid. It is possible to manage
what to do with any remaining credit by setting this function. The display shows:
By enabling the Reset option, the remaining credit can be cancelled by choosing one of the following three options:
i. by turning the power off and on
(choose the option TURN OFF/ ON)
ii. automatic reset, after 30 seconds
have passed. If during these 30 seconds
more money is inserted, it will be added
to the remaining credit amount
(choose the option FIXED TIME-OUT)
PARTIAL ACCOUNTS
CANCELLED (*)
(*) When erasing the partial accounts, the
existing record of the LAST PARTIALS
cancelled (cf. 7.3.4 Show Accounts) gets
replaced by the latest values deleted (sum
of banknotes and coins, IN and OUT). In
addition, all the recorded data regarding the
Refill records are reset as well.
RESET ACCOUNTS
RESET THE REMAINING CREDDIT:
TURN FIXED RESET
OFF/ON TIME OUT BY MENU
ENABLE
x
x
x
AZZ. CONTABILITA’
RESET THE REMAINING CREDDIT:
TURN FIXED RESET
OFF/ON TIME OUT BY MENU
x
x
x
ENABLE
AZZ. CONTABILITA’
RESET THE REMAINING CREDDIT:
TURN FIXED RESET
OFF/ON TIME OUT BY MENU
x
x
x
x
ENABLE
v
RESET ACCOUNTS
v
RESET ACCOUNTS

16
iii. By accessing the RESET ACCOUNTS
Menu and confirming the line named RESET
OF THE REMAINING CREDIT
(choose the option RESET BY MENU) .
The line” RESET OF THE REMAINING CREDIT” will be made available and active only once the RESET BY MENU
option has been validated. It appears below the line “HANDLING OF THE REMANING CREDIT”.
When the option is enabled, to delete the remaining credit enter the RESET ACCOUNTS Menu, select the line
“RESET OF THE REMAINING CREDIT”, and confirm your choice.
Upon clearing the remaining credit amount by means of any of the three modes, the canceled amount grets recorded
in the SHOW ACCOUNTS Menu, under the item REMAINING CREDIT PAID.
7.3.6 SETUP THE MACHINE
The PERIPHERAL UNITS function allows to set which banknote and coin denominations must be accepted; if POS
device is included, its operation can be enabled or disabled by this function. If the telemetry module is part of the
machine, this sub-menu allows to configure the GSM-GPS fuction.
The DISPENSE MODE function allows to set the way the machine reacts to the introduction of money (i.e. change
money immediately and automatically, or wait for the User to confirm after dropping the money in); it also allows to
set the coin denominations (and possibly the note denomiations) that can be delivered by the dispensers.
When the Pay-out Table is enabled, the Operator can set different change combinations related to the amount
introduced by the User; different operating options can be set, according to whether the DISPENSE MODE has been
set to AUTOMATIC mode or to MANUAL mode. The POS has its own dedicated table. If not set, POS will not operate.
SET UP PERIPHERAL UNITS
SET UP DISPENSING MODE
SET UP PAY-OUT TABLE
SET UP POS PAY-OUT TABLE (*)
EXIT
AZZ. CONTABILITA’
RESET THE REMAINING CREDIT:
TURN FIXED RESET
OFF/ON TIME OUT BY MENU
x
x
ENABLE
(*) appears only if POS
has been enabled, and
operation set to
Automatic
v
RESET ACCOUNTS
RESET ACCOUNTS
RESET TOTALS
RESET PARTIALS
HANDLING OF REMAINING CREDIT
RESET OF THE REMINING CREDIT
EXIT

17
7.3.6.1 Set up Peripheral Units
This section allows to set which banknote and coin denominations must be accepted; if POS device is included, its
operation can be enabled or disabled by this function.
7.3.6.1.A ENABLE NOTES (NOTE DENOMINATIONS TO BE ACCEPTED):
All the programmed note values (5-to-100 Euro) are enabled (‘v’ = enabled) by default. To modify such condition, or
to change later modifications, press OK to get to the first denomination box (ex. 5 €), then press “+” or “-” to reverse
its status. Press OK to confirm (the sign ‘v’ will turn to ‘x’, and viceversa) and to shift to the next option (ex. 10 €).
Press OK to confirm and return to the upper level. Then press “+” to shift to the following line (ENABLE COINS).
7.3.6.1.B ENABLE COINS
By this function, the Operator can decide which coin denominations the machine must accept and which ones it
must reject and immediately return to the User.
The default coin denomination is 2 € for all 4 Hopper S11. If at least one Hopper AH4 (discriminator) is part of the
machine, default denominations are 0,50 € – 1,00 € – 2,00 €.
Press OK to get access to the modification controls. Press OK again to get to the first denomination box (ex.
2,00 €), then press “+” or “-” to reverse its status. Press OK to confirm the setting (the sign ‘v’ will turn to ‘x’, and
viceversa) and to shift to the next box (ex. 1,00 €).
‘v’ = enabled
‘x’ = disabled
(*) Only if the Note
Recycler is connected
‘v’ = enabled
‘x’ = disabled
COIN ACCEPTOR: PRESS OK
NOTE VALUE (*) PRESS 0K
POS ENABLE? NO
EXIT
COIN ACCEPTOR: PRESS OK
NOTE VALUE (*) PRESS 0K
POS ENABLE? NO
EXIT
(*) Only if the Note
Recycler is connected

18
7.3.6.1.C ENABLE POS TERMINAL (IF PRESENT):
Highlight the POS ENABLE line and press OK to modify its status: the cursor will highlight the present status of
the Terminal: make use of the “+” or of the “-“ button-key to enable or disable it.
Press OK to return to the ENABLE POS function, and press “+” to shift to EXIT, then again OK to return
to the upper menu level.
7.3.6.2 Set up Dispensing Mode
The DISPENSING MODE function allows to set the way the machine reacts to the introduction of money (i.e.
change money immediately and automatically, or wait for the User to confirm after dropping the money in); it
also allows to set the coin denominations that can be individually delivered by the 4 hoppers.
Press OK to start the modification of the current setting: the mode latter setting (ex. AUTOMATIC) will be displayed.
When set to AUTOMATIC mode, and the Pay-out Table is disabled, the machine will pay out as much evenly as
possible from each hopper (e.g. 5 pcs from HP1, 5 pcs from HP2, 5 pcs from HP3, 5 pcs from HP4); if set to
AUTOMATIC mode, and the Pay-out Table is enabled, the machine will pay out the combination preset by the
Operator (see section 7.6.3.A).
SET UP PERIPHERAL UNITS
SET UP DISPENSING MODE
SET UP PAY-OUT TABLE
SET UP POS PAY-OUT TABLE
EXIT
SET UP DISPENSING MODE

19
To transform the setting to MANUAL 2P, press the “+”key or the “-“ key. The MANUAL 2P mode allows the following:
-when the Pay-out Table is disabled:
1) to select the type of coin or token denominations that he wishes, if hoppers contain only tokens or only coins;
2) to select how many tokens he wants to obtain, if hopper 1 contains Tokens and hopper 2 contains coins.
- when the Pay-out Table is enabled :
2) to obtain the combination of coins and/or tokens that he wishes to receive, amng the ones that have been preset
by the operator (see section 7.3.6B). The User will check the available options by pressing the SELECT button, and
will start the payment of the chosen option by pressing the CONFIRM button.
Following to that, It is possible to set the hoppers for the wished coin denominations. If the unit includes the Note
Recycler, the banknote values to be recycled can be set as well.
Press OK to check or modify the default or the current settings. The display will show the following table:
By pressing the OK button, highlight the box that needs be changed, then press the “+” key or the “-“ key to
increase or decrease the value of the coin denomination to be paid out by the hopper.
It is possible to set which hopper must preferably pay out, i.e. when tokens are dispensed by e.g. HP1, and the
Operator wishes to sell as many tokens as can be purchased by the money introduced. This is obtained by
setting HP1 only as Primary Hopper.
MODE: AUTOMATIC

20
PLEASE NOTICE: if the Note Recycler is part of the machine, this section will offer as well the possibily to set the
note denominations to be recycled, choosing them among the accepted ones.
The default setting for the Note Recycler is 50 € / 20 €. Press first “- “/ “+” to move the highlighted combination,
then press “OK” to confirm the wished one and to return to the previous menu.
PAY ATTENTION: it is not possible to reverse the order in the combinations: the greater value is always matched
to Recycler 1 (which means: it is not possible to program the € 20 in the RC1 and the € 50 in the RC2).
7.3.6.3 Setup the Pay-out Table
When the Pay-out Table is enabled, the Operator can set different change combinations for the amounts introduced
by the User; different operating options can be set, according to whether the DISPENSE MODE has been set to
AUTOMATIC mode or to MANUAL mode. The POS has its own dedicated table, that will be made available in the
Menu only if the Dispensing Mode has been set to AUTOMATIC. If the Pay-out Table has not been set, the POS will
not operate.
Press “+”/”-“ to change the state of the function between ENABLED and DISABLED. According to which choice is
made, see possible operation in the next pattern.
SET UP PERIPHERAL UNITS
SET UP DISPENSING MODE
SET UP PAY-OUT TABLE
SET UP POS PAY-OUT TABLE (*)
EXIT
(*) appears only if POS
has been enabled, and
operation set to
Automatic
Table of contents