pratic Pergola STIl User manual

Pergola STIL
(rev. 02/18)
Manuale di Installazione
Installation manual
Notice d’installation
Installationshandbuch
Istruzioni originali
Original instructions
Instructions originales
Originalbetriebsanleitung
L’installazione va eseguita da personale
qualicato nel rispetto delle norme IEC e
delle disposizioni nazionali realtive agli
impianti elettrici civili
Consultare anche la documentazione tecni-
ca della struttura.
Questo simbolo indica possibile
pericolo per la persona o danno al
prodotto.
Questo simbolo indica“Attenzione”.
Questo simbolo indica l’utilizzo della
forza nell’operazione indicata.
Utilizzando avvitatori elettrici
settare il corretto valore di coppia.
Questo simbolo indica il non
utilizzo della forza nell’operazione
indicata
Questo simbolo indica un accesso-
rio opzionale.
Questo simbolo indica un opera-
zione eseguita correttamente.
Questo simbolo indica un operazio-
ne non eseguita correttamente.
Questo simbolo consiglia l’utilizzo
dell’elevatore Ercolino
.
Questo simbolo consiglia l’utilizzo
della livella laser
.
Altri simboli di sicurezza riportati fanno
riferimento alla norma UNI EN ISO 7010.
È responsabilità dell’installatore la corretta
scelta dei sistemi di ancoraggio idonei al
tipo di supporto su cui ancorarsi e dei carichi
derivanti dal peso della struttura e dall’azio-
ne del vento.
Il costruttore non risponde delle possibili
inesattezze, imputabili a errori di stampa
o di trascrizione, contenute nel presente
manuale. Si riserva di apportare ai propri
prodotti quelle modiche che ritenesse
necessarie o utili anche nell’interesse
dell’utenza, senza pregiudicare le
caratteristiche essenziali di funzionalità e
sicurezza.
Gentile Cliente,
grazie per aver scelto una copertura Pratic
della serie TECNIC.
La nostra azienda progetta e produce tende
da sole dal 1960; sin dalle origini abbiamo
scelto di investire sulla qualità e sull’inno-
vazione, selezionando e perfezionando sia i
materiali che i processi produttivi.
La sua copertura è stata realizzata impiegan-
do materiali di prima qualità, accuratamente
selezionati.
Nel processo produttivo, tecnologie all’a-
vanguardia sono state aancate alla cura
artigianale nella rinitura dei dettagli, per
garantire una qualità senza confronti.
Il risultato è un prodotto che garantisce il
massimo in termini di sicurezza, comfort e
semplicità d’uso e che è destinato a durare
a lungo nel tempo.
La invitiamo a leggere con attenzione le
pagine che seguono nelle quali troverà una
serie di informazioni che le permetteranno
di apprezzare sin nei dettagli la qualità del
prodotto che ha acquistato.
ATTENZIONE: Prima di utilizzare
la tenda, leggere attentamente
tutte le avvertenze e le istruzio-
ni riportate nel presente
manuale e nel manuale “Manuale delle istru-
zioni per l’uso”. I manuali installazione ed istru-
zioni per l’uso, compresi quelli relativi agli
accessori, sono parte integrante del prodotto
e devono essere conservati e tenuti sempre a
disposizione per successive consultazioni,
no allo smaltimento della tenda.
Dear Customer,
thanks for having chosen a Pratic cover of
TECNIC line.
Our company has been designing and
producing sun awnings since 1960. since
our very beginning we have chosen to
invest on quality and innovation, selecting
and improving both the materials used
and the productive processes.
This cover has been realized using rst
quality, carefully chosen materials.
Our productive process involves the
newest technologies matched with handi-
craft care for detail rening, in order to
ensure quality beyond compare.
The result is a product able to ensure
the top in terms of safety, comfort and
user-friendliness and that is meant to last
longer and longer.
We invite you to read carefully the
following pages, where you’ll nd infor-
mation that let you appreciate in detail
the quality of the product you bought.
WARNING: before using the
awning, read carefully all
warnings and instructions in
this manual and also in the
one called“Instructions Manual”.
The installation and instruction manuals,
as well as the spare parts manuals are
part of the product and must be proper-
ly stored for any future need until the
awning disposal.
Cher Client, merci d’avoir choisi une structu-
re Pratic de la série TECNIC.
Notre société conçoit et produit des stores
pare-soleil depuis 1960 ; dès le départ,
nous avons choisi d’investir sur la qualité
et sur l’innovation, en sélectionnant et en
perfectionnant tant les matériaux que les
processus de fabrication.
Votre couverture a été réalisée avec des
matériaux de première qualité, sélectionnés
de façon méticuleuse.
Le processus de fabrication est fondé sur
des Technologies d’avant-garde alliées au
soin artisanal des nitions des détails, pour
garantir une qualité sans pareille.
Le résultat est un produit qui garantit le
maximum en termes de sécurité, confort et
simplicité d’usage et qui est destiné à durer
au l du temps.
Nous vous invitons à lire attentivement les
pages suivantes dans lesquelles vous trouve-
rez une série d’informations qui vous permet-
tront d’apprécier dans les moindres détails la
qualité du produit que vous avez acheté.
ATTENTION: avant d’utiliser le
store, lire attentivement tous
les avertissements et les
instructions gurant dans ce
manuel et dans le manuel “Manuel d’utilisa-
tion.”Les instructions d’installation et d’utili-
sation avec ceux des pièces détachées font
partie intégrante du produit et ils doivent
être conservés et être toujours à disposition
pour toutes consultations futures, jusqu’à
l’élimination du store.
Sehr geehrter Kunde, vielen Dank für die
Wahl eine Pratic Abdeckung der Serie
TECNIC. Unsere Firma entwirft und produ-
ziert Markisen seit 1960; vom Anfang an
haben wir gewählt in Qualität und Innova-
tion zu investieren, indem die Materia-
lien wie auch die Produktionsvorgänge
ausgewählt und verbessert wurden.
DieMarkise wurde mit Materialien von erster
und sorgfältig ausgesuchter Qualität realisiert.
Neben dem Produktionsvorgang und der
Avantgarde Technologie wurden handwer-
kliche Sorgfalt bei der Feinbearbeitung der
Besonderheiten hinzugefügt, um eine Qualität
ohne Vergleich zu garantieren.
Das Ergebnis ist ein Produkt, das die höchste
Sicherheit, Komfort und einfache Verwendung
garantiert und das zur langhaltigen Benutzun-
gszeit bestimmt ist.
Wir bitten Sie darum, diese Seiten aufmerksam
zu lesen, in denen Sie nützliche Informationen
nden werden, die Ihnen erlauben, die Quali-
tät des von Ihnen gekauften Produktes bis zu
den Einzelheiten schätzen zu können.
ACHTUNG!: vor der Markisen-
benutzung bitte alle Hinwei-
se und Anleitungen in diesem
Handbuch und im Handbuch
“Bedienungsanleitung”sorgfältig lesen.
Das Installationshandbuch und die Bedie-
nung und Zubehör Anleitungen beglei-
ten das Produkt und müssen sorgfältig
aufbewahrt werden um für jede weitere
Information gribereit zu bleiben, bis die
Markise entsorgt wird.
Installation must be carried out by quali-
ed personnel in compliance with EN and
local safety regulations relative to domestic
electrical systems.
See also product technical sheet.
This symbol indicates the possibili-
ty of injury to persons or damage to
the product.
This symbol means“Warning”.
This symbol means to use force
during the shown operation.
Using electric screwdrivers set the
correct torque value.
This symbol means not to use
force during the shown operation.
This symbol indicate a particular
which is given as optional.
This symbol indicates an operation
carried out correctly.
This symbol indicates an opera-
tion carried out not correctly.
This symbol recomend the use of
the manual lift Ercolino.
This symbol recomend the use of
laser measurement instruments.
Other indicated safety symbols refer to the
regulation UNI EN ISO 7010.
It is responsibility of the tter to correctly
choose the anchoring systems suitable to
the type of support on which it is necessary
to anchor and the loads due to the weight of
the structure and the wind action.
The manufacturer accepts no liability for any
inaccuracies or printing errors that may be
contained in this manual. The manufacturer
reserves the right to introduce any modi-
cations to the product that are considered
necessary or in the interests of the user and
which do not alter the essential operational
and safety characteristics of the appliance.
L’installation doit être eectuée par du
personnel qualié conformément aux
normes NF et aux dispositions nationales
relatives aux installations électriques civiles.
Voir aussi la documentation technique de la
structure.
Ce symbole indique un risque de
danger pour les personnes ou de
dommage à le produit.
Ce symbole indique: «Attention».
Ce symbole vous indique d’utiliser
de la force au cours de l’opération.
Si on utilise un visseuse électrique
il faut dénir la valeur de couple
correcte pour le serrage
Ce symbole vous indique de ne pas
recourir à la force au cours de l’opé-
ration.
Ce symbole vous indique un acces-
soir en option.
Ce symbole vous indique une
opération réalisée correctement.
Ce symbole vous indique une
opération réalisée pas correcte-
ment.
Avec ce symbole nous vous conseil-
lons d’utiliser le système de levage
Ercolino.
Avec ce symbole nous vous conseil-
lons d’utiliser des instruments de
mesure laser.
D’autres symboles de sécurité indiqués se
réfèrent à la norme UNI EN ISO 7010.
L’installateur est responsable de la bonne
choix des systèmes d’ancrage appropriés
au type de support sur lequel s’ancrer et des
charges résultants du poids de la structure
et de l’action du vent.
Le Fabricant décline toute responsabi-
lité pour les éventuelles inexactitudes
imputables à des erreurs d’impression
ou de transcription contenues dans cette
notice. Il se réserve la faculté d’apporter à
ses produits toutes les modications qu’il
estime nécessaires au utiles, y compris dans
l’intérêt des utilisateurs, sans modier leurs
caractéristiques essentielles de fonctionna-
lité et sécurité.
Die Installation ist von Fachpersonal und
unter Beachtung der IECBestimmungen und
der örtlichen Vorschriften bezüglich elektri-
scher Anlagen auszuführen.
Siehe auch Produckt Technisches Daten-
blatt.
Dieses Symbol weist auf eine
mögliche Gefahr für Personen bzw.
Schäden am Produkt.
Dieses Symbol steht für“Vorsicht!”
Dieses Symbol bedeutet, Kraftanwen-
dung bei der Operationsdurchführung.
Wenn Sie Elektrische Schrauber
benutzen, achten Sie bitte auf den
korrekte Drehmoment.
Dieses Symbol bedeutet, dass kein
Gewalt bei der Operationsdurchfüh-
rung angewendet werden muss.
Dieses Symbol kennzeichnet ein
optionales Zubehör.
Dieses Symbol bedeutet, dass die
Operation korrekt durchgeführt
worden ist.
Dieses Symbol bedeutet eine
Operation, die nicht korrekt durch-
geführt worden ist.
Dieses Symbol empehlt der
Ercolino-Heber zu verwenden.
Dieses Symbol empehlt die
Laser-Messgeräten zu verwenden.
Andere angegebene Sicherheitssymbole
beziehen sich auf die Norm UNI EN ISO 7010.
Der Installateur ist dafür verantwortlich,
die richtigen, für die Art der zu ankernden
Unterlage geeigneten Verankerungssys-
teme anzuwählen, als auch die von dem
Gewicht der Struktur und der Wirkung des
Windes verursachten Lasten.
Für Unrichtigkeiten in diesem Handbuch, die
auf Druck- oder Abschreibfehler zurückzu-
führen sind, übernimmt der Hersteller keine
Haftung. Der Hersteller behält sich das Recht
vor, alle für notwendig erachteten bzw. im
Interesse der Abnehmer liegenden Änderun-
gen an seinen Produkten vorzunehmen, ohne
jedoch deren wesentliche Funktions- und
Sicher-heitseigenschaften zu beeinträchtigen.
Informazioni generali
Avvertenze
ITALIANO ENGLISH FRANÇAIS DEUTSCH
General Information
Warnings
Informations Générales
Avertissements
Allgemeine Hinweise
Anmerkung

PAG. 3 Pergola Stil - Manuale di installazione Rev. 02/18
ATTENZIONE: è assolutamente vietato rimuovere la targhetta metallica con marchio, l’etichetta con ologramma,
con dichiarazione di conformità e/o con avvertenze applicate ai prodotti. La rimozione delle stesse fa decadere
automaticamente la validità della garanzia.
CAUTION: It is strictly forbidden to remove the metal plate with logo, the label with hologram, containing the
declaration of conformity and/or instructions applied on the products.
Their removal will automatically cause the expiration of the warranty.
ATTENTION: Il est absolument interdit d’enlever la plaquette metallique avec logo Pratic, l’étiquette avec ologramme,
avec déclaration de conformité et/ou avec avertissements appliqués aux produits.
L’enlèvment des étiquettes annule automatiquement la validité de la garantie.
ACHTUNG: es ist streng verboten, das metallische Schildchen mit dem Logo, die Etikette mit dem Hologramm, mit
der Konformitätserklärung und/oder mit den an den Produkten angesetzten Anweisungen zu entfernen. Deren
Beseitigung lässt die Gewährleistung sofort verfallen.
STOCCAGGIO DEI COLLI: Evitare assolutamente l’esposizione delle strutture o loro parti, ancora avvolte da materiali
d’imballaggio, alle intemperie o a luoghi con un alto tasso di umidità.
La presenza di acqua o umidità all’interno dell’imballo può generare macchie sulle componenti della struttura.
PARCELS STORAGE: The structures or their parts, still wrapped up in their packaging, must not be exposed to
the elements or to places with high humidity levels.
The presence of water or humidity within the packaging can cause stains on the structure components.
STOCKAGE DES COLIS: Éviter absolument l’exposition des structures, ou des leur parties encore emballées,
aux éléments climatiques ou aux endroits avec haut taux d’humidité.
La présence d’eau ou d’humidité à dans l’emballage peut causer des taches sur les composants de la structure.
LAGERUNG DER FRACHTSTÜCKE: Die noch verpackten Strukturen – oder ihre Bestandteile – sollen den
Wetterunbilden oder den Orten mit eine hohe Feuchtigkeit nicht ausgesetzt werden. Das Vorhandensein von Wasser
oder Feuchtigkeit innerhalb der Verpackung kann Flecken auf den Strukturkomponenten verursachen.
ATTENZIONE: PROTEZIONE SCARICHE ATMOSFERICHE: La valutazione del rischio di fulminazione va eettuata da
un tecnico abilitato che, applicando la normativa vigente nel paese di installazione del prodotto, può determinare se la
struttura, in riferimento alla sua posizione di installazione ed al suo ambiente circostante, necessita di protezioni contro
le scariche atmosferiche. A protezione delle apparecchiature elettroniche installate sui prodotti, valutare l’installazione
di appositi scaricatori di sovratensione. Gli scaricatori vanno dimensionati da un tecnico abilitato in funzione del tipo
di impianto di alimentazione elettrica a monte della struttura.
CAUTION: PROTECTION AGAINST LIGHTNING: The evaluation of the risk of lightning strike must be carried out by
a competent technician who, in compliance with the regulations in force in the country of installation of the product,
must decide whether the structure, in consideration of the installation position and surrounding environment, needs
protection devices against lightning.To protect the electronic equipment installed on the products, it is necessary to
take into consideration the use of specic lightning arresters. Arresters must be adapted by a competent technician
according to the type of power supply system of the structure.
ATTENTION: PROTECTION DÉCHARGES ATMOSPHÉRIQUES: L’évaluation des risques de foudre doit être eectuée
par un technicien qualié que par l’application de la législation en vigueur dans le pays d’installation du produit, peut
déterminer si la structure, en référence à sa position d’installation et à son environnement, a besoin des protections
contre la foudre. A’ protection des équipements électroniques installés sur les produits, évaluer l’installation de
parafoudres de surtension spéciaux. Les parafoudres doivent être dimensionnés par un technicien qualié en fonction
du type de système d’alimentation éléctrique en amont de la structure.
ACHTUNG: BLITZSCHUTZ: Die Abschätzung des Risikos vom Blitz muss von einem Fachtechniker ausgeführt werden.
Durch die Handhabung der geltenden Rechtsvorschriften im Land der Installation des Produktes, kann er bestimmen,
ob die Struktur, in Bezug auf den Installationsort und auf das umliegende Gebiet, den Schutz vor den Blitzen erfordert.
Zum Schutz der auf den Produkten installierten elektronischen Geräten, schätzen Sie die Installation geeigneter
Überspannungsableiter ein. Die Ableiter sollen von einem Fachtechniker angepasst werden, abhängig von der Art der
Stromversorgungsanlage der Struktur.
ATTENZIONE: I consigli tecnici riportati, pur basandosi sull’esperienza ricavata dal contatto con i nostri rivenditori,
sono da ritenersi, in ogni caso, puramente indicativi. Essi non dispensano quindi il posatore specializzato dalla verica
della loro idoneità relativa all’uso previsto.
CAUTION: The here indicated technical recommendations, even though based on tests and on our experience with
our retailers, have to be considered, in any case, purely indicative.They do not authorize the qualied installer to check
their suitability for the intended use.
ATTENTION: Les conseils techniques, même en s’appuyant sur l’expérience résultant du contact avec nos revendeurs,
sont à se considérer en tout cas simplement indicatifs. Ceux-ci donc ne dispensent pas le poseur spécialisé de la
vérication de leur aptitude à l’utilisation prévue.
ACHTUNG: Die angegebenen technischen Räte, auch wenn auf unseren Versuchen und Erfahrungen mit unseren
Wiederverkäufern beruhen, sind auf jeden Fall nur indikativ. Sie berechtigen den Fachinstallateur nicht zu die
Überprüfung ihrer Eignung in Bezug auf den vorgesehenen Gebrauch.

PAG. 4 Pergola Stil - Manuale di installazione Rev. 02/18
ATTENZIONE: È possibile scaricare dal sito B2B la documentazione tecnica dei produttori degli
automatismi ed accessori elettronici. Pratic non può garantire che la documentazione Somfy presente
sia allineata con gli ultimi aggiornamenti del produttore. Si consiglia pertanto di vericarne gli
aggiornamenti contattando il call center al numero che trovate sul retro di copertina e/o accedere al
sito www.somfy.com del produttore stesso.
WARNING: You can download the producers’ technical documentation about automatic devices
and electronic accessories from the B2B website. Pratic cannot ensure that the available Somfy
documentation is conform to the producer’s latest upgrades. It is therefore advised to verify the
upgrades by dialing the number of the call center printed on the back of the cover and/or log into the
producer’s site www.somfy.com.
ATTENTION: Il est possible de télécharger du site B2B la documentation technique des fabricants
d’automatismes et d’accessoires électroniques. Pratic ne peut pas garantir que la présente
documentation de Somfy soit conforme aux dernières mises à jour du fabricant. Il est donc conseillé de
vérier les mises à jour en contactant le centre d’appel au numéro indiqué sur la couverture arrière et /
ou en se accédant au site Web du fabricant www.somfy.com.
ACHTUNG!: Es ist möglich, die technischen Unterlagen der Hersteller der Automationen und der
elektronischen Zubehöre von der B2B Website herunterzuladen. Pratic kann nicht garantieren, dass die
Somfy Unterlagen den neuesten Aktualisierungen des Herstellers entspricht. Es wird daher empfohlen,
die Aktualisierungen zu überprüfen, durch den Konatkt mit dem Call Center unter der Nummer auf der
Rückseite des Buchdeckels bzw. durch den Zugang auf die Website des Herstellers www.somfy.com.
ATTENZIONE: Proteggere durante le fasi di installazione le parti della struttura da scintille, amme libere o
altre fonti di accensione e da prodotti chimici quali cementi, malte o altre sostanze acide o alcaline per evitare
danneggiamenti alle superci o incendi.
WARNING: During installation protect the structure parts from sparks, open ames or other lighting sources and from
chemicals such as concrete, mortar or other acid or alkaline substances in order to avoid damages to surfaces or res.
ATTENTION: Protéger pendant les phases d’installation les parties de la structure des étincelles, des ammes
libres ou d’autres sources d’inammation et des produits chimiques tels que les ciments, mortiers ou d’autres
substances acides ou alcalines an d’éviter d’endommager les surfaces ou des incendies.
ACHTUNG!: Schützen Sie während der Installationsphasen die Teile der Struktur gegen Funken, oene Flammen
oder andere Zündquellen und gegen Chemikalien bzw. Zement, Mörtel oder andere saure oder alkalische
Substanzen, um Beschädigungen an Oberächen oder Brände zu vermeiden.
CORRETTO IMPIEGO SIGILLANTE: Il sigillante e le operazioni per la sua corretta posa dipendono dall’ambiente e dalle
condizioni ambientali, es. umidità, temperatura,sbalzi termici, atmosfere aggressive o inquinanti, ecc. ove l’installazione viene
eettuata.Si suggerisce la verica con un professionista del settore per la corretta scelta del prodotto e/o prodotti idonei ai
materiali e alle condizioni di posa e messa in opera delle nostre strutture.
In caso di installazioni in aree con forti esposizioni a nebbie saline o luoghi con atmosfere aggressive, ad esempio aree
termali, piscine, ecc., al ne di limitare l’aggressione alle superci dei materiali, è responsabilità dell’installatore la valutazione
dell’applicazione di prodotti appositi, distribuiti da rivenditori specializzati nel campo delle vernici, atti a proteggere le
superci dei proli in alluminio non coperte dalla vernice, quali ad esempio le parti terminali degli stessi, i contorni dei fori o
delle fresature, ecc., comprese le aree di alluminio non verniciate coperte comunque dal contatto con altre superci.
PROPER SEALING USE: Sealing and the steps for its correct placing depend on the environment and on the environmental conditions, e.g. humidity,
temperature, thermal jump, aggressive or polluting atmospheres etc, where the installation takes place. We suggest to verify with a professional in the
eld for the correct choice of the product/products suitable to the placing condition and the setup of our structures.
In case of installation in areas with substantial exposure to saline mist or places with aggressive air such as spas, swimming pools etc. in order to
reduce the attack to the material surfaces, it is responsibility of the installer to evaluate the application of adequate products, provided by retailers
specialized in the eld of lacquers, aiming at protecting the non-lacquered surfaces of the aluminium proles, such as for example the end parts of
the proles, the edges of the holes or of the millings, etc., included the non-lacquered aluminium parts which are protected from the contact with
other materials.
UTILISATION CORRECTE DU MASTIC: Le mastic et les opérations pour sa correcte pose dépendent de l’ambiance et des conditions environnementale
par exemple l’humidité, la température, les variations de températures, atmosphères agressives ou polluantes etc ou on fait l’installation. On suggère
une vérication avec un professionnel du secteur pour une correcte choix du produit/produits qui soit appropriée aux matériaux et aux conditions de
pose et mise en œuvre de nos structures.
Dans le cas d’applications dans des lieux avec fortes expositions aux brouillards salins ou endroits avec des atmosphères agressives, par exemple
zones thermales, piscines ecc., an de limiter l’agression aux surfaces des matériaux, l’installateur est responsable d’évaluer le besoin d’appliquer des
produits appropriés, distribués par des revendeurs spécialistes dans le domaine des peintures, aptes à protéger les surfaces des prols en aluminium
qui ne sont pas couverts par la peinture, tels que par exemple les parties d’extrémité de ceux-ci, les contours des trous ou des fraisages ecc., y compris
les parties d’aluminium non peint, cependant couverts par le contact avec d’autres matériaux.
KORREKTE DICHTUNGSMATERIAL VERWENDUNG: Dichtungsmaterial und Ihre korrekte Verlegung hängen von Ihrer Umgebung, Umweltzustand z.B.
Feuchtigkeit, Temperatur, plötzlicher Temperaturwechsel, aggressive oder Schadstoe Atmosphäre ab, u.s.w. wo die Installation vorgenommen wird.
Wir vorschlagen eine Überprüfung mit einem Fachmann für die korrekte Wahl der Produkt/Produkte die geeignet zu den Material und zu die Verlegung
unseren Strukturen ist.
Im Fall von Installierungen in Gebieten mit starker Exposition gegenüber Salznebel oder in Orten mit aggressiven Wetterbedingungen, zum Beispiel
in Thermalbereichen, Schwimmbädern, usw., um die Aggression auf den Oberächen der Materialien zu begrenzen, übernimmt der Installateur die
Verantwortung von einer eventuellen Anwendung von geeigneten, von Fachwiederverkäufer im Lackierungsfeld verteilte Produkten, zum Schutz
der Oberächen der Aluminiumprole, die nicht von der Lackfarbe abgedeckt sind, wie z.B. die Endteile der Prole, die Konturen der Löcher oder des
Fräsens, usw., einschließlich die unlackierten Aluminiumbereiche, die jedoch durch Kontakt mit anderen Metallen bedeckt sind.
PAG. 5 Pergola Stil - Manuale di installazione Rev. 02/18
MOVIMENTAZIONE DEI COLLI: In caso di movimentazione manuale dei colli contenenti il prodotto tenere presente
che, in generale, il limite massimo per la movimentazione degli stessi è di 25 Kg per gli uomini e di 15 Kg per le donne.
Per colli di dimensioni ingombranti e di dicile maneggiabilità considerare sempre l’impiego di più persone e/o di un
idoneo sollevatore.
HANDLING OFTHE PARCELS: In case of manual handling of the parcels containing the product take into account that,
generally, the maximum limit for handling them is 25 kg for men and 15 kg for women.For handling voluminous and
dicult to handle parcels employ more people and/or use an adequate lifter.
MOUVEMENT DES COLIS: Dans le cas de mouvement manuelle des colis contenants le produit, considérer que en
générale la limite maximum pour le mouvement des mêmes est de 25 kg pour les hommes et 15 kg pour les femmes.
Pour les colis diciles à gérer et ayant dimensions encombrants, envisager toujours l’emploi de plusieurs personnes
et / ou un système de levage approprié.
HANDHABUNG DER FRACHTSTÜCKE: Bei manueller Bewegung der das Produkt enthaltenen Frachtstücke bedenken
Sie, dass, in Allgemeinen, die Höchstgrenze für ihre Bewegung 25 Kg für Männer und 15 Kg für Frauen ist.
Für Frachtstücke sperriger Abmessungen und schwerer Handhabbarkeit berücksichtigen Sie immer die Verwendung
mehrerer Personen und/oder eines geeigneten Stapler.
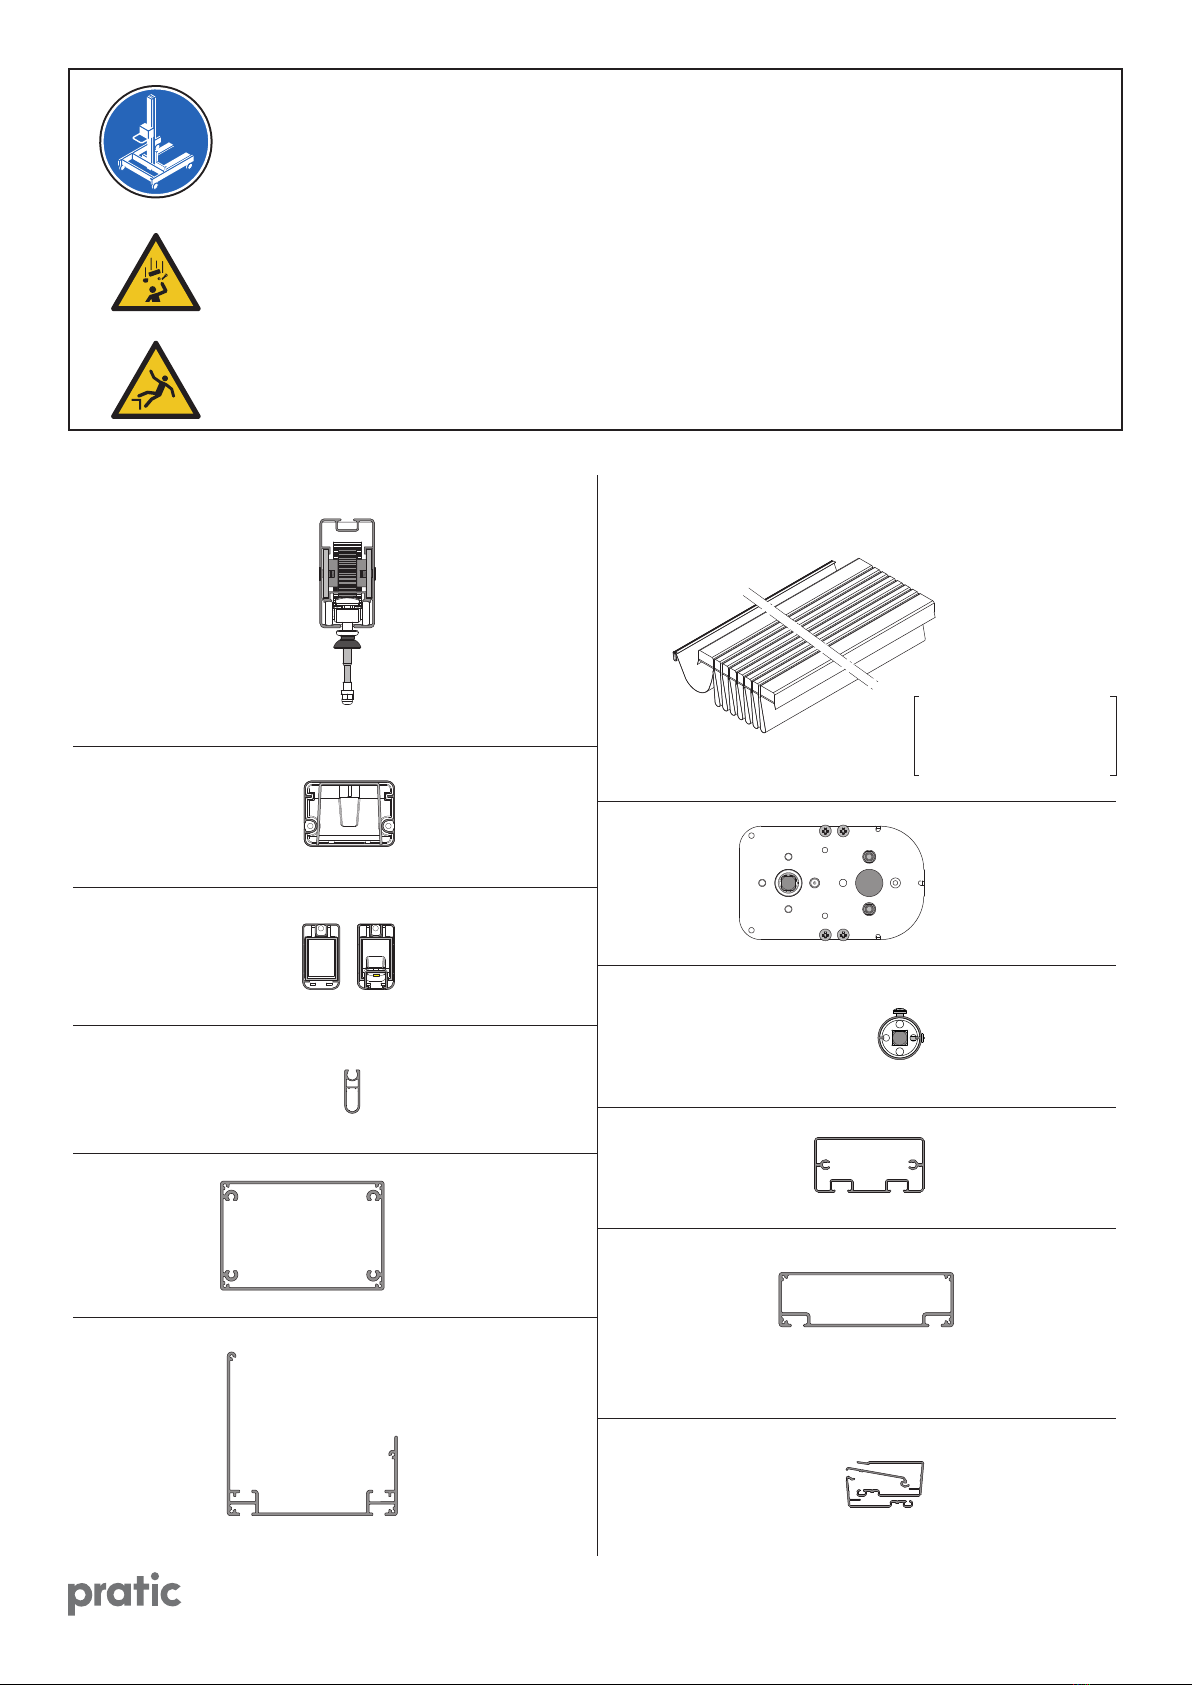
Guida assemblata
Assembled guide
Rail assemblé
Montierte führung
Prolo frontale assemblato
Assembled front prole
Barre de charge assemblé
Montierte ausfallprol
Prolo rompitratta assemblato
Assembled crossbar prole
Traverse de toile assemblé
Montierte querstückprol
Prolo cappottina
Canopy prole
Prolé store corbeille
Korbmarkise prol
5cm × 10cm*
3 Kg/m
8,3cm × 6cm
1,5 Kg/m
3,4cm × 6cm
1 Kg/m
1,4cm × 4cm
0,4 Kg/m
11 Kg
Ø 4cm
0,7 Kg/m
10cm × 5cm
2 Kg/m
1,6 Kg/m
15,6cm × 15cm
3 Kg/m
Telo preassemblato
Preassembled cover
Toile pré-assemblé
Vormontiertes Tuch 5,5 Kg/m
Prolo corrente motore
Motor crossbar prole
Prolé courant moteur
Trägerprol Motor
10cm × 5cm
3,5 Kg/m
Prolo arcareccio e
corrente aggiuntivo
Purlin e additional
crossbar prole
Prolé panne et
courant supplémentaire
Pfetten und
zusätzliches Trägerprol
15cm × 10cm
4,5 Kg/m
Prolo montante
Post prole
Prolé poteau
Montageprol
Asse di trasmissione assemblato
Assembled Transmission shaft
Axe de transmission assemblé
Montierte Übertragungsachse
Proli tettuccio
Hood proles
Prols Auvent
Prolen Dächlein
Prolo gronda
Gutter prole
Prolé Gouttière
Regenrinnenprol
Box base
Safety Box
Considerare la supercie del telo esteso
Consider the area of the unfolded cover
Considérer la surface de la toile ouverte
Berücksichtigen Sie die Oberäche des
gespannten Tuchs
*

PAG. 6 Pergola Stil - Manuale di installazione Rev. 02/18
d
L
C
Vite autolettante
Self-tapping Screw
Vis Autotaraudeuse
Schneidschraube
TEF d ×L
d
L
Vite autoforante
Self-drilling Screw
Vis Autoforeuse
Selbstbohrende Schraube
TC+ d ×L
d
L
Vite autolettante
Self-tapping Screw
Vis Autotaraudeuse
Schneidschraube
TC+ d ×L
d
L
Vite autolettante
Self-tapping Screw
Vis Autotaraudeuse
Schneidschraube
TSP+ d ×L
d
L
Vite autolettante
Self-tapping Screw
Vis Autotaraudeuse
Schneidschraube
TSC+ d ×L
C
d
Dado esagonale
Hex Nut
Écrou hexagonal
Sechseckige Mutter
Md
C
d
Dado esagonale angiato
Hex Flanged Nut
Ecrou hexagonal avec bride
Sechseckige Mutter / Flansch
Md
de
di
Rosetta piana
Flat washer
Rondelle plate
Ebene Scheibe
Mdi
Mdi ×de
C
Vite
Screw
Vis
Schraube
TE Md ×L
C
d
L
Vite
Screw
Vis
Schraube
TEF Md ×L
d
L
s
Vite
Screw
Vis
Schraube
TCEI Md ×L
d
L
e
Vite
Screw
Vis
Schraube
TBEI Md ×L
d
L
e
Vite
Screw
Vis
Schraube
TPSCE Md × L
d
L
Rivetto
Pop rivet
Rivet pop
Blindniet
d ×L
2 3 4 5 6 7 8 9 10 11 12
d C s e
M4 7 3 2,5
M5 8 4 3
M6 10 5 4
M8 13 6 5
M10 17 8 6
M12 19 10 8
M14 22 12 10
M16 24 14 10
4,2 8
5,5 8
6,3 10
ANCORAGGI NON FORNITI IN DOTAZIONE: I diversi materiali delle pareti richiedono tipi
diversi di viti. Scegliere viti adatte al materiale della parete in questione.
ANCHOR BOLTS NOT SUPPLIED: Dierent wall materials require dierent types of
screws. Choose screws that are specially suited to the material in your wall.
ANCRAGES NON FOURNI: Le choix des vis dépend du matériau dans lequel elles doivent
être xées. Utiliser des vis adaptées au matériau de votre mur.
ANKER NICHT MITGELIEFERT: Unterschiedliche Wandmaterialien erfordern unterschiedliche
Schrauben. Immer Schrauben verwenden, die für die Wandbeschaenheit geeignet sind.
PAG. 7 Pergola Stil - Manuale di installazione Rev. 02/18
1
2
3
4
5
2
1
3
4
5
6
7
8
9
10
11
12
13
14
15
16
17
18
19
20
21
22
23
24
25
26
27
28
29
30
31
32
33
34
35
36
37
38
39
40
41
42
43
44
1
0
2
3
4
5
6
7
8
9
10
11
12
13
14
15
16
17
18
19
20
21
22
23
24
25
26
27
28
29
30
31
32
33
34
35
36
37
38
39
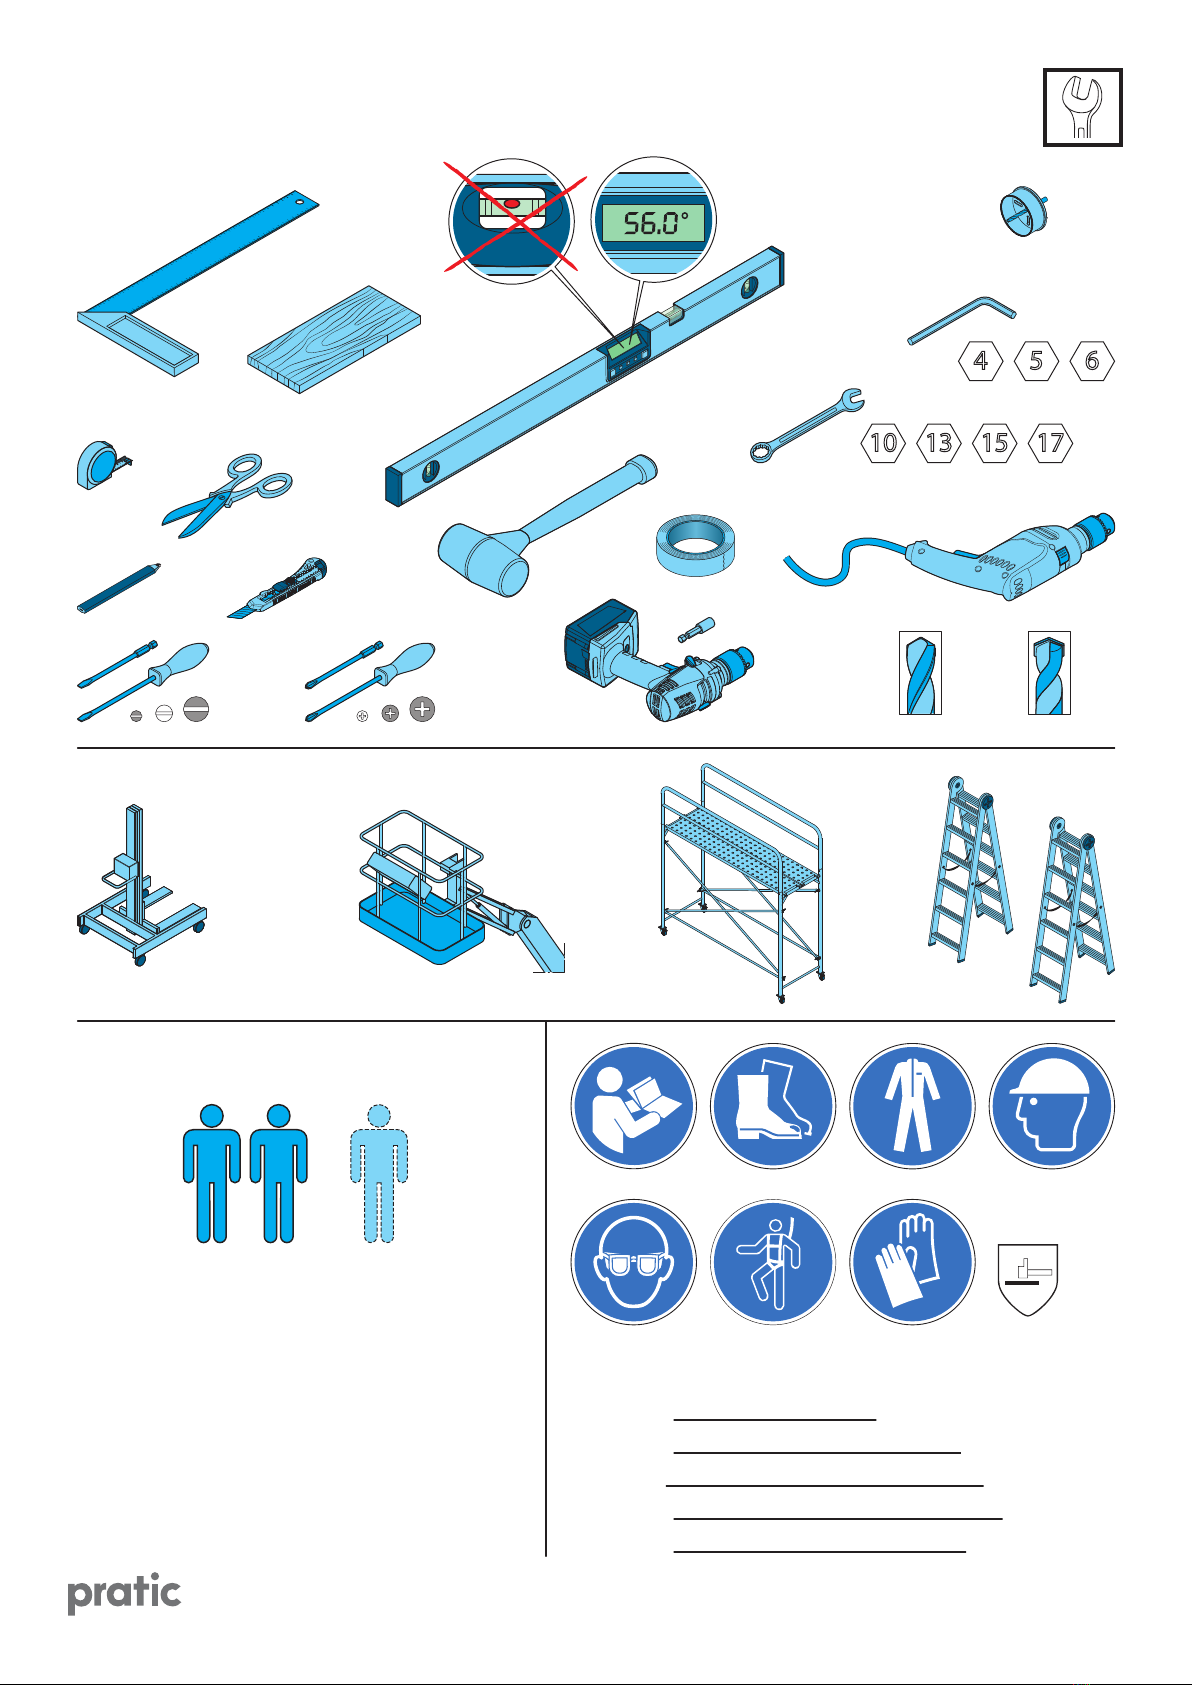
× 2,,,
, ,
EN388
Ø4
Ø5
Ø10 Ø...
Ø61
Ercolino
+n
IT-DPI (Minimi consigliati)
EN-PPE (Minimum recommended)
FR-EPI (Minimales recommandées)
DE-PSA(Das Mindeste wir empfohlen)
ES-EPI (Los minimos aconsejados)
Vedere “movimentazione dei colli”
See “handling of the parcels”
Voir “mouvement des colis”
Sie “handhabung der frachtstücke”
Ver “manejo de los paquetes”
IT - UTENSILI, ATTREZZATURE E DPI EN- TOOLS, FACILITIES AND PPE
FR - OUTILS, ÉQUIPEMENT ET EPI DE- WERKZEUGE, AUSRÜSTUNGEN UND PSA

PAG. 8 Pergola Stil - Manuale di installazione Rev. 02/18

PAG. 9 Pergola Stil - Manuale di installazione Rev. 02/18
PAG. 10 Pergola Stil - Manuale di installazione Rev. 02/18
ISTRUZIONI DI MONTAGGIO
Larghezza no a cm.700
Guide della tenda (24) con carrelli (5) (6) (7), fermo-carrello (30), cinghia (17), pulegge e carter (8) (9) già
assemblate.
Frontale (22), rompitratta (23) e teli accoppiati.
Larghezza oltre a cm.700
Guide della tenda (24) con carrelli (5) (6) (7), fermo-carrello (30), cinghia (17), pulegge e carter (8) (9) già
assemblate.
I proli vengono forniti in più parti da unire tramite appositi giunti.
Accoppiare il telo ai rompitratta inlando il prolo di PVC (27), saldato sul telo, nell’apposita cava dei
proli di alluminio (schema [A] e [B]), inserire la tasca di chiusura e il relativo prolo di cappottina,
secondo lo schema [A] riportato nelle pagine seguenti; chiudere i proli lateralmente con i tappi (28)
(29) e mettere in giusta tensione il telo con le relative viti (schema [D]); praticare con cautela i fori Ø10 sul
telo in corrispondenza dei fori sui proli di alluminio (schemi [A] e [E]), per permettere, successivamente,
di inlare i perni dei carrelli.
Attenzione: forare il telo solamente dopo averlo accoppiato ai proli (prestando attenzione a non
rovinare il sistema di aggancio del tappo)
Attenzione: per consentire un migliore scorrimento dei tubetti lungo le sedi nei proli si consiglia
applicare sui tubetti stessi“Distaccante Protettivo Siliconico”.
Operazioni
1) Aprire l’imballo con cautela, prestando attenzione a non tagliare il tessuto, si faccia attenzione a non
graare la vernice dell’alluminio.
Costruzione della struttura in alluminio.
2) Applicare le piastre di supporto a muro secondo lo schema e gli interassi indicati nella prima pagina
delle istruzioni.
3) Accoppiare gli arcarecci 2 a 2 ssandogli il supporto a parete (86) con relative boccole di centraggio già
innestate; inserire nell’apposita sede tutte le viti TE M10 utili al ssaggio delle cavallotte intermedie (87),
senza serrare totalmente i dadi (schemi [F] [G]).
4) InserirelepiastrinediposizionamentocompletedigranoM10;viteM10eganciodisicurezza.Posizionarle
alla distanza indicata (schema H) e serrare i grani M10.
N.B. ATTENZIONE al verso delle piastrine di posizionamento. La quota indicata fa riferimento per una
strutturaTecnic Stil con arcarecci che sbordano rispetto alla gronda di circa 35 cm.(vedi schema L)
Nel caso che la tenda sia ad argano è necessario montare subito il gruppo argano (90) (senza il perno di
trazione) sull’arcareccio opportuno (schema [I]); l’argano va montato verso la parte interna della tenda.
5) Fissare i tappi (98) sugli arcarecci dalla parte anteriore.
6) Montare i tappi dei montanti (97). Fissare le stae a terra (89) sui proli montanti. Costruire il telaio
anteriore inserendo e ssando la gronda portante alle stae (88) dei proli montanti con le apposite viti
e piastrine (schema [K]).
Attenzione: si consiglia di“siliconare”tutte le varie giunzioni della gronda.
7) Montare gli arcarecci già accoppiati agganciandoli posteriormente alle piastre di supporto a muro e
appoggiandoli anteriormente alle stae anteriori (88) dei proli montanti. Inserire le viti TE M10 della
piastrina di posizionamento nelle apposite asole delle stae anteriori (88); ssare i ganci di sicurezza alle
viti TBEI M8 e serrare tutte le viti.(schema [L]).
8) Controllare i livelli, la squadratura e le varie misure della struttura; ssarla denitivamente serrando tutte
le viti.

PAG. 11 Pergola Stil - Manuale di installazione Rev. 02/18
Montaggio della tenda.
9) Fissare le guide (24) alle cavallotte (87) nello spazio creato tra le coppie di arcarecci senza serrare
totalmente le viti (schema [M]).
10)Controllare il perfetto allineamento dei carrelli su tutte le guide (schema [P]), quindi procedere al
montaggio del motore a parete oppure su prolo corrente secondo i casi (schemi [Q] [R]), prestando
attenzione a rispettare l’esatto allineamento dell’asse dì trasmissione. Inserire le calotte nei tubi Ø40
di trasmissione e montare la trasmissione su tutte le campate della tenda. Regolare opportunamente i
perni quadri, inne serrare le viti delle calotte per bloccare denitivamente i perni (schema [S]).
11)Nel caso di motorizzazione con Safety-Box installato su prolo corrente, sarà necessario prevedere un
prolo corrente per la campata nella quale si intenderà posizionare la motorizzazione (schema [R]).
12)Fissare i proli già accoppiati col telo alle guide inlando, un prolo alla volta, i perni dei carrelli
nell’apposito foro utilizzando il nuovo sistema brevettato Clic System per gli attacchi terminali e la
boccola in delrin per gli attacchi intermedi (schema [T] [U] [V]).
Attenzione: prima di chiudere il coperchio inferiore del tappo del frontale, assicurarsi di avere inserito la
relativa boccola di sicurezza con innesto a scatto (schema [V]).
Attenzione: nel caso di tende con telo confezionato lasco sarà fornita una fascia occhiolata distanziale per
ogni guida da inserire nei carrelli (tra il gommino in neoprene e il carrello stesso) prima di innestare i
proli.
13)Fare correre la tenda in apertura e chiusura un paio di volte quindi, a tenda aperta serrare le viti che
uniscono le guide (24) alle cavallotte (87).
14)Regolare i ne-corsa del motore (vedi istruzioni dei motori allegate)
Attenzione: leggere attentamente le istruzioni e gli schemi elettrici relativi ai motori.
15)Fissare al supporto a parete la staa di aggancio (3/T o 3/NT); nella versione No Tasca di chiusura si
utilizza la staa (3/NT), nella versione Con Tasca di chiusura si utilizza la staa (3/T) (schema [W]).
16)Nel caso di tenda ad argano è obbligatoria la versione Con Tasca di chiusura (3/T); inoltre bisogna
praticare un taglio nella tasca di chiusura per il passaggio dell’asta (schema [X]).
Copriarcarecci.
17)Fissare i copriarcarecci sulle coppie di arcarecci a protezione dei proli e della guida (schema [Y]). I
copriarcarecci saranno forniti in più pezzi da cm. 110 da sormontare in senso ascendente (tipo coppo).

PAG. 12 Pergola Stil - Manuale di installazione Rev. 02/18
INSTALLATION INSTRUCTIONS
Width to cm. 700
Side guides of the structure (24) with polyamide slides (5) (6) (7), stop-slide (30), polyurethane driving belt
with stainless steel pins (17), pulleys (8) and cases (9) already assembled.
Front bar (22) inter-ties (23) and coupled fabrics.
Width over cm. 700
Side guides of the structure (24) with slides (5) (6) (7), stop-slide (30), polyurethane driving belt with stainless
steel pins (17), pulleys (8) and cases (9) already assembled.
The proles will be supplied in more components to be assembled through suitable joints.
Couple the prole of the inter-ties windbreaks, passing the PVC prole (27) welded on the fabric inside the
proper slot of the aluminium proles (scheme A, B).
Insert the closure pocket and the related prole of the canopy according to the scheme A which has been
recorded in the next pages; Close the proles sideways with the taps (28) (29) and tension the fabric through
the relative screws (scheme D); Drill holes 10 mm diameter with care on the fabric according to the holes on
the aluminium proles (schemes A, E) in order to allow the insert of the slides ‘ pivots later.
Caution : drill the fabric only after having coupled it to the proles (taking care not to damage the hooking
system of the tap).
Caution :In order to allow a better sliding of the tubes along the seats into the proles it is advisable to
apply Silicone Protective Detacher on the same small tubes.
Operations:
1. Open the package with care, in particular do not cut the fabric and do not scratch the paint of the
aluminium.
Assembling of the aluminium structure:
2. Apply the wall plate according to scheme and to the indicated interaxis in the rst page of the installation
instructions.
3. Couple the beams in groups of two pcs. and x to them the wall plate (86) with relative centring bushes
which are already jointed; Insert all the TE M 10 screws suitable for the xing of the intermediate U
bracket (87) into the proper seat, without clamping completely the screw nuts (schemes F, G).
4. Insert the positioning plates completes of M10 dice, screws M10 and security hook.
Place them at the required distance (scheme H) and clamp rmly the dice M10.
Caution:pay attention the the side of the positioning plates.
The indicated quote referes to a structure with purlins that tranship to the gutter 19 cm. (scheme L)
In the case of gear, it is advisable to install immediately the gear unit(90) (without the drive pin) on the
suitable purlin (scheme I) teh gear must be installed in the inside part of the structure.
5. Set the caps (98) on the front pulrins.
6. Fix the ground brackets (141) on the front posts proles. Build the front frame inserting and xing the
supporting gutter to the brackets (121 and 122) of the front posts with the proper screws and small
plates (scheme K)
Caution: we advise to put silicon in all the joints of the gutter.
7. Install the beams already coupled, xing them backward to the wall support plate and rest them frontly
to the front brackets (122). Insert the screws TE M10 of the positioning plates in the appropriate slots
of the front brackets(122). Fix the security hooks to the TBEI M screws and clamp rmly the screws.
(scheme L)
8. Check the levels, the squaring and all the sizes of the structure; at the end, clamp rmly all the screws.
PAG. 13 Pergola Stil - Manuale di installazione Rev. 02/18
Installation of the awning
9. Fix the guides (24) to the U bracket (87) into the space that has been created between the couple of the
beams without clamping completely the screws (scheme M).
10. Check the perfect alignment of the slides on all the guides (scheme P, then You can proceed with the
installation of the motor on the wall or on a current prole according to the cases (scheme Q, R) taking
care to respect the precise alignment of the transmission axes. Insert the caps into the transmission
tubes diameter 40 mm and install the transmission on all the elds of the awning. Regoulate properly
the square pivots and at the end please, close the screws of the caps in order to block denitively the
pivots (scheme S).
11. In case of motor safety Box which has been installed on a current prole, it will be necessary to forecast
a current prole for the eld where You intend to put the motor (scheme R).
12. Fix the proles (which have been previously coupled with the fabric) to the guides passing through (a
prole at a time) the pivots of the slides in the suitable hole using the new patented system Clic System
for the terminal fastening and the delrin security bush for the intermediate fastening (schemes T, U, V).
Caution : before closing the lower cover of the front tap, be sure to have inserted the related security
bush with a coupling snap (scheme V).
Caution : In case of structures with packed slack fabric, it will be supplied a spacing slot band per each
guide which will be inserted in the slides (between the small neopreme gum and the same slide) before
engaging the proles.
13. Let the awning run opening and closing a couple of times.
14. Regulate the end-run of the motor (please see the enclosed instructions of the motors)
Caution : Read the instructions and the electric schemes related to the motors very carefully.
15. The connecting bracket of the pocket (3/T o 3/NT) will be xed to the wall support; No Tasca version use
bracket (3/NT), Con Tasca version use bracket (3/T) (scheme [W]).
16. In case of winch is mandatory Con Tasca version(3/T); and drill a cut in the closure pocket for teh pass of
the rod (scheme [X]).
Roof and Top cover beams
17. Fix the top cover beams on the couples of beams in order to protect the proles and the guides (scheme
X). The top cover beams will be supplied in more pieces of 110 cm to be surmounted in ascendant
direction (like the roof tile).
PAG. 14 Pergola Stil - Manuale di installazione Rev. 02/18
PAG. 15 Pergola Stil - Manuale di installazione Rev. 02/18

PAG. 16 Pergola Stil - Manuale di installazione Rev. 02/18

PAG. 17 Pergola Stil - Manuale di installazione Rev. 02/18

PAG. 18 Pergola Stil - Manuale di installazione Rev. 02/18

PAG. 19 Pergola Stil - Manuale di installazione Rev. 02/18

PAG. 20 Pergola Stil - Manuale di installazione Rev. 02/18
Table of contents
Popular Tent manuals by other brands


Nemo
Nemo HORNET ELITE Series Instructions for setup

KING CANOPY
KING CANOPY Garden Party 13ft X 13ft manual

OZtrail
OZtrail PopUp Beach Dome owner's manual

Snugpak
Snugpak JOURNEY TRIO Assembly instructions

Dancover
Dancover Storage Tent PRO manual

Eureka! Tents
Eureka! Tents Copper Canyon 4 & 6 Tents Assembly instructions


