Pream-I-Air PRDHZ80U User manual

L. SERVICE & WARRANTY
• Do not operate the unit with a damaged cord or plug, after the unit
malfunctions, or has been dropped or damaged.
• For your convenience, record the complete model number and product
name (located on the Product Identification Plate), the date you purchased
the product, and attach your purchase receipt docket as proof of purchase.
To ensure your product is covered by warranty, the complete faulty product
together with your purchase receipt should be returned to your retailer.
This product has been manufactured to comply with EEC Directives 73/23/EEC
and 89/336/EEC
Waste electrical products should not be disposed of with household waste.
Please recycle where facilities exist. Check with your Local Authority or retailer
for recycling advice.
EHS, Manchester, M17 1RN
EHS 11/06
DESICCANT DEHUMIDIFIER
ONE (1) YEAR LIMITED WARRANTY
Save This Warranty Information
EHS (International) Ltd. Guarantees this product free from defects in
materials and workmanship for a period of one (1) year.
Should this unit be operated under conditions other than those
recommended, at voltages other than the voltage indicated on the unit, o
r
any attempts made to service or modify the unit, will render this
WARRANTY VOID. The product you buy may sometimes differ slightly
from illustration. This warranty is in addition to, and does not affect, you
r
statutory rights
Should you have a problem with this product, please call our Help Desk on:
(0870) 742 5021.
MODEL: PRDHZ80U
PLEASE READ THIS INSTRUCTION MANUAL
BEFORE OPERATING AND KEEP
SAFE FOR FUTURE REFERENCE

A. IMPORTANT SAFETY INSTRUCTIONS
1. Do not operate the unit with a damaged cord or plug, after it malfunctions
or has been dropped or damaged in any way. Return to an authorized
service facility for examination and repair.
2. This unit should always be kept in an upright position to avoid any damage.
3. Locate the unit on a flat stable surface.
4. Check the household voltage to ensure it matches the units rated
specification before operating.
5. Operate this unit in an ambient temperature between 1ºC and 40ºC.
6. Ensure that the air inlets and outlets are not blocked or covered.
7. Do not place the unit too close to curtains or other objects – min 40cm.
8. Do not place in direct sunlight.
9. Never place anything on top of the unit and do not cover with any kind of
material while in use.
10. This product is intended for domestic and light office use ONLY and not for
commercial, industrial or outdoor use.
11. To protect against electrical shocks, do not immerse unit, plug or cord in
water, or spray with liquids.
12. Never unplug the appliance without pressing the "ON/OFF" key first.
13. Always unplug the unit when not in use or moving location. To disconnect
from the power supply, grip the plug and pull from the power socket. Never
pull by the cord.
14. Always empty the water tank before storing the unit away.
15. Close supervision is necessary when any appliance is used by or near
children and pets.
16. Do not run power cord under carpeting, or cover with rugs or runners.
17. Arrange the cord away from areas where it may be tripped over.
18. Never operate or store the unit in direct sunlight.
19. To repair the unit, take to a qualified service engineer. Repairs carried out
by unqualified people may cause damage to the unit or injury to persons or
property and void the warranty.
20. Where possible, avoid the use of an extension cable as they may overheat
and cause a risk of fire. Only use an extension cord after ensuring it is in
perfect condition.
21. Do not use the unit without the air filter.
SAVE AND READ THESE IMPORTANT SAFETY
INSTRUCTIONS
B. BS PLUG WIRING
Wiring Instructions: Should it be necessary to change the plug please
note the wires in the mains lead are coloured in accordance with the
following code: BLUE - NEUTRAL
BROWN - LIVE
GREEN AND YELLOW - EARTH
As the colours of the wires in the mains lead of this appliance may not
correspond with the coloured markings identifying the terminals in your plug,
proceed as follows:
1. The BLUE wire is the NEUTRAL and must be connected to the terminal,
which is marked with the letter Nor coloured BLACK.
2. The BROWN wire is the LIVE and must be connected to the terminal,
which is marked with the letter Lor coloured RED.
3. The GREEN/YELLOW is the EARTH and must be connected to the
terminal which is marked with the letter Eor or coloured GREEN OR
GREEN/YELLOW.
4. Always ensure that the cord grip is positioned and fastened correctly.
If a 13A (BS 1363) fused plug is used it must be fitted with a 13A fuse. If in
doubt consult a qualified electrician.
Wiring for a 13 Amp Plug (BS1363)
Please note. The Earth Terminal is marked with the letter Eor Earth Symbol
C. FEATURES
• Compressorless dehumidifier ~ uses desiccant rotor
technology
• Environmentally friendly with no harmful gasses & quiet
in operation
• Moisture removal ~8 litres/day (20ºC RH60%)
• Water tank capacity ~ 2.6 Litres
• Washable filter
• Built-in ioniser
• Oscillation louvre
• 3 Mode Settings – Normal, Quiet and Powerful
• Up to 8 hours timer ~ for added convenience
• Temperature range for use ~ 1ºC - 40 C
• Continuous drainage
• Light & portable with carry handle
• Removable water bucket with handle
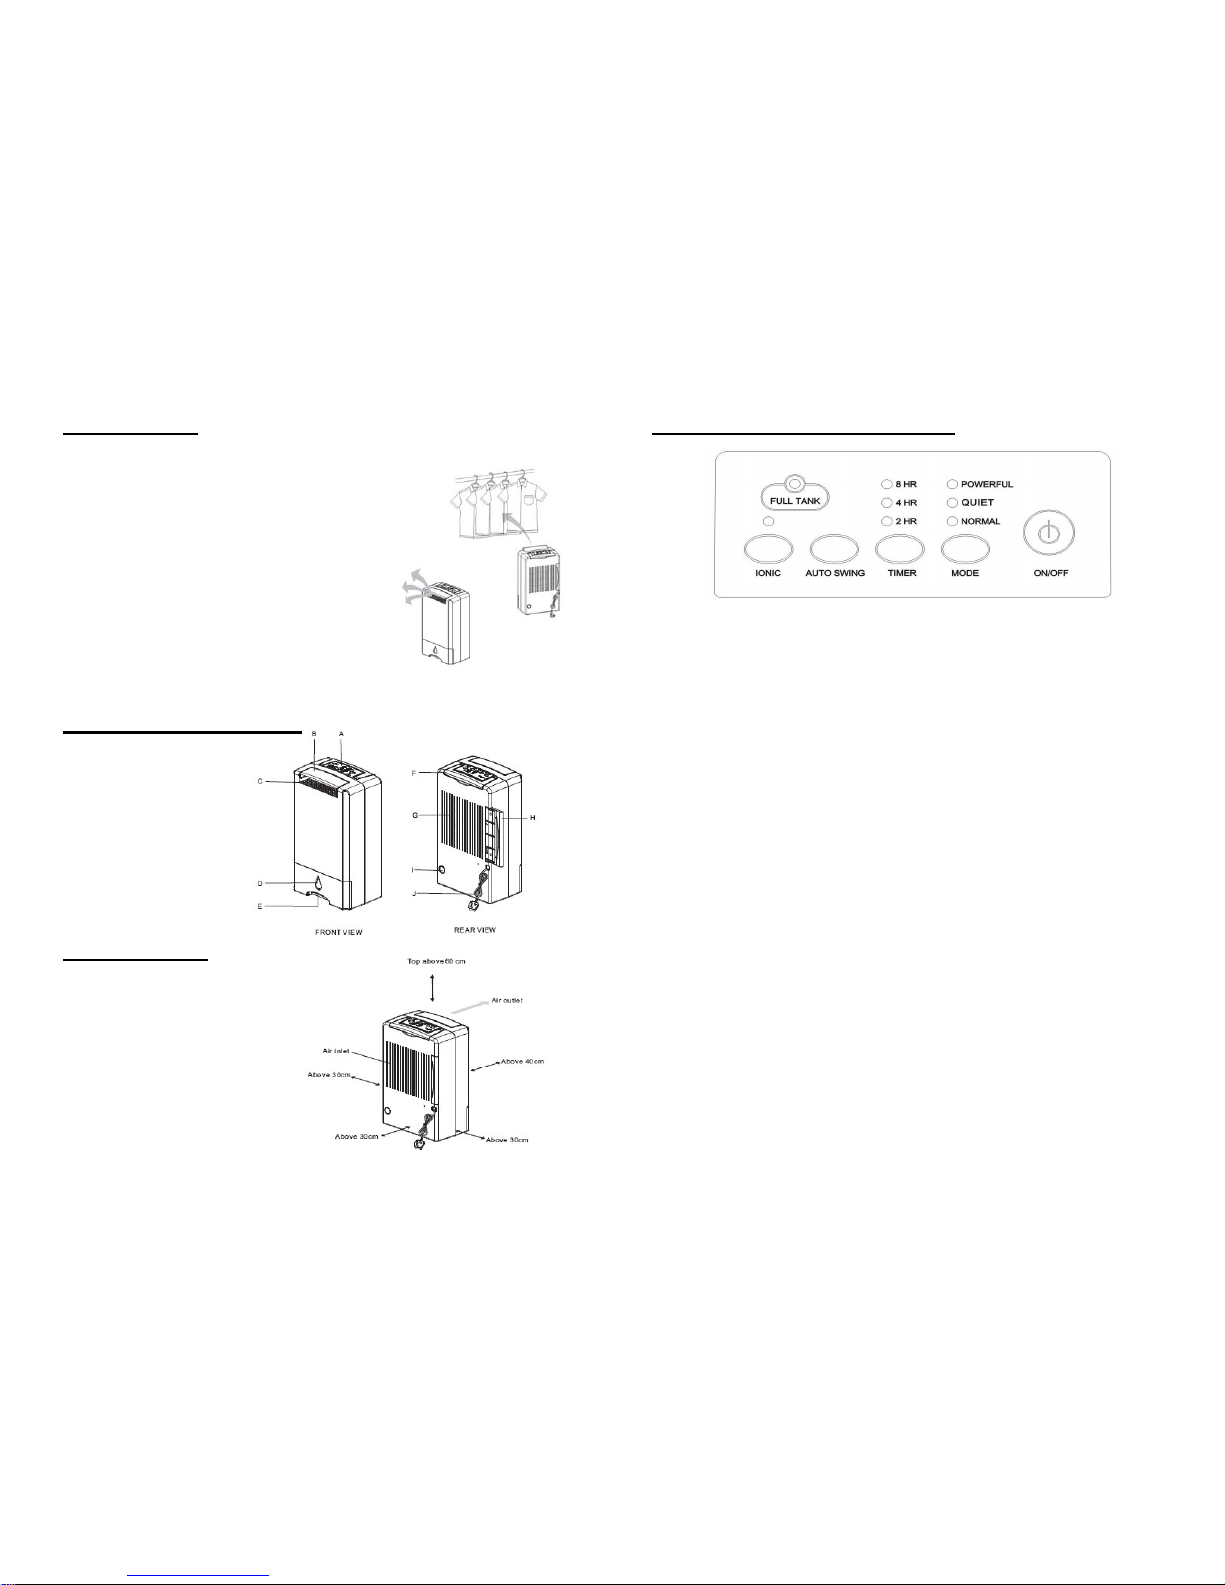
D. PARTS DESCRIPTION
A. Control Panel
B. Oscillation louvre
C. Air outlet
D. Water indicated window
E. Water tank
F. Handle
G. Air intake grill
H. Air filter
I. Drain hose outlet
J. Power cord and plug
E. UNIT SETUP
• Please ensure the unit is placed
on a flat level surface
• Please ensure the unit is a safe
distance away from a wall or
furniture (see the diagram
below)
• Keep the unit a minimum
distance of 60cm away from
laundry, in order to prevent any
water getting into the unit.
F. OPERATING INSTRUCTIONS
1. POWER ON/OFF BUTTON
CONTROL PANEL
2. MODE – Fan Speed Setting
This dehumidifier offers you 3 Modes for your selection. The indicator light will
illuminate when the unit is operating the selected mode.
When you plug in and switch on (1) the unit it will start-up in “NORMAL” mode.
Press “MODE” (2) button to select desired Speed.
Its path cycle is: NORMAL →QUIET →POWERFUL
NORMAL – Automatic operation for a comfortable humidity between
50%~60%RH
QUIET – Quiet operation with low fan speed, ideal for nighttime use.
POWERFUL – Operation with full fan speed for maximum performance, ideal
for use in laundry rooms.
When you restart the appliance it will continue to operate in last selected mode,
unless unplugged from the mains socket.
NB. Please note when your unit is switched off using the control panel
the fan will continue to operate for a short period to cool the heating
element. DO NOT unplug from the mains until the fan is turned off.
3. TIMER
Press TIMER button to set the unit to run for desired amount of hours before
switching off. You can only set the unit to switch off from running; you cannot
delay the start time. You can set the unit to run for 2, 4 or 8 hours
If the timer is not set (no timer indicator on), the unit will continuously run until
the water tank is full or preset humidity is achieved.
4. IONISER
Press this button to turn the Ion generator ON and OFF. When the LED light is
on, the appliance will release negative ions from the air outlet.
Negative Ions are beneficial in removing dust, pollen, bacteria, mildew and pet
dander etc., from the atmosphere, thus improving indoor air quality.
5. AUTO SWING
When operational the louvre will be open in the upward direction. Pressing the
AUTO-SWING button (5) and the oscillating louvre will swing up and down.
Pressing the AUTO-SWING again will stop the louvre at your desired position.
WARNING: DO NOT adjust the OSCILLATION LOUVRE by hand as this
will damage the mechanism.
6. FULL TANK INDICATOR
The indicator will flash and the alarm will sound when the water tank is full.
Switch off the unit and unplug from the mains power socket. Empty the water
tank and refit the tank into the correct position.
NOTE:
This unit is equipped with a safety tip-over switch. If the unit is tipped
over it will automatically switch off.
7. ENERGY SAVING SAFETY FEATURE
After 12-hours of continuous operation the heater element will reduce power
from 620watts to 390watts. This is normal for this type of equipment and the
logic circuit will control the operation between the two operating parameters for
best performance.
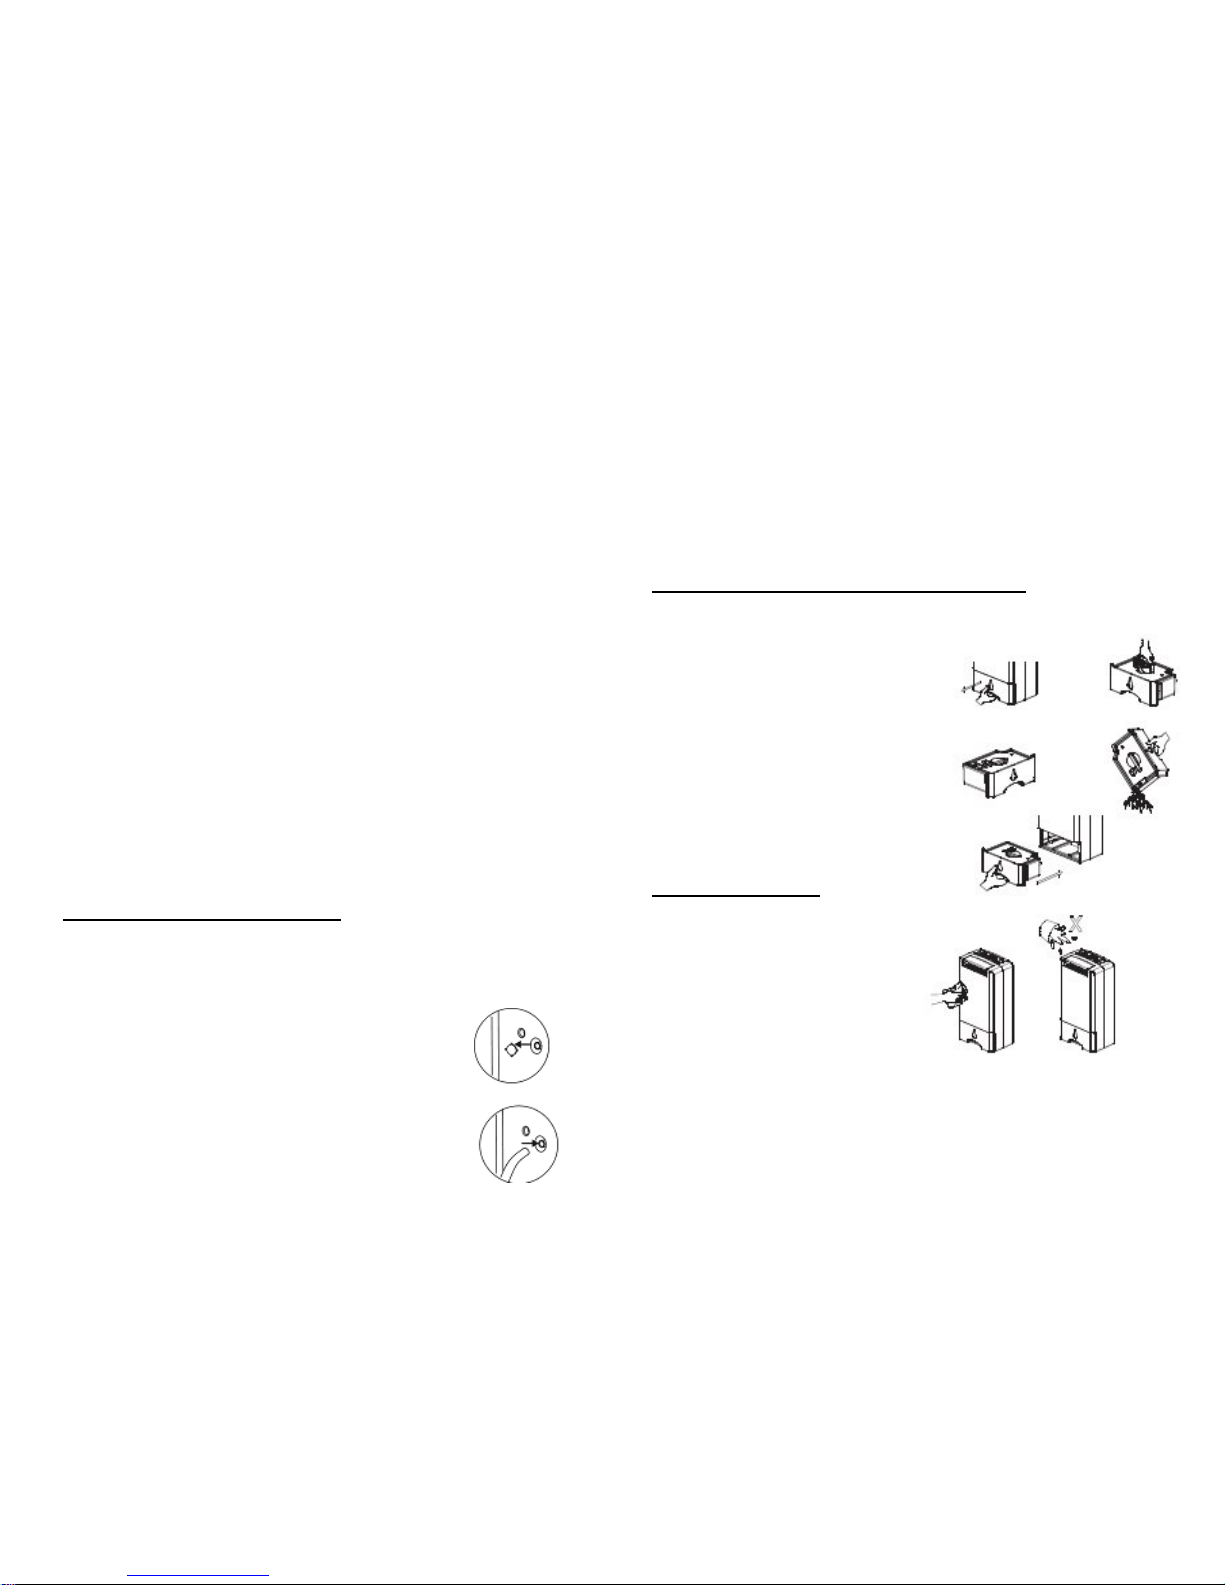
G. CONTINUOUS DRAINAGE
In Certain situations it may be more convenient to set the unit up for continuous
drainage. A hose with an inner diameter of approximately 10-10.5mm is
required (not supplied). A typical reinforced section of a garden hose would be
suitable.
Cut out the outlet at the back of the unit (Fig 1) and push
through the hose you have purchased (Fig 2).
1. Pull out the water tank and remove the rubber
bung from the water outlet at the back of the
water tank. Pull through the hose and connect
to the outlet on the tank. Retain the rubber
bung for future use.
2. Push the tank back into the unit ensuring the hose stays connected to the
outlet.
If you wish to revert back to draining into the tank, when the unit is
switched off and unplugged, simply remove the drainage hose. Pull out
the tank and replace the rubber bung in the water outlet and push the
water tank securely into place.
NB. Please note that this appliance uses a gravity drain when on continuous
drain. The hose must be directed in a downward position.
H. HOW TO EMPTY THE WATER TANK
Always remove the plug from the power socket before emptying the water tank.
1. Gently pull out the water tank and lift
it by the handle.
2. Open the sliding cover on the top
left hand side of the tank cover.
3. Pour the water out. Clean the tank
with water. A mild detergent can be
used if necessary.
4. Slide back the opening and press
back the handle into its original
position.
5. Refit the water tank into the
appliance.
I. MAINTENANCE
1. Turn off the unit; wait for a few
minutes until the fan stops
operating. Unplug from the power
socket.
2. Clean the surface with a damp
soft cloth.
3. Wash the water tank with a mild
detergent and remove from the
unit before cleaning.
FIG
1
Do not use abrasive cleaning
liquids or chemical agents
(Alcohol, petrol etc.), as these will
damage the unit.
4. Dry thoroughly with a clean dry cloth.
FIG
2

J. CLEANING THE AIR FILTER
• Clean the air filter every two weeks. If
dust and dirt are allowed to
accumulate on the filter, this will
impair the performance.
• Carefully pull out the filter screens
from the unit.
• Use your vacuum cleaner hose
attachment. If the filter is very dirty, it
may be washed with a mild detergent
in warm water.
NOTE: Ensure that the filter is dry before replacing. Never operate the
unit without a filter, as this will reduce the efficiency of the unit.
K. SPECIFICATION
Power: 620W max
Voltage: 230V ~50Hz
Net Weight: 6.5kg
Gross Weight: 8.0kg
Table of contents
Other Pream-I-Air Air Conditioner manuals

Popular Air Conditioner manuals by other brands

Mitsubishi Electric
Mitsubishi Electric MSZ-EF18VGW operating instructions

Sharp
Sharp AY-XPC12JHR Operation manual

Nordyne
Nordyne Single Package Gas Heating/Electric Cooling... User's information manual

Retro Aire
Retro Aire R40C Installation, operation & maintenance manual

Mitsubishi Electric
Mitsubishi Electric PUHZ-RP50VHA4 Service manual

Toshiba
Toshiba RAS-18SKV-E Series Service manual


