Prebena PKT-2-CLIP45-SY User manual
PREBENA Wilfried Bornemann GmbH & Co. KG
Seestr. 20 – 26, 63679 Schotten, Germany
Tel.: +49 (0) 60 44 / 96 01 – 0, Fax: +49 (0) 60 44 / 96 01 – 80
eMail: info@prebena.com
www.prebena.de, www.kartuschen-tausch.de
Operating Manual for the Cordless Air
Nailer
PKT-2-ES40-S
PKT-2-ES40-SY
PKT-2-CLIP45-SY
PKT-2-J50-S
PKT-2-J50-SY
PKT-2-J50 SVN
PKT-2-N65-S
98679601

Introduction
This operating manual is provided as an aid for
•proper,
•safe, and
•economical
use of the following cordless air nailers:
PKT-2-ES40-S and PKT-2-ES40-SY
PKT-2-CLIP45-SY
PKT-2-J50-S and PKT-2-J50-SY
PKT-2-J50 SVN
PKT-2-N65-S.
These cordless air nailers are referred to as a pneumatic tool in this
operating manual.
We assume that every user of the pneumatic tool has experience
handling devices that are powered by compressed air, and
experience with the materials used. Those who do not have this
experience must be instructed in the operation of the pneumatic tool.
Every person who
operates,
cleans, or
disposes
of this pneumatic tool must have read and understood this operating
manual.
This operating manual is considered as a component of the product.
Always keep this operating with the pneumatic tool. If you sell the
pneumatic tool, or provide it another party ensure that the operating
manual is included with the pneumatic tool.

Table of Contents
Organizational Features.................................................................. 5
General Organizational Features ................................................. 5
Features of the safety instructions ............................................... 6
Basic Safety Instructions ...................................................... 7
Proper Use ................................................................................... 7
Hazard - avoid fatal injuries.......................................................... 9
Avoid explosion hazards .............................................................. 9
Avoid injury hazards ..................................................................... 9
Avoid damage to the pneumatic tool.......................................... 10
Description ..................................................................................... 11
Device Overview and Scope of Delivery .................................... 11
Function...................................................................................... 13
Product features of the pneumatic tools..................................... 13
Left/right and direction information............................................. 15
Safety fixtures............................................................................. 15
Accessories ................................................................................ 16
Rating Plate Information............................................................. 16
Preparing the pneumatic tool....................................................... 17
Unpacking the pneumatic tool .................................................... 17
Check the status......................................................................... 18
Attaching the compressed air cartridge...................................... 19
Filling the magazine ................................................................... 21
Check the function...................................................................... 27
Operating the pneumatic tool ...................................................... 28
Adjusting depth-of-drive ............................................................. 28
Using the glass-stop ................................................................... 31
Driving the fasteners .................................................................. 32
Reloading the magazine............................................................. 34
After operation............................................................................... 35

Remove the compressed air cartridge .......................................35
Emptying the magazine ..............................................................36
Transporting and storing the pneumatic tool.............................37
Packing .......................................................................................37
Transport ....................................................................................39
Storage .......................................................................................40
Cleaning the pneumatic tool ........................................................41
Troubleshooting ............................................................................43
Malfunction overview ..................................................................43
Removing jammed fasteners (PKT-2-N65-S)............................47
Removing jammed fasteners (other device types).....................49
Ordering accessories ....................................................................50
Ordering fasteners......................................................................50
Ordering additional compressed air cartridges...........................54
Ordering other accessories ........................................................54
Pneumatic tool disposal ...............................................................55
Technical data................................................................................56
PKT-2-ES40-S and PKT-2-ES40-SY .........................................56
PKT-2-CLIP45-SY ......................................................................57
PKT-2-J50-S and PKT-2-J50-SY................................................58
PKT-2-J50 SVN ..........................................................................59
PKT-2-N65-S ..............................................................................60
KT-1000 compressed air cartridge .............................................60
Manufacturer's address ................................................................61
Guarantee .......................................................................................62
Index................................................................................................63

Organizational Features
5
Organizational Features
General Organizational Features
Different elements of the operating manual have specified
organizational features. These features make it easy to differentiate
normal text,
listings, or
action steps.
These instructions contain additional information, such as
special tips on economical use of the pneumatic tool.

Organizational Features
6
Features of the safety instructions
All safety instructions contained in this operating manual are
structured on the same pattern. To the left there is a symbol that
indicates the type of hazard. To the right a signal word that indicates
the seriousness of the hazard. Below there is a description of the
hazard source and instructions on how you can avoid this hazard.
HAZARD
Instructions with the word HAZARD warn of
hazards that directly result in serious or fatal
injuries.
WARNING
Instructions with the word WARNING warn of
hazards that could possibly result in serious or
fatal injuries.
CAUTION
Instructions with the word CAUTION warn of
hazards in which light to medium severity
injuries, property damage, or damage to the
environment can possibly occur.

Basic Safety Instructions
7
Basic Safety Instructions
Comply with and heed all warnings and instructions in this operating
manual and on the pneumatic tool when handling the pneumatic tool.
Proper Use
Type PKT-2-J50-S, PKT-2-J50-SY, PKT-2-J50 SVN and PKT-2-N65-
S pneumatic tools are used to drive brads into wood.
Pneumatic tool types PKT-2-ES40-S and PKT-2-ES40-SY, on the
other hand are used to drive staples into wood.
These pneumatic tools can also be used to anchor rubber mats and
plates onto wood. Only rubber mats and plates with the following
material characteristics should be used:
Shore hardness "A" rubber mats that are half as thick (maximum)
as the length of the fastener.
Zinc and aluminum sheet metal with a thickness of max. 0.7 mm
and tensile strength of max.180 N/mm
2
.

Basic Safety Instructions
8
Pneumatic tool type PKT-2-CLIP45-SY is used to drive magazined
cable clips into the following materials:
Wood:
Pumice stone
Insulating mortar joints
Gypsum plaster board
Sand-lime brick
Cellar stone
Glued joints
Breeze concrete
Wall joints
OSB panels
Door lintels
Ytong (aerated concrete),
Cement joints,
Brick
Using the pneumatic tool on other materials is only permitted after
consultation with the manufacturer.
Proper use also includes compliance with accident prevention
regulations and legal guidelines and standards applicable at the site
of implementation. Any other use is considered to be improper use
and can result in property damage, or even personal injury.

Basic Safety Instructions
9
Improper use particularly includes operation
by persons who have no experience operating pneumatic tools ,
or no experience with the materials used,
with bypassed safety fixtures,
of pneumatic tools that have been modified without the
manufacturer's authorization,
with accessories other than those listed in this operating manual,
with compressed air sources that are not listed in this operating
manual.
PREBENA WILFRIED BORNEMANN GMBH & CO. KG assumes no
liability for damage that occurs due to improper use.
Hazard - avoid fatal injuries
Never point the pneumatic tool at people, animals, or body parts.
Only activate the trigger of the pneumatic tool when the tool nose
is pressed against the workpiece.
Do not let children play with packaging; there is risk of
suffocation.
Ensure that the fasteners are not driven into electrical lines.
Avoid explosion hazards
Do not use the pneumatic tool at locations that are potentially
explosive.
Never operate the pneumatic tool with oxygen or other flammable
gasses or gas mixtures.
Never expose the compressed air cartridge to temperatures in
excess of 100 °C.
Avoid injury hazards
Store the pneumatic tool where it is inaccessible to children and
other unauthorized persons.

Basic Safety Instructions
10
Disconnect the pneumatic tool from the compressed air cartridge
prior to every transport.
Wear protective goggles, ear protection, and stable work clothing
when operating the pneumatic tool.
Hold the pneumatic tool in such a manner that you cannot be
injured by possible recoil.
Always adopt sure footing and a stable position when using the
pneumatic tool.
Avoid damage to the pneumatic tool
Never open the pneumatic tool housing. Only have qualified
specialists perform repair work.
Do not use the pneumatic tool if it has fallen down or is damaged.
Have it checked by qualified, specialized personnel before you
operate it again.
Only install permanently mounted pneumatic tools in securely
anchored holding fixtures. The pneumatic tool should not turn or
shift in the holding fixture. The holder should not damage the
pneumatic tool or its accessories.
Description
11
Description
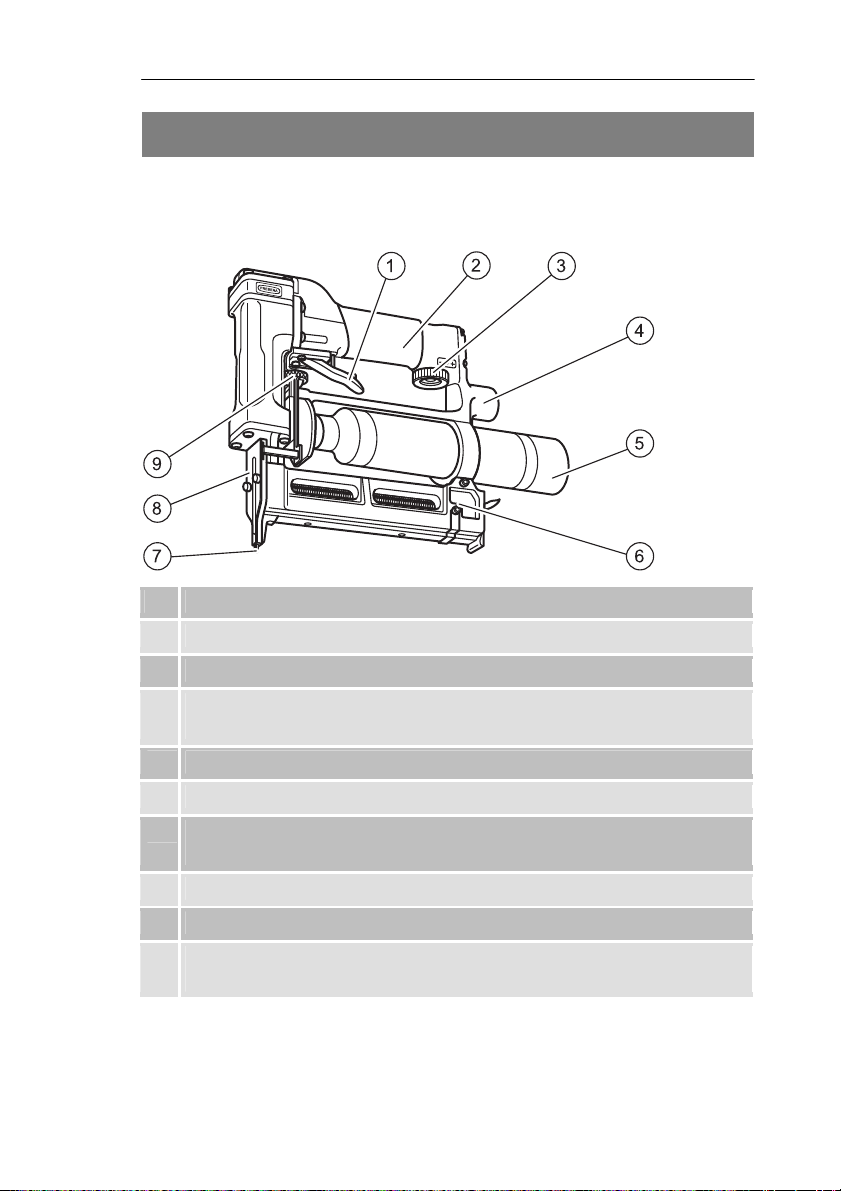
Device Overview and Scope of Delivery
No.
Explanation
1
Discharge
2
Handle
3
Knurled screw for driving force (only PKT
-
2
-
ES40
-
S(Y ,
PKT-2-CLIP45-SY and PKT-2-N65-S
4
Fill
-
level indicator for compressed air cartridge
5
KT
-
1000 compressed air cartridge,
6
Magazine for fasteners (de
pending on type
-
staples, brads, or magazined
cable clips
7
Safety device
8
Cover plate
9
Adjustment wheel for depth adjustment:
(not with PKT-2-CLIP45-SY and PKT-2 J50-SVN

Description
12
Type PKT-2-ES40-SY, PKT-2-CLIP45-SY and PKT-2-J50-SY
pneumatic tools are shipped in a plastic Systainer. Systainers
can be combined. Thus for example the pneumatic tool and
replacement cartridges can be simply transported in two
connected Systainers.
All of the other types of pneumatic tools described here are
shipped in a plastic transport case.
Scope of delivery includes:
One transport case or Systainer,
One pneumatic tool,
Two KT-1000 compressed air cartridges (one with PKT-2-
CLIP45-SY),
One Allen wrench size 3, one Allen wrench size 4,
The operating manual,
The Declaration of Conformity

Description
13
Function
The pneumatic tool drives PREBENA single fasteners (brads or
staples depending on type) into a piece of wood through compressed
air. The materials into which magazined cable clips may be driven
are listed on page 52. A PREBENA KT-1000 cartridge is mounted on
the pneumatic tool as the compressed air source.
With the type PKT-2-CLIP45-SY pneumatic tool, the depth-of-drive
can only be controlled by adjusting the driving force.
You can control the depth-of-drive via the adjustment wheel. For
types PKT-2-ES40-S(Y) and PKT-2-N65-S the driving force can also
be regulated.
Product features of the pneumatic tools
All types
The pneumatic tools have the following features in common:
Operation with PREBENA KT-1000 compressed air cartridges,
Compressed air cartridge fill-level indicator,
Safety device
PKT-2-ES40-S
The pneumatic tool has the following additional features:
Bottom loading magazine
Depth adjustment
Regulated driving force via adjustable pressure reduction valve.
PKT-2-ES40-SY
The pneumatic tool has the same features as PKT-2-ES40-S.
However it is shipped in a Systainer.

Description
14
PKT-2-CLIP45-SY
The pneumatic tool has the following additional features:
Lock-out safety device,
Side-loading magazine,
Regulated driving force via adjustable pressure reduction valve.
PKT-2-J50-S
The pneumatic tool has the following additional features:
Side loading magazine,
Depth adjustment,
Pressure reduction valve with fixed setting.
PKT-2-J50-SY
The pneumatic tool has the same features as the PKT-2-J50-S;
however it is shipped in a Systainer.
PKT-2-J50 SVN
The pneumatic tool has the following additional features:
Side-loading magazine,
Pressure reduction valve with fixed setting,
Special tool for invisible glass border attachment.
PKT-2-N65-S
The pneumatic tool has the following additional features:
Side-loading magazine,
Depth adjustment,
Regulated driving force via adjustable pressure reduction valve.

Description
15
Left/right and direction information
The left/right and direction information in this operating manual is
based on view direction towards the material.
Safety fixtures
Safety device
The pneumatic tool has a safety device on the tool nose. Discharge
is only released when the safety device is pushed in.
WARNING!
If the safety device is defective or bypassed
maximum severity injuries are possible when
operating the pneumatic tool.
Only use the pneumatic tool if the safety
device is functional.
Only release the pneumatic tool when the
tool nose is firmly pressed against the
material.
Lock-out safety device
The PKT-2-CLIP45-SY pneumatic tool is equipped with a lock-out
safety device on the top end of the magazine. The lock-out safety
device blocks the discharge when there are no fasteners left in the
magazine.

Description
16
Accessories
The following accessories are available for the pneumatic tool:
KT-1000 compressed air cartridge,
Five KT-1000 compressed air cartridges in the Systainer,
Different fasteners depending on the type (see page 50),
Special PREBENA nailer oil.
Rating Plate Information
The rating plate is bonded to the compressed air cartridge holder. It
contains the following information:
Company name and country of origin,
Type designation of the pneumatic tool,
Type designation of the fasteners that can be used,
CE mark (the product satisfies the standards listed in the
accompanying Declaration of Conformity)
GS mark (the product has a passed a safety inspection in
accordance with the Equipment and Product Safety Act).
Inverted triangle (this triangle indicates that you should only
operate this device if the safety device is functional).

Preparing the pneumatic tool
17
Preparing the pneumatic tool
Unpacking the pneumatic tool
Remove the pneumatic tool from the packaging.
Remove all packaging material, such as foil, fill material, and
packing box.
WARNING!
A risk of suffocation exists for children when
playing with the packaging foil.
Never permit children to play with
packaging foil.
Store packaging material where it is
inaccessible to children.
Store the packaging for later use.
Keep the transport case for transport of the pneumatic tool.
Only transport the pneumatic tool in the transport case.

Preparing the pneumatic tool
18
Check the condition
WARNING
An injury hazard exists when operating a
damaged pneumatic tool, or if accessories are
not properly mounted.
Check the condition of the pneumatic tool
prior to each use.
Only use pneumatic tools that are in
trouble-free condition.
Check the following points in particular:
-
All pneumatic tool parts and all accessory parts must be
securely attached.
-
The safety fixtures should not be blocked or otherwise
impaired in function.
-
The spring of the safety device should not be damaged.
-
The pneumatic tool and its accessories should not show any
external damage such as scratches or dents.
Scratches in the paint of the housing or of the magazine are
not considered damage.
Do not connect a damaged pneumatic tool to a compressed air
cartridge.
Have specialized personnel repair a damaged pneumatic tool
before placing it in service.

Preparing the pneumatic tool
19
Attaching the compressed air cartridge
WARNING
Injury hazard due to unsuitable compressed air
cartridges.
Only use original PREBENA type KT-1000
cartridges.
Important instructions for handling compressed air cartridges
Only use original KT-1000 compressed air cartridges to operate
the pneumatic tools described in this document.
Only use the KT-1000 compressed air cartridge to supply
compressed air to the pneumatic tools described in this manual.
Keep the valve of the compressed air cartridge, and the
pneumatic tool connection clean, and protect these elements from
damage. Remove fouling prior to placing in service. Heavy fouling
should only be removed by the manufacturer.
Do not use defective or damaged compressed air cartridges.
Exchange defective or damaged compressed air cartridges
through your dealer.
The lettering on the compressed air cartridge should not be
removed or made illegible.
Only transport and store compressed air cartridges in the original
packaging or in the pneumatic tool's transport case.
Do not transport the compressed air cartridge when it is
connected. Disconnect the compressed air cartridge from the
device after each use.
Preparing the pneumatic tool
20
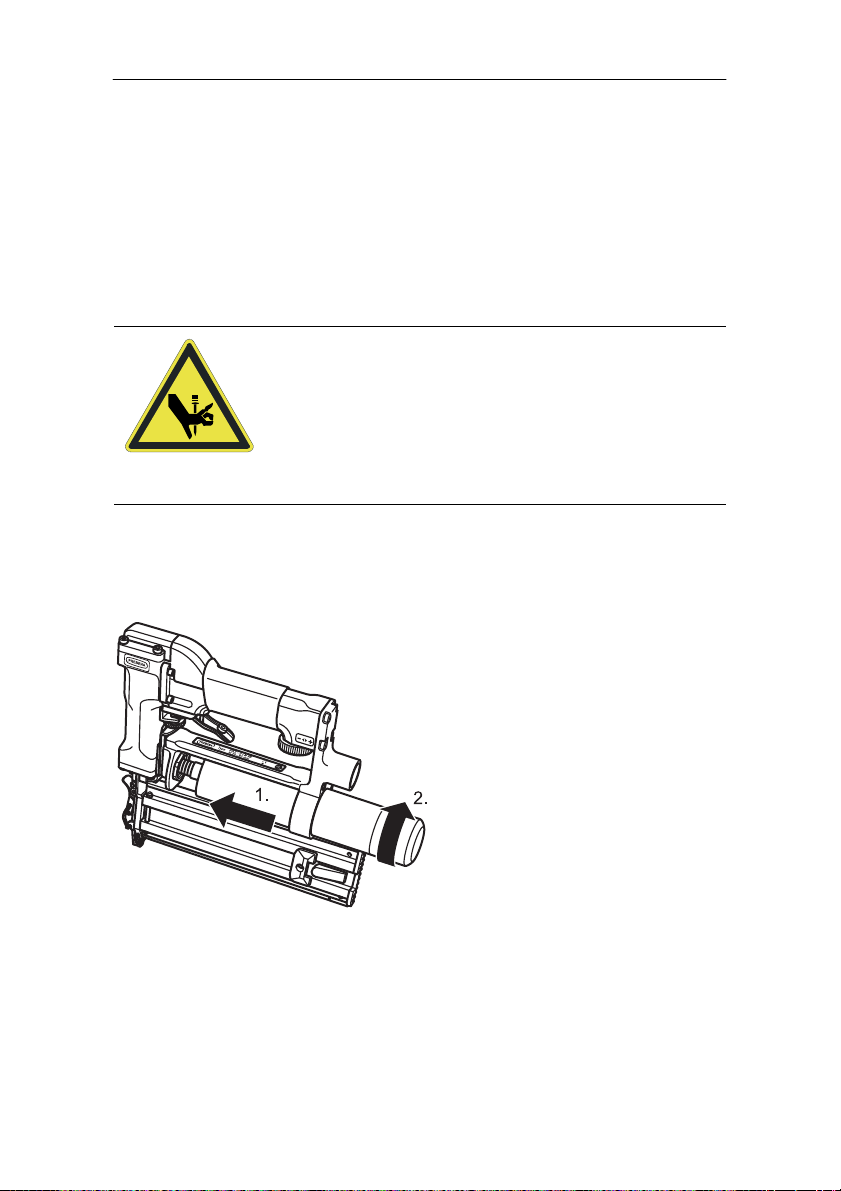
Connecting the compressed air cartridge
Remove the protective cap from the connection thread of the
compressed air cartridge.
Check the connection and the connection thread of the
compressed air cartridge for foreign objects and fouling.
Clean the connection and the connection thread if necessary.
Check the status of the pneumatic tool (see page 18).
WARNING
Inadvertent release can result in serious or
fatal injuries.
Do not point the pneumatic tool at people
or animals.
Empty the magazine before connecting.
Slide the compressed air cartridge into the holders (1.).
Screw the compressed air cartridge hand-tight into the thread on
the connection element (2.).
This manual suits for next models
6
Table of contents
Other Prebena Nail Gun manuals


Popular Nail Gun manuals by other brands

Everwin
Everwin CFN-15S Operation and maintenance manual

Axminster
Axminster Palm Nailer user manual

Parkside
Parkside PAT 4 C3 Original instructions

Senco
Senco Nailer SLP20XP Parts reference guide

HIKOKI
HIKOKI NR 90AD Instruction and safety manual

Axminster
Axminster PROFESSIONAL AP1550FN Original instructions


