Precisia SYL-100 User manual

Instruction Manual
PID Temperature Controlled Espresso Machine*
Auber Instruments
7
www. com
Precisia SYL-100
Version 1.0w
30 Culworth Manor
Alpharetta, GA 30022
770-783-3568
precisiacoffee.
*Patents pending

Table of Contents
Introduction . . . . . . . . . . . . . . . . . . . . . . . . . . . . 2
Unpacking . . . . . . . . . . . . . . . . . . . . . . . . . . . . . 5
Description of Components . . . . . . . . . . . . . . . 6
Initial Setup . . . . . . . . . . . . . . . . . . . . . . . . . . . . . 10
aring the Machine . . . . . . . . . . . . . . . . . . . . 11
Operating Instructions . . . . . . . . . . . . . . . . . . . . 12
e
lk
PID Temperature Control . . . . . . . . . . . . .. . . 21
Routine Cleaning and Maintenance . . . . . . . . . . 22
Troubleshooting . . . . . . . . . . . . . . . . . . . . . . . . . 25
Warranty . . . . . . . . . . . . . . . . . . . . . . . . . . . . . . . . 26
Cleaning the Parts
Prep
Location Recommendations
Initial Espresso Brewing
Brewing Espresso
Cappuccino or Latt
Steaming/Frothing Mi
Tips & Tricks
1

Introduction
Precisia SYL-100
Thank you for purchasing the Precisia SYL-100 espresso and cappuccino machine. We
sincerely appreciate your decision and trust that our machine will meet your expectations
in both the quality of the espresso produced and the high value of our product. While we
are delighted that you may be anxious to brew some espresso or make a delicious
cappuccino, a few minutes of your time reading through this manual now will only serve
to enhance your espresso experience in the months and years ahead. In particular, we
would urge you to read through the safety warnings below. Although brewing and
drinking espresso is a delightful experience, the process involves hot water under high
pressure and your safety is paramount.
SAFTY WARNINGS
•The power source must meet the specifications of the coffee machine with correct
voltage and proper grounding connections.
•Do not attempt to remove the portafilter holder during or immediately following the
brewing operation. Very hot water under high pressure will spray out possibly
causing injury to the user. Wait 15 seconds after brewing stops before removing
the portafilter assembly.
•Do not touch the metal tubing of the steam wand nozzle during and right after
frothing milk. Do not touch the bottom or sides of the group head when the
machine is on. These surfaces are very hot.
•If an abnormal display or noise is observed, turn the machine off, unplug the
power cord and contact the manufacturer before using it again.
•Do not move the machine when water is present in the reservoir. Water may spill
inside the machine causing permanent damage or electric shock.
•Clean the machine only when it is cool and unplugged.
•Empty the water reservoir if the machine will be subjected to freezing
temperature.
•Do not allow children to operate machine unless they are under adult supervision.
2

Our Mission
Precisia Coffee is dedicated to manufacturing precision temperature controlled home
espresso machines. It is widely recognized that proper brewing water temperature is
one of the most important factors affecting the taste of the espresso. If the water
temperature is too low, it will not completely extract the aroma from the coffee.
However, if the water temperature is too high, it will extract unwanted bitterness.
Experts believe that the brewing temperature for any particular blend of espresso beans
(optimum is typically between 196 F and 204 F) should be maintained within one degree
during the extraction process in order to produce the best tasting espresso. In addition,
each individual may have their own taste preferences of that coffee which can be
affected by the brewing water temperature. Most home espresso machines use a
simple snap action on-off thermostat as a means of controlling water temperature. This
can allow for a fluctuation of up to 40 degrees (Fahrenheit) in the brew water
temperature and is the primary reason why most espressos made in the home cannot
equal the taste of an espresso brewed in a commercial coffee cafe.
Precision Temperature Control
The Precisia SYL-100 incorporates a custom developed temperature control system
utilizing a PID algorithm that can maintain the water temperature for brewing your
espresso within one degree of the selected value. Users can easily change the water
temperature to suit their own taste. The actual temperature of the boiler is displayed by
a bright red LED display with a green light signifying when the water is ready for brewing
your espresso.
Home espresso machines usually require a rapid heat up speed. This requirement
makes it difficult to obtain precision and stable temperature control, especially for a
stainless steel boiler/group head. Precisia has achieved superior performance with
these usually-contradictory parameters through innovative hardware and software
design. The system generally takes about 5 minutes to heat up from room temperature
and less than 2 minutes between each shot.
Precision Shot Volume Control
The shot volume of the espresso can be easily adjusted to suit the user’s preferences.
The shot volume is adjusted by varying the pumping time with one-second accuracy.
3

Stainless Steel Group Head
Precisia uses a stainless steel grouphead for better taste and uniform temperature rather
than the more commonly used brass group heads which have the tendency to absorb
coffee oils and negatively affect the taste.
With Precisia, you are in total control of your espresso!
Specifications
Dimensions (h x w x d): 12.0 x 11.2 x 8.5 in. (30.5 x 28.5 x 21.6 cm)
Weight: 11 lb (5.0kg)
Power Requirements: 115-120 VAC, 60 Hz, 10.5 A
Heater Power: 1000 W
Pump Power: 50 W
Pump Pressure: 14-16 Bar
Water Reservoir Capacity: 42 ounces (1.25 L)
Drip Tray Capacity: 15 ounces (.44 L)
Temperature display units: degrees F or degrees C
Temperature display range: 32F to 302 F (0 C to 150 C)
Pump timing range: 10 to 40 seconds
Espresso temperature range: 140 to 212 F (60 to 100 C)
Steam temperature range: 230 to 257 F (110 to 125 C)
Factory Default Settings
Pump timing (SEC): 14 seconds
Espresso brew water (ESP): 208 F (97.8 C)
Steam temperature (CAP): 240 F (115 C)
4

Unpacking the Precisia SYL-100
The Precisia SYL-100 comes nicely packaged in a sturdy cardboard box with formed
styrofoam inserts to prevent damage due to shifting during transit.
Carefully inspect the exterior packaging of the machine for any signs of damage during
transit. Pictures of transit damage are invaluable should it be necessary to file a claim
with the delivery service or carrier.
The machine itself is wrapped in an easily removable plastic bag. After removing the
machine from its box and removing the plastic bag, remove the blue-colored protection
film from the warming plate and replace the plate back on the top of the machine.
All of the filter baskets and portafilter are in the styrofoam block tightly packed beneath
the control panel. Slightly rotate the steam nozzle outwards and push the styrofoam to
the left to get it out. The steaming/frothing thermometer is inside the water reservoir.
CAUTION
Do not leave the bag where younger children can easily
access it.
A good idea would be to store the plastic bag and all other packaging materials back in
the Precisia box for later use.
Visually inspect the machine for any damage due to shipping and handling.
5

Description of Components
Control Panel. The control panel serves as the interface between you (the barista) and
your espresso machine. Here you can turn the machine on and off, set the temperature
parameters for brewing espresso and steaming/frothing milk, and the amount of time the
pump operates for brewing espresso shots.
6

Warming plate. Placing cups on this plate will help keep them warm. Pre-warmed
cups will make the espresso taste better by increasing the life span of the delicious
crema foam formed on top of the espresso liquid.
emovable Water Reservoir. This easily removable and cleanable reservoir holds 42
ch
t
he water tank slides out easily for refilling when necessary or it can be partially slid out
oir
plash Grid and Drip Tray. The drip tray assembly consists of two molded pieces; the
n
ortafilter Assembly. The portafilter assembly consists of the portafilter itself and your
R
ounces of water for brewing coffee and producing steam for frothing milk. While the
water level can be easily seen from either the front or the side of the machine, your
Precisia is equipped with a magnetically activated low water level switch. This swit
automatically turns the power off to both the pump and heating element to prevent
damage to the machine when the water level reaches a preset low level. A filtered
water source, e.g. Brita pitcher or equivalent, is highly recommended for the water tha
your machine will use for brewing your espresso.
T
as illustrated if refilling from a handy pitcher. Place the two silicone tubes in the
container before sliding it back. When moving the espresso machine, the reserv
either must be emptied or removed to prevent water from being spilled inside the
machine.
S
top grid for holding espresso or cappuccino cups while brewing and the collector tray
itself that catches any spilled liquid. Although they are a snug fit to the base, both ca
be easily removed for cleaning using warm soapy water.
P
choice of three espresso baskets. The height and internals of each basket differ
7

depending upon either the method or amount of espresso you plan or brewing. T
portafilter handle is equipped with a sliding lock that holds the basket in place when
removing spent coffee grounds or a used espresso POD.
he
stall the portafilter assembly into the espresso machine by holding the filter assembly
0
o
the
team Valve, Frothing Enhancer Device and Nozzle. These are used to produce
In
level with the handle approximately 60 degrees to the left (8:00 o’clock position).
Unlock the filter lock with your thumb. Raise the assembly until the front is in the
grouphead hole. Turn the portafilter assembly counterclockwise for approximately 6
degrees (until the handle is at the 6:00 to 5:30 position or until it feels snug). Check t
make sure the portafilter assembly is correctly installed. To remove the filter assembly
from the espresso machine, turn the handle of the filter assembly clockwise for 60
degrees and then drop it slightly to remove. Engage the filter basket lock to retain
filter basket in the portafilter and dispose the spent coffee grounds or espresso POD in a
convenient trash container.
S
steamed and frothed milk for delicious cappuccinos or lattes. Press the CAP/▼key
and wait until temperature reaches your set value (240 F is the default setting) and for
the ready light to stop flashing. Place your steaming pitcher, filled to 1/4 - 1/3 capacity
with fresh cold milk, underneath the steam nozzle. Open the steam valve by turning the
steam knob counterclockwise. After the milk is frothed to your satisfaction, close the
valve by gently turning the knob clockwise.
8

CAUTION
After steaming, the steam wand is very hot. Be extremely careful with
your hands and fingers when moving (rotating) the high temperature
steam wand.
Please select a stainless steel steaming pitcher of proper height and capacity.
Recommended steaming pitcher sizes range from 12 to 20 ounces in capacity. Fill the
steaming pitcher approximately 1/4 to 1/3 of its capacity with the fresh chilled milk of your
choice. This will ensure sufficient frothed milk for two delicious cappuccinos or lattes.
After you are finished the frothing operation, clean the nozzle internally by briefly
releasing a small burst of steam into a wet cloth and then wipe the outside of the nozzle
with that same wet cloth.
Accessories:
easuring scoop. A combination measuring scoop and tamper is provided with your
ilter baskets for espresso. Two filter baskets for espresso are provided; a single
ed plastic
teaming/Frothing Thermometer. A stainless steel steaming/frothing thermometer
M
espresso machine. Each level spoon of coffee powder provides the proper amount of
coffee (approximately 7 grams) for a single shot of espresso. Use the flat end to tamp
the espresso grinds level with approximately 8 -13 lbs force after putting it in the coffee
filter basket.
F
shot basket and a double shot basket. A special filter basket, sized for a standard 45
mm diameter espresso coffee pod, is also provided. It has the same outside
dimensions as the single shot basket for espresso powder but has a white color
ring sitting inside the stainless steel basket. If there is no desire to utilize coffee pods,
this filter basket can be converted to a single shot basket by removing the white plastic
ring and the white o-ring.
S
with clip is provided for your use when preparing milk-based drinks.
9

Initial Setup
Cleaning the Parts. Rinse the water container and fill it with filtered water to just below
the 1.25-liter mark. Before sliding the reservoir back into position, place the two silicone
tubes inside the reservoir.
Plug the power cord into a standard 115-120VAC grounded receptacle and note that the
red power indicator LED is lit. If, by some chance, the green LED starts flashing, press
the On/Off button to turn the machine off.
Place a normal coffee cup on the drip tray directly underneath the grouphead shower
screen and turn the machine on. Now press the ESP button to initially fill the boiler with
water. The pump will operate for 14 seconds (this is the default timer setting set at the
factory) drawing water from the reservoir. Repeat this process two more times for a
total of three pumping cycles. You should notice a small change in the sound of the
pump when the boiler is full and water begins flowing from the grouphead shower
screen.
Mount the portafilter assembly to the grouphead. Slide the portafilter basket locking
mechanism back (in the direction of the arrow) and place any one of the three baskets in
the portafilter. Make sure the basket lock remains slid back. Install the portafilter
assembly into the espresso machine by holding the filter assembly level with the handle
approximately 60 degrees to the left (8:00 o’clock position). Turn the portafilter
assembly counterclockwise for approximately 60 degrees (until the handle is at 6:00
o’clock or until it feels snug).
CAUTION
The portafilter assembly cannot be properly installed in the
machine with the basket lock engaged. Attempting to install
the assembly into the machine in this manner may cause
damage to the portafilter assembly or the grouphead or both.
10

With the portafilter assembly installed, press the ESP button which will run the pump for
again to operate the pump for another cycle.
Replace the basket with another all the new assembly back into the machine.
Repeat the two pumping cycles as per the first basket.
Replace this basket with the one remaining baske all this assembly back into the
machine. Repeat the two pumping
Replenish the water supply in the reservoir as necessary and turn the machine off if it
won’t be used in the next few hours.
one cycle (14 seconds).
Press the ESP button once
Remove the portafilter assembly from the espresso machine by turning the handle of the
filter assembly clockwise for approximately 60 degrees and then drop it slightly to get it
out.
one and inst
t and inst
cycles as per the first basket.
Congratulations! You have now successfully cleaned all parts which will contact the
brew water and gained experience in removing and replacing baskets and portafilter
assemblies from the machine. The best is yet to come!
Preparing the Machine
Location Recommendations. Precisia is best located on the kitchen countertop nea
the sink and preferably on the left hand side of the sink because of the location of the
steam wand.
Initial Espresso Brewing. You might want to begin your espresso journey using
because of their ease of use. The cost of the typical espresso pod is around 50 - 70
cents and while this is more e
r
pods
xpensive than using freshly ground espresso beans,
leanup is inherently a lot easier. Espresso pods are available at national coffee cafes
such as Starbucks and food stores such as Whole Foods Market. The pods from
tarbucks are convenient in that they are individually sealed, are available in two
different roas
c
S
t levels, and are available in a decaffeinated variety.
11

Operating Instructions
The control panel is the “link” between you and the machine. We recommend that you
become familiar with the operation of the control panel prior to making any espresso or
spresso based drinks. After operating the Precisia for a few days, most of what
elicious drinks.
ne important thing worth remembering is to always start your operations with both the
e
follows in this section will become well known and you will be producing d
O
reservoir tank and boiler full with fresh, filtered water.
12
Control Panel Operation
The red power indicator LED will be lit anytime the machine is plugged into an electrical
outlet. Press the ON/OFF button to turn the machine on. The Water Temperature
Indicator LED (Green Ready Light) will begin flashing at the rate of 1/second signif
that the boiler is heating up to the set espresso brewing temperature.
The display window will show a rising temperature whi
ying
ch will take about 5 minutes to rise
from room temperature (72-76 F) to the temperature set for espresso brewing (208 F is
the default).
Any time the machine is “on”, the three adjustable parameters of pumping time (SEC),
espresso water temperature (ESP), and cappuccino steaming temperature (CAP) can be
adjusted to suit YOUR preferences. This is done by pressing the “SET” button which
will put the machine into the Parameter Setting mode.
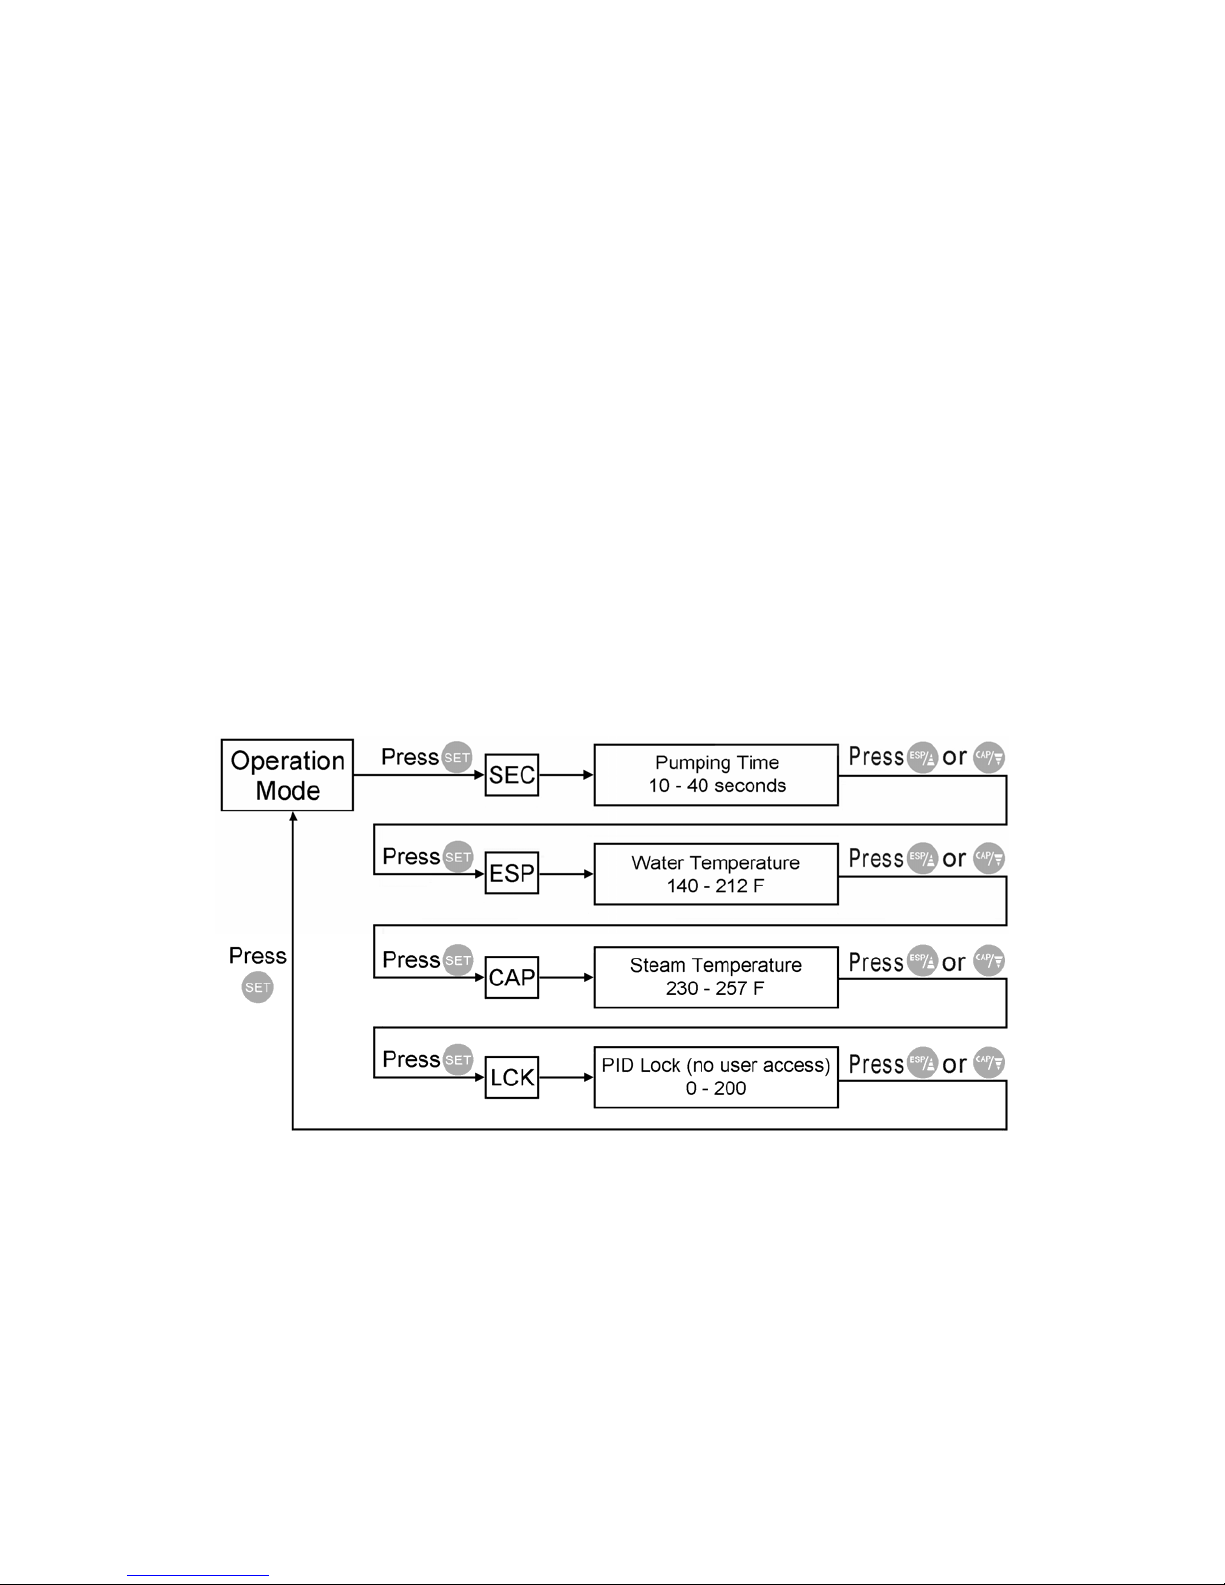
The chart shown below shows the sequence of parameters when the SET key is
pressed:
Flow Chart for Parameter Setting Mode
When the system is in the Parameter Setting mode, the decimal point LED will be
flashing. Press SET to confirm and store in memory changes made to any of the
parameters. If no key is pressed within 8 seconds, the system will automatically return
to the Operation Mode. In this case, any changes made to the last displayed parameter
will not be saved.
13

If a parameter does not need to be changed, press the SET button to advance to the
ext parameter. Changes made to the parameters are stored in non-volatile memory
e
nty.
ill the water reservoir with fresh, filtered water and gently slide it back into
the machine.
The LED display will show the current temperature (which will begin to rise) and the
esso brewing water temperature and pumping time (this step can be skipped
if there is no desire to change the default values). However, please do not forget to
change the pumping time if you are switching from pods (single-shot- 14 seconds) to
a double-shot basket (19-21 seconds) or vice-versa.
•When the machine reaches set temperature, activate the pump again for one brew
cycle to heat up the installed portafilter and basket.
NOTE
In order to produce the best espresso that Precisia is capable
of, we recommend that you always first “pull a blank shot” of
hot water through an empty basket and portafilter prior to
making a “real shot.” The idea here is to make sure the
boiler is as full as possible and to heat up all the components
in the brew path closer to the temperature they will be
subjec ot
water from the port
coffee and putting the portafilter back into the machine.
s
p it hot.
n
such that even if the machine is turned off and the power cord disconnected, the saved
parameter values are not lost. PID parameters have been locked with an access cod
only available to authorized repair facilities. Unauthorized modifications of these
parameters could result in machine malfunction and will void the warra
Brewing Espresso
•Check / F
•Install the portafilter into the machine with the empty basket of your choice in place.
•Turn the machine on and, regardless of water temperature, activate the pump by
pressing the ESP/▲button until you see water flowing from the portafilter to ensure
that the boiler is full of water.
•
green LED will begin flashing at the rate of approximately 1/sec.
•Set espr
ted to when “pulling a real shot.” Shake excess h
afilter and basket prior to loading the
•Remove the portafilter assembly, engage the basket lock, and shake it a few time
over a nearby sink to remove the small amount of water that remains inside.
Remove the basket from the portafilter and reinsert the portafilter back into the
machine to kee
14

•Load espresso grounds (or an espresso POD) into the filter basket, using one level
spoon for the single-shot filter basket and two level spoons for the double-shot filter
basket. Tamp the grounds level using the combination scoop/tamper, making
that the final, tamped level of coffee in the basket is about 1/16” to 1/8” b
sure
elow the rim
of the basket.
o level scoops), it
will be advantageous to slightly level and very lightly tamp the
grounds after loading the first scoop into the basket. Set the
pump timing (SEC) to 19-21 se
•Wipe any poor seal
between t
•Remove t
•Load the p in place by
turning the ition or slightly past
or until it i
•Wait until tly lit, place a
pre-warme /▲key to start the
pumping cycle.
•
•after the pump stops before removing the portafilter.
NOTE
If you are using the double shot basket (tw
conds for a double-shot.
stray grounds from the rim of the basket which might cause a
he basket and grouphead sealing ring.
he warmed portafilter and insert the filled basket into it.
ortafilter assembly back into the espresso machine and lock it
assembly until the handle reaches the 6:00 o’clock pos
s snug.
the Ready indicator has changed from flashing to constan
d cup underneath the filter assembly, and press the ESP
•Wait a few seconds after pump stops to let the dripping stop.
Espresso is ready – ENJOY!
Wait about 15 seconds
15

Ti s:
1. Precisia’s pump can be started (or stopped) at any time even if the temperature is
not at the set point by simply pressing the ESP/▲button.
p
2. The default pumping time is set at 14 seconds for a single-shot (~1.0 oz or 30 ml)
5. The optimum brewing temperature for
re
Ca
c
A la
e de up of espresso and
asy to find variations
aferences are what really count.
o
of espresso. The shot volume can vary due to the fineness of the coffee grounds
and/or the amount of coffee grounds used. It is easy to change the pumping
time parameter (SEC) to arrive at the right concentration and amount of espresso
best suited to your taste.
3. The default value of the espresso brewing temperature parameter (ESP) is set at
208 F which is measured on the top surface of the boiler. The temperature of the
water exiting the grouphead is about 8 F lower than the temperature shown on the
display panel.
4. Precisia utilizes brew water pressure to assist in packing the ground espresso to
the correct density point for optimum flavor. Because of this, there is no need to
tamp the coffee very forcefully unless the grind of the coffee is relatively coarse
however, it is important that the grounds be level.
different blends of espresso beans can
vary from 195 F to 205 F. Precisia users can easily adjust the temperature to
optimize the flavor for different beans, remembering that the set ESP temperatu
on the display panel is about 8 degrees F above the temperature of the brew
water hitting the coffee.
ppuccino or Latte
A appuccino is made up of espresso, steamed milk, and frothed milk in equal portions.
tte is made up of espresso and steamed milk with a spoonful of frothed milk added
aft r pouring in the steamed milk. The classic cappuccino is ma
ed/frothed milk. Certainly it is ea foamy uniform mixture of steam
f ll of the foregoing but your preo
Sh uld you steam/froth the milk first and then make the espresso or should you make
16

the espresso first? With Precisia, we recommend frothing the milk first and then
reating your espresso but please feel free to try it either way. Experimentation is part
f the “fun” in creating your own espresso or espresso based drinks. Our directions,
follow, assume you are starting with the machine at room temperature and that the
achine is set up as follows: SEC=14, ESP=208, CAP=240. If this is not the case, your
act
g
•LED will be flashing at the rate of 1/sec as the machine
•
emperature set for steaming. As a reference point, note that it
•
•e milk level such that at least
half the length of the gray frothing enhancer is submerged. Tilting the pitcher is
d milk.
ensures
•
knob clockwise.
•
•Press art the pumping cycle which will again
e boiler temperature closer to the espresso brewing temperature
c
o
which
m
ions will need to be modified accordingly.
•Turn the machine on and, with an empty portafilter and basket in place, press the
ESP/▲key to start the pumping cycle with a cup beneath the grouphead to catch
the water. This ensures that the boiler is full of water for your steaming/frothin
adventure.
The green ready indicator
is heating up towards the set espresso temperature.
Press the CAP/▼key at any time while the temperature is rising. The green
LED will begin flashing at the rate of approximately 2/sec as the boiler is now
heating up to the t
takes about 65 seconds for the Precisia boiler to heat from 208 F to 240 F.
Fill a chilled stainless steel steaming pitcher with fresh, cold milk in an amount
equal to 1/4 to 1/3 of the pitcher’s capacity (4 to 5 ounces).
Lower the wand into the steaming pitcher below th
perfectly acceptable to achieve the proper insertion depth. When the
temperature reaches 220 to 228 F, open the steam valve slowly by turning the
knob counterclockwise about 1-1/2 turns to release the steam into the chille
Initiating the steaming/frothing process at a temperature of 220 to 228 F
that the heating element will remain “full on” during the steaming process.
Once the milk is sufficiently frothed (140-150 F), close the valve by turning the
•Press the CAP/▼key to take the machine out of the steaming/frothing mode.
The green ready indicator LED will stop flashing.
Press the ESP/▲key to start the pumping cycle which will refill the boiler and
quickly reduce the boiler temperature down towards the espresso brewing
setpoint.
the ESP/▲key once again to st
rapidly reduce th
setpoint (208 F).
17

Steaming/Frothing Milk
r pitcher can be used successfully with
recisia but a 12-ounce pitcher may be the easiest to use because the small amount of
mil
pitcher
delicio
desirab
Milk v k at one time and certainly
no ed
exposu
setting
may be
re-a i
setting
Milk ty
tends t xture.
The m
produc
Tempe
frot
prefere the milk will continue to increase in temperature after the steam
is s
reache sonal preference. Milk will
sca
steami e
temperature of the milk, however once you become experienced, you can judge the
tem /or
fingers
rothing. Frothing is using the steam to foam the milk. Another function of the
othing is to warm up the milk (steaming) to make it taste better with coffee. As steam
simply pressurized water vapor with no air, it cannot foam the milk by itself. Foam is
What you will need:
Stainless steel pitcher Steaming/Frothing thermometer
Cold milk Wet cloth
Pitcher. The readily available sizes of reasonably priced stainless steel pitchers seem
to be limited to either 12 or 20 ounces. Eithe
P
k typically required for one or two cappuccinos or lattes froths up nicely in the smaller
with little waste. On the other hand, if you are frothing up milk for making some
us frothy hot chocolates, a 20-ounce stainless steel pitcher may be more
le.
olume. We recommend frothing 4 to 5 ounces of mil
more than 6 ounces. To prevent damage to sophisticated electronics from extend
re to high temperature, the microprocessor shuts the heater off once the CAP
temperature is reached. If more than 5 ounces of milk needs to be frothed, it
necessary to press the CAP/▼key one more time during the frothing to
ct vate the heater but only when the temperature has dropped below the CAP
temperature (240 F).
pe. Skim milk produces more foam than 1%, 2%, or whole milk but that foam
o be airy and dry. 1% or 2 % milk will produce foam having a better te
ilk should be cold and fresh and the pitcher should be chilled, as warm milk will
e foam of poor quality.
rature. A steaming/frothing thermometer is included with Precisia. The
hing should be finished once the milk reaches 140 - 150 F depending on your
nce. Note that
hut-off. Steaming/frothing with 1% milk and shutting off the steam when the milk
s a temperature of 140 - 145 degrees F is our per
ld at around 175 F with the taste and smell being quite obvious. The
ng/frothing thermometer should always be placed in the pitcher to monitor th
perature almost as accurately by touching the milk container with your hands and
if a metal pitcher is used for steaming/frothing.
F
fr
is
18

formed by introducing air into the milk simultaneously with the steam and, with Precisia,
ere are two ways in which this can be accomplished.
1) Use the frothing aid device (FAD), which is the gray colored plastic part screwed
e steam wand. The FAD has two small air intake holes on the
top surface of the device. It is important to keep them clean and open after each
ing th FA into the
ting into the milk, a small
ir
erature,
g is complete. Close the steam valve gently, remove the pitcher from the
steam wand, and wipe the steaming wand/FAD with a wet cloth.
ir
steam
the
mersed below the milk surface. You can tell that you are
at the right depth when you see air being injected into the milk with the steam
s
e
am is produced, place the wand tip deep into the milk to
keep streaming the milk until the desired temperature is reached.
mal. Once
uts
Once the frothing is started, the
temperature will stop rising and the heater will be on during frothing. The boiler
th
onto the tip of th
use. During the froth , e D tip should be immersed about halfway
milk and remain in that position. As steam is shoo
vacuum is formed inside the FAD which introduces air into the milk from the two
small holes on the top. As the foam grows, it will eventually partially seal the a
intake holes. Once the holes are partially covered, the foam will stop forming as
very little additional air is being injected. Frothing continues past this point to
assist in breaking up large air bubbles which have formed and to heat the mixture
to the desired end temperature. Once the milk reaches the desired temp
frothin
2) Use the bare steam wand without the FAD attached. Although a little difficult for
most beginning baristas, this method will produce a better foam (with a little
practice) and is the most common way in which professional baristas create the
micro-foam. First, you need to remove the FAD by unscrewing it from the
wand. During the frothing process, you need to locate the pitcher such that
steam wand tip is just im
The tip of the wand should be about 1/8 - 3/16” beneath the surface. If the tip i
too high, large air bubbles will be created and/or the milk will spatter. As the
foam grows, the pitcher needs to be lowered to keep the wand tip just beneath th
surface. Once enough fo
Notes
1. In order to reach the proper temperature as rapidly as possible to produce steam
for frothing milk, steaming temperature is not PID controlled. A 20-degree
temperature overshoot above the set temperature is considered nor
the machine reaches the CAP setting temperature, the heater automatically sh
off. It will not come on again until the CAP is pressed a second time. We
recommend you start frothing as soon as the temperature reaches 220-228 F,i.e.,
before the CAP setting temperature is reached.
has sufficient capacity to froth about 6 ounces of chilled milk to the proper
19
Table of contents


