Premium PGS2410S User manual

PGS2410S
Estufa de Gas
Freestanding Gas Stove

Importante
El equipo que usted ha comprado puede ser diferente al que se encuentra ilustrado en este
manual. Chequee por favor con la información del modelo que Usted ha comprado. La
aplicación que usted tiene puede llevar un enchufe diferente al que está ilustrado en este
manual. El enchufe que viene con el producto sigue la especificación eléctrica del país en
donde es vendido.
Condiciones del Lugar de Instalación
1. El uso de las estufas de gas produce calor y humedad en donde están instaladas.
2. Asegúrese que haya un buen flujo de aire, manteniendo una ventilación natural a través de
una ventana, puerta o instalando una campanilla que extraiga el gas que se encuentra en el
ambiente. Si la ventilación no es buena, esto puede causar la carência del oxígeno, lo cuál
podría ser perjudicial para su salud y el rendimiento del gas.
3. Si la estufa de gas trabaja durante un largo periodo de tiempo, será necesario aumentar el
flujo de aire.
4. La entrada de aire no debe disminuir el buen funcionamiento de la gama de gas o corte la
llama del gas.
5. Para instalar su estufa de gas, compruebe si su casa tiene una llave de gas exclusivo para
la estufa y se encuentra en buenas condiciones.
6. Asegúrese que su casa tenga un enchufe exclusivo para la estufa de gas y si se encuentra
en buenas condiciones.
7. No instale la estufa de gas encima de las alfombras.
8. No instale la estufa de gas cerca del refrigerador, porque el calor excesivo dificulta su
rendimiento.
Instalación de la estufa de gas
1. Deja al menos 80 a 85 cm entre la parte superior de la estufa de gas y
cualquier mueble o Campana de cocina antes de ser instalado.
2. Dejar al menos 2 cm en la parte posterior y a cada lado de la estufa de
gas para permitir que el calor pueda salir.
3. Asegúrese de no bloquear la salida de gas del horno de embudo o las
rejillas de ventilación de gas, al momento de instalar el horno.
Instalación de Gas
1. Esta estufa fue diseñada para el uso de gas licuado.
2. Se debe utilizar siempre un regulador de presión exclusivamente para
su estufa de gas. La falta de presión del regulador podría causar fugas
de gas. Comprobar la validez de la presión del regulador. El regulador
debe ser reemplazado cada 5 años.
1~_Z 1.NX
+NX
Nombre de Las Partes
1. Hornillas selladas.
2. Parrillas tablero
3. Tapa de cristal.
4. Perillas de las hornillas
5. Perilla del horno
6. Bandeja central / goteo
7. Encendido eléctrico del horno
8. Parrilla
9. Base
10. Encendido eléctrico de las cuatro
hornillas y el horno (solo algunos modelos)
11. Luz del horno (solo algunos modelos)
ES-2

100°. Asegúrese que la manguera:
.No tenga uniones.
.No vaya en la parte posterior de la estufa de gas, ni cerca de las
salidas de aire caliente.
Debe ser menor a 125cm de largo.
4. Si es posible, instale el cilindro de gas fuera de la cocina, en un lugar
protegido y con flujo de aire.
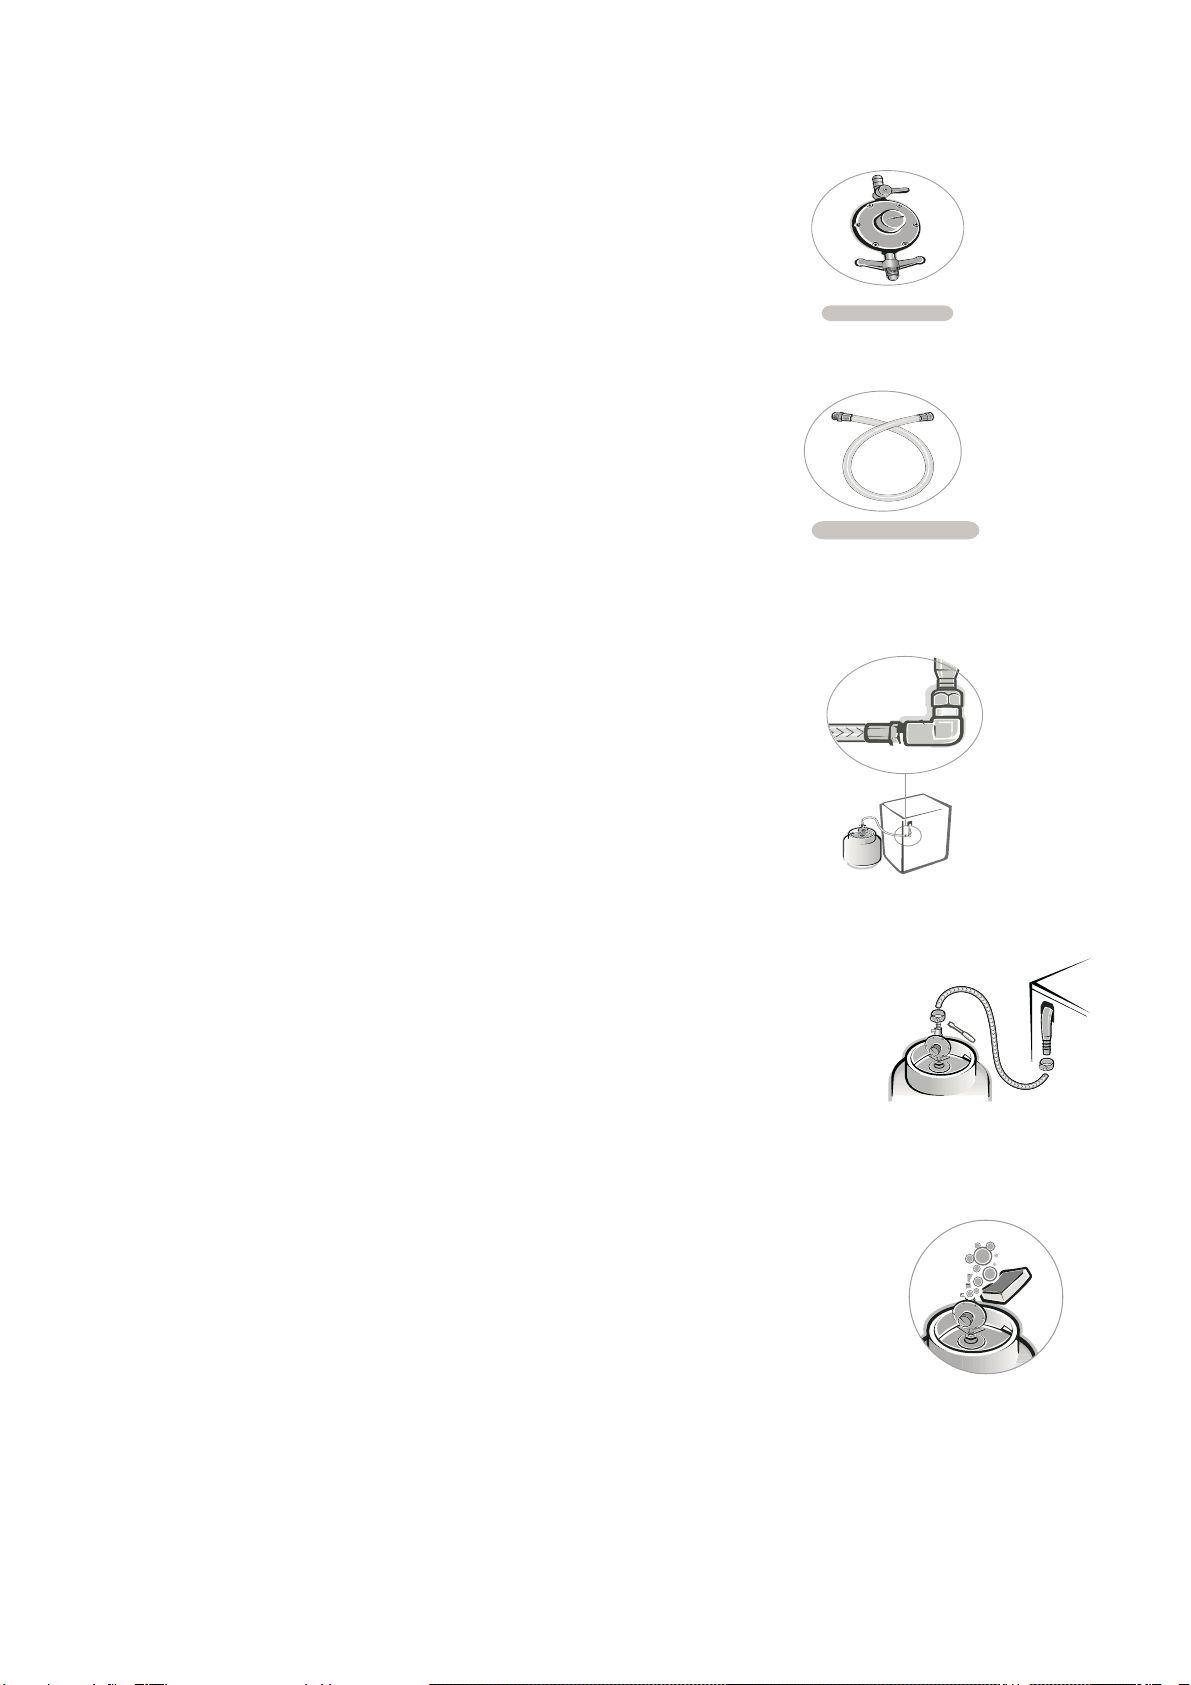
5. Use una manguera de 1 / 2” metálica para conectarla a la estufa de gas.
6. Utilice manguera de plástico solo cuando no este ubicada en la parte
posterior de la estufa de gas.
Manguera de Instalación
1.Coloque la abrazadera de metal en el extremo de la manguera.
2.Conectar la manguera a la entrada del horno y apretar la abrazadera
3.Coloque la pinza en el otro extremo de la manguera y conéctelo al
regulador de presión. Apretar la pinza.
4.Regular la presión del cilindro de gas con cuidado
5.Después de la instalación chequea que no haya ninguna
fuga usando jabón o detergente liquido.
Seguridad para los niños
1. Evita accidentes. Antes de desempacar la estufa. Mantenga el material
envoltorio fuera del alcance de los niños.
2. No permita a los niños manipular el equipo, ni siquiera cuando este
desconectado.
3. Evitar que los niños toquen la superficie y permanezcan cerca del equipo
cuando este caliente en uso todavía o después de estar apagado.
Para quien lo vaya a instalar
1. Desconecte la estufa antes de limpiarla o hacerle mantenimiento.
2. Nunca desconecte la estufa tirando del cable de alimentación. Use el enchufe.
No manipule el enchufe de la estufa de gas. No gire, enrede ni apriete el cable
de alimentación.
3. No es recomendable modificar las características del equipo. No instalar la
cocina de gas sobre el cable de alimentación. Conecte la estufa de gas en su
propia toma de corriente. No use extensiones, ni enchufes adaptadores. Para
evitar cualquier accidente, antes de reemplazar la lámpara de la luz, apague las
hornillas superiores y desenchufe el equipo. Use una lámpara de 40v para
reemplazarla. Cuidado con la comida y los utensilios de cocina.
1. Para apartar o remover comida se deben utilizar guantes de cocina.
2. Nunca deje cerca de la cocina y de las hornillas ningún material inflamable
miéntras se encuentre en uso. Cuando este usando aceite de cocina o
mantequilla deberá tener especial cuidado, ya que estos productos son
inflamables.
3. No use el horno para guardar utensilios de cocina, especialmente aquellos
que contengan residuos o grandes cantidades de aceite.
4. Los recipientes con curvas o bordes salientes no deberán ser usados, ya que
estos por naturaleza son inestables.
5. El mango del utensilio debe colocarse hacia adentro.
Instrucciones para limpiar la cocina
1. Antes de limpiar o hacerle mantenimiento su estufa de gas debe estar
desenchufada.
2. La limpieza debe hacerse cuando la estufa de gas se encuentre fría.
3. Por razones de higiene y seguridad usted deberá tener su estufa de gas
siempre limpia.
4. elija el tamaño de la hornilla de acuerdo a la olla que vaya a utilizar.
5. Después de cada uso siempre deberá limpiarse el vidrio de la estufa de gas.
Especificaciones técnicas del regulador
Presión: 290mm C.A
Consumo Máximo: 2kg/h
3. Siempre use una manguera de PVC para el trabajo desde 20° C a
Regulador de presión
tubo metálico flxible
adaptador
ES-3

Cómo utilizar el horno
Ajuste del temporizador
1. Para ajustar la hora, gire la perilla a la hora deseada.(El tiempo se puede
ajustar hasta 60 minutos)
Antes de encender el horno, por favor elimine los siguientes elementos:
· Bandeja central;
. Parrilla.
1. Identifique la perilla del horno en el medio de las perillas.
2. El encendido puede ser manual o eléctrico.
Encendido manual del horno
Gire la perilla a la posición máxima y al mismo tiempo coloque un fósforo encendido en
el quemador del horno.
Encendido eléctrico (sólo para algunos modelos):
Pulse el botón de encendido y gire la perilla del horno al mismo tiempo hasta que la luz
del horno encienda.
3. Asegúrese que el horno caliente, luego cierra la puerta cuidadosamente. Mantenga el
horno a una temperatura máxima entre 10 a 20 minutos.
4. Seleccione la temperatura. Para apagar el horno, gire la perilla a la posición de
apagado.
5. Su estufa de gas puede tener un control térmico o un termostato. El horno con un
termostato le dará la temperatura más precisa con la perilla.
Bastidores Horno
El nivel en donde se debe colocar la rejilla o bandeja de hornear dependerá del tipo de
alimentos que desee cocinar. Nosotros recomendamos:
1. Utilizar el regulador central para hacer pan, pasteles, etc
2. Siga las instrucciones de la receta adecuada.
3. Para hornear pan, galletas, pizzas y alimentos similares, use la placa de hornear en la
rejilla.
Importante
Nunca hornear los alimentos directamente sobre el quemador superior o la bandeja que
cubre el quemador.
Quemador para el encendido
1. Elige el mando del quemador que desea a la luz.
2. El encendido puede ser manual o eléctrico.
Manual de encendido
1. Gire la perilla de la hornilla que desea encender hasta la posición máxima,
luego mantenga cerca el fósforo de la hornilla.
2. Encendido eléctrico (sólo para algunos modos):
Pulse el botón de encendido y, al mismo tiempo gire la perilla en sentido antihorario
hasta que
encienda la hornilla.
3. Seleccione la temperatura.
4. Gire la perilla a la posición de apagado para apagar la hornilla.
Luz del horno (sólo para algunos modelos)
1. Presione el botón que indica la luz del horno para encender la luz.
2. Para apagar la luz, pulse el botón de nuevo.
Importante: Es normal que continue el encendido mientras se mantiene presionado el
interruptor de encendido.
El uso del asador: (Sólo para algunos modelos)
1. Retire la parrilla y sustitúyala por la bandeja del horno.
2. Coloque la comida en el asador utilizando las varillas que correspondan
al tamaño del horno.
3. Gire la perilla del asador.
4. Cierre la puerta para que comience asar.
encendido del quemador
Posición del
quemador
temperatura
máxima
temperatura
mínima
ES-4

Accesorios: (sólo para algunos modelos)
Pincho de asado
El asador en su velocidad media calienta la comida uniformemente.
Al mismo tiempo, esto puede garantizar una mejor cocción.
Consejos
1. No use cualquier tipo de protección (papel aluminio), ya que esto podría
causar obstrucción de la boquilla del gas o mal funcionamiento de las
piezas de las hornillas.
2. Cuando use el horno, evite tocar el vidrio externo y los accesorios
internos, espere que estos se enfríen dejándolos un tiempo prudencial y
luego proceda a retirarlos.
Recomendaciones Importantes
Para un menor y más eficiente consumo de gas es recomendable usar las
parrillas con un diámetro adecuándose al tamaño de las hornillas previniendo
quemaduras con la llama de la hornilla al momento de abrirla. Es recomendable
reducir la llama antes que el líquido empiece a hervir. Y mantenga la llama a
fuego mínimo mientras sea necesario con el fin de mantener la ebullición. Asegúrese que
haya una buena ventilación en el lugar en donde se encuentre instalada la estufa de gas.
Es recomendable encender la hornilla antes de colocar la olla sobre la parrilla.
Limpieza y Mantenimiento
Antes de hacer limpieza y mantenimiento la estufa de gas deberá estar
desenchufada.
1. Al terminar de usar la estufa de gas límpiela con un paño suave, con una
solución de agua, jabón y bicarbonato (2 cucharaditas llenas en 1 litro de
agua)
2. Para limpiar el vidrio frontal y el panel de control, es recomendable usar
un papel seco.
3. No use detergentes, corrosivos o abrasivos muy fuertes.
Nivel más alto
Medio
Bajo
bandeja grasera
encendido manual
ES-5

PROBLEMAS Y SOLUCIONES
PROBLEMA
CAUSA POSIBLE
SOLUCION
Olor a gas
La conexión de la manguera
Tubo pinchado
Quemadores en posición
incorrecta
Quemador en uso se apago
accidentalmente
El regulador está mal
Instalado.
Cambie la instalación
Colocarlos en posición
correcta
Llame al Servicio de Atención
Al cliente
Instale correctamente
Fuerte olor
Aceite y grasa al fabricar
al fabricar la estufa.
Esto es normal al utilizarla
por primera vez.
Ruido
Expansión de metal debido al
calor.
Normal
Los componentes
eléctricos no funcionan.
Desconecte la estufa.
La
toma de corrientes no tiene
energía.
Conecte el cordón eléctrico.
Compruebe el toma corriente
conectando una lámpara.
Al encender la lámpara,
se inicia el motor del
asador.
Esto
es
normal.
TABLA GENERAL DE EQUIVALENCIAS
MEDIDAS COMUNES MEDIDAS LIQUIDAS
1
Pizca
Menos de
¼
de cucharadita
8
cucharadas ½
taza
3
Cucharaditas
1
cucharada
1
taza 8onz.liquidas
2
cucharadas
30
gramos
=
1
Onza
1 taza
¼
Litro
4
cucharadas
¼
taza
2
tazas
½
Litro
8
cucharadas
½
taza
3
tazas
1
Botella
=
750cc
12
cucharadas
¾
taza
4
tazas
1
Litro
16
cucharadas
1taza
EQUIVALENCIAS EN FARENHEIT Y GRADOS CELCIUS
122º
F
=
50ºC
250º
f
=
121º
C
400ºF
=
204º
C
130
54
275
135
425
218
150
66
300
149
450
232
175
79
325
163
475
246
200
93
350
177 500 260
225
107
375
191
ES-6

Installation place conditions
1>The use of the gas ranges produce heat and humidity where they are installed
2> Be sure that there is a good air flow, keeping natural air ventilation through
a window or door by installing a range hood to extract the air. If ventilation is
not good, this might cause lack of oxygen, which is dangerous for your health
and the gas performance.
3> If the gas range will be working for a long period of time, an extra ventilation
will be necessary to increase the air flow.
4> Air draft should not decrease the performance of the gas range or cut the gas
flame.
5>To install your gas range to a LPG(Liquefied Petroleum Gas) pipe,
check if your hose has a gas tap exclusive for the gas range and if this is in good condition.
6> Be sure that your house has an exclusive plug for your gas range and this is in good conditions.
7> Do not install the range on top of carpets.
8> Do not install the range near the refrigerator, as the excessive heat hinders its performance.
The appliance that you have bought may be slightly different from the one illustrated in this manual. Please refer to
the information related to the model you have. The appliance you have may carry a different plug than the one
illustrated in this manual. The plug that comes with the product follows the electrical specification of the country
where it is sold.
1> Sealed burners
2> Pan Grated
3> Glass Lid
4> Burners knobs
5> Temperature knob
6> Baking rack
7> Oven igniter
8> Dripping Pan
9> Base
10> Electric igniter-burners and oven (only some models)
11> Oven light (only some models)
Important
Product description
Parts name
Important
11
10
09 08
07
06
05
04
03
02
01
EN-2

80 to 85cm
2cm
1> Leave at least 80 to 85cm between the top of the gas range and any
cabinet or range hood install above prepared to be installed built in.
2>Leave at least 2cm in the back and each side of the gas range to allow
the heat to get out.
3>Make sure to not blok the oven gas exit, including the funnel or the gas vents,
when you install the oven.
Gas installation
1>This range was designed for use with LP gas
2> Always use a pressure regulator exclusive for your gas range. The lack of
pressure regulator might cause excess of pressure and leak of gas. Always
check for the validity of the pressure regulator. Hose and regulartor should
be replaced every 5 years. Technical specificaltion of the pressure regulator.
·Pressure: 200mm C.A.
·Max. consumption: 2kg/h
3> Always use a PVC hose to work from-20OCto 100OC. Be sure that hose:
·does not have joints.
·does not go on the back of the gas range neither close to the hot air exits.
·Its less then 125cm long.
4> If possible, install the gas cylinder outside the kitchen, in a place protected
and with air flow.
5> Use a
½
metallice hose to connect to the gas range.
6> Only use a plastic hose when this one does not go on the back of the gas range.
Hose installation
1> Place the metal clamp on the hose end.
2> Connect the hose to the oven inlet and tighten the clamp.
3> Place the other clamp on the oppsite hose end and connect it to the pressure regulator,
Tighten the clamp.
4>Bolt the pressure regulator to the gas cylinder carefully.
5> After the installation, check if there is any gas leak, using soap or liquid detergent foam.
Gas range installation
EN-3

Safety
For children
1>. Avoid accidents. After unpacking the range,keep packing materials away from children.
2>. Do not allow children to handle the appliance,even when it is disconnected.
3>. Prevent children from touching the range surface and from staying in its proximity when in use,
still hot,or after turn off.
For the user and installer
1>. Disconnect the range before cleaning or doing maintenance.
2>. Never unplug the range by pulling on the power cord.Use the plug.
Do not manipulate your gas range plug. Do not bite, twist or tie the power cord.
3>. It is dangerous to modify your gas range specifications and characteristics.
Do not install your gas range on top of the power cord.
4>. Connect the range to its own outlet. Do not use an extension cord or adaptor plug.
To avoid any accident,before replacing the light lamp, turn off the cook top burners
and unplug the appliance. Use a range lamp of 40W to replace it.
Care with food and cookware
1>To handle or remove food, please use the cooking gloves.
2> Never leave clothes or flammable materials near the burners
when the range is in use.When using frying oil or butter additional
care must be taken since these products are flammable.
3> Do not use the oven to store utensils,especially those containing
residues or large quantities of oil or fat.
4> Containers with curved bases or salient edges must not be used
since they can be easily destabilized when moved.
5> The handle of the utensil should be positioned so that it is turned inward.
Instructions for cleaning your range
1> Before cleaning or servicing your gas range,unplug it and cut gas tap.
2> Cleaning should be done when the appliance is cold.
3> For hygienic and security reasons,you should keep your gas range always clean
4> After each use always clean the glass cove of the gas range
5> Choose the burner size according to the pot you are going to use.
EN-4

How to use:
Before lighting the oven,please remove the following elements: A.Dripping pan; B.Baking rack.
C.Identify the oven knob in the middle of the knobs. D.Ignition can be manual or electric.
Manual ignition:Turn the knob to the maximum position, then at the same time keep a match
close the oven burner.
Electric ignition (only some models) : Press the ignition button and turn the oven knob
counterclockwisely at the same time until the oven light.
1> Be sure that the oven is burning, then close door smoothly. Preheat the oven at maximum
temperature for 10 to 20 minutes.
2> Select the temperature.To turn off the oven,turn the knob to the off position.
4> your gas range can have a thermo control or a thermostat.Oven with a thermostat
will give you more precise temperature as indentified mo the oven konb.
Oven racks:
Leveling the baking rack or tray will depend on the type of the food you want to cook.
We recommend:
1> Use the central slider to bake bread,cakes,etc.
2> Follow the instructions of the proper recipe.
3> To bake bread, cookies,pizzas or similar food, use the baking plate on the grate.
Burner ignition
1> Choose the knob of the burner that you want to light.
2> Ignition can be manual or electric.
Manual ignition:
Turn the knob of the burner you want to light up to maximum position,
then at the same time keep a match close the burner.
Electric ignition (only for some modes):
Press the ignition button and at the same time turn the knob counterclockwise until the burners light.
3> Select the temperature.
4> Turn the knob to off position to turn off the burner.
Important:
Never bake food directly on the upper burner or the tray covering the burner.
EN-5

Tips and adverside
1> Do not use any kind of protection on the board(aluminium foil) as it could cause clogging of the gas nozzle or bad
coupling of the burners parts.
2> When using the oven avoid touching its glass surface and internal accessories, wait for them to cool for a reasonable
time before handling them.
3> When cooking on the oven, avoild contact with glass. Avoid children in the kitchen when you are cooking.
4> Never allow kid to sit on the oven door,neither put heavy items on it.
5> To avoid electrical shocks,unplug the gas range when you replace the oven light.
For a lower and more efficient gas consumption it is advisable to use pans with a diameter adequate to the burners
size(fig.1and 2), preventing the flame to burn in the open(fig.3).It is advisable to reduce the flame as soon as the liquid
starts to boil, and keep the flame to the minimum necessary to sustain boiling.Make sure there is adequate ventilation
in the room where the range is installed. For an easier ignition,light the burner before placing the pan over the grill.
Usage of the Rotisserie Rack: (only for some models)
1> Remove the grill rack and replace with the oven tray.
2> Put the food on the rosisserie and fix it using the forks, then install the rod on
corresponding support inside the oven.
3> Turn on the knob"Grill" as indicated in the previous point.
4> Gently close the door to start roasting.
Accessories: Rotisserie skewer
The average speed of the motor heat the food evenly. AT the same time,it can guarantee the nutrition of the food.
Oven light(only for some models)
1> Press the button that indicates the oven light to turn the light on.
2> To turn the light off, press the button again.
It is normal that all the burners have continuous sparkling when pressing the electric ignition.
Important recommendations
Cleaning and maintenance
Before any cleaning or servicing unplug the gas range and cut gas tap.
1> To clean the finishing use a soft cloth with a hot soap cloth with a hot soap water solution with
bicarbonate(2 spoonfuls in 1L of water).
2> To clean the glass front and control panel of the touch pad system, it is recommended to use a dry
paper towel.
3> Do not use detergents aerosols, corrosive or strongly abrasive products.
4> Do not use scrubbers as they may deteriorate the appearance and polish.
Important
When cleaning the board or the burners,you must be careful not to let food remainders into the oven,
pay attention into the gas exit.
EN-6

PROBLEM POSSIBLE CAUSE SOLUTION
Gas Smell
Connection hose or tubing punctured Change the installation
Burners incorrect position Place them in the
correct position.
An oven burner in use accidentally went off. Call the costumer service
Pressure regulator badly installed Install it correctly
Strong Smells Oil and grease used to manufacture your stove It is normal the first time
you use it.
Noise Metal expansion due to heat Normal.
Electric components
do not function Disconnected stove socket without power Connect the electric
cord.Check the
socket connecting
a lamp.
.
PROBLEM SOLUTION
Gas Smell
Strong Smells
Noise
When turning on the
lamp,the roasting
rod It is normal.
.
GENERAL EQUIVALENCES TABLE
COMMON MEASURES LIQUID MEASURES
1 Pinch Less than
¼ teaspoonful 8 Spoonfuls ½Cup
3 Teaspoonfuls 1 Spoonful 1 Cup 8 Liqude Ounces
2 Spoonfuls 30 grams= 10 Ounce 1 Cup ¼Liter
4 Spoonfuls ¼ Cup 2Cups ½Liter
8 Spoonfuls ¼ Cup 4 Cups 1Liter
16 Spoonfuls 1 Cup
EQUIVALENCES FARENHEITAND CELCIUS GRADES
122º
F
=
50
ºC
250
º
f
=
121º
C400
ºF
=
204
º
C
130 54 275 135 425 218
150 66 300 149 450 232
175 79 325 163 475 246
200 93 350 177 500 260
225 107 375 191
Troubleshooting
EN-7
Table of contents
Languages:
Other Premium Stove manuals
Popular Stove manuals by other brands

maxsun
maxsun ms-3800s instruction manual

SCAN
SCAN 5004 FRL Assembly and instruction manual

Broseley
Broseley IGNITE 5 CD1 MK2 Installation & operating instructions

Ashley
Ashley AP5780 Owner’s Instruction and Operation Manual

Heta
Heta Scan-Line 800 Series Operating and installation instructions

Regency
Regency PR67 installation manual

KRAFT
KRAFT KF-FSK5401AGW user guide

hergom
hergom ADDA 8 Instructions for installation, use and maintenance

Napoleon
Napoleon GDS60-1N Installation and operation manual

Broseley
Broseley Q7 Installation & operating instructions

Superior
Superior WXS2021WS Installation and operation manual

509 Fabrication
509 Fabrication 509-1 OPTIMUM Owner's operation manual