PrepPal PPSLA-14 Owner's manual

OWNER /OPERATOR
MANUAL
Model
PPSLA-14
IMPORTANT NOTICE
This manual contains Important Safety Instructions which must be strictly followed
when using this equipment.
SAVE THE INSTRUCTION
Rev.20

Safety Reminding
A service agent/qualified technician should carry out installation and any repairs of this product if required.
Do not remove any components on this product.
ALWAYS place the slicer on a flat, stable surface in work area with adequate light and space.
ALWAYS stand BEHIND the safety guard when operating the appliance.
DO NOT place hands near the blade when in use. This can result in severe injury.
DO NOT touch the blade edge.
DO NOT remove food from the appliance until the blade has come to a complete stop.
DO NOT immerse the appliance in water.
DO NOT attempt to cut bones or items that have been frozen below -6°C. This can damage the blade.
ALWAYS switch off and disconnect the power supply to the appliance when not in use.
NEVER leave the appliance unattended when in use.
NEVER bypass or alter any switch or circuit.
Keep all packaging away from children. Dispose of the packaging in accordance to the regulations of local
authorities.
If the power cord is damaged, it must be replaced by an Preppel agent or a recommended qualified
technician in order to avoid a hazard.
This appliance must only be used in accordance with these instructions and by persons competent to do so.
This appliance is not suitable for use by children.
When the motor temperature is going up high and heat protect switch will turn off, the main switch will also
turn off. But when the motor is cool down and heat protect switch turn on, the motor will not working. If you
want the motor working, you need to switch on the power button again.
USA Toll Free: 1-800-683-8660
Canada Toll Free: 855-885-6518
Email: [email protected]
www.atosa.com
www.atosausa.com

GENERAL
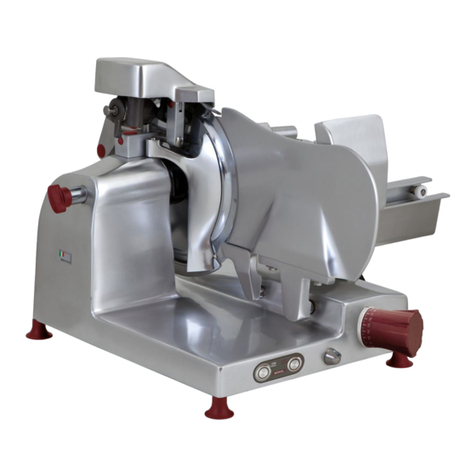
The PPSLA-14 is equipped with a 1
/
2
hp knife motor. The slicer features 14" diameter contoured
stainless steel knife. The slicer is furnished with a cord and plug as standard equipment.

FEATURES
Slicing counting – have count up or count down function in Automatic mode
Automatic high precision capacity and cutting, improved with 3 carriage speed(max.50) and 3 stroke lengths
(small-medium-large)
All functions for slice count, carriage speed control, stroke length control, start/hold/down control are integrated
in a digital display and button panel
Double powerful motors to drive this slicer device, one motor(1/2 HP, 370watts) drives blade, another
motor(2/3 HP, 450watts) drives stroke moving.
14” special alloy knife(Rasspe@, high quality brand made in Italy), longer lasting and easier to sharpen
Heavy duty slicer for full capacity at cheese slicing, all day-long duty slicing, slicing volume rate range at 37—62
slices per minute.
Easier switch between automatic slice model to manual slice mode
High quality reliable structure at base, frame and carriage, include: stainless steel bottom base, anodized
aluminum frame base and carriage
Plastic free structure at this slicer: stainless steel material at index knob, carriage handle and feet
Top mounted metal knife sharpener with two stones for a razor sharp cutting edge
High quality stainless steel index knob control gets 0 to 9/16"(14mm) precision slice thickness adjustment
Knife cover interlock prevents slicer from operating without knife cover in place
Sealed splash zones for added sanitation and seamless edges and radius corners
Large square food receiving plate
Big carriage angle 42°, full gravity feed food chute
Power switch secures no voltage release preventing inadvertent reactivation of slicer in the event of power or
interlock interruption.
Technical Specifications
Specification Model No
PPSLA-14
Blade Diameter mm / inch 350 / 14”
Blade motor power Watt / HP 370 / 1/2
Stroke motor power Watt / HP 450 / 2/3
Slicer thickness mm 0-13
Cut capacity H x W mm 150 x 255
Net weight Kg / LBS 71 / 156.5
Packing size (L x W x H) mm 880 x 750 x 870

INSTALLATION
UNPACKING
The slicer was inspected before leaving the factory. Check for possible shipping damage immediately
after receipt. When the slicer has been unpacked and removed from its shipping carton, it should be
checked carefully for any damage that may have occurred during shipment. Do not plug in the power cord
or attempt to operate the slicer prior to this examination.
Carefully check all slicer components such as the product table(food chute), pusher, sharpener, thickness
Control knob, etc., to make certain they move freely and that there are no obstructions.
ELECTRICAL CONNECTIONS
The electrical cord on this machine is equipped with a three-pronged grounding
plug which must be connected to a properly grounded receptacle. If the receptacle is not the
proper grounding type, contact an electrician. Do not remove the grounding prong from the plug.
LOCATION
Place the slicer on a suitable counter or tabletop. Allow enough space around the slicer so the carriage
can move freely forward and back.
CLEAN BEFORE USING
The slicer must be thoroughly cleaned and sanitized after installation and before being used. See
Cleaning.

OPER
A
TION
Rotating
knife.
Use meat
grip.
Unplug
machine
power
cord
before
cleaning,
servicing
or removing parts. Replace parts before use.
SLICING IN MANUAL MODE
Turn the Lever knob fully clockwise, ensure Lever is in the position for manual mode.
Pull the Carriage toward the controls until it reaches its stop. This is the home position.
Raise the Meat Grip to the top of the Carriage to rest in the Meat Grip Slot.
Place the product to be sliced against the Gauge Plate on the Carriage.
Set the Meat Grip against the product, or use the Fence or Food Chute if desired.
Adjust the Gauge Plate to obtain the desired slice thickness by turning the Index Knob counter-clockwise.
The numbers on the Index Knob do not indicate actual measurements but may be used for reference to
duplicate slice thickness.
Use the Carriage Handle to push and pull the Carriage back and forth to slice. When finish, put the food
tray forward until it stops. Press the Knife OFF Button to stop the slicer.
Turn the slicer on: by pressing the Knife ON button.
Turn the slicer off: by pressing the Knife OFF button.
NOTE:
The Stroke function doesn’t work and Slicing counting will not count up or count down in manual mode.

SLICINGINAUTOMATICMODE
Pull the carriage toward the Controls until it reaches its stop. This is the home position.
Raise the Meat Grip to the top of the carriage to rest in the Meat Grip Slot.
Place the product to be sliced against the Gauge Plate on the Carriage.
Set the Meat Grip against the product, or use the Fence or Food Chute if desired.
Turn the Lever Knob counter-clockwise fully, ensure Lever is in the position for Automatic mode.
Press the speeds arrow symbol to select the carriage speed; The green light shows which speed is
selected. The carriage speed can be changed at any time.
Select a stroke length for the carriage to move back and forth. Press the STROKE LENGTH button to
toggle through the lengths. The green light above the button shows the length selected. The stroke
length can be changed at any time.
You can set the Slicing counting by pressing the up arrow and down arrow. The max. PC is 999.
The Slicing counting will show “000” every time you change to Auto mode. And the Slicing counting
doesn’t have the memory function when turn off the slicer or power off.
If set the Slicing counting, the slicer will stop when count down to “000”. When count down to “000”,
the “000” will blink and sound “beep-beep” to remind. Press any up or down arrow can cancel the
blink and “beep-beep”. And then reset to the Slicing counting you set last time.
If not set, the slicer will keep working and Slicing counting will count up from “000” until you stop it by
pressing the Auto OFF button. When it count up to 999,it will count up from “000” again.
Adjust the Gauge Plate to obtain the desired slice thickness by turning the Index Knob counter-
clockwise. The numbers on the Index Knob do not indicate actual measurements but may be used for
reference to duplicate slice thickness.
Turn on the slicer: First, set the Carriage SPEED and STROKE LENGTH as you needed. Next to
press the Knife ON button. Then press the Auto ON button to start the slicer in auto mode.
Turn off the slicer: First, press the Auto OFF button, This will stop the stroke and return the Carriage
to the home position. Then press Knife OFF button to stop the slicer.
NOTE:PPSLA-14 only have the PC MODE!

Cleaning, Care & Maintenance
Unplug the machine power cord and turn the index knob fully clockwise to close
the gauge
plate
before cleaning the slicer.
The
slicer
knife is
very
sharp.
Exercise extreme
caution when working
near the knife.
Always turn off and disconnect the appliance from the power supply before cleaning.
Always use extreme care when handling the blade.
Use soapy water (comply to EPA regulation) and a damp cloth to clean the appliance.
If a chemical sanitizer other than chlorine, iodine or quaternary ammonium is used, it shall be applied in
accordance with the EPA-registered label use instruction.
This slicer line shall be cleaned and sanitized at intervals to comply with national, state and/or local health
codes or regulations.
Cleaning the Blade and Cover
Cleaning and Checking the Food Receiving Area
NOTE: The appliance will not work with the blade cover release bolt unscrewed.
NOTE: Recommend the use of cut-resistant or wire mesh gloves when cleaning
NOTE: Recommend using USDA approved sanitizer for cleaning.
1. Disconnect the appliance from the power supply.
2. Push the carriage away from the blade.
3. The blade cover release bolt.
4. Carefully lift off the blade cover.
5. Wash the blade by wiping from the center towards the edge.
NEVER
MOVEYOURHANDTOWARDSTHEEDGEOFTHEKNIFE.
6.
Sanitize
and dry thoroughly.
7. Replace the cover, ensuring the blade securing bolt is securely tightened.
After every time of use of slicer, a complete cleaning and checking at food receiving area is necessary.
Move forward to take off slicer deflector from back of blade support, and clean it.
Clean all food receiving area and gage plate holder and gasket for thickness adjustment moving.
Please ask technician to replace and repair if you find any damage and missing of parts in slicer.

Cleaning and Checking the Food Pusher and Food Chute Area
Lubricating
If both the Knife ON LED light and Auto ON LED light are blink at the same time, this is remind you to
lubricate. It is not malfunction and not affect the function. You can cancel this blink by pressing the Knife
OFF button and Auto OFF button at the same time for 5 seconds.
Lubricate Carriage Slide Guides
Lubricate the carriage slide guides at least once a month and any time that pushing the tray becomes difficult. Use the oil
supplied with the slicer or a food safe lubricant. Do NOT use cooking oil.
1. Press and release the OFF (O) button.
2. Unplug the slicer from the electrical outlet.
3. Put a few drops of the oil that was supplied with slicer into the
carriage slide lubricant access hole (OIL) on the front of the slicer.
Sharpener shaft also need to lubricated as the arrow show.
NOTE: Ensure you use a grease that is suitable for use in a food preparation area.
Under the Slice
The Slicer is equipped with Kickstand to assist in cleaning under the slicer. To raise the slicer, lift up the
handle and rotate to the control panel until it stops. The kickstand will hold the slicer in position for
cleaning. Rotate down the kickstand handle to lower the slicer.
NOTE: Do not lift or lower the slicer with the control panel.
1. After every time of use, a complete cleaning and checking at food pusher and chute area is necessary.
2. Turn the pusher to clockwise direction, pull pusher up through its shaft to the end.
3. Clean all food chute area & pusher, special clean effort need to put at the nail side of pusher face to food.
4. Please ask technician to replace and repair if you find any damage and missing of parts in slicer.

To sharpen the blade
1. Open the cover of the blade sharpener.
2. Pull the position pin of sharpener and turn it up to the work position.
3. Turn the grinding stone knob, clockwise turn would loose grinding stone, it wouldn’t touch knife during
sharpening knife, counterclockwise turn would tight grinding stone, the stone would move with sharpening
stone, to grinding another side of knife.
4. Holding the sharpener handle in hand, turn it clockwise, sharpening stone will sharpen the knife, grinding stone
will grind another side of knife if it is tight.
5. After sharpening, clean the sharpener assembly and knife, put down sharpener back then return the cover back.

Troubleshooting
Fault Probable Cause Action
The unit is not working
The unit is not switched on Check the unit is plugged in correctly and
switched on
Plug and lead are damaged Call agent or qualified technician
Power supply Check power supply
Internal wiring fault Call agent or qualified technician
Blade cover securing screw
is not properly inserted
Remove plate securing screw and screw back
in
The cradle hits the blade
guard
The carriage has been
improperly fitted
Unscrew the carriage knob, check the carriage
is properly in place then replace the carriage
knob
The blade is not cutting
properly/accurately
Blade is blunt Sharpen the blade
Fault
code Fault description Fault cause Solution
E01 overcurrent protection Over load 1、 Set the low speed
2、 Less loading
E02 overheating protection Over load and continue
working time is too long
1、 Less loading
2、 Short continue working time
E03 Velocity anomaly Over load, speed slow Less load
E04 short-circuit protection The motor short circuit Repair the motor
E05 Hall sensor fault Hall sensor wiring wrong Correct the wiring
E06 Feed limit switch is
abnormal
No rewind limit switch signal
can be detected
Replace the limit switch or
check the wiring
E07 The resetting limit switch
is abnormal
No rewind limit switch signal
can be detected
Replace the limit switch or
check the wiring
E08 Two proximity switches
operate simultaneously
Two proximity switches wiring
error or damage
Correct wiring or replace
proximity switch
E09 Abnormal communication
Abnormal communication
between main board and
display board
Check if the wire is loose


Table of contents
