Prestige P-950WESP User manual

128-6864
1 of 16
Released 7-8-03
OO
OO
OWNER'SWNER'S
WNER'SWNER'S
WNER'S
MAMA
MAMA
MANUALNUAL
NUALNUAL
NUAL
P-950WESP
AM/FM/MPX RADIO WITH FOLD-DOWN
DETACHABLE FRONT PANEL,
COMPACT DISC PLAYER WITH ELECTRONIC SKIP PRO-
TECTION (ESP), CD CHANGER CONTROLS,
WIRELESS REMOTE CONTROL
AND QUARTZ CLOCK
T/F
EQ
LOCSCANMUTE
SEL
1
OPEN
JAZZ
MONO
ST
LOC
REG
LOUD
POP
CLAS
CD-R/RW PLAYBACK
POWER LEVEL METER
2
PAU SCN RPT
3
SHF
45
D.DN D.UP
6
MODE
P-950W
ME/CR
TP
AF TA EON
PTY
Sub. W
/Seek
/Track
Tune
ILL
PWR
MONO
BAND
AS/PS
LOUD
MULTI-COLOR FLOURESCENT DISPLAY
ESP

128-6864
2 of 16
INDEX Page
Operating Instructions............................................................... 3 - 9
Setting the Clock ..........................................................................9
CD Player Error Codes.................................................................9
Specifications ..............................................................................10
CD Changer Controls..................................................................11
CD Changer Error Codes............................................................12
Wireless Remote Control Operation...........................................13
Care and Maintenance ...............................................................14
Handling Compact Discs ............................................................15
Notes on Discs ............................................................................15
Electronic Skip Protection...........................................................15
Warranty ..............................................................................Back Cover

128-6864
3 of 16
-3-
1POWER ON-OFF/ILLUMINATION (PWR/ILL) BUTTON
Press this button to turn the unit on or off. If the ignition switch is
“on”, the unit will also turn on automatically when a compact disc is
inserted, or if the MODE switch or BAND switch is pressed.
When the unit is on, each time the button is momentarily pressed
and released, the VFD display panel back-lighting intensity will
change from low-to-medium-to-high, and then back to low, thereby
providing three different intensity settings.
2AUDIO CONTROL ( / ) BUTTONS
To increase the volume level, press the button. The volume will
increase and the level will be shown on the display panel from a
minimum of VOL 00 to a maximum of VOL 100. To decrease the
volume level, press the button. The display will automatically
return to the normal indication 5 seconds after the last volume
adjustment or when another function is activated. These control but-
tons are also used in conjunction with the Select (SEL) button 3to
adjust the bass, treble, balance and fader levels as described in
4, 5, 6and 7.
3PUSH SELECT CONTROL BUTTON (SEL)
This button is used to select the audio function (volume, bass,
treble, balance, or fade) whose setting is adjusted using the AUDIO
CONTROL buttons 2. Pressing the SEL button once will set the
unit for bass adjustment (BAS will appear on the display panel)
and an audible beep will occur. Pressing the button additional times
will select treble adjusBtment (TRB on the display), balance (BAL),
or fader (FAD), each accompanied by a beep tone. The display will
automatically return to the normal indication 5 seconds after the
last adjustment or when another function is activated.
NOTE: Bass and Treble cannot be adjusted while the Equalizer
function cu is in ROCK, CLAS or POP mode.
OPERATING INSTRUCTIONS
15
9
2
14
28
29
(BEHINDPANEL)
18
35
33 17
8
10
30
13
1
12 26
36
22 23
39 25
41
16
24
40
19, 27, 31, 32
11, 20, 21, 37, 38
3, 4, 5, 6, 7
34
T/F
EQ
LOCSCANMUTE
SEL
1
OPEN
JAZZ
MONO
ST
LOC
REG
LOUD
POP
CLAS
CD-R/RW PLAYBACK
POWER LEVEL METER
2
PAU SCN RPT
3
SHF
45
D.DN D.UP
6
MODE
P-950W
ME/CR
TP
AF TA EON
PTY
Sub. W
/Seek
/Track
Tune
ILL
PWR
MONO
BAND
AS/PS
LOUD
MULTI-COLOR FLOURESCENT DISPLAY
ESP

128-6864
4 of 16
4 BASS CONTROL
To adjust the bass level (Equalizer function inactive), first select
theBassmodebypressing the SEL button 3sotheBAS indication
appears on the display panel. Within 5 seconds of choosing the
Bass mode, press the AUDIO CONTROL 2button to decrease
the bass response, or the AUDIO CONTROL button to increase
it as desired. The level will be shown on the display panel from a
minimum BAS -10 to a maximum of BAS +10 (BAS 00 indicates
flat response). The display will automatically return to the normal
indication 5 seconds after the last adjustment or when another
function is activated.
5TREBLE CONTROL
To adjust the treble level (Equalizer function inactive), first select
the Treble mode by pressing the SEL button 3so the TRB
indication appears on the display panel. Within 5 seconds of
choosing the Treble mode, press the AUDIOCONTROLbutton
2to decrease the treble response or the AUDIO CONTROL
button to increase it as desired. The level will be shown on the
display panel from a minimum TRB -10 to a maximum of TRB +10
(TRB 00 indicates flat response). The display will automatically
return to the normal indication 5 seconds after the last adjustment
or when another function is activated.
6LEFT/RIGHT BALANCE CONTROL
To adjust the left-right speaker balance, first select the Balance
mode by pressing the SEL button 3so the BAL indication appears
on the display panel. Within 5 seconds of choosing the Balance
mode, press the AUDIO CONTROL button 2to adjust the
stereo balance to the left channel speakers or the AUDIO
CONTROL button to adjust it to the right channel speakers. The
balance position will be shown on the display panel from BAL L10
(full left) to BAL R10 (full right). When the volume level between-4-
the left and right speakers is equal, BAL 00 will be shown on the
display panel. The display will automatically return to the normal
indication 5 seconds after the last adjustment or when another
function is activated.
7FRONT/REAR FADER CONTROL
To adjust the front-rear speaker balance, first select the Fader mode
by pressing the SEL button 3so the FAD indication appears on
the display panel. Within 5 seconds of choosing the Fader mode,
press the AUDIO CONTROL button 2to adjust the front-rear
speaker balance to the rear speakers or the AUDIO CONTROL
button to adjust it to the front speakers. The fader position will be
shown on the display panel from FAD R10 (full rear) to FAD F10
(full front). When the level between the front and rear speakers is
equal, FAD 00 will be shown on the display panel. The display will
automatically return to the normal indication 5 seconds after the
last adjustment or when another function is activated.
8LOUDNESS CONTOUR (LOUD)
When listening to music at low volume levels, this feature will boost
the bass and treble ranges to compensate for the characteristics
of human hearing. Press and hold the BAND/LOUD button for 2
seconds to activatethis feature; LOUD ON will appear onthedisplay
for5seconds.Pressing thebuttonagainfor 2secondswilldeactivate
the feature; LOUD OFF will appear on the display panel for 5
seconds.
9AUDIO MUTE SELECTOR (MUTE)
Press this button momentarily to mute the volume from the system
(MUTE will appear blinking on the display panel). Pressing the
button again or activating any other button/function will return to
the volume level setting in use before the Mute function was
activated. During disc play, pressing this button will mute disc

128-6864
5 of 16
-5-
audio; however, disc play will continue and not be paused. During
this time, the indication will remain on the display panel to show
that a disc is still loaded in the unit.
bl AM/FM BAND SELECTOR (BAND)
Each time the BAND/LOUD button is pressed momentarily, the
radio band is changed. The indication AM, F1, F2 or F3 will appear
on the display panel according to your selection.
bm UP/DOWN TUNE/SEEK/TRACK ( / ) BUTTONS
To manually select a radio station, press for longer than 0.5 second
either the UpTuning ( ) button to advance the unit higher, or
press the Down Tuning ( ) button to tune lower within the
selected band.
Pressing either button momentarily will activate the Automatic Seek
Tuning function. The radio will seek the next available station in
the selected direction and stop at that frequency. The Seek function
can be stopped by pressing the button again or activating any other
tuning function.
bn LOCAL (LOC) BUTTON
This feature is used to select the strength of the signals at which
the radio will stop during Automatic Seek Tuning. Pressing and
this button will select the Local setting (LOCAL will appear on the
display panel) and only strong (local) stations will be received.
Pressing the button again will select the normal Distant setting
(LOCAL will disappear from the display panel, and Dx will be
displayed instead) and the radio will stop at a wider range of signals,
including weaker (more distant) stations.
bo FM MONO/STEREO BUTTON (MONO)
During FM radio operation, this button is used to select mono or
stereo reception of the broadcast signal. Under normal reception
conditions, the unit should be left in the stereo mode as indicated
by the ST indication on the display panel when tuned to an FM
stereo signal. If the stereo signal is too noisy for comfortable
listening, press the MONO button to switch to mono reception (the
ST indication will disappear from the display panel, and MONO will
be displayed). To return to stereo reception mode, press the button
again so that the ST indication reappears in the display.
bp LOCAL STATION SCAN (SCAN) BUTTON
Press this button momentarily to commence an scan of the nearby
local stations whose signal strengths are the strongest (the station
number will appear flashing on the display panel during station
search). Press the button again momentarily to stop the Scan
operation and remain on the current local frequency. To return to
oneofthefrequencies preset intothecurrent band, pressthedesired
pre-set button.
bq STATION PRE-SET MEMORIES
To set any of the 6 pre-set memories in each band, use the following
procedure:
1. Turn the radio on and select the desired band.
2. Select the first station to be pre-set using the Manual
TUNE or Automatic SEEK Controls bm .
3. Press the pre-set button to be set and continue to hold it
in for approximately 2 seconds. The preset number,
followed by CH (channel), will appear on the display panel

128-6864
6 of 16
-6-
and two beeps will sound, indicating that the station is now
set into that preset memory position. The station can now
be recalled at any time by pressing that button.
4. Repeat the above procedure for the remaining 5 pre-sets on
that band and for the other 4 bands on the unit.
br VACUUM FLUORESCENT DISPLAY (VFD)
The Vacuum Fluorescent Display (VFD) panel displays the
frequency, time, and activated functions using one of three
illumination levels as selected by the PWR/ILL button 1.
bs POWER LEVEL METER DISPLAY
This display consists of a left and right five-bar graph and a center
graph which provides a visual representation of the volume level
and the left and right channel audio signal levels. The volume level
is represented by the two outer bar graphs. As the volume is
increased, the number of illuminated segments will increase. The
left and right channels are represented by the three inner and center
bar graphs whose illuminated segments increase and decrease as
afunctionofthe signal strength appliedtotheleft and rightchannels.
As the signal increases, the number of illuminated segments will
increase and vice-versa.
bt MODE SELECTOR (MODE)
This button is used to select the radio, CD player or CD changer (if
installed) playback mode. Each press of the button will select a
different mode as indicated on the display panel.
During CD player operation, this button may be used to change to
radio, CD player or CD changer mode without ejecting the disc.
The DISC indication will remain on the display panel to show that
the CD changer is operating. Press the button again to return to
CD player mode and resume play of the disc from beginning of the
track at which it was stopped.
bu DISC SLOT
With the front panel in the fold-down position, gently insert the disc
intotheslot (label surfacefacingup)until thesoft-loadingmechanism
engages and pullsthe disc in. The LOAD indicationwillmomentarily
appear on the display panel followed by the total playing time of
the disc. The indication illuminates and becomes animated,
the symbol lights, and the track number and elapsed time will
appear on the display panel.
CAUTION: This unit is designed for play of standard 5" (12cm)
compact discs ONLY. Do not attempt to use 3" (8cm)
CD-Singles in this unit, either with or without an adapter,
as damage to the player and/or disc can occur. Such
damage will not be covered by the Warranty on this
product.
cl TRACK SELECT ( / )
The Track Select function of the TUNE/SEEK/TRACK buttons are
used to quickly access the beginning of a particular track when a
disc is in play. Each time the Forward TRACK Select ( ) side of
the button is pressed, the next higher track number will be selected
as shown on the display panel. Similarly, each time the Backward
TRACK Select ( ) side of the button is pressed, the next lower
track number will be selected as shown on the display panel.
cm CUE/REVIEW FUNCTIONS ( / )
High-speed audible search to any section of the disc can be made
by the Cue and Review functions. Press and hold the Cue ( )
side of the button to advance rapidly in the forward direction
(theadvancing disc playing time will be shown on the display panel),
or the Review ( ) button to advance rapidly in the backward
direction (the decreasing disc playing time will be shown on the
display panel). During either function, the elapsed time within each
track will automatically be shown on the display panel.

128-6864
7 of 16
-7-
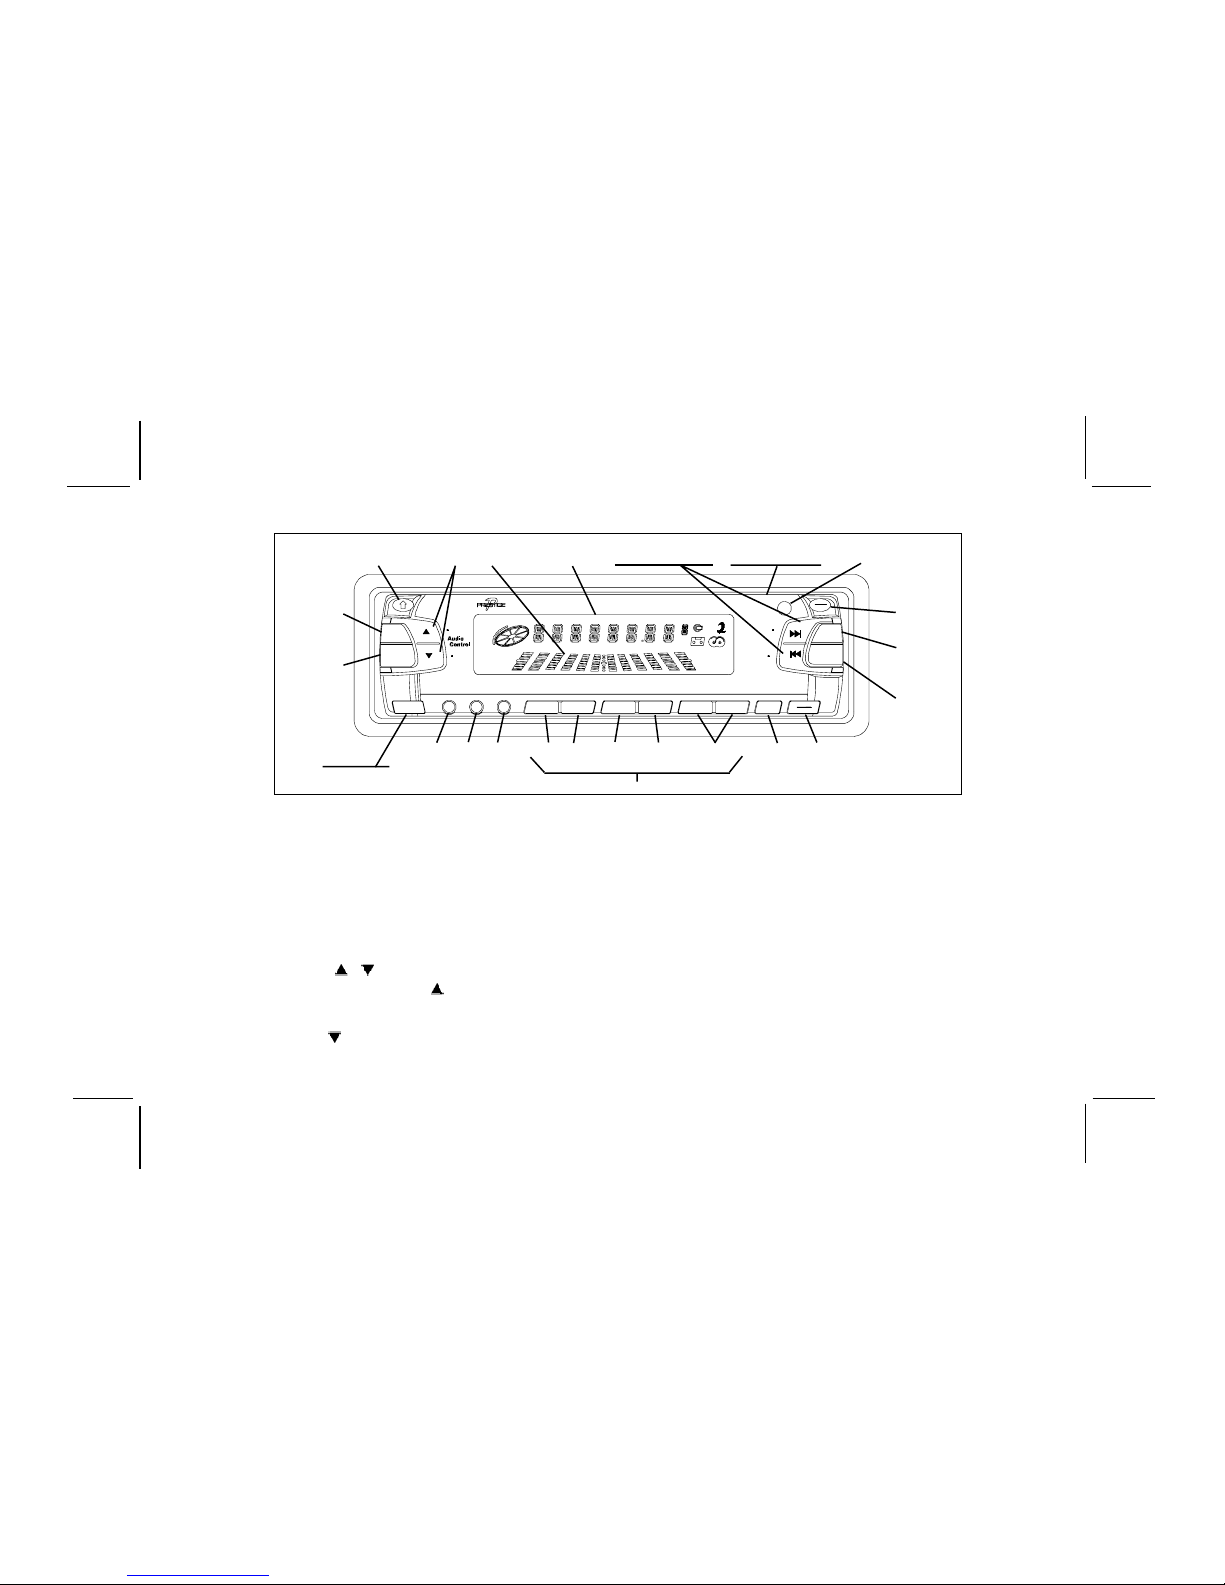
cn PAUSE (PAU) BUTTON
The Pause function is used to freeze disc play when the CD player
or optional CD changer is in use. PAUSE will appear on the display.
Press this button again to resume disc play; the PAUSE indication
will disappear.
co TRACK SCAN (SCN) SELECT
During disc play, press this button to play the first 10 seconds of
each track on the disc (SCN) will appear on the display panel).
When a desired track is reached, press the SCAN button again to
cancel the function (SCN will disappear from the display panel)
and play of the selected track will continue. Scan mode will also
be canceled by activating Repeat Play cp, or Shuffle Play cq.
cp REPEAT PLAY (RPT) SELECT
During disc play, press this button to repeat the play of the selected
track (RPT will appear on the display panel). Play of the track will
continue to repeat until the button is pressed again and the RPT
indication disappears from the display panel. Repeat Play mode
will also be canceled by activating the Track Scan co or Shuffle
Play cq functions.
cq SHUFFLE PLAY (SHF) SELECT
During disc play, press this button to play the tracks on the disc in a
random shuffled order (SHF will appear on the display panel). In Shuffle
Play mode, the TRACK Select function cl will also select tracks in the
random order instead of the normal progression. The Shuffle Play mode
canbecanceledbypressingthebuttonagain(SHFindicationwilldisappear
from the display panel) or by activating the Repeat Play cp or Track
Scan co functions.
cr DISC SELECT UP/DOWN (D.UP/D.DN)
These buttons are used to select the desired disc for play during
changer operation. To advance to a higher number disc, press the
D.UP button, and to return to a lower number disc, press the D.DN
button. The number of the disc in play will be shown on the display panel.
cs DISC EJECT ( )
Disc play is stopped and the disc is ejected when the front panel is
folded down and this button on the rear of the panel is pressed.
Radio or CD changer operation will automatically resume depending on
which mode was in operation prior to disc play. If the disc is not
removed from the unit within 15 seconds of being ejected, it will
automatically be re-loaded into the unit to prevent it from being
accidentally damaged ( will appear on the display panel to
indicate that a disc is loaded in the player). Play of the disc can be
resumedbyusingthe MODE buttonbt tochooseCD player function.
ct TIME/FREQUENCY (T/F) DISPLAY BUTTON
During radio operation, press this button to call the time display on
the incorporated quartz clock. The current time will appear together
with an AM or PM indication. The display will return to the radio
frequency indication after 5 seconds.
During CD player operation, a second press of this button will call
the time display. During CD changer operation the first press of
the button will call the time display. In either case, the display will
return to the disc indication after 5 seconds.
cu EQUALIZER BUTTON (EQ)
The EQ button applies preset sound effects to the unit’s audio output
signal. The EQ button, when pressed, will activate one of the following
operating modes: CLASSICS,POP, JAZZ,FLAT,or DSP OFF. When
the EQ function is active, as displayed on the panel, the bass and
treble levels cannot be changed. When the EQ function is not active,
the unit returns to the user set bass and treble levels. The FLAT
selection indicates no equalizer enhancement of the program, while
DSP OFF inhibits selection of equalizer mode enhancement.

128-6864
8 of 16
-8-
dl PRE-SET SCAN (PS) /AUTO-STORE TUNING (AS)
Press this button momentarily to scan the stations pre-set into the
six memories of the current band in use. The unit will stop at each
pre-set station for 5 seconds before continuing to the next pre-set
station (the pre-set number on the display panel will flash during
Pre-Set Scan operation). Press the button again momentarily to
stop Pre-Set Scan operation and remain on the selected frequency.
If no buttons are pressed during the scan, the unit will return to the
original station before the scan started.
Pressing and holding the button for longer than 2 seconds will
activate the Auto-Store Tuning feature which will automatically scan
and enter up to 6 stations into the pre-set memories on the band in
use. If you have already set the pre-set memories to your favorite
stations, activating the Auto-Store Tuning feature will erase those
stations and enter the new ones. This feature is most useful when
traveling in a new area where you are not familiar with the local
stations.
dm THEFT-DETERRENT LED
Located on the chassis behind the front panel, a light-emitting diode
(LED) will flash when the panel is physically removed. The flashing
light serves as a visual warning to the would-be thief that the unit has
been disabled by removal of the front panel.
dn RESET BUTTON
The RESET button is located to the right of the theft deterrent LED.
The reset circuitry should only be activated under the following
circumstances as it will erase the time and pre-set memories:
1. Upon initial installation after all wiring is completed.
2. If there is a malfunction of any of the switches on the unit,
pressing the RESET button may clear the system and return
to normal operation.
dp REMOTE SENSOR
Thesensortodetect theinfraredsignalfromthewirelessremote
control is located behind the VFD display lens. For optimum
operationoftheremotecontrol,alwaysaim the control at theVFD
display.
NOTES ON USE OF FRONT PANEL
1. Makesurethefrontpanelispositionedcorrectlywhenslid-
ingitintothefrontmountingplate, asitcannotbeattached
when up-side down. Use moderate pressure to fully seat
the panel into position.
2. To verify correct panel installation, swing the panel as -
sembly up into position until it locks easily into place. If
any resistance is encountered, re-check panel orienta -
tion in chassis mounting plate.
3. When taking the front panel with you, please use the sup -
plied carrying case to protect the panel from dirt and
damage. Make sure there is no dust or dirt on the
electrical terminals on the back of the panel as this could
causeintermittent operation or other malfunctions.
do FRONT PANEL RELEASE BUTTON (OPEN)
This button is used to release the mechanism that holds the front
panel to the chassis. To detach the front panel, press the button
so that the panel drops to the lowered position. Grasp the panel at
the middle and pull it off of the chassis. To re-attach the panel,
press it straight onto the chassis until the mechanism locks it into
place.

128-6864
9 of 16
-9-
CD PLAYER ERROR CODES
IfaproblemshoulddevelopwhileoperatingtheCDplayer, an error code(ER-1,ER-2,ER-3, etc.) may appearonthe display panel.
This can indicate a number of problems with the unit, including a mechanical error or an error in the microprocessor control of the
player. Ifanerror code should appear,tryejectingandre-loading the disc into theplayer. Whilethedisc is out of theunit,makesure
it is clean, undamaged, and loaded correctly (label surface up). You may also try activating the RESET button dn on the unit, but
this will also erase the time and pre-set memories.
Ifthe suggested measures do not solve the problem, contact an approved warranty station near you for further assistance.
1. Switchthevehicleignitionandradio“on”.
2. PresstheDisplay(T/F)button to call thetimedisplay;thenpressand hold the buttonuntilabeeptoneoccurs and the timedisplay
flashes.
3. While the display is flashing, press the Up TUNE/SEEK/TRACK ( ) button to adjust the hours and AM/PM indication, or the
Down TUNE/SEEK/TRACK ( ) button to adjust the minutes to the correct time.
4. Five seconds after the last hour or minute adjustment is made, the time will be set in the unit and the display will return to the
normalindication.
SETTING THE CLOCK
CD EJECT
BUTTON(27) FRONT PANEL
MOUNTINGPLATE
GUIDE (2 PLACES)
PANELMOUNTING
PLATE
RESETBUTTON
(32)
THEFTDETERRENT
LED (31)
DISC SLOT
(19)

128-6864
10 of 16
-10-
*Specifications are subject to change without notice.
Size: 7" W x 2" H x 6-5/8"D
178 mm x 50 mm x 168 mm
Operating Voltage: 12 volts DC, negative ground
Fuse Ratings: Constant(Yellowwire):15AMP.
Switched (Red wire): 0.5 AMP.
Output Power: 160wattsmaximum
(40 watts x 4 channels)
Output Wiring: Floating-ground type designed
for 4 speaker use.
Front and rear channels CAN
NOT be combined (bridged) for
use with 2 speakers.
RCA low-level outputs (front
and rear channels).
Output Impedance: Compatible with 4 – 8
ohm speakers.
Low-Level Output: 1.0 V
Tuning Range: AM: 530 – 1,710 kHz.
(10 kHz. step)
FM: 87.5 – 107.9 MHz.
(200 kHz. step)
Sensitivity: AM: 20 uv.
FM: 1.5 uv.
FM Stereo Separation: >20 dB
CD Frequency Response: 20 – 20 kHz (+/-3 dB)
CD Signal/Noise Ratio: >60 dB
CD Channel Separation: >50 dB
CD Distortion: 0.2%
SPECIFICATIONS

128-6864
11 of 16
-11-
dt CUE/REVIEW FUNCTIONS ( / )
High-speedaudiblesearchtoanysection of the disc canbemade
by the Cue and Review functions. Repeatedly press the Cue
( ) sideofthebutton to advancerapidlyinthe forward direction
(disc play symbol rotation on the display panel will stop), or the
Review( )side ofthebuttonto advancerapidlyinthe backward
direction.
du TRACK/DISC SCAN SELECTOR (SCN)
WhentheSCN buttonis pressed,theSCAN indicationwillappear
onthedisplaypanel,andthefirst10secondsofeachtrackon the
disc will be played in order. When a desired track is reached,
press the SCN button twice, and play of the selected track will
continue(SCN) willdisappearfromthedisplaypanel). TheTrack
Scanmodewillalsobecanceled byactivatingtheRepeatorShuffle
Play functions.
When the SCN button is pressed for 2 seconds the DSN
indication willappearonthe display panelandthefirst10 seconds
ofthefirsttrack on eachdiscinthemagazine willbeplayed. When
adesireddiscisreached,presstheSCNbuttonagainandplay of
theselecteddiscwill continue (DSNwilldisappearfrom the display
panel). The Disc Scan mode will also be canceled by activating
the Repeat Play or Shuffle Play functions.
el DISC/TRACK REPEAT PLAY (RPT)
WhentheRPT button ispressed,theRPT indicationwillappearon
the display panel and play of the selected track will be continually
repeateduntiltheTrackRepeatmodeis canceled by pressing the
RPT button twice, or by activating the Scan or Shuffle Play
functions.
Whenthe Repeatbuttonispressedfor 2secondstheDRTindication
will appear on the display panel and play of the selected disc will
Built into this radio are controls to operate an optional CD changer.
PleasecheckwithyourPrestige/Audiovoxcarstereospecialistor
call1-800-645-4994 for recommendations of the models that will
work with this radio.
Adjustment of the audio functions (volume, tone, balance, and
fader)fortheCDchanger operate in the same manner as they do
forradioplay. The following controls will operate the CD changer
when it is installed and connected to this radio. Refer to the
owner’s manual included with the CD changer for instructions on
the installation and correct loading and use of the CD magazine.
dq CDCHANGERMODESELECTOR (MODE)
DuringradioorCDplay,pressthis button toselectoperationofthe
CDchanger asshownbyCDC on the displaypanel. Discplaywill
begin and the disc and track number will be shown on the display
panel. When the magazine is loaded into the changer, play will
begin from the first track of the first disc in the magazine.
dr DISC SELECT (D.UP/D.DN)
These buttons are used to select the desired disc for play. To
advancetoahigher numberdisc,presstheD.UP button. Toreturn
to a lower number disc, press the D.DN button. The number of
the disc in play will be shown on the display panel.
ds TRACK SELECT ( / )
TheTrackSelectfunctionsareusedtoquicklyaccessthebeginning
of a particular track. Each time the Forward Track Select ( )
buttonispressed,thenexthigher track number willbeselectedas
shown on the display panel. Similarly, each time the Backward
TrackSelect( ) button ispressed,thenextlowertrack number
will be selected as shown on the display panel.
CD CHANGER CONTROLS

128-6864
12 of 16
becontinuallyrepeateduntiltheDisc Repeat mode is canceledby
pressingtheRPT buttonagain orbyactivating theScanor Shuffle
Play functions.
em DISC/TRACK SHUFFLE PLAY (SHF)
When the SHF button is pressed, the SHF indication will appear
on the display panel and the tracks on the disc will be played in a
random, shuffled order. The Track Select button will also select
tracksintheshuffledorderinsteadof the normal progression. The
RandomTrackmodecanbe canceled by pressingtheSHFbutton
twice, or by activating the Scan or Repeat Play functions.
-12-
WhentheSHF buttonis pressed for2seconds,the DSF indication
willappearonthedisplaypanelandthediscsinthemagazine will
be played in a random, shuffled order, as well as the tracks on
each disc. After playing all tracks selected at random from a disc
in the magazine, the unit will select another disc at random and
playallthe tracksonit inarandomshuffledorder. Thiswillcontinue
from disc-to-disc until the Random Disc mode is canceled by
pressingtheSHFbuttonagain or by activatingtheScanorRepeat
Play functions.
If a problem should develop while operating the CD changer, the following error codes may appear on the display panel.
ER-1: Indicates that there is no magazine loaded in the CD changer.
ER-2: Indicatesaproblemwiththemagazineejectfunction.
ER-3: Indicatesanerrorinthediscloadingfunction.
ER-4: Indicatesanerrorinthediscunloadingfunction.
ER-5: Indicatesanerrorinthemagazineposition.
ER-6: Indicatesanerrorinthelaserpick-upposition.
ER-7: Indicates an error in the laser focus on the disc.
In anyof these error situations,tryejecting the CDmagazinefromthe changer andmakesurethediscs are clean,undamaged, and
loaded correctly (refer to the Owner’s Manual of the CD changer). Re-load the magazine and check for proper operation. You may
also try activatingthe RESET button dn ontheunit,butthiswillalso erase the time and pre-set memories.If thesuggested measures
do not solve the problem, contact an approved warranty station near you for further assistance.
CD CHANGER ERROR CODES

128-6864
13 of 16
-13-
WIRELESS REMOTE CONTROL
OPERATION
Thewirelessremotecontrolsuppliedwiththismodelis capable of
operating most of the features of the unit from a remote location.
Each button on the remote control functions in the same way as
the referenced button on the main unit. For optimal operation of
theremotecontrol,alwaysaimittowardthe Remote Sensor dp on
the front panel of the main unit.
1POWER - See Main Unit 1
2VOLUME (LEVEL) CONTROL- SeeMainUnit2,34,5,
6, and 7except press VOL + to increase level, and press
VOL - to decreaselevel
3SELECT BUTTON (S) - See Main Unit 3, 4, 5, 6, and 7
4PRE-SET SCAN-AUTO STORE TUNING- SeeMainUnitdl
5AM/FM BAND SELECTOR (BAND) – SeeMainUnitbl
6MANUAL UP/DOWN TUNING – See Main Unitbm
AUTOMATIC SEEK TUNING – See Main Unit bm, except
press to seek upward and press to seek down-
ward.
CD TRACK SELECT – See Main Unit cl and ds except
press to select a higher track number, press to se-
lect a lower track number.
CD CUE/REVIEW – See Main Unit cm and dt except press
for Cue function, andpress forReviewfunction.
7RADIO PRE-SET MEMORY 1-6 - See Main Unit bq
8DISC UP SELECT (D.UP) - See Main Unit cr
9DISC DOWN SELECT (D.DN) - See Main Unit cr
bl TRACK/DISC REPEAT (RPT) - See Main Unit cp and el
bm TRACK/DISC SHUFFLE (SHF) - See Main Unit cq and em
bn TRACK/DISC PAUSE (PAU) - See Main Unit cn
bo TRACK/DISC SCAN (SCN) - See Main Unit co and du
bp MODE SELECTOR (MODE) - See Main Unit bt and dq
bq TIME/FREQUENCY SELECT BUTTON- See Main Unit ct
br INFRARED SENDER - Emits infrared signal to radiowhich
is detected by the sensor dp
bs BATTERY COMPARTMENT - Holds two AAA batteries for
remotewirelesscontroloperation.

128-6864
14 of 16
-14-
CAREANDMAINTENANCE
Theradiosectionof your new sound systemdoesnot requireany
maintenance. Werecommendyoukeepthismanualforreference
on the many features found in this unit as well as how to set the
clock.
The compact disc player section also requires no routine mainte-
nance,butproperunderstandingofitsuseandhandlingwillhelpyou
obtainmaximumenjoymentofitscapabilities. Thefollowingpoints
shouldbeobserved:
lWhen cleaning the interior of the vehicle, do not get water or
cleaning fluids on the unit.
lThe CD player is a precision instrument and will not operate
properlyinextremehotor cold. Incaseofsuchconditions,wait
until the interior temperature of the vehicle reaches a normal
temperaturebeforeusingtheplayer.
lIf the temperature inside the player gets too hot, a protective
circuitwillautomaticallystopplayofthedisc. Inthiscase,allow
theunittocooloff before operatingtheplayeragain.
lNeverinsertanythingotherthan a 5"(12cm)compactdisc into
theplayerasthemechanismcanbedamagedbyforeignobjects.
lDonotattempttouse3"(8cm)CD-Singlediscsinthisunit,either
withorwithoutanadaptor,as damage to theplayerand/ordisc
mayoccur. SuchdamagewillnotbecoveredbytheWarrantyon
this product.
lWhennotusingthediscplayer,alwaysremovethecompactdisc.
lWhenthevehiclewarmsupduringcoldweatherorunderdamp
conditions,moisturemaycondenseonthelensofthediscplayer.
1
2
3
4
5
6
7
8
9
10
11
12
13
14
15
16
17 (FAR SIDE)
CONTROLLER
INFRARED REMOTE
PAU
SEL
AS/PS
RPTSCN
S D
BN
OWER MODE
D.DNSHF
21 3
4 5 6
T/F
D.UP
A

128-6864
15 of 16
-15-
Should this occur, the player will not operate properly until the
moisturehasevaporated.
lTheunitisdesignedwithavibrationdampeningCDmechanismto
minimize interruption of disc play due to normal vibration in a
moving vehicle. When driving on very rough roads,
however,occasionalsoundskipsmayoccur.This willnotscratch
ordamagethediscandnormalplaywillresumewhentherough
conditionscease.
HANDLING COMPACT DISCS
Dirt,dust,scratches,andwarpagecancauseskipsintheplayback
anddeteriorationof soundquality. Pleasefollow theseguidelines
to take care of your compact discs:
lUse only compact discs with the mark .
lFingerprints,dust,anddirtshouldbecarefullywipedoffthedisc’s
playingsurface(shinyside) withasoftcloth. Wipe inastraight
motion from the inside to the outside of the disc.
lNeverusechemicalssuchasrecordsprays,householdcleaners
or thinner to clean compact discs. Such chemicals can
irreparablydamagethedisc’ssurface.
lDiscs should be kept in their storage cases when not in use.
lDonotexposediscstodirectsunlight,hightemperaturesorhigh
humidityforextendedperiods.
lDonotstickpaper,tape,orlabelsonthediscsurfacesnorwrite
on them with any type of marker.
NOTES ON DISCS
Attempting to use non-standard shape discs (e.g.; square, star,
heart)maydamagetheunit.Besuretouseround-shapeCDsonly
in this unit.
ELECTRONIC SKIP PROTECTION (ESP)
The CD Player in this unit is equipped with Electronic Skip
Protection(ESP)circuits.ThiscapabilityenablestheCDPlayerto
projectdiscplayapproximately10secondsaheadofitscurrentplay
position. As a result, if a severe road bump is encountered during
Playeroperation, playofthecurrenttrackwillnotbeinterrupted,or
result in a skip.
NOTES ON CD-Rs (Recordable CDs)/CD-RWs (Rewriteable
CDs):
1. Besuretousediscswith thefollowingmarks onlyforplay
in this unit: .
2. TheunitcannotplayaCD-RorCD-RWthatisnotfinalized.
(Pleaserefertothemanualofyour CD-R/CD-RWsoftware
for moreinformationon thefinalizationprocess.)
3. Dependingontherecordingstatus,conditionsofthedisc
and theequipment usedfor therecording, someCD-Rs/
CD-RWs may not be played on this unit.
RELIABLEPLAYBACK:
Toensuremorereliableplayback,pleasenote thefollowing
recommendations:
1. Use CD-RWs with speed 1x to 4x.
2. UseCD-Rswithspeed1xto8x,andwritewithspeed1xto
2x.
3. DonotplayaCD-RWwhichhasbeenwrittenonmorethan
5 times.
NOTESON MULTI-SESSION DISCS:
If the first track of the first session is audio CD data, then the unit
will play only the audio CD data.

128-6864
16 of 16
-16-
AUDIOVOXCORPORATION(theCompany)warrantstotheoriginalretailpurchaserofthisproduct thatshould thisproduct orany partthereof,
under normal use and conditions, be proven defective in material or workmanship within 12 months from the date of original purchase, such
defect(s) will be repaired or replaced with new or reconditioned product (at the Company's option) without charge for parts and repair labor.
Toobtain repairorreplacementwithinthetermsofthis Warranty,theproductisto bedeliveredwith proofofwarrantycoverage(e.g. dated billof
sale),specification ofdefect(s), transportationprepaid,toanapproved warrantystation ortheCompanyatthe addressshown below.
Thewarrantyperiodwillbeextendedto24monthsfromthedateoforiginalpurchaseiftheproductisinstalledbyanauthorizedPrestigeAudiodealer.
Toclaim warrantyserviceduring thisextendedperiod, thebillofsalemustspecifythattheproductwasinstalled byanauthorized PrestigeAudio
dealer.
This Warranty does not extend to the elimination of externally generated static or noise, to correction of antenna problems, to costs incurred for
installation,removalor reinstallationof theproduct,ortodamage totapes, compactdiscs,speakers, accessories,or vehicleelectricalsystems.
ThisWarrantydoesnotapplytoanyproductorpartthereofwhich,intheopinionoftheCompany,hassufferedorbeendamagedthroughalteration,
improper installation, mishandling, misuse, neglect, accident, or by removal or defacement of the factory serial number/bar code label(s). THE
EXTENTOFTHECOMPANY'SLIABILITYUNDERTHISWARRANTYISLIMITEDTOTHEREPAIRORREPLACEMENTPROVIDEDABOVEAND,
INNOEVENT,SHALLTHECOMPANY'SLIABILITYEXCEEDTHEPURCHASEPRICEPAIDBYPURCHASERFORTHEPRODUCT.
ThisWarranty isin lieuof allother expresswarranties orliabilities. ANY IMPLIEDWARRANTIES,INCLUDINGANYIMPLIEDWARRANTYOF
MERCHANTABILITY, SHALL BE LIMITED TO THE DURATION OF THIS WRITTEN WARRANTY. ANY ACTION FOR BREACH OF ANY
WARRANTYHEREUNDERINCLUDINGANYIMPLIEDWARRANTYOFMERCHANTABILITYMUSTBEBROUGHTWITHINAPERIODOF30
MONTHS FROM DATE OF ORIGINAL PURCHASE. IN NO CASE SHALL THE COMPANY BE LIABLE FOR ANY CONSEQUENTIAL OR
INCIDENTAL DAMAGES FOR BREACH OF THIS OR ANY OTHER WARRANTY, EXPRESS OR IMPLIED, WHATSOEVER. No person or
representativeis authorizedto assumefor theCompanyanyliabilityotherthanexpressed hereinin connectionwith thesaleofthisproduct.
Somestatesdonotallowlimitations onhowlonganimpliedwarrantylastsortheexclusionorlimitationofincidentalorconsequentialdamageso
theabovelimitationsorexclusions maynot applyto you. ThisWarrantygives youspecific legalrights andyou mayalsohave otherrights which
vary from state to state.
12 / 24 MONTH LIMITED WARRANTY
Applies to automotive radios, radio/tape players, radio/CD players, CD
changers, power amplifiers, equalizers and accessories.
U.S.A. : AUDIOVOXCORPORATION, 150 MARCUSBLVD., HAUPPAUGE, NEWYORK 11788 l1-800-645-4994
CANADA : CALL1-800-645-4994 FOR LOCATIONOFWARRANTYSTATION SERVING YOURAREA 128-5543
128-6864
Table of contents
Other Prestige Car Receiver manuals