Price PRTU-Front-End Series User manual

v100 –Issue Date: 06/17/19
© 2019 Price Industries Limited. All rights reserved.
MANUAL – INSTALLATION
Web Server
PRTU-Front-End Series

WEB SERVER
TABLE OF CONTENTS
Product Overview
Safety Precautions ........................................................ 1
Introduction................................................................... 1
Price Web Server Features ............................................ 1
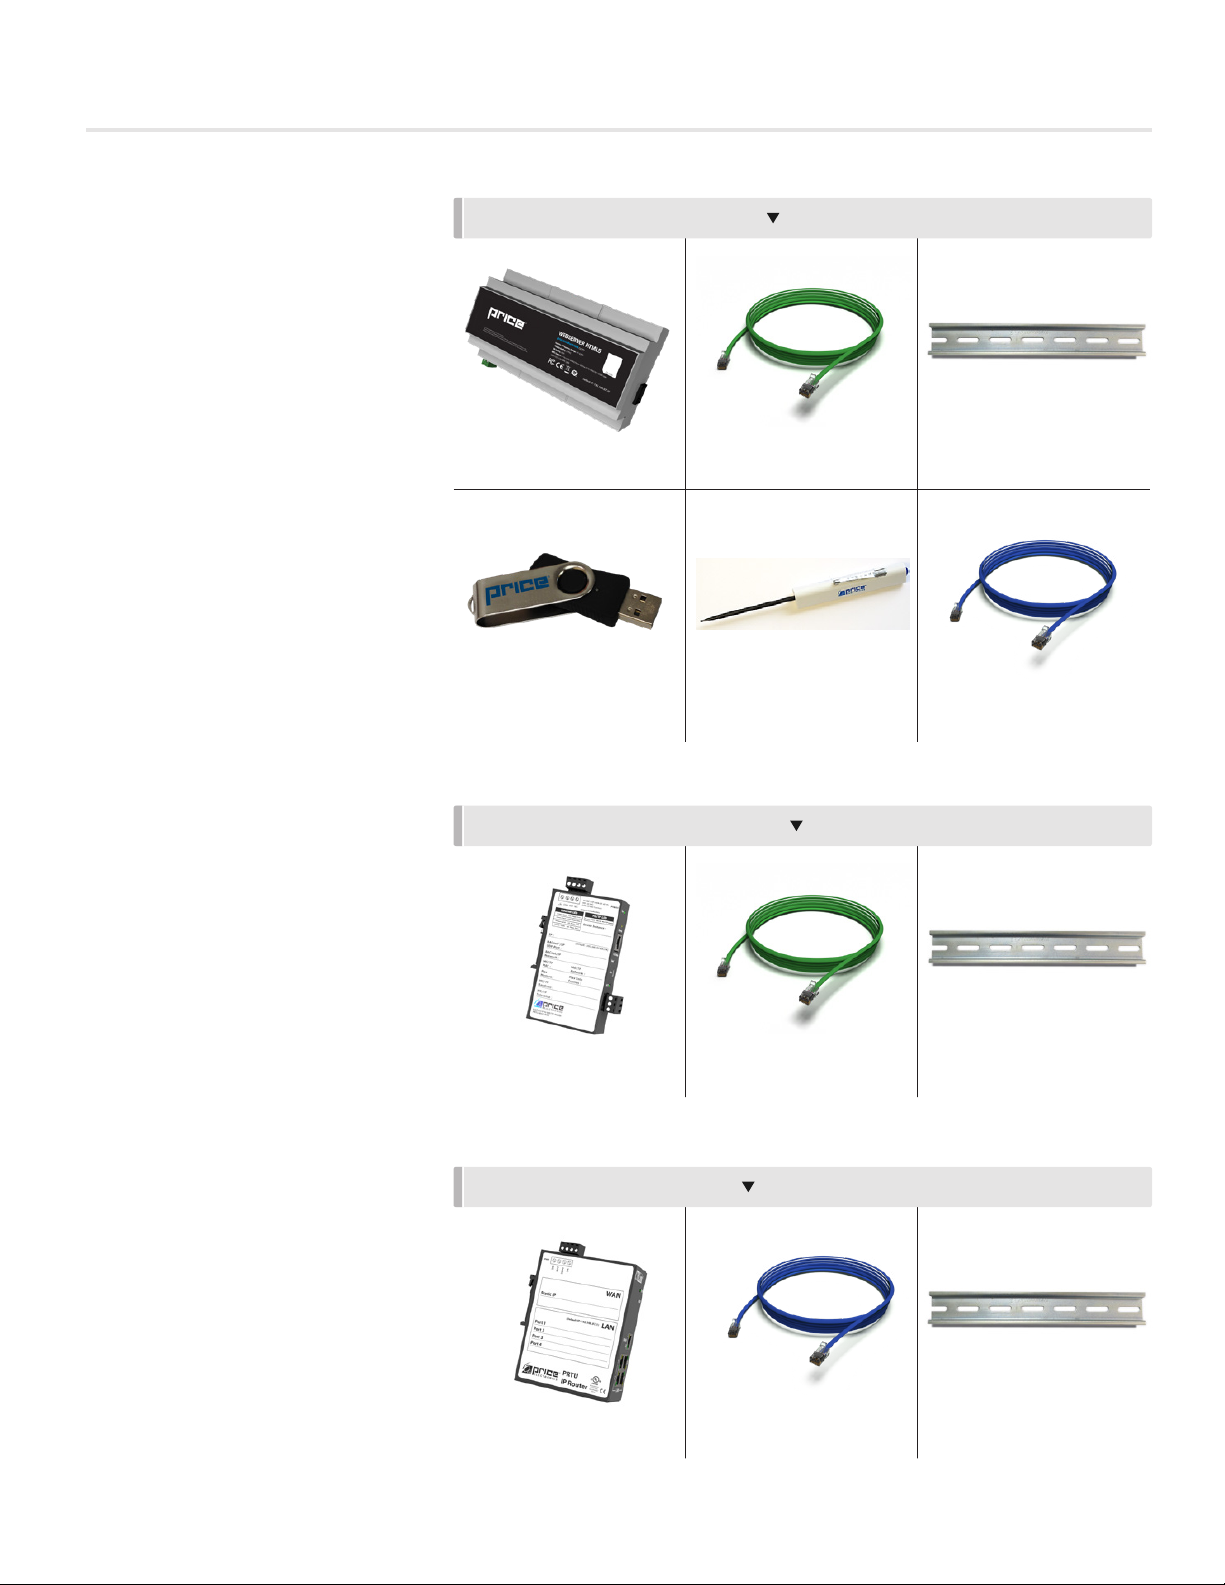
Package/Component Identification................................ 2
Web-Master........................................................... 2
Web Additional....................................................... 3
PRTU IP Switch ..................................................... 3
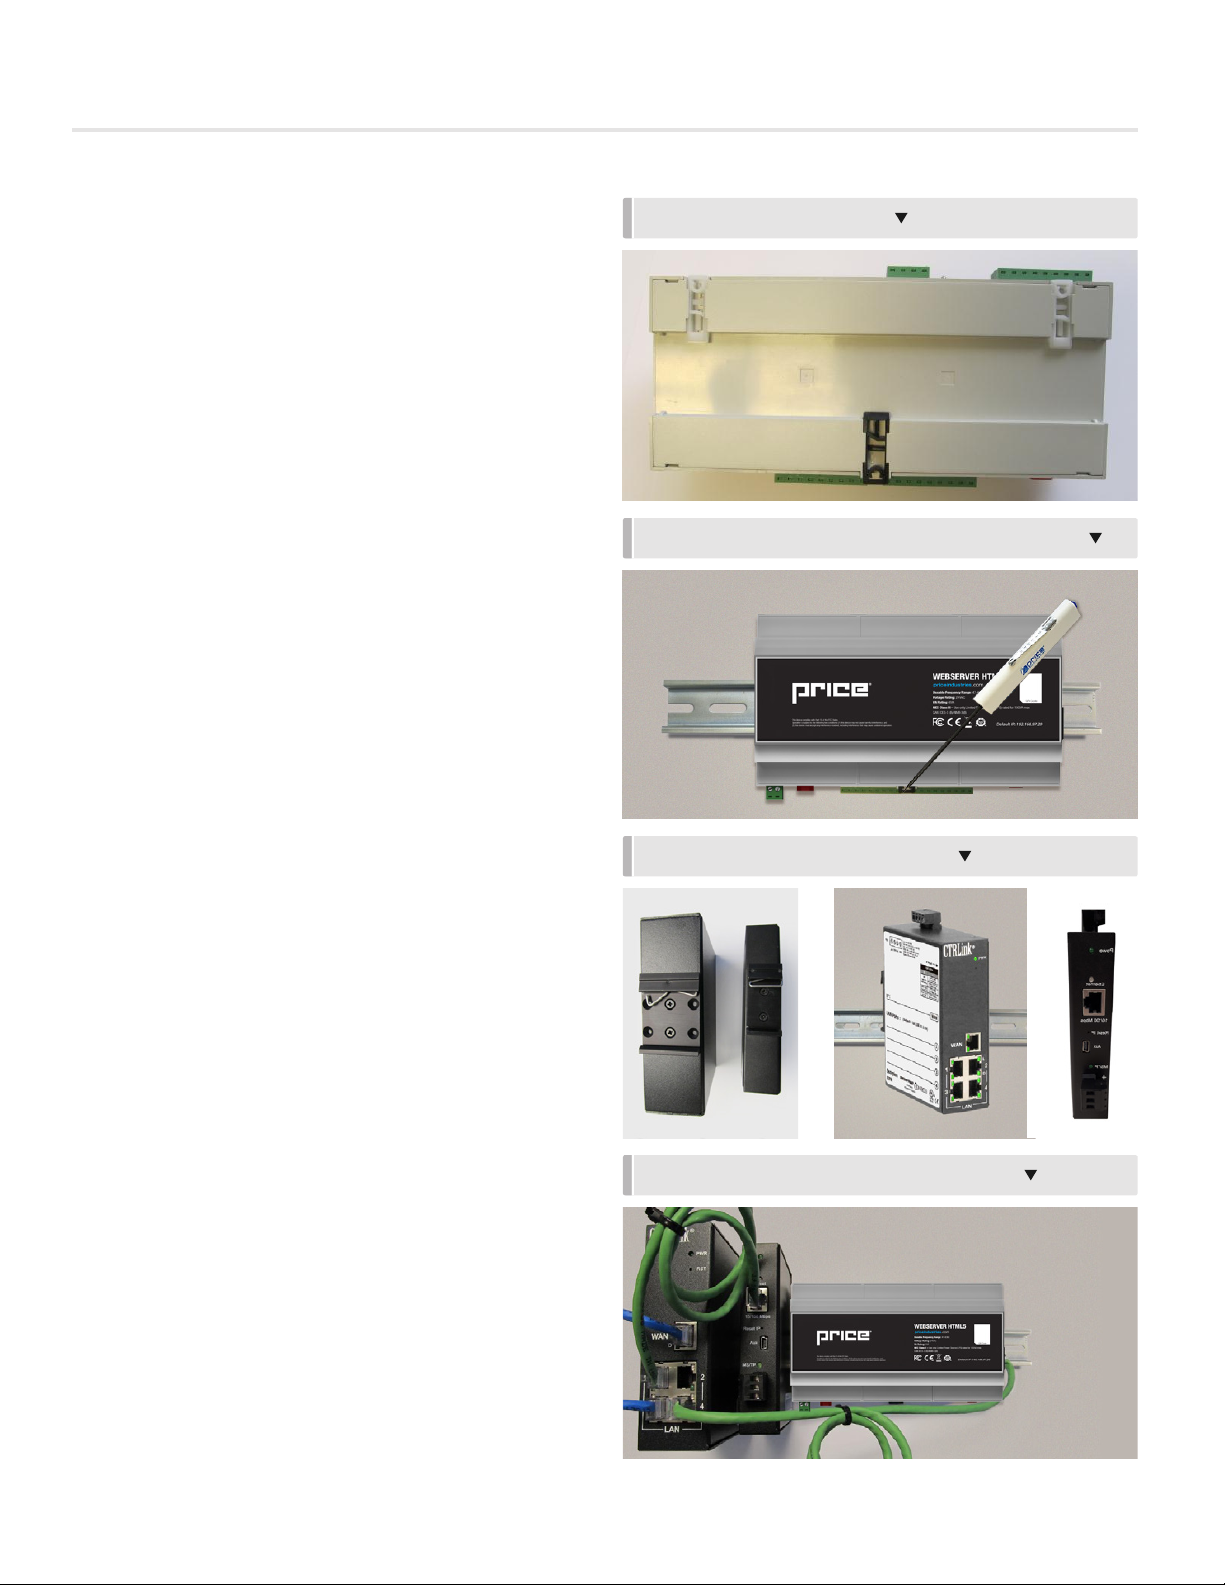
Installation & Mounting Instructions
Location........................................................................ 4
Mounting....................................................................... 5
Wiring ........................................................................... 6
BACnet MS/TP Wiring ........................................... 6
24VAC Power Wiring.............................................. 7
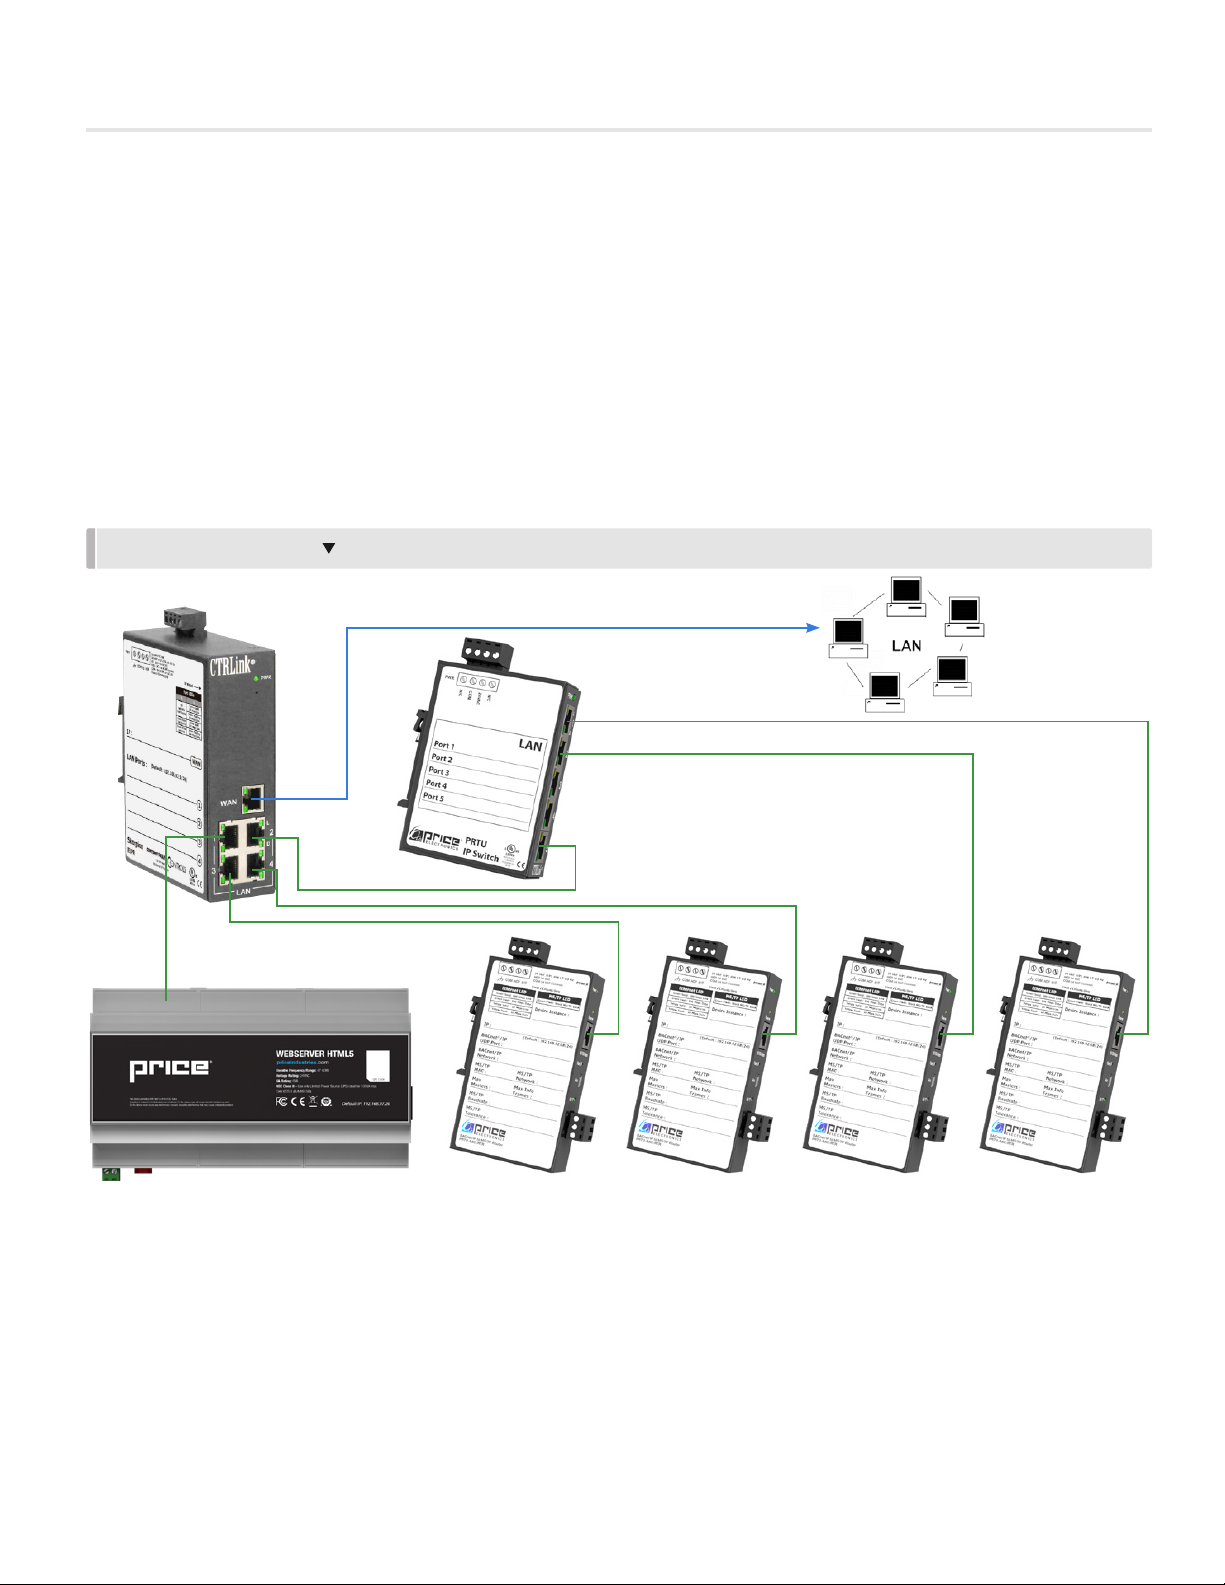
Network Connections ............................................ 8
Setup
Web Server Setup......................................................... 9
Creating Graphics ....................................................... 21
Creating Dashboards .................................................. 25
Tool Bar ...................................................................... 29
Creating a Trend Log................................................... 30
Viewing a Trend Log.................................................... 34
Exporting a Trend Log ................................................. 36
Creating Alarms........................................................... 37
Creating Runtimes....................................................... 41
Viewing Runtimes........................................................ 44
BACnet Router Configuration
PRTU-BAC_RTR (BACnet Router Configuration .......... 46
IP Router Configuration
IP Setup (LAN Integration) ........................................... 47
PRUT-IP-RTR (IP Router Configuration) ....................... 48
Appendix A
IT Request and Information Form ................................ 50
Hardware Specifications.............................................. 51

1
priceindustries.com |WEB SERVER - Manual
WEB SERVER
PRODUCT OVERVIEW
Safety Precautions
Short circuit or incorrect wiring may
permanently damage the controls or
other equipment. Ensure proper wiring
practices are followed. If a control failure
could lead to personal and/or property
damage, the installer must add safety/
interlock devices to protect against
these events.
Introduction
The Price Web Server is a complete BACnet front-end solution for small to medium
sized networks. The Price Web Server hosts all web pages containing graphics and
BACnet points reported by the system controllers.
The Price Web Server is accessed from any computer or smart device (tablet or
mobile phone) on the local network using a web browser. Remote access is possible
from across the globe with the use of Port Forwarding on the computer network.
Contained within the webserver are pre-loaded templates with graphics and points
lists for the popular Price controls. Changes to the graphics or the creation of new
custom graphics are supported from within the web interface.
Price Web Server can be ordered as PRTU-Front-End, which contains all of the parts
required to network all of the controls, connect them to the web server, and then
interface them to the building LAN system at a single point.
Price Web Server Features
Features of the Web Server include:
• Accessibility from any web browser on a laptop, smart phone, or tablet.
• Animated graphics
• Pre-loaded templates for Price controls
• Drag and drop setup, no programming required
• Multiple simultaneous users
• Support for Email alerts based on user-defined conditions

2WEB SERVER - Manual |priceindustries.com
WEB SERVER
Product overview
Package/Component Identification
Web-Master
Each PRTU ships with the following
items:
This package contains all the
components required for the Web
Server graphics, the parts to connect
to a single PRTU (Price Rooftop Unit
Controller) system, and those required
to connect the system to the building
computer network.
Components:
250000-920 - Price Web Server
1. PRTU-WEB
2. NETC2 cable
(to connect to PRTU-IP-RTR)
3. DIN rail
4. USB drive with manual and setup
videos
5. Price Electronics flat head
screwdriver (0.1” tip)
6. NECT12 cable
250000-931 - PRTU Bacnet Router
1. PRTU-BAC-RTR
2. NETC2 cable
(to connect to PRTU-IP-RTR)
3. DIN rail
250000-932 - PRTU IP Router
1. PRTU-IP-RTR
2. NETC12 cable
(laptop setup connection)
3. DIN rail
250000-920 - PRICE WEB SERVER
1. PRTU-WEB 3. DIN RAIL2. NETC2 CABLE
5. PRICE ELECTRONICS FLAT
HEAD SCREWDRIVER
4. USB DRIVE
250000-931 - PRTU BACNET ROUTER
1. PRTU-BAC-RTR 3. DIN RAIL2. NETC2 CABLE
250000-932 - PRTU IP ROUTER
1. PRTU-IP-RTR 3. DIN RAIL2. NETC12 CABLE
6. NETC12 CABLE

3
priceindustries.com |WEB SERVER - Manual
WEB SERVER
PRODUCT OVERVIEW
250000-933 - PRTU IP SWITCH
1. PRTU-IP-SWITCH
3. DIN RAIL
2. NETC2 CABLE
Package/Component Identification
Web Additional
The WEB-ADDITIONAL package is used
to connect additional PRTU systems to
the WEB-MASTER system.
Components:
250000-931 - PRTU Bacnet Router
1. PRTU-BAC-RTR
2. NETC2 cable
(to connect to PRTU-IP-RTR)
3. DIN Rail
PRTU IP Switch
The IP-SWITCH is required if there
are more than 3 PRTU systems being
connected to the Web Server. This
component is used to expand the “LAN”
port on the IP-RTR, allowing a further
3 PRTU systems to be connected.
See the example layout section of this
manual for further detail.
Examples:
• 1-3 PRTU Systems:
No IP Switch required
• 4-6 PRTU Systems:
Qty: 1 IP Switch required
• 7-9 PRTU Systems:
Qty: 2 IP Switch required
Components:
250000-933 - PRTU IP Switch
1. PRTU-IP-SWITCH
2. NETC2 cable
(to connect to PRTU-IP-RTR)
3. DIN rail
Please ensure you have all components
before proceeding. Inspect components
for shipping damage. Do not install
components that appear damaged.
Contact your local PRICE Sales Rep for
quick ship replacements.
As always, for the latest information and
video please visit priceindustries.com.
250000-931 - PRTU BACNET ROUTER
1. PRTU-BAC-RTR
3. DIN RAIL
2. NETC2 CABLE

4WEB SERVER - Manual |priceindustries.com
WEB SERVER
INSTALLATION & MOUNTING INSTRUCTIONS
Location
The PRTU-Front-End components should be mounted in an accessible location close to a network connection. Price suggests
mounting these components in the network or server room.
The WEB-SERVER, PRTU-IP-RTR, PRTU-BAC-RTR, and PRTU-IP-SWITCH (if applicable) should all be mounted together.
MOUNTING DETAILS
MOUNT TOGETHER IN SERVER ROOM
LONG-DISTANCE MS/TP CONNECTION
(SEE WIRING SECTION)
MOUNT PRTU / ZONE CONTROLLERS IN THEIR ZONES
PRTU-IP-RTR PRTU-BAC-RTR WEB-SERVER PRTU-IP-SWITCH

5
priceindustries.com |WEB SERVER - Manual
WEB SERVER
INSTALLATION & MOUNTING INSTRUCTIONS
Mounting
Use the included DIN rail to securely mount the PRTU-Front-
End components.
1. The Price Web Server MUST be mounted in an enclosure
2. Using 3 screws (by others) mount the DIN rail horizontally
to a secure, accessible surface.
3. Hang the Price Web Server onto the DIN rail using the
TOP white clips.
4. Using the Price Electronics screwdriver, gently pull down
on the BLACK clip, while pushing gently on the WEB-
SERVER towards the DIN rail. The Price Web Server
should click securely into place.
5. Use the mounting clips on the rear of the BAC-RTR, IP-
RTR, or IP-SWITCH to mount the components to the din
rail. Slip the top clip behind the DIN rail flange, then use
steady pressure to push the component down then back
towards the DIN rail to secure.
6. The same section of DIN rail can be used to mount
multiple components.
FRONT VIEW OF WEB-SERVER MOUNTED ON DIN RAIL
Page 8of 32
INSTALLATION AND MOUNTING
PRTU CONTROLLER
To mount the PRTU controller use the included 11” piece of DIN rail. The PRTU must NOT be installed
outdoors or inside the RTU. Mount the PRTU in the PLENUM space. Ideally near the main ductwork
discharge/return of the RTU just above the ceiling tiles.
1. Using 3 screws (by others) mount the DIN rail horizontally to a secure, accessible surface
2. Hang the PRTU controller onto the DIN rail using the TOP white clips
3. Using the Price Electronics screwdriver, gently pull down on the BLACK clip, while pushing gently
on the PRTU towards the DIN rail.
4. The PRTU should click securely into place.
5. To remove, repeat above steps in reverse
DIN Rail
Back view of PRTU
Front view of PRTU mounted on DIN Rail
BACK VIEW OF WEB-SERVER
REAR VIEW OF IP-RTR AND BAC-RTR
SAMPLE FRONT-END MOUNTING ON DIN RAIL

6WEB SERVER - Manual |priceindustries.com
WEB SERVER
INSTALLATION & MOUNTING INSTRUCTIONS
Wiring
BACnet MS/TP Wiring
Connect the BACnet MS/TP wires between the BAC-RTR(s) and their respective PRTU systems. Each system requires its own
BAC-RTR to avoid MAC address collisions.
For example, a building with 3 PRTU systems would require 3 total BAC-RTRs.
TWISTED-PAIR NETWORK CABLE (OR CAT-5).
USE 35’ PROVIDED WITH PRTU OR CABLE BY
OTHERS FOR LONG RUNS.
NETC35 CABLE (35 FOOT CAT-5 CABLE
W/ RJ-45 PLUGS) PROVIDED WITH PIC
CONNECT AS SHOWN:
+ (ORANGE/WHITE)
- (ORANGE)
SC NETCOM (BROWNS)
NOTE: TERMINAL ORDER IS DIFFERENT
ON BAC-RTR AND PRTU
PRTU-BAC-RTR
PRTU
WIRING DETAIL

7
priceindustries.com |WEB SERVER - Manual
WEB SERVER
INSTALLATION & MOUNTING INSTRUCTIONS
Wiring Continued...
24VAC Power Wiring
All components of the PRTU-Front-End package are powered by 24VAC.
WEB-SERVER BAC-RTR, IP-RTR, IP-SWITCH
24VAC HOT
COMMON
Power requirements are as follows:
• PRTU-WEB: 6VA
• BAC-RTR: 6VA
• IP-RTR: 6VA
• IP-SWITCH: 6VA
24VAC power typically from
transformer by others.
WIRING DETAILS
24VAC Polarity is critical.
HOT/Common may NOT be
swapped between devices.

8WEB SERVER - Manual |priceindustries.com
WEB SERVER
INSTALLATION & MOUNTING INSTRUCTIONS
Wiring Continued...
Network Connections
Once the BAC-RTRs have been networked to the PRTU/PIC/Prodigy controllers and the FRONT-END components have been
powered up, the IP networks can be connected and tied into the building LAN.
1. Connect the Price Web Server to one of the four “LAN” ports on the IP-RTR using the included 2 foot cable.
2. Connect the BAC-RTRs to the “LAN” ports on the IP-RTR using their included 2 foot cables.
a. If required (> 3 BAC-RTRs), the IP-SWITCH is used to expand the “LAN” ports on the IP-RTR
3. Connect the “WAN” port of the IP-RTR to the building LAN system.
NOTE: WAN port is set to DHCP by default
WEB-MASTER PACKAGE
IP-RTR
WEB-SERVER BAC-RTR BAC-RTR BAC-RTR BAC-RTR
IP-SWITCH
(ONLY REQUIRED IF > 3 BAC-RTRS)
TO BUILDING LAN

9
priceindustries.com |WEB SERVER - Manual
WEB SERVER
SETUP
Web Server Setup
The Price Web Server is pre-loaded with graphics and device templates. To apply these templates, the controllers on the job must
be discovered and loaded.
The Web Server is accessed through an internet browser Price recommends using a laptop for the initial setup.
1. Access the Web Server
There are two ways to accomplish this:
a. From the building LAN: Connect your computer to the building’s computer LAN. Open a web browser and go to the address
given to you by IT and set up in the previous step. (http://xxx.xxx.xxx.xxx)
b. If your computer is still connected on the LAN side of the IP-RTR, you can access the Web Server directly by going to
http://192.168.97.20
(NOTE: You may NOT use this method if you were forced to disconnect a BAC-RTR to access the IP-RTR in the last step. If this
is the case, reconnect the BAC-RTR now and connect your computer to the Web Server using method a. above.)
2. Login to the Web Server:
IP-RTR
WEB-SERVER BAC-RTR BAC-RTR
OR
HTTP://192.168.97.20
(ONLY IF IP-RTR HAS A FREE LAN PORT)
HTTP://XXX.XXX.XX.XX
(STATIC IP GIVEN BY IT)
TO BUILDING LAN
Avoid removing power from the Price Web Server
without properly shutting it down by selecting
“Shutdown” from the Administrator menu.
WIRING DETAILS

10 WEB SERVER - Manual |priceindustries.com
WEB SERVER
SETUP
SITE SETTINGS
Login to Web Server:
a. Username: admin
b. Password: pass
3. Setup the Site Information. Select the Gear icon in the bottom left corner of your web browser. This will open the System
Menu. Select 'Edit Settings' and enter the 'Site Settings' menu. Here you will be able to enter information pertaining to the job
such as the Site Name, Site Address, as well as the contact information of the service or maintenance contractor.
It is recommended to go through the initial setup of the Price Web Server via a laptop or desktop computer.
a. d.
b.
c.

11
priceindustries.com |WEB SERVER - Manual
WEB SERVER
SETUP
ADD DEVICES
4. Add devices to the Device Tree.
a. Open the site and open the BACnet tree on the left hand side of the window
by clicking on them.
b. Right-click on the Devices folder and select "Scan for Devices"

12 WEB SERVER - Manual |priceindustries.com
WEB SERVER
SETUP
c. Click on the “Scan” button.
d. The Web Server will now scan for devices. This will
take several minutes. Do not click or tap any buttons
until the "information" box closes.

13
priceindustries.com |WEB SERVER - Manual
WEB SERVER
SETUP
e. You will see a dialog box filled in with all the devices the Web Server was able to discover. The different
systems are defined by their addressing scheme.
System 1: Addresses 100 (PRTU), 101, 102, 103 (Prodigy VAV controllers)
System 2: Addresses 200 (PRTU), 201, 202 (PIC VAV controllers)
RTU-1 SYSTEM
RTU-2 SYSTEM

14 WEB SERVER - Manual |priceindustries.com
WEB SERVER
SETUP
g. Left click on the '+' Template button to slect a template.
h. Click on the "PRTU Templates" Folder and indicate whether your system is Standalone or Networked (Polling).
f. Select first PRTU (100 in this case), enter a label (ex: RTU-1), enter a description if desired.
Template Type: PRTU
Units:
F= Fahrenheit
C= Celsius
Control Mode:
Poll = Polling (voting) system
with PIC/Prodigy
StAl = Standalone
Number of Heat/Cool stages:
2C0H = 2 Cool, 0 Heat stages
2C2H = 2 Cool, 2 Heat stages
Etc.

15
priceindustries.com |WEB SERVER - Manual
WEB SERVER
SETUP
i. Click the “OK” button.
The template window should close and your template choice should appear in the Template space:
j. Select the '+' in the top left corner of the Device Scan to add your device. Wait while the Web Server processes. When
complete, the PRTU will disappear from the list of discovered devices.

16 WEB SERVER - Manual |priceindustries.com
WEB SERVER
SETUP
k. Next, click on the first PIC in the system (201) in this case. Enter an appropriate label (ex. VAV2-1), description (ex. Ron’s
Office), and select a template. In this example we will add a Fan Powered Constant Volume Box.
Template Type: PIC
Box Type:
Fan Powered Constant Volume = Fan
Powered Constant Volume VAV Box
Fan Powered Variable Volume = Fan
Powered Variable Volume VAV Box
Single Duct = Single Duct VAV Box
Template Type: PIC
Box Type: Fan Powered Constant Volume
Fan Powered Constant Volume = Fan
Powered Constant Volume VAV Box
Fan Powered ConVol Electric Heat = Fan
Powered Constant Volume VAV Box with
Electric Heat
Fan Powered ConVol Hot Water = Fan
Powered Constant Volume VAV Box with
Hot Water Heat

17
priceindustries.com |WEB SERVER - Manual
WEB SERVER
SETUP
Template Type: PIC
Box Type: Fan Powered Constant
Volume With Electric Heat
Units:
F= Fahrenheit
C= Celsius
n. Click the “OK” button.
o. Repeat these steps and assign each controller to it's corresponding template until all controllers have been added to the
database.
NOTE: Be sure to enter a new (unique) label to each device, and select the correct template
NOTE #2: There is no need to add the PRTU-BAC-RTR devices to the Web Server.

18 WEB SERVER - Manual |priceindustries.com
WEB SERVER
SETUP
5. Viewing points and Graphics
a. Now that each device has been added to the Web Server, click on the device to view its contents.
b. By clicking on any point (an analog value for instance) a box will pop up and display the current value in the controller.
You can set new values if the point is writable.
NOTE: Be sure to check the manual for the specific device. A BACnet points list can be found online for each
controller at www.priceindustries.com
c. Click on an item in the “Graphics” folder to view the graphic for that specific controller. Graphics are best viewed on a laptop
or computer. Dashboards are best suited for mobile devices.
This manual suits for next models
1
Table of contents
Popular Server manuals by other brands

Lenovo
Lenovo ThinkServer RD240 Istruzioni per l'installazione del rack

HP
HP Windows Server 2008 R2 Administrator's guide

NEC
NEC NEC Express5800 Series Configuration guide

IBM
IBM 88784RU user guide

Dell
Dell PowerEdge HS5620 Installation and service manual

Supermicro
Supermicro SuperStorageSystem SSG-5019D8-TR12P user manual